page 1 MERCEDES-BENZ C240 2002 W203 Owner's Manual
[x] Cancel search | Manufacturer: MERCEDES-BENZ, Model Year: 2002, Model line: C240, Model: MERCEDES-BENZ C240 2002 W203Pages: 406
Page 22 of 406
19 Instruments and controls
Te ch n i c a l
data Instruments
and controlsOperation DrivingInstrument
cluster displayPractical hints Car care Index 1Door control panel, see page 20
2Overhead control panel, see page 213Dashboard, see page 22
4Center console, see page 24
OM_203.book Seite 19 Donnerstag, 31. Mai 2001 11:57 11
Page 23 of 406
20 Instruments and controls
Te ch n i c a l
data Instruments
and controlsOperation DrivingInstrument
cluster displayPractical hints Car care Index
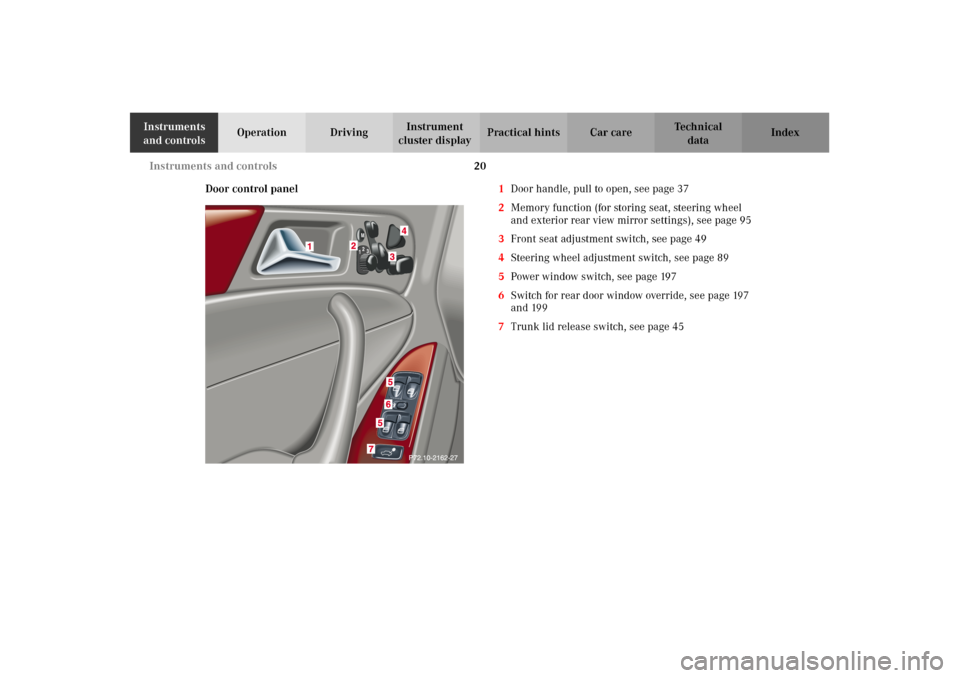
Door control panel1Door handle, pull to open, see page 37
2Memory function (for storing seat, steering wheel
and exterior rear view mirror settings), see page 95
3Front seat adjustment switch, see page 49
4Steering wheel adjustment switch, see page 89
5Power window switch, see page 197
6Switch for rear door window override, see page 197
and 199
7Trunk lid release switch, see page 45
OM_203.book Seite 20 Donnerstag, 31. Mai 2001 11:57 11
Page 24 of 406
21 Instruments and controls
Te ch n i c a l
data Instruments
and controlsOperation DrivingInstrument
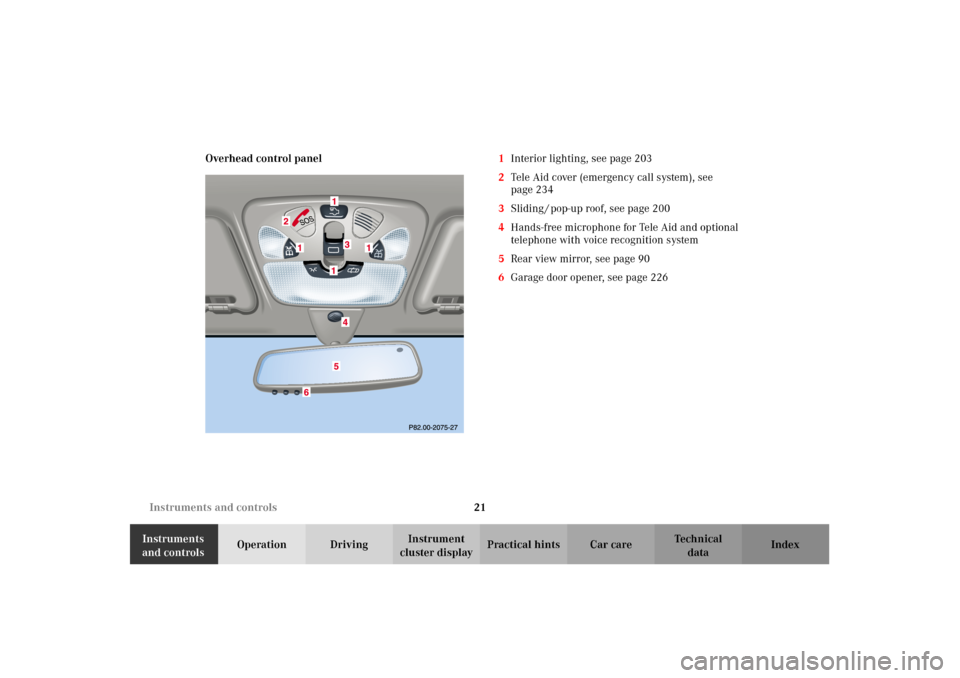
cluster displayPractical hints Car care Index Overhead control panel1Interior lighting, see page 203
2Tele Aid cover (emergency call system), see
page 234
3Sliding / pop-up roof, see page 200
4Hands-free microphone for Tele Aid and optional
telephone with voice recognition system
5Rear view mirror, see page 90
6Garage door opener, see page 226
OM_203.book Seite 21 Donnerstag, 31. Mai 2001 11:57 11
Page 26 of 406
23 Instruments and controls
Te ch n i c a l
data Instruments
and controlsOperation DrivingInstrument
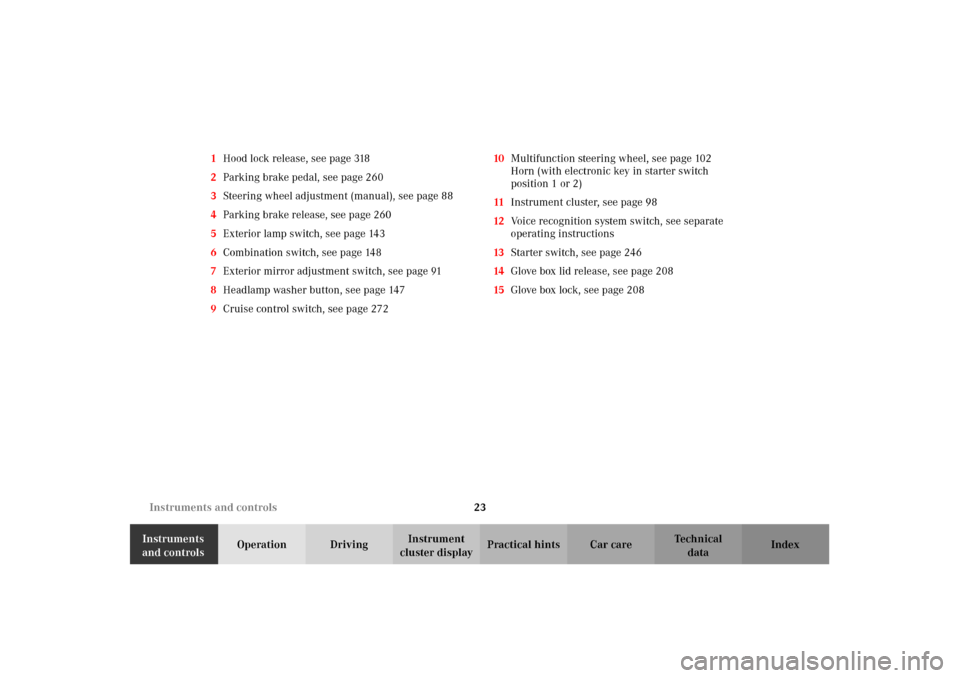
cluster displayPractical hints Car care Index 1Hood lock release, see page 318
2Parking brake pedal, see page 260
3Steering wheel adjustment (manual), see page 88
4Parking brake release, see page 260
5Exterior lamp switch, see page 143
6Combination switch, see page 148
7Exterior mirror adjustment switch, see page 91
8Headlamp washer button, see page 147
9Cruise control switch, see page 27210Multifunction steering wheel, see page 102
Horn (with electronic key in starter switch
position 1 or 2)
11Instrument cluster, see page 98
12Voice recognition system switch, see separate
operating instructions
13Starter switch, see page 246
14Glove box lid release, see page 208
15Glove box lock, see page 208
OM_203.book Seite 23 Donnerstag, 31. Mai 2001 11:57 11
Page 27 of 406
24 Instruments and controls
Te ch n i c a l
data Instruments
and controlsOperation DrivingInstrument
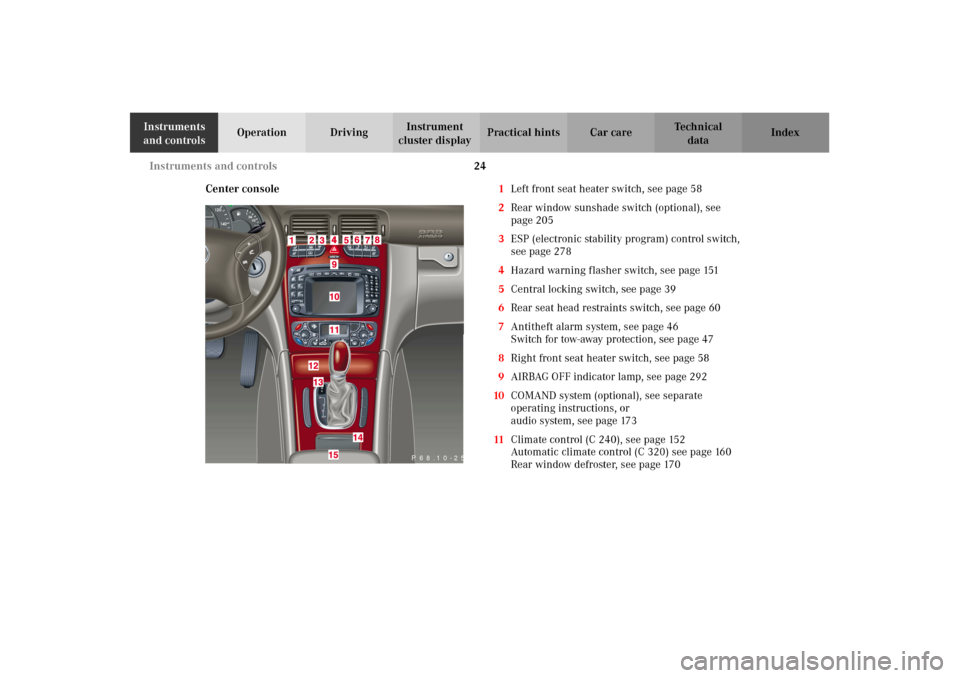
cluster displayPractical hints Car care Index
Center console1Left front seat heater switch, see page 58
2Rear window sunshade switch (optional), see
page 205
3ESP (electronic stability program) control switch,
see page 278
4Hazard warning flasher switch, see page 151
5Central locking switch, see page 39
6Rear seat head restraints switch, see page 60
7Antitheft alarm system, see page 46
Switch for tow-away protection, see page 47
8Right front seat heater switch, see page 58
9AIRBAG OFF indicator lamp, see page 292
10COMAND system (optional), see separate
operating instructions, or
audio system, see page 173
11Climate control (C 240), see page 152
Automatic climate control (C 320) see page 160
Rear window defroster, see page 170
P 68.10-2501-27
OM_203.book Seite 24 Donnerstag, 31. Mai 2001 11:57 11
Page 28 of 406
25 Instruments and controls
Te ch n i c a l
data Instruments
and controlsOperation DrivingInstrument
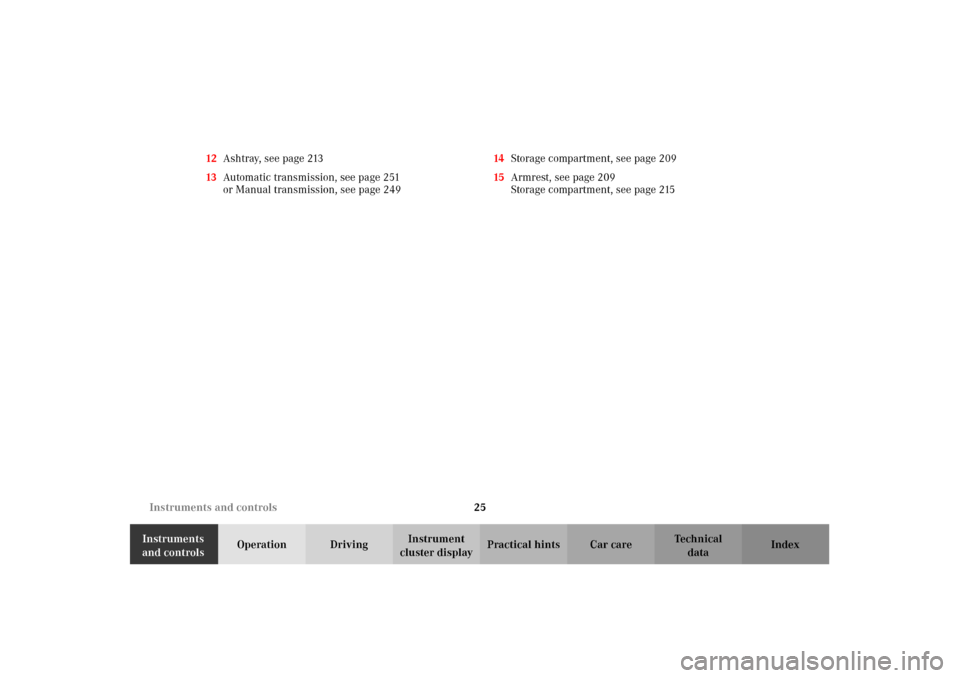
cluster displayPractical hints Car care Index 12Ashtray, see page 213
13Automatic transmission, see page 251
or Manual transmission, see page 24914Storage compartment, see page 209
15Armrest, see page 209
Storage compartment, see page 215
OM_203.book Seite 25 Donnerstag, 31. Mai 2001 11:57 11
Page 32 of 406
29 Central locking system
Te ch n i c a l
data Instruments
and controlsOperationDrivingInstrument
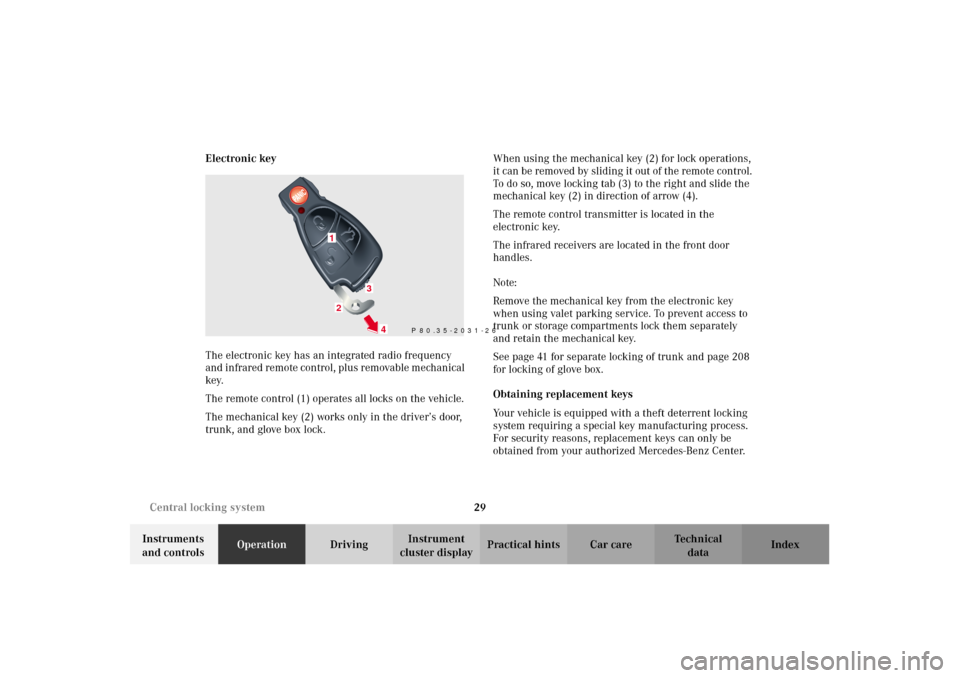
cluster displayPractical hints Car care Index Electronic key
The electronic key has an integrated radio frequency
and infrared remote control, plus removable mechanical
key.
The remote control (1) operates all locks on the vehicle.
The mechanical key (2) works only in the driver’s door,
trunk, and glove box lock.When using the mechanical key (2) for lock operations,
it can be removed by sliding it out of the remote control.
To do so, move locking tab (3) to the right and slide the
mechanical key (2) in direction of arrow (4).
The remote control transmitter is located in the
electronic key.
The infrared receivers are located in the front door
handles.
Note:
Remove the mechanical key from the electronic key
when using valet parking service. To prevent access to
trunk or storage compartments lock them separately
and retain the mechanical key.
See page 41 for separate locking of trunk and page 208
for locking of glove box.
Obtaining replacement keys
Your vehicle is equipped with a theft deterrent locking
system requiring a special key manufacturing process.
For security reasons, replacement keys can only be
obtained from your authorized Mercedes-Benz Center.
P 80.35-2031-26
1
3
4
2
OM_203.book Seite 29 Donnerstag, 31. Mai 2001 11:57 11
Page 33 of 406
30 Central locking system
Te ch n i c a l
data Instruments
and controlsOperationDrivingInstrument
cluster displayPractical hints Car care Index
Start lock-out
Important!
Removing the electronic key from the starter switch
activates the start lock-out. The engine cannot be
started.
Inserting the electronic key in the starter switch
deactivates the start lock-out.
Note:
In case the engine cannot be started (vehicle’s battery is
in order), the system is not operational. Contact an
authorized Mercedes-Benz Center or call 1-800-FOR-
MERCedes (in the USA), or 1-800-387-0100 (in Canada).General notes on the central locking system
If the electronic key is inserted in the starter switch, the
vehicle cannot be locked or unlocked with the remote
control.
If the vehicle cannot be locked or unlocked:
•Aim transmitter eye at a receiver of either front door
handle. Check the batteries of the electronic key, see
page 357, or synchronize the electronic key, see
page 359.
•Use the mechanical key to unlock the vehicle. To
start engine, insert the electronic key in the starter
switch. There could be a slight delay until the
electronic key can be turned in the starter switch.
Important!
When unlocking the driver’s door with the mechanical
key, the exterior lamps will flash and the alarm will
sound.
To cancel the alarm, insert the electronic key in the
starter switch or press buttonŒ or‹ on the
electronic key.
OM_203.book Seite 30 Donnerstag, 31. Mai 2001 11:57 11
Page 34 of 406
31 Central locking system
Te ch n i c a l
data Instruments
and controlsOperationDrivingInstrument
cluster displayPractical hints Car care Index Central locking system
Radio frequency and infrared remote control
The electronic key has an integrated radio frequency
and infrared remote control.
Due to the extended operational range of the remote
control, it could be possible to unintentionally lock or
unlock the vehicle by pressing the transmit button. If
one of the transmit buttons is pressed, the battery check
lamp lights up brief ly – indicating that the batteries are
in order. See page 357 for checking batteries.
The vehicle doors, trunk and fuel filler flap can be
centrally locked and unlocked via remote control.
Opening and closing the windows and sliding/pop-up
roof can only be done with the infrared portion of the
remote control. Aim transmitter eye at a receiver (6
or 7), press and hold transmit button Œ or ‹,
seepage35.
With vehicle centrally locked, the trunk can also be
opened by using the remote control.
If the electronic key is inserted in starter switch, the
vehicle cannot be locked or unlocked, and the trunk lid
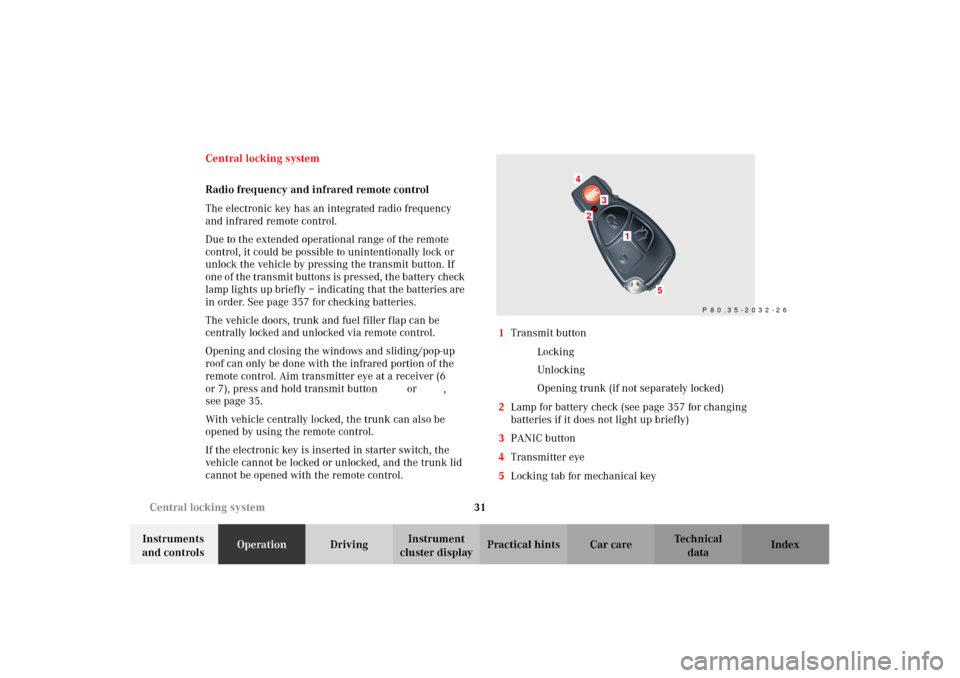
cannot be opened with the remote control.1Transmit button
‹ Locking
ΠUnlocking
Š Opening trunk (if not separately locked)
2Lamp for battery check (see page 357 for changing
batteries if it does not light up briefly)
3PANIC button
4Transmitter eye
5Locking tab for mechanical key
P 80.35-2032-26
24
3
5
1
OM_203.book Seite 31 Donnerstag, 31. Mai 2001 11:57 11
Page 36 of 406
33 Central locking system
Te ch n i c a l
data Instruments
and controlsOperationDrivingInstrument
cluster displayPractical hints Car care Index Locking and unlocking with remote control
Unlocking:
Press transmit button Œ. All turn signal lamps blink
once to indicate that the vehicle is unlocked.
The remote control can be programmed for two kinds of
unlocking modes (see below):
Selective unlocking mode –
Press transmit button Œ once to unlock driver’s door
and fuel filler flap.
Press transmit button Πtwice to unlock all doors,
fuel filler flap, and trunk.
Global unlocking mode –
Press transmit button Πonce to unlock all doors,
fuel filler flap, and trunk.
Notes:
If the trunk was previously locked separately, it will
remain locked, see page 41.
The presently active unlocking mode (selective or
global) can only be determined by unlocking the vehicle
with the remote control (see below for changing mode).If within 40 seconds of unlocking with the remote
control, neither door or trunk is opened, the electronic
key is not inserted in the starter switch, or the central
locking switch is not activated, the vehicle will
automatically lock.
Locking:
Press transmit button ‹ once. All turn signal lamps
blink three times to indicate that the vehicle is locked. If
they do not blink three times, a door or trunk is not
properly closed.
Note:
If the vehicle cannot be locked or unlocked by pressing
the transmit button, then it may be necessary to change
the batteries in the electronic key (if ok, battery check
lamp in electronic key will light briefly when pressing
transmit button) or to synchronize the remote control,
see pages 357 and 359.
Choosing global or selective mode on remote control
Press and hold transmit buttons‹ andŒ
simultaneously for five seconds to reprogram the
remote control. Battery check lamp will blink two times
indicating the completed mode change.
OM_203.book Seite 33 Donnerstag, 31. Mai 2001 11:57 11