tow MERCEDES-BENZ C300 4MATIC 2010 W204 Owner's Guide
[x] Cancel search | Manufacturer: MERCEDES-BENZ, Model Year: 2010, Model line: C300 4MATIC, Model: MERCEDES-BENZ C300 4MATIC 2010 W204Pages: 364, PDF Size: 8.23 MB
Page 258 of 364
removed without putting other road users
at risk
R maintain a greater distance to the vehicle
ahead and drive with particular care
R carefully apply the brakes at the end of a
trip and immediately after commencing a
new trip, so that salt residues are removed
from the brake disc
Brake service
! The brake fluid level in the reservoir may
be too low if the red brake warning lamp in
the instrument cluster comes on while the
engine is running and an acoustic warning
sounds. Observe additional messages in
the multifunction display that may appear.
Brake pad wear or a leak in the system may
be the reason for low brake fluid in the
reservoir.
Have the brake system inspected
immediately. Contact an authorized
Mercedes-Benz Center.
All checks and service work on the brake
system should be carried out by qualified
technicians only. Contact an authorized
Mercedes-Benz Center.
Only install brake pads and use brake fluid
recommended by Mercedes-Benz.
GWarning!
If other than recommended brake pads are
installed, or other than recommended brake
fluid is used, the braking properties of the
vehicle can be degraded to an extent that safe
braking is substantially impaired. This could
result in an accident.
! Vehicles with 4MATIC:
Only conduct operational or performance
tests on a two-axle dynamometer. If such
tests are necessary, contact an authorized
Mercedes-Benz Center. You could
otherwise seriously damage the brake
system or the transfer case which is not
covered by the Mercedes-Benz Limited
Warranty.
! Vehicles with 4MATIC:
Because the ESP ®
operates automatically,
the engine and ignition must be shut off
(SmartKey in starter switch position 0 or
1 or KEYLESS-GO start/stop button in
position 0 or 1) when the parking brake is
being tested on a brake test dynamometer.
Active braking action through the ESP ®
may otherwise seriously damage the brake
system which is not covered by the
Mercedes-Benz Limited Warranty.
! Vehicles without 4MATIC:
Because the ESP ®
operates automatically,
the engine and ignition must be shut off
(SmartKey in starter switch position 0 or
1 or KEYLESS-GO start/stop button in
position 0 or 1) when the parking brake is
being tested on a brake test dynamometer
or the vehicle is being towed with the front
axle raised.
Active braking action through the ESP ®
may otherwise seriously damage the brake
system which is not covered by the
Mercedes-Benz Limited Warranty.
If your brake system is only subjected to
moderate loads, you should occasionally test
the effectiveness of the brakes by applying
above-normal braking pressure at higher
speeds. This will also enhance the grip of the
brake pads.GWarning!
Make sure not to endanger any other road
users when carrying out these braking
maneuvers.
Refer to the description of the Brake Assist
System (BAS) ( Y page 61).
High-performance brake system
The high-performance brake system is only
available on C 63 AMG.
256Driving instructionsOperation
204_AKB; 5; 23, en-USd2ureepe,Version: 2.11.8.12009-07-16T17:54:06+02:00 - Seite 256
Page 264 of 364
normally be done every 3 to 5 months,
depending on the climate and washing
detergent used.
Mercedes-Benz approved Paint Cleaner
should be applied if the paint surface shows
signs of embedded dirt (i.e. loss of gloss).
Do not apply any of these products or wax if
your vehicle is parked in the sun or if the hood
is still hot.XUse the appropriate MB-Touch-Up Stick for
quick and provisional repairs of minor paint
damage (i.e. chips from stones, vehicle
doors, etc.).
Engine cleaning
Prior to cleaning the engine compartment,
make sure to protect electrical components
and connectors from contact with water and
cleaning agents.
Corrosion protection, such as MB
Anticorrosion Wax should be applied to the
engine compartment after every engine
cleaning. Before applying, all control linkage
bushings and joints should be lubricated. The
poly-V-belt and all pulleys should be
protected from any wax.
Vehicle washing
In the winter, thoroughly remove all traces of
road salt as soon as possible.
When washing the vehicle underbody, do not
forget to clean the inner sides of the wheels.
i Vehicles with KEYLESS-GO:
If a door handle is hit by a strong jet of
water, and a SmartKey is within
approximately 3 ft (1 m) of the vehicle, it
could be inadvertently locked or unlocked.
Hand-wash
XDo not use hot water or wash your vehicle
in direct sunlight.XOnly use a soft, wet cloth or sponge to
clean the vehicle.XOnly use a mild vehicle wash detergent,
such as Mercedes-Benz approved Car
Shampoo.XThoroughly spray the vehicle with a
diffused jet of water.XDo not spray directly towards the
ventilation intake.XUse plenty of water and rinse the sponge
and chamois frequently.XRinse with clean water and dry with a
chamois thoroughly.
Do not allow cleaning agents to dry on the
finish.
Automatic car wash
You can have your vehicle washed in an
automatic car wash from the start. Brushless
car washes are preferable.
XTo protect the filter system, activate the air
recirculation mode using button g on
the climate control panel.
! Do not clean your vehicle in an automatic
touchless car wash which uses caustic
spray. Caustic spray will damage the paint
or ornamental moldings.
If the vehicle is very dirty, prewash it before
running it through the automatic car wash.
! Make sure the combination switch is set
to wiper setting $. Otherwise, the rain
sensor could activate and cause the wipers
to move unintentionally. This may lead to
vehicle damage.
Due to the width of the vehicle, fold in
exterior rear view mirrors prior to running
the vehicle through an automatic car wash
to prevent damage to the mirrors.
Vehicles with automatic transmission:
XWhen taking the vehicle through an
automatic conveyor-type car wash:
Make sure the automatic transmission
remains in neutral position N.
When leaving the automatic car wash, make
sure the mirrors are folded out.
262Vehicle careOperation
204_AKB; 5; 23, en-USd2ureepe,Version: 2.11.8.12009-07-16T17:54:06+02:00 - Seite 262
Page 269 of 364
Vehicle equipment ............................268
Where will I find ...? ..........................268
Vehicle status messages in the
multifunction display .......................270
What to do if … ..................................297
Unlocking/locking manually ...........309
Resetting activated NECK-PRO
active front head restraints .............311
Replacing SmartKey batteries .........312
Replacing bulbs .................................313
Replacing wiper blades ....................316
Flat tire ..............................................317
Battery ...............................................321
Jump starting ....................................323
Towing the vehicle ............................325
Fuses ..................................................328
267Practical hints204_AKB; 5; 23, en-USd2ureepe,Version: 2.11.8.12009-07-16T17:54:06+02:00 - Seite 267
Page 270 of 364
Vehicle equipment
iThis Operator’s Manual describes all
features, standard or optional, potentially
available for your vehicle at the time of
purchase. Please be aware that your
vehicle might not be equipped with all
features described in this manual.
Where will I find ...?
First aid kit
iCheck expiration dates and contents for
completeness at least once a year and
replace missing/expired items.
Depending on the equipment configuration,
the first-aid kit will be located either in the
open storage department in the trunk or
behind the cover panel on the left-hand side
of the trunk.
XTurn lock : counterclockwise.XFold down cover ;.
The first aid kit can be removed.
Vehicle tool kit
The vehicle tool kit is located in the space
underneath the trunk floor.
iVehicles without spare wheel are not
factory-equipped with the tools required for
a wheel change such as a jack or a wheel
wrench. Some tools required for a wheel
change are specific to your vehicle.
Contact an authorized Mercedes-Benz
Center to obtain the tools approved for
your vehicle.
The vehicle tool kit includes:
RCollapsible wheel chock20
RFuse chart
RJack20
RPair of gloves20
RTowing eye bolt
RWheel wrench20
XOpen the trunk (Y page 75).XLift the trunk floor using the floor handle.XEngage the floor handle on the upper trunk
lip.
! To prevent damage, always disengage the
floor handle from the upper trunk lip and
lower the trunk floor before closing the
trunk.
:Tab;Removing vehicle tool kit box=Vehicle tool kit box cover?Opening vehicle tool kit box coverATabBVehicle tool kitCVehicle tool kit boxDLuggage bowl20Vehicles with spare wheel only.268Where will I find ...?Practical hints
204_AKB; 5; 23, en-USd2ureepe,Version: 2.11.8.12009-07-16T17:54:06+02:00 - Seite 268
Page 313 of 364
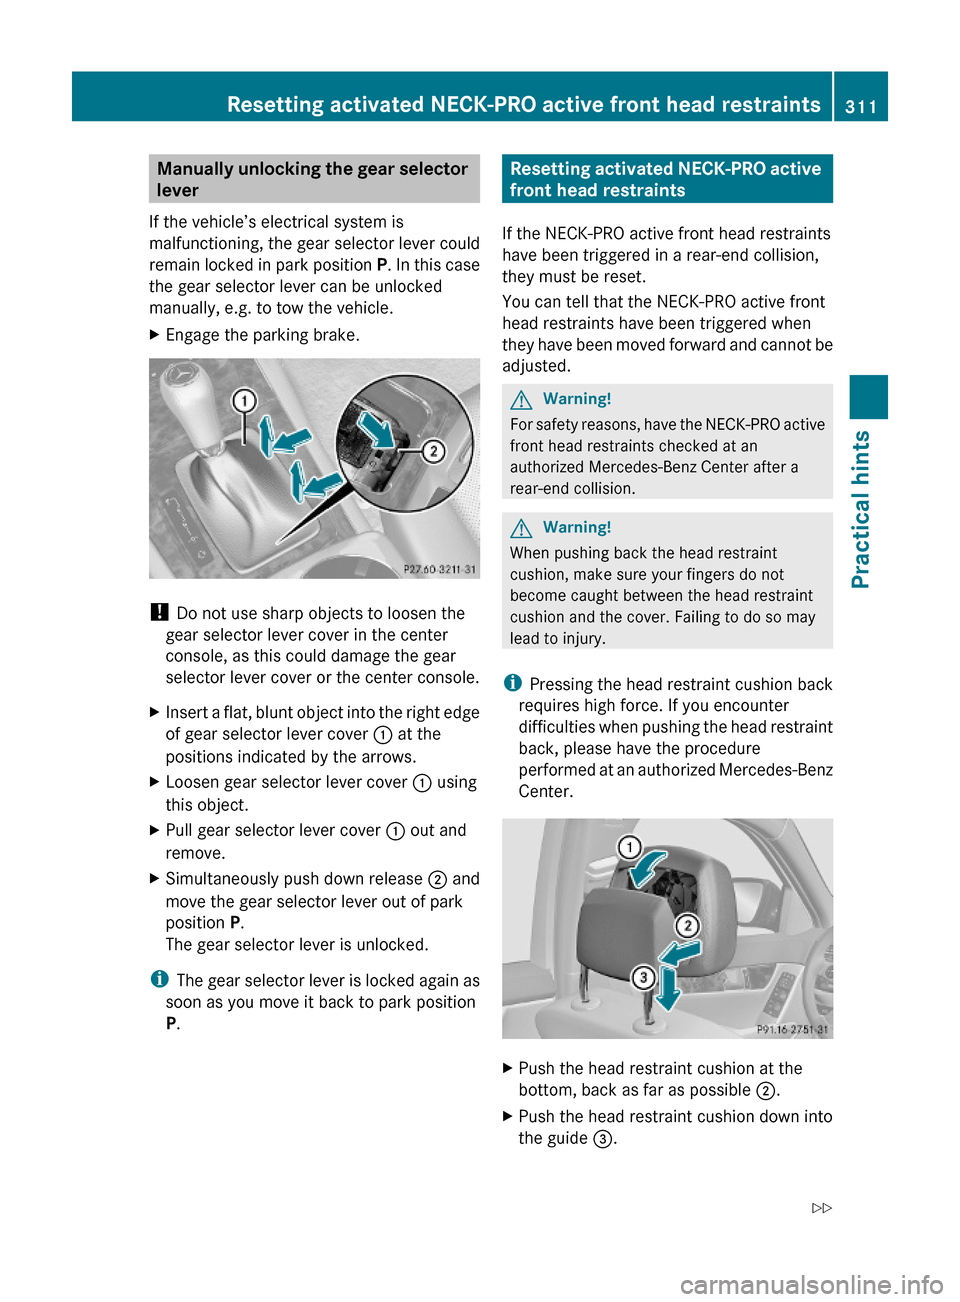
Manually unlocking the gear selector
lever
If the vehicle’s electrical system is
malfunctioning, the gear selector lever could
remain locked in park position P. In this case
the gear selector lever can be unlocked
manually, e.g. to tow the vehicle.
XEngage the parking brake.
! Do not use sharp objects to loosen the
gear selector lever cover in the center
console, as this could damage the gear
selector lever cover or the center console.
XInsert a flat, blunt object into the right edge
of gear selector lever cover : at the
positions indicated by the arrows.
XLoosen gear selector lever cover : using
this object.
XPull gear selector lever cover : out and
remove.
XSimultaneously push down release ; and
move the gear selector lever out of park
position P.
The gear selector lever is unlocked.
iThe gear selector lever is locked again as
soon as you move it back to park position
P.
Resetting activated NECK-PRO active
front head restraints
If the NECK-PRO active front head restraints
have been triggered in a rear-end collision,
they must be reset.
You can tell that the NECK-PRO active front
head restraints have been triggered when
they have been moved forward and cannot be
adjusted.
GWarning!
For safety reasons, have the NECK-PRO active
front head restraints checked at an
authorized Mercedes-Benz Center after a
rear-end collision.
GWarning!
When pushing back the head restraint
cushion, make sure your fingers do not
become caught between the head restraint
cushion and the cover. Failing to do so may
lead to injury.
iPressing the head restraint cushion back
requires high force. If you encounter
difficulties when pushing the head restraint
back, please have the procedure
performed at an authorized Mercedes-Benz
Center.
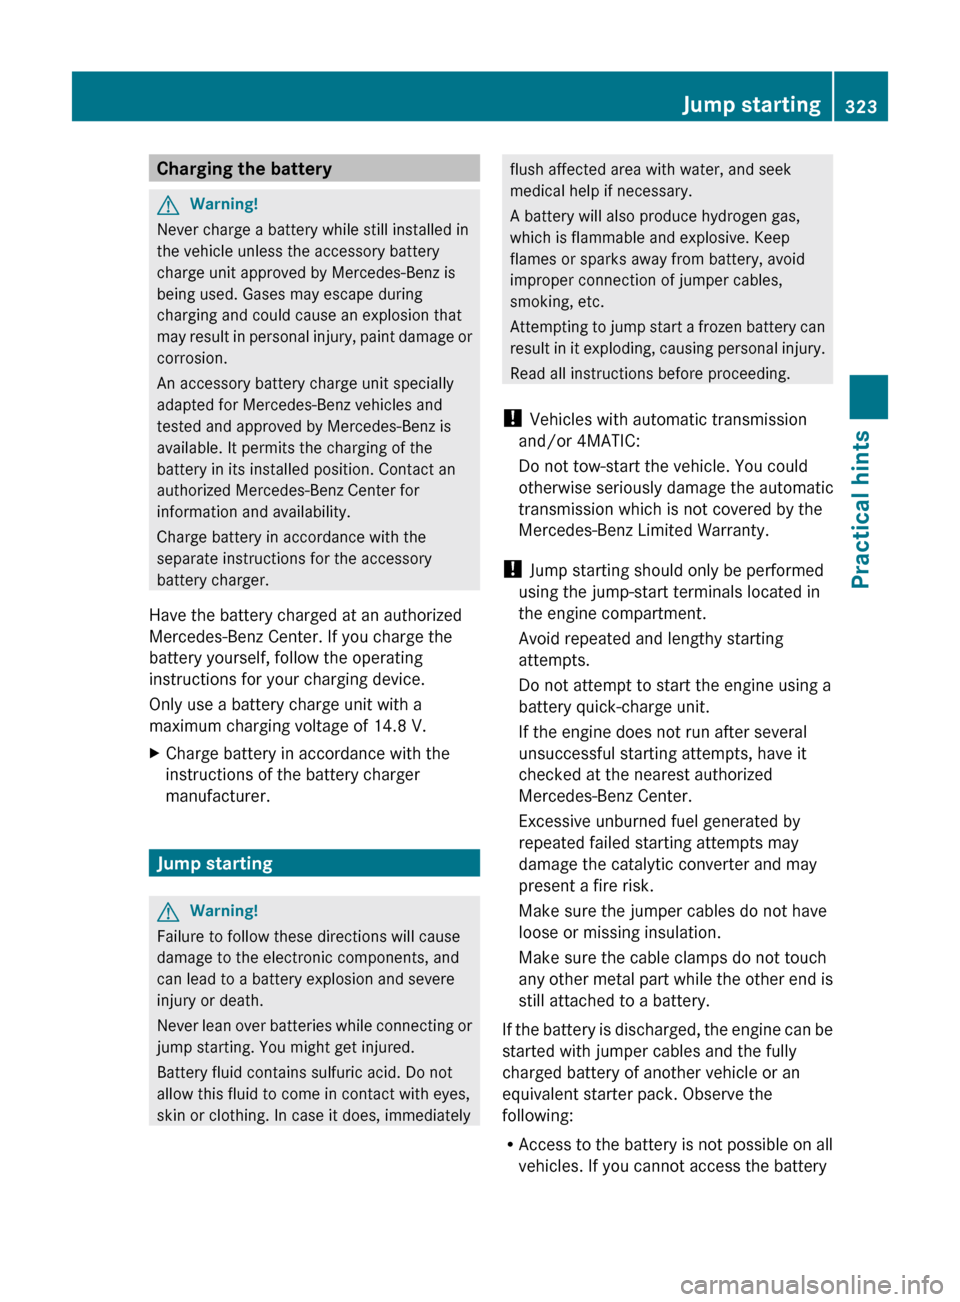
XPush the head restraint cushion at the
bottom, back as far as possible ;.
XPush the head restraint cushion down into
the guide =.
Resetting activated NECK-PRO active front head restraints311Practical hints204_AKB; 5; 23, en-USd2ureepe,Version: 2.11.8.12009-07-16T17:54:06+02:00 - Seite 311Z
Page 325 of 364
Charging the batteryGWarning!
Never charge a battery while still installed in
the vehicle unless the accessory battery
charge unit approved by Mercedes-Benz is
being used. Gases may escape during
charging and could cause an explosion that
may result in personal injury, paint damage or
corrosion.
An accessory battery charge unit specially
adapted for Mercedes-Benz vehicles and
tested and approved by Mercedes-Benz is
available. It permits the charging of the
battery in its installed position. Contact an
authorized Mercedes-Benz Center for
information and availability.
Charge battery in accordance with the
separate instructions for the accessory
battery charger.
Have the battery charged at an authorized
Mercedes-Benz Center. If you charge the
battery yourself, follow the operating
instructions for your charging device.
Only use a battery charge unit with a
maximum charging voltage of 14.8 V.
XCharge battery in accordance with the
instructions of the battery charger
manufacturer.
Jump starting
GWarning!
Failure to follow these directions will cause
damage to the electronic components, and
can lead to a battery explosion and severe
injury or death.
Never lean over batteries while connecting or
jump starting. You might get injured.
Battery fluid contains sulfuric acid. Do not
allow this fluid to come in contact with eyes,
skin or clothing. In case it does, immediately
flush affected area with water, and seek
medical help if necessary.
A battery will also produce hydrogen gas,
which is flammable and explosive. Keep
flames or sparks away from battery, avoid
improper connection of jumper cables,
smoking, etc.
Attempting to jump start a frozen battery can
result in it exploding, causing personal injury.
Read all instructions before proceeding.
! Vehicles with automatic transmission
and/or 4MATIC:
Do not tow-start the vehicle. You could
otherwise seriously damage the automatic
transmission which is not covered by the
Mercedes-Benz Limited Warranty.
! Jump starting should only be performed
using the jump-start terminals located in
the engine compartment.
Avoid repeated and lengthy starting
attempts.
Do not attempt to start the engine using a
battery quick-charge unit.
If the engine does not run after several
unsuccessful starting attempts, have it
checked at the nearest authorized
Mercedes-Benz Center.
Excessive unburned fuel generated by
repeated failed starting attempts may
damage the catalytic converter and may
present a fire risk.
Make sure the jumper cables do not have
loose or missing insulation.
Make sure the cable clamps do not touch
any other metal part while the other end is
still attached to a battery.
If the battery is discharged, the engine can be
started with jumper cables and the fully
charged battery of another vehicle or an
equivalent starter pack. Observe the
following:
R Access to the battery is not possible on all
vehicles. If you cannot access the batteryJump starting323Practical hints204_AKB; 5; 23, en-USd2ureepe,Version: 2.11.8.12009-07-16T17:54:06+02:00 - Seite 323Z
Page 327 of 364
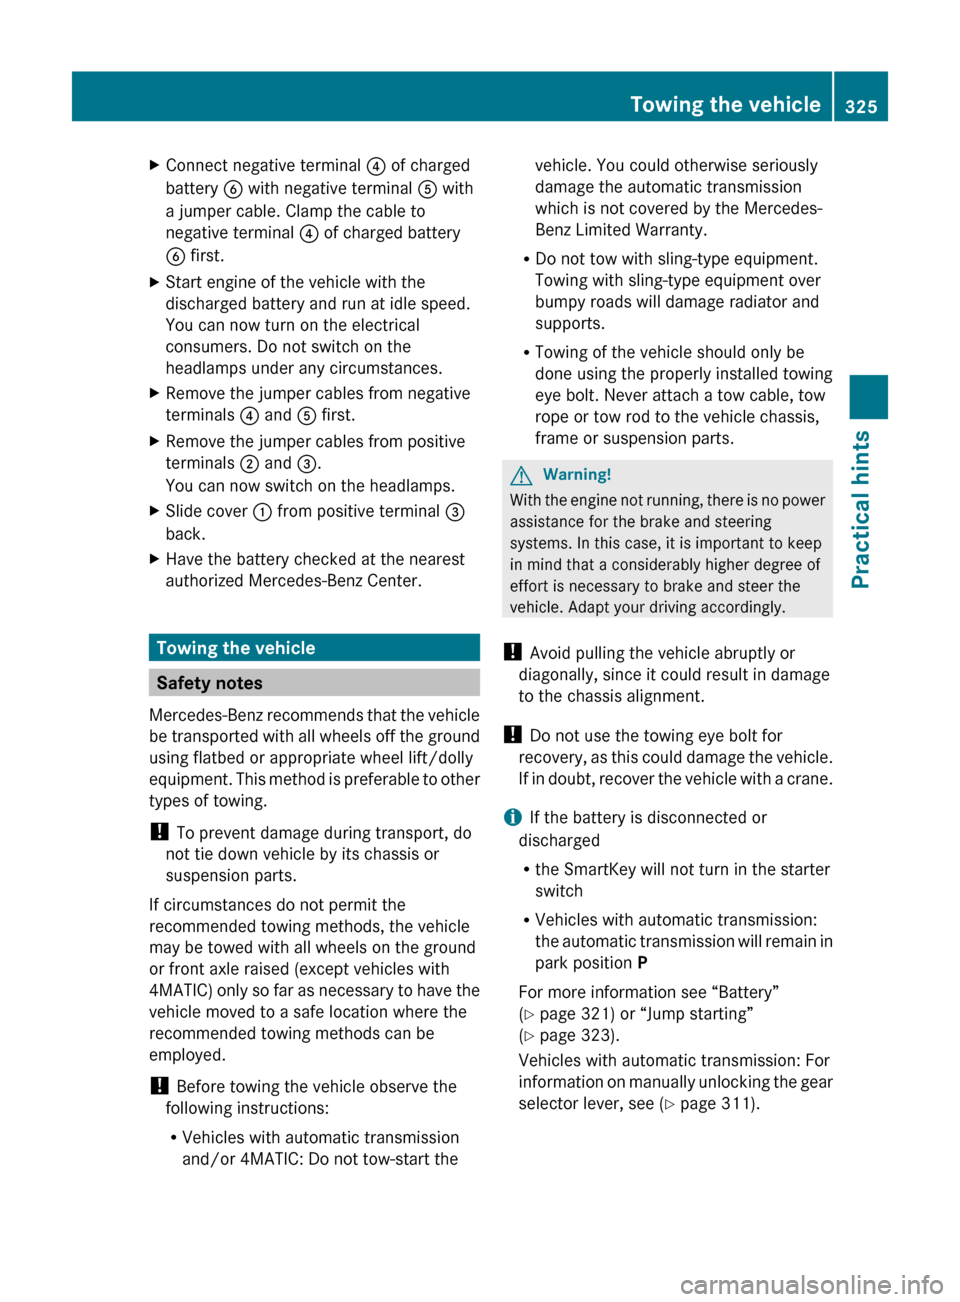
XConnect negative terminal ? of charged
battery B with negative terminal A with
a jumper cable. Clamp the cable to
negative terminal ? of charged battery
B first.XStart engine of the vehicle with the
discharged battery and run at idle speed.
You can now turn on the electrical
consumers. Do not switch on the
headlamps under any circumstances.XRemove the jumper cables from negative
terminals ? and A first.XRemove the jumper cables from positive
terminals ; and =.
You can now switch on the headlamps.XSlide cover : from positive terminal =
back.XHave the battery checked at the nearest
authorized Mercedes-Benz Center.
Towing the vehicle
Safety notes
Mercedes-Benz recommends that the vehicle
be transported with all wheels off the ground
using flatbed or appropriate wheel lift/dolly
equipment. This method is preferable to other
types of towing.
! To prevent damage during transport, do
not tie down vehicle by its chassis or
suspension parts.
If circumstances do not permit the
recommended towing methods, the vehicle
may be towed with all wheels on the ground
or front axle raised (except vehicles with
4MATIC) only so far as necessary to have the
vehicle moved to a safe location where the
recommended towing methods can be
employed.
! Before towing the vehicle observe the
following instructions:
R Vehicles with automatic transmission
and/or 4MATIC: Do not tow-start the
vehicle. You could otherwise seriously
damage the automatic transmission
which is not covered by the Mercedes-
Benz Limited Warranty.
R Do not tow with sling-type equipment.
Towing with sling-type equipment over
bumpy roads will damage radiator and
supports.
R Towing of the vehicle should only be
done using the properly installed towing
eye bolt. Never attach a tow cable, tow
rope or tow rod to the vehicle chassis,
frame or suspension parts.GWarning!
With the engine not running, there is no power
assistance for the brake and steering
systems. In this case, it is important to keep
in mind that a considerably higher degree of
effort is necessary to brake and steer the
vehicle. Adapt your driving accordingly.
! Avoid pulling the vehicle abruptly or
diagonally, since it could result in damage
to the chassis alignment.
! Do not use the towing eye bolt for
recovery, as this could damage the vehicle.
If in doubt, recover the vehicle with a crane.
i If the battery is disconnected or
discharged
R the SmartKey will not turn in the starter
switch
R Vehicles with automatic transmission:
the automatic transmission will remain in
park position P
For more information see “Battery”
( Y page 321) or “Jump starting”
( Y page 323).
Vehicles with automatic transmission: For
information on manually unlocking the gear
selector lever, see ( Y page 311).
Towing the vehicle325Practical hints204_AKB; 5; 23, en-USd2ureepe,Version: 2.11.8.12009-07-16T17:54:06+02:00 - Seite 325Z
Page 328 of 364
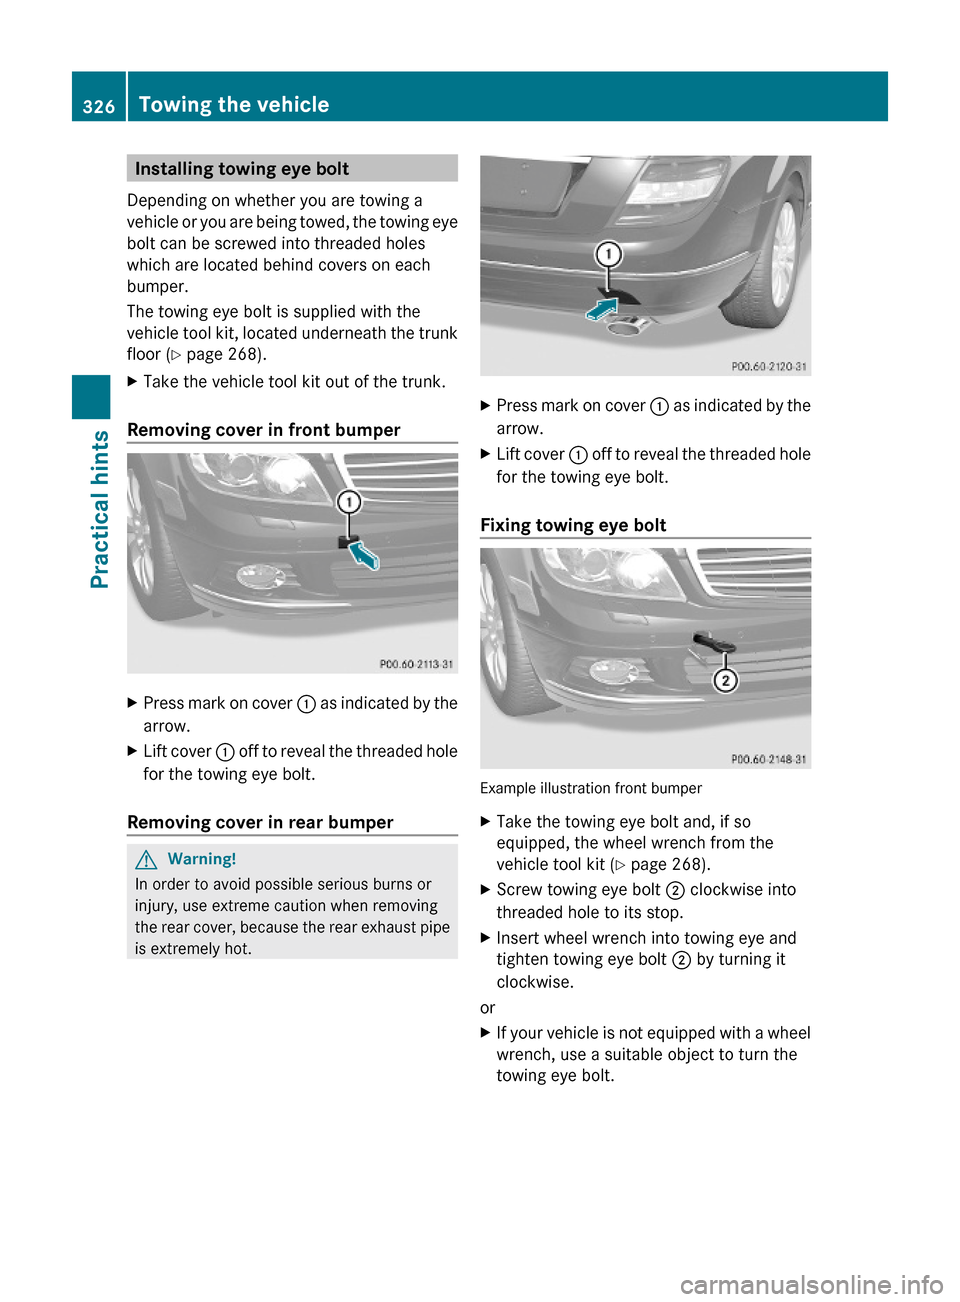
Installing towing eye bolt
Depending on whether you are towing a
vehicle or you are being towed, the towing eye
bolt can be screwed into threaded holes
which are located behind covers on each
bumper.
The towing eye bolt is supplied with the
vehicle tool kit, located underneath the trunk
floor (Y page 268).
XTake the vehicle tool kit out of the trunk.
Removing cover in front bumper
XPress mark on cover : as indicated by the
arrow.
XLift cover : off to reveal the threaded hole
for the towing eye bolt.
Removing cover in rear bumper
GWarning!
In order to avoid possible serious burns or
injury, use extreme caution when removing
the rear cover, because the rear exhaust pipe
is extremely hot.
XPress mark on cover : as indicated by the
arrow.
XLift cover : off to reveal the threaded hole
for the towing eye bolt.
Fixing towing eye bolt
Example illustration front bumper
XTake the towing eye bolt and, if so
equipped, the wheel wrench from the
vehicle tool kit (Y page 268).
XScrew towing eye bolt ; clockwise into
threaded hole to its stop.
XInsert wheel wrench into towing eye and
tighten towing eye bolt ; by turning it
clockwise.
or
XIf your vehicle is not equipped with a wheel
wrench, use a suitable object to turn the
towing eye bolt.
326Towing the vehiclePractical hints
204_AKB; 5; 23, en-USd2ureepe,Version: 2.11.8.12009-07-16T17:54:06+02:00 - Seite 326
Page 329 of 364
Removing towing eye boltXLoosen towing eye bolt ; by turning it
counterclockwise.XUnscrew towing eye bolt ;.XStore the towing eye bolt ; and wheel
wrench back into the vehicle tool kit.
Towing with all wheels on the ground
GWarning!
If circumstances require towing the vehicle
with all wheels on the ground, always tow with
a tow bar if:
R the engine will not run
R there is a malfunction in the brake system
R there is a malfunction in the power supply
or in the vehicle’s electrical system
This is necessary to adequately control the
towed vehicle.
Prior to towing the vehicle with all wheels on
the ground, make sure the SmartKey is in
starter switch position 2.
If the SmartKey is left in the starter switch
position 0 for an extended period of time, it
can no longer be turned in the switch. In this
case, the steering is locked. To unlock,
remove SmartKey from starter switch and
reinsert.
GWarning!
With the engine not running, there is no power
assistance for the brake and steering
systems. In this case, it is important to keep
in mind that a considerably higher degree of
effort is necessary to brake and steer the
vehicle. Adapt your driving accordingly.
XMake sure the ignition is switched on.XWith the vehicle at a standstill, depress the
brake pedal and keep it pressed.XVehicles with manual transmission: Shift
the manual transmission into the neutral
position (no gear selected).
or
XVehicles with automatic transmission: Shift
the automatic transmission into neutral
position N.XRelease the brake pedal.XIf engaged, release the parking brake.XSwitch on the hazard warning flasher
( Y page 93).
!
The vehicle may be towed only for
distances up to 30 miles (50 km) and at a
speed not to exceed 30 mph (50 km/h).
i While being towed with the hazard
warning flasher in use, use the combination
switch in the usual manner to signal turns.
Only the selected turn signal will operate.
Upon canceling the turn signal, the hazard
warning flasher will operate again.
Towing with front axle raised
! The vehicle may be towed only for
distances up to 30 miles (50 km) and at a
speed not to exceed 30 mph (50 km/h).
! Vehicles with 4MATIC: Do not tow with
one axle raised. Doing so could damage the
transfer case, which is not covered by the
Mercedes-Benz Limited Warranty.
All wheels must be on or off the ground.
Observe instructions for towing the vehicle
with all wheels on the ground.
XMake sure the ignition is switched on.XWith the vehicle at a standstill, depress the
brake pedal and keep it pressed.Towing the vehicle327Practical hints204_AKB; 5; 23, en-USd2ureepe,Version: 2.11.8.12009-07-16T17:54:06+02:00 - Seite 327Z
Page 330 of 364
XVehicles with manual transmission: Shift
the manual transmission into the neutral
position (no gear selected).
or
XVehicles with automatic transmission: Shift
the automatic transmission into neutral
position N.XRelease the brake pedal.XIf engaged, release the parking brake.XSwitch off the automatic central locking
( Y page 135).XSwitch off the ignition and leave the
SmartKey in the starter switch.XSwitch on the hazard warning flasher
( Y page 93).
!
Vehicles without 4MATIC:
Because the ESP ®
operates automatically,
the engine and ignition must be shut off
(SmartKey in starter switch position 0 or
1 or KEYLESS-GO start/stop button in
position 0 or 1) when the vehicle is being
towed with the front axle raised.
Active braking action through the ESP ®
may otherwise seriously damage the brake
system which is not covered by the
Mercedes-Benz Limited Warranty.
Fuses
Introduction
The electrical fuses in your vehicle serve to
switch off malfunctioning power circuits.
If a fuse is blown, the components and
systems secured by that fuse will stop
operating.
GWarning!
Only use fuses approved by Mercedes-Benz
with the specified amperage for the system in
question and do not attempt to repair or
bridge a blown fuse. Using other than
approved fuses or using repaired or bridged
fuses may cause an overload leading to a fire,
and/or cause damage to electrical
components and/or systems. Have the cause
determined and remedied by an authorized
Mercedes-Benz Center.
A blown fuse must be replaced by an
appropriate spare fuse (recognizable by its
color or the fuse rating given on the fuse) of
the amperage recommended in the fuse
chart. Any Mercedes-Benz Center will be glad
to advise you on this subject.
i In case of a blown fuse contact Roadside
Assistance or an authorized Mercedes-
Benz Center.
If a newly inserted fuse blows again, have the
cause determined and rectified by an
authorized Mercedes-Benz Center.
The fuse chart is located in the trunk with the
vehicle tool kit ( Y page 268). The fuse chart
explains the fuse allocation and fuse
amperages.
Before replacing fuses
XEngage the parking brake.XMake sure the automatic transmission is in
park position P (manual transmission to
Neutral).XSwitch off all electrical consumers.XTurn off the engine.XRemove the SmartKey from the starter
switch.XVehicles with KEYLESS-GO: Open the
driver’s door (this puts the starter switch in
position 0, same as with the SmartKey
removed from the starter switch). The
driver’s door then can be closed again.
Fuse box in passenger compartment
! Do not use sharp objects such as a
screwdriver to open the fuse box cover in
the dashboard. You could damage the fuse
box cover or the dashboard.
328FusesPractical hints
204_AKB; 5; 23, en-USd2ureepe,Version: 2.11.8.12009-07-16T17:54:06+02:00 - Seite 328