window MERCEDES-BENZ C300LUX 4MATIC 2010 W204 Owner's Guide
[x] Cancel search | Manufacturer: MERCEDES-BENZ, Model Year: 2010, Model line: C300LUX 4MATIC, Model: MERCEDES-BENZ C300LUX 4MATIC 2010 W204Pages: 364, PDF Size: 8.23 MB
Page 61 of 364
XInstall a LATCH-type (ISOFIX) child seat
according to the manufacturer’s
instructions.
A rigid connection between the child seat
and the body of the vehicle is established.
XMake sure that the seat belt for the rear
center seat can operate freely with a child
seat installed.
Child safety
Child safety locks
GObserve Safety notes, see page 54.GWarning!
Children could open a rear door from the
inside. This may cause serious personal injury
or an accident. Therefore, secure the rear
doors with the child safety locks whenever
children are riding in the back seats of the
vehicle.
The child safety locks on the rear doors
enable you to secure each rear door
individually. You cannot open a secured rear
door from the inside. You can open the rear
door from the outside when the vehicle is
unlocked.
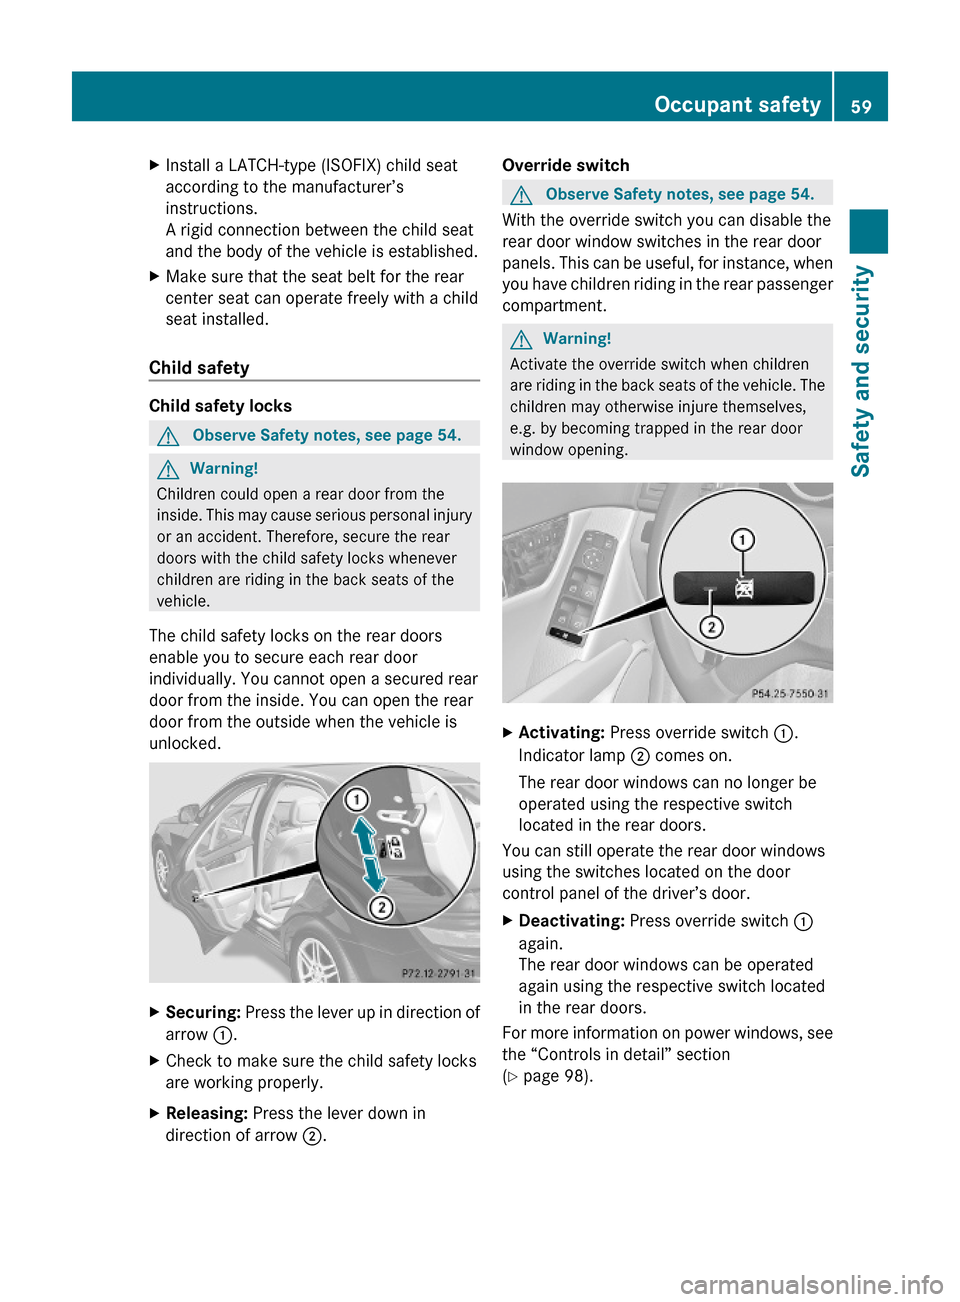
XSecuring: Press the lever up in direction of
arrow :.
XCheck to make sure the child safety locks
are working properly.
XReleasing: Press the lever down in
direction of arrow ;.
Override switchGObserve Safety notes, see page 54.
With the override switch you can disable the
rear door window switches in the rear door
panels. This can be useful, for instance, when
you have children riding in the rear passenger
compartment.
GWarning!
Activate the override switch when children
are riding in the back seats of the vehicle. The
children may otherwise injure themselves,
e.g. by becoming trapped in the rear door
window opening.
XActivating: Press override switch :.
Indicator lamp ; comes on.
The rear door windows can no longer be
operated using the respective switch
located in the rear doors.
You can still operate the rear door windows
using the switches located on the door
control panel of the driver’s door.
XDeactivating: Press override switch :
again.
The rear door windows can be operated
again using the respective switch located
in the rear doors.
For more information on power windows, see
the “Controls in detail” section
(Y page 98).
Occupant safety59Safety and security204_AKB; 5; 23, en-USd2ureepe,Version: 2.11.8.12009-07-16T17:54:06+02:00 - Seite 59Z
Page 71 of 364
Vehicle equipment ..............................70
Locking and unlocking .......................70
Starter switch positions .....................77
Seats ....................................................79
Multifunction steering wheel .............84
Mirrors .................................................86
Memory function .................................89
Lighting ................................................90
Wipers ..................................................96
Power windows ...................................98
Driving and parking ..........................101
Manual transmission ........................107
Automatic transmission ...................108
Transfer case ....................................116
Instrument cluster ............................116
Control system ..................................118
Audio system ....................................136
Driving systems ................................180
Climate control system ....................189
Rear window defroster .....................196
Power tilt/sliding sunroof ...............196
Panorama roof with power tilt/
sliding panel ......................................199
Loading and storing ..........................202
Useful features .................................207
69Controls in detail204_AKB; 5; 23, en-USd2ureepe,Version: 2.11.8.12009-07-16T17:54:06+02:00 - Seite 69
Page 89 of 364
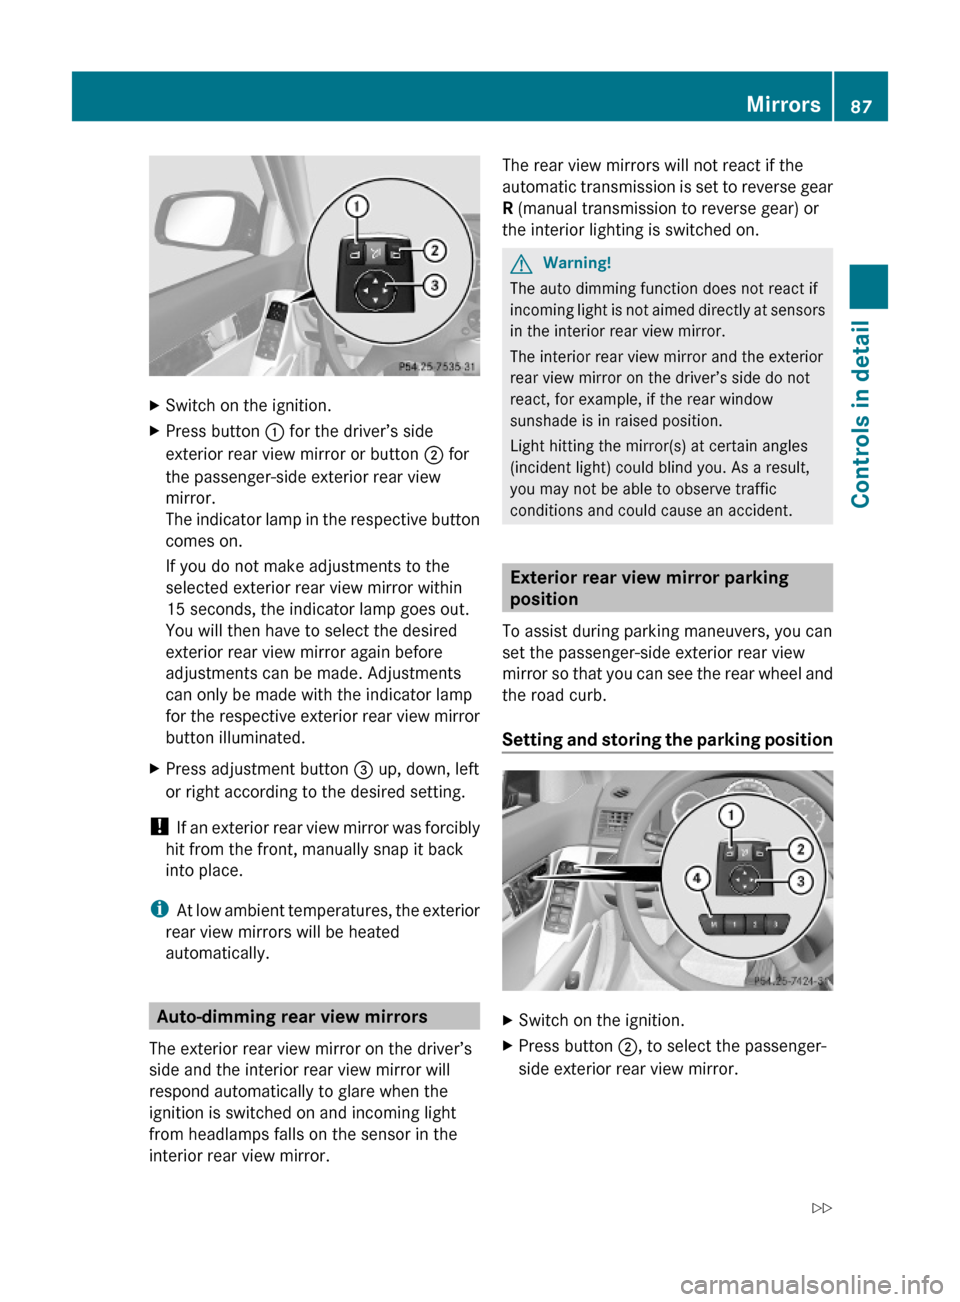
XSwitch on the ignition.XPress button : for the driver’s side
exterior rear view mirror or button ; for
the passenger-side exterior rear view
mirror.
The indicator lamp in the respective button
comes on.
If you do not make adjustments to the
selected exterior rear view mirror within
15 seconds, the indicator lamp goes out.
You will then have to select the desired
exterior rear view mirror again before
adjustments can be made. Adjustments
can only be made with the indicator lamp
for the respective exterior rear view mirror
button illuminated.
XPress adjustment button = up, down, left
or right according to the desired setting.
! If an exterior rear view mirror was forcibly
hit from the front, manually snap it back
into place.
iAt low ambient temperatures, the exterior
rear view mirrors will be heated
automatically.
Auto-dimming rear view mirrors
The exterior rear view mirror on the driver’s
side and the interior rear view mirror will
respond automatically to glare when the
ignition is switched on and incoming light
from headlamps falls on the sensor in the
interior rear view mirror.
The rear view mirrors will not react if the
automatic transmission is set to reverse gear
R (manual transmission to reverse gear) or
the interior lighting is switched on.
GWarning!
The auto dimming function does not react if
incoming light is not aimed directly at sensors
in the interior rear view mirror.
The interior rear view mirror and the exterior
rear view mirror on the driver’s side do not
react, for example, if the rear window
sunshade is in raised position.
Light hitting the mirror(s) at certain angles
(incident light) could blind you. As a result,
you may not be able to observe traffic
conditions and could cause an accident.
Exterior rear view mirror parking
position
To assist during parking maneuvers, you can
set the passenger-side exterior rear view
mirror so that you can see the rear wheel and
the road curb.
Setting and storing the parking position
XSwitch on the ignition.XPress button ;, to select the passenger-
side exterior rear view mirror.
Mirrors87Controls in detail204_AKB; 5; 23, en-USd2ureepe,Version: 2.11.8.12009-07-16T17:54:06+02:00 - Seite 87Z
Page 100 of 364
If the windshield wipers fail to function at
all with the combination switch in position
Ä or Å,
Rset the combination switch to the next
higher wiper speed
Rhave the windshield wipers checked at
the nearest authorized Mercedes-Benz
Center
Power windows
Opening and closing
The door windows are opened and closed
electrically. The switches for all door windows
are located on the driver’s door control panel.
The switches for the respective door windows
are located on the front passenger door and
on the rear doors.
i Operating the rear door windows from
the rear is not possible when you activate
the override switch (Y page 59).
GObserve Safety notes, see page 54.GWarning!
When opening or closing the door windows,
make sure there is no danger of anyone being
harmed by the opening/closing procedure.
The door windows are equipped with the
express operation and automatic reversal
function. If in express operation mode a door
window encounters an obstruction that
blocks its path, the automatic reversal
function will stop the door window and open
it slightly.
The door windows operate differently when
the switch is pulled and held. See the “Closing
when a door window is blocked” section in
this chapter for details.
The closing of the door windows can be
immediately halted by releasing the switch or,
if the switch was pulled past the resistance
point and released, by either pressing or
pulling the respective switch.
If a door window encounters an obstruction
that blocks its path in a circumstance where
you are closing the door windows by pressing
and holding button & on the SmartKey or
by pressing and holding the sensor surface
(vehicles with KEYLESS-GO) on an outside
door handle, the automatic reversal function
will not operate.
Activate the override switch when children
are riding in the back seats of the vehicle. The
children may otherwise injure themselves,
e.g. by becoming trapped in the door window
opening.
GWarning!
Do not keep any part of your body up against
the window pane when opening a window. The
downward motion of the pane may pull that
part of your body down between the window
pane and the door frame and trap it there. If
there is a risk of entrapment, release the
switch and pull it to close the window.
iYou can also open or close the door
windows using the SmartKey, see
“Summer opening feature” (Y page 99)
and “Convenience closing feature”
(Y page 100).
iAfter switching off the ignition or
removing the SmartKey from the starter
switch, you can operate the door windows
until you open the driver’s or front
passenger door. If no door was opened you
can operate the door windows for up to
5 minutes.
98Power windowsControls in detail
204_AKB; 5; 23, en-USd2ureepe,Version: 2.11.8.12009-07-16T17:54:06+02:00 - Seite 98
Page 101 of 364
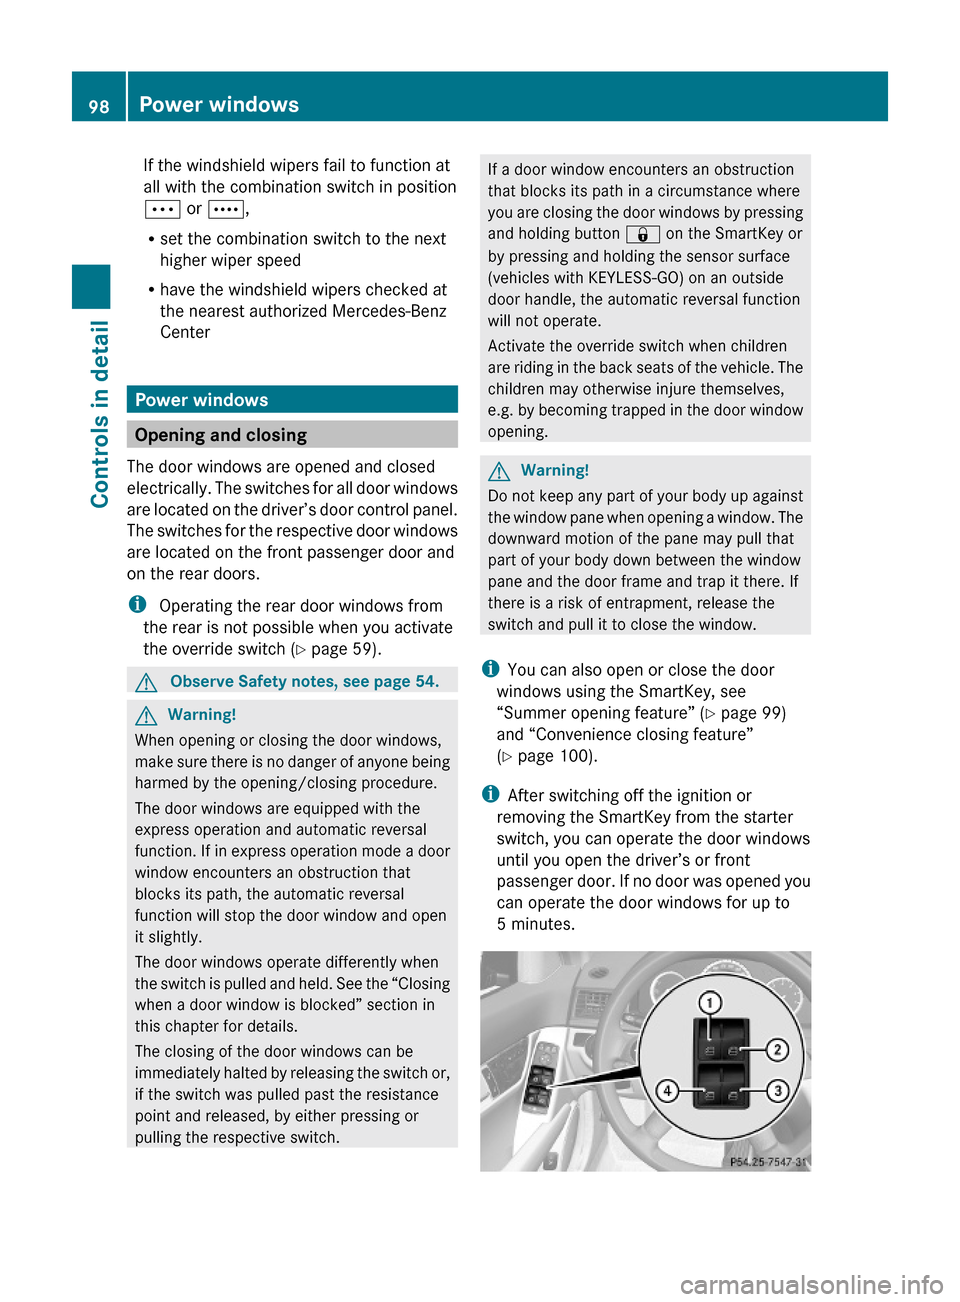
XSwitch on the ignition.XOpening/closing: Press or pull and hold
switch : to ? to the resistance point.
The corresponding door window moves
downward or upward until you release the
switch.XExpress operation: Press or pull
switch : to ? past the resistance point
and release.
The corresponding door window opens or
closes completely.XStopping during express operation:
Press or pull the respective switch again.
Closing when a door window is blocked
GWarning!
Make sure that nobody can become trapped
and be seriously or even fatally injured when
closing a door window with greater force or
without automatic reversal function.
If the upward movement of a door window is
blocked during the closing procedure, the
door window will stop and open slightly.
XImmediately after the door window has
stopped because it was blocked, pull and
hold the respective switch upward until the
door window is fully closed.
The door window closes with greater force.
If the door window is blocked again and opens
slightly:
XImmediately after the door window was
blocked, pull and hold the respective
switch upward until the door window is fully
closed.
The door window closes without automatic
reversal function.GWarning!
Pulling and holding the switch to close the
door window immediately after it had been
blocked two times will cause the door window
to close without any reversal function for as
long as you hold the switch.
Synchronizing door windows
The door windows must be synchronized if
they cannot be fully closed (express
operation).
Each door window must be synchronized
separately.XClose all doors.XSwitch on the ignition.XPull and hold switch :, ; , = or ?
( Y page 98) until the respective door
window is closed.
The door window opens again slightly.XPull and hold the respective switch once
more immediately until the door window is
closed completely.XHold the respective switch for
approximately 1 second.
The door window is synchronized.
Summer opening feature
When the weather is warm, you can ventilate
the vehicle before driving off by
simultaneously
R opening the door windows
R opening the tilt/sliding sunroof
R opening the panorama roof with power tilt/
sliding panel and roller sunblinds
The summer opening feature can only be
activated via the remote control of the
SmartKey. The SmartKey must be in close
proximity to the driver’s outside door handle.
XAim the transmitter eye of the SmartKey at
the driver’s outside door handle.
Vehicles with tilt/sliding sunroof
XPress and hold button % on the
SmartKey until the door windows and thePower windows99Controls in detail204_AKB; 5; 23, en-USd2ureepe,Version: 2.11.8.12009-07-16T17:54:06+02:00 - Seite 99Z
Page 102 of 364
tilt/sliding sunroof have reached the
desired position.
The vehicle unlocks.XRelease button % on the SmartKey to
interrupt the opening procedure.
Vehicles with panorama roof with
power tilt/sliding panel
When roller sunblinds are extended:
XPress and hold button % on the
SmartKey.
The vehicle unlocks.
The door windows open and the roller
sunblinds begin to retract after
approximately 1 second.XWith the door windows opened and the
roller sunblinds fully retracted, press and
hold button % on the SmartKey again.
The tilt/sliding panel opens.XRelease button % on the SmartKey to
interrupt the opening procedure.
When roller sunblinds are retracted:
XPress and hold button % on the
SmartKey.
The door windows and the tilt/sliding panel
opens after approximately 1 second.XRelease button % on the SmartKey to
interrupt the opening procedure.
Convenience closing feature
When locking the vehicle, you can
simultaneously close
R the door windows
R the tilt/sliding sunroof
R the panorama roof with power tilt/sliding
panel
Afterward, you can extend the roller
sunblinds of the panorama roof with power
tilt/sliding panel.
GWarning!
When closing the door windows and the tilt/
sliding sunroof or panorama roof with power
tilt/sliding panel, make sure there is no
danger of anyone being harmed by the closing
procedure.
If potential danger exists, proceed as follows:
R Release button & to stop the closing
procedure. To open, press and hold button
% . To continue the closing procedure
after making sure that there is no danger of
anyone being harmed by the closing
procedure, press and hold button &.
Vehicles with KEYLESS-GO:
R Release the sensor surface on the outside
door handle to stop the closing procedure.
R Immediately pull on the same outside door
handle and hold firmly. The door windows
and the tilt/sliding sunroof or panorama
roof with power tilt/sliding panel will open
for as long as the door handle is held but
the door not opened.
With SmartKey
The SmartKey must be in close proximity to
the driver’s outside door handle.
XAim transmitter eye of the SmartKey at the
driver’s outside door handle.XPress and hold button & on the
SmartKey until the door windows and the
tilt/sliding sunroof or panorama roof with
power tilt/sliding panel are closed
completely.XRelease button & on the SmartKey to
interrupt the closing procedure.XVehicles with panorama roof with
power tilt/sliding panel: Press and hold
button & on the SmartKey once more.
The roller sunblinds extend.XRelease button & on the SmartKey to
interrupt the extending procedure.100Power windowsControls in detail
204_AKB; 5; 23, en-USd2ureepe,Version: 2.11.8.12009-07-16T17:54:06+02:00 - Seite 100
Page 103 of 364
With KEYLESS-GO
The SmartKey with KEYLESS-GO must be
located outside the vehicle within
approximately 3 ft (1 m) of a door.
XClose all doors.XTouch and hold the sensor surface on an
outside door handle (Y page 71) until the
door windows and the tilt/sliding sunroof
or panorama roof with power tilt/sliding
panel are closed completely.
iMake sure you are only touching the
sensor surface.
XRelease the sensor surface to interrupt the
closing procedure.
XVehicles with panorama roof with
power tilt/sliding panel: Touch and hold
the sensor surface once more.
The roller sunblinds extend.
XRelease the sensor surface to interrupt the
extending procedure.
Driving and parking
Safety notes
GWarning!
Make sure absolutely no objects are
obstructing the pedals’ range of movement.
Keep the driver’s footwell clear of all
obstacles. If there are any floormats or
carpets in the footwell, make sure the pedals
still have sufficient clearance.
During sudden driving or braking maneuvers
the objects could get caught between or
under the pedals. You could then no longer
brake or accelerate. This could lead to
accidents and injury.
GWarning!
With the engine not running, there is no power
assistance for the brake and steering
systems. In this case, it is important to keep
in mind that a considerably higher degree of
effort is necessary to brake and steer the
vehicle. Adapt your driving accordingly.
Starting the engine
GWarning!
Inhalation of exhaust gas is hazardous to your
health. All exhaust gas contains carbon
monoxide (CO), and inhaling it can cause
unconsciousness and possible death.
Do not run the engine in confined areas (such
as a garage) which are not properly ventilated.
If you think that exhaust gas fumes are
entering the vehicle while driving, have the
cause determined and corrected
immediately. If you must drive under these
conditions, drive only with at least one
window fully open at all times.
Manual transmission
Gearshift pattern for manual transmission
kReverse gear1 to 6Forward gears
For more information, see “Manual
transmission” (Y page 107).
XDepress the brake pedal.XMake sure the manual transmission is in
the neutral position (no gear selected).
XFully depress the clutch pedal.
Otherwise the engine cannot be started
due to the integrated safety interlock.
Driving and parking101Controls in detail204_AKB; 5; 23, en-USd2ureepe,Version: 2.11.8.12009-07-16T17:54:06+02:00 - Seite 101Z
Page 150 of 364
Xi Q System Q Reset.
A prompt appears asking whether you
really want to reset.
XSelect Yes or No.
If you select Yes another prompt will
appear asking whether you really want to
reset.
XSelect Yes or No.
If you select Yes, the audio system will be
reset and restarted.
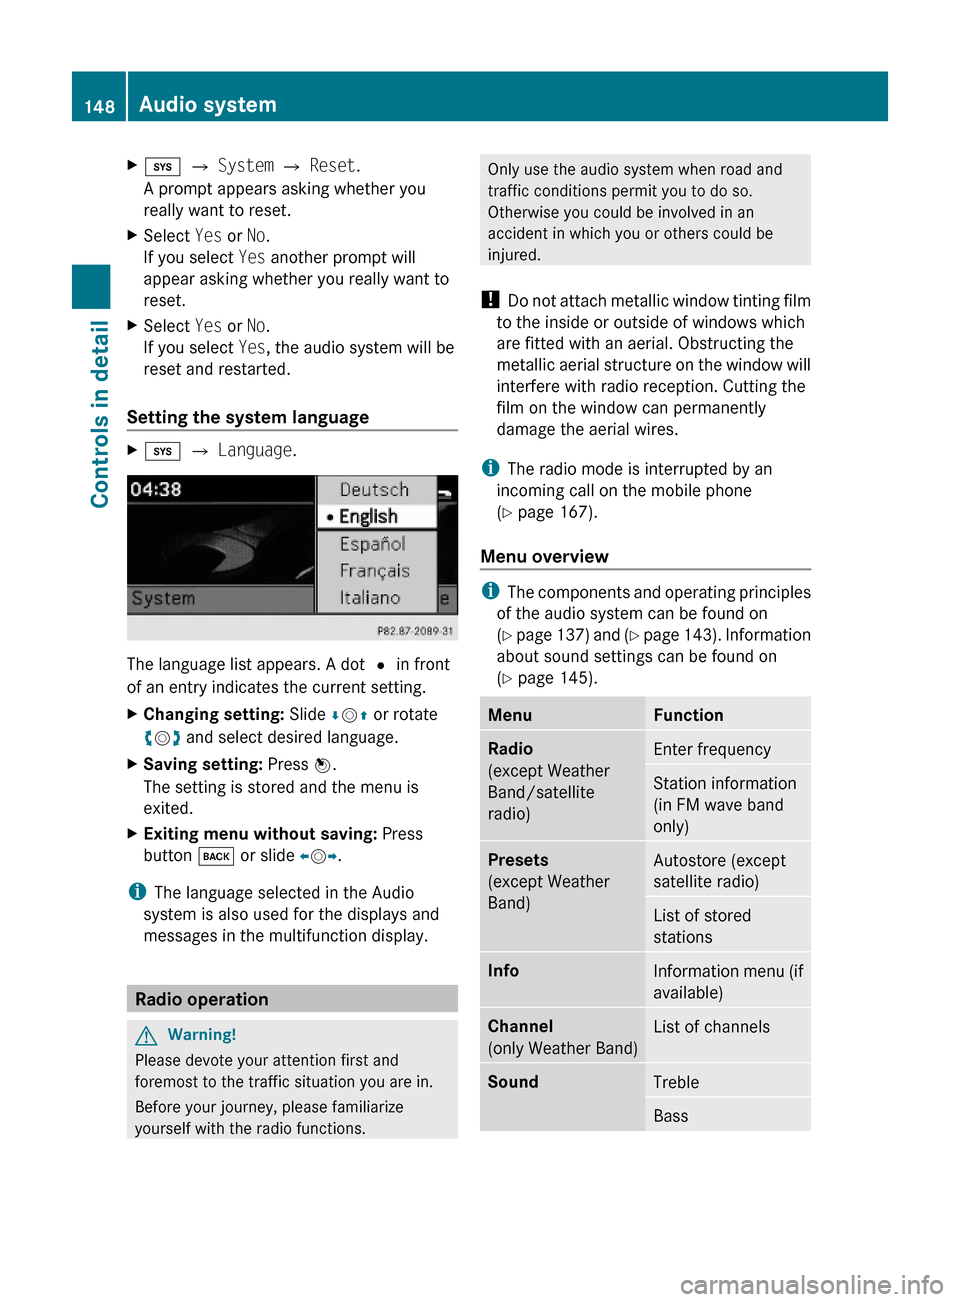
Setting the system language
Xi Q Language.
The language list appears. A dot # in front
of an entry indicates the current setting.
XChanging setting: Slide ÆVZ or rotate
cVd and select desired language.
XSaving setting: Press W.
The setting is stored and the menu is
exited.
XExiting menu without saving: Press
button k or slide XVY.
iThe language selected in the Audio
system is also used for the displays and
messages in the multifunction display.
Radio operation
GWarning!
Please devote your attention first and
foremost to the traffic situation you are in.
Before your journey, please familiarize
yourself with the radio functions.
Only use the audio system when road and
traffic conditions permit you to do so.
Otherwise you could be involved in an
accident in which you or others could be
injured.
! Do not attach metallic window tinting film
to the inside or outside of windows which
are fitted with an aerial. Obstructing the
metallic aerial structure on the window will
interfere with radio reception. Cutting the
film on the window can permanently
damage the aerial wires.
iThe radio mode is interrupted by an
incoming call on the mobile phone
(Y page 167).
Menu overview
iThe components and operating principles
of the audio system can be found on
(Y page 137) and (Y page 143). Information
about sound settings can be found on
(Y page 145).
MenuFunctionRadio
(except Weather
Band/satellite
radio)
Enter frequencyStation information
(in FM wave band
only)
Presets
(except Weather
Band)
Autostore (except
satellite radio)
List of stored
stations
InfoInformation menu (if
available)
Channel
(only Weather Band)
List of channelsSoundTrebleBass148Audio systemControls in detail
204_AKB; 5; 23, en-USd2ureepe,Version: 2.11.8.12009-07-16T17:54:06+02:00 - Seite 148
Page 162 of 364
File structure on a disc
When you create an MP3/WMA disc, the
MP3/WMA tracks can be organized in
folders.
A folder can also contain other folders.
A disc can contain a maximum of 255 folders.
A folder can contain a maximum of 255 tracks
and 255 subfolders.
A data medium may contain a maximum of
500 tracks.
The directory depth may not exceed a
maximum of 8 levels. The system will ignore
files in lower levels.
Track and folder names
When you create an MP3/WMA disc, you can
assign names to the MP3/WMA tracks and
folders.
The audio system uses these names for the
corresponding display in MP3 mode. Empty
folders or folders which contain data other
than MP3/WMA tracks are not displayed by
the audio system.
If MP3/WMA files are saved in the root
directory itself (uppermost directory on
storage medium), the root directory will also
be treated as a folder. The audio system will
then show the name of the root directory as
the folder name.
You must observe the following when
assigning track names:
R Track names must have at least one
character.
R Track names must have the extension
“mp3” or “wma”.
R There must be a period between the track
name and the extension.
Example of a correct track name:
Track1.mp3
The audio system is unable to recognize an
MP3/WMA track if
R there is no period between the track title
and the extension
R there is no extensioni The audio system does not support ID3
tags.
Supported file formats
Supported file formats are:
R MP3
R WMA
i If music files of file formats other than
MP3 are stored together with MP3 files on
one disc, the loading process may take
longer.
Permissible MP3 formats
The audio system supports the MPEG1 Audio
Layer 3 format.
i This format is generally known as “MP3”.
Permissible bit and sampling rates are:
R fixed and variable bit rates up to
320 kbit/s
R Sampling rates of 24 kHz – 48 kHz
i Only use MP3 tracks with a bit rate of at
least 128 kbit/s or higher and a sampling
rate of at least 44.1 kHz or higher. Smaller
rates can cause a noticeable deterioration
in sound quality. This is especially the case
if you have the surround sound function
activated.
WMA (Windows Media ®
Audio)
Windows Media ®
Audio (WMA) is an audio
data compression technology developed by
Microsoft ®
.
The audio system supports the following
types of audio files:
R fixed bit rates of 5 kbit/s up to
384 kbit/s
R Sampling rates from 8 kHz to 48 kHz
The audio system does not support the
following WMA files:
R DRM (Digital Rights Management) coded
files
R variable bit rates160Audio systemControls in detail
204_AKB; 5; 23, en-USd2ureepe,Version: 2.11.8.12009-07-16T17:54:06+02:00 - Seite 160
Page 192 of 364
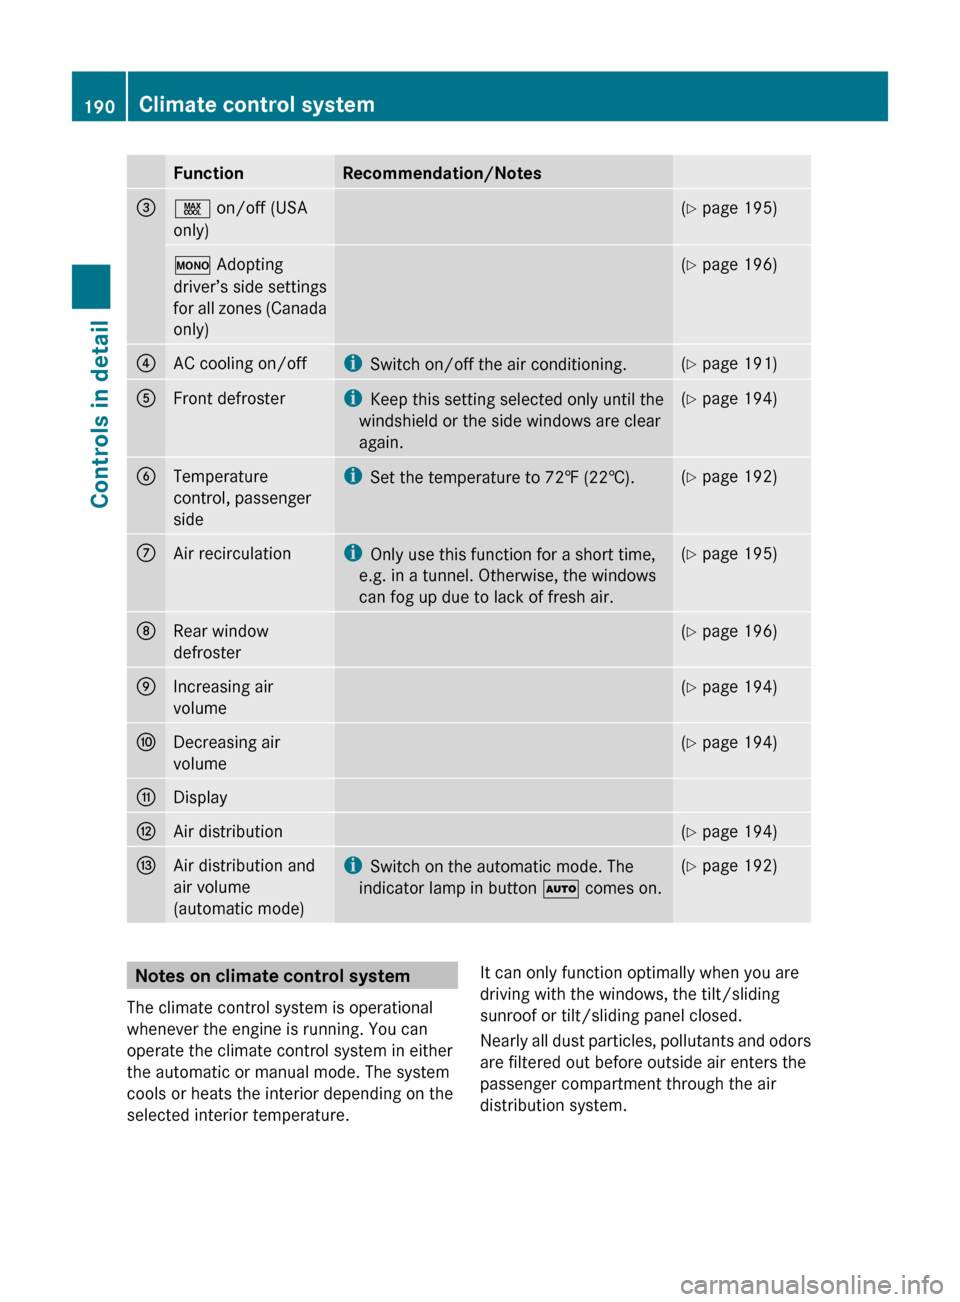
FunctionRecommendation/Notes=Ù on/off (USA
only)( Y page 195)º Adopting
driver’s side settings
for all zones (Canada
only)( Y page 196)?AC cooling on/offi
Switch on/off the air conditioning.(Y page 191)AFront defrosteri
Keep this setting selected only until the
windshield or the side windows are clear
again.( Y page 194)BTemperature
control, passenger
sidei Set the temperature to 72‡ (22†).(Y page 192)CAir recirculationi
Only use this function for a short time,
e.g. in a tunnel. Otherwise, the windows
can fog up due to lack of fresh air.( Y page 195)DRear window
defroster( Y page 196)EIncreasing air
volume( Y page 194)FDecreasing air
volume( Y page 194)GDisplayHAir distribution(Y page 194)IAir distribution and
air volume
(automatic mode)i Switch on the automatic mode. The
indicator lamp in button à comes on.(Y page 192)Notes on climate control system
The climate control system is operational
whenever the engine is running. You can
operate the climate control system in either
the automatic or manual mode. The system
cools or heats the interior depending on the
selected interior temperature.It can only function optimally when you are
driving with the windows, the tilt/sliding
sunroof or tilt/sliding panel closed.
Nearly all dust particles, pollutants and odors
are filtered out before outside air enters the
passenger compartment through the air
distribution system.190Climate control systemControls in detail
204_AKB; 5; 23, en-USd2ureepe,Version: 2.11.8.12009-07-16T17:54:06+02:00 - Seite 190