Gear MERCEDES-BENZ C320 2002 W203 Owner's Manual
[x] Cancel search | Manufacturer: MERCEDES-BENZ, Model Year: 2002, Model line: C320, Model: MERCEDES-BENZ C320 2002 W203Pages: 406
Page 9 of 406

6 Contents
Vehicle careCleaning and care
of the vehicle .............................366
Power washer ..............................367
Tar stains .....................................367
Paintwork, painted body
components .................................367
Engine cleaning ..........................368
Vehicle washing .........................368
Ornamental moldings ................369
Headlamps, taillamps,
turn signal lenses ......................369
Window cleaning ........................369
Wiper blade .................................369
Light alloy wheels ......................370
Instrument cluster .....................370
Steering wheel and
gear selector lever ......................370
Cup holder ...................................370
Seat belts ..................................... 371
Headliner and
shelf below rear window ........... 371
Leather upholstery ..................... 371Hard plastic trim items ..............371
Plastic and rubber parts ............371
Technical dataSpare parts service ........................374
Warranty coverage .........................374
Identification labels ...................... 375
Layout of poly-V-belt drive ............376
Technical data ................................ 377
Fuels, coolants, lubricants etc. -
capacities ................................... 381
Engine oils ...................................... 383
Engine oil additives ...................... 383
Air conditioner refrigerant .......... 383
Brake fluid ...................................... 383
Premium unleaded gasoline ........ 384
Fuel requirements ........................ 384
Gasoline additives ......................... 385
Coolants .......................................... 385
Consumer information ................. 387
Uniform tire quality grading ....... 387
IndexIndex ................................................389
OM_203.book Seite 6 Donnerstag, 31. Mai 2001 11:57 11
Page 93 of 406
90 Rear view mirrors
Te ch n i c a l
data Instruments
and controlsOperationDrivingInstrument
cluster displayPractical hints Car care Index
Rear view mirrors
Inside rear view mirror
Manually adjust the inside rear view mirror.
Inside rear view mirror, automatic antiglare
With the electronic key in starter switch position 2, the
mirror reflection brightness responds to changes in
light sensitivity.
With the gear selector lever in position “R”, or with the
interior light switched on, the mirror brightness does
not respond to changes in light sensitivity.Note:
The automatic antiglare function does not react, if
incoming light is not aimed directly at sensors in the
mirror.
The automatic antiglare function will not react for
example, if the rear window sun shade is in the raised
position.
Wa r n i n g !
In the case of an accident liquid electrolyte may
escape the mirror housing when the mirror glass
breaks.Electrolyte has an irritating effect. Do not allow the
liquid to come into contact with eyes, skin,
clothing, or respiratory system. In cases it does,
immediately flush affected area with water, and
seek medical help if necessary.
OM_203.book Seite 90 Donnerstag, 31. Mai 2001 11:57 11
Page 95 of 406
92 Rear view mirrors
Te ch n i c a l
data Instruments
and controlsOperationDrivingInstrument
cluster displayPractical hints Car care Index
Parking position exterior rear view mirror
(only vehicles with memory function)
The passenger side exterior mirror can be adjusted and
programmed to assist the driver during parking
maneuvers (e.g. to observe the curb or other objects
close to the vehicle).
With the electronic key in starter switch position 2, and
the exterior rear view mirror switch in the passenger
side position, the passenger side mirror will be turned
downward when placing the gear selector lever in “R”
reverse.Note:
For activating the mirror adjustment, see under
individual setting menu “CONVENIENCE” – “MIRROR
SETTING WHEN PARKING”, on page 134.
The mirror position can now be adjusted as desired.
The passenger side mirror will return to its previous
position:
•immediately at speeds above approx. 6 mph
(10km/h)–independent of the engaged gear,
•after 10 seconds when shifting gear selector lever
from “R” Reverse,
•by pressing the driver’s side mirror button%.
OM_203.book Seite 92 Donnerstag, 31. Mai 2001 11:57 11
Page 97 of 406
94 Rear view mirrors
Te ch n i c a l
data Instruments
and controlsOperationDrivingInstrument
cluster displayPractical hints Car care Index
Driver’s side exterior rear view mirror,
antiglare mode
With the electronic key in starter switch position 2, the
mirror reflection brightness responds to changes in
light sensitivity.
With the gear selector lever in position “R”, or with the
interior light switched on, the mirror brightness does
not respond to changes in light sensitivity.
Note:
The automatic antiglare function does not react, if
incoming light is not aimed directly at sensors in the
inside rear view mirror.
The automatic antiglare function will not react for
example, if the rear window sun shade is in the raised
position.Important!
Electrolyte drops coming into contact with the vehicle
paint finish can only be completely removed while in
their liquid state, by applying plenty of water.
Wa r n i n g !
In the case of an accident liquid electrolyte may
escape the mirror housing when the mirror glass
breaks.Electrolyte has an irritating effect. Do not allow the
liquid to come into contact with eyes, skin,
clothing, or respiratory system. In cases it does,
immediately flush affected area with water, and
seek medical help if necessary.
OM_203.book Seite 94 Donnerstag, 31. Mai 2001 11:57 11
Page 102 of 406
99 Instrument cluster
Te ch n i c a l
data Instruments
and controlsOperationDrivingInstrument
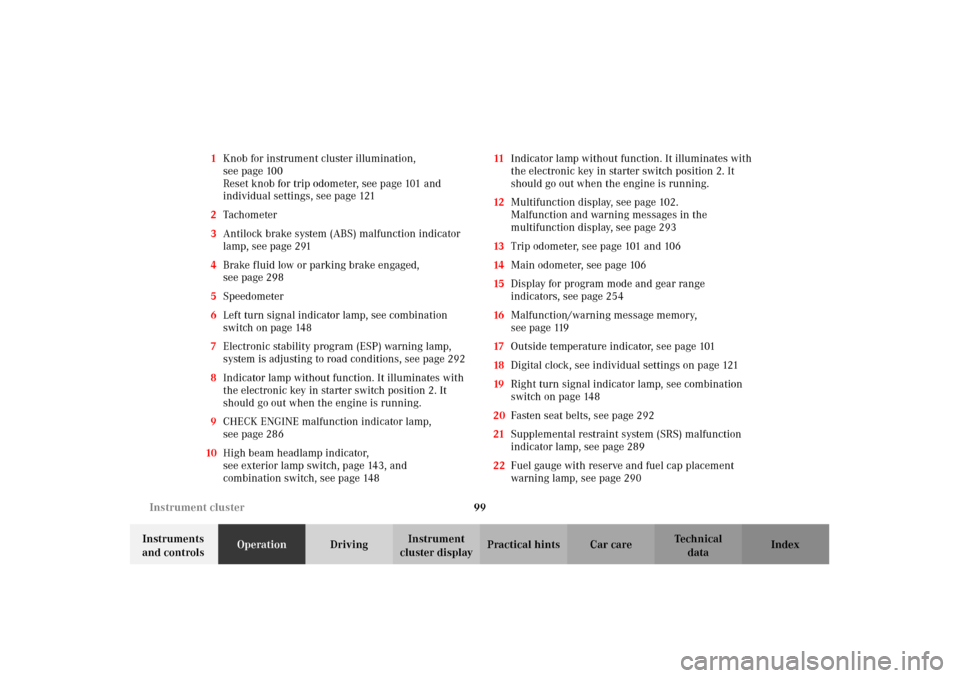
cluster displayPractical hints Car care Index 1Knob for instrument cluster illumination,
seepage100
Reset knob for trip odometer, see page 101 and
individual settings, see page 121
2Tachometer
3Antilock brake system (ABS) malfunction indicator
lamp, see page 291
4Brake fluid low or parking brake engaged,
seepage298
5Speedometer
6Left turn signal indicator lamp, see combination
switch on page 148
7Electronic stability program (ESP) warning lamp,
system is adjusting to road conditions, see page 292
8Indicator lamp without function. It illuminates with
the electronic key in starter switch position 2. It
should go out when the engine is running.
9CHECK ENGINE malfunction indicator lamp,
seepage286
10High beam headlamp indicator,
seeexterior lamp switch, page143, and
combination switch, see page 14811Indicator lamp without function. It illuminates with
the electronic key in starter switch position 2. It
should go out when the engine is running.
12Multifunction display, see page 102.
Malfunction and warning messages in the
multifunction display, see page 293
13Trip odometer, see page 101 and 106
14Main odometer, see page 106
15Display for program mode and gear range
indicators, see page 254
16Malfunction/warning message memory,
seepage119
17Outside temperature indicator, see page 101
18Digital clock, see individual settings on page 121
19Right turn signal indicator lamp, see combination
switch on page 148
20Fasten seat belts, see page 292
21Supplemental restraint system (SRS) malfunction
indicator lamp, see page 289
22Fuel gauge with reserve and fuel cap placement
warning lamp, see page 290
OM_203.book Seite 99 Donnerstag, 31. Mai 2001 11:57 11
Page 216 of 406
213 Interior equipment
Te ch n i c a l
data Instruments
and controlsOperationDrivingInstrument
cluster displayPractical hints Car care Index Ashtrays
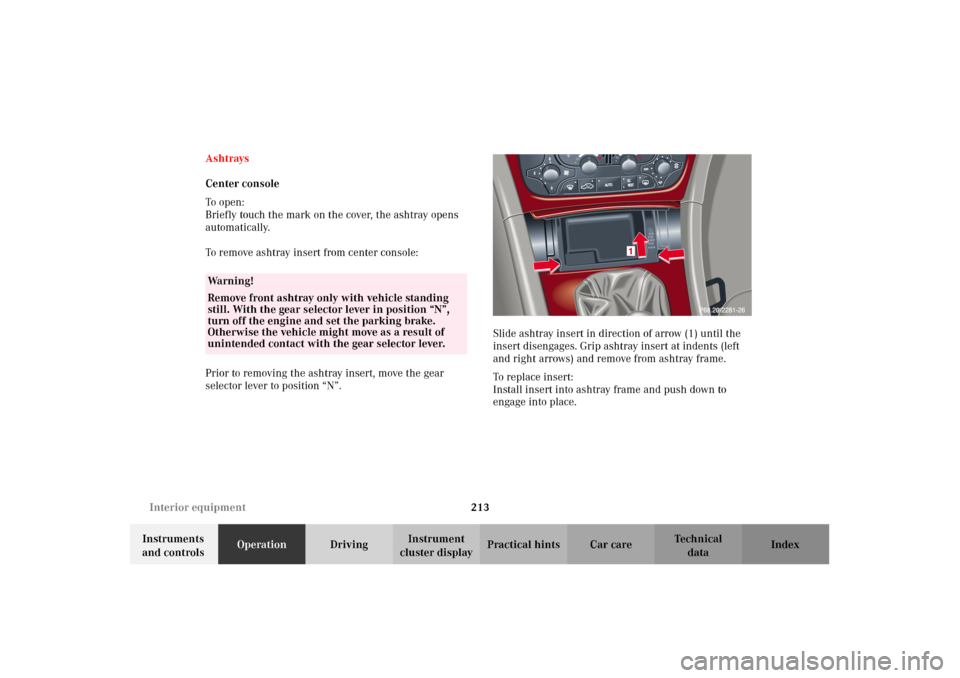
Center console
To o pen :
Briefly touch the mark on the cover, the ashtray opens
automatically.
To remove ashtray insert from center console:
Prior to removing the ashtray insert, move the gear
selector lever to position “N”.Slide ashtray insert in direction of arrow (1) until the
insert disengages. Grip ashtray insert at indents (left
and right arrows) and remove from ashtray frame.
To replace insert:
Install insert into ashtray frame and push down to
engage into place.
Wa r n i n g !
Remove front ashtray only with vehicle standing
still. With the gear selector lever in position “N”,
turn off the engine and set the parking brake.
Otherwise the vehicle might move as a result of
unintended contact with the gear selector lever.
OM_203.book Seite 213 Donnerstag, 31. Mai 2001 11:57 11
Page 236 of 406
233 The first 1 000 miles
Te ch n i c a l
data Instruments
and controlsOperationDrivingInstrument
cluster displayPractical hints Car care Index The first 1 000 miles (1 500 km)
The more cautiously you treat your vehicle during the
break-in period, the more satisfied you will be with its
performance later on. Therefore, drive your vehicle
during the first 1 000 miles (1 500 km) at moderate
vehicle and engine speeds.
During this period, avoid heavy loads (full throttle
driving) and excessive engine speeds.
Avoid accelerating by kickdown. It is not recommended
to brake t he vehicle by man ually shif tin g to a lower gear.
We recommend that you select positions “3”, “2” or “1”
only at moderate speeds (for hill driving).
After 1 000 miles (1 500 km) speeds may be gradually
increased to the permissible maximum.Maintenance
We strongly recommend that you have your vehicle
serviced by your authorized Mercedes-Benz Center, in
accordance with the Service Booklet at the times called
for by the FSS.
Failure to have the vehicle maintained in accordance
with the Service Booklet at the designated times /
mileage may result in vehicle damage not covered by
the Mercedes-Benz Limited Warranty.
For information on the Flexible service system (FSS),
see page 138.
OM_203.book Seite 233 Donnerstag, 31. Mai 2001 11:57 11
Page 249 of 406
246 Starter switch
Te ch n i c a l
data Instruments
and controlsOperationDrivingInstrument
cluster displayPractical hints Car care Index
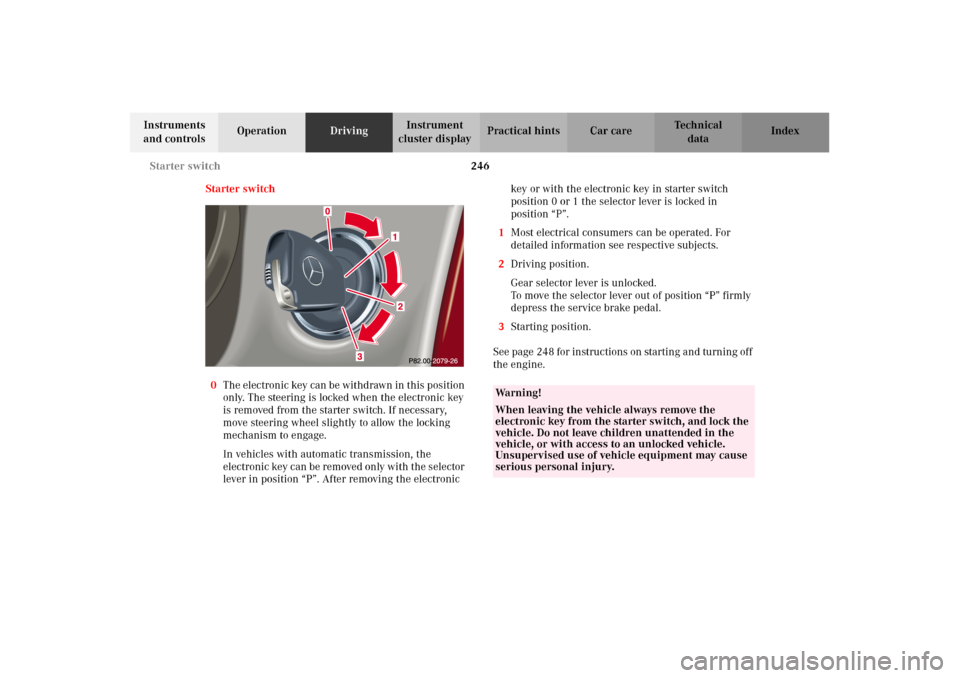
Starter switch
0The electronic key can be withdrawn in this position
only. The steering is locked when the electronic key
is removed from the starter switch. If necessary,
move steering wheel slightly to allow the locking
mechanism to engage.
In vehicles with automatic transmission, the
electronic key can be removed only with the selector
lever in position “P”. After removing the electronic key or with the electronic key in starter switch
position 0 or 1 the selector lever is locked in
position “P”.
1Most electrical consumers can be operated. For
detailed information see respective subjects.
2Driving position.
Gear selector lever is unlocked.
To move the selector lever out of position “P” firmly
depress the service brake pedal.
3Starting position.
See page 248 for instructions on starting and turning off
the engine.
Wa r n i n g !
When leaving the vehicle always remove the
electronic key from the starter switch, and lock the
vehicle. Do not leave children unattended in the
vehicle, or with access to an unlocked vehicle.
Unsupervised use of vehicle equipment may cause
serious personal injury.
OM_203.book Seite 246 Donnerstag, 31. Mai 2001 11:57 11
Page 251 of 406
248 Starting and turning off the enginge
Te ch n i c a l
data Instruments
and controlsOperationDrivingInstrument
cluster displayPractical hints Car care Index
Starting and turning off the engine
Before starting
Ensure that parking brake is engaged and that selector
lever is in position “P” or “N” (gearshift lever in
neutral). Turn electronic key in starter switch to
position 2.
Starting
Vehicles with automatic transmission:
Do n ot de pr ess accelerato r. B rie f ly turn electron ic key i n
starter switch clockwise to the stop and release. The
starter will engage until the engine is running.
If engine will not run, and the starting procedure stops,
turn electronic key completely to the left and repeat
starting the engine.
After several unsuccessful attempts, have the system
checked at the nearest authorized Mercedes-Benz
Center.Vehicles with manual transmission:
Do not depress accelerator. Fully depress clutch pedal,
otherwise the engine cannot be started due to the
integrated safety interlock.
Turn electronic key in starter switch clockwise to the
stop. Release only when the engine is firing regularly.
Important!
Due to the installed starter non-repeat feature, the
electronic key must be turned completely to the left
before attempting to start the engine again.
In areas where temperatures frequently drop below -4
°F
(-20
°C) we recommend that an engine block heater be
installed. Your authorized Mercedes-Benz Center will
advise you on this subject, see page 269.
Turning off
Turn the electronic key in the starter switch to
position 0 to turn off the engine.
Vehicles with automatic transmission:
The electronic key can only be removed with the
selector lever in position “P”.
OM_203.book Seite 248 Donnerstag, 31. Mai 2001 11:57 11
Page 252 of 406
249 Manual transmission
Te ch n i c a l
data Instruments
and controlsOperationDrivingInstrument
cluster displayPractical hints Car care Index Manual transmission
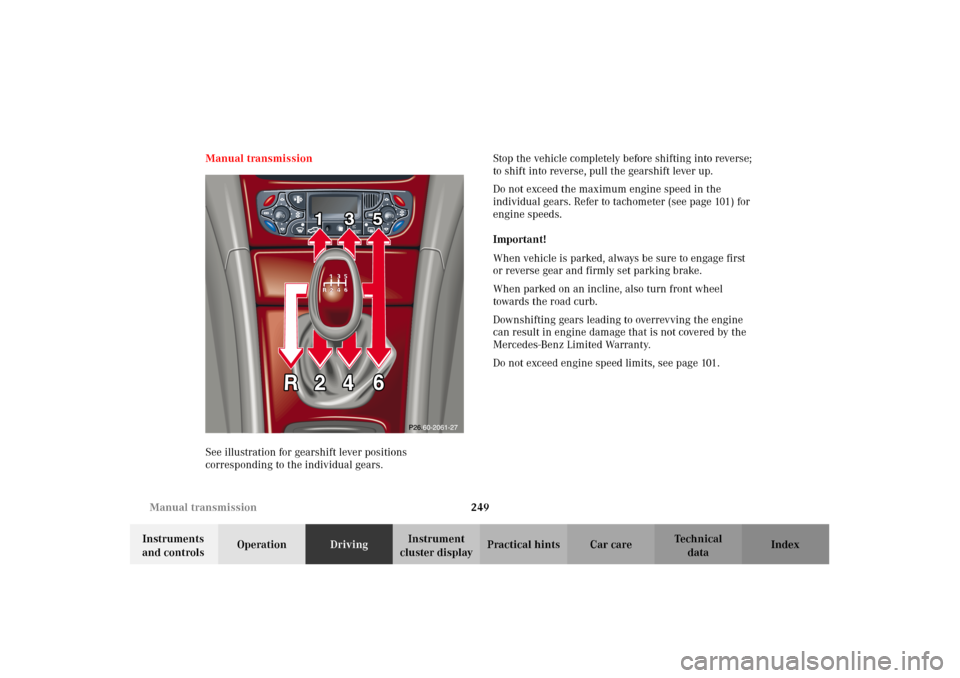
See illustration for gearshift lever positions
corresponding to the individual gears.Stop the vehicle completely before shifting into reverse;
to shift into reverse, pull the gearshift lever up.
Do not exceed the maximum engine speed in the
individual gears. Refer to tachometer (see page 101) for
engine speeds.
Important!
When vehicle is parked, always be sure to engage first
or reverse gear and firmly set parking brake.
When parked on an incline, also turn front wheel
towards the road curb.
Downshifting gears leading to overrevving the engine
can result in engine damage that is not covered by the
Mercedes-Benz Limited Warranty.
Do not exceed engine speed limits, see page 101.
OM_203.book Seite 249 Donnerstag, 31. Mai 2001 11:57 11