engine MERCEDES-BENZ CL CLASS 2010 Owner's Manual
[x] Cancel search | Manufacturer: MERCEDES-BENZ, Model Year: 2010, Model line: CL CLASS, Model: MERCEDES-BENZ CL CLASS 2010Pages: 500, PDF Size: 9.32 MB
Page 64 of 500
R
the cruise control or the DISTRONIC PLUS
cannot be activated
R the cruise control or the DISTRONIC PLUS
switch off if activated
i When the ESC is switched off and one or
more drive wheels are spinning, the ESC
warning lamp ÷ in the instrument
cluster flashes.
However, the ESC will then
not stabilize the vehicle.
X With the engine running, switch off the ESC
via the control system (Y page 212). G
Warning!
When the ESC OFF warning lamp å is on,
the ESC is switched off.
When the ESC warning lamp ÷ and the
ESC OFF warning lamp å are on
continuously, the ESC is not operational due
to a malfunction.
When the ESC is switched off or not
operational, vehicle stability in standard
driving maneuvers is reduced.
Adapt your
speed and driving to the prevailing
road conditions and to the non-operating
status of the ESC.
! Avoid spinning of a drive wheel for an
extended period with the ESC switched off.
This may cause serious damage to the
drivetrain which is not covered by the
Mercedes-Benz Limited Warranty.
Switching on the ESC X
Switch on the ESC via the control system
(Y page 212). PRE-SAFE
®
Brake
The PRE-SAFE ®
Brake is available in vehicles
equipped with DISTRONIC PLUS. The PRE-
SAFE ®
Brake
can assist you in minimizing the
risk of a rear-end collision with a vehicle in
front of you. The PRE-SAFE ®
Brake may also
reduce the severity of an accident. At speeds above approximately 20 mph (30 km/h) it will
issue a warning when your vehicle is
approaching the preceding vehicle very
quickly. An intermittent acoustic warning
sounds and the distance warning lamp
·
in the instrument cluster comes on.
When the driver and front passenger have
fastened their seat belts, the PRE-SAFE ®
Brake can also
R brake the vehicle within a speed range of
up to 112 mph (180 km/h ) automatically
R activate preventative occupant safety
measures (PRE-SAFE ®
) ( Y
page 49) G
Warning!
An intermittent warning sounds and the
distance warning
lamp · in the instrument
cluster is illuminated if the PRE-SAFE ®
Brake
calculates that the distance to the vehicle
ahead and your vehicle’s current speed
indicate that the PRE-SAFE ®
Brake will not be
capable of slowing the vehicle sufficiently to
maintain the preset following distance, which
creates a danger of a collision.
Immediately brake your vehicle to increase
the distance between your vehicle and the
vehicle driving in front of you. The warning
sound is intended as a final caution that you
have not interceded with your own braking
inputs to avoid a potentially dangerous
situation. Do not wait for the operation of the
warning signal to intercede with your own
braking, as that will result in potentially
dangerous emergency braking which will not
always result in an impact being avoided.
Tailgating increases the risk of an accident. G
Warning!
The PRE-SAFE ®
Brake is a convenience
system designed to assist the driver during
vehicle operation. The responsibility for the
vehicle speed
and the distance to the vehicle
ahead, including most importantly brake
operation to assure safe stopping distance,
always remains with the driver. 62
Driving safety systems
Safety and security
216_AKB; 3; 90, en-US
d2ureepe,
Version: 2.11.8.1 2009-05-15T11:47:50+02:00 - Seite 62
Page 67 of 500
Anti-theft systems
Immobilizer
The immobilizer prevents unauthorized
persons from starting your vehicle.
When leaving the vehicle, always take the
SmartKey with you and lock the vehicle. The
engine can be started by anyone with a valid
SmartKey that is left inside the vehicle.
Activating X
With SmartKey: Remove the SmartKey
from the starter switch.
X With KEYLESS-GO: Turn off the engine and
open the driver’s door.
Deactivating X
Switch on the ignition.
i Starting the engine will also deactivate
the immobilizer.
In the event that the engine cannot be
started (yet the vehicle’s battery is
charged), the system is not operational.
Contact an authorized Mercedes-Benz
Center or call 1-800-FOR-MERCedes (in the
USA) or 1-800-387-0100 (in Canada). Anti-theft alarm system
Once the alarm system has been armed, a
visual and audible alarm is triggered when
someone opens
R a door
R the trunk
R the hood
The alarm will stay on even if the activating
element, a door, for example, is closed
immediately.
The alarm system will also be triggered when
R the vehicle is opened with the mechanical
key
R a door is opened from the inside To cancel the alarm after it has been
triggered, see “Canceling the alarm”
(Y page 66).
i
If the alarm stays on for more than
30 seconds, the Tele Aid system initiates a
call to the Customer Assistance Center
automatically. The Tele Aid system will
initiate the call provided that
R you have subscribed to the Tele Aid
service
R the Tele Aid service has been activated
properly
R the necessary mobile phone, power
supply and GPS coverage are available X
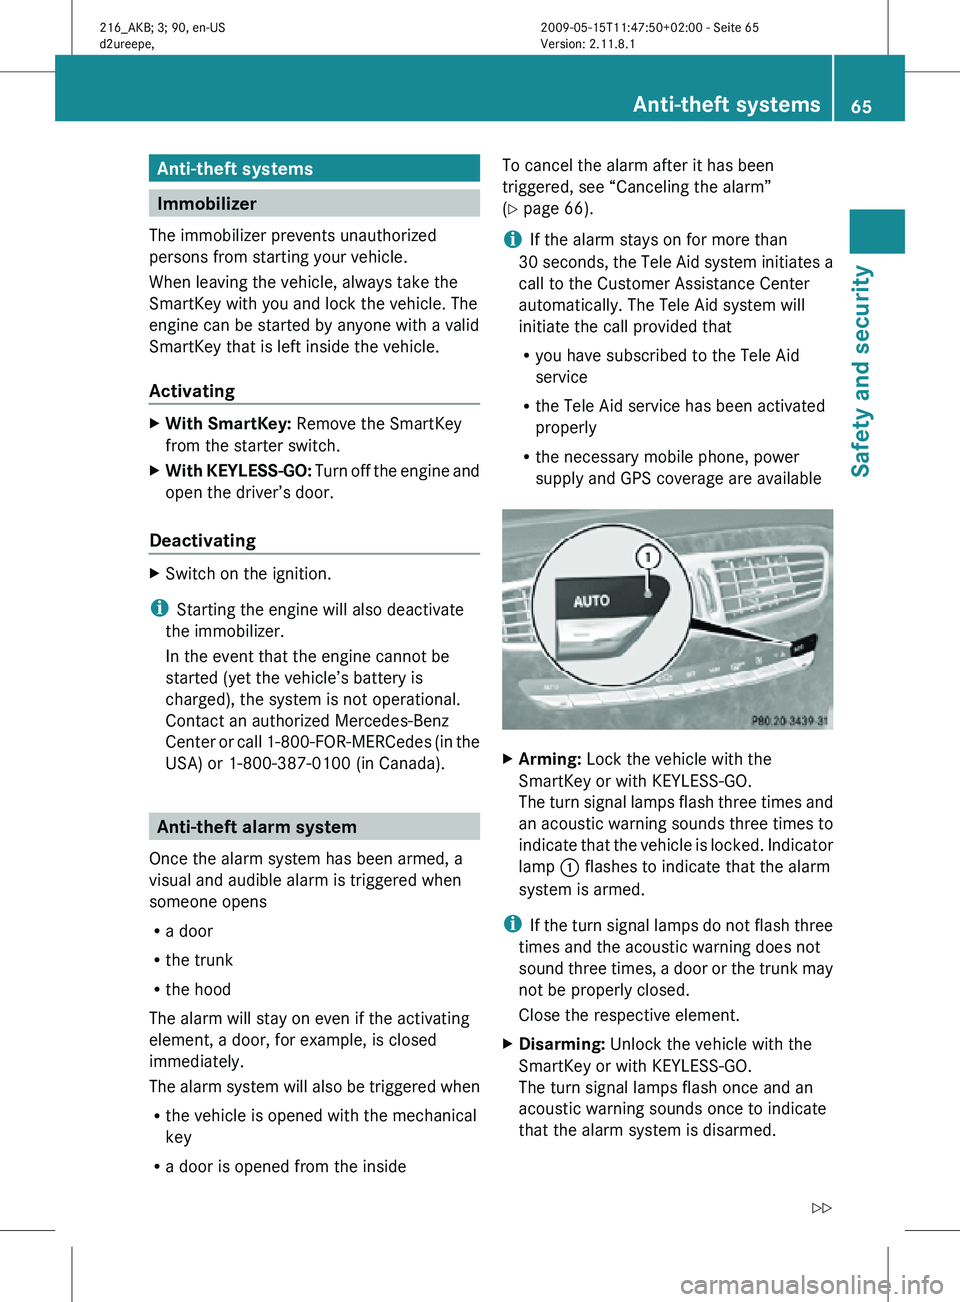
Arming: Lock the vehicle with the
SmartKey or with KEYLESS-GO.
The turn signal lamps flash three times and
an acoustic warning sounds three times to
indicate that the vehicle is locked. Indicator
lamp : flashes to indicate that the alarm
system is armed.
i If the turn signal lamps do not flash three
times and the acoustic warning does not
sound three times, a door or the trunk may
not be properly closed.
Close the respective element.
X Disarming: Unlock the vehicle with the
SmartKey or with KEYLESS-GO.
The turn signal lamps flash once and an
acoustic warning sounds once to indicate
that the alarm system is disarmed. Anti-theft systems
65Safety and security
216_AKB; 3; 90, en-US
d2ureepe, Version: 2.11.8.1 2009-05-15T11:47:50+02:00 - Seite 65 Z
Page 86 of 500
When reinstalling a map software that has
been installed in that vehicle already, an
activation code is not required.
Installation process
i
The installation process can take
between 10 and 120 minutes, depending
on the
size of the map software. If the radio
is switched on when you start the
installation process, you can still adjust the
volume. During the installation process,
some COMAND functions are suspended.
Still available are the COMAND functions
for automatic air conditioning operation
and canceling the installation process.
If possible, carry out the installation when
the vehicle is stationary. When the vehicle
is stationary, the reading rate of the DVD
drive is higher than in a moving vehicle and
the installation process requires less time. G
Observe Safety notes, see page 68.
i COMAND may switch off during the
installation process automatically in order
to protect the battery. This may happen
when the engine is switched off and the
vehicle battery has insufficient power. If
this occurs,
restart the installation with the
engine running. Similarly, if the SmartKey
position is unintentionally switched to 0,
restart the installation. G
Warning!
Inhalation of exhaust gas is hazardous to your
health. All exhaust gas contains carbon
monoxide (CO), and inhaling it can cause
unconsciousness and lead to death. Do not
run the engine in confined areas (such as a
garage) which are not properly ventilated. Installing
Notes about handling DVDs (Y page 165). X
Load the map software DVD into the DVD
changer (Y page 165).
The COMAND
system verifies the DVD and
a respective message appears in the
COMAND display.
Map software incompatible with
navigation system A message indicates that installation of the
map software is not possible.
X
Confirming message: Press W.
The DVD is ejected.
X Remove the DVD from the slot.
X Insert a DVD that is compatible with the
navigation system of the vehicle.
Map software incompatible with the
current system software A message indicates that the system
software and the map software are
incompatible.
X
Confirming message: Press W.
The DVD is ejected.
X Remove the DVD from the slot.
X Have the system software updated at an
authorized Mercedes-Benz Center.
The system software must be updated before
you can install the map software.
Map software compatible with
navigation software and current
system software The COMAND system verifies whether the
map data on the DVD have been installed
already.
Map data installed already
A message that indicates that the map data
have been installed already appears. Also,
you
are
being asked if you would like to install
the map software anyhow. 84
COMAND navigation (introduction)
Control systems
216_AKB; 3; 90, en-US
d2ureepe,
Version: 2.11.8.1 2009-05-15T11:47:50+02:00 - Seite 84
Page 194 of 500
Delayed Shut-off: Slide XVY or rotate
cVd and press W.
A menu appears.
The dot
# indicates the currently selected
setting.
X Selecting setting: Slide ZVÆ or rotate
cVd and press W.
The dot # indicates the currently selected
setting.
i The exterior lamp switch must be in
position c (Y page 275) before turning
off the engine. Otherwise the exterior
lighting will not come on when leaving the
vehicle. Setting interior ambient lighting
i The components and operating principles
of COMAND can be found on ( Y page 68).
You can select the following settings:
R SOLAR (amber interior lighting)
R NEUTRAL (white interior lighting)
R POLAR (blue interior lighting)
R Brightness of the interior lighting ranging
from 0 (off) to 5 (bright) X
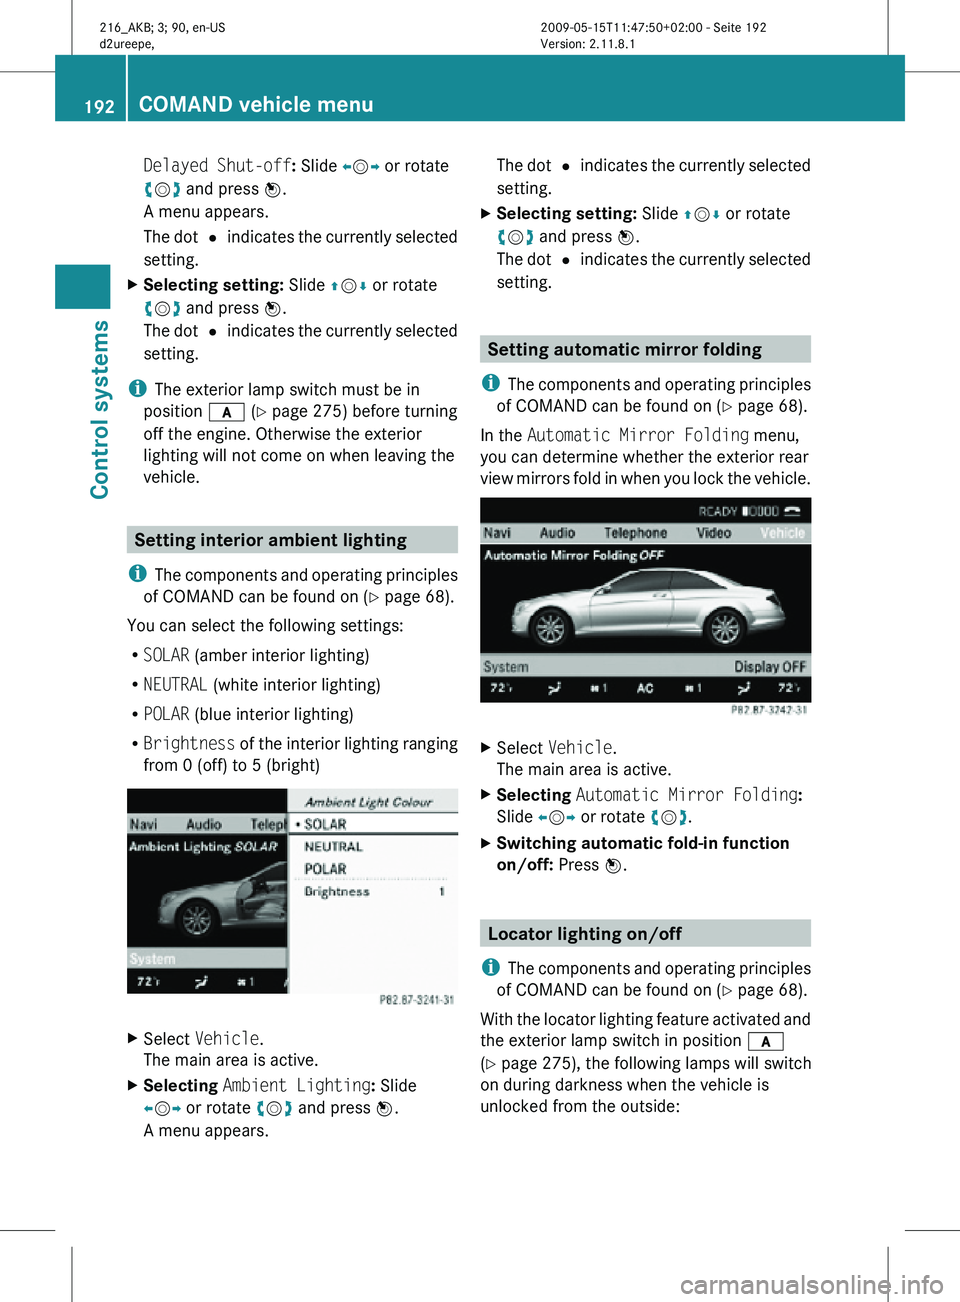
Select Vehicle.
The main area is active.
X Selecting Ambient Lighting: Slide
XVY or rotate cVd and press W.
A menu appears. The dot
# indicates the currently selected
setting.
X Selecting setting: Slide ZVÆ or rotate
cVd and press W.
The dot # indicates the currently selected
setting. Setting automatic mirror folding
i The components and operating principles
of COMAND can be found on ( Y page 68).
In the Automatic Mirror Folding menu,
you can determine whether the exterior rear
view mirrors fold in when you lock the vehicle. X
Select Vehicle.
The main area is active.
X Selecting Automatic Mirror Folding:
Slide XVY or rotate cVd.
X Switching automatic fold-in function
on/off: Press W. Locator lighting on/off
i The components and operating principles
of COMAND can be found on ( Y page 68).
With the locator lighting feature activated and
the exterior lamp switch in position c
(Y page 275), the following lamps will switch
on during darkness when the vehicle is
unlocked from the outside: 192
COMAND vehicle menuControl systems
216_AKB; 3; 90, en-US
d2ureepe,
Version: 2.11.8.1 2009-05-15T11:47:50+02:00 - Seite 192
Page 198 of 500

X
Changing air volume: Slide ZVÆ or rotate
cVd.
or
X Switching back to automatic mode:
Rotate cVd and select AUTO.
X Exiting menu: Press W, back button
% in the center console (Y page 69) or
slide XVY.
The setting is saved. Central climate control menu via
COMAND
The central climate control menu is in the
center of the climate control settings. When
the climate control is activated, you will see
AC in the central menu. The following
functions can only be operated in the central
climate control menu via COMAND:
R Deactivating cooling (Æ) (Y page 196)
R Central climate control (Mono)
(Y page 196)
R Footwell temperature ( Y page 197)
R Air flow from air vents (Y page 197)
X Select climate control settings Q Central
menu. Activating/deactivating air
conditioning
The air conditioning is operational while the
engine is running and cools the interior air to
the temperature set by the operator. In addition, the air conditioning dehumidifies
the interior air and helps prevent window
fogging.
i
Condensation may drip out from
underneath the vehicle. This is normal and
not an indication of a malfunction. G
Warning!
If you deactivate the air conditioning, the
vehicle will not be cooled when weather
conditions are warm. The windows can fog up
more quickly. Window fogging may impair
visibility and endanger you and others.
X Select climate control settings Q Central
climate control menu.
X Selecting Æ: Slide ZVÆ or rotate
cVd.
X Confirming selection: Press W.
A checkmark appears when the cooling is
deactivated.
Æ appears in the central menu of the
climate control settings. !
If the air conditioning cannot be activated
again, this indicates that the air
conditioning is losing refrigerant. The
compressor has turned off.
Have the air conditioning checked at the
nearest authorized Mercedes-Benz Center.
Selecting Mono mode Mono is used to adjust the climate zones for
the entire vehicle at the same time. When the
Mono function is switched on and you change
the climate on the driver’s side, these
changes will be carried out in the same
manner for all climate zones.196
COMAND automatic climate controlControl systems
216_AKB; 3; 90, en-US
d2ureepe,
Version: 2.11.8.1 2009-05-15T11:47:50+02:00 - Seite 196
Page 206 of 500
Function
:
Trip
menu (Y page 204) ;
Navi menu (Y page 206)
=
Audio
menu (Y page 207) ?
AMG
28
menu (Y page 208) A
Telephone
menu (Y page 211) B
Assistance
menu (Y page 212) C
Service
menu (Y page 214) D
Settings menu (Y page 214)
Trip menu
In the Trip menu, you can show an additional
display for the speedometer and call up or
reset your vehicle’s statistical data.
The following information is available:
R Standard display ( Y page 204)
R Fuel consumption statistics since start
(Y page 204)
R Fuel consumption statistics since last reset
(Y page 205)
R Resetting values ( Y page 205)
R Remaining driving range and current fuel
consumption (Y page 205)
R Digital Speedometer ( Y page 205)
Standard display X
Press button = or ; to select the
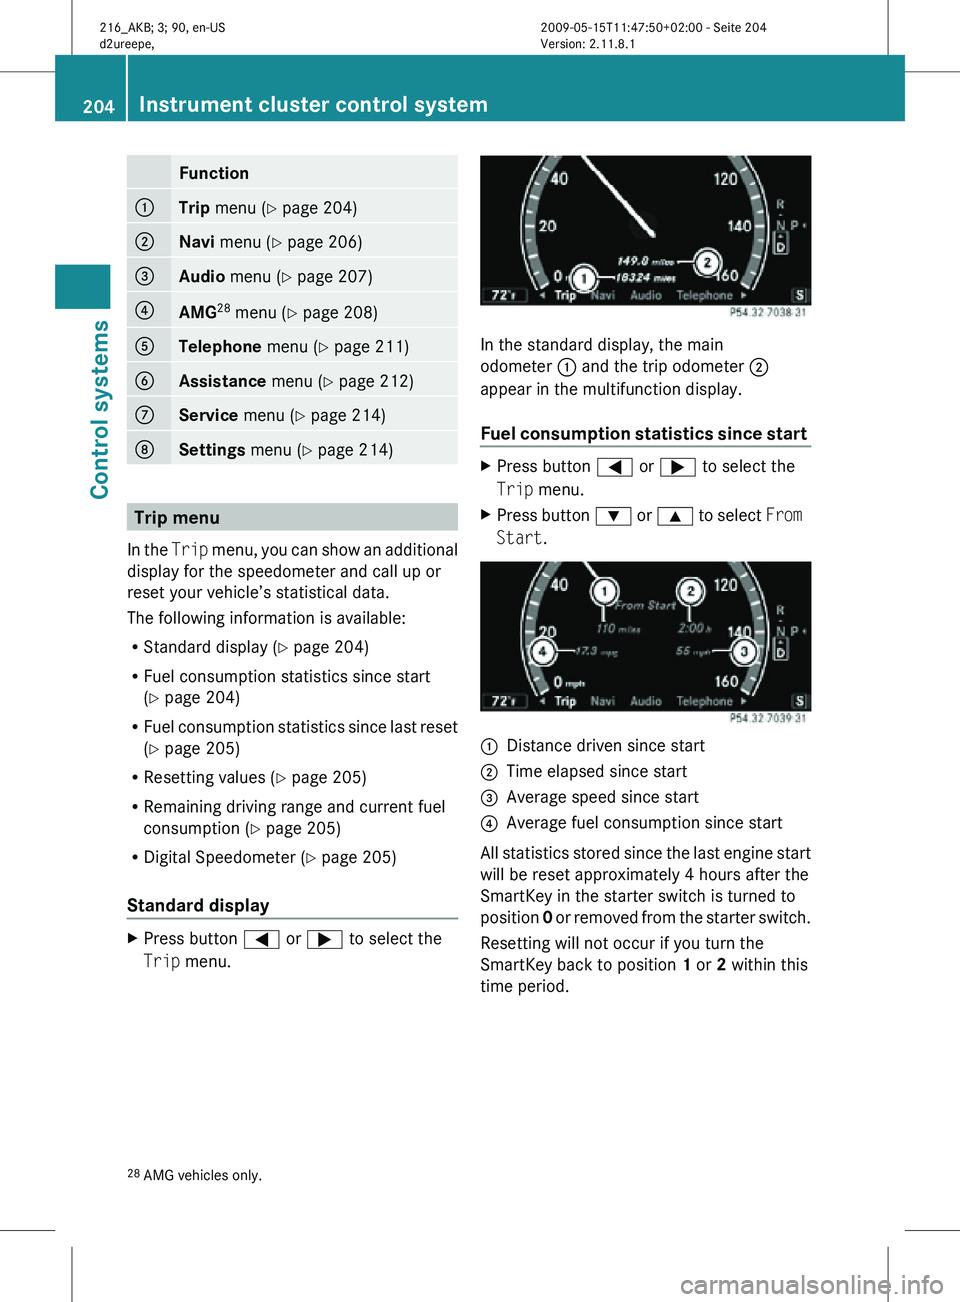
Trip menu. In the standard display, the main
odometer : and the trip odometer ;
appear in the multifunction display.
Fuel consumption statistics since start
X
Press button = or ; to select the
Trip menu.
X Press button : or 9 to select From
Start. :
Distance driven since start
; Time elapsed since start
= Average speed since start
? Average fuel consumption since start
All statistics stored since the last engine start
will be reset approximately 4 hours after the
SmartKey in the starter switch is turned to
position 0 or removed from the starter switch.
Resetting will not occur if you turn the
SmartKey back to position 1 or 2 within this
time period.
28 AMG vehicles only. 204
Instrument cluster control systemControl systems
216_AKB; 3; 90, en-US
d2ureepe,
Version: 2.11.8.1 2009-05-15T11:47:50+02:00 - Seite 204
Page 210 of 500
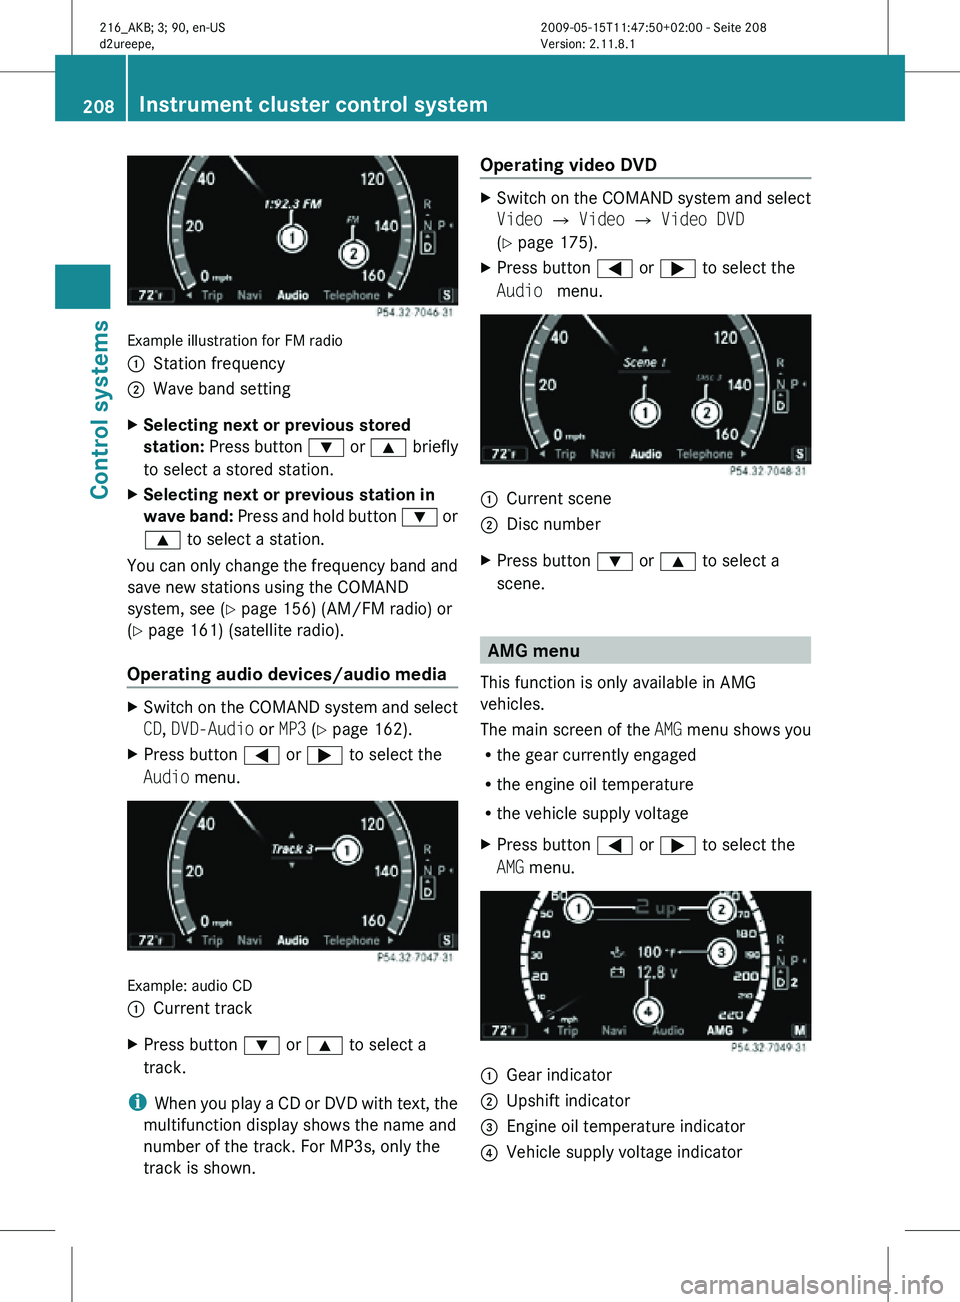
Example illustration for FM radio
:
Station frequency
; Wave band setting
X Selecting next or previous stored
station: Press button : or 9 briefly
to select a stored station.
X Selecting next or previous station in
wave band: Press and hold button : or
9 to select a station.
You can only change the frequency band and
save new stations using the COMAND
system, see ( Y page 156) (AM/FM radio) or
(Y page 161) (satellite radio).
Operating audio devices/audio media X
Switch on the COMAND system and select
CD, DVD-Audio or MP3 (Y page 162).
X Press button = or ; to select the
Audio menu. Example: audio CD
:
Current track
X Press button : or 9 to select a
track.
i When you play a CD or DVD with text, the
multifunction display shows the name and
number of the track. For MP3s, only the
track is shown. Operating video DVD X
Switch on the COMAND system and select
Video Q Video Q Video DVD
(Y page 175).
X Press button = or ; to select the
Audio menu. :
Current scene
; Disc number
X Press button : or 9 to select a
scene. AMG menu
This function is only available in AMG
vehicles.
The main screen of the AMG menu shows you
R the gear currently engaged
R the engine oil temperature
R the vehicle supply voltage
X Press button = or ; to select the
AMG menu. :
Gear indicator
; Upshift indicator
= Engine oil temperature indicator
? Vehicle supply voltage indicator 208
Instrument cluster control systemControl systems
216_AKB; 3; 90, en-US
d2ureepe,
Version: 2.11.8.1 2009-05-15T11:47:50+02:00 - Seite 208
Page 211 of 500
The engine oil temperature will be shown in
blue if the engine oil temperature has not yet
reached 176‡ (80†). During this time, avoid
driving at full engine speed.
If the engine reaches the overspeed range in
the manual shift program, you will see
up next
to gear indicator : as a reminder to upshift.
Use buttons : or 9 to select the
following functions in the AMG menu:
R RACETIMER (Y page 209)
R Overall analysis ( Y page 210)
R Lap analysis (Y page 210)
RACETIMER G
Warning!
The RACETIMER feature is only for use on
roads and in conditions where high speed
driving is permitted. Racing on public roads is
prohibited under all circumstances. The driver
is and must always remain responsible for
following posted speed limits.
The RACETIMER allows you to time and save
driving stretches.
X Press button = or ; to select the
AMG menu.
X Press button 9 to select the
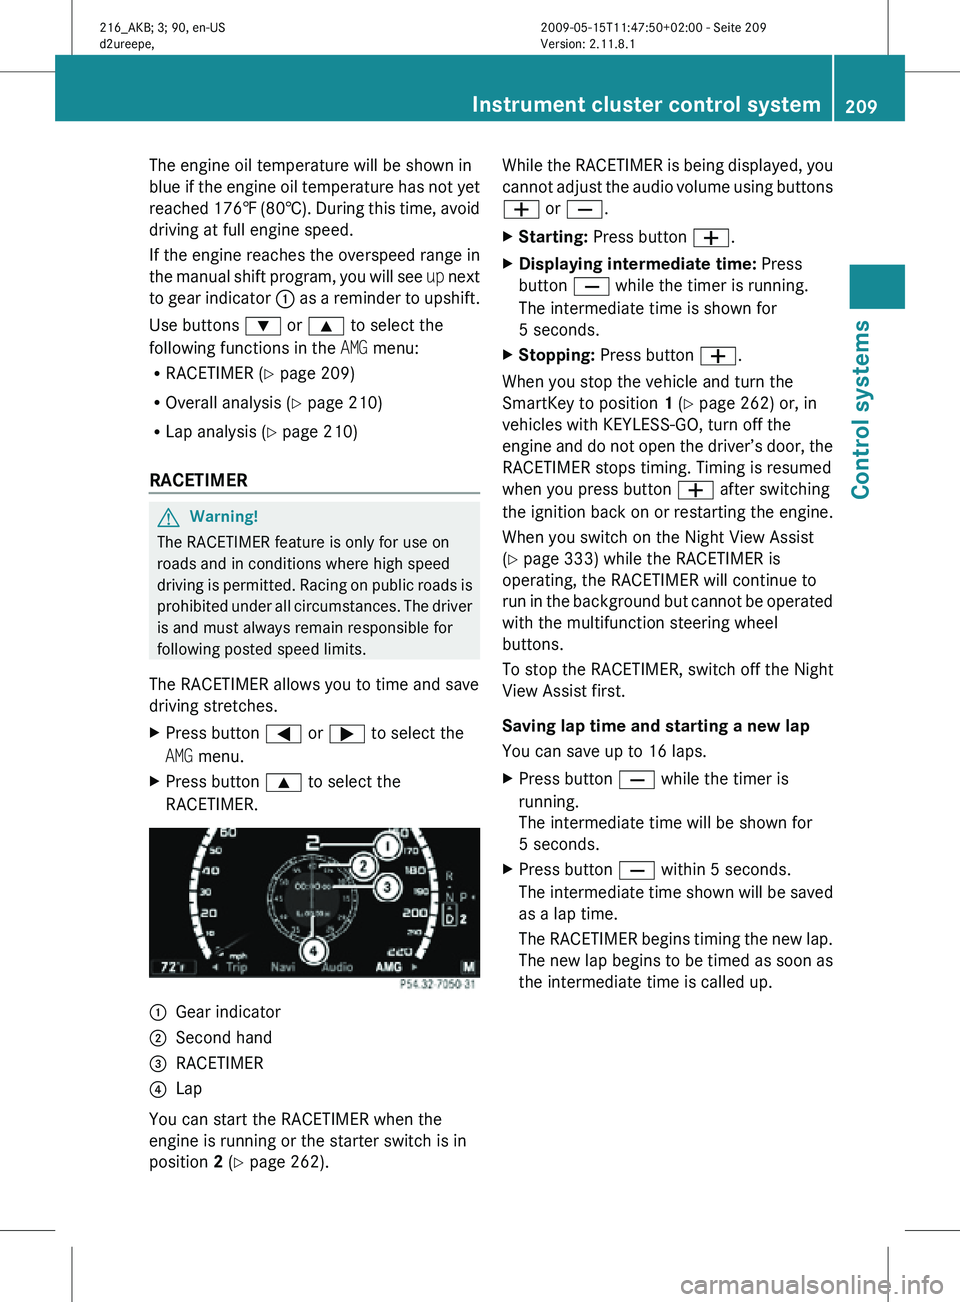
RACETIMER. :
Gear indicator
; Second hand
= RACETIMER
? Lap
You can start the RACETIMER when the
engine is running or the starter switch is in
position 2 (Y page 262). While the RACETIMER is being displayed, you
cannot adjust the audio volume using buttons
W or X.
X
Starting: Press button W.
X Displaying intermediate time: Press
button X while the timer is running.
The intermediate time is shown for
5 seconds.
X Stopping: Press button W.
When you stop the vehicle and turn the
SmartKey to position 1 (Y page 262) or, in
vehicles with KEYLESS-GO, turn off the
engine and do not open the driver’s door, the
RACETIMER stops timing. Timing is resumed
when you press button W after switching
the ignition back on or restarting the engine.
When you switch on the Night View Assist
(Y page 333) while the RACETIMER is
operating, the RACETIMER will continue to
run in the background but cannot be operated
with the multifunction steering wheel
buttons.
To stop the RACETIMER, switch off the Night
View Assist first.
Saving lap time and starting a new lap
You can save up to 16 laps.
X Press button X while the timer is
running.
The intermediate time will be shown for
5 seconds.
X Press button X within 5 seconds.
The intermediate time shown will be saved
as a lap time.
The RACETIMER begins timing the new lap.
The new lap begins to be timed as soon as
the intermediate time is called up. Instrument cluster control system
209Control systems
216_AKB; 3; 90, en-US
d2ureepe, Version: 2.11.8.1 2009-05-15T11:47:50+02:00 - Seite 209 Z
Page 215 of 500
Failure to observe these guidelines could
cause the vehicle to skid. The ESC cannot
prevent accidents resulting from excessive
speed.
For more Information, see ( Y page 59)
X Start the engine.
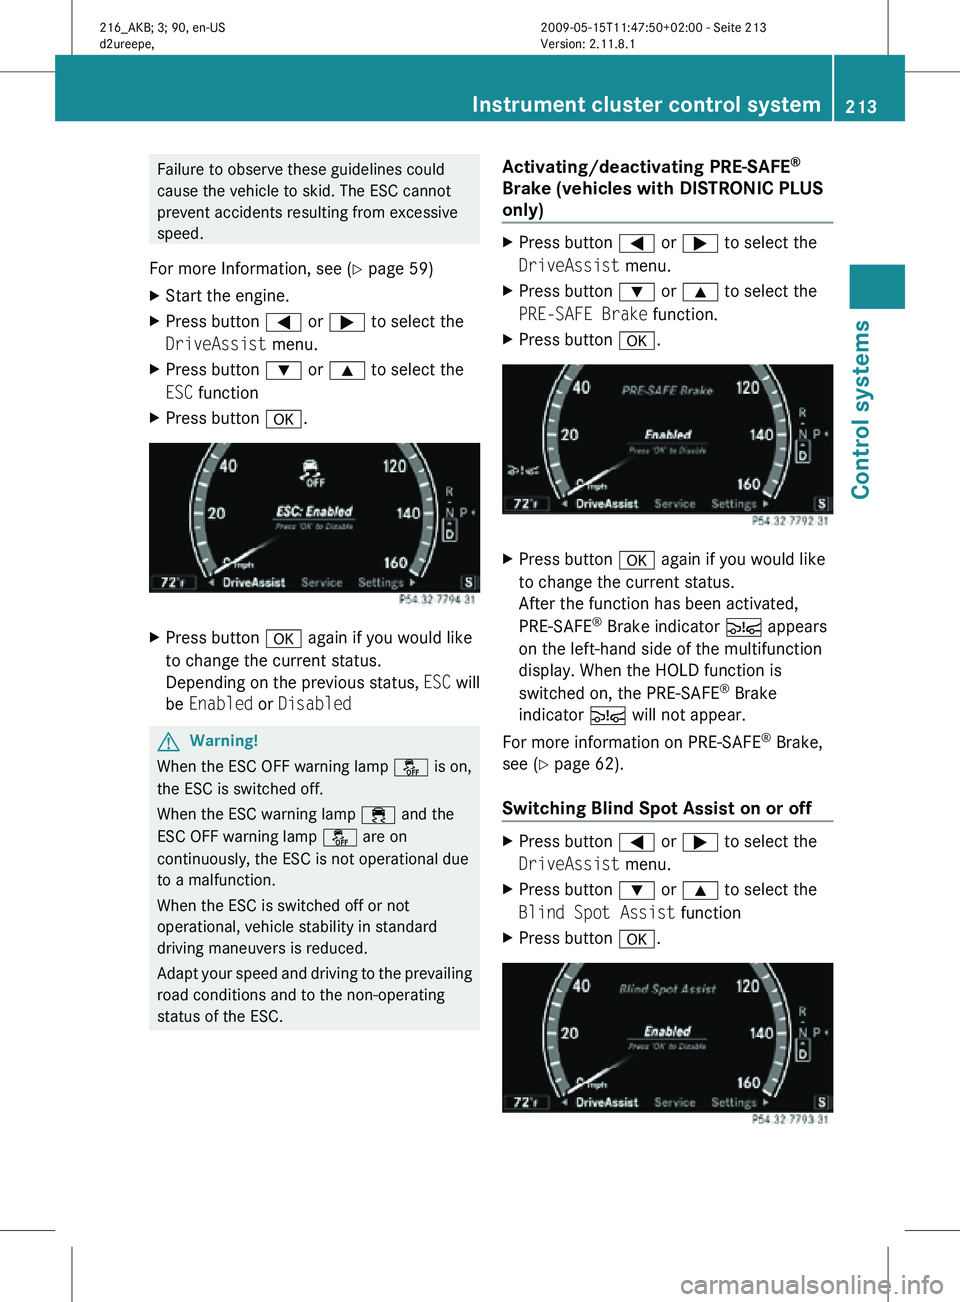
X Press button = or ; to select the
DriveAssist menu.
X Press button : or 9 to select the
ESC function
X Press button a. X
Press button a again if you would like
to change the current status.
Depending on the previous status, ESC will
be Enabled or Disabled G
Warning!
When the ESC OFF warning lamp å is on,
the ESC is switched off.
When the ESC warning lamp ÷ and the
ESC OFF warning lamp å are on
continuously, the ESC is not operational due
to a malfunction.
When the ESC is switched off or not
operational, vehicle stability in standard
driving maneuvers is reduced.
Adapt your speed and driving to the prevailing
road conditions and to the non-operating
status of the ESC. Activating/deactivating PRE-SAFE
®
Brake (vehicles with DISTRONIC PLUS
only) X
Press button = or ; to select the
DriveAssist menu.
X Press button : or 9 to select the
PRE-SAFE Brake function.
X Press button a. X
Press button a again if you would like
to change the current status.
After the function has been activated,
PRE-SAFE ®
Brake indicator Ä appears
on the left-hand side of the multifunction
display. When the HOLD function is
switched on, the PRE-SAFE ®
Brake
indicator Ä will not appear.
For more information on PRE-SAFE ®
Brake,
see ( Y page 62).
Switching Blind Spot Assist on or off X
Press button = or ; to select the
DriveAssist menu.
X Press button : or 9 to select the
Blind Spot Assist function
X Press button a. Instrument cluster control system
213Control systems
216_AKB; 3; 90, en-US
d2ureepe, Version: 2.11.8.1 2009-05-15T11:47:50+02:00 - Seite 213 Z
Page 216 of 500

X
Press button a again if you would like
to change the current status.
Depending on the previous status, Blind
Spot Assist will be Enabled or Disabled
For more information on Blind Spot Assist,
see ( Y page 335). Service menu
In the Service menu the following functions
are available:
R Vehicle status message memory
(Y page 214)
R Checking tire inflation pressure
electronically with the Advanced TPMS
(Y page 377)
R Calling up the maintenance service
indicator display ( Y page 402)
R Checking engine oil level (CL 600 and
CL 65 AMG) ( Y page 370)
Vehicle status message memory Use the vehicle status message memory
function to scan malfunction and warning
messages that may be stored in the system.
Such messages appear in the multifunction
display and are based on conditions or
system status the vehicle’s system has
recorded.
The vehicle status message memory function
only appears if there are any messages
stored.
G
Warning!
Malfunction and warning messages are only
indicated for certain systems and are
intentionally not very detailed. The
malfunction and warning messages are
simply a reminder with respect to the
operation of certain systems. They do not
replace the owner’s and/or driver’s
responsibility to maintain the vehicle’s
operating safety. Have all required
maintenance and safety checks performed on the vehicle. Bring the vehicle to an authorized
Mercedes-Benz Center to address the
malfunction and warning messages.
X Press button = or ; to select the
Service menu.
If conditions have occurred causing status
messages to be recorded, the number of
messages appears in the multifunction
display: 2 Messages.
X Press button : or 9 to select the
Messages function.
X Press button a to confirm.
For malfunction and warning messages,
see “Vehicle status messages in the
multifunction display” ( Y page 414).
X Use button : or 9 to scroll through
the messages.
If you turn the SmartKey in the starter switch
to position 0 and then back to position 2, all
messages will be deleted from the message
memory. Settings menu
In the
Settings menu the following functions
are available:
R Switching daytime running lamp mode on
or off (USA only) (Y page 215)
R Showing or hiding additional speedometer
(Y page 215)
R Selecting speedometer display mode
(Y page 215)
R Switching the radar sensors on or off
(Y page 216) 214
Instrument cluster control systemControl systems
216_AKB; 3; 90, en-US
d2ureepe,
Version: 2.11.8.1 2009-05-15T11:47:50+02:00 - Seite 214