suspension MERCEDES-BENZ CL CLASS 2010 Owners Manual
[x] Cancel search | Manufacturer: MERCEDES-BENZ, Model Year: 2010, Model line: CL CLASS, Model: MERCEDES-BENZ CL CLASS 2010Pages: 500, PDF Size: 9.32 MB
Page 18 of 500
Selective setting (KEYLESS-GO) ..... 255
Selective setting (SmartKey) ..........
253
Time
................................................. 79
Trunk opening-height restriction ....193
Voice Control System ...................... 80
Shelf below rear window, cleaning .. 409
Shortcut buttons ................................. 69
Side impact air bags ...........................40
Side marker lamps
Cleaning lenses ............................. 406
Messages in the multifunction
display ........................................... 446
Sidewall (tires) .................................. 395
Side windows see Power windows
SmartKey
see Key, SmartKey
SmartKey with KEYLESS-GO
see Key, SmartKey
Snow chains ...................................... 396
Snow tires see Winter tires
Spare wheel ....................................... 486
Mounting ....................................... 466
Storage location ............................ 413
Speedometer ....................................... 29
Speed settings Cruise control ................................ 303
DISTRONIC PLUS ........................... 311
Resume function ................... 304, 312
SRS
Indicator lamp .................................. 29
SRS (Supplemental Restraint System)
Indicator lamp ......................... 36, 455
Messages in the multifunction
display ........................................... 436
Standing water, driving through ......400
Starter switch positions KEYLESS-GO .................................. 262
SmartKey ....................................... 262
Starting difficulties (engine) ............286
Starting the engine ........................... 285
Steering column see Multifunction steering wheel,
Adjustment
Steering wheel
see Multifunction steering wheel Steering wheel gearshift control
.....297
Stolen Vehicle Recovery Services ...360
Storage compartments .....................348
Storing tires ....................................... 387
Sunroof see Power tilt/sliding sunroof
Sunshade
Rear window .................................. 352
Sun visors .......................................... 351
Suspension tuning see AIRMATIC T
Tachometer .................................. 30, 301
Overspeed range ........................... 301
Tail lamps
Cleaning lenses
............................. 406
Tar stains ........................................... 404
Technical data Air conditioning refrigerant .... 492, 493
Brake fluid ............................. 491, 493
Capacities fuels, coolants,
lubricants etc. ................................ 490
Coolant .................................. 491, 494
Engine oil additives ........................493
Engine oils ............................. 490, 492
Fuel requirements .......................... 494
Gasoline additives .......................... 494
Identification labels .......................480
Premium unleaded gasoline ...........493
Rims and tires ................................ 486
Spare wheel ................................... 490
Vehicle specification
CL 550 4MATIC ............................. 483
Vehicle specification CL 600 ......... 483
Vehicle specification CL 63 AMG ...484
Vehicle specification CL 65 AMG ...485
Washer and headlamp cleaning
system ................................... 492, 496
Technical data (dimensions)
see Vehicle specification
Technical data (electrical system)
see Vehicle specification
Technical data (engine)
see Vehicle specification
Technical data (weights)
see Vehicle specification 16
Index 216_AKB; 3; 90, en-US
d2ureepe,
Version: 2.11.8.1 2009-05-15T11:47:50+02:00 - Seite 16
Page 29 of 500
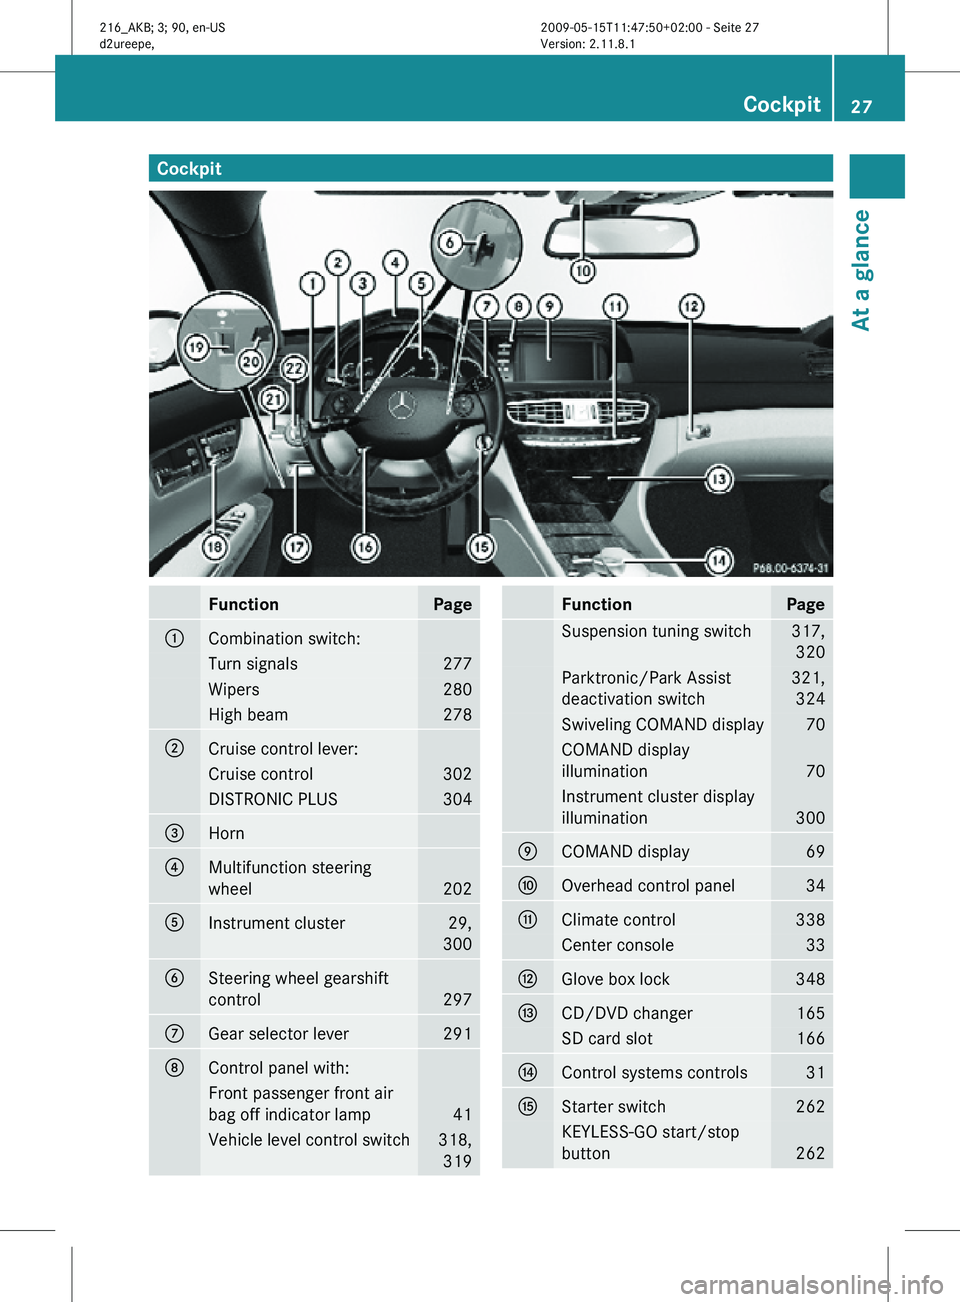
Cockpit
Function Page
:
Combination switch:
Turn signals 277
Wipers 280
High beam 278
;
Cruise control lever:
Cruise control 302
DISTRONIC PLUS 304
=
Horn
?
Multifunction steering
wheel
202
A
Instrument cluster 29,
300 B
Steering wheel gearshift
control
297
C
Gear selector lever 291
D
Control panel with:
Front passenger front air
bag off indicator lamp
41
Vehicle level control switch 318,
319 Function Page
Suspension tuning switch 317,
320 Parktronic/Park Assist
deactivation switch 321,
324 Swiveling COMAND display 70
COMAND display
illumination
70
Instrument cluster display
illumination
300
E
COMAND display 69
F
Overhead control panel 34
G
Climate control 338
Center console 33
H
Glove box lock 348
I
CD/DVD changer 165
SD card slot 166
J
Control systems controls 31
K
Starter switch 262
KEYLESS-GO start/stop
button
262Cockpit
27At a glance
216_AKB; 3; 90, en-US
d2ureepe, Version: 2.11.8.1 2009-05-15T11:47:50+02:00 - Seite 27 Z
Page 298 of 500
Effect
=
With this selection you can use the
braking effect of the engine.
5
Allows the use of the engine’s
braking effect when driving
R
on steep downgrades
R in mountainous regions
R under extreme operating
conditions 4
For maximum use of the engine’s
braking effect on very steep or
lengthy downgrades.
Automatic shift program
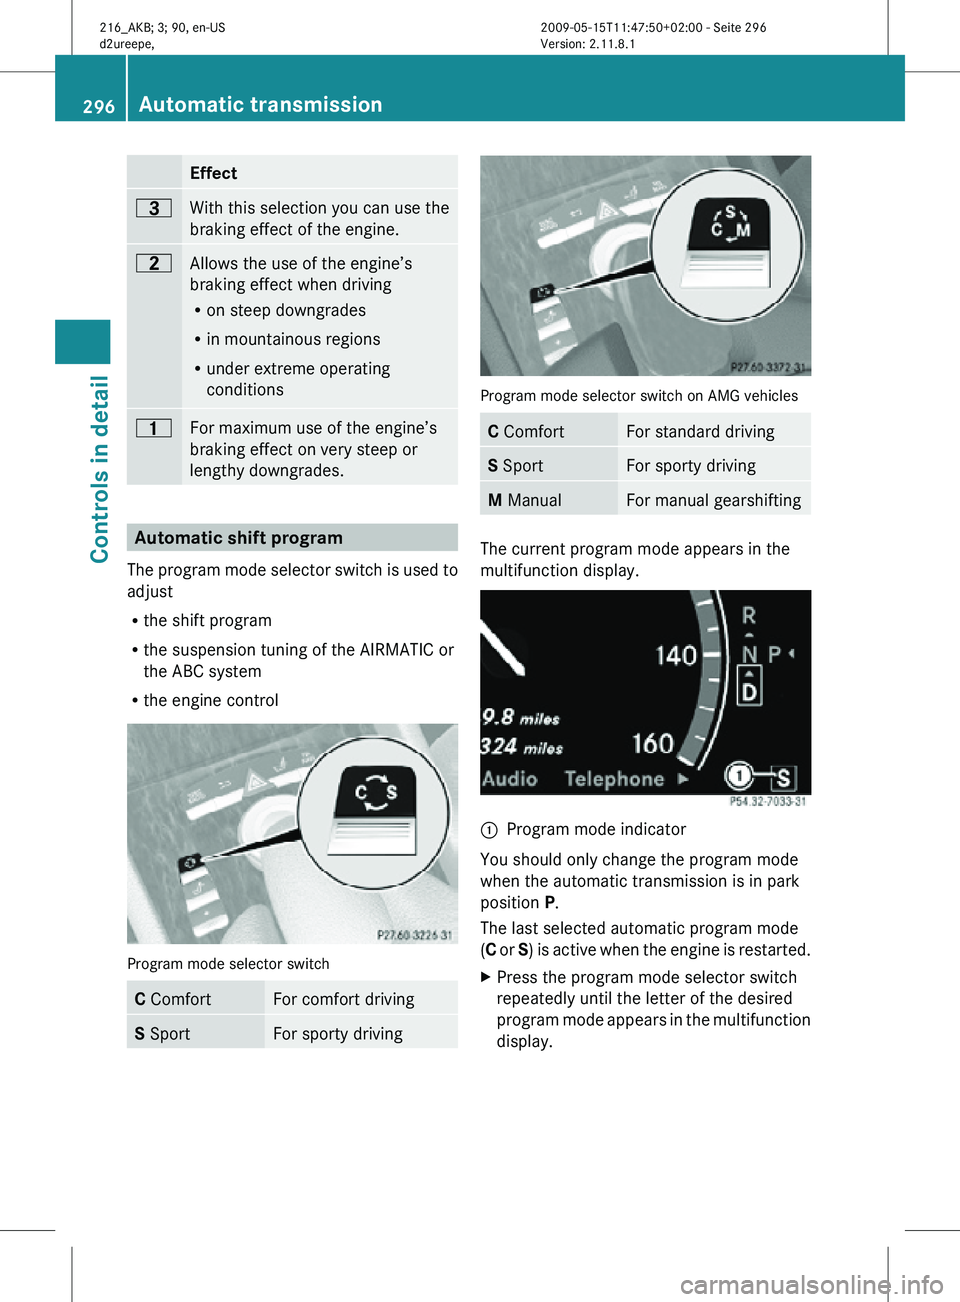
The program mode selector switch is used to
adjust
R the shift program
R the suspension tuning of the AIRMATIC or
the ABC system
R the engine control Program mode selector switch
C Comfort For comfort driving
S Sport For sporty driving Program mode selector switch on AMG vehicles
C Comfort For standard driving
S Sport For sporty driving
M Manual For manual gearshifting
The current program mode appears in the
multifunction display.
:
Program mode indicator
You should only change the program mode
when the automatic transmission is in park
position P.
The last selected automatic program mode
(C or S) is active when the engine is restarted.
X Press the program mode selector switch
repeatedly until the letter of the desired
program mode appears in the multifunction
display. 296
Automatic transmissionControls in detail
216_AKB; 3; 90, en-US
d2ureepe,
Version: 2.11.8.1 2009-05-15T11:47:50+02:00 - Seite 296
Page 319 of 500
G
Warning!
The braking effect of the HOLD function is
canceled and the vehicle can start to roll if
R the HOLD function is deactivated by
depressing the accelerator pedal or the
brake pedal
R the HOLD function or the power supply is
malfunctioning, e.g. due to battery failure
R the electrical components in the engine
compartment or the fuses have been
manipulated
R the battery is disconnected G
Warning!
Never get out of the vehicle while the HOLD
function is activated!
The HOLD function must never be operated
or deactivated by passengers or from outside
the vehicle.
The HOLD function does not replace the
electronic parking brake. It must not be used
to secure the vehicle when parking.
Deactivate the HOLD function when leaving
or parking the vehicle. Use the electronic
parking brake to secure the vehicle.
When the HOLD function is activated, the
automatic transmission shifts into park
position P automatically when
R opening the driver’s door and releasing the
seat belt
R turning off the engine
R opening the hood
R a system malfunction occurs
R the on-board voltage is insufficient
The HOLD function is deactivated. AIRMATIC
Introduction The AIRMATIC lets you select the chassis and
suspension setup. The chassis and suspension setup adjusts the damping
behavior and the ride height for your vehicle.
The AIRMATIC consists of two components.
The Adaptive Damping System (ADS)
(Y page 317) and the vehicle level control
(Y page 318).
Adaptive Damping System (ADS)
The Adaptive Damping System (ADS) is
controlled electronically and operates
continuously. It adjusts the damping
characteristics to the current operating and
driving conditions. The damping is adjusted
individually for each wheel. Driving safety and
tire comfort are increased.
The fine tuning of the damping is dependent
on
R your driving style
R road surface conditions
R your personal settings
The selected setting remains stored in
memory even if the SmartKey is removed
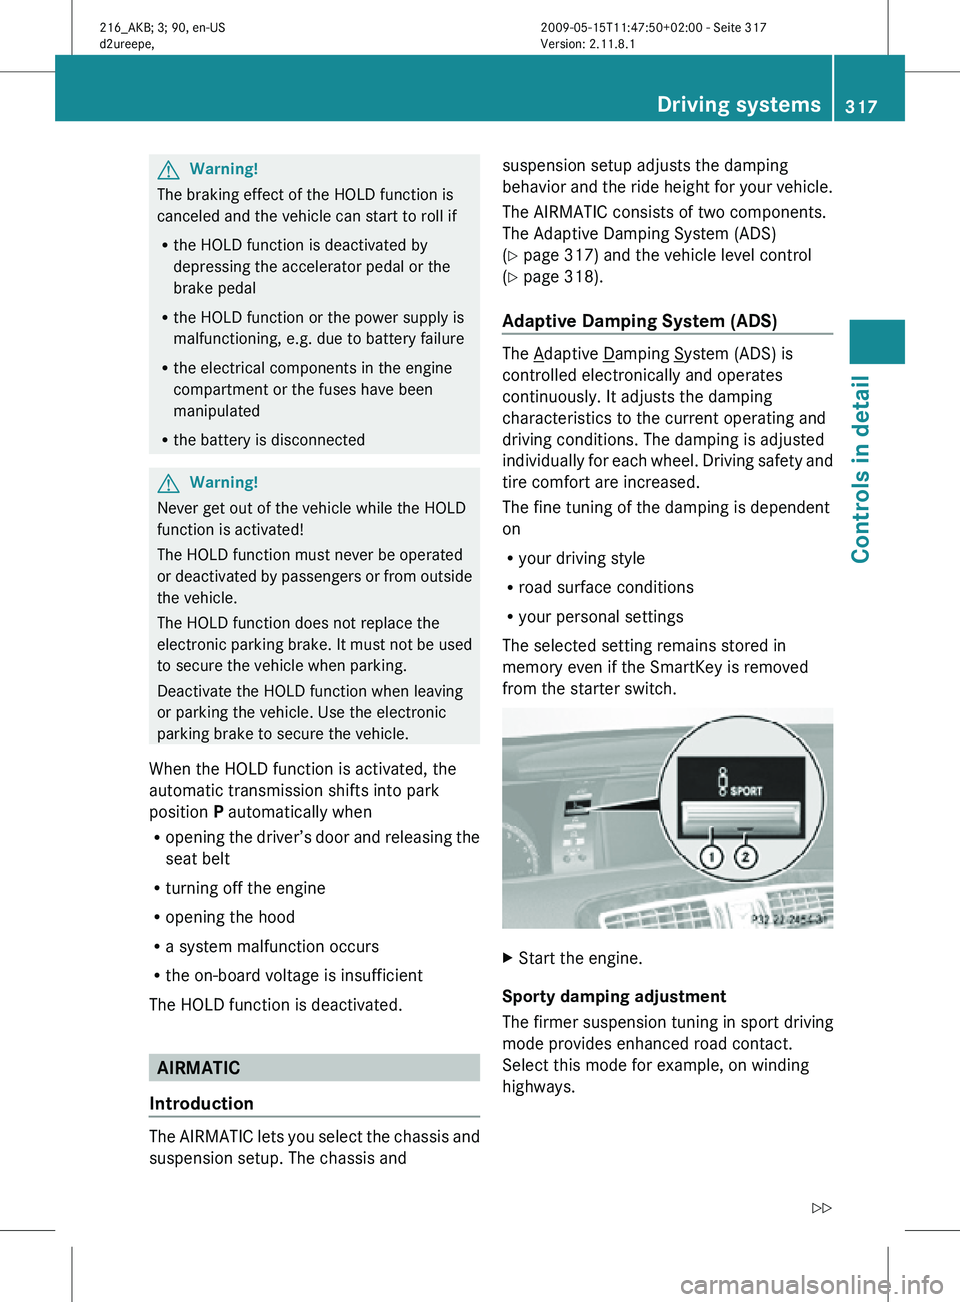
from the starter switch. X
Start the engine.
Sporty damping adjustment
The firmer suspension tuning in sport driving
mode provides enhanced road contact.
Select this mode for example, on winding
highways. Driving systems
317Controls in detail
216_AKB; 3; 90, en-US
d2ureepe, Version: 2.11.8.1 2009-05-15T11:47:50+02:00 - Seite 317 Z
Page 320 of 500
X
If indicator lamp ; is not lit: Press ADS
switch :.
Indicator lamp ; comes on. The sport
driving mode with a firmer suspension
tuning is selected. The message
AIRMATIC SPORT appears in the
multifunction display.
Comfort damping adjustment
Vehicle handling in comfort driving mode is
softer. Select this mode when you prefer a
more comfortable driving style on straight
freeways.
X If indicator lamp ; is lit: Press ADS
switch :.
Indicator lamp ; goes out. The comfort
driving mode is selected. The message
AIRMATIC COMFORT appears in the
multifunction display.
Vehicle level control Your vehicle automatically adjusts its ride
height.
The all-around vehicle level control provides
best possible suspension and constant
ground clearance. The vehicle lowers at high
speed automatically in order to increase
driving safety and to reduce fuel
consumption.
The following vehicle levels are available:
R
normal
R raised; the vehicle is raised by
approximately 1.0 in (25 mm) compared to
normal level
R lowered; the vehicle is lowered by
approximately 0.4 in (10 mm) compared to
normal level
You can choose between normal or raised
level when the vehicle is stationary and the
engine is running.
The vehicle chassis ride height is raised or
lowered according to the selected level
setting and to the vehicle speed. With
increasing speed, ride height is reduced by up to approximately 0.8 in (20 mm). With
decreasing speed, the ride height is again
raised to the selected vehicle level.
i
These height adjustments are so small
that you may not notice any change.
Adjusting vehicle level manually G
Warning!
To help avoid personal injury, keep hands and
feet away from wheel housing area, and stay
away from under the vehicle when lowering
the vehicle chassis.
Select the normal level for driving on normal
roads. Select the raised level for driving on
rough roads or with snow chains. Select the
raised level only when required by current
driving conditions. Otherwise, the handling
may be impaired and the fuel consumption
may increase.
The selected vehicle level setting remains
stored in memory even if the SmartKey is
removed from the starter switch. Selecting raised level
X
Start the engine.
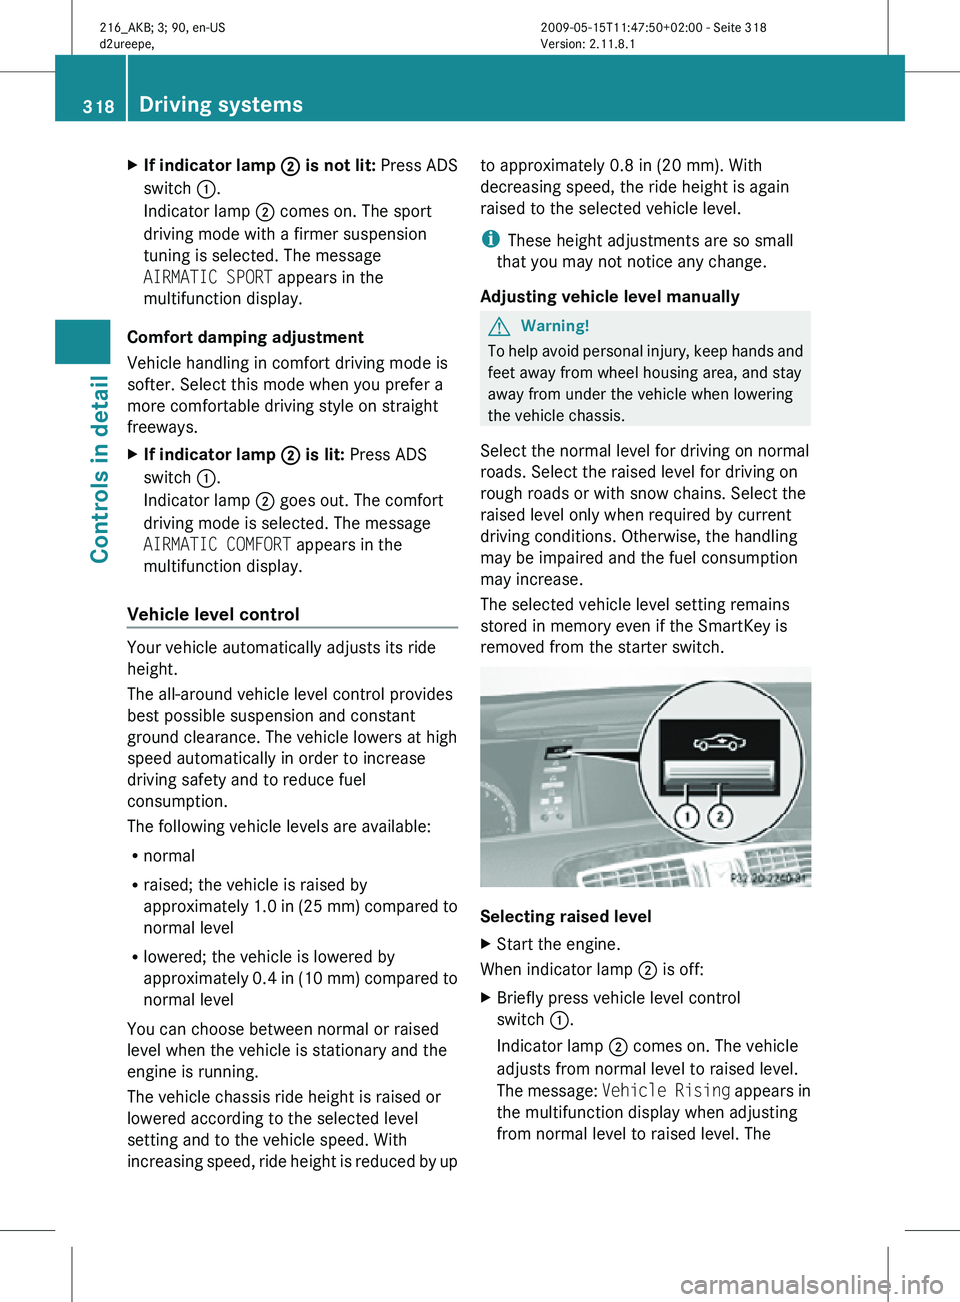
When indicator lamp ; is off:
X Briefly press vehicle level control
switch :.
Indicator lamp ; comes on. The vehicle
adjusts from normal level to raised level.
The message: Vehicle Rising appears in
the multifunction display when adjusting
from normal level to raised level. The 318
Driving systemsControls in detail
216_AKB; 3; 90, en-US
d2ureepe,
Version: 2.11.8.1 2009-05-15T11:47:50+02:00 - Seite 318
Page 321 of 500
message disappears when the vehicle is
raised. Indicator lamp
; is then lit.
When the
vehicle is in raised level, pressing
vehicle level control switch : will return
the vehicle to normal level.
The vehicle is lowered to the normal level
automatically when
R the vehicle speed is above 75 mph
(120 km/h)
R the vehicle speed stays between 50 mph
(80 km/h) and 75 mph (120 km/h) for
approximately 3 minutes.
Indicator lamp
; in
vehicle level control switch : goes out.
If you do not drive in this speed range, the
selected vehicle level setting remains stored
in memory even if the SmartKey is removed
from the starter switch.
Selecting normal level
X Start the engine.
When indicator lamp ; is on:
X Briefly press vehicle level control
switch :.
Indicator lamp ; goes out. The vehicle
adjusts from raised level to normal level. ABC
The ABC system is an active, computer-
controlled system that adjusts the
suspension hydraulically at all four wheels in
response to various driving situations. It
selects the optimum suspension tuning and
ride height for your vehicle automatically.
Vehicle level control Your vehicle adjusts its ride height
automatically to increase vehicle safety and
to reduce fuel consumption.
The vehicle chassis ride height is raised or
lowered according to the selected level
setting and to the vehicle speed. With increasing speed, the ride height is reduced
by up to approximately 0.4 in
(10 mm). With
decreasing speed, the ride height is again
raised to the selected vehicle level.
These height adjustments are so small that
you may not notice any change. G
Warning!
When you turn off the engine, the entire
vehicle is
lowered. You should therefore make
sure that no one is near the wheel housing or
under the vehicle when you turn off the
engine. Otherwise, parts of the individuals
body could be trapped.
! When you turn off the engine, the entire
vehicle is lowered. When parking, position
your vehicle in such a way that it will not
scrape against a curb, for example, when it
is lowered. Your vehicle could otherwise be
damaged.
i CL 63 AMG and CL 65 AMG only:
When you turn off the engine, the entire
vehicle is lowered by 0.2 in (5 mm).
Setting the vehicle level G
Warning!
To help avoid personal injury, keep hands and
feet away from wheel housing area, and stay
away from under the vehicle when lowering
the vehicle chassis. Driving systems
319
Controls in detail
216_AKB; 3; 90, en-US
d2ureepe, Version: 2.11.8.1 2009-05-15T11:47:50+02:00 - Seite 319 Z
Page 322 of 500
The following vehicle level settings can be
selected when the vehicle is stationary and
the engine is running:
Level Use for Indicator
lamp
Normal
For driving on
normal roads. The
indicator
lamp is off.
Raised
For driving on
rough roads or
with snow chains
(Y page 396). The
indicator
lamp is on.
Select the “Raised” level setting only when
required by current driving conditions.
Otherwise the fuel consumption may
increase and/or the handling may be
impaired.
i
The selected setting remains stored in
memory, even when the engine is turned
off and restarted. X
Start the engine.
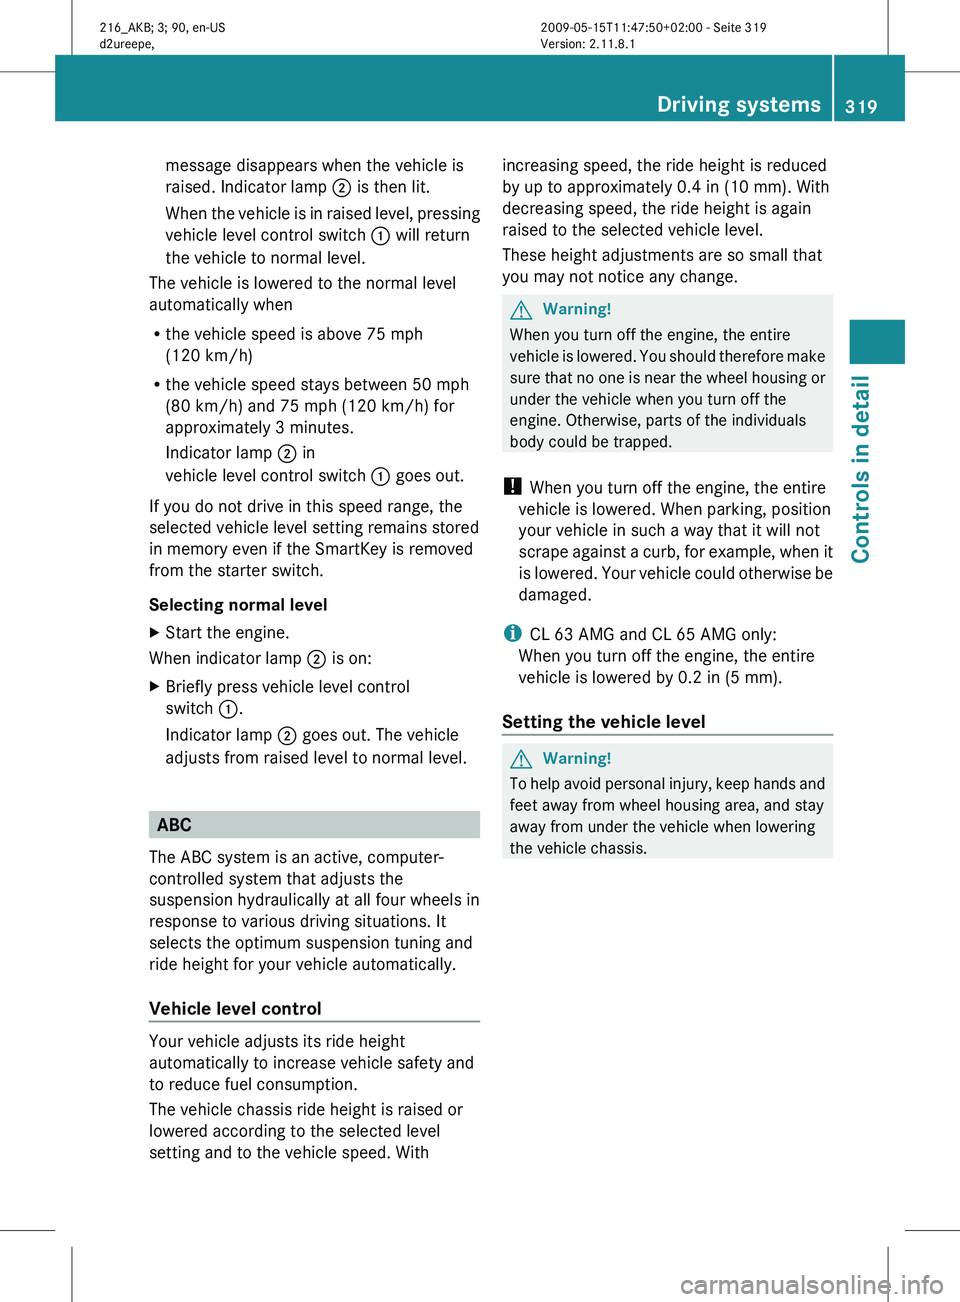
Selecting a higher level
If indicator lamp ; is off:
X Press vehicle level control switch :.
Indicator lamp ; comes on. The vehicle is
raised to a higher level. Selecting a normal level
If indicator lamp ; is on:
X
Press vehicle level control switch :.
Indicator lamp ; goes out. The vehicle is
adjusted to a normal level.
Suspension tuning The suspension tuning of the ABC system is
adjusted for each wheel individually and
depends on:
R
your driving style
R the road condition, such as bumps etc.
R your individual selection, sporty or
comfortable
R the vehicle loading
i The selected setting remains stored in
memory, even when the engine is turned
off and restarted. X
Start the engine.
Sporty suspension tuning
The firmer chassis and suspension setup in
sport driving mode provides enhanced road
contact. Select this mode when you prefer a
firmer chassis and suspension setup.
X When indicator lamp ; is off: Press
button :.
Indicator lamp ; comes on. The sporty
chassis and suspension setup is selected.
The message ABC Active Body Control
SPORT appears in the multifunction display. 320
Driving systemsControls in detail
216_AKB; 3; 90, en-US
d2ureepe,
Version: 2.11.8.1 2009-05-15T11:47:50+02:00 - Seite 320
Page 323 of 500

Comfort suspension tuning
Vehicle handling in comfort driving mode is
softer. Select this mode when you prefer a
more comfortable driving style.
X
When indicator lamp ; is on: Press
button :.
Indicator lamp ; goes out. The
comfortable chassis
and suspension setup
is selected.
The message ABC Active Body Control
COMFORT appears in the multifunction
display. All-wheel drive (4MATIC)
In vehicles with all-wheel drive (4MATIC),
both axles
are powered at all times when the
vehicle is being operated. The 4MATIC
improves traction in conjunction with the ESC
(Y page 59) and the Electronic Traction
System (ETS/4-ETS) (Y page 60). G
Warning!
If a drive wheel is spinning due to insufficient
traction:
R While driving off, apply as little throttle as
possible.
R While driving, ease up on the accelerator
pedal.
R Adapt your speed and driving style to the
prevailing road conditions.
Failure to observe these guidelines could
cause the vehicle to skid.
The 4MATIC cannot prevent accidents
resulting from excessive speed.
! Do not
tow with one axle raised. Doing so
could damage the transfer case, which is
not covered by the Mercedes-Benz Limited
Warranty. All wheels must be on or off the
ground. Observe instructions for towing the
vehicle with all wheels on the ground. !
Only conduct
operational or performance
tests on a two-axle dynamometer. If such
tests are necessary, contact an authorized
Mercedes-Benz Center. You could
otherwise seriously damage the brake
system and/or the transfer case which is
not covered by the Mercedes-Benz Limited
Warranty.
i In winter operation, the maximum
effectiveness of the 4MATIC is only
achieved with winter tires ( Y page 395) or
snow chains as required. Parktronic system
The Parktronic system is an electronic
parking aid with ultrasonic sensors designed
to assist
the driver during parking maneuvers.
The Parktronic system indicates the relative
distance between the vehicle and an obstacle
visually and audibly.
The Parktronic system is activated
automatically when
R you switch on the ignition
and
R you release the electronic parking brake
or
R you start the engine
and
R shift the automatic transmission into drive
position D, reverse gear R, or neutral
position N
The Parktronic system deactivates at speeds
above approximately 11 mph (18 km/h). At
lower speeds, the Parktronic system
activates again.
The Parktronic system also deactivates when
you shift the automatic transmission into
park position P or engage the electronic
parking brake and turn off the engine.
The Parktronic system monitors the
surroundings of your vehicle with six sensors Driving systems
321
Controls in detail
216_AKB; 3; 90, en-US
d2ureepe, Version: 2.11.8.1 2009-05-15T11:47:50+02:00 - Seite 321 Z
Page 375 of 500
During all seasons, use MB Windshield
Washer Concentrate “MB SummerFit”. Mix it
with water or premixed washer solvent/
antifreeze depending on the ambient
temperature (
Y page 496). X
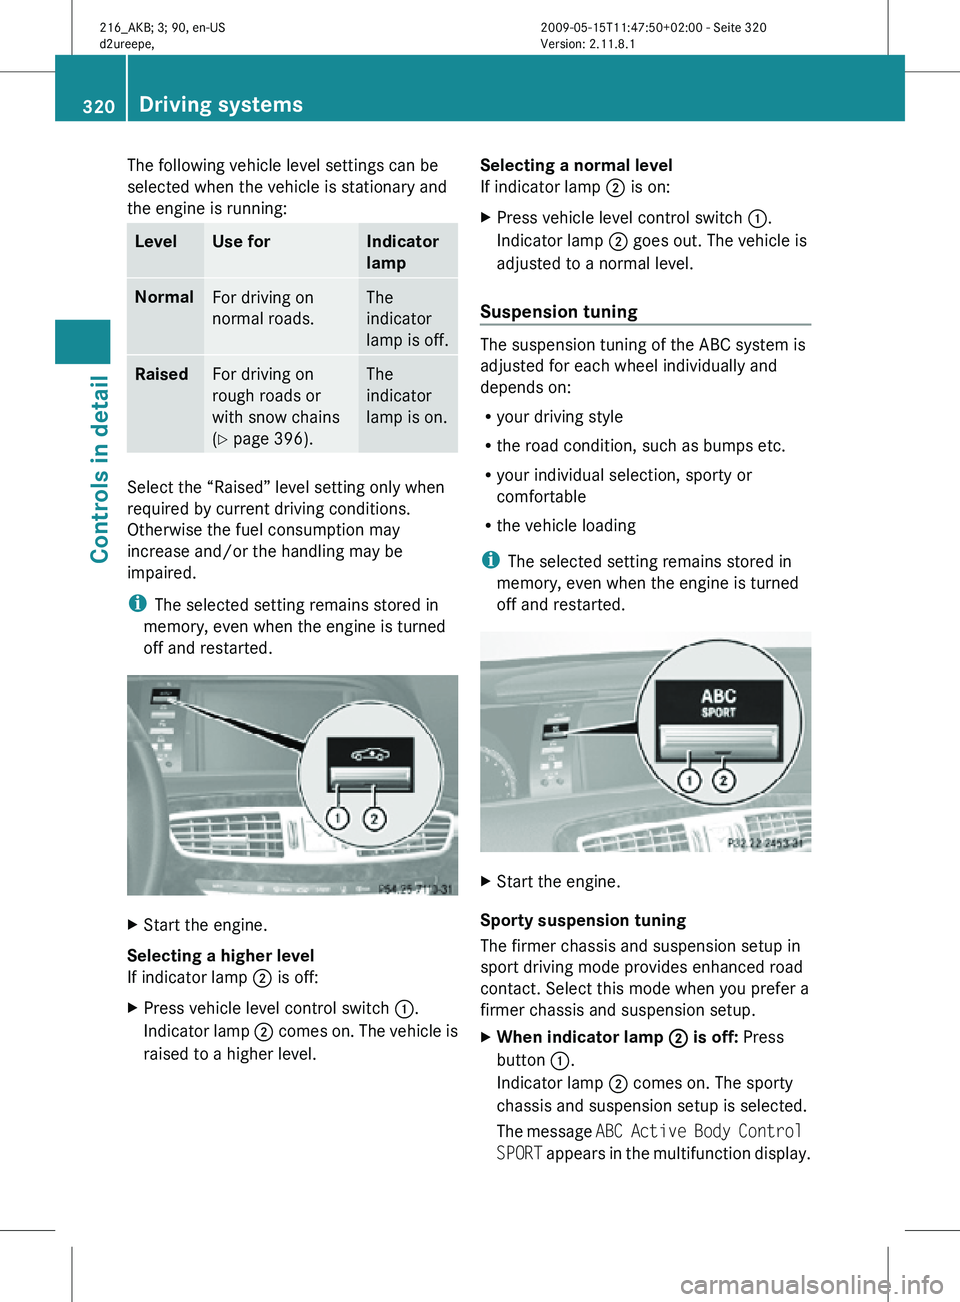
Opening washer fluid reservoir: Pull tab
of cap : upwards.
X Refill the washer fluid reservoir.
X Closing washer fluid reservoir: Press
cap : onto filler hole until it engages.
For more information, see “Washer system
and headlamp cleaning system”
(Y page 492). Brake fluid level
! If you find that the brake fluid in the brake
fluid reservoir has fallen to the minimum
mark or below, have the brake system
checked for brake pad thickness and leaks
immediately. Contact an authorized
Mercedes-Benz Center immediately. Do
not add brake fluid as this will not solve the
problem. For more information, see
“Practical hints”.
When checking the brake fluid level, the
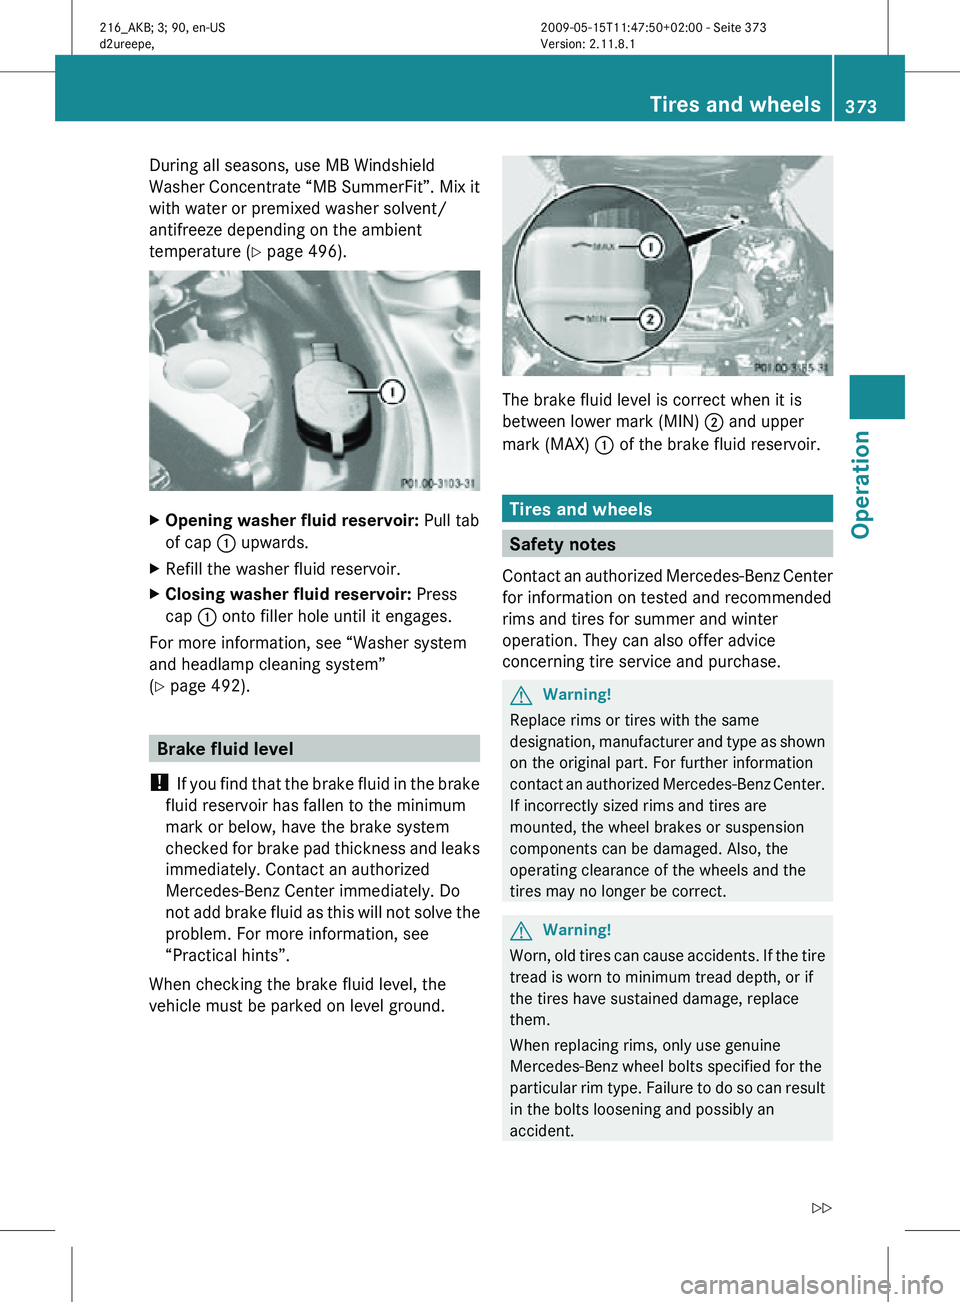
vehicle must be parked on level ground. The brake fluid level is correct when it is
between lower mark (MIN)
; and upper
mark (MAX) : of the brake fluid reservoir. Tires and wheels
Safety notes
Contact an authorized Mercedes-Benz Center
for information on tested and recommended
rims and tires for summer and winter
operation. They can also offer advice
concerning tire service and purchase. G
Warning!
Replace rims or tires with the same
designation, manufacturer and type as shown
on the original part. For further information
contact an authorized Mercedes-Benz Center.
If incorrectly sized rims and tires are
mounted, the wheel brakes or suspension
components can be damaged. Also, the
operating clearance of the wheels and the
tires may no longer be correct. G
Warning!
Worn, old tires can cause accidents. If the tire
tread is worn to minimum tread depth, or if
the tires have sustained damage, replace
them.
When replacing rims, only use genuine
Mercedes-Benz wheel bolts specified for the
particular rim type. Failure to do so can result
in the bolts loosening and possibly an
accident. Tires and wheels
373Operation
216_AKB; 3; 90, en-US
d2ureepe, Version: 2.11.8.1 2009-05-15T11:47:50+02:00 - Seite 373 Z
Page 475 of 500

X
Connect positive terminal : of charged
battery A with
positive terminal ; with a
jumper cable. Clamp the cable to positive
terminal : of charged battery A first.
X Start engine of the vehicle with charged
battery A and run at idle speed.
X Connect negative terminal = of charged
battery A with negative terminal ? with
a jumper cable. Clamp the cable to
negative terminal = of charged battery
A first.
X Start engine of the vehicle with the
discharged battery and run at idle speed.
You can now turn on the electrical
consumers. Do not switch on the
headlamps under any circumstances.
X Remove the jumper cables from negative
terminals = and ? first.
X Remove the jumper cables from positive
terminals : and ;.
You can now switch on the headlamps.
X Have the battery checked at the nearest
authorized Mercedes-Benz Center. Towing the vehicle
Safety notes
G
Warning!
The vehicle is braked when the HOLD function
or DISTRONIC PLUS is activated. Therefore,
deactivate the HOLD function or DISTRONIC
PLUS if the vehicle is to be towed.
Mercedes-Benz recommends
that the vehicle
be transported with all wheels off the ground
using flatbed or appropriate wheel lift/dolly
equipment. This method is preferable to other
types of towing.
! To prevent damage during transport, do
not tie down vehicle by its chassis or
suspension parts.
If circumstances do not permit the
recommended towing methods, the vehicle
may be towed with all wheels on the ground or front axle raised (except vehicles with
4MATIC) only
so far as necessary to have the
vehicle moved to a safe location where the
recommended towing methods can be
employed.
! Before towing the vehicle observe the
following instructions:
R Do not tow-start the vehicle. You could
otherwise seriously damage the
automatic transmission which is not
covered by the Mercedes-Benz Limited
Warranty.
R Do not tow with sling-type equipment.
Towing with sling-type equipment over
bumpy roads will damage radiator and
supports.
R Towing of the vehicle should only be
done using the properly installed towing
eye bolt. Never attach a tow cable, tow
rope or tow rod to the vehicle chassis,
frame or suspension parts. G
Warning!
With the engine not running, there is no power
assistance for the brake and steering
systems. In this case, it is important to keep
in mind that a considerably higher degree of
effort is necessary to brake and steer the
vehicle. Adapt your driving accordingly.
! Avoid pulling the vehicle abruptly or
diagonally, since it could result in damage
to the chassis alignment.
! Do not use the towing eye bolt for
recovery, as
this could damage the vehicle.
If in doubt, recover the vehicle with a crane.
i If the battery is disconnected or
discharged
R the SmartKey will not turn in the starter
switch
R the automatic transmission will remain in
park position P Towing the vehicle
473
Practical hints
216_AKB; 3; 90, en-US
d2ureepe, Version: 2.11.8.1 2009-05-15T11:47:50+02:00 - Seite 473 Z