hood open MERCEDES-BENZ CL-Class 2011 C216 User Guide
[x] Cancel search | Manufacturer: MERCEDES-BENZ, Model Year: 2011, Model line: CL-Class, Model: MERCEDES-BENZ CL-Class 2011 C216Pages: 480, PDF Size: 19.76 MB
Page 362 of 480
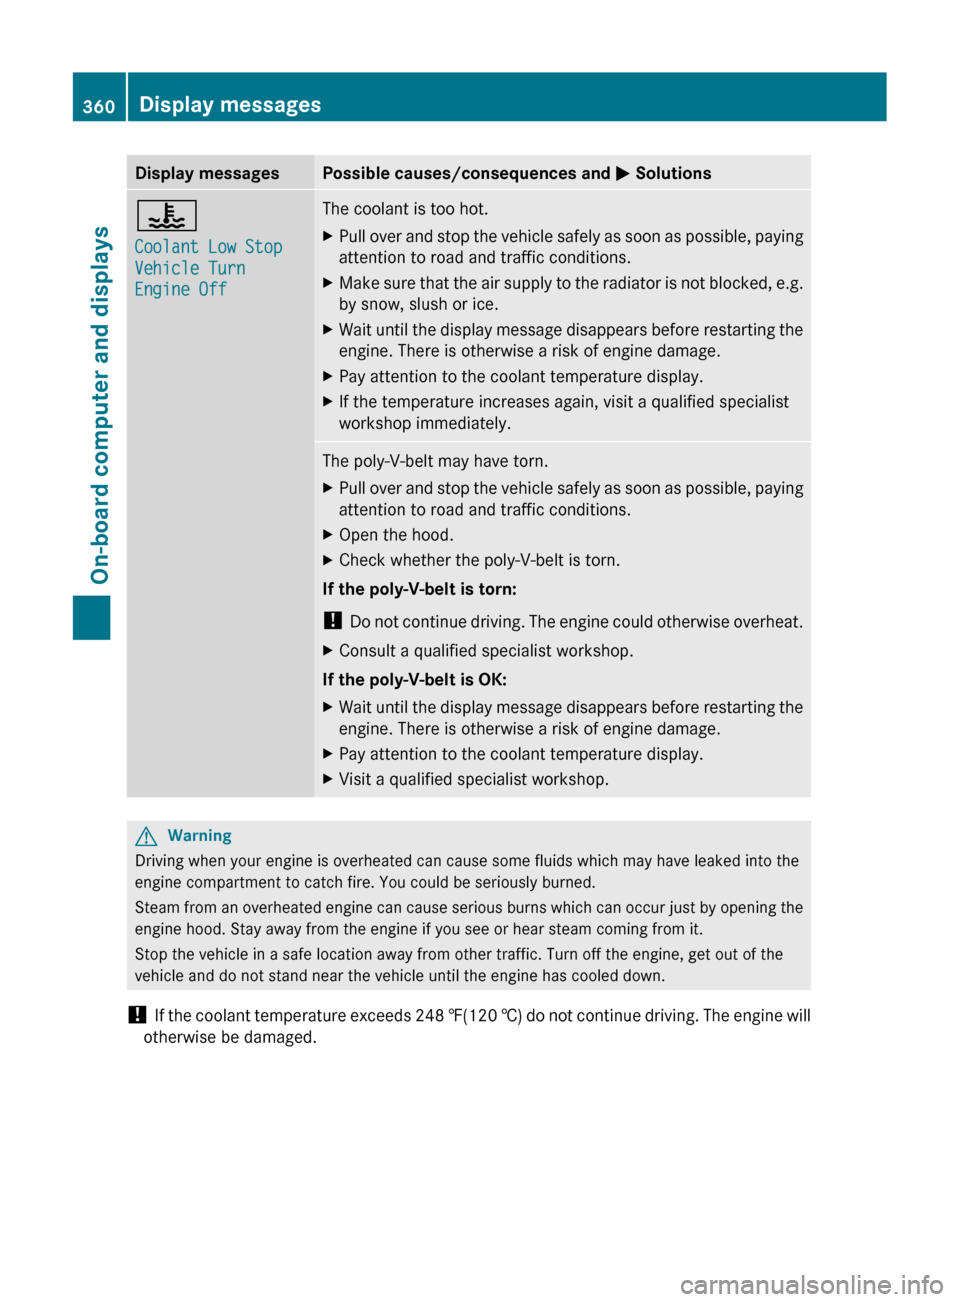
Display messagesPossible causes/consequences and M Solutions?
Coolant Low Stop
Vehicle Turn
Engine OffThe coolant is too hot.XPull over and stop the vehicle safely as soon as possible, paying
attention to road and traffic conditions.XMake sure that the air supply to the radiator is not blocked, e.g.
by snow, slush or ice.XWait until the display message disappears before restarting the
engine. There is otherwise a risk of engine damage.XPay attention to the coolant temperature display.XIf the temperature increases again, visit a qualified specialist
workshop immediately.The poly-V-belt may have torn.XPull over and stop the vehicle safely as soon as possible, paying
attention to road and traffic conditions.XOpen the hood.XCheck whether the poly-V-belt is torn.
If the poly-V-belt is torn:
! Do not continue driving. The engine could otherwise overheat.
XConsult a qualified specialist workshop.
If the poly-V-belt is OK:
XWait until the display message disappears before restarting the
engine. There is otherwise a risk of engine damage.XPay attention to the coolant temperature display.XVisit a qualified specialist workshop.GWarning
Driving when your engine is overheated can cause some fluids which may have leaked into the
engine compartment to catch fire. You could be seriously burned.
Steam from an overheated engine can cause serious burns which can occur just by opening the
engine hood. Stay away from the engine if you see or hear steam coming from it.
Stop the vehicle in a safe location away from other traffic. Turn off the engine, get out of the
vehicle and do not stand near the vehicle until the engine has cooled down.
! If the coolant temperature exceeds 248 ‡(120 †) do not continue driving. The engine will
otherwise be damaged.
360Display messagesOn-board computer and displays
Page 363 of 480
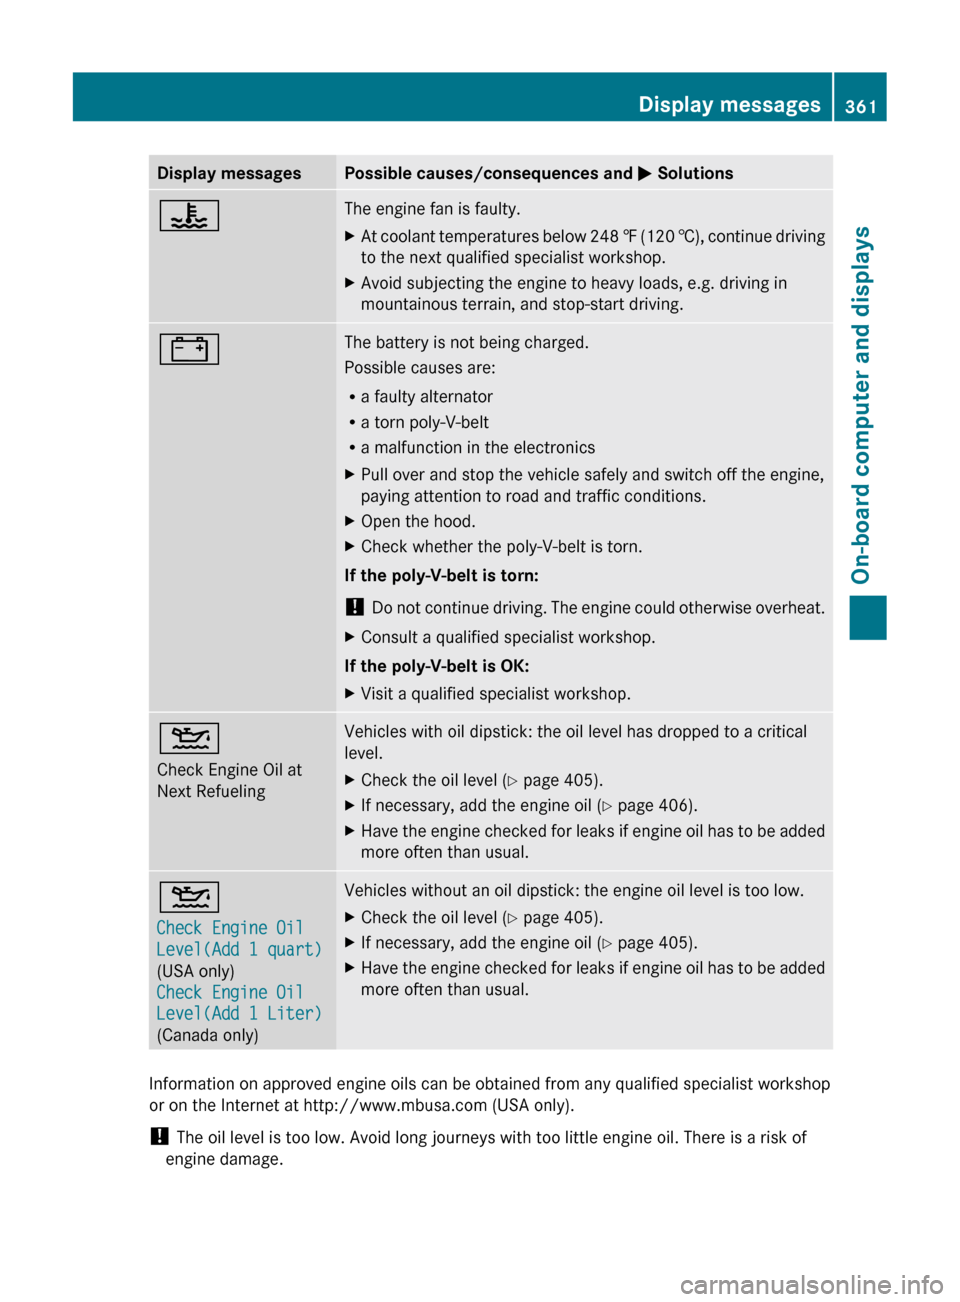
Display messagesPossible causes/consequences and M Solutions?The engine fan is faulty.XAt coolant temperatures below 248 ‡ (120 †), continue driving
to the next qualified specialist workshop.XAvoid subjecting the engine to heavy loads, e.g. driving in
mountainous terrain, and stop-start driving.#The battery is not being charged.
Possible causes are:
R a faulty alternator
R a torn poly-V-belt
R a malfunction in the electronicsXPull over and stop the vehicle safely and switch off the engine,
paying attention to road and traffic conditions.XOpen the hood.XCheck whether the poly-V-belt is torn.
If the poly-V-belt is torn:
! Do not continue driving. The engine could otherwise overheat.
XConsult a qualified specialist workshop.
If the poly-V-belt is OK:
XVisit a qualified specialist workshop.4
Check Engine Oil at
Next RefuelingVehicles with oil dipstick: the oil level has dropped to a critical
level.XCheck the oil level ( Y page 405).XIf necessary, add the engine oil ( Y page 406).XHave the engine checked for leaks if engine oil has to be added
more often than usual.4
Check Engine Oil
Level(Add 1 quart)
(USA only)
Check Engine Oil
Level(Add 1 Liter)
(Canada only)Vehicles without an oil dipstick: the engine oil level is too low.XCheck the oil level ( Y page 405).XIf necessary, add the engine oil ( Y page 405).XHave the engine checked for leaks if engine oil has to be added
more often than usual.
Information on approved engine oils can be obtained from any qualified specialist workshop
or on the Internet at http://www.mbusa.com (USA only).
! The oil level is too low. Avoid long journeys with too little engine oil. There is a risk of
engine damage.
Display messages361On-board computer and displaysZ
Page 374 of 480
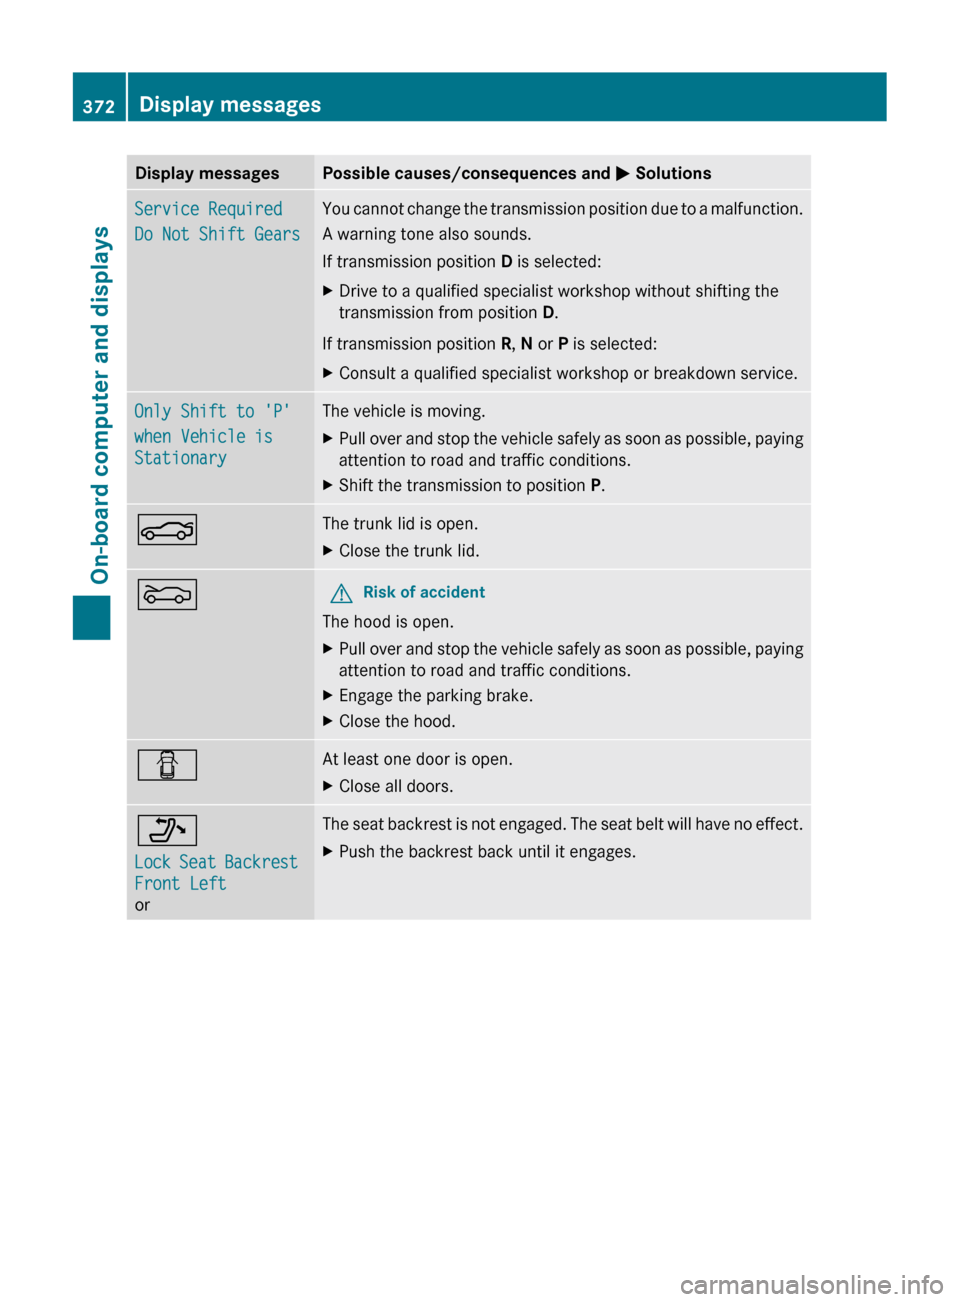
Display messagesPossible causes/consequences and M SolutionsService Required
Do Not Shift GearsYou cannot change the transmission position due to a malfunction.
A warning tone also sounds.
If transmission position D is selected:XDrive to a qualified specialist workshop without shifting the
transmission from position D.
If transmission position R, N or P is selected:
XConsult a qualified specialist workshop or breakdown service.Only Shift to 'P'
when Vehicle is
StationaryThe vehicle is moving.XPull over and stop the vehicle safely as soon as possible, paying
attention to road and traffic conditions.XShift the transmission to position P.NThe trunk lid is open.XClose the trunk lid.MGRisk of accident
The hood is open.
XPull over and stop the vehicle safely as soon as possible, paying
attention to road and traffic conditions.XEngage the parking brake.XClose the hood.CAt least one door is open.XClose all doors._
Lock Seat Backrest
Front Left
orThe seat backrest is not engaged. The seat belt will have no effect.XPush the backrest back until it engages.372Display messagesOn-board computer and displays
Page 401 of 480
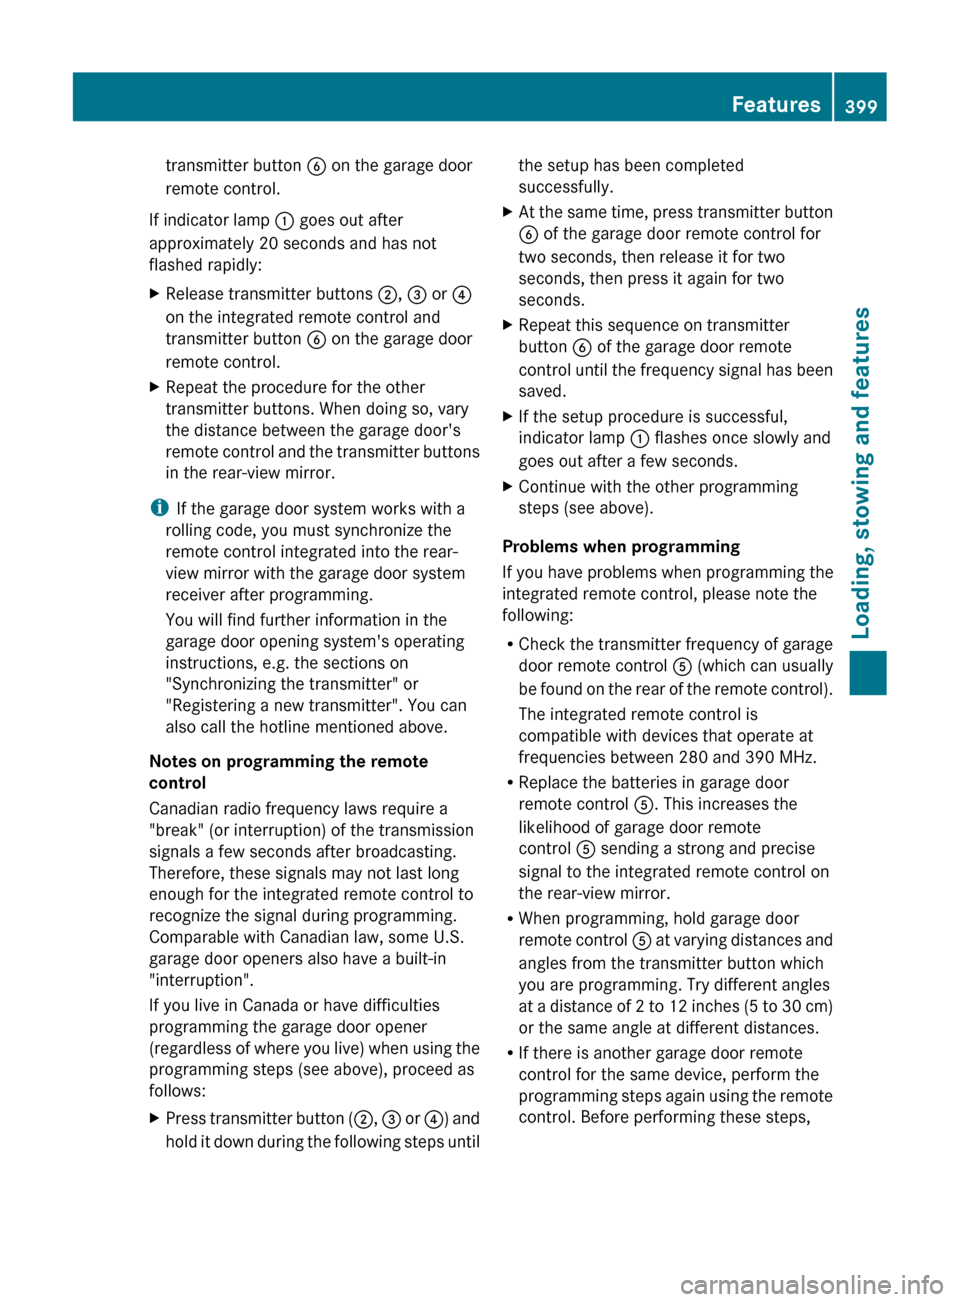
transmitter button B on the garage door
remote control.
If indicator lamp : goes out after
approximately 20 seconds and has not
flashed rapidly:
XRelease transmitter buttons ;, = or ?
on the integrated remote control and
transmitter button B on the garage door
remote control.XRepeat the procedure for the other
transmitter buttons. When doing so, vary
the distance between the garage door's
remote control and the transmitter buttons
in the rear-view mirror.
i If the garage door system works with a
rolling code, you must synchronize the
remote control integrated into the rear-
view mirror with the garage door system
receiver after programming.
You will find further information in the
garage door opening system's operating
instructions, e.g. the sections on
"Synchronizing the transmitter" or
"Registering a new transmitter". You can
also call the hotline mentioned above.
Notes on programming the remote
control
Canadian radio frequency laws require a
"break" (or interruption) of the transmission
signals a few seconds after broadcasting.
Therefore, these signals may not last long
enough for the integrated remote control to
recognize the signal during programming.
Comparable with Canadian law, some U.S.
garage door openers also have a built-in
"interruption".
If you live in Canada or have difficulties
programming the garage door opener
(regardless of where you live) when using the
programming steps (see above), proceed as
follows:
XPress transmitter button ( ;, = or ?) and
hold it down during the following steps untilthe setup has been completed
successfully.XAt the same time, press transmitter button
B of the garage door remote control for
two seconds, then release it for two
seconds, then press it again for two
seconds.XRepeat this sequence on transmitter
button B of the garage door remote
control until the frequency signal has been
saved.XIf the setup procedure is successful,
indicator lamp : flashes once slowly and
goes out after a few seconds.XContinue with the other programming
steps (see above).
Problems when programming
If you have problems when programming the
integrated remote control, please note the
following:
R Check the transmitter frequency of garage
door remote control A (which can usually
be found on the rear of the remote control).
The integrated remote control is
compatible with devices that operate at
frequencies between 280 and 390 MHz.
R Replace the batteries in garage door
remote control A. This increases the
likelihood of garage door remote
control A sending a strong and precise
signal to the integrated remote control on
the rear-view mirror.
R When programming, hold garage door
remote control A at varying distances and
angles from the transmitter button which
you are programming. Try different angles
at a distance of 2 to 12 inches (5 to 30 cm)
or the same angle at different distances.
R If there is another garage door remote
control for the same device, perform the
programming steps again using the remote
control. Before performing these steps,
Features399Loading, stowing and featuresZ
Page 406 of 480
Vehicle equipment
iThis manual describes all the standard
and optional equipment of your vehicle
which was available at the time of
purchase. Country-specific differences are
possible. Note that your vehicle may not be
equipped with all functions described.
Engine compartment
Hood
Opening the hood
GWarning
Do not pull the release lever while the vehicle
is in motion. Otherwise, the hood could be
forced open by passing air flow.
This could cause the hood to come loose and
injure you and/or others.
GWarning
Do not open the hood when the engine is
overheated. You could be seriously injured.
Observe the coolant temperature gauge to
determine whether the engine may be
overheated. If you see flames or smoke
coming from the engine compartment, move
away from the vehicle. Wait until the engine
has cooled. If necessary, call the fire
department.
GWarning
There is a risk of injury if the hood is open,
even if the engine is not running.
Some engine components can become very
hot.
To avoid the risk of burns, only touch those
components described in the Operator's
Manual and observe the relevant safety notes.
GWarning
To help prevent personal injury, stay clear of
moving parts when the hood is open and the
engine is running.
The radiator fan may continue to run for
approximately 30 seconds or may even
restart after the engine has been turned off.
Stay clear of fan blades.
GWarning
The engine is equipped with a transistorized
ignition system. Because of the high voltage,
it is dangerous to touch any components
(ignition coils, spark plug sockets, diagnostic
socket) of the ignition system:
Rwith the engine running
Rwhile starting the engine
Rwhen the ignition is switched on and the
engine is turned manually
XMake sure that the windshield wipers are
switched off.
GWarning
The windshield wipers and wiper linkage
could be set in motion.
When the hood is open, you or others could
be injured by the wiper linkage.
Make sure that the windshield wipers are
switched off. Remove the SmartKey or make
sure that no ignition position has been
selected with KEYLESS-GO. All indicator
lamps must be off in the instrument cluster.
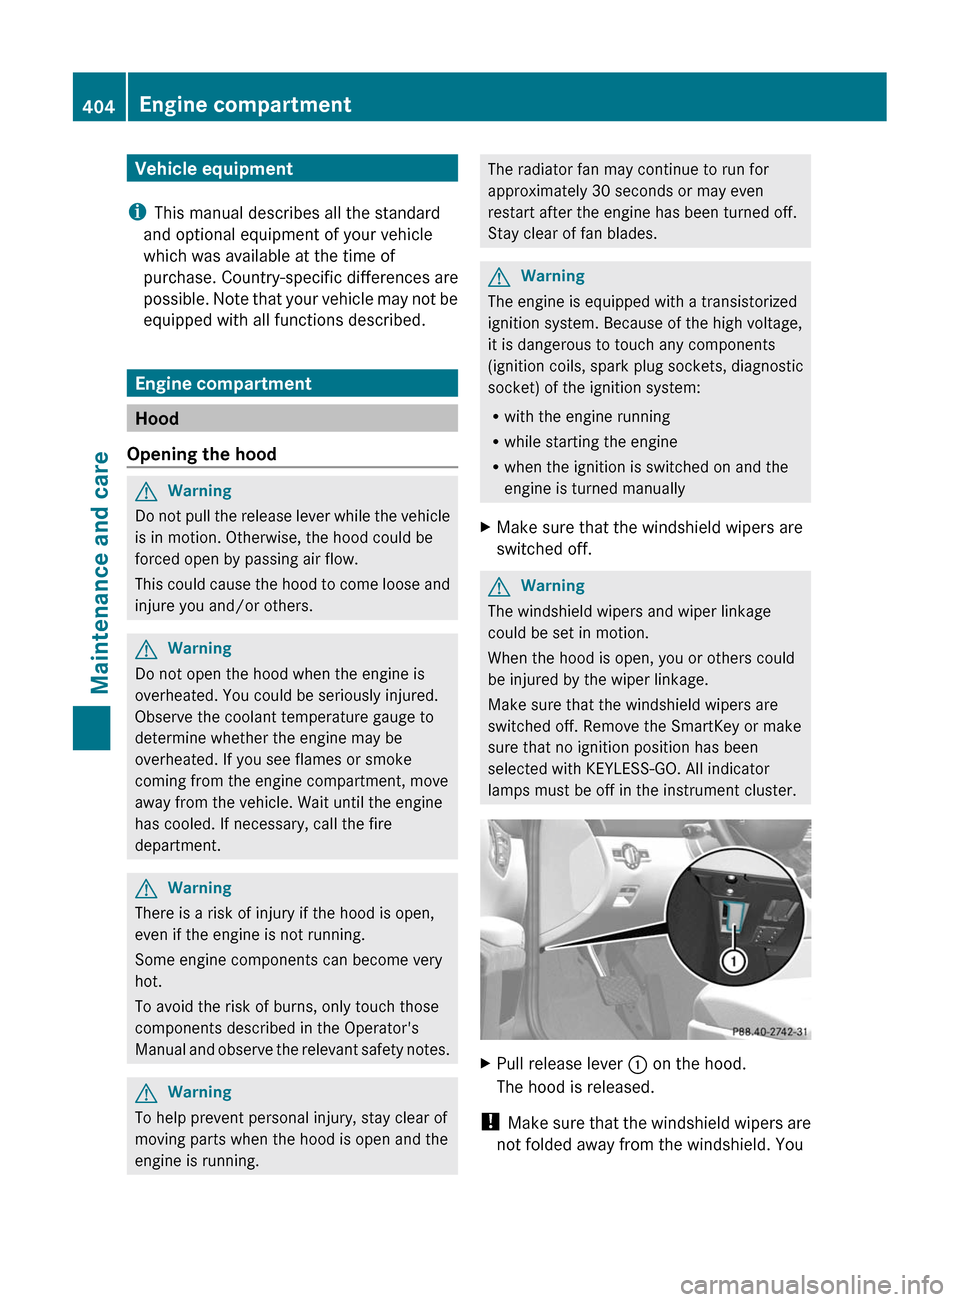
XPull release lever : on the hood.
The hood is released.
! Make sure that the windshield wipers are
not folded away from the windshield. You
404Engine compartmentMaintenance and care
Page 407 of 480
could otherwise damage the windshield
wipers or the hood.
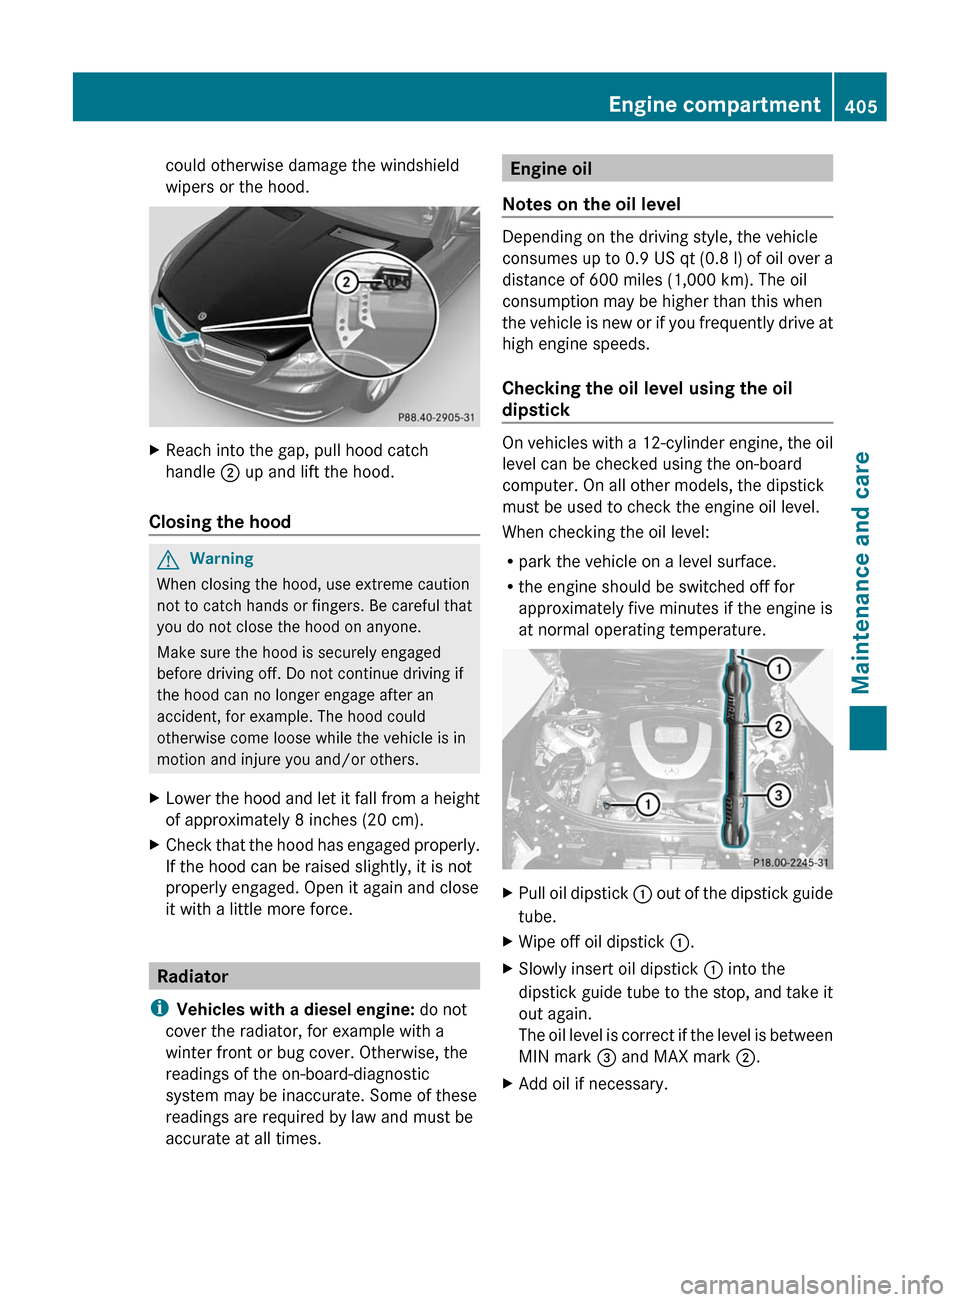
XReach into the gap, pull hood catch
handle ; up and lift the hood.
Closing the hood
GWarning
When closing the hood, use extreme caution
not to catch hands or fingers. Be careful that
you do not close the hood on anyone.
Make sure the hood is securely engaged
before driving off. Do not continue driving if
the hood can no longer engage after an
accident, for example. The hood could
otherwise come loose while the vehicle is in
motion and injure you and/or others.
XLower the hood and let it fall from a height
of approximately 8 inches (20 cm).
XCheck that the hood has engaged properly.
If the hood can be raised slightly, it is not
properly engaged. Open it again and close
it with a little more force.
Radiator
iVehicles with a diesel engine: do not
cover the radiator, for example with a
winter front or bug cover. Otherwise, the
readings of the on-board-diagnostic
system may be inaccurate. Some of these
readings are required by law and must be
accurate at all times.
Engine oil
Notes on the oil level
Depending on the driving style, the vehicle
consumes up to 0.9 US qt (0.8 l) of oil over a
distance of 600 miles (1,000 km). The oil
consumption may be higher than this when
the vehicle is new or if you frequently drive at
high engine speeds.
Checking the oil level using the oil
dipstick
On vehicles with a 12-cylinder engine, the oil
level can be checked using the on-board
computer. On all other models, the dipstick
must be used to check the engine oil level.
When checking the oil level:
Rpark the vehicle on a level surface.
Rthe engine should be switched off for
approximately five minutes if the engine is
at normal operating temperature.
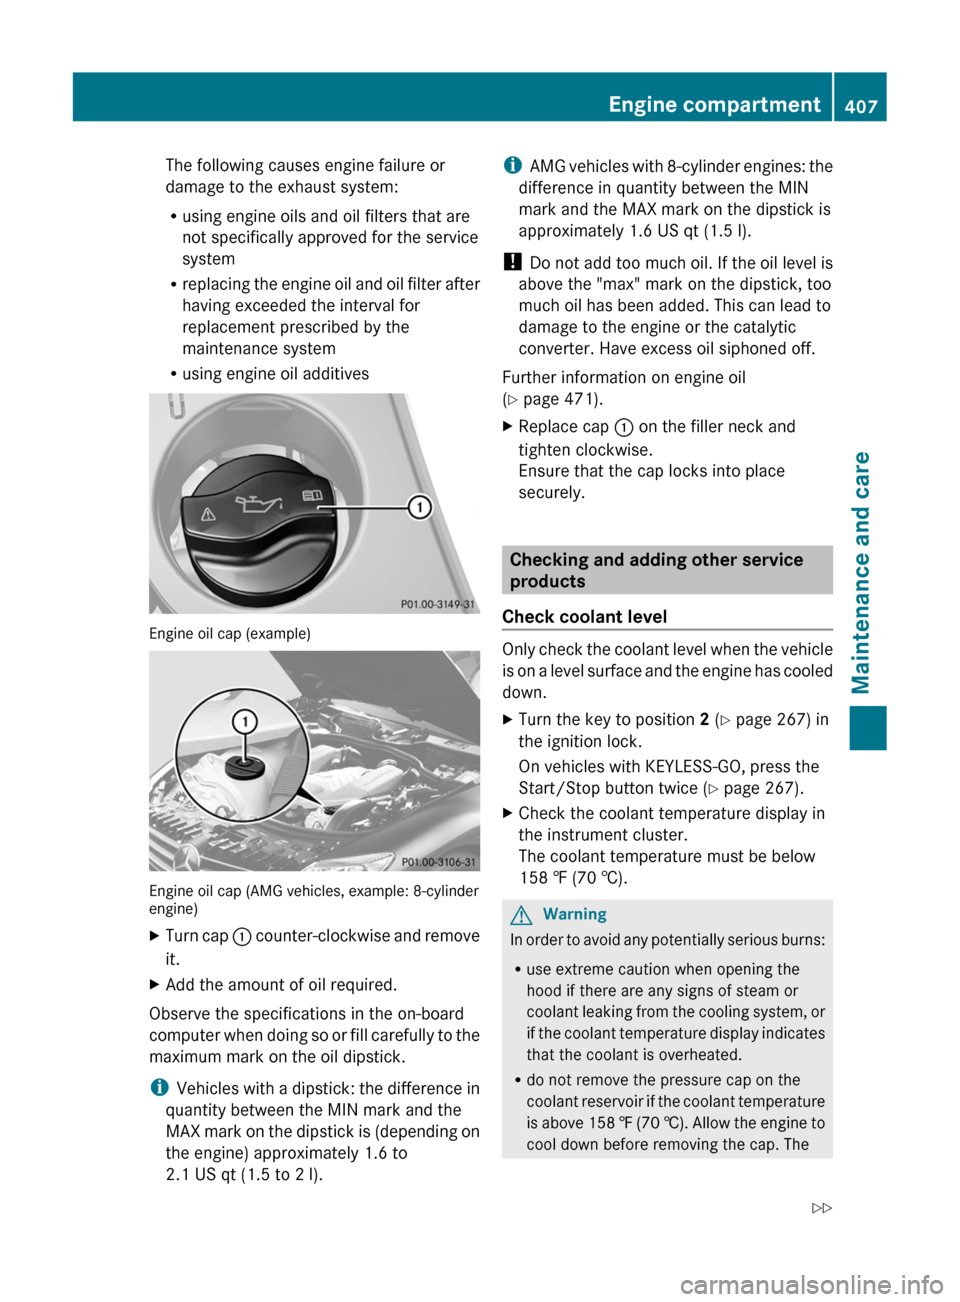
XPull oil dipstick : out of the dipstick guide
tube.
XWipe off oil dipstick :.XSlowly insert oil dipstick : into the
dipstick guide tube to the stop, and take it
out again.
The oil level is correct if the level is between
MIN mark = and MAX mark ;.
XAdd oil if necessary.Engine compartment405Maintenance and careZ
Page 409 of 480
The following causes engine failure or
damage to the exhaust system:
Rusing engine oils and oil filters that are
not specifically approved for the service
system
Rreplacing the engine oil and oil filter after
having exceeded the interval for
replacement prescribed by the
maintenance system
Rusing engine oil additives
Engine oil cap (example)
Engine oil cap (AMG vehicles, example: 8-cylinderengine)
XTurn cap : counter-clockwise and remove
it.
XAdd the amount of oil required.
Observe the specifications in the on-board
computer when doing so or fill carefully to the
maximum mark on the oil dipstick.
iVehicles with a dipstick: the difference in
quantity between the MIN mark and the
MAX mark on the dipstick is (depending on
the engine) approximately 1.6 to
2.1 US qt (1.5 to 2 l).
iAMG vehicles with 8-cylinder engines: the
difference in quantity between the MIN
mark and the MAX mark on the dipstick is
approximately 1.6 US qt (1.5 l).
! Do not add too much oil. If the oil level is
above the "max" mark on the dipstick, too
much oil has been added. This can lead to
damage to the engine or the catalytic
converter. Have excess oil siphoned off.
Further information on engine oil
(Y page 471).
XReplace cap : on the filler neck and
tighten clockwise.
Ensure that the cap locks into place
securely.
Checking and adding other service
products
Check coolant level
Only check the coolant level when the vehicle
is on a level surface and the engine has cooled
down.
XTurn the key to position 2 (Y page 267) in
the ignition lock.
On vehicles with KEYLESS-GO, press the
Start/Stop button twice (Y page 267).
XCheck the coolant temperature display in
the instrument cluster.
The coolant temperature must be below
158 ‡ (70 †).
GWarning
In order to avoid any potentially serious burns:
Ruse extreme caution when opening the
hood if there are any signs of steam or
coolant leaking from the cooling system, or
if the coolant temperature display indicates
that the coolant is overheated.
Rdo not remove the pressure cap on the
coolant reservoir if the coolant temperature
is above 158 ‡ (70 †). Allow the engine to
cool down before removing the cap. The
Engine compartment407Maintenance and careZ
Page 430 of 480
Charging the batteryGWarning
Never charge a battery while still installed in
the vehicle unless the accessory battery
charge unit approved by Mercedes-Benz is
being used. Gases may escape during
charging and cause explosions that may
result in paint damage, corrosion or personal
injury.
An accessory battery charge unit specially
adapted for Mercedes-Benz vehicles and
tested and approved by Mercedes-Benz is
available. It permits the charging of the
battery in its installed position. Contact an
authorized Mercedes-Benz Center for
information and availability.
Charge the battery in accordance with the
separate instructions for the accessory
battery charger.
GWarning
There is a risk of acid burns during the
charging process due to the gases which
escape from the battery. Do not lean over the
battery during the charging process.
GWarning
Battery acid is caustic. Avoid contact with the
skin, eyes or clothing.
! Only charge the installed battery with a
battery charger which has been tested and
approved by Mercedes-Benz. These battery
chargers allow the battery to be charged
while still installed.
! Only use battery chargers with a
maximum charging voltage of 14.8 V.
! Only charge the battery using the jump-
starting connection point.
The jump-starting connection point is in the
engine compartment ( Y page 429).
XOpen the hood ( Y page 404).XConnect the battery charger to the positive
terminal and earth point in the same orderas when connecting the donor battery in
the jump-starting procedure
( Y page 429).XRead the battery charger's operating
instructions before charging the battery.428BatteryRoadside Assistance
Page 432 of 480
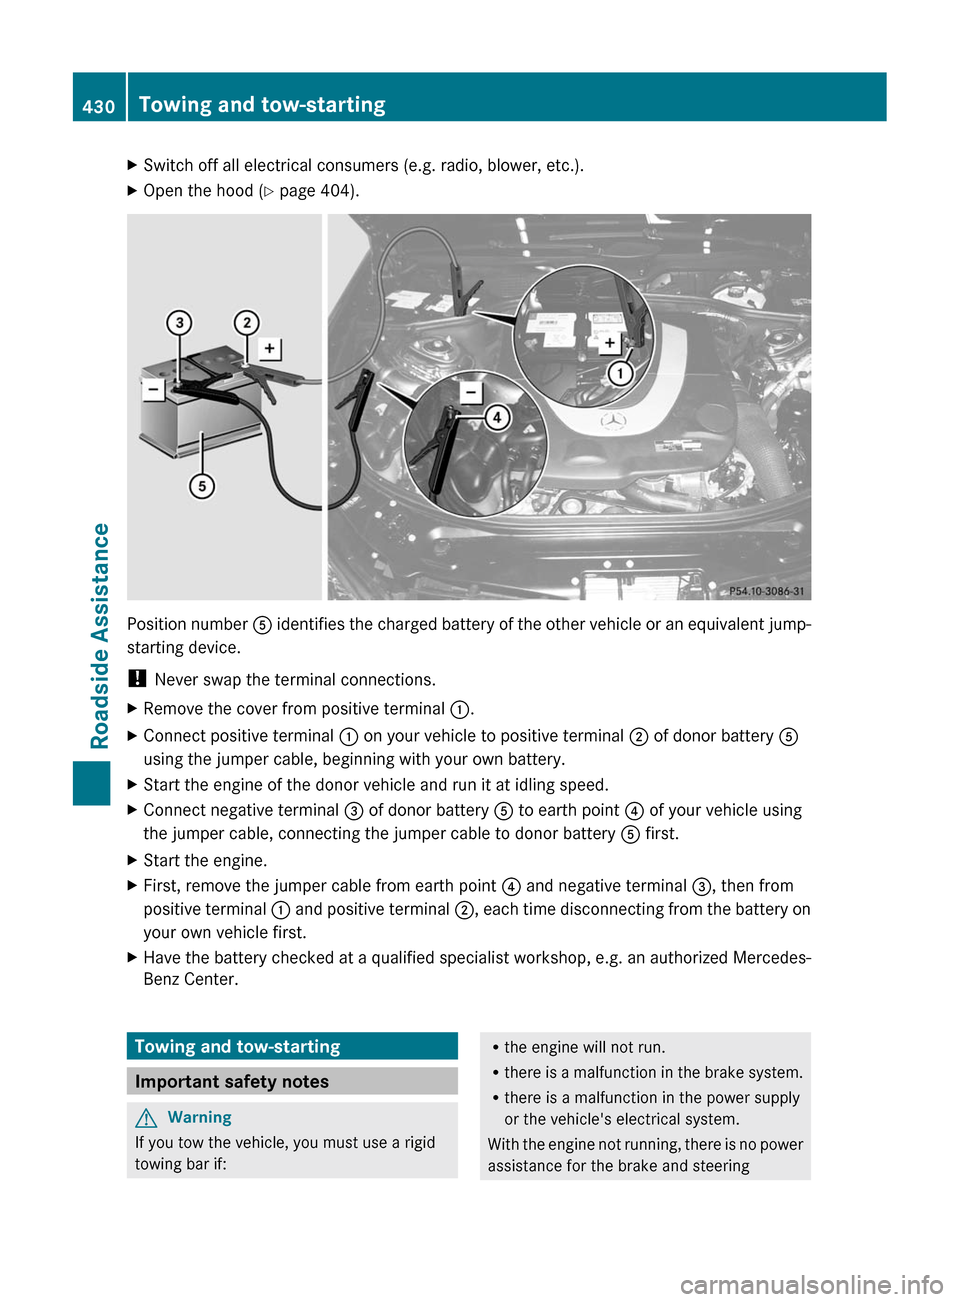
XSwitch off all electrical consumers (e.g. radio, blower, etc.).XOpen the hood (Y page 404).
Position number A identifies the charged battery of the other vehicle or an equivalent jump-
starting device.
! Never swap the terminal connections.
XRemove the cover from positive terminal :.XConnect positive terminal : on your vehicle to positive terminal ; of donor battery A
using the jumper cable, beginning with your own battery.
XStart the engine of the donor vehicle and run it at idling speed.XConnect negative terminal = of donor battery A to earth point ? of your vehicle using
the jumper cable, connecting the jumper cable to donor battery A first.
XStart the engine.XFirst, remove the jumper cable from earth point ? and negative terminal =, then from
positive terminal : and positive terminal ;, each time disconnecting from the battery on
your own vehicle first.
XHave the battery checked at a qualified specialist workshop, e.g. an authorized Mercedes-
Benz Center.Towing and tow-starting
Important safety notes
GWarning
If you tow the vehicle, you must use a rigid
towing bar if:
Rthe engine will not run.
Rthere is a malfunction in the brake system.
Rthere is a malfunction in the power supply
or the vehicle's electrical system.
With the engine not running, there is no power
assistance for the brake and steering
430Towing and tow-startingRoadside Assistance
Page 436 of 480
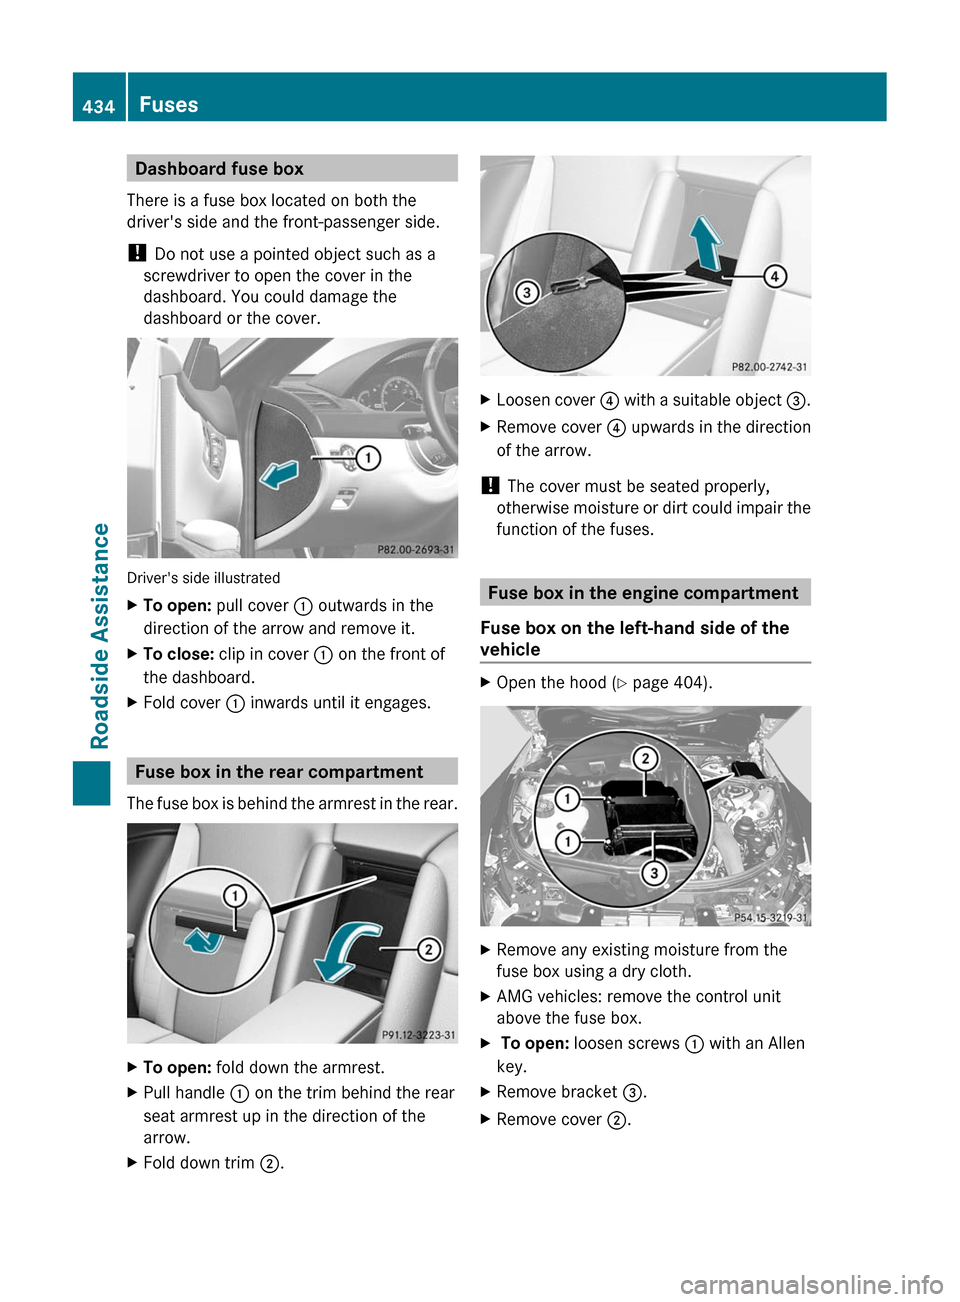
Dashboard fuse box
There is a fuse box located on both the
driver's side and the front-passenger side.
! Do not use a pointed object such as a
screwdriver to open the cover in the
dashboard. You could damage the
dashboard or the cover.
Driver's side illustrated
XTo open: pull cover : outwards in the
direction of the arrow and remove it.
XTo close: clip in cover : on the front of
the dashboard.
XFold cover : inwards until it engages.
Fuse box in the rear compartment
The fuse box is behind the armrest in the rear.
XTo open: fold down the armrest.XPull handle : on the trim behind the rear
seat armrest up in the direction of the
arrow.
XFold down trim ;.XLoosen cover ? with a suitable object =.XRemove cover ? upwards in the direction
of the arrow.
! The cover must be seated properly,
otherwise moisture or dirt could impair the
function of the fuses.
Fuse box in the engine compartment
Fuse box on the left-hand side of the
vehicle
XOpen the hood (Y page 404).XRemove any existing moisture from the
fuse box using a dry cloth.
XAMG vehicles: remove the control unit
above the fuse box.
X To open: loosen screws : with an Allen
key.
XRemove bracket =.XRemove cover ;.434FusesRoadside Assistance