key battery MERCEDES-BENZ CL-Class 2011 C216 User Guide
[x] Cancel search | Manufacturer: MERCEDES-BENZ, Model Year: 2011, Model line: CL-Class, Model: MERCEDES-BENZ CL-Class 2011 C216Pages: 480, PDF Size: 19.76 MB
Page 100 of 480
XMake sure that the SmartKey is in position
2 in the ignition lock.
XTo switch on: press button : repeatedly
until the desired heating level is set.
XTo switch off: press button : repeatedly
until all the indicator lamps go out.
Problems with the seat heating
The seat heating has switched itself off
prematurely. The vehicle's electrical system
voltage is too low because too many electrical
consumers are switched on.
XSwitch off electrical consumers which you
do not need, such as the rear window
heating or interior lighting.
Switching the seat ventilation on/off
Switching on/off
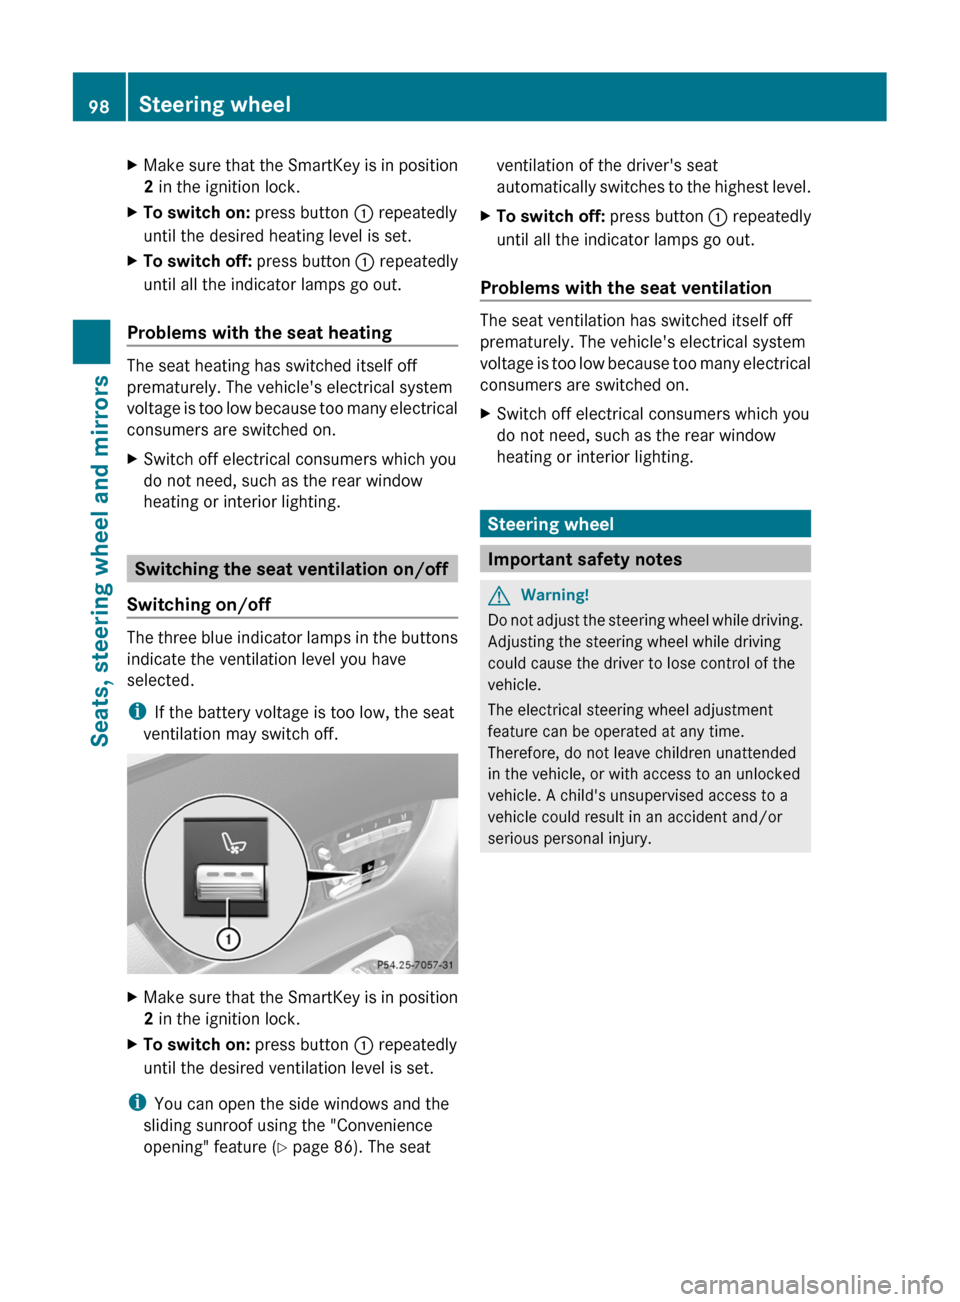
The three blue indicator lamps in the buttons
indicate the ventilation level you have
selected.
iIf the battery voltage is too low, the seat
ventilation may switch off.
XMake sure that the SmartKey is in position
2 in the ignition lock.
XTo switch on: press button : repeatedly
until the desired ventilation level is set.
iYou can open the side windows and the
sliding sunroof using the "Convenience
opening" feature (Y page 86). The seat
ventilation of the driver's seat
automatically switches to the highest level.
XTo switch off: press button : repeatedly
until all the indicator lamps go out.
Problems with the seat ventilation
The seat ventilation has switched itself off
prematurely. The vehicle's electrical system
voltage is too low because too many electrical
consumers are switched on.
XSwitch off electrical consumers which you
do not need, such as the rear window
heating or interior lighting.
Steering wheel
Important safety notes
GWarning!
Do not adjust the steering wheel while driving.
Adjusting the steering wheel while driving
could cause the driver to lose control of the
vehicle.
The electrical steering wheel adjustment
feature can be operated at any time.
Therefore, do not leave children unattended
in the vehicle, or with access to an unlocked
vehicle. A child's unsupervised access to a
vehicle could result in an accident and/or
serious personal injury.
98Steering wheelSeats, steering wheel and mirrors
Page 246 of 480
Vehicle equipment
i This manual describes all the standard
and optional equipment of your vehicle
which was available at the time of
purchase. Country-specific differences are
possible. Bear in mind that your vehicle
may not feature all functions described
here. This also refers to safety-related
systems and functions.
Exterior lighting
Important safety notes
For reasons of safety, Mercedes-Benz
recommends that you drive with the lights
switched on even during the daytime. In some
countries, operation of the headlamps varies
due to legal requirements and self-imposed
obligations.
Notes on driving abroad
Convert to symmetrical low beam when
driving abroad: switch the headlamps to
symmetrical low beam in countries in which
traffic drives on the opposite side of the road
from the country where the vehicle is
registered. This prevents oncoming traffic
from being dazzled. Symmetrical lights do not
illuminate as large an area of the edge of the
road.
Have the headlamps converted at a qualified
specialist workshop, e.g. an authorized
Mercedes-Benz Center, as close to the border
as possible before driving in these countries.
Convert to asymmetrical low beam after
returning: have the headlamps converted
back to asymmetrical low beam at a qualified
specialist workshop, e.g. an authorized
Mercedes-Benz Center, as soon as possible
after crossing the border when returning.
Light switch
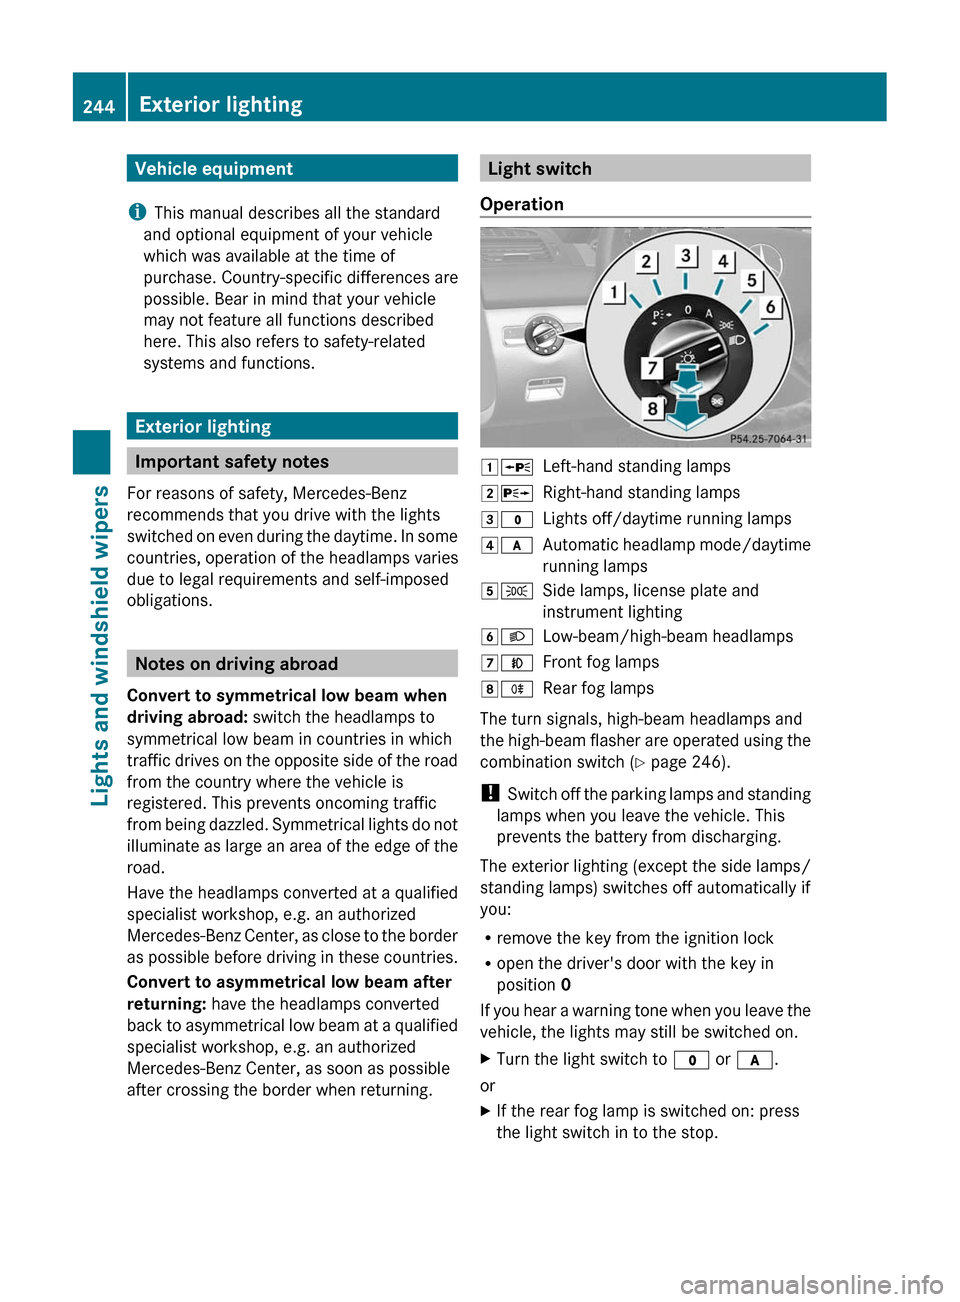
Operation1 WLeft-hand standing lamps2XRight-hand standing lamps3$Lights off/daytime running lamps4cAutomatic headlamp mode/daytime
running lamps5 TSide lamps, license plate and
instrument lighting6 LLow-beam/high-beam headlamps7NFront fog lamps8RRear fog lamps
The turn signals, high-beam headlamps and
the high-beam flasher are operated using the
combination switch ( Y page 246).
! Switch off the parking lamps and standing
lamps when you leave the vehicle. This
prevents the battery from discharging.
The exterior lighting (except the side lamps/
standing lamps) switches off automatically if
you:
R remove the key from the ignition lock
R open the driver's door with the key in
position 0
If you hear a warning tone when you leave the
vehicle, the lights may still be switched on.
XTurn the light switch to $ or c .
or
XIf the rear fog lamp is switched on: press
the light switch in to the stop.244Exterior lightingLights and windshield wipers
Page 251 of 480
The cornering light function improves the
illumination of the road over a wide angle in
the direction you are turning, enabling better
visibility in tight bends, for example. It can
only be activated when the low-beam
headlamps are switched on.
Active:
Rif you are driving at speeds below 25
(40 km/h) and switch on the turn signals
or turn the steering wheel.
Rif you are driving at speeds between
25 mph (40 km/h) and
45 mph (70 km/h) and turn the steering
wheel.
Not active: if you are driving at speeds above
25 mph (40 km/h) or switch off the turn
signals or turn the steering wheel to the
straight-ahead position.
The cornering light function may remain lit for
a short time, but is automatically switched off
after no more than three minutes.
Headlamps fogged up on the inside
The headlamps may fog up on the inside if
there is high atmospheric humidity.
XDrive with the headlamps switched on.
The headlamps clear up after a short
distance.
If the moisture does not disappear, the
headlamp casing is not sealed correctly and
moisture has been able to enter.
XHave the headlamps checked at a qualified
specialist workshop.Interior lighting
Overview of interior lighting
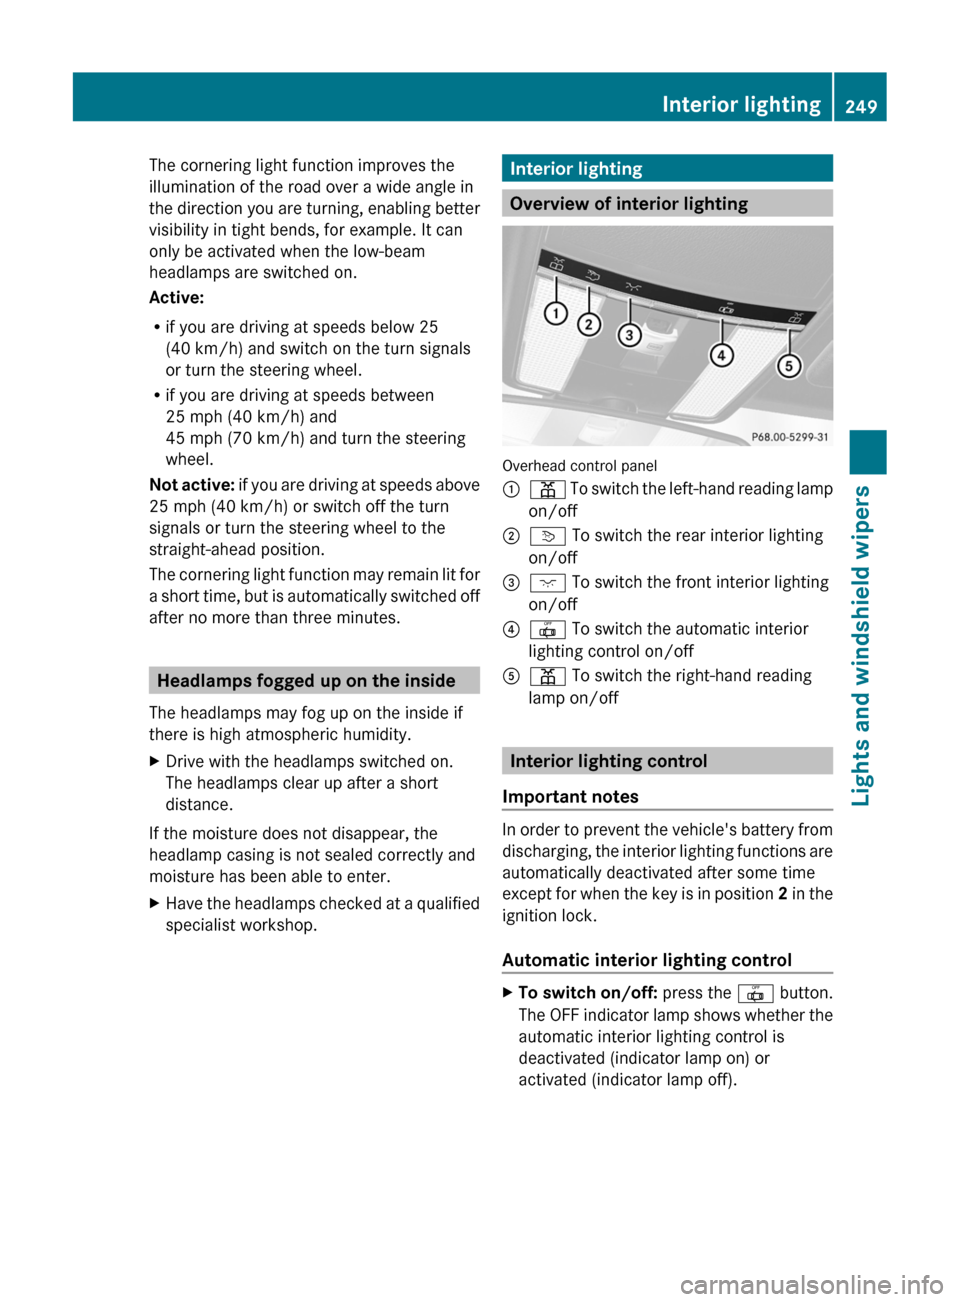
Overhead control panel
:p To switch the left-hand reading lamp
on/off
;v To switch the rear interior lighting
on/off
=c To switch the front interior lighting
on/off
?| To switch the automatic interior
lighting control on/off
Ap To switch the right-hand reading
lamp on/off
Interior lighting control
Important notes
In order to prevent the vehicle's battery from
discharging, the interior lighting functions are
automatically deactivated after some time
except for when the key is in position 2 in the
ignition lock.
Automatic interior lighting control
XTo switch on/off: press the | button.
The OFF indicator lamp shows whether the
automatic interior lighting control is
deactivated (indicator lamp on) or
activated (indicator lamp off).
Interior lighting249Lights and windshield wipersZ
Page 263 of 480
Rear window defroster
Activating/deactivatingGWarning
Any accumulation of snow and ice should be
removed from the rear window before driving.
Visibility could otherwise be impaired,
endangering you and others.
The rear window heating has a high current
draw. You should therefore switch it off as
soon as the window is clear as it only switches
off automatically after several minutes.
If the battery voltage is too low, the rear
window heating may switch off.
XTurn the SmartKey to position 2 in the
ignition lock.XPress the ¤ rocker switch up or down.
The indicator lamp in the ¤ rocker
switch lights up or goes out.
Problems with the rear window heating
The rear window heating has deactivated
itself prematurely or cannot be activated.
XSwitch off any consumers that are not
required, e.g. reading lamps or interior
lighting.
When the battery is sufficiently charged,
the rear window heating is activated again
automatically.
Activating/deactivating air-
recirculation mode
You can deactivate the flow of fresh air if
unpleasant odors are entering the vehicle
from outside. The air already inside the
vehicle will then be recirculated.
GWarning
Fogged windows impair visibility,
endangering you and others. If the windows
begin to fog on the inside, switching off the
air recirculation mode immediately should
clear interior window fogging. If interior
window fogging persists, make sure the air
conditioning is activated, or press the ¬
button.XTurn the SmartKey to position 2 in the
ignition lock.XTo activate: press the g rocker switch
up or down.
The indicator lamp in the g rocker
switch lights up.
i Air-recirculation mode is activated
automatically at high outside
temperatures. The indicator lamp in the
g rocker switch is not lit when
automatic air-recirculation mode is
activated.
Outside air is added after about 30
minutes.
X To deactivate: press the g rocker
switch up or down.
The indicator lamp in the g rocker
switch goes out.
i Air-recirculation mode switches off
automatically:
R after approximately five minutes if
outside temperatures are under about
41 ‡ (5 †)
R after approximately five minutes if
cooling with air dehumidification is
deactivated
R after approximately 30 minutes if outside
temperatures are over about
41 ‡ (5 †)
Switching the residual heat on/off
It is possible to make use of the residual heat
of the engine to continue heating the
stationary vehicle for up to 30 minutes after
the engine has been switched off. The heating
time depends on the temperature that has
been set.
i The blower will run at a low speed
regardless of the airflow setting.
Operating the control systems261Climate controlZ
Page 264 of 480
iIf you activate the "residual heat" function
at high temperatures, only the ventilation
will be activated. The blower runs at
medium speed.
XTurn the key to position 0 in the ignition
lock or remove it.
XTo switch on: press the Ì rocker
switch up or down.
The indicator lamp in the Ì rocker
switch lights up.
XTo switch off: press the Ì rocker
switch up or down.
The indicator lamp in the Ì rocker
switch goes out.
iResidual heat is deactivated
automatically:
Rafter about 30 minutes
Rwhen the ignition is switched on
Rif the battery voltage drops
Rif the coolant temperature is too low
Setting the air vents
Important safety notes
GWarning
When operating the climate control, the air
that enters the passenger compartment
through the air vents can be very hot or very
cold (depending on the set temperature). This
could cause burns or frostbite to unprotected
skin in the immediate area of the air vents.
Always keep sufficient distance between
unprotected parts of the body and the air
vents. If necessary, use the air distribution
adjustment to direct the air to air vents in the
vehicle interior that are not in the immediate
area of unprotected skin.
In order to ensure the direct flow of fresh air
through the air vents into the vehicle interior,
please observe the following notes:
Rkeep the air inlet grille on the hood free of
blockages, such as ice, snow or leaves
Rnever cover the vents or air inlet and outlet
grilles in the vehicle interior.
iFor virtually draft-free ventilation, adjust
the sliders of the air vents to the center
position.
Setting the center air vents
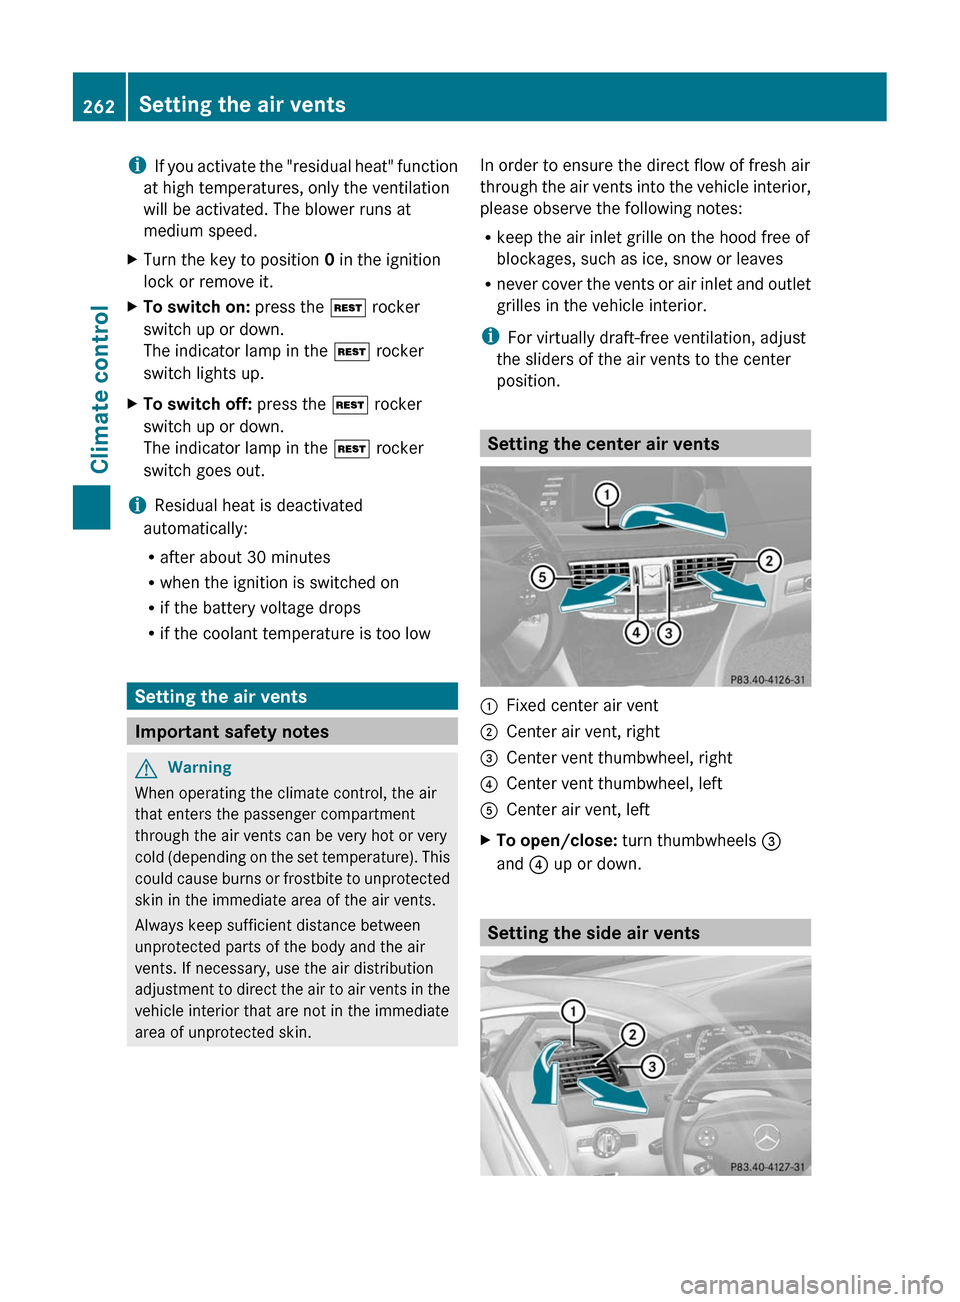
:Fixed center air vent;Center air vent, right=Center vent thumbwheel, right?Center vent thumbwheel, leftACenter air vent, leftXTo open/close: turn thumbwheels =
and ? up or down.
Setting the side air vents
262Setting the air ventsClimate control
Page 269 of 480
gear when the engine is idling normally and
when your right foot is firmly on the brake
pedal.
! Warm up the engine quickly. Do not use
the engine's full performance until it has
reached operating temperature.
Only shift the automatic transmission to
the desired drive position when the vehicle
is stationary.
Where possible, avoid spinning the drive
wheels when pulling away on slippery
roads. You could otherwise damage the
drive train.
! CL 63 AMG: at low engine oil
temperatures below 68 ‡ (+20 †), the
maximum engine speed is restricted in
order to protect the engine. To protect the
engine and maintain smooth engine
operation, avoid driving at full throttle when
the engine is cold.
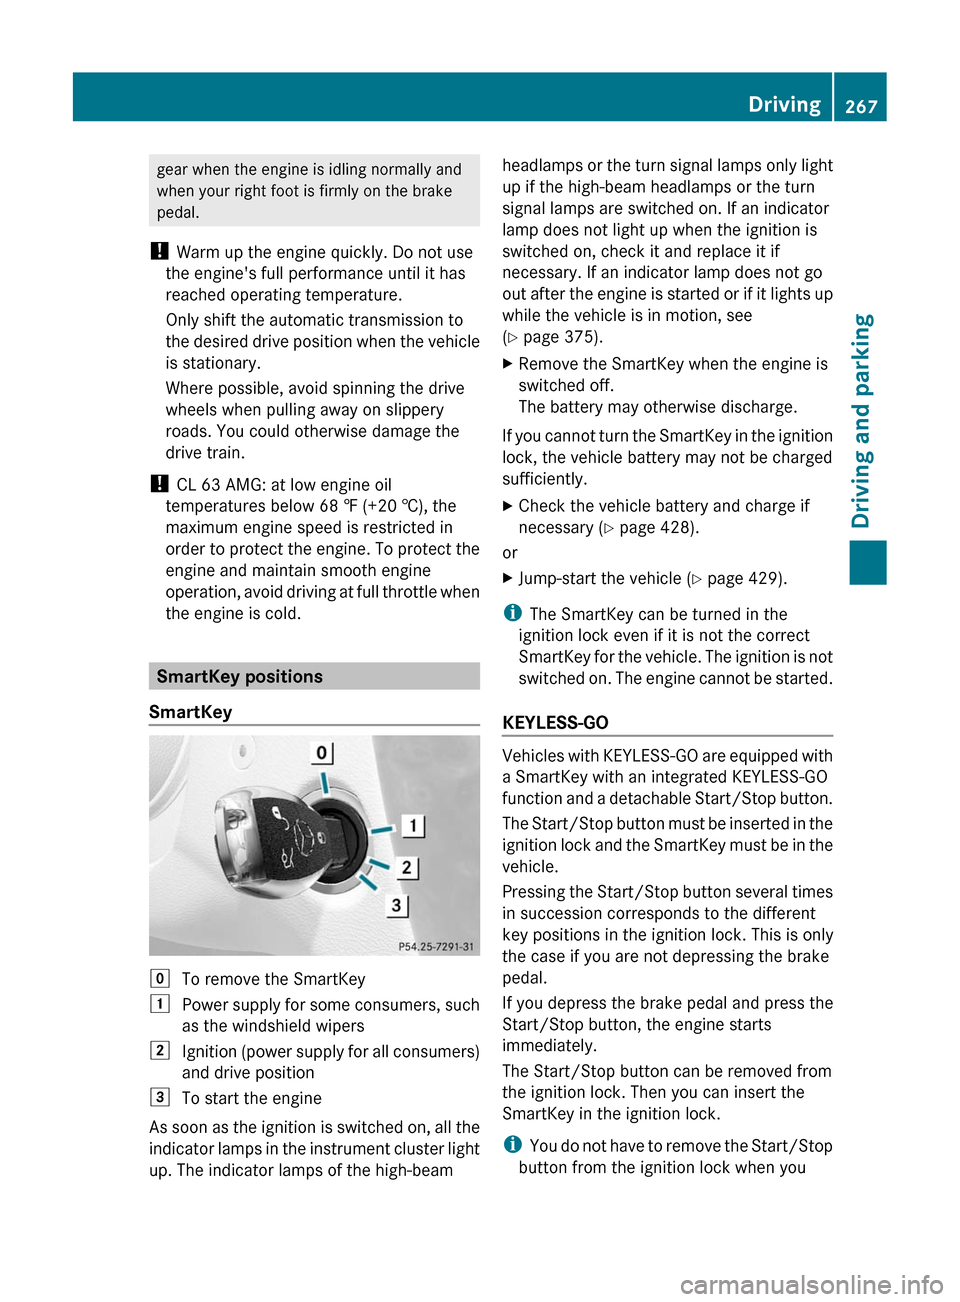
SmartKey positions
SmartKey
gTo remove the SmartKey1Power supply for some consumers, such
as the windshield wipers2Ignition (power supply for all consumers)
and drive position3To start the engine
As soon as the ignition is switched on, all the
indicator lamps in the instrument cluster light
up. The indicator lamps of the high-beam
headlamps or the turn signal lamps only light
up if the high-beam headlamps or the turn
signal lamps are switched on. If an indicator
lamp does not light up when the ignition is
switched on, check it and replace it if
necessary. If an indicator lamp does not go
out after the engine is started or if it lights up
while the vehicle is in motion, see
( Y page 375).XRemove the SmartKey when the engine is
switched off.
The battery may otherwise discharge.
If you cannot turn the SmartKey in the ignition
lock, the vehicle battery may not be charged
sufficiently.
XCheck the vehicle battery and charge if
necessary ( Y page 428).
or
XJump-start the vehicle ( Y page 429).
i
The SmartKey can be turned in the
ignition lock even if it is not the correct
SmartKey for the vehicle. The ignition is not
switched on. The engine cannot be started.
KEYLESS-GO
Vehicles with KEYLESS-GO are equipped with
a SmartKey with an integrated KEYLESS-GO
function and a detachable Start/Stop button.
The Start/Stop button must be inserted in the
ignition lock and the SmartKey must be in the
vehicle.
Pressing the Start/Stop button several times
in succession corresponds to the different
key positions in the ignition lock. This is only
the case if you are not depressing the brake
pedal.
If you depress the brake pedal and press the
Start/Stop button, the engine starts
immediately.
The Start/Stop button can be removed from
the ignition lock. Then you can insert the
SmartKey in the ignition lock.
i You do not have to remove the Start/Stop
button from the ignition lock when you
Driving267Driving and parkingZ
Page 275 of 480
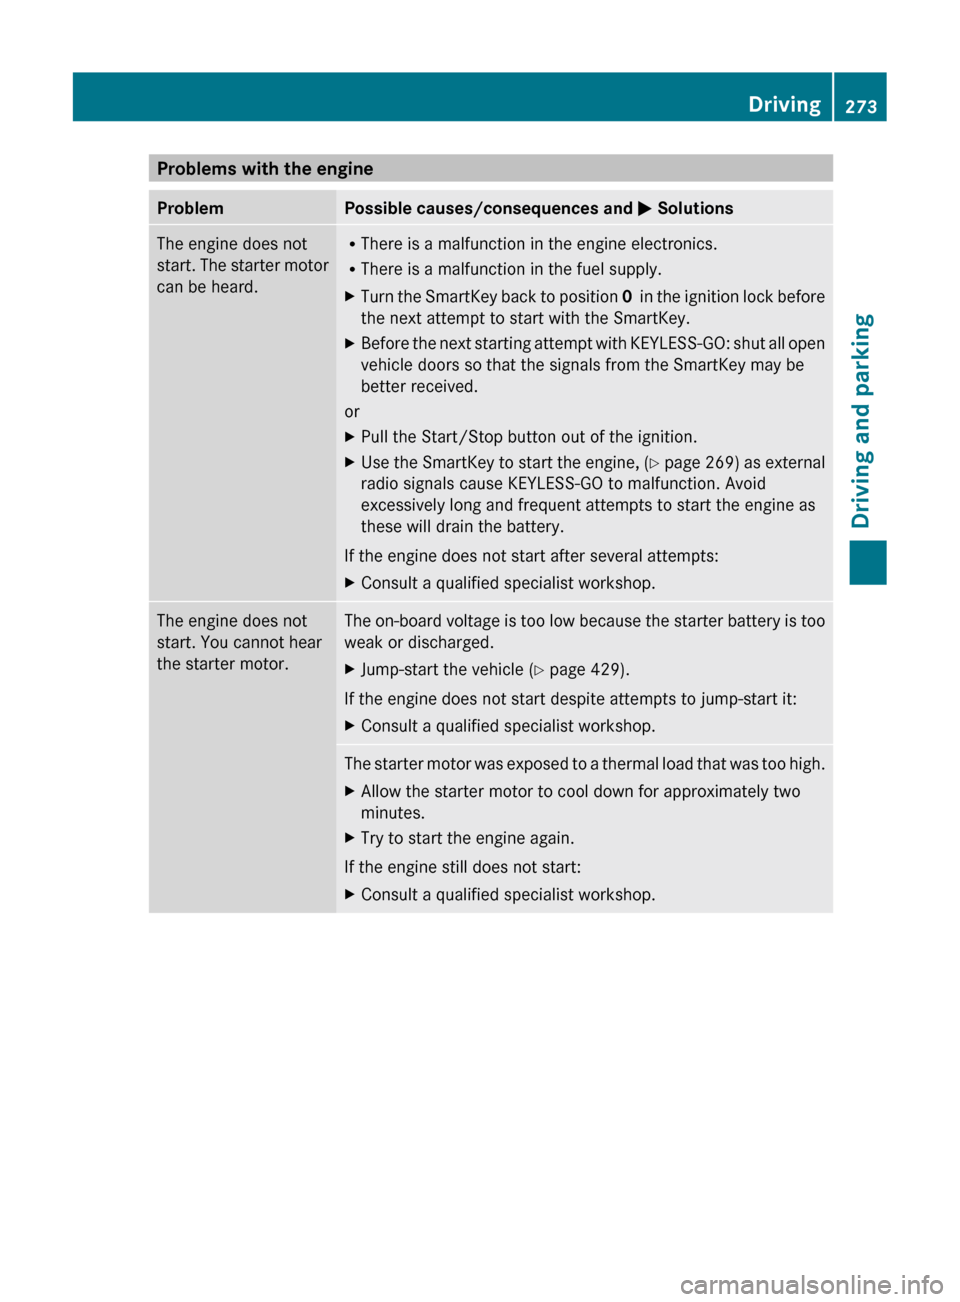
Problems with the engineProblemPossible causes/consequences and M SolutionsThe engine does not
start. The starter motor
can be heard.R There is a malfunction in the engine electronics.
R There is a malfunction in the fuel supply.XTurn the SmartKey back to position 0 in the ignition lock before
the next attempt to start with the SmartKey.XBefore the next starting attempt with KEYLESS-GO: shut all open
vehicle doors so that the signals from the SmartKey may be
better received.
or
XPull the Start/Stop button out of the ignition.XUse the SmartKey to start the engine, (Y page 269) as external
radio signals cause KEYLESS-GO to malfunction. Avoid
excessively long and frequent attempts to start the engine as
these will drain the battery.
If the engine does not start after several attempts:
XConsult a qualified specialist workshop.The engine does not
start. You cannot hear
the starter motor.The on-board voltage is too low because the starter battery is too
weak or discharged.XJump-start the vehicle ( Y page 429).
If the engine does not start despite attempts to jump-start it:
XConsult a qualified specialist workshop.The starter motor was exposed to a thermal load that was too high.XAllow the starter motor to cool down for approximately two
minutes.XTry to start the engine again.
If the engine still does not start:
XConsult a qualified specialist workshop.Driving273Driving and parkingZ
Page 288 of 480
lock is in position 1 or if the ignition is
switched on using the Start/Stop button.
Releasing the electric parking brake
automatically
The electric parking brake is released
automatically when the following conditions
are simultaneously fulfilled:
R the engine is running.
R the automatic transmission is in position
D or R.
R the hood is closed.
R your seat belt is fastened.
R you depress the accelerator pedal.
If the automatic transmission is in position
R , the trunk lid must be closed.
For the parking brake to be released
automatically if your seat belt is not fastened,
the following conditions must be fulfilled:
R the driver's door is closed.
R you shift out of P or you have previously
driven faster than 2 mph (3 km/h).
Engaging the electric parking brake
manually
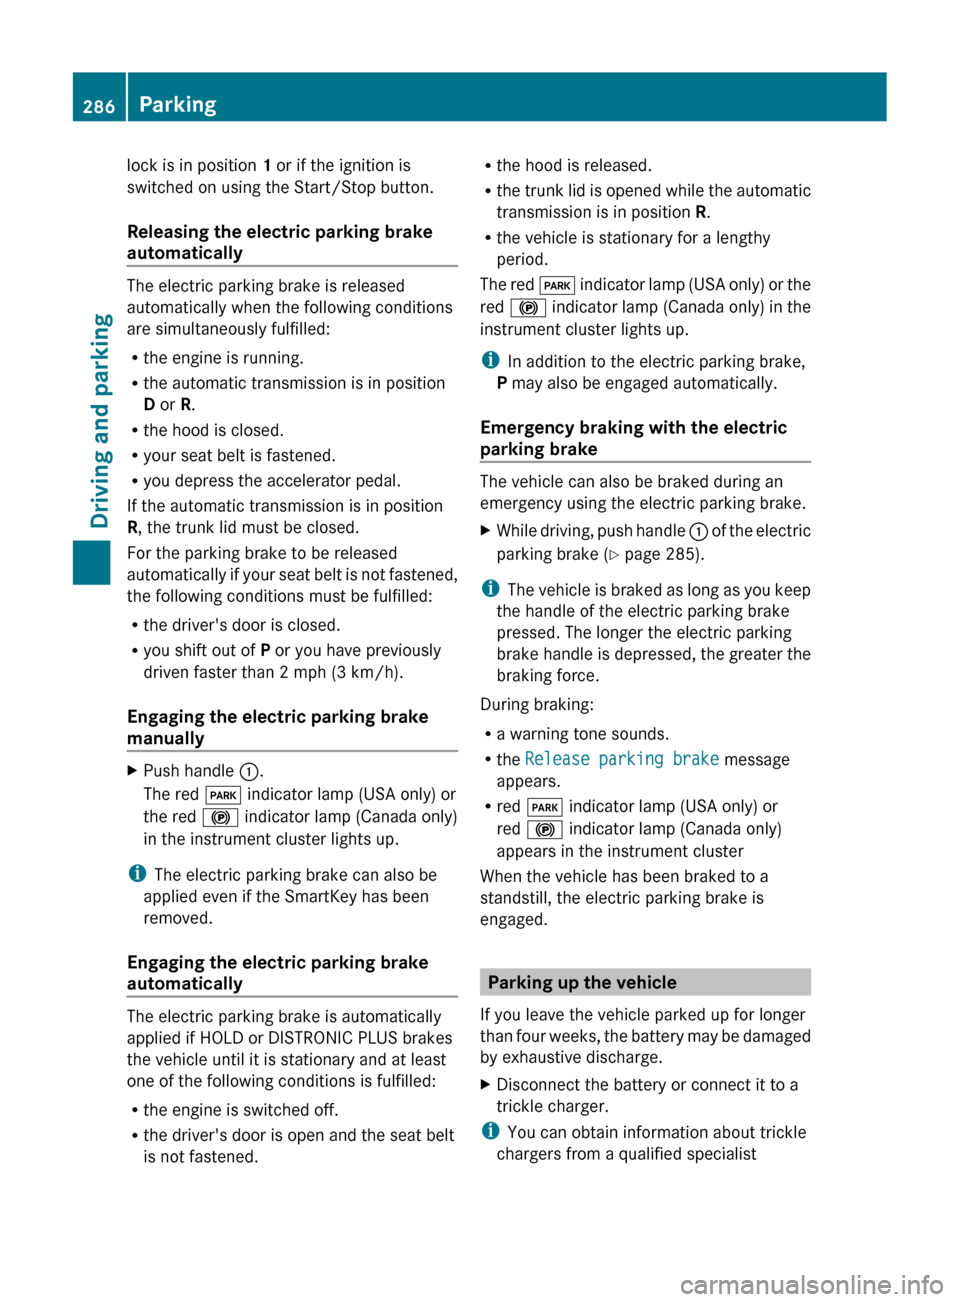
XPush handle :.
The red F indicator lamp (USA only) or
the red ! indicator lamp (Canada only)
in the instrument cluster lights up.
i The electric parking brake can also be
applied even if the SmartKey has been
removed.
Engaging the electric parking brake
automatically
The electric parking brake is automatically
applied if HOLD or DISTRONIC PLUS brakes
the vehicle until it is stationary and at least
one of the following conditions is fulfilled:
R the engine is switched off.
R the driver's door is open and the seat belt
is not fastened.
R the hood is released.
R the trunk lid is opened while the automatic
transmission is in position R.
R the vehicle is stationary for a lengthy
period.
The red F indicator lamp (USA only) or the
red ! indicator lamp (Canada only) in the
instrument cluster lights up.
i In addition to the electric parking brake,
P may also be engaged automatically.
Emergency braking with the electric
parking brake
The vehicle can also be braked during an
emergency using the electric parking brake.
XWhile driving, push handle : of the electric
parking brake ( Y page 285).
i
The vehicle is braked as long as you keep
the handle of the electric parking brake
pressed. The longer the electric parking
brake handle is depressed, the greater the
braking force.
During braking:
R a warning tone sounds.
R the Release parking brake message
appears.
R red F indicator lamp (USA only) or
red ! indicator lamp (Canada only)
appears in the instrument cluster
When the vehicle has been braked to a
standstill, the electric parking brake is
engaged.
Parking up the vehicle
If you leave the vehicle parked up for longer
than four weeks, the battery may be damaged
by exhaustive discharge.
XDisconnect the battery or connect it to a
trickle charger.
i You can obtain information about trickle
chargers from a qualified specialist
286ParkingDriving and parking
Page 306 of 480
Rthe electrical system in the engine
compartment, the battery or the fuses are
tampered with.
Rthe battery is disconnected.
AIRMATIC
Vehicle level
Your vehicle regulates its height
automatically. All-round self-leveling ensures
the best possible suspension and constant
ground clearance, even with a laden vehicle.
When you drive fast, the vehicle is lowered
automatically to improve driving safety and to
reduce fuel consumption.
The following vehicle levels are possible:
Rnormal.
Rraised: the vehicle is raised above the
normal level by 1.20 in (30 mm).
Rlowered: the vehicle is lowered beyond the
normal level by 0.40 in (10 mm).
The "Normal" and "Raised" vehicle levels can
be set manually.
The "Lowered” vehicle level is set
automatically at speeds over 60 mph
(100 km/h).
Setting the vehicle level
Select the "Normal" setting for normal road
surfaces and "Raised" for driving with snow
chains or on particularly poor road surfaces.
Your selection remains stored even if you
remove the SmartKey from the ignition lock.
GWarning!
To help avoid personal injury, keep hands and
feet away from wheel housing area, and stay
away from under the vehicle when lowering
the vehicle chassis.
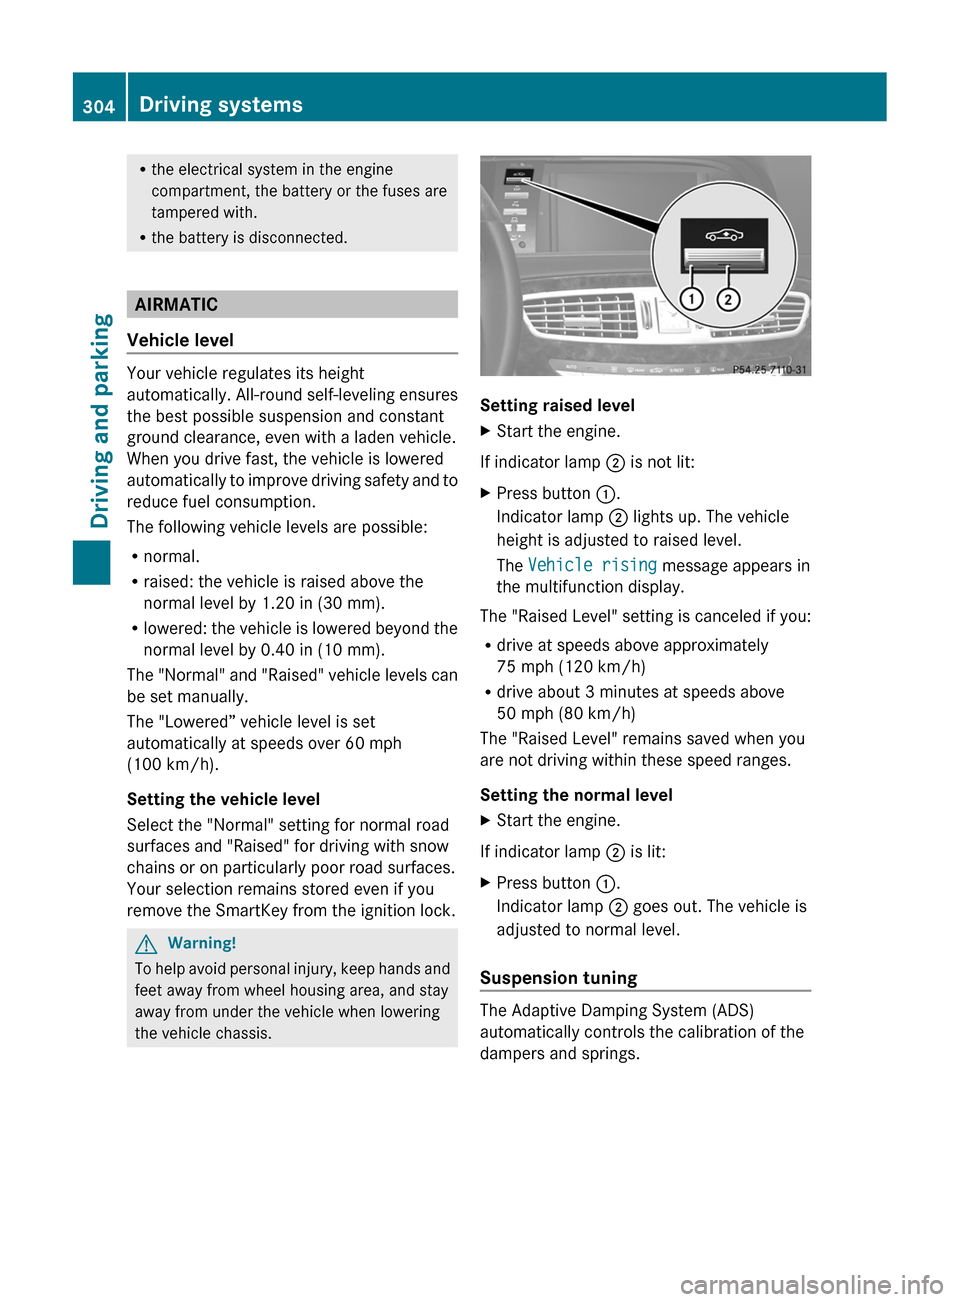
Setting raised level
XStart the engine.
If indicator lamp ; is not lit:
XPress button :.
Indicator lamp ; lights up. The vehicle
height is adjusted to raised level.
The Vehicle rising message appears in
the multifunction display.
The "Raised Level" setting is canceled if you:
Rdrive at speeds above approximately
75 mph (120 km/h)
Rdrive about 3 minutes at speeds above
50 mph (80 km/h)
The "Raised Level" remains saved when you
are not driving within these speed ranges.
Setting the normal level
XStart the engine.
If indicator lamp ; is lit:
XPress button :.
Indicator lamp ; goes out. The vehicle is
adjusted to normal level.
Suspension tuning
The Adaptive Damping System (ADS)
automatically controls the calibration of the
dampers and springs.
304Driving systemsDriving and parking
Page 375 of 480
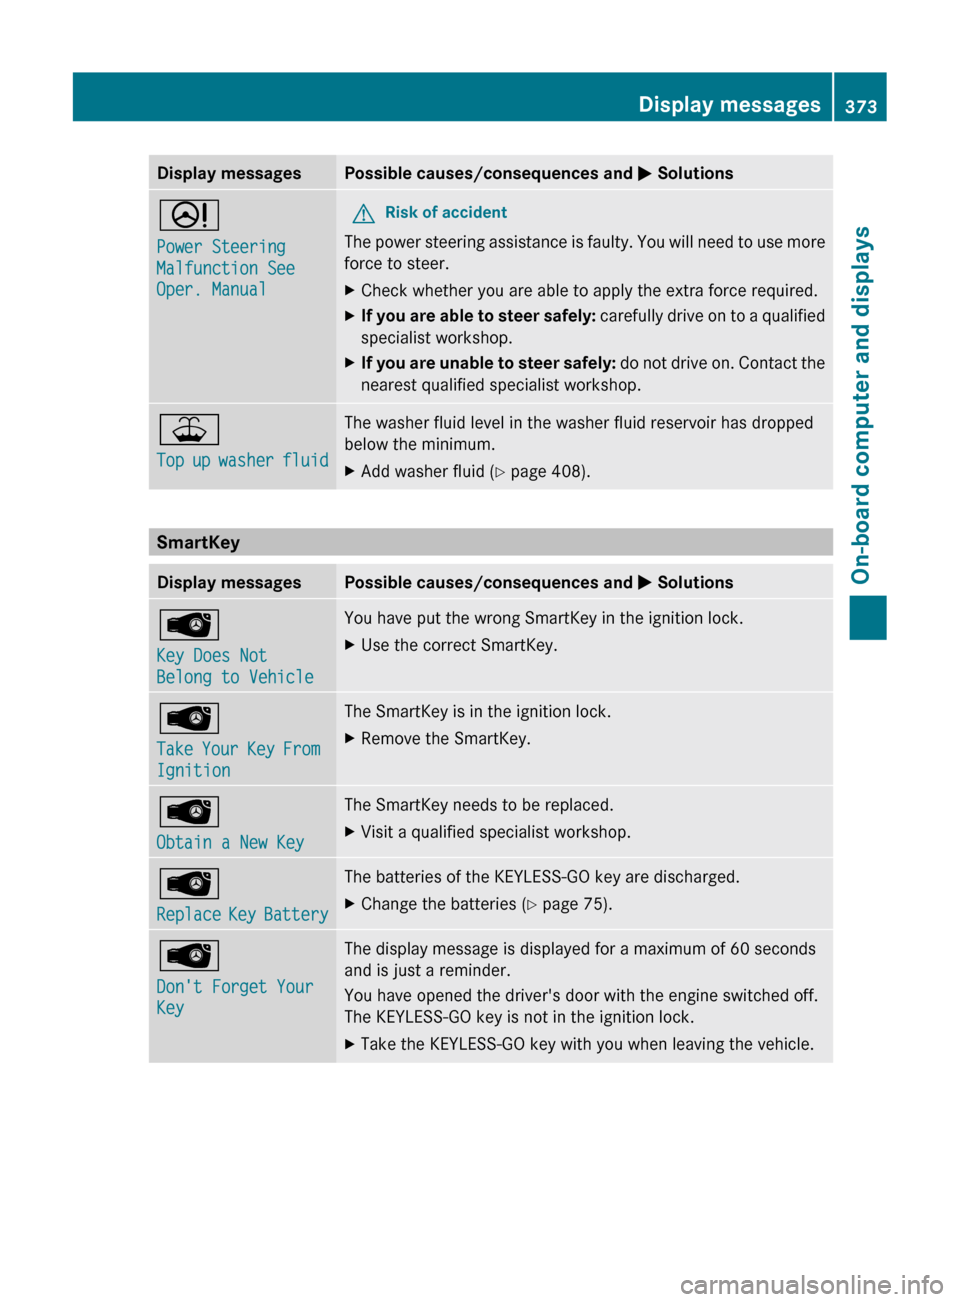
Display messagesPossible causes/consequences and M SolutionsD
Power Steering
Malfunction See
Oper. ManualGRisk of accident
The power steering assistance is faulty. You will need to use more
force to steer.
XCheck whether you are able to apply the extra force required.XIf you are able to steer safely: carefully drive on to a qualified
specialist workshop.XIf you are unable to steer safely: do not drive on. Contact the
nearest qualified specialist workshop.¥
Top up washer fluidThe washer fluid level in the washer fluid reservoir has dropped
below the minimum.XAdd washer fluid ( Y page 408).
SmartKey
Display messagesPossible causes/consequences and M SolutionsÂ
Key Does Not
Belong to VehicleYou have put the wrong SmartKey in the ignition lock.XUse the correct SmartKey.Â
Take Your Key From
IgnitionThe SmartKey is in the ignition lock.XRemove the SmartKey.Â
Obtain a New Key The SmartKey needs to be replaced.XVisit a qualified specialist workshop.Â
Replace Key BatteryThe batteries of the KEYLESS-GO key are discharged.XChange the batteries ( Y page 75).Â
Don't Forget Your
KeyThe display message is displayed for a maximum of 60 seconds
and is just a reminder.
You have opened the driver's door with the engine switched off.
The KEYLESS-GO key is not in the ignition lock.XTake the KEYLESS-GO key with you when leaving the vehicle.Display messages373On-board computer and displaysZ