window MERCEDES-BENZ CL-Class 2011 C216 Workshop Manual
[x] Cancel search | Manufacturer: MERCEDES-BENZ, Model Year: 2011, Model line: CL-Class, Model: MERCEDES-BENZ CL-Class 2011 C216Pages: 480, PDF Size: 19.76 MB
Page 221 of 480
XOn the multifunction steering wheel:
switch on Media Interface mode in
COMAND ( Y page 217).XOn the multifunction steering wheel, press
the = or ; button to select the
Audio menu.XOn the multifunction steering wheel, press
9 or : to select a track.
Selecting using the number keypad
XTo make an entry: press the Ä button.
The input menu appears. The number of
characters available for input depends on
the number of stored tracks.XTo enter a track number: press a number
key, e.g. q.
The digit is entered in the first position in
the input line.
i COMAND will ignore and not display an
invalid digit.
XEnter more numbers if desired.
The selected track is played.
Fast forward/rewind
XWhile the display/selection window is
active, slide XVY and hold the COMAND
controller until the desired position has
been reached.
i On an iPod ®
, fast rewind only functions
within the current track.
Selecting a category/playlist/folder
iPod ®
and certain MP3 players
For an iPod ®
or MP3 player, you can select
tracks using categories or folders.
Depending on the device connected, the
following categories may be available, for
example:
R Current Track List
R Playlists (e.g. All)
R Artists
R Albums
R
Track
R Podcasts
R Genres
R Composers
R Audiobooks
i Some playback categories contain the
entry All. If this entry has been selected,
the entire content of the category selected
will be played.
USB devices
For USB mass storage devices, you can select
both folders as well as any existing playlists.
COMAND can also display the album name
and artist (metadata) during playback, if this
information has been entered into the
system.
Playlists are indicated in the display by a
special icon. When you open the playlist, the
corresponding tracks are opened and
playback begins. You can now select
Category mix instead of Random folder as
a playback option.
For USB mass storage devices, you can
choose to display the metadata contained in
the tags of the encoded music data, or to
display the file and directory names during
playback.XTo display the album and artist name:
select Media Interface in the basic
display by sliding VÆ and turning cVd the
COMAND controller and press W to
confirm.XSelect Display Metadata and press W to
confirm.
Selecting a category and opening a folder
XPress W the COMAND controller when the
display/selection window is active.XSelect Folder by sliding VÆ and turning
cVd the COMAND controller and press
W to confirm.
The available categories or the folder
contents (e.g. further folders) areAudio219COMANDZ
Page 223 of 480
Selecting an active partition (USB mass
storage devices only)
You can select this function for USB mass
storage devices when the storage device is
partitioned. Up to four partitions (primary or
logical; FAT format) are supported.
i The Windows formatting program
supports FAT partitions of up to 32 GB as
standard.
XSelect Media Interface in the basic
display by sliding VÆ and turning cVd the
COMAND controller and press W to
confirm.XSelect Select active partition and
press W to confirm.
Playback options
The following options are available:
R Normal track sequence
Normal track sequence: You hear the
tracks in their normal order (numerical or
alphabetical).
R Random tracks:
All the tracks on the medium are played in
random order.
R Category mix or Random folder (for USB
devices if Folder has been selected)
The tracks in the currently active category
or folder, including any subfolders, are
played in random order.
i For USB devices, the random playlists
offer a maximum of 300 tracks chosen at
random.
XTo select a playback option: select
Media Interface in the basic display by
sliding VÆ and turning cVd the COMAND
controller and press W to confirm.
The options list appears. The # dot
indicates the option selected.XSelect an option and press W to confirm.Separate USB connection
In addition to the USB connection on the
Media Interface, there is another USB
connection in the glove box. This connection
can also be used to play audio files.
Electrical consumption at this connection
must not exceed a continuous current of
500 mA. If the electrical consumption is
higher, use a separate source to provide
power for the USB device (e.g.
12 V power supply).
Notes on USB devices
Data formats
The following data formats are supported:
R MP3: CBR, VBR (up to 320 kbit/s)
R wma: CBR, VBR (up to 320 kbit/s)
Notes on USB devices
R In order to keep the initialization time to a
minimum, store only music data on a USB
device.
R Approximately 10,000 tracks are
supported. Multiple folders should be used
for larger numbers of tracks.
R Do not use USB extension leads or
adapters. They can impair functionality.
R A background search of the USB device is
performed and any playlists found are
shown in a separate category in addition to
the folders. Initialization of larger USB mass
storage devices containing a high number
of files may take several minutes.
i DRM (Digital Rights Management)
protected files are not supported by the
Media Interface.
Audio AUX mode
Notes on audio AUX mode
You can connect an external audio source
(AUX) to COMAND. The socket for this is
located in the glove box.
Audio221COMANDZ
Page 231 of 480
Switching on video AUX modeXSelect Video in the main function bar by
sliding ZV and turning cVd the COMAND
controller and press W to confirm.
If video AUX mode was the last mode
selected, it will now be active.
If another video source is switched on, you
can now switch to video AUX mode in the
video menu.
XSelect Video and press W to confirm.XSelect Aux and press W to confirm.
The video AUX menu appears. You will hear
and see the content of the external video
source if it is connected and switched to
playback.
For details on how to operate the external
video source, see the respective device's
operating instructions.
Showing/hiding the menu
XTo show: press W the COMAND
controller.
XTo hide: slide ZV the COMAND controller
and confirm Full screen by pressing W.
Volume and sound settings
You will find details on volume (Y page 124)
and sound (Y page 125) settings in the "At a
glance" section.
GWarning!
External video sources may have different
volumes, which can mean that system
messages such as traffic announcements and
navigation system announcements are much
louder. If necessary, please deactivate the
system messages or adjust their volume
manually.
iIt may be the case that a device which is
connected as an external video source
seems quieter or louder in the vehicle, or
that the usual maximum volume cannot be
reached. On some devices, it is possible to
adjust the volume separately. In this case,
start at a medium volume and increase it
gradually. This enables you to determine
whether the system is able to play the
music at high volume without distorting it.
Vehicle
Vehicle
General notes
In this menu, you can set the following vehicle
functions:
RECO
RMulticontour seat settings
RRear window blind
REASY-ENTRY/EXIT feature
RExterior lighting delayed switch-off time
RInterior lighting delayed switch-off
RAmbient lighting
RAutomatic folding mirror
RLocator lighting
RAutomatic locking feature
RTrunk lid opening height restriction
You can open the "Vehicle" menu in one of
two ways.
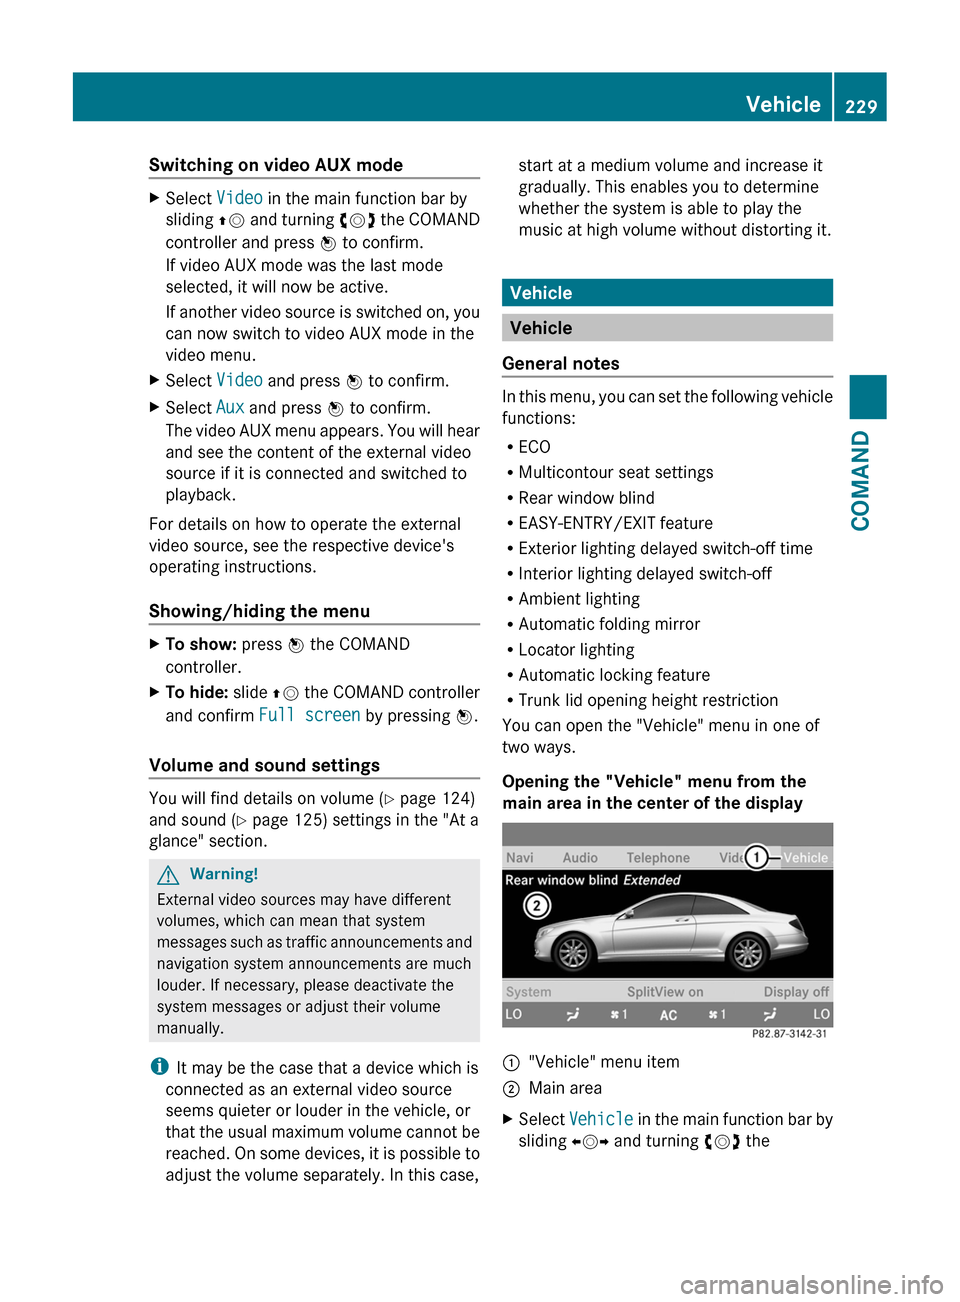
Opening the "Vehicle" menu from the
main area in the center of the display
:"Vehicle" menu item;Main areaXSelect Vehicle in the main function bar by
sliding XVY and turning cVd the
Vehicle229COMANDZ
Page 232 of 480
COMAND controller and press W to
confirm.
Main area ; is active.
XSelect the individual vehicle functions by
sliding XVY or turning cVd the COMAND
controller and press W to confirm.
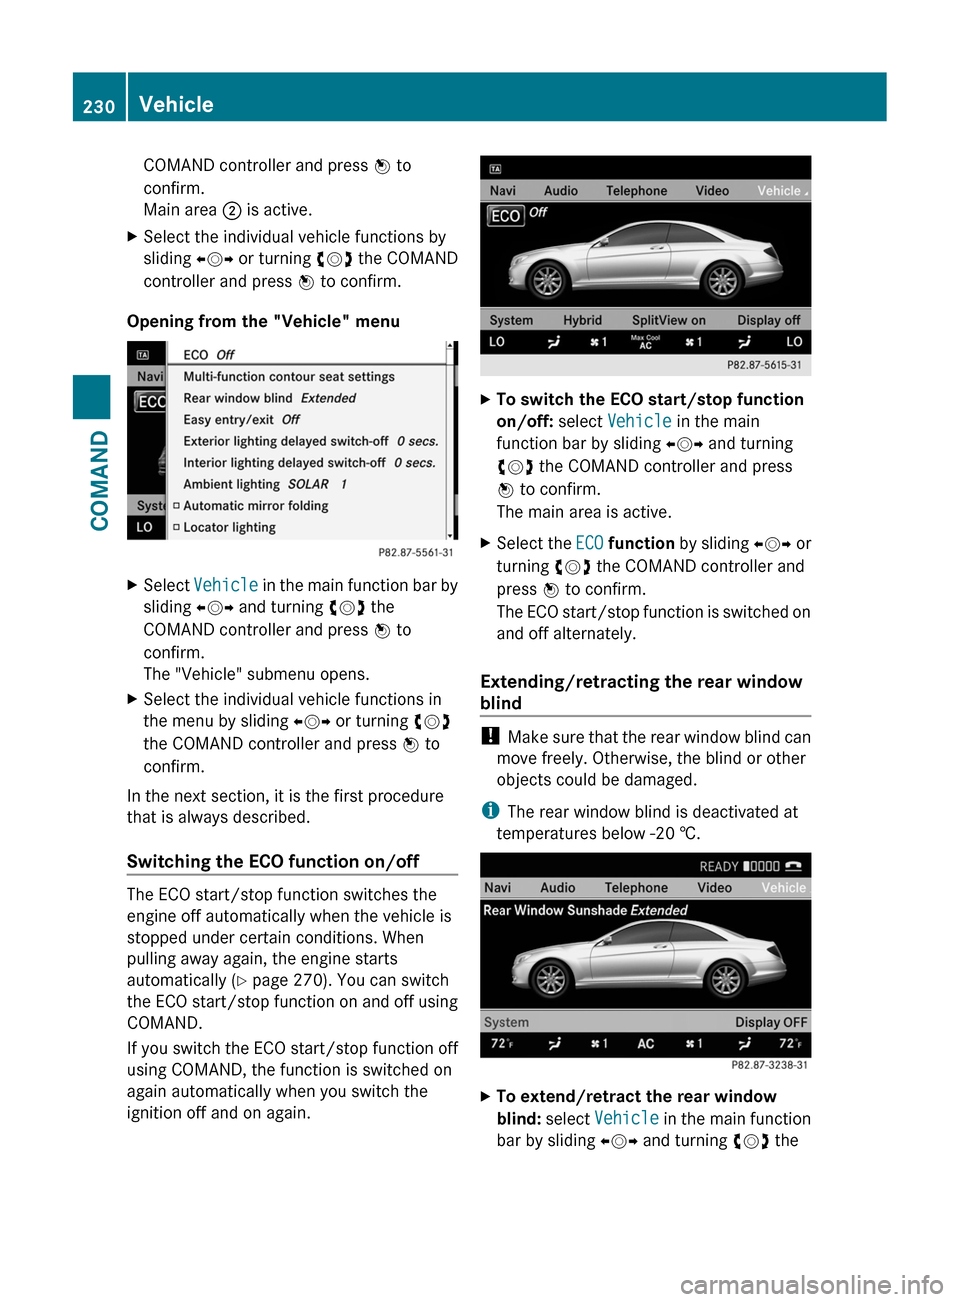
Opening from the "Vehicle" menu
XSelect Vehicle in the main function bar by
sliding XVY and turning cVd the
COMAND controller and press W to
confirm.
The "Vehicle" submenu opens.
XSelect the individual vehicle functions in
the menu by sliding XVY or turning cVd
the COMAND controller and press W to
confirm.
In the next section, it is the first procedure
that is always described.
Switching the ECO function on/off
The ECO start/stop function switches the
engine off automatically when the vehicle is
stopped under certain conditions. When
pulling away again, the engine starts
automatically (Y page 270). You can switch
the ECO start/stop function on and off using
COMAND.
If you switch the ECO start/stop function off
using COMAND, the function is switched on
again automatically when you switch the
ignition off and on again.
XTo switch the ECO start/stop function
on/off: select Vehicle in the main
function bar by sliding XVY and turning
cVd the COMAND controller and press
W to confirm.
The main area is active.
XSelect the ECO function by sliding XVY or
turning cVd the COMAND controller and
press W to confirm.
The ECO start/stop function is switched on
and off alternately.
Extending/retracting the rear window
blind
! Make sure that the rear window blind can
move freely. Otherwise, the blind or other
objects could be damaged.
iThe rear window blind is deactivated at
temperatures below -20 †.
XTo extend/retract the rear window
blind: select Vehicle in the main function
bar by sliding XVY and turning cVd the
230VehicleCOMAND
Page 233 of 480
COMAND controller and press W to
confirm.
The main area is active.
XSelect the Rear window blind function
by sliding XVY or turning cVd the
COMAND controller and press W to
confirm.
Activating/deactivating the automatic
folding mirror
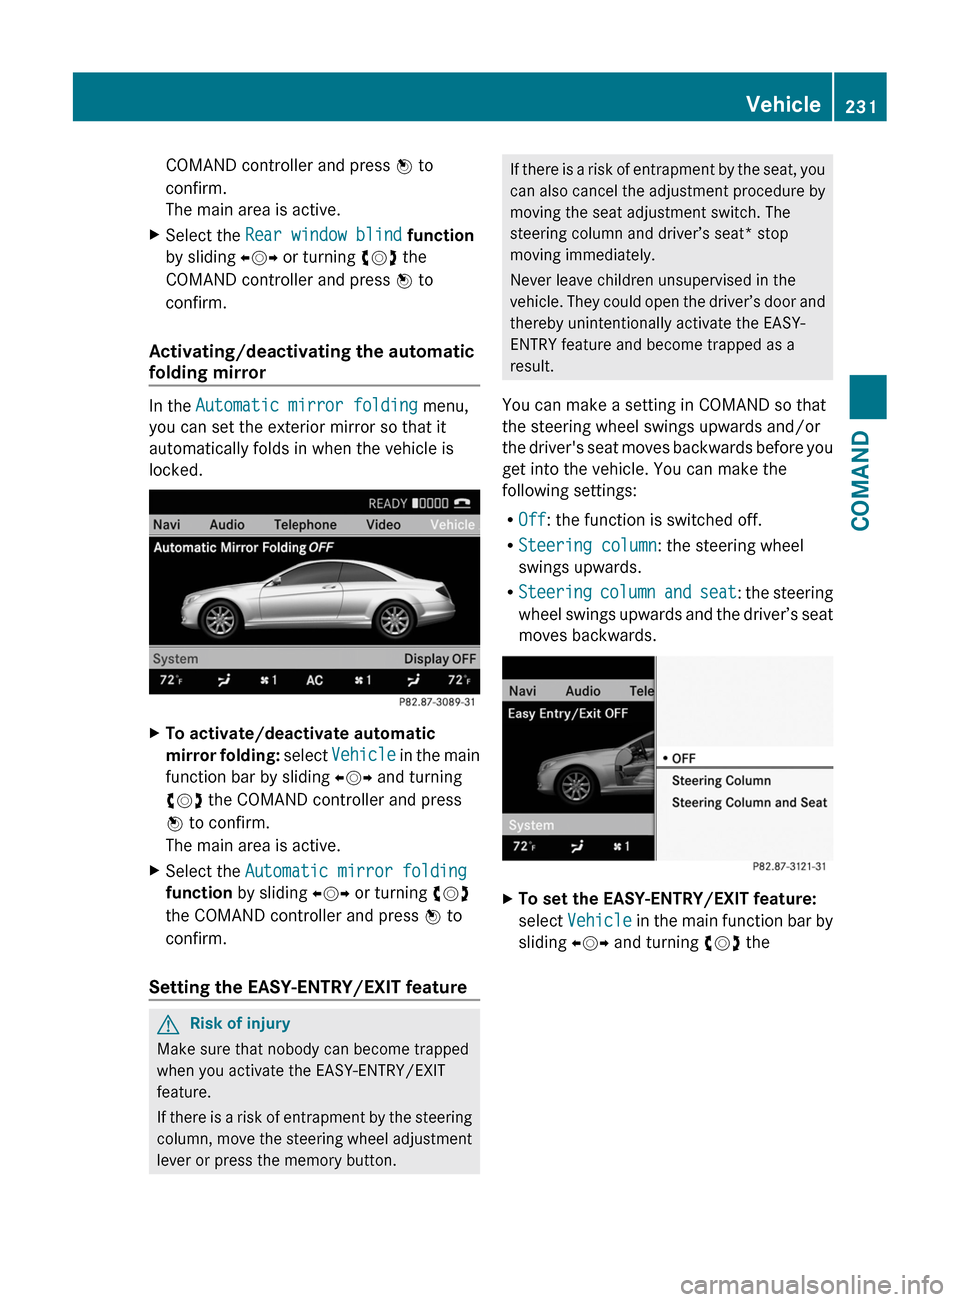
In the Automatic mirror folding menu,
you can set the exterior mirror so that it
automatically folds in when the vehicle is
locked.
XTo activate/deactivate automatic
mirror folding: select Vehicle in the main
function bar by sliding XVY and turning
cVd the COMAND controller and press
W to confirm.
The main area is active.
XSelect the Automatic mirror folding
function by sliding XVY or turning cVd
the COMAND controller and press W to
confirm.
Setting the EASY-ENTRY/EXIT feature
GRisk of injury
Make sure that nobody can become trapped
when you activate the EASY-ENTRY/EXIT
feature.
If there is a risk of entrapment by the steering
column, move the steering wheel adjustment
lever or press the memory button.
If there is a risk of entrapment by the seat, you
can also cancel the adjustment procedure by
moving the seat adjustment switch. The
steering column and driver’s seat* stop
moving immediately.
Never leave children unsupervised in the
vehicle. They could open the driver’s door and
thereby unintentionally activate the EASY-
ENTRY feature and become trapped as a
result.
You can make a setting in COMAND so that
the steering wheel swings upwards and/or
the driver's seat moves backwards before you
get into the vehicle. You can make the
following settings:
ROff: the function is switched off.
RSteering column: the steering wheel
swings upwards.
RSteering column and seat: the steering
wheel swings upwards and the driver’s seat
moves backwards.
XTo set the EASY-ENTRY/EXIT feature:
select Vehicle in the main function bar by
sliding XVY and turning cVd the
Vehicle231COMANDZ
Page 238 of 480
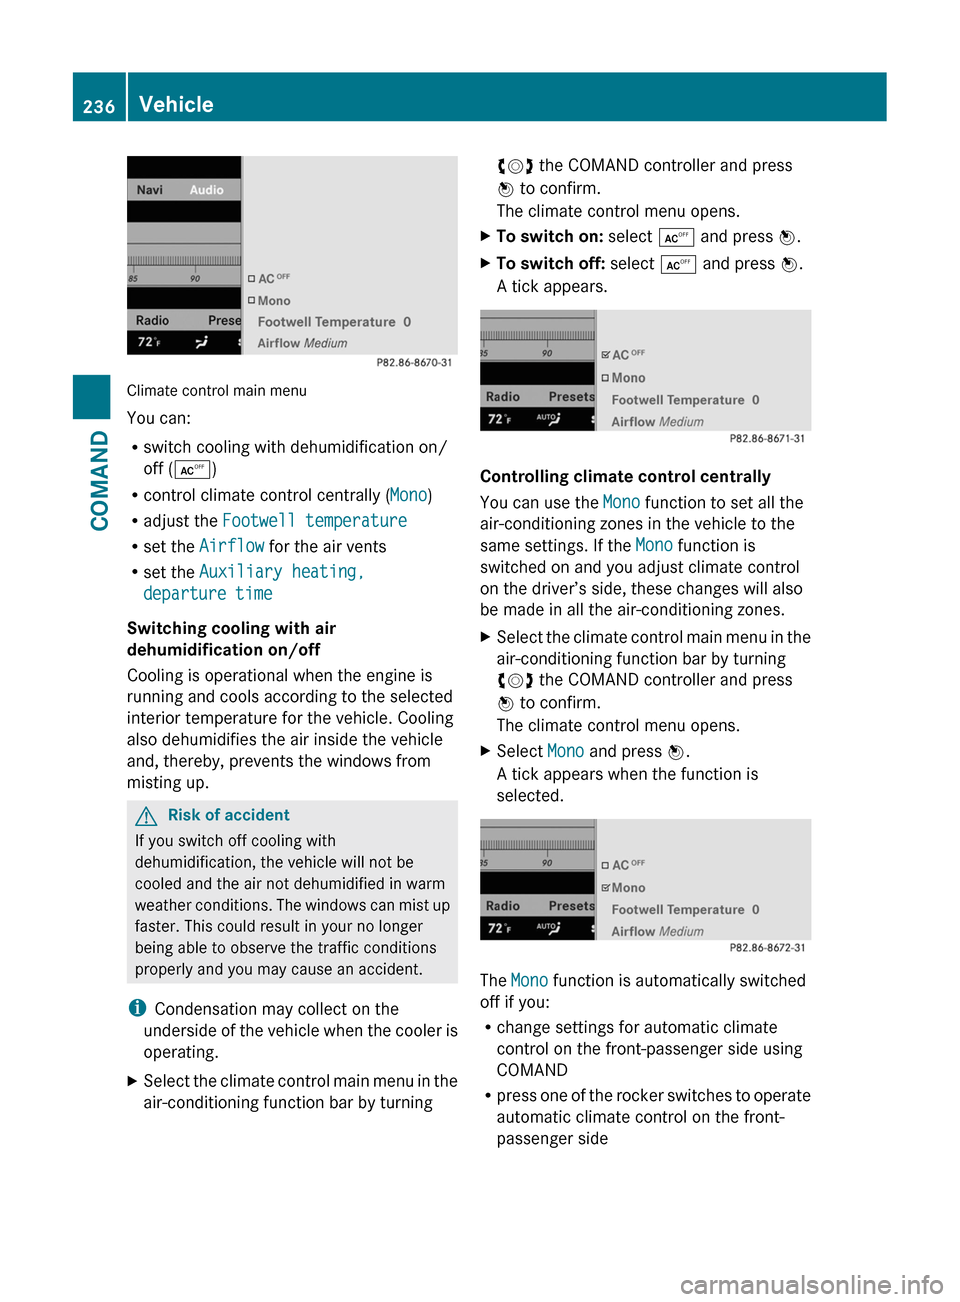
Climate control main menu
You can:
Rswitch cooling with dehumidification on/
off (Æ)
Rcontrol climate control centrally (Mono)
Radjust the Footwell temperature
Rset the Airflow for the air vents
Rset the Auxiliary heating,
departure time
Switching cooling with air
dehumidification on/off
Cooling is operational when the engine is
running and cools according to the selected
interior temperature for the vehicle. Cooling
also dehumidifies the air inside the vehicle
and, thereby, prevents the windows from
misting up.
GRisk of accident
If you switch off cooling with
dehumidification, the vehicle will not be
cooled and the air not dehumidified in warm
weather conditions. The windows can mist up
faster. This could result in your no longer
being able to observe the traffic conditions
properly and you may cause an accident.
iCondensation may collect on the
underside of the vehicle when the cooler is
operating.
XSelect the climate control main menu in the
air-conditioning function bar by turning
cVd the COMAND controller and press
W to confirm.
The climate control menu opens.
XTo switch on: select Æ and press W.XTo switch off: select Æ and press W.
A tick appears.
Controlling climate control centrally
You can use the Mono function to set all the
air-conditioning zones in the vehicle to the
same settings. If the Mono function is
switched on and you adjust climate control
on the driver’s side, these changes will also
be made in all the air-conditioning zones.
XSelect the climate control main menu in the
air-conditioning function bar by turning
cVd the COMAND controller and press
W to confirm.
The climate control menu opens.
XSelect Mono and press W.
A tick appears when the function is
selected.
The Mono function is automatically switched
off if you:
Rchange settings for automatic climate
control on the front-passenger side using
COMAND
Rpress one of the rocker switches to operate
automatic climate control on the front-
passenger side
236VehicleCOMAND
Page 258 of 480
Vehicle equipment
i This manual describes all the standard
and optional equipment of your vehicle
which was available at the time of
purchase. Country-specific differences are
possible. Bear in mind that your vehicle
may not feature all functions described
here. This also refers to safety-related
systems and functions.
Overview of climate control systems
Important safety notes
GWarning
Severe conditions (e.g. strong air pollution)
may require replacement of the filter before
its scheduled replacement interval. A clogged
filter will reduce the air volume to the interior
and the windows could fog up, impairing
visibility and endangering you and others.
Have a clogged filter replaced as soon as
possible at an authorized Mercedes-Benz
Center.
GWarning
Follow the recommended settings for heating
and cooling given on the following pages.
Otherwise, the windows could fog up,
impairing visibility and endangering you and
others.
Automatic climate control regulates the
temperature and the humidity in the vehicle
interior and filters undesirable substances
from the air.
Automatic climate control is only operational
when the engine is running 15
. Optimum
operation is only achieved when you drive
with the side windows and tilt/sliding sunroof
closed.
Some functions of automatic climate control
can also be set via COMAND ( Y page 234).
i
Ventilate the vehicle for a brief period
during warm weather, e.g. using the
convenience opening feature ( Y page 86).
This will speed up the cooling process and
the desired vehicle interior temperature
will be reached more quickly.
i The integrated filter can remove most
particles of dust and removes pollen
completely. A clogged filter reduces the
amount of air supplied to the vehicle
interior. For this reason, you should always
observe the interval for replacing the filter,
which is specified in the Service Booklet.
As it depends on environmental conditions,
e.g. heavy air pollution, the interval may be
shorter than stated in the Service Booklet.
i It is possible that the interior blower may
be activated automatically 40 minutes after
the SmartKey is removed. The vehicle is
then ventilated for 30 minutes to dry the
air-conditioning system.15 The "residual heat" function can only be switched on/off if the ignition is switched off.256Overview of climate control systemsClimate control
Page 259 of 480
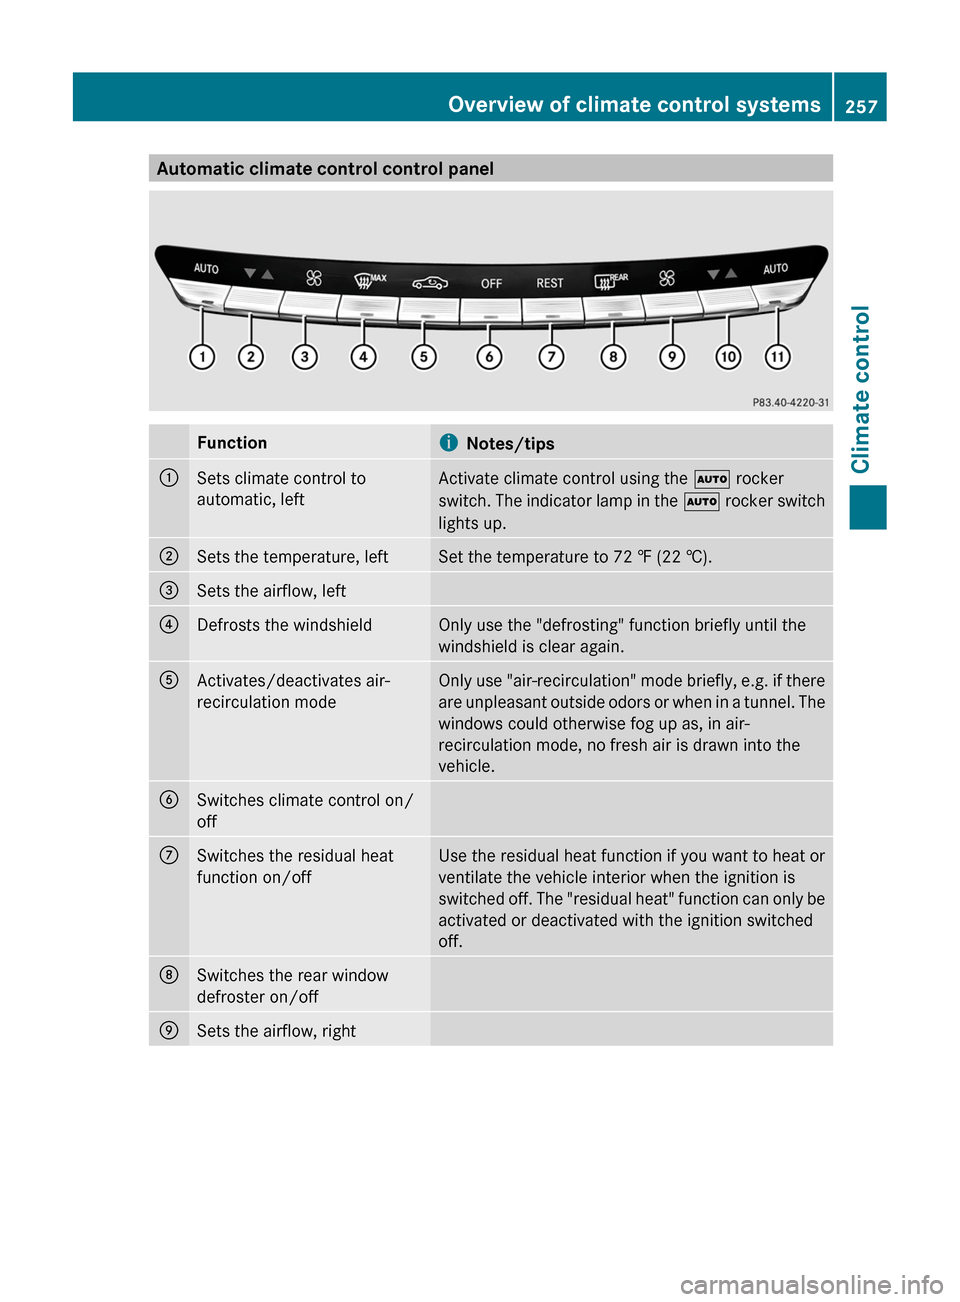
Automatic climate control control panelFunctioniNotes/tips:Sets climate control to
automatic, leftActivate climate control using the à rocker
switch. The indicator lamp in the à rocker switch
lights up.;Sets the temperature, leftSet the temperature to 72 ‡ (22 †).=Sets the airflow, left?Defrosts the windshieldOnly use the "defrosting" function briefly until the
windshield is clear again.AActivates/deactivates air-
recirculation modeOnly use "air-recirculation" mode briefly, e.g. if there
are unpleasant outside odors or when in a tunnel. The
windows could otherwise fog up as, in air-
recirculation mode, no fresh air is drawn into the
vehicle.BSwitches climate control on/
offCSwitches the residual heat
function on/offUse the residual heat function if you want to heat or
ventilate the vehicle interior when the ignition is
switched off. The "residual heat" function can only be
activated or deactivated with the ignition switched
off.DSwitches the rear window
defroster on/offESets the airflow, rightOverview of climate control systems257Climate controlZ
Page 260 of 480
FunctioniNotes/tipsFSets the temperature, rightSet the temperature to 72 ‡ (22 †).GSets climate control to
automatic, rightActivate climate control using the à rocker
switch. The indicator lamp in the à rocker switch
lights up.Operating the control systems
Switching the control on/off
Important information
GWarning!
When the climate control system is
deactivated, the outside air supply and
circulation are also deactivated. Only choose
this setting for a short time. Otherwise the
windows could fog up, impairing visibility and
endangering you and others.
i Activate climate control primarily using
the à rocker switch ( Y page 258).
Activating/deactivating
XTurn the key to position 2 in the ignition
lock.XTo switch on: press the ^ rocker
switch up or down.
The indicator lamp in the rocker switch
goes out. The previously selected settings
come into effect again.XTo switch off: press the ^ rocker
switch up or down.
The indicator lamp in the rocker switch
lights up.
Activating/deactivating cooling with
air dehumidification
Important information
The cooling with air dehumidification function
is only available when the engine is running.
The air inside the vehicle is cooled and
dehumidified according to the temperature
selected.GWarning
If you switch off the cooling function, the
vehicle will not be cooled when weather
conditions are warm. The windows can fog up
more quickly. Window fogging may impair
visibility and endanger you and others.
Condensation may drip from the underside of
the vehicle when the automatic climate
control is in cooling mode. This is normal and
not a sign that there is a malfunction.
You can activate or deactivate the "cooling
with air dehumidification" function via
COMAND ( Y page 236).
i The cooling with air dehumidification
function uses refrigerant R134a. This
coolant does not contain
chlorofluorocarbons, and therefore does
not damage the ozone layer.
Problems with the "cooling with air
dehumidification" function
If you can no longer switch on the cooling with
air dehumidification function via COMAND,
the cooling with air dehumidification function
is switched off due to a malfunction.
XConsult a qualified specialist workshop.
Setting climate control to automatic
GWarning
If you switch off the cooling function, the
vehicle will not be cooled when weather
conditions are warm. The windows can fog up
258Operating the control systemsClimate control
Page 261 of 480
more quickly. Window fogging may impair
visibility and endanger you and others.
In automatic mode, the set temperature is
maintained automatically at a constant level.
The system automatically regulates the
temperature of the dispensed air, the airflow
and the air distribution.
Automatic mode will achieve optimal
operation if cooling with air dehumidification
is also activated. If desired, cooling with air
dehumidification can be deactivated.
XTurn the key to position 2 in the ignition
lock.
XSet the desired temperature.X To switch on: press the à rocker
switch up or down.
The indicator lamp in the à rocker
switch lights up.
XTo switch off: press the K rocker
switch up or down.
The indicator lamp in the à rocker
switch goes out.
or
XSet the air distribution using COMAND
(Y page 235).
The indicator lamp in the à rocker
switch goes out.
Setting the temperature
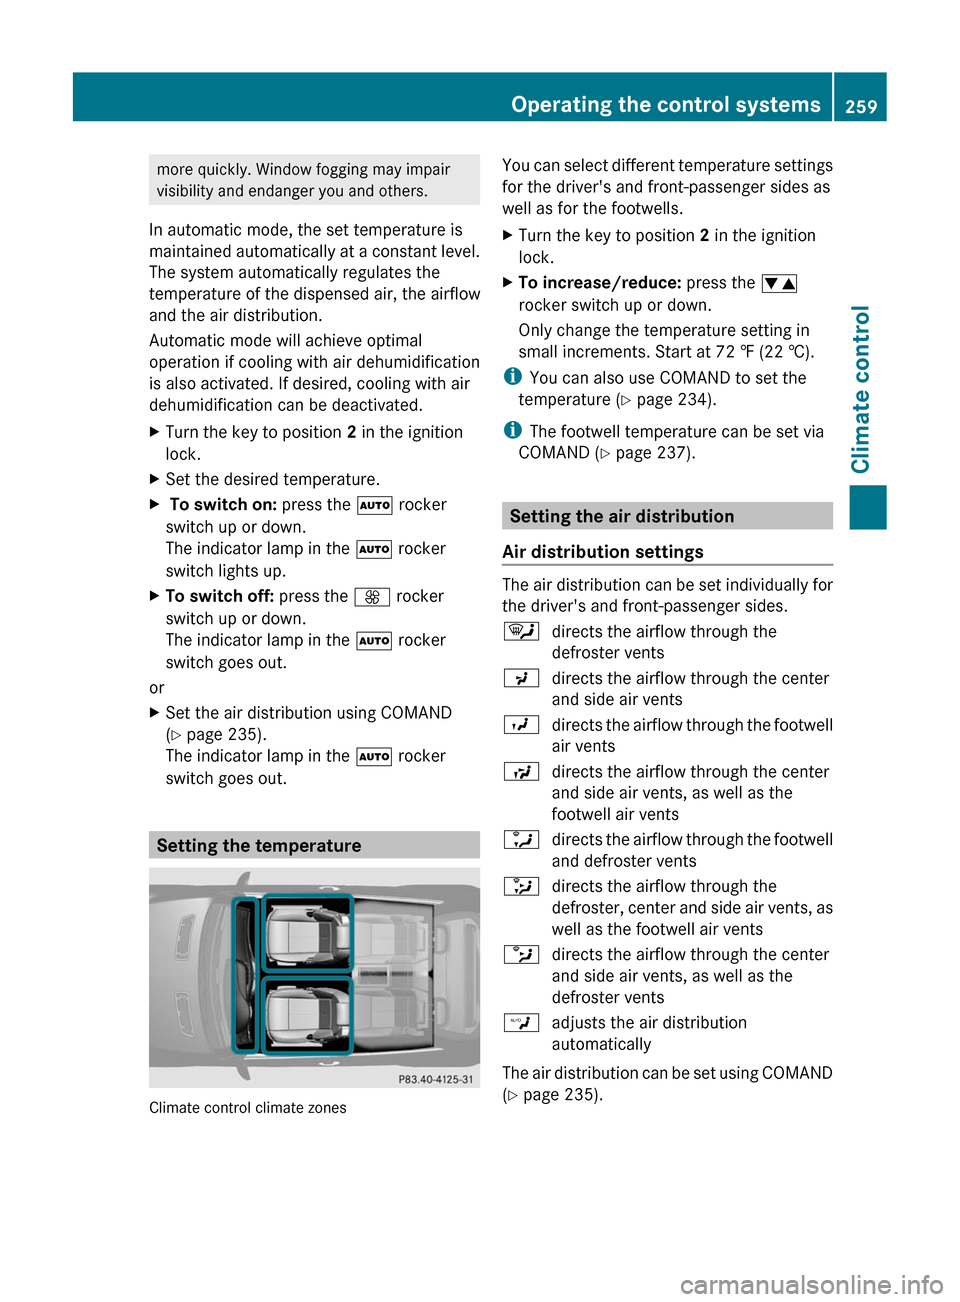
Climate control climate zones
You can select different temperature settings
for the driver's and front-passenger sides as
well as for the footwells.
XTurn the key to position 2 in the ignition
lock.
XTo increase/reduce: press the w
rocker switch up or down.
Only change the temperature setting in
small increments. Start at 72 ‡ (22 †).
iYou can also use COMAND to set the
temperature (Y page 234).
iThe footwell temperature can be set via
COMAND (Y page 237).
Setting the air distribution
Air distribution settings
The air distribution can be set individually for
the driver's and front-passenger sides.
¯directs the airflow through the
defroster vents
Pdirects the airflow through the center
and side air vents
Odirects the airflow through the footwell
air vents
Sdirects the airflow through the center
and side air vents, as well as the
footwell air vents
adirects the airflow through the footwell
and defroster vents
_directs the airflow through the
defroster, center and side air vents, as
well as the footwell air vents
bdirects the airflow through the center
and side air vents, as well as the
defroster vents
Wadjusts the air distribution
automatically
The air distribution can be set using COMAND
(Y page 235).
Operating the control systems259Climate controlZ