ECO mode MERCEDES-BENZ CL CLASS 2013 User Guide
[x] Cancel search | Manufacturer: MERCEDES-BENZ, Model Year: 2013, Model line: CL CLASS, Model: MERCEDES-BENZ CL CLASS 2013Pages: 496, PDF Size: 7.5 MB
Page 122 of 496
Functions with the E and F button
You can use the remote control to execute the same functions as the COMAND control panel.
ModeFunctionAudio modeSelects a station using the station search function ( Y page 200)Selects a track by skipping to a track ( Y page 213)Fast forward/rewind ( Y page 214)Video modeSelects a scene or chapter (video DVD mode) ( Y page 231)Fast-forward/rewind (video DVD mode) ( Y page 231)
Functions of the number keypad
You can use the remote control to execute the same functions as the COMAND control panel.
ModeFunctionAudio modeSelects stations via the station presets ( Y page 200)Sets stations by entering the frequency manually ( Y page 201)Stores stations manually ( Y page 201)Selects a track ( Y page 213)Selects a data medium via the media list ( Y page 212)Telephone modeTelephone number entry ( Y page 188)Character entryEnters characters (direct entry) ( Y page 123)Operating COMAND
Selecting a main function
Initial situation
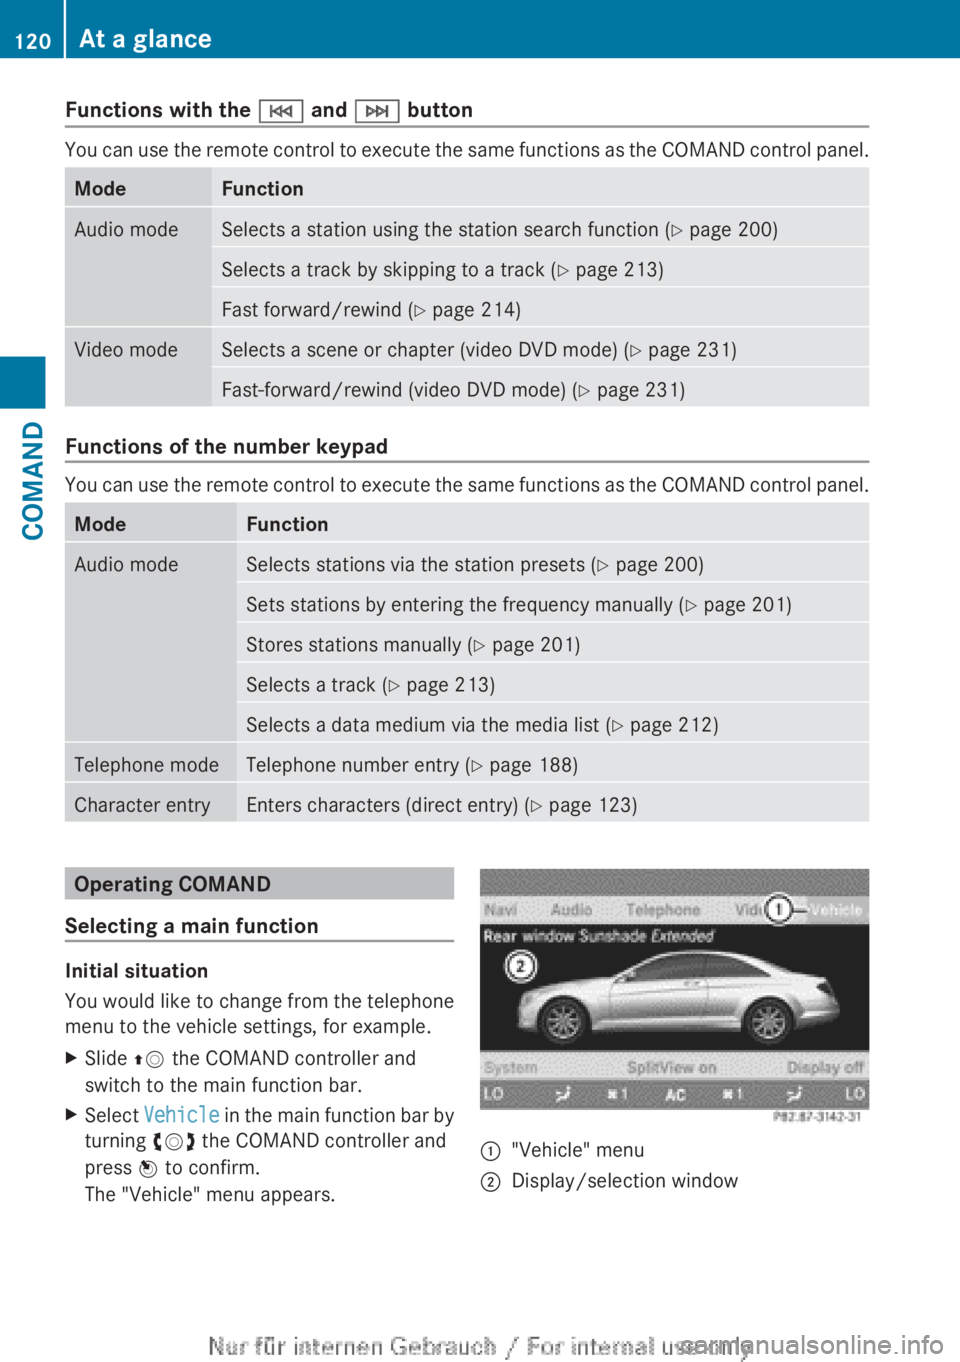
You would like to change from the telephone
menu to the vehicle settings, for example.
XSlide ZV the COMAND controller and
switch to the main function bar.XSelect Vehicle in the main function bar by
turning cVd the COMAND controller and
press W to confirm.
The "Vehicle" menu appears.:"Vehicle" menu;Display/selection window120At a glanceCOMAND
Page 124 of 496
Calling up the audio function
XSelect Audio in the main function bar by
sliding ZV and turning cVd the COMAND
controller and press W to confirm.
The basic display of the current audio
operating mode, e.g. audio CD, appears.
Switching to radio mode
Option 1
XPress the R function button.
The radio display appears.
i Repeated pressing of this function button
switches between radio and the most
recently active audio source.
Option 2
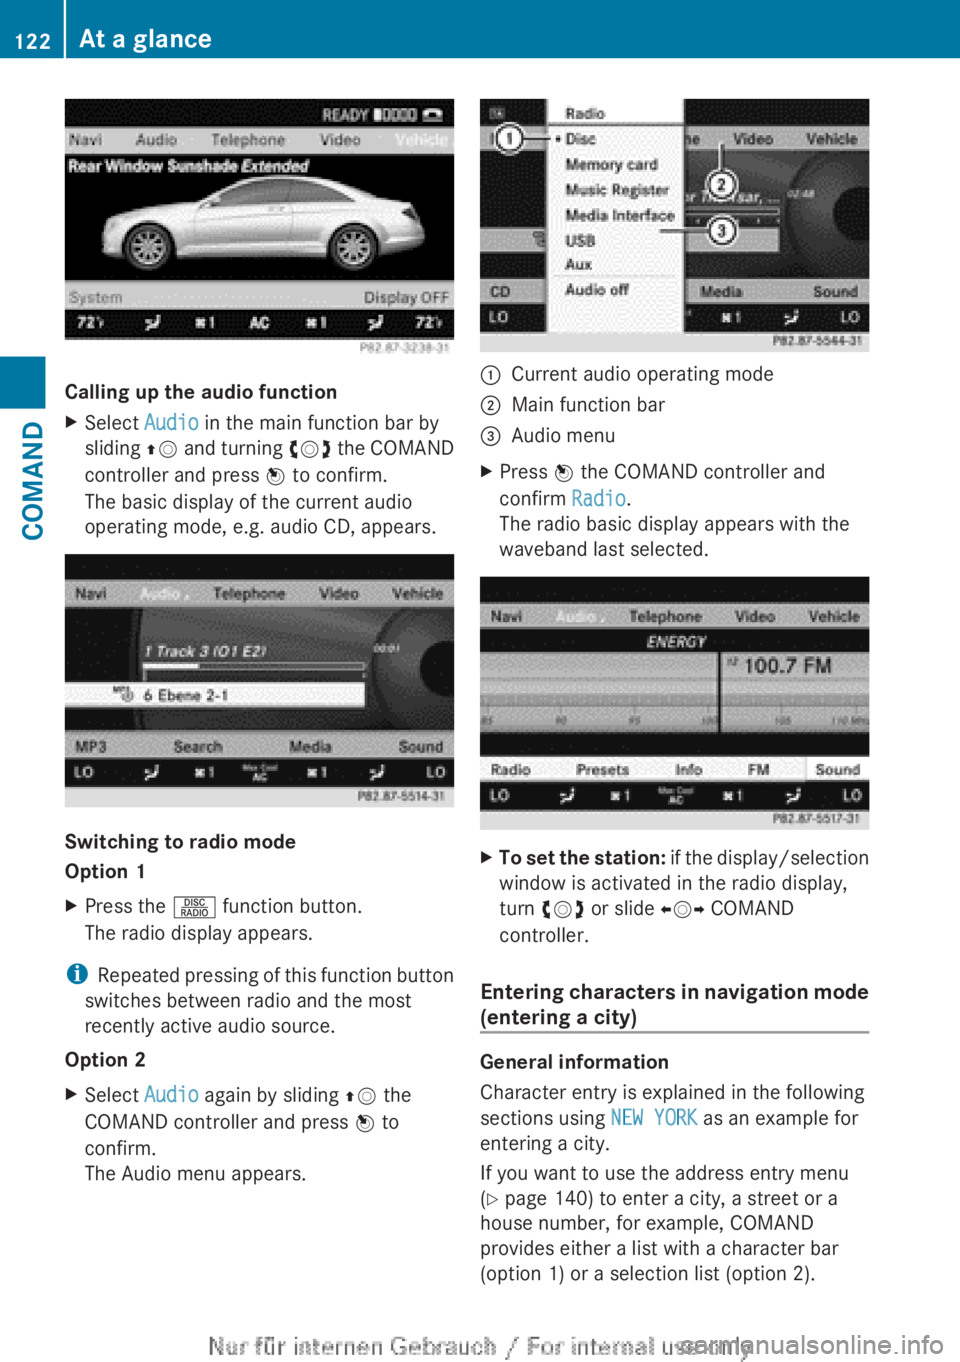
XSelect Audio again by sliding ZV the
COMAND controller and press W to
confirm.
The Audio menu appears.:Current audio operating mode;Main function bar=Audio menuXPress W the COMAND controller and
confirm Radio.
The radio basic display appears with the
waveband last selected.XTo set the station: if the display/selection
window is activated in the radio display,
turn cVd or slide XVY COMAND
controller.
Entering characters in navigation mode
(entering a city)
General information
Character entry is explained in the following
sections using NEW YORK as an example for
entering a city.
If you want to use the address entry menu
( Y page 140) to enter a city, a street or a
house number, for example, COMAND
provides either a list with a character bar
(option 1) or a selection list (option 2).
122At a glanceCOMAND
Page 130 of 496
Adjusting the sound settings
Calling up the sound menu
You can make various sound settings for the
different audio and video sources. This means
that it is possible to set more bass for radio
mode than for audio CD mode, for example.
You can call up the respective sound menu
from the menu of the desired mode.
The example describes how to call up the
sound menu in radio mode.
XPress the R function button.
The radio display appears. You will hear the
last station played on the last waveband.XSelect Sound by sliding VÆ and turning
cVd the COMAND controller and press
W to confirm.
You can now set the treble and bass or the
balance and fader for radio mode.
Adjusting treble and bass
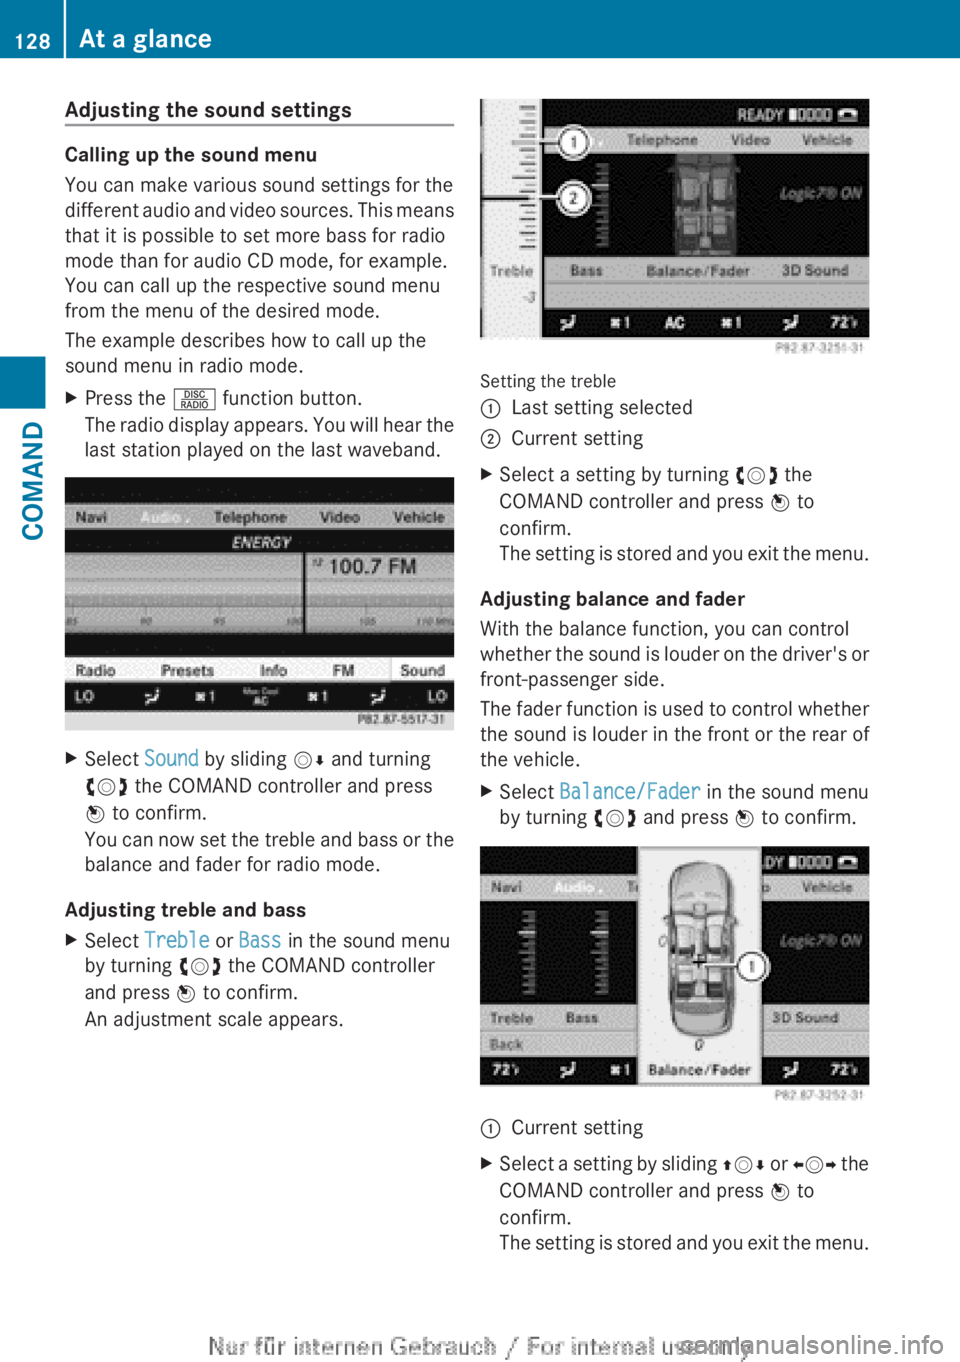
XSelect Treble or Bass in the sound menu
by turning cVd the COMAND controller
and press W to confirm.
An adjustment scale appears.
Setting the treble
:Last setting selected;Current settingXSelect a setting by turning cVd the
COMAND controller and press W to
confirm.
The setting is stored and you exit the menu.
Adjusting balance and fader
With the balance function, you can control
whether the sound is louder on the driver's or
front-passenger side.
The fader function is used to control whether
the sound is louder in the front or the rear of
the vehicle.
XSelect Balance/Fader in the sound menu
by turning cVd and press W to confirm.:Current settingXSelect a setting by sliding ZVÆ or XVY the
COMAND controller and press W to
confirm.
The setting is stored and you exit the menu.128At a glanceCOMAND
Page 131 of 496
Surround sound
General information
If your vehicle is equipped with the harman/
kardon ®
Logic 7 ®
surround sound system,
you can provide the optimum sound
experience for every passenger.
The harman/kardon ®
Logic7 ®
surround
sound system is available for the following
operating modes:
R radio (FM only)
R satellite radio
R audio CD
R audio DVD (MLP™, dts™, PCM and
Dolby ®
Digital audio formats)
R MP3
R Media Interface
R video DVD (PCM, dts™ and Dolby ®
Digital
audio formats)
R AUX
Because some DVDs contain both stereo and
multichannel audio formats, it may be
necessary to set the audio format
( Y page 216).
i The Logic7 ®
ON function enables
playback of stereo recordings, for instance,
with a surround sound experience for every
passenger. It enables optimum playback of
music and films on CDs, audio DVDs or
video DVDs with multichannel audio
formats, such as MLP™, dts™ or Dolby ®
Digital. This results in sound
characteristics like those intended by the
sound engineer when the original was
recorded.
i If you select Logic7®
OFF , the sound
system plays all playable formats as stored
on the medium. Due to the design of the
passenger compartment, an optimum
audio experience cannot be guaranteed for
all passengers.
i Discs which support the audio formats
mentioned have the following logos:
Dolby ®
Digital
dts™
Switching surround sound on/off
Example: switching on surround sound for
radio mode
XPress the R function button.
The radio display appears. You will hear the
last station played on the last waveband.XSelect Sound by sliding VÆ and turning
cVd the COMAND controller and press
W to confirm.XSelect 3D Sound and press W to confirm.At a glance129COMANDZ
Page 132 of 496
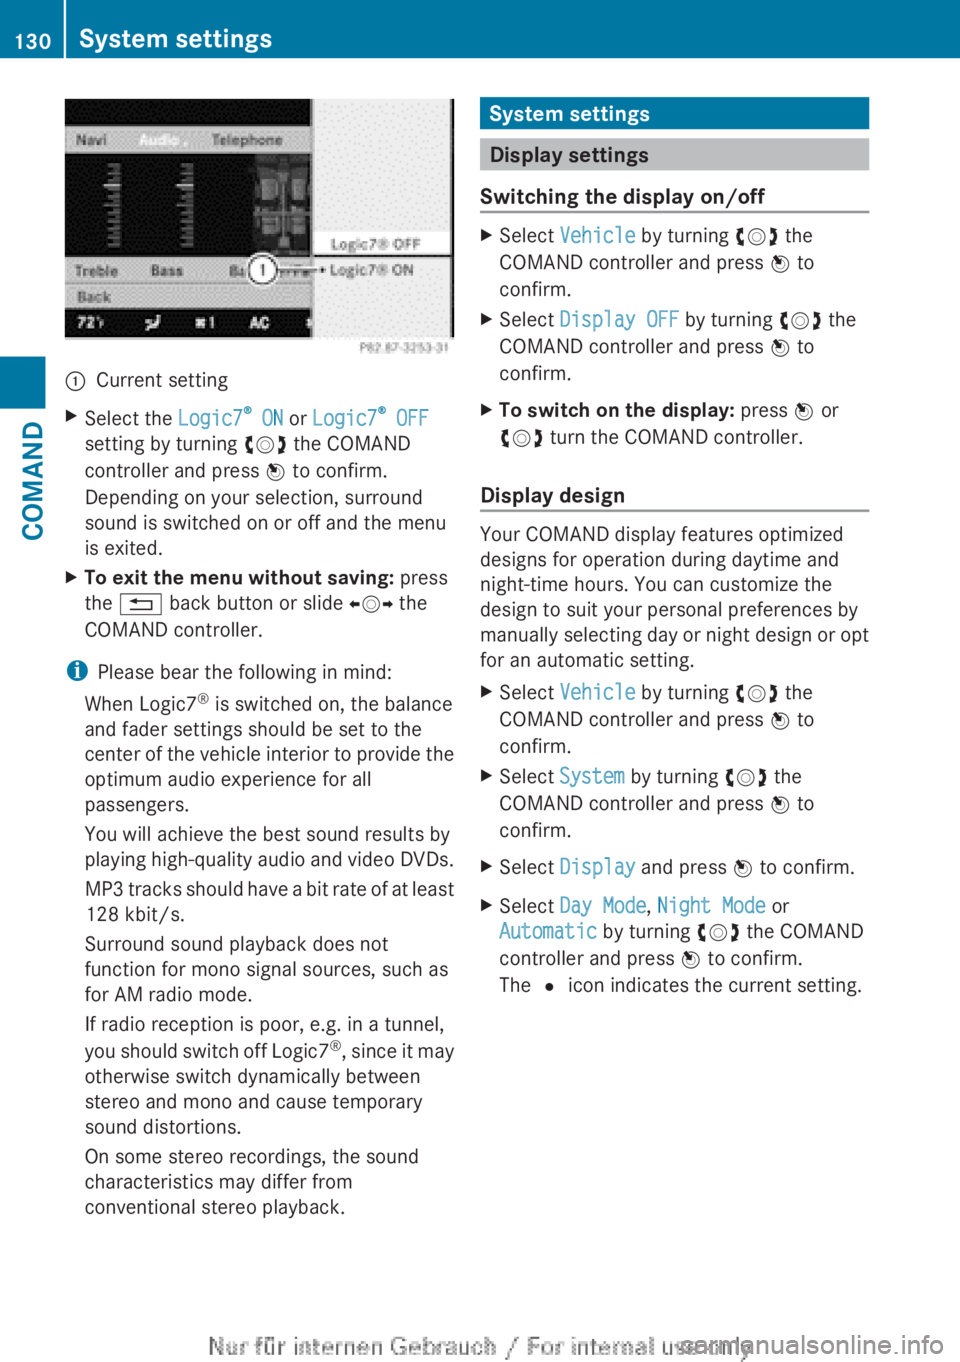
:Current settingXSelect the Logic7®
ON or Logic7 ®
OFF
setting by turning cVd the COMAND
controller and press W to confirm.
Depending on your selection, surround
sound is switched on or off and the menu
is exited.XTo exit the menu without saving: press
the % back button or slide XVY the
COMAND controller.
i Please bear the following in mind:
When Logic7 ®
is switched on, the balance
and fader settings should be set to the
center of the vehicle interior to provide the
optimum audio experience for all
passengers.
You will achieve the best sound results by
playing high-quality audio and video DVDs.
MP3 tracks should have a bit rate of at least
128 kbit/s.
Surround sound playback does not
function for mono signal sources, such as
for AM radio mode.
If radio reception is poor, e.g. in a tunnel,
you should switch off Logic7®
, since it may
otherwise switch dynamically between
stereo and mono and cause temporary
sound distortions.
On some stereo recordings, the sound
characteristics may differ from
conventional stereo playback.
System settings
Display settings
Switching the display on/off
XSelect Vehicle by turning cVd the
COMAND controller and press W to
confirm.XSelect Display OFF by turning cVd the
COMAND controller and press W to
confirm.XTo switch on the display: press W or
cVd turn the COMAND controller.
Display design
Your COMAND display features optimized
designs for operation during daytime and
night-time hours. You can customize the
design to suit your personal preferences by
manually selecting day or night design or opt
for an automatic setting.
XSelect Vehicle by turning cVd the
COMAND controller and press W to
confirm.XSelect System by turning cVd the
COMAND controller and press W to
confirm.XSelect Display and press W to confirm.XSelect Day Mode , Night Mode or
Automatic by turning cVd the COMAND
controller and press W to confirm.
The # icon indicates the current setting.130System settingsCOMAND
Page 141 of 496
Switching to navigation modeXPress the S function button once or
twice.
or
XSelect Navi in the main function bar by
sliding ZV and turning cVd the COMAND
controller and press W to confirm.
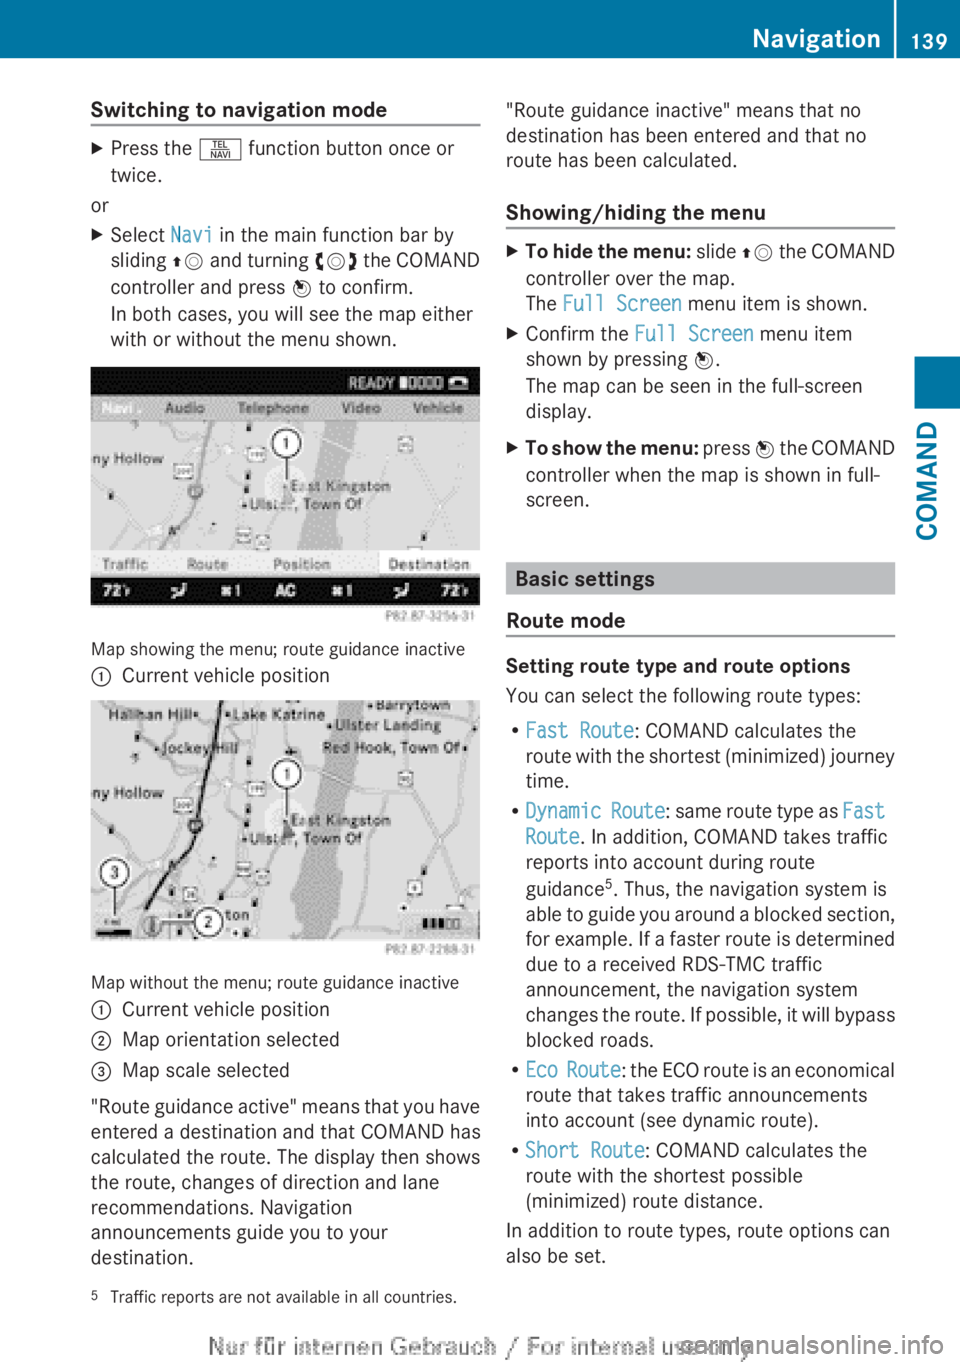
In both cases, you will see the map either
with or without the menu shown.
Map showing the menu; route guidance inactive
:Current vehicle position
Map without the menu; route guidance inactive
:Current vehicle position;Map orientation selected=Map scale selected
" Route guidance active" means that you have
entered a destination and that COMAND has
calculated the route. The display then shows
the route, changes of direction and lane
recommendations. Navigation
announcements guide you to your
destination.
"Route guidance inactive" means that no
destination has been entered and that no
route has been calculated.
Showing/hiding the menuXTo hide the menu: slide ZV the COMAND
controller over the map.
The Full Screen menu item is shown.XConfirm the Full Screen menu item
shown by pressing W.
The map can be seen in the full-screen
display.XTo show the menu: press W the COMAND
controller when the map is shown in full-
screen.
Basic settings
Route mode
Setting route type and route options
You can select the following route types:
R Fast Route : COMAND calculates the
route with the shortest (minimized) journey
time.
R Dynamic Route : same route type as Fast
Route . In addition, COMAND takes traffic
reports into account during route
guidance 5
. Thus, the navigation system is
able to guide you around a blocked section,
for example. If a faster route is determined
due to a received RDS-TMC traffic
announcement, the navigation system
changes the route. If possible, it will bypass
blocked roads.
R Eco Route : the ECO route is an economical
route that takes traffic announcements
into account (see dynamic route).
R Short Route : COMAND calculates the
route with the shortest possible
(minimized) route distance.
In addition to route types, route options can
also be set.
5 Traffic reports are not available in all countries.Navigation139COMANDZ
Page 147 of 496
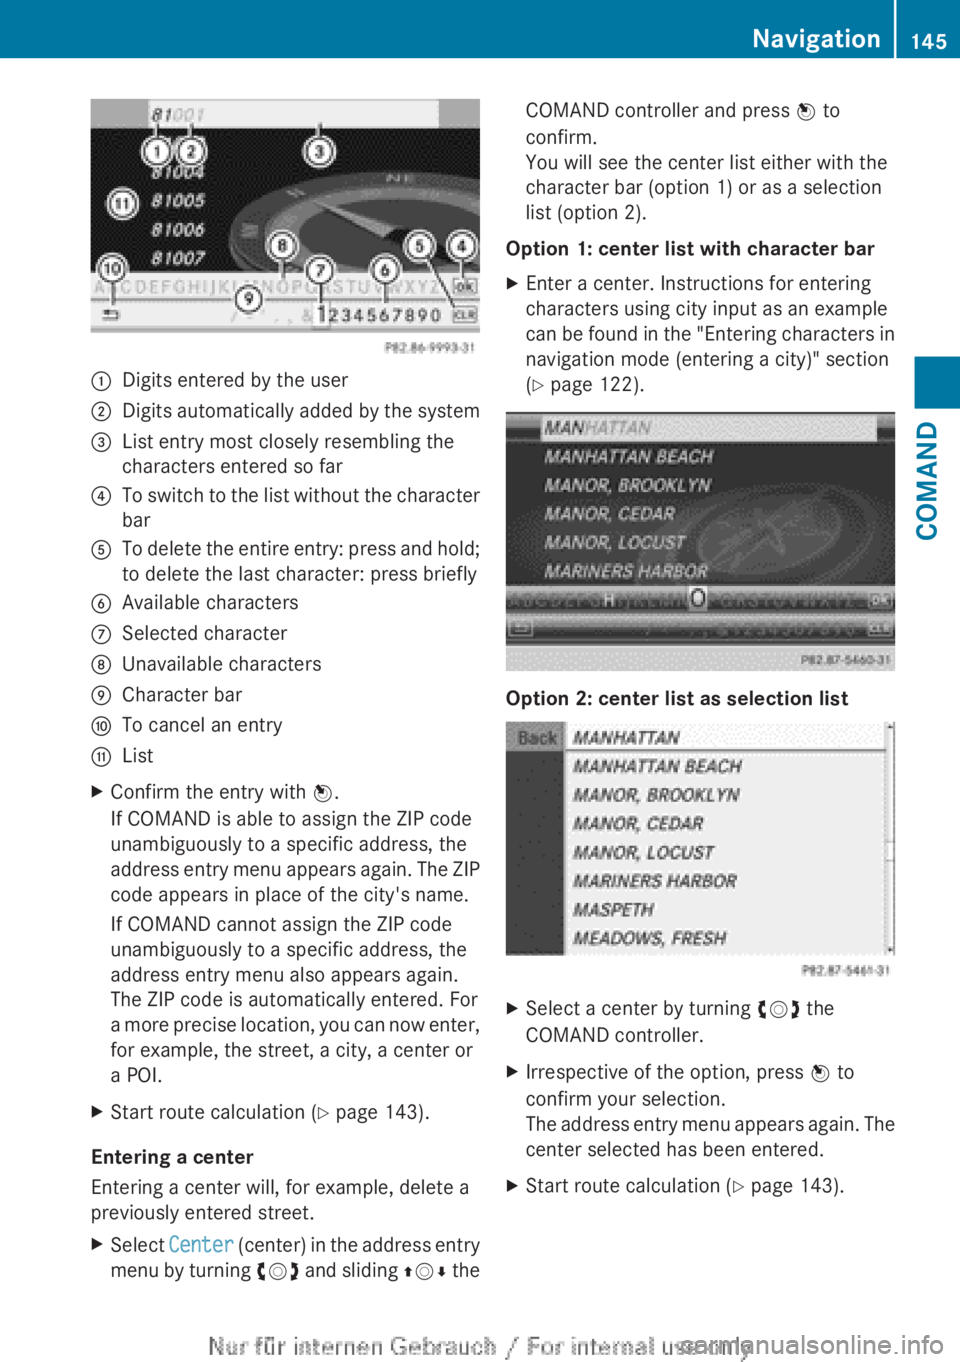
:Digits entered by the user;Digits automatically added by the system=List entry most closely resembling the
characters entered so far?To switch to the list without the character
barATo delete the entire entry: press and hold;
to delete the last character: press brieflyBAvailable charactersCSelected characterDUnavailable charactersECharacter barFTo cancel an entryGListXConfirm the entry with W.
If COMAND is able to assign the ZIP code
unambiguously to a specific address, the
address entry menu appears again. The ZIP
code appears in place of the city's name.
If COMAND cannot assign the ZIP code
unambiguously to a specific address, the
address entry menu also appears again.
The ZIP code is automatically entered. For
a more precise location, you can now enter,
for example, the street, a city, a center or
a POI.XStart route calculation ( Y page 143).
Entering a center
Entering a center will, for example, delete a
previously entered street.
XSelect Center (center) in the address entry
menu by turning cVd and sliding ZVÆ theCOMAND controller and press W to
confirm.
You will see the center list either with the
character bar (option 1) or as a selection
list (option 2).
Option 1: center list with character bar
XEnter a center. Instructions for entering
characters using city input as an example
can be found in the "Entering characters in
navigation mode (entering a city)" section
( Y page 122).
Option 2: center list as selection list
XSelect a center by turning cVd the
COMAND controller.XIrrespective of the option, press W to
confirm your selection.
The address entry menu appears again. The
center selected has been entered.XStart route calculation ( Y page 143).Navigation145COMANDZ
Page 159 of 496
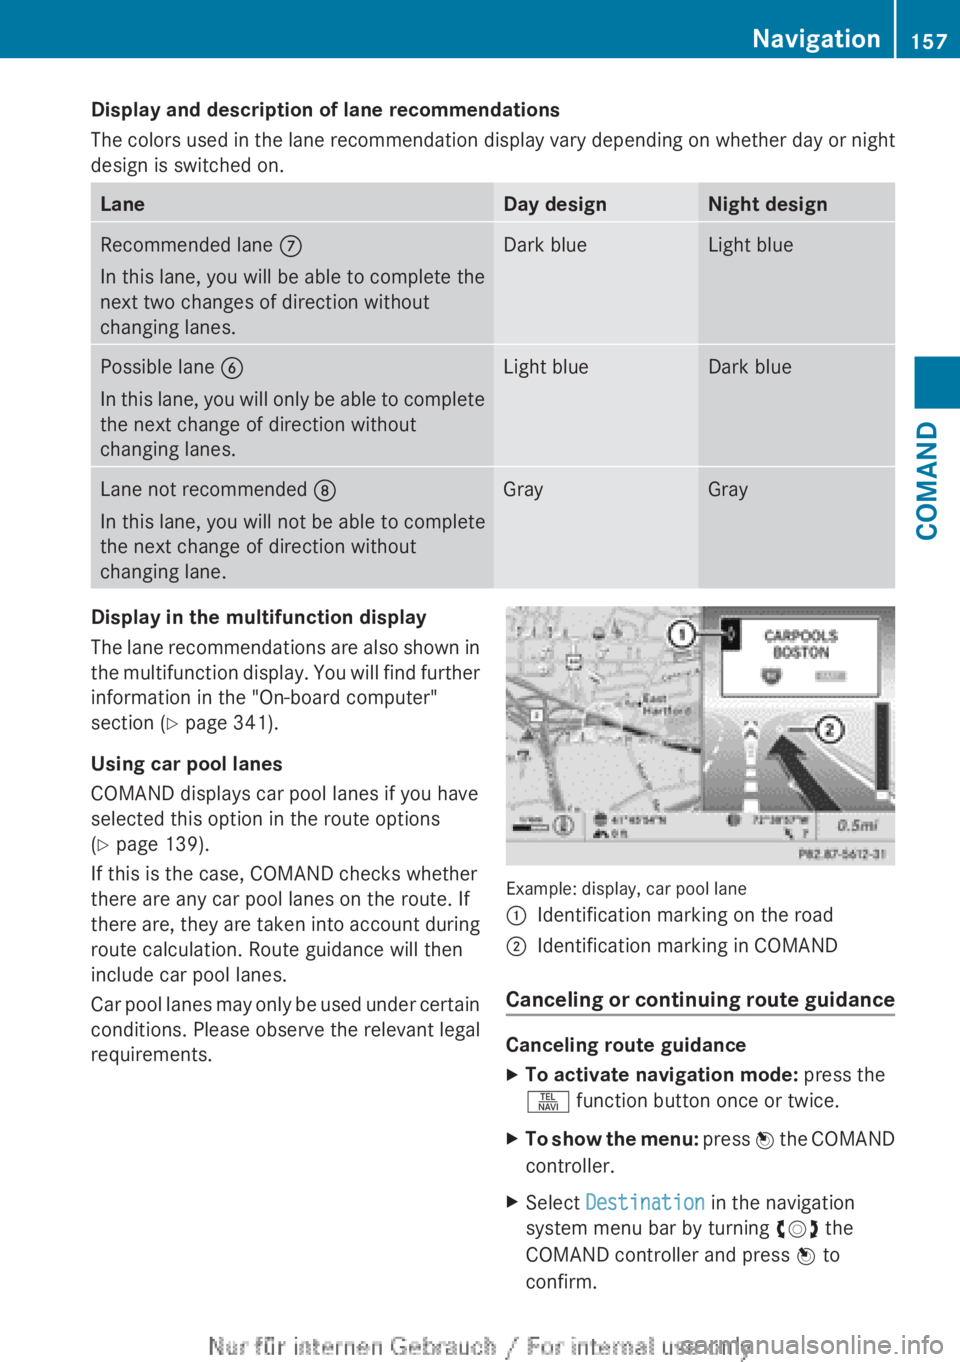
Display and description of lane recommendations
The colors used in the lane recommendation display vary depending on whether day or night
design is switched on.LaneDay designNight designRecommended lane C
In this lane, you will be able to complete the
next two changes of direction without
changing lanes.Dark blueLight bluePossible lane B
In this lane, you will only be able to complete
the next change of direction without
changing lanes.Light blueDark blueLane not recommended D
In this lane, you will not be able to complete
the next change of direction without
changing lane.GrayGrayDisplay in the multifunction display
The lane recommendations are also shown in
the multifunction display. You will find further
information in the "On-board computer"
section ( Y page 341).
Using car pool lanes
COMAND displays car pool lanes if you have
selected this option in the route options
( Y page 139).
If this is the case, COMAND checks whether
there are any car pool lanes on the route. If
there are, they are taken into account during
route calculation. Route guidance will then
include car pool lanes.
Car pool lanes may only be used under certain
conditions. Please observe the relevant legal
requirements.
Example: display, car pool lane
:Identification marking on the road;Identification marking in COMAND
Canceling or continuing route guidance
Canceling route guidance
XTo activate navigation mode: press the
S function button once or twice.XTo show the menu: press W the COMAND
controller.XSelect Destination in the navigation
system menu bar by turning cVd the
COMAND controller and press W to
confirm.Navigation157COMANDZ
Page 161 of 496
Avoiding a section of the route blocked
by a traffic jam
This function blocks a section of the route
ahead of you. You can set the length of the
blocked route section. If possible, COMAND
calculates a detour around the blocked
section of the route.
XTo activate navigation mode: press the
S function button once or twice.XTo show the menu: press W the COMAND
controller.XSelect Route in the navigation system
menu bar by turning cVd the COMAND
controller and press W to confirm.XSelect Detour and press W to confirm.XTo block a section of the route: select
More or Less repeatedly and confirm using
W until the desired section has been
selected.
i The total length of the section that can be
blocked is defined by the digital map. The
menu items are available accordingly.
XTo start route calculation: select Start
and press W to confirm.XTo delete the blocked section: select
Delete while the message is shown and
press W to confirm.
COMAND calculates the route without the
block.
Selecting an alternative route
With the "Alternative route" function, routes
other than the original one can be calculated.
XTo activate navigation mode: press the
S function button once or twice.XTo show the menu: press W the COMAND
controller.XSelect Route in the navigation system
menu bar by turning cVd the COMAND
controller and press W to confirm.XSelect Alternative Route and press W
to confirm.
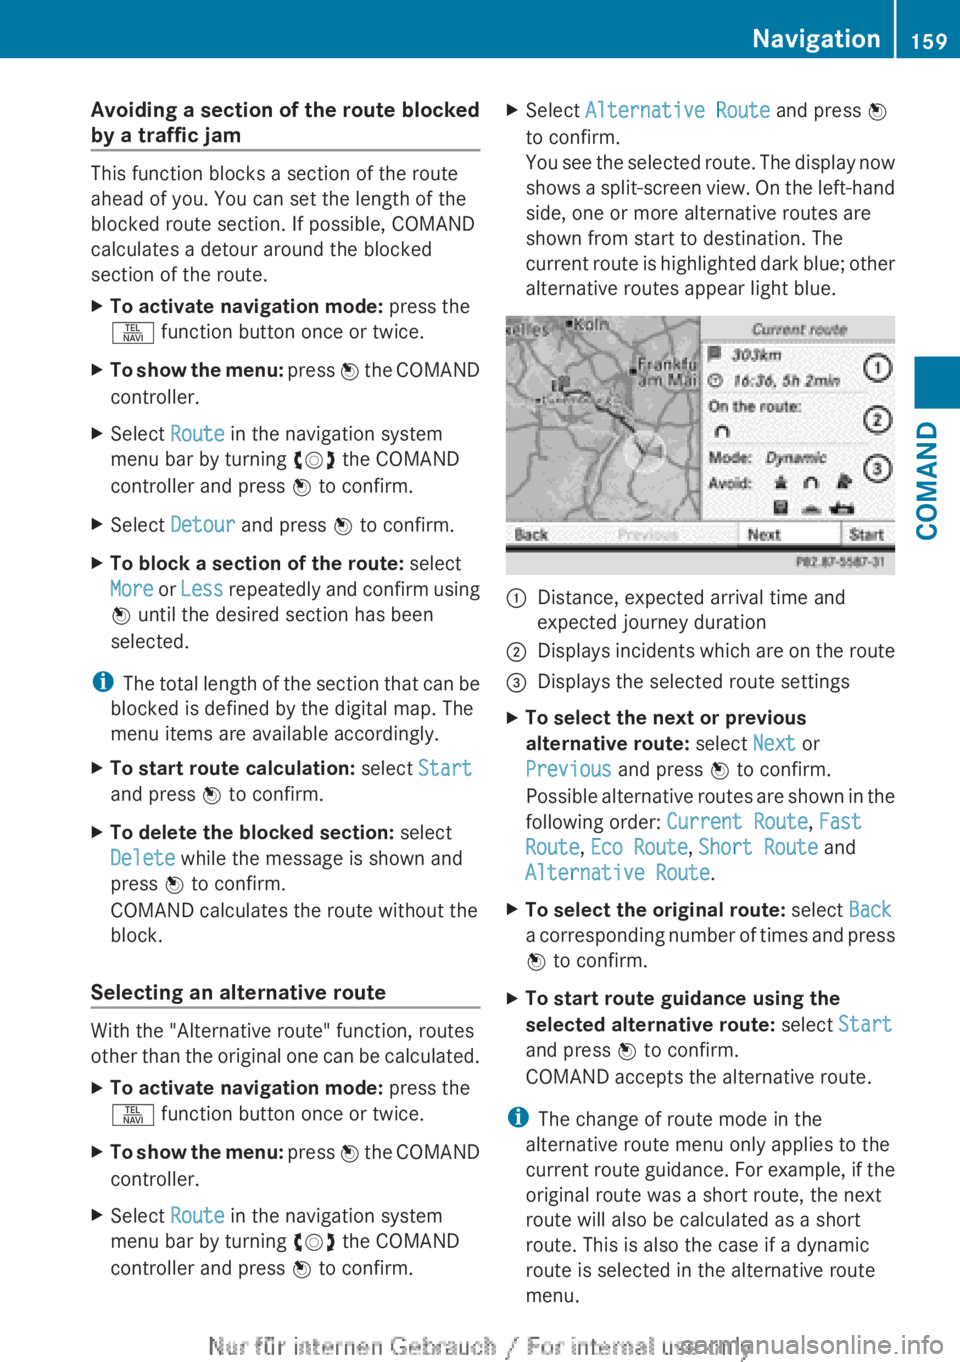
You see the selected route. The display now
shows a split-screen view. On the left-hand
side, one or more alternative routes are
shown from start to destination. The
current route is highlighted dark blue; other
alternative routes appear light blue.:Distance, expected arrival time and
expected journey duration;Displays incidents which are on the route=Displays the selected route settingsXTo select the next or previous
alternative route: select Next or
Previous and press W to confirm.
Possible alternative routes are shown in the
following order: Current Route, Fast
Route , Eco Route , Short Route and
Alternative Route .XTo select the original route: select Back
a corresponding number of times and press
W to confirm.XTo start route guidance using the
selected alternative route: select Start
and press W to confirm.
COMAND accepts the alternative route.
i The change of route mode in the
alternative route menu only applies to the
current route guidance. For example, if the
original route was a short route, the next
route will also be calculated as a short
route. This is also the case if a dynamic
route is selected in the alternative route
menu.
Navigation159COMANDZ
Page 163 of 496
iIf the first or last route section is
highlighted, you cannot select Previous or
Next .XTo zoom in or out of the map: select N
or M and press W to confirm.XTo close the route overview: select
Back and press W to confirm.
Where am I?
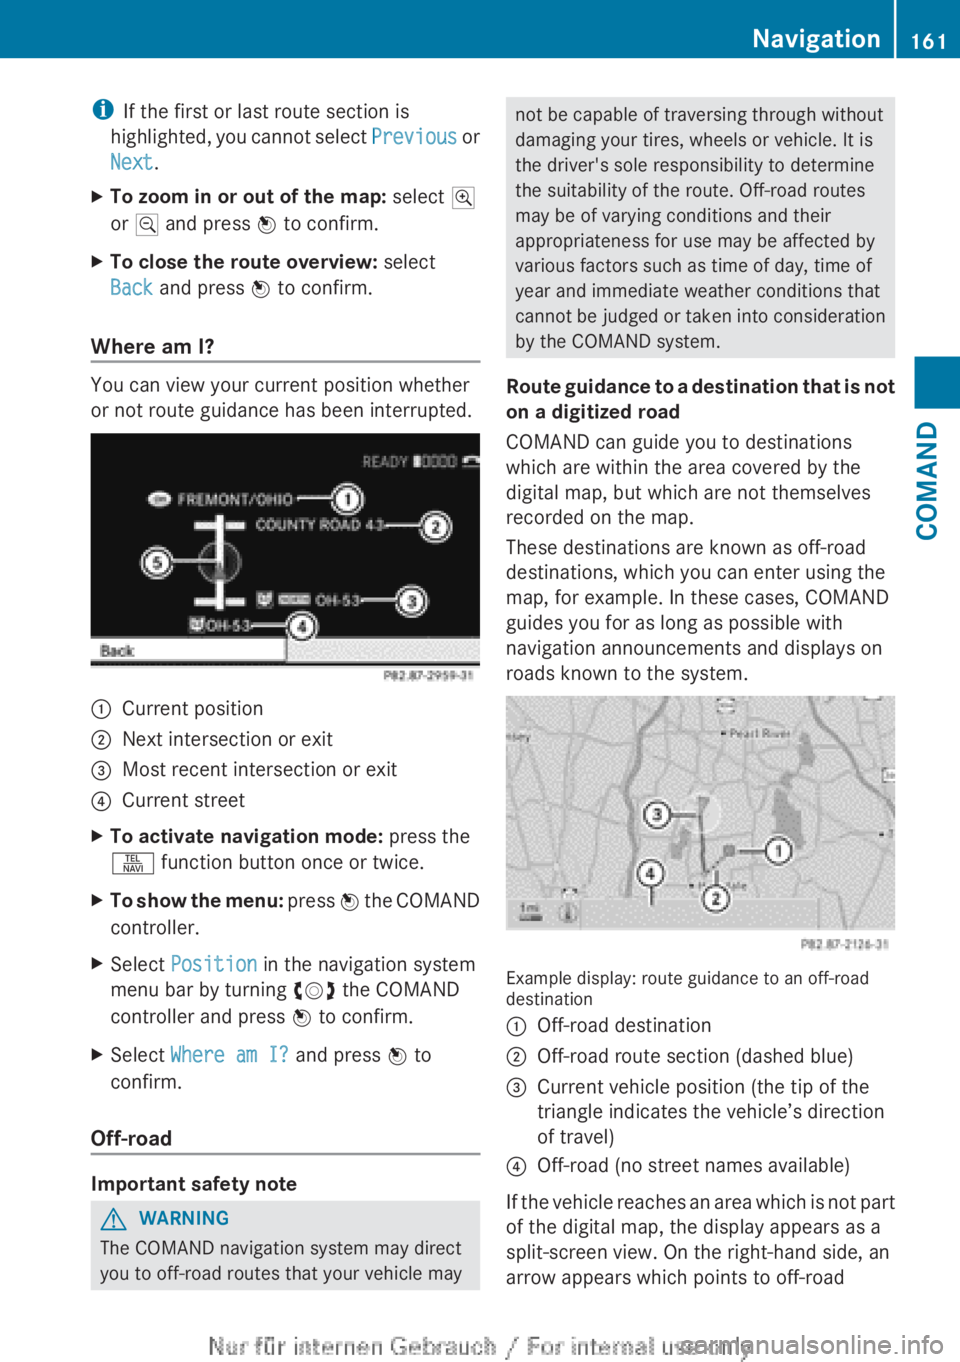
You can view your current position whether
or not route guidance has been interrupted.
:Current position;Next intersection or exit=Most recent intersection or exit?Current streetXTo activate navigation mode: press the
S function button once or twice.XTo show the menu: press W the COMAND
controller.XSelect Position in the navigation system
menu bar by turning cVd the COMAND
controller and press W to confirm.XSelect Where am I? and press W to
confirm.
Off-road
Important safety note
GWARNING
The COMAND navigation system may direct
you to off-road routes that your vehicle may
not be capable of traversing through without
damaging your tires, wheels or vehicle. It is
the driver's sole responsibility to determine
the suitability of the route. Off-road routes
may be of varying conditions and their
appropriateness for use may be affected by
various factors such as time of day, time of
year and immediate weather conditions that
cannot be judged or taken into consideration
by the COMAND system.
Route guidance to a destination that is not
on a digitized road
COMAND can guide you to destinations
which are within the area covered by the
digital map, but which are not themselves
recorded on the map.
These destinations are known as off-road
destinations, which you can enter using the
map, for example. In these cases, COMAND
guides you for as long as possible with
navigation announcements and displays on
roads known to the system.
Example display: route guidance to an off-road
destination
:Off-road destination;Off-road route section (dashed blue)=Current vehicle position (the tip of the
triangle indicates the vehicle’s direction
of travel)?Off-road (no street names available)
If the vehicle reaches an area which is not part
of the digital map, the display appears as a
split-screen view. On the right-hand side, an
arrow appears which points to off-road
Navigation161COMANDZ