headlamp MERCEDES-BENZ CL CLASS 2013 User Guide
[x] Cancel search | Manufacturer: MERCEDES-BENZ, Model Year: 2013, Model line: CL CLASS, Model: MERCEDES-BENZ CL CLASS 2013Pages: 496, PDF Size: 7.5 MB
Page 255 of 496
=High-beam flasher?Left turn signalXTo indicate briefly: press the combination
switch briefly to the pressure point in the
direction of arrow ; or ?.
The corresponding turn signal flashes three
times.XTo indicate: press the combination switch
beyond the pressure point in the direction
of arrow ; or ?.
High-beam headlamps
XTo switch on the high-beam headlamps:
turn the SmartKey in the ignition lock to
position 2 or start the engine.XTurn the light switch to L.XPress the combination switch beyond the
pressure point in the direction of
arrow :.
The K indicator lamp in the instrument
cluster lights up.XTo switch off the high-beam
headlamps: move the combination switch
back to its normal position.
The K indicator lamp in the instrument
cluster goes out.
High-beam flasher
XTo switch on: turn the SmartKey in the
ignition lock to position 1 or 2 or start the
engine.XPull the combination switch in the direction
of arrow =.Hazard warning lamps
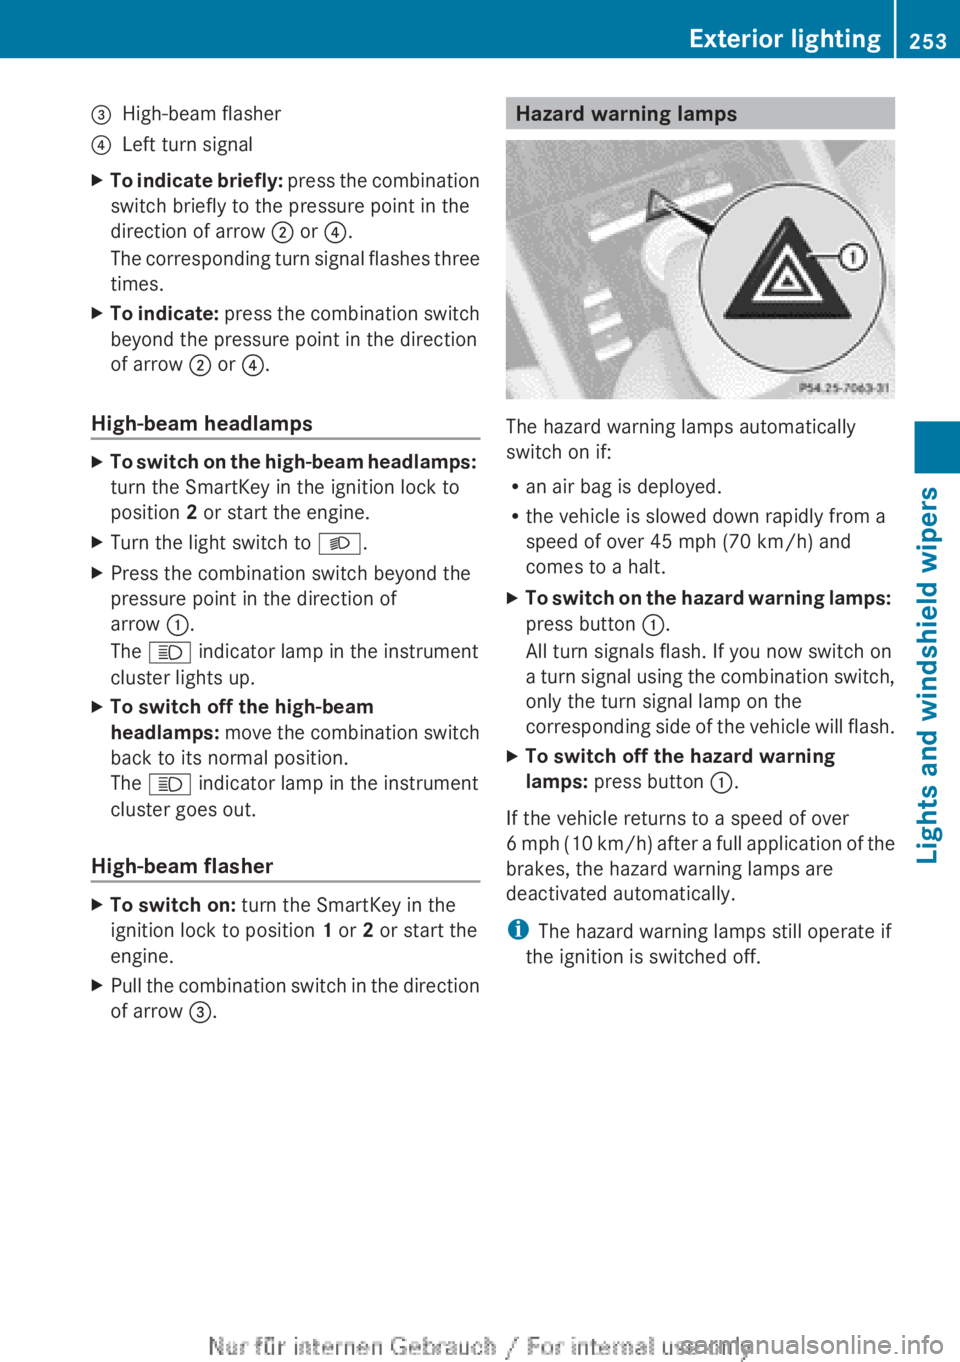
The hazard warning lamps automatically
switch on if:
R an air bag is deployed.
R the vehicle is slowed down rapidly from a
speed of over 45 mph (70 km/h) and
comes to a halt.
XTo switch on the hazard warning lamps:
press button :.
All turn signals flash. If you now switch on
a turn signal using the combination switch,
only the turn signal lamp on the
corresponding side of the vehicle will flash.XTo switch off the hazard warning
lamps: press button :.
If the vehicle returns to a speed of over
6 mph (10 km/h) after a full application of the
brakes, the hazard warning lamps are
deactivated automatically.
i The hazard warning lamps still operate if
the ignition is switched off.
Exterior lighting253Lights and windshield wipersZ
Page 256 of 496
Cornering light function
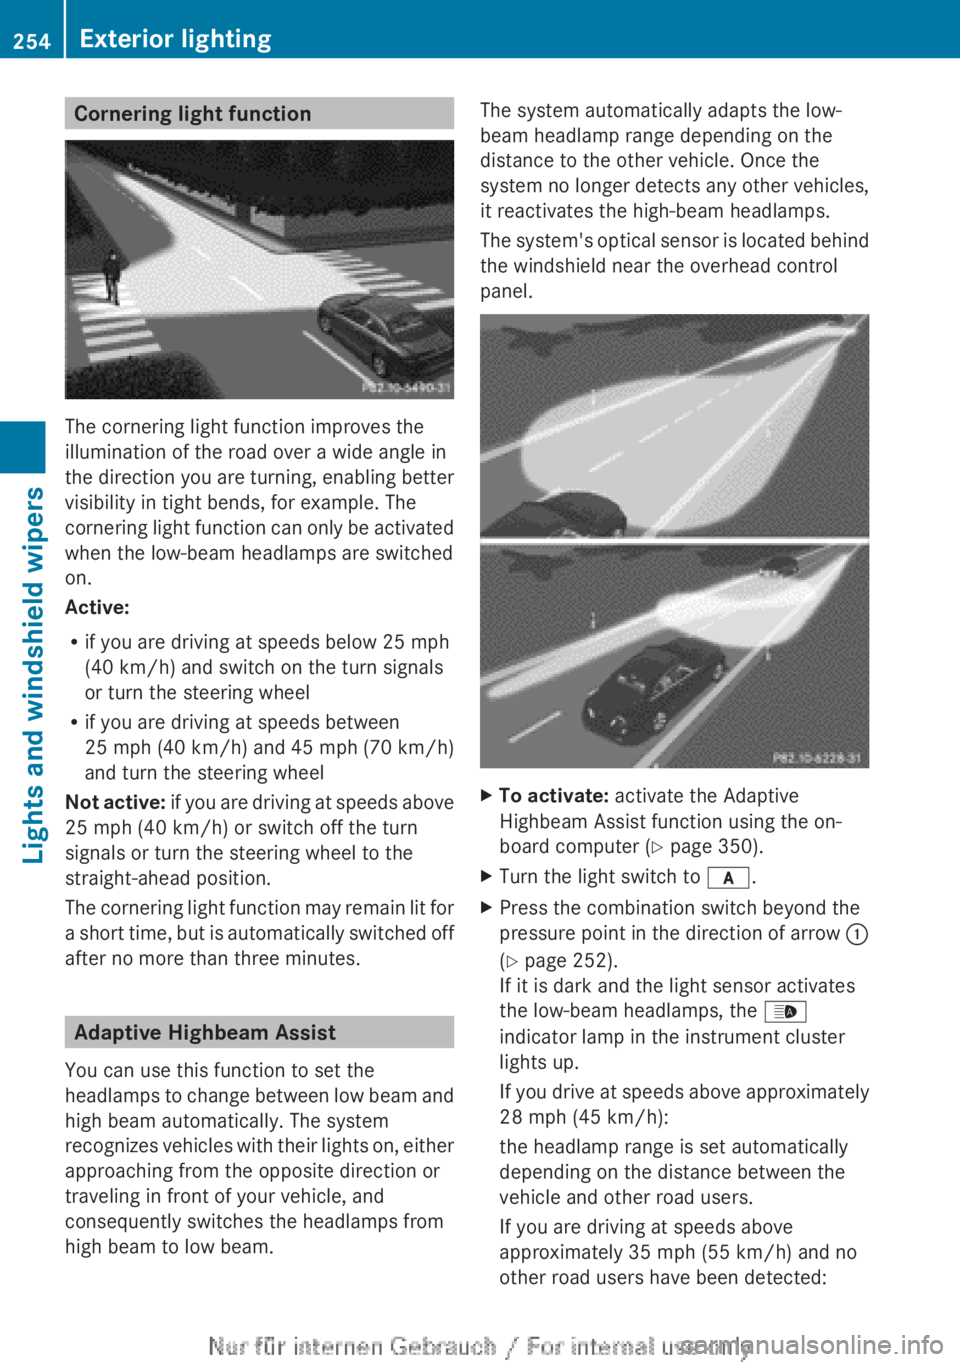
The cornering light function improves the
illumination of the road over a wide angle in
the direction you are turning, enabling better
visibility in tight bends, for example. The
cornering light function can only be activated
when the low-beam headlamps are switched
on.
Active:
R if you are driving at speeds below 25 mph
(40 km/h) and switch on the turn signals
or turn the steering wheel
R if you are driving at speeds between
25 mph (40 km/h) and 45 mph (70 km/h)
and turn the steering wheel
Not active: if you are driving at speeds above
25 mph (40 km/h) or switch off the turn
signals or turn the steering wheel to the
straight-ahead position.
The cornering light function may remain lit for
a short time, but is automatically switched off
after no more than three minutes.
Adaptive Highbeam Assist
You can use this function to set the
headlamps to change between low beam and
high beam automatically. The system
recognizes vehicles with their lights on, either
approaching from the opposite direction or
traveling in front of your vehicle, and
consequently switches the headlamps from
high beam to low beam.
The system automatically adapts the low-
beam headlamp range depending on the
distance to the other vehicle. Once the
system no longer detects any other vehicles,
it reactivates the high-beam headlamps.
The system's optical sensor is located behind
the windshield near the overhead control
panel.XTo activate: activate the Adaptive
Highbeam Assist function using the on-
board computer ( Y page 350).XTurn the light switch to c.XPress the combination switch beyond the
pressure point in the direction of arrow :
( Y page 252).
If it is dark and the light sensor activates
the low-beam headlamps, the _
indicator lamp in the instrument cluster
lights up.
If you drive at speeds above approximately
28 mph (45 km/h):
the headlamp range is set automatically
depending on the distance between the
vehicle and other road users.
If you are driving at speeds above
approximately 35 mph (55 km/h) and no
other road users have been detected:254Exterior lightingLights and windshield wipers
Page 257 of 496
the high-beam headlamps are switched on
automatically. The K indicator lamp in
the instrument cluster also lights up.
If you drive at speeds below approximately
30 mph (45 km/h) or if other road users
are identified or if the roads are sufficiently
illuminated:
the high-beam headlamps are switched off
automatically. The K indicator lamp in
the instrument cluster goes out. The _
indicator lamp in the instrument cluster
stays on.XTo deactivate: move the combination
switch back to its normal position.
The _ indicator lamp in the instrument
cluster goes out.GWARNING
The Adaptive Highbeam Assist is only an aid
intended to support you while driving. The
driver is and remains responsible for proper
vehicle lighting in accordance with the
prevailing light, sight and traffic conditions.
The system may be impaired or unavailable
when
R visibility is poor, e.g. due to snow, rain, fog,
or heavy spray
R the optical sensor area of the windshield is
dirty, fogged up, or covered by a sticker for
example
The system cannot recognize the following
road users:
R Road users without a lighting system of
their own, e.g. pedestrians
R Road users with dim lighting of their own,
e.g. cyclists
R Road users whose lighting is obstructed,
e.g. road users behind a guardrail
R In some seldom cases, even road users with
a lighting system of their own may be
recognized too late or not at all.
The automatic high-beam headlamps will then
not be deactivated or it will be activated in
spite of preceding or oncoming road users.
This could endanger you and/or others and
cause an accident. Always pay close attention
to the traffic situation and switch off the high
beam manually if necessary.
Headlamps fogged up on the inside
The headlamps may fog up on the inside if
there is high atmospheric humidity.
XDrive with the headlamps switched on.
The level of moisture diminishes,
depending on the length of the journey and
the weather conditions (humidity and
temperature).
If the level of moisture does not diminish:
XHave the headlamps checked at a qualified
specialist workshop.
Interior lighting
Overview of interior lighting
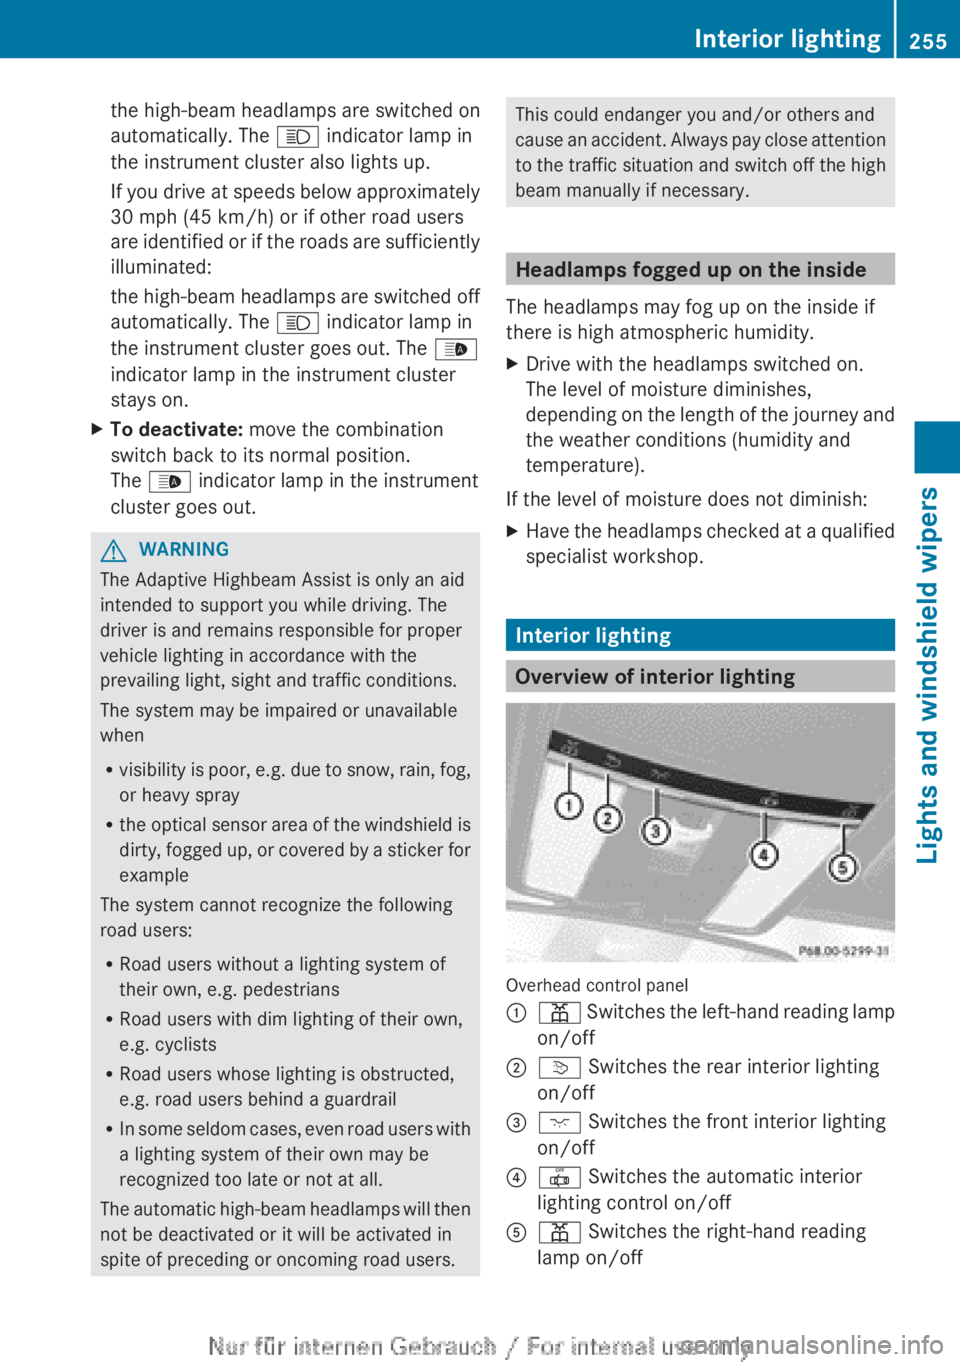
Overhead control panel
:p Switches the left-hand reading lamp
on/off;v Switches the rear interior lighting
on/off=c Switches the front interior lighting
on/off?| Switches the automatic interior
lighting control on/offAp Switches the right-hand reading
lamp on/offInterior lighting255Lights and windshield wipersZ
Page 258 of 496
Interior lighting control
Important notes
In order to prevent the vehicle's battery from
discharging, the interior lighting functions are
automatically deactivated after some time
except for when the SmartKey is in position
2 in the ignition lock.
Automatic interior lighting control
XTo switch on/off: press the | button.
The OFF indicator lamp shows whether the
automatic interior lighting control is
deactivated (indicator lamp on) or
activated (indicator lamp off).
The interior lighting automatically switches
on if you:
R unlock the vehicle
R open a door
R remove the SmartKey from the ignition lock
The interior light is activated for a short while
when the SmartKey is removed from the
ignition lock. You can activate this delayed
switch-off using COMAND ( Y page 237).
Manual interior lighting control
XTo switch the front interior lighting on/
off: press the c button.XTo switch the rear interior lighting on/
off: press the u button.XTo switch the reading lamps on/off:
press the p button.
Replacing bulbs
Important safety notes
Xenon bulbs
GDANGER
Xenon bulbs carry a high voltage. You could
get an electric shock and be seriously or even
fatally injured if you touch the electric
contacts on Xenon bulbs. Therefore, never
remove the cover from Xenon bulbs.
Do not change the Xenon bulbs yourself, but
have them replaced at a qualified workshop.
If your vehicle is equipped with Xenon bulbs,
you can recognize this by the following: the
cone of light from the Xenon bulbs moves
from the top to the bottom and back again
when you start the engine. For this to be
observed, the lights must be switched on
before starting the engine.
Bulbs and lamps are an important aspect of
vehicle safety. You must therefore make sure
that these function correctly at all times.
Have the headlamp setting checked regularly.
Other bulbs
There are bulbs other than the Xenon bulbs
that you cannot replace. Replace only the
bulbs listed (Y page 257). Have the bulbs that
you cannot replace yourself changed at a
qualified specialist workshop.
If you require assistance changing bulbs,
consult a qualified specialist workshop.
Do not touch the glass tube of new bulbs with
your bare hands. Even minor contamination
can burn into the glass surface and reduce
the service life of the bulbs. Always use a lint-
free cloth or only touch the base of the bulb
when installing.
Only use bulbs of the correct type.
If the new bulb still does not light up, consult
a qualified specialist workshop.
Bulbs and lamps are an important aspect of
vehicle safety. You must therefore make sure
that these function correctly at all times.
Have the headlamp setting checked regularly.
GWARNING
Bulbs and lamps can become very hot. For
this reason, allow them to cool down before
changing them. Otherwise, you could burn
yourself when you touch them.
256Replacing bulbsLights and windshield wipers
Page 259 of 496
Keep bulbs out of the reach of children.
Otherwise, they could, for example, damage
the bulbs and injure themselves.
Never use a bulb which has been dropped.
Such a bulb may explode and injure you.
Halogen bulbs are pressurized and could
explode when you change them, especially if
they are very hot. You should therefore wear
eye protection and gloves when you are
changing them.
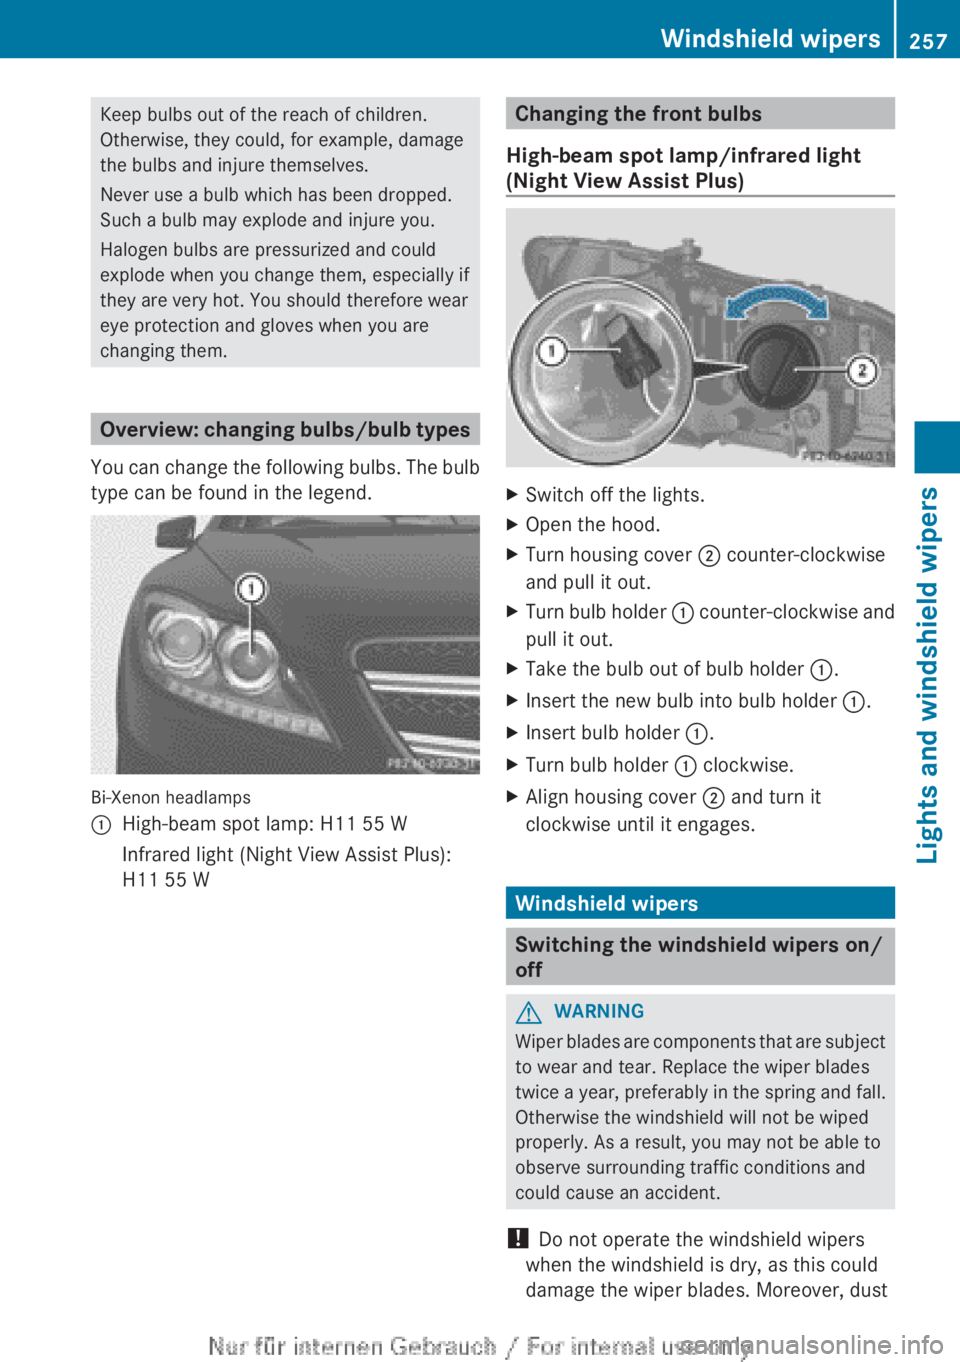
Overview: changing bulbs/bulb types
You can change the following bulbs. The bulb
type can be found in the legend.
Bi-Xenon headlamps
:High-beam spot lamp: H11 55 WInfrared light (Night View Assist Plus):
H11 55 WChanging the front bulbs
High-beam spot lamp/infrared light
(Night View Assist Plus)XSwitch off the lights.XOpen the hood.XTurn housing cover ; counter-clockwise
and pull it out.XTurn bulb holder : counter-clockwise and
pull it out.XTake the bulb out of bulb holder :.XInsert the new bulb into bulb holder :.XInsert bulb holder :.XTurn bulb holder : clockwise.XAlign housing cover ; and turn it
clockwise until it engages.
Windshield wipers
Switching the windshield wipers on/
off
GWARNING
Wiper blades are components that are subject
to wear and tear. Replace the wiper blades
twice a year, preferably in the spring and fall.
Otherwise the windshield will not be wiped
properly. As a result, you may not be able to
observe surrounding traffic conditions and
could cause an accident.
! Do not operate the windshield wipers
when the windshield is dry, as this could
damage the wiper blades. Moreover, dust
Windshield wipers257Lights and windshield wipersZ
Page 324 of 496
ATTENTION ASSIST is reset when you
continue your journey and starts assessing
your tiredness again if:
R you switch off the engine.
R you take off your seat belt and open the
driver's door, e.g. for a change of drivers or
to take a break.
Night View Assist Plus with spotlight
function
Important safety notes
In addition to the illumination provided by the
normal headlamps, Night View Assist Plus
uses infrared light to illuminate the road. The
Night View Assist Plus camera picks up the
infrared light and shows a black-and-white
image in the multifunction display. The image
shown in the multifunction display
corresponds to a road lit up by high-beam
headlamps. This enables you to see the road's
course and any obstacles in good time. If
pedestrian recognition is activated,
pedestrians recognized by the system are
highlighted in the Night View Assist Plus
display.
The spotlight function also illuminates
individual detected pedestrians with a
spotlight that flashes four times in quick
succession. After this targeted illumination,
the headlamps return to the original driving
position again.
GWARNING
Night View Assist Plus is only an aid designed
to assist driving. It is not a substitute for
attentive driving. Do not rely solely on the
Night View Assist Plus display. Continue to
look through the windshield. You are
responsible for safety and must drive in
accordance with traffic conditions. You could
otherwise put yourself and others in danger.
The system may be impaired or unavailable if:
R there is poor visibility, e.g. due to snow,
rain, fog or heavy spray.
R the windshield is dirty, fogged up or
covered, for instance by a sticker, in the
vicinity of the camera.
R you are driving on bends, uphill gradients
or downhill gradients.
Light from the headlamps of oncoming
vehicles does not affect the Night View Assist
Plus display in the multifunction display. This
is also the case if you cannot switch on the
high-beam headlamps due to oncoming
traffic.GWARNING
The Night View Assist Plus cannot record
objects immediately in front of or next to the
vehicle. When maneuvering, continue to look
through the windshield. Make sure no
persons or animals are in the area in which
you are maneuvering. You could otherwise
injure them.
i Infrared light is not visible to the human
eye and therefore does not glare. Night
View Assist Plus can therefore remain
switched on even if there is oncoming
traffic.
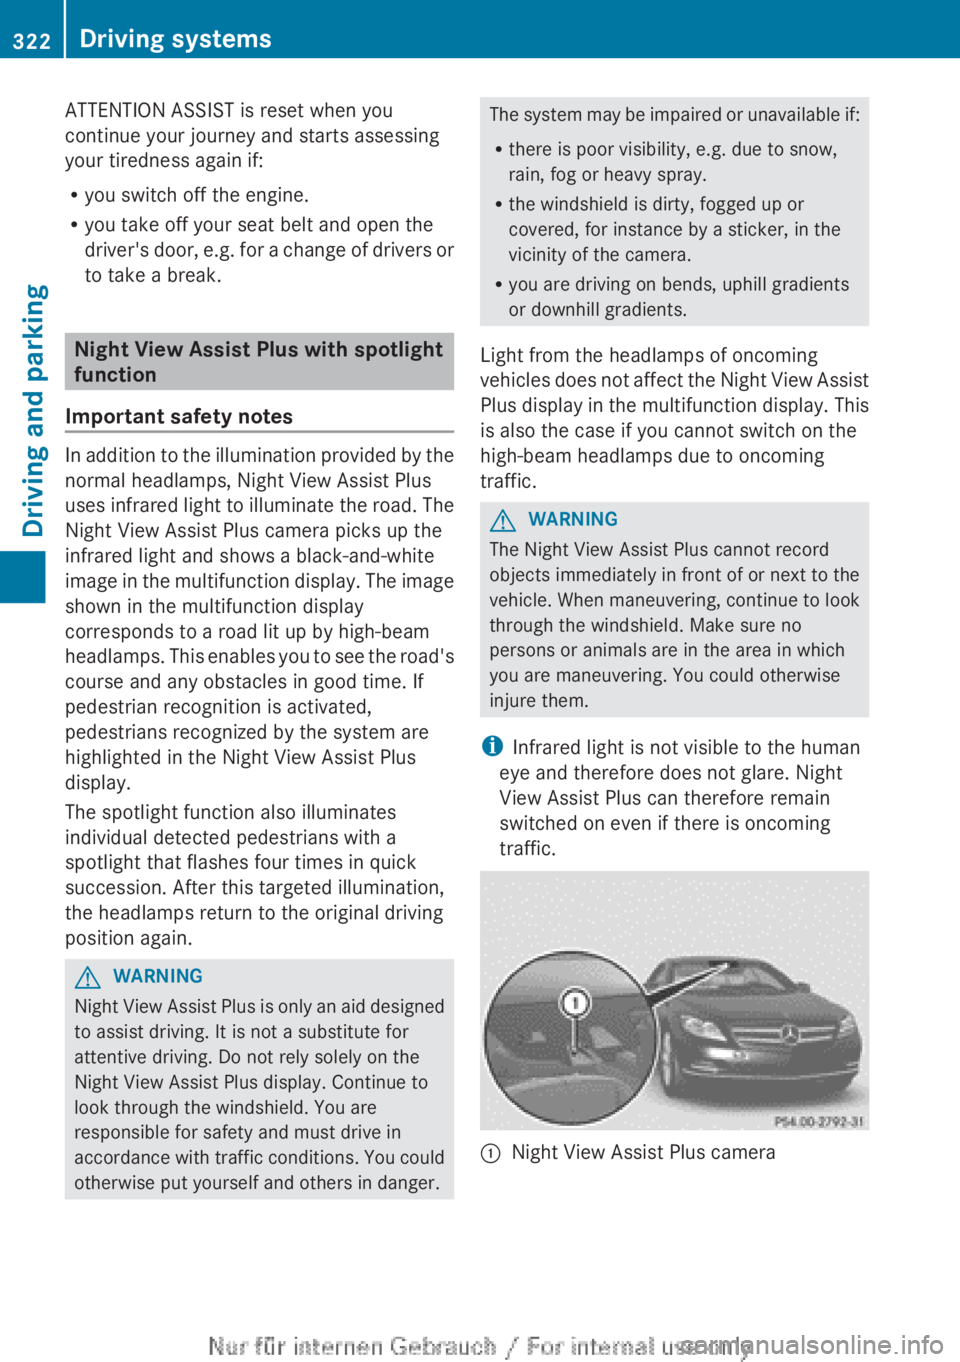
:Night View Assist Plus camera322Driving systemsDriving and parking
Page 369 of 496
Display messagesPossible causes/consequences and M Solutionslamp remains lit or goes out depends on how OCS classifies the
occupant.
If the conditions are not fulfilled, the system is not operating
correctly.XVisit a qualified specialist workshop immediately.GWARNING
If the 42 indicator lamp remains off even after performing the above corrective
steps, do not have any children twelve years old and under and other small individuals use the
front-passenger seat until the system has been repaired.
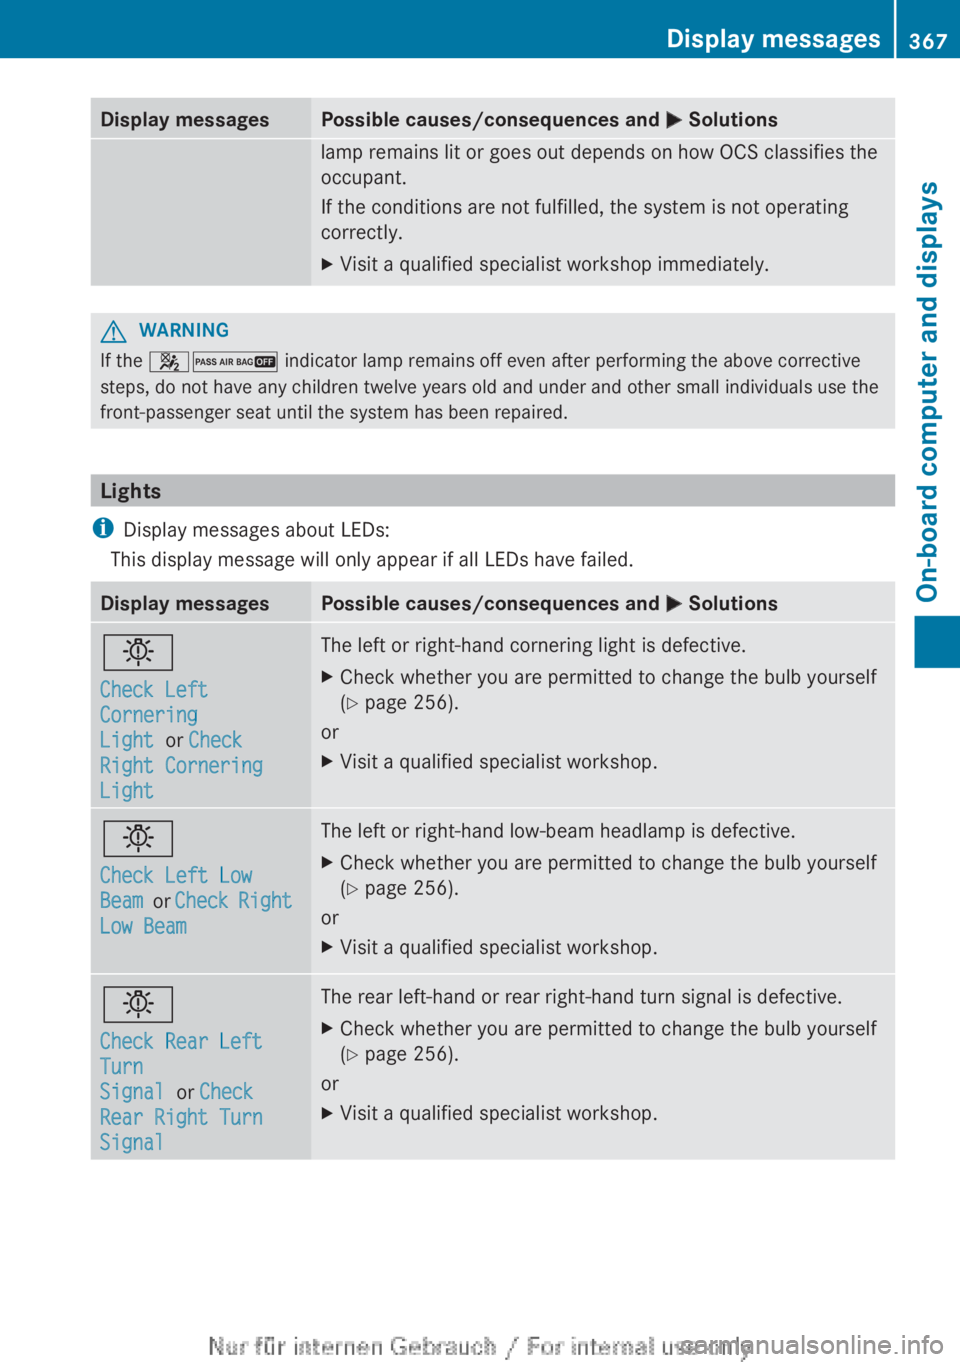
Lights
i Display messages about LEDs:
This display message will only appear if all LEDs have failed.
Display messagesPossible causes/consequences and M Solutionsb
Check Left
Cornering
Light or Check
Right Cornering
LightThe left or right-hand cornering light is defective.XCheck whether you are permitted to change the bulb yourself
( Y page 256).
or
XVisit a qualified specialist workshop.b
Check Left Low
Beam or Check Right
Low BeamThe left or right-hand low-beam headlamp is defective.XCheck whether you are permitted to change the bulb yourself
( Y page 256).
or
XVisit a qualified specialist workshop.b
Check Rear Left
Turn
Signal or Check
Rear Right Turn
SignalThe rear left-hand or rear right-hand turn signal is defective.XCheck whether you are permitted to change the bulb yourself
( Y page 256).
or
XVisit a qualified specialist workshop.Display messages367On-board computer and displaysZ
Page 372 of 496
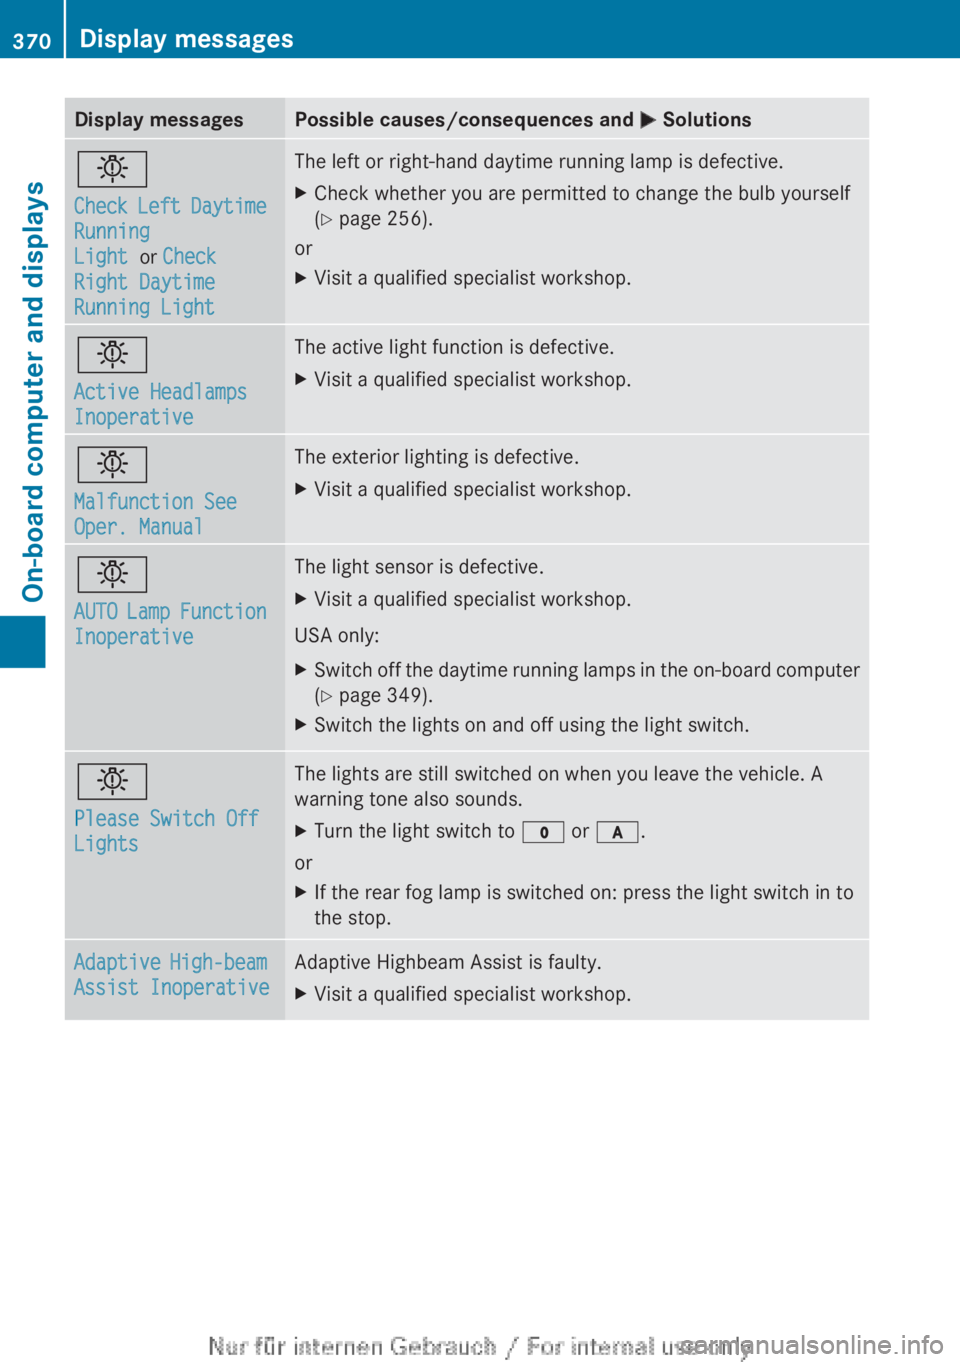
Display messagesPossible causes/consequences and M Solutionsb
Check Left Daytime
Running
Light or Check
Right Daytime
Running LightThe left or right-hand daytime running lamp is defective.XCheck whether you are permitted to change the bulb yourself
( Y page 256).
or
XVisit a qualified specialist workshop.b
Active Headlamps
InoperativeThe active light function is defective.XVisit a qualified specialist workshop.b
Malfunction See
Oper. ManualThe exterior lighting is defective.XVisit a qualified specialist workshop.b
AUTO Lamp Function
InoperativeThe light sensor is defective.XVisit a qualified specialist workshop.
USA only:
XSwitch off the daytime running lamps in the on-board computer
( Y page 349).XSwitch the lights on and off using the light switch.b
Please Switch Off
LightsThe lights are still switched on when you leave the vehicle. A
warning tone also sounds.XTurn the light switch to $ or c .
or
XIf the rear fog lamp is switched on: press the light switch in to
the stop.Adaptive High-beam
Assist InoperativeAdaptive Highbeam Assist is faulty.XVisit a qualified specialist workshop.370Display messagesOn-board computer and displays
Page 427 of 496

XPark the vehicle on a level surface.
Only check the coolant level when the
vehicle is on a level surface and the engine
has cooled down.XTurn the SmartKey to position 2 in the
ignition lock ( Y page 273).
On vehicles with KEYLESS-GO, press the
Start/Stop button twice ( Y page 273).XCheck the coolant temperature display in
the instrument cluster.
The coolant temperature must be below
158 ‡ (70 †).XTurn the SmartKey to position
0 (Y page 273) in the ignition lock.XSlowly turn cap : half a turn counter-
clockwise to allow excess pressure to
escape.XTurn cap : further counter-clockwise and
remove it.
If the coolant is at the level of marker bar
= in the filler neck when cold, there is
enough coolant in coolant expansion
tank ;.
If the coolant level is approximately 0.6 in
(1.5 cm) above marker bar = in the filler
neck when warm, there is enough coolant
in coolant expansion tank ;.XIf necessary, add coolant that has been
tested and approved by Mercedes-Benz.XReplace cap : and turn it clockwise as far
as it will go.
For further information on coolant, see
( Y page 487).
Adding washer fluid to the windshield
washer system/headlamp cleaning
systemGWARNING
Washer solvent/antifreeze is highly
flammable. Do not spill washer solvent/
antifreeze on hot engine parts, because it may
ignite and burn. You could be seriously
burned.
XTo open: pull cap : upwards by the tab.XAdd the premixed washer fluid.XTo close: press cap : onto the filler neck
until it engages.
The washer fluid reservoir is used for both the
windshield washer system and the headlamp
cleaning system.
Further information on windshield washer
fluid/antifreeze ( Y page 488).
Brake fluid level
! If the brake fluid level in the brake fluid
reservoir has fallen to the MIN mark or
below, check the brake system
immediately for leaks. Also check the
thickness of the brake linings. Visit a
qualified specialist workshop immediately.
Do not add brake fluid. This does not
correct the malfunction.
Only check the brake fluid level when the
vehicle is stationary and on a level surface.
Engine compartment425Maintenance and careZ
Page 490 of 496
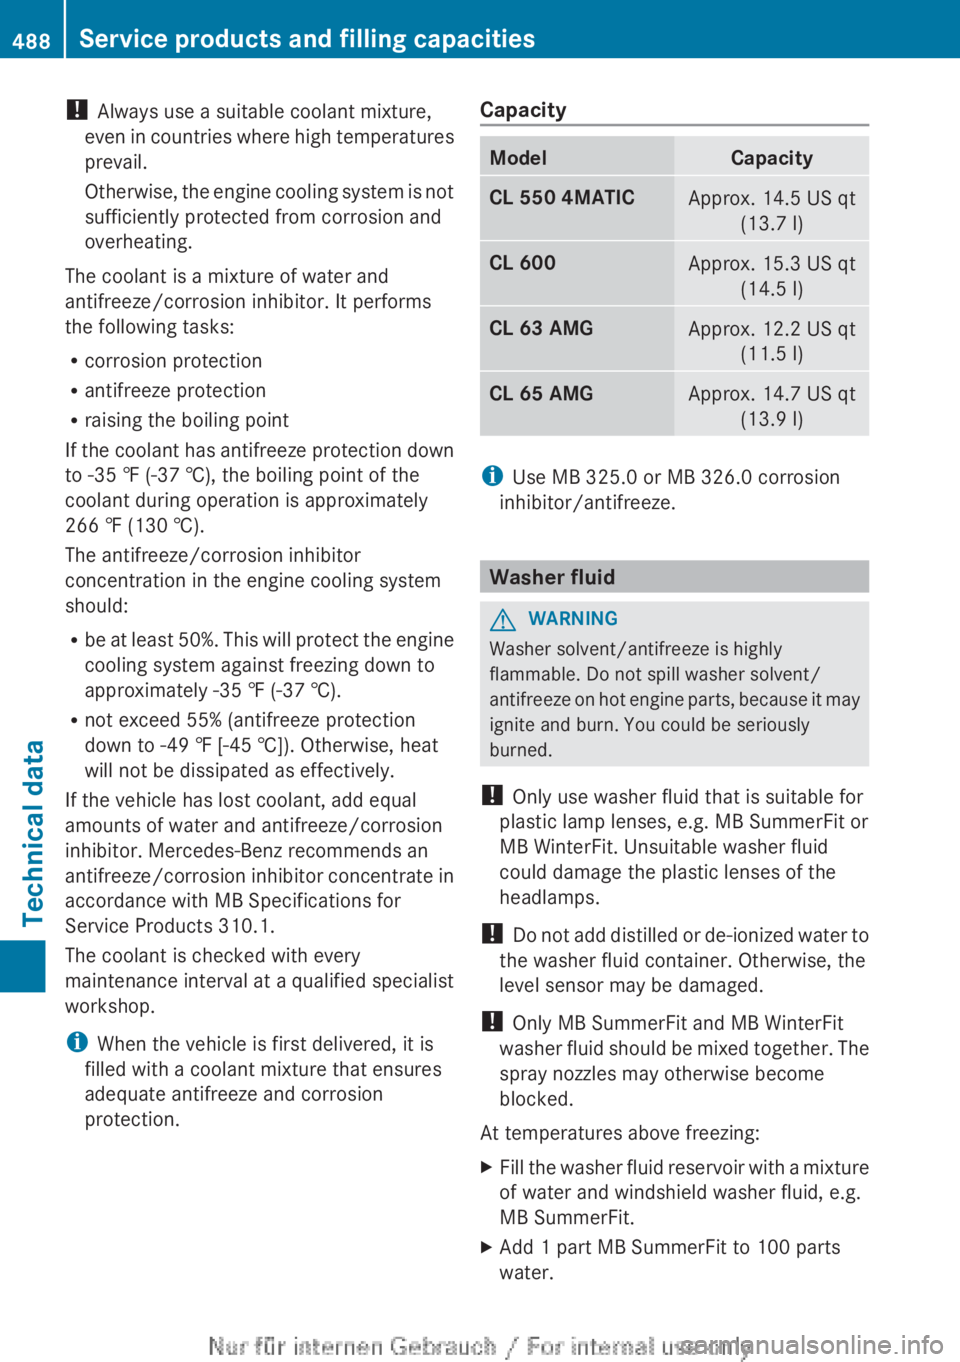
! Always use a suitable coolant mixture,
even in countries where high temperatures
prevail.
Otherwise, the engine cooling system is not
sufficiently protected from corrosion and
overheating.
The coolant is a mixture of water and
antifreeze/corrosion inhibitor. It performs
the following tasks:
R corrosion protection
R antifreeze protection
R raising the boiling point
If the coolant has antifreeze protection down
to -35 ‡ (-37 †), the boiling point of the
coolant during operation is approximately
266 ‡ (130 †).
The antifreeze/corrosion inhibitor
concentration in the engine cooling system
should:
R be at least 50%. This will protect the engine
cooling system against freezing down to
approximately -35 ‡ (-37 †).
R not exceed 55% (antifreeze protection
down to -49 ‡ [-45 †]). Otherwise, heat
will not be dissipated as effectively.
If the vehicle has lost coolant, add equal
amounts of water and antifreeze/corrosion
inhibitor. Mercedes-Benz recommends an
antifreeze/corrosion inhibitor concentrate in
accordance with MB Specifications for
Service Products 310.1.
The coolant is checked with every
maintenance interval at a qualified specialist
workshop.
i When the vehicle is first delivered, it is
filled with a coolant mixture that ensures
adequate antifreeze and corrosion
protection.CapacityModelCapacityCL 550 4MATICApprox. 14.5 US qt (13.7 l)CL 600Approx. 15.3 US qt(14.5 l)CL 63 AMGApprox. 12.2 US qt(11.5 l)CL 65 AMGApprox. 14.7 US qt(13.9 l)
iUse MB 325.0 or MB 326.0 corrosion
inhibitor/antifreeze.
Washer fluid
GWARNING
Washer solvent/antifreeze is highly
flammable. Do not spill washer solvent/
antifreeze on hot engine parts, because it may
ignite and burn. You could be seriously
burned.
! Only use washer fluid that is suitable for
plastic lamp lenses, e.g. MB SummerFit or
MB WinterFit. Unsuitable washer fluid
could damage the plastic lenses of the
headlamps.
! Do not add distilled or de-ionized water to
the washer fluid container. Otherwise, the
level sensor may be damaged.
! Only MB SummerFit and MB WinterFit
washer fluid should be mixed together. The
spray nozzles may otherwise become
blocked.
At temperatures above freezing:
XFill the washer fluid reservoir with a mixture
of water and windshield washer fluid, e.g.
MB SummerFit.XAdd 1 part MB SummerFit to 100 parts
water.488Service products and filling capacitiesTechnical data