rear view mirror MERCEDES-BENZ CL CLASS 2013 User Guide
[x] Cancel search | Manufacturer: MERCEDES-BENZ, Model Year: 2013, Model line: CL CLASS, Model: MERCEDES-BENZ CL CLASS 2013Pages: 496, PDF Size: 7.5 MB
Page 118 of 496
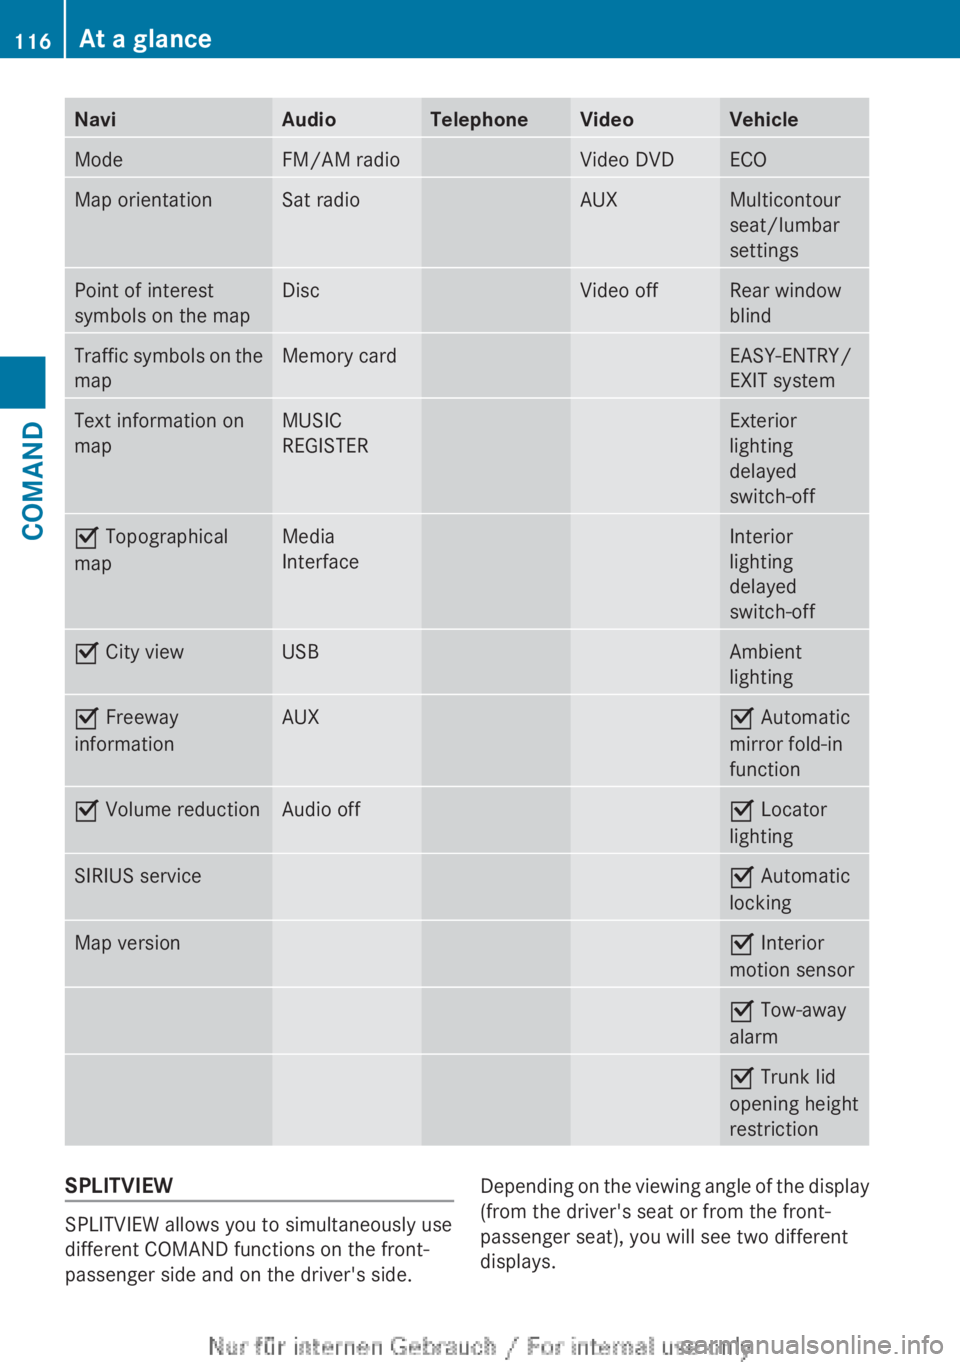
NaviAudioTelephoneVideoVehicleModeFM/AM radioVideo DVDECOMap orientationSat radioAUXMulticontour
seat/lumbar
settingsPoint of interest
symbols on the mapDiscVideo offRear window
blindTraffic symbols on the
mapMemory cardEASY-ENTRY/
EXIT systemText information on
mapMUSIC
REGISTERExterior
lighting
delayed
switch-offO Topographical
mapMedia
InterfaceInterior
lighting
delayed
switch-offO City viewUSBAmbient
lightingO Freeway
informationAUXO Automatic
mirror fold-in
functionO Volume reductionAudio offO Locator
lightingSIRIUS serviceO Automatic
lockingMap versionO Interior
motion sensorO Tow-away
alarmO Trunk lid
opening height
restrictionSPLITVIEW
SPLITVIEW allows you to simultaneously use
different COMAND functions on the front-
passenger side and on the driver's side.
Depending on the viewing angle of the display
(from the driver's seat or from the front-
passenger seat), you will see two different
displays.116At a glanceCOMAND
Page 321 of 496
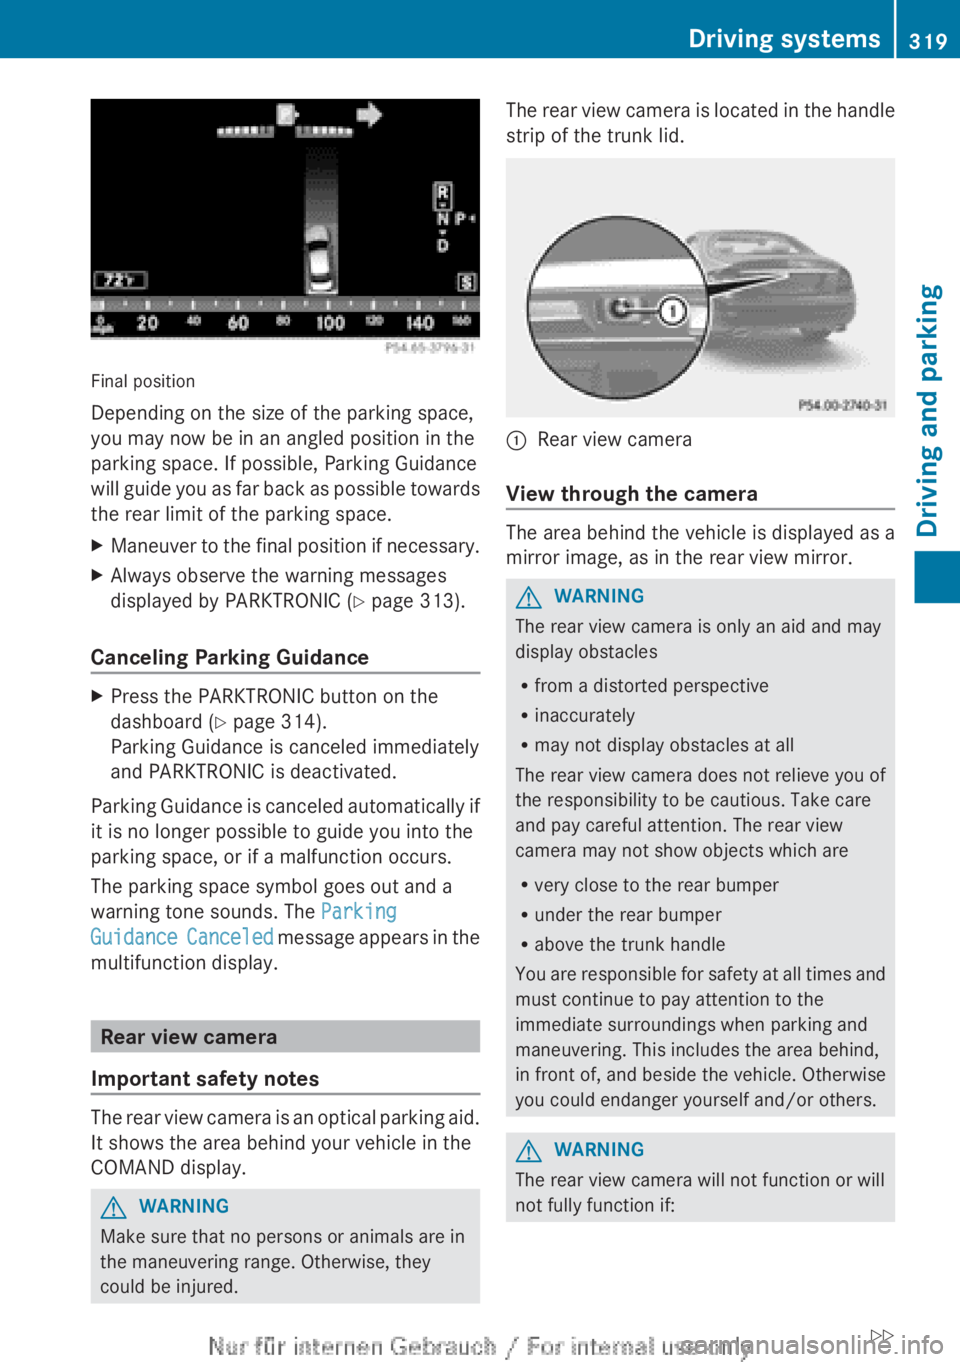
Final position
Depending on the size of the parking space,
you may now be in an angled position in the
parking space. If possible, Parking Guidance
will guide you as far back as possible towards
the rear limit of the parking space.
XManeuver to the final position if necessary.XAlways observe the warning messages
displayed by PARKTRONIC ( Y page 313).
Canceling Parking Guidance
XPress the PARKTRONIC button on the
dashboard ( Y page 314).
Parking Guidance is canceled immediately
and PARKTRONIC is deactivated.
Parking Guidance is canceled automatically if
it is no longer possible to guide you into the
parking space, or if a malfunction occurs.
The parking space symbol goes out and a
warning tone sounds. The Parking
Guidance Canceled message appears in the
multifunction display.
Rear view camera
Important safety notes
The rear view camera is an optical parking aid.
It shows the area behind your vehicle in the
COMAND display.
GWARNING
Make sure that no persons or animals are in
the maneuvering range. Otherwise, they
could be injured.
The rear view camera is located in the handle
strip of the trunk lid.:Rear view camera
View through the camera
The area behind the vehicle is displayed as a
mirror image, as in the rear view mirror.
GWARNING
The rear view camera is only an aid and may
display obstacles
R from a distorted perspective
R inaccurately
R may not display obstacles at all
The rear view camera does not relieve you of
the responsibility to be cautious. Take care
and pay careful attention. The rear view
camera may not show objects which are
R very close to the rear bumper
R under the rear bumper
R above the trunk handle
You are responsible for safety at all times and
must continue to pay attention to the
immediate surroundings when parking and
maneuvering. This includes the area behind,
in front of, and beside the vehicle. Otherwise
you could endanger yourself and/or others.
GWARNING
The rear view camera will not function or will
not fully function if:
Driving systems319Driving and parkingZ
Page 329 of 496
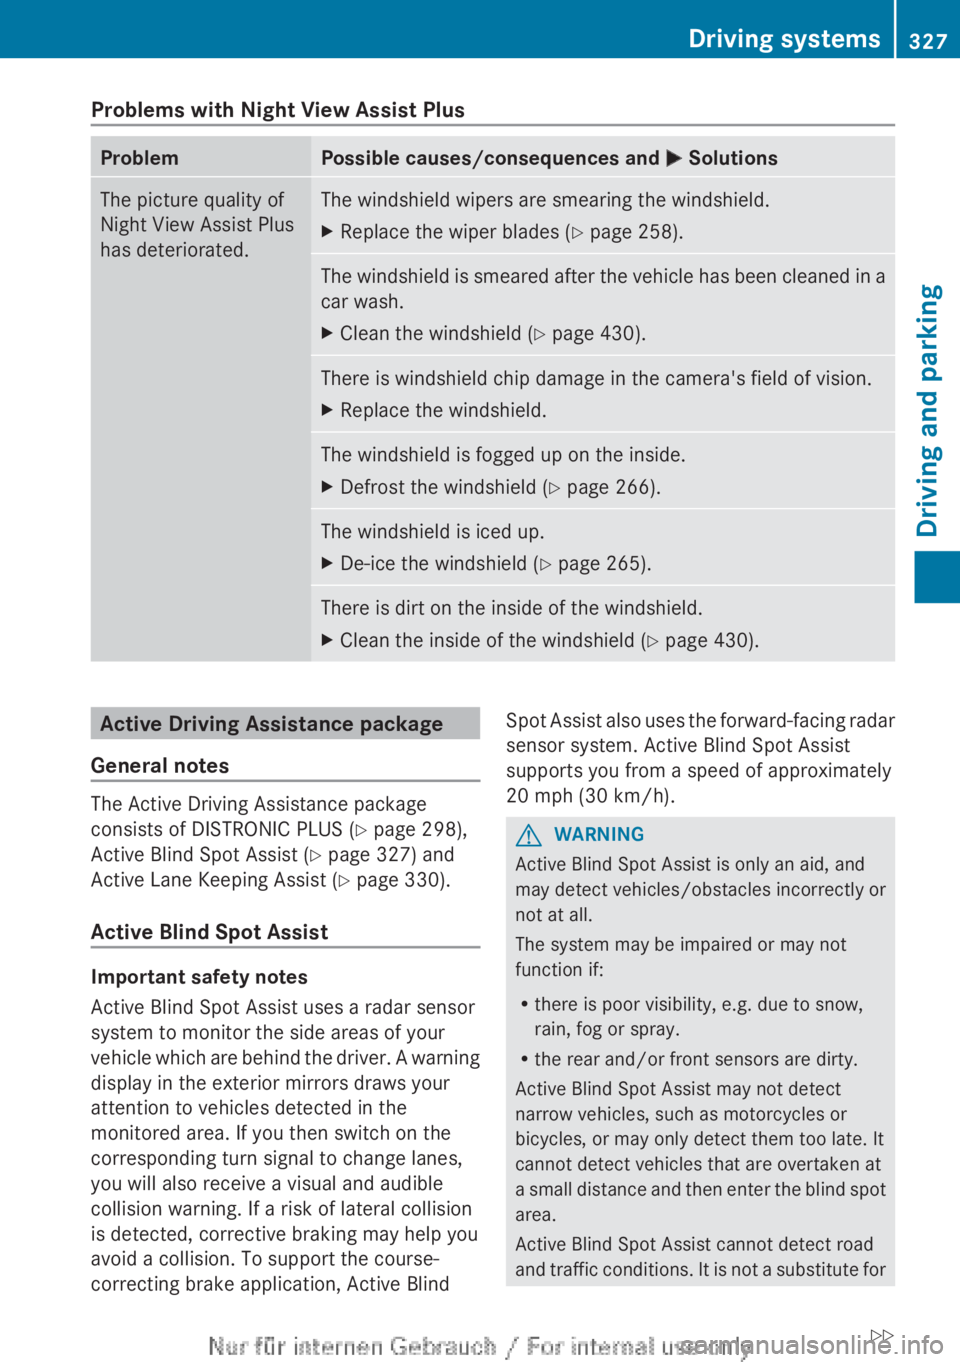
Problems with Night View Assist PlusProblemPossible causes/consequences and M SolutionsThe picture quality of
Night View Assist Plus
has deteriorated.The windshield wipers are smearing the windshield.XReplace the wiper blades ( Y page 258).The windshield is smeared after the vehicle has been cleaned in a
car wash.XClean the windshield ( Y page 430).There is windshield chip damage in the camera's field of vision.XReplace the windshield.The windshield is fogged up on the inside.XDefrost the windshield ( Y page 266).The windshield is iced up.XDe-ice the windshield ( Y page 265).There is dirt on the inside of the windshield.XClean the inside of the windshield ( Y page 430).Active Driving Assistance package
General notes
The Active Driving Assistance package
consists of DISTRONIC PLUS ( Y page 298),
Active Blind Spot Assist ( Y page 327) and
Active Lane Keeping Assist ( Y page 330).
Active Blind Spot Assist
Important safety notes
Active Blind Spot Assist uses a radar sensor
system to monitor the side areas of your
vehicle which are behind the driver. A warning
display in the exterior mirrors draws your
attention to vehicles detected in the
monitored area. If you then switch on the
corresponding turn signal to change lanes,
you will also receive a visual and audible
collision warning. If a risk of lateral collision
is detected, corrective braking may help you
avoid a collision. To support the course-
correcting brake application, Active Blind
Spot Assist also uses the forward-facing radar
sensor system. Active Blind Spot Assist
supports you from a speed of approximately
20 mph (30 km/h).GWARNING
Active Blind Spot Assist is only an aid, and
may detect vehicles/obstacles incorrectly or
not at all.
The system may be impaired or may not
function if:
R there is poor visibility, e.g. due to snow,
rain, fog or spray.
R the rear and/or front sensors are dirty.
Active Blind Spot Assist may not detect
narrow vehicles, such as motorcycles or
bicycles, or may only detect them too late. It
cannot detect vehicles that are overtaken at
a small distance and then enter the blind spot
area.
Active Blind Spot Assist cannot detect road
and traffic conditions. It is not a substitute for
Driving systems327Driving and parkingZ
Page 406 of 496
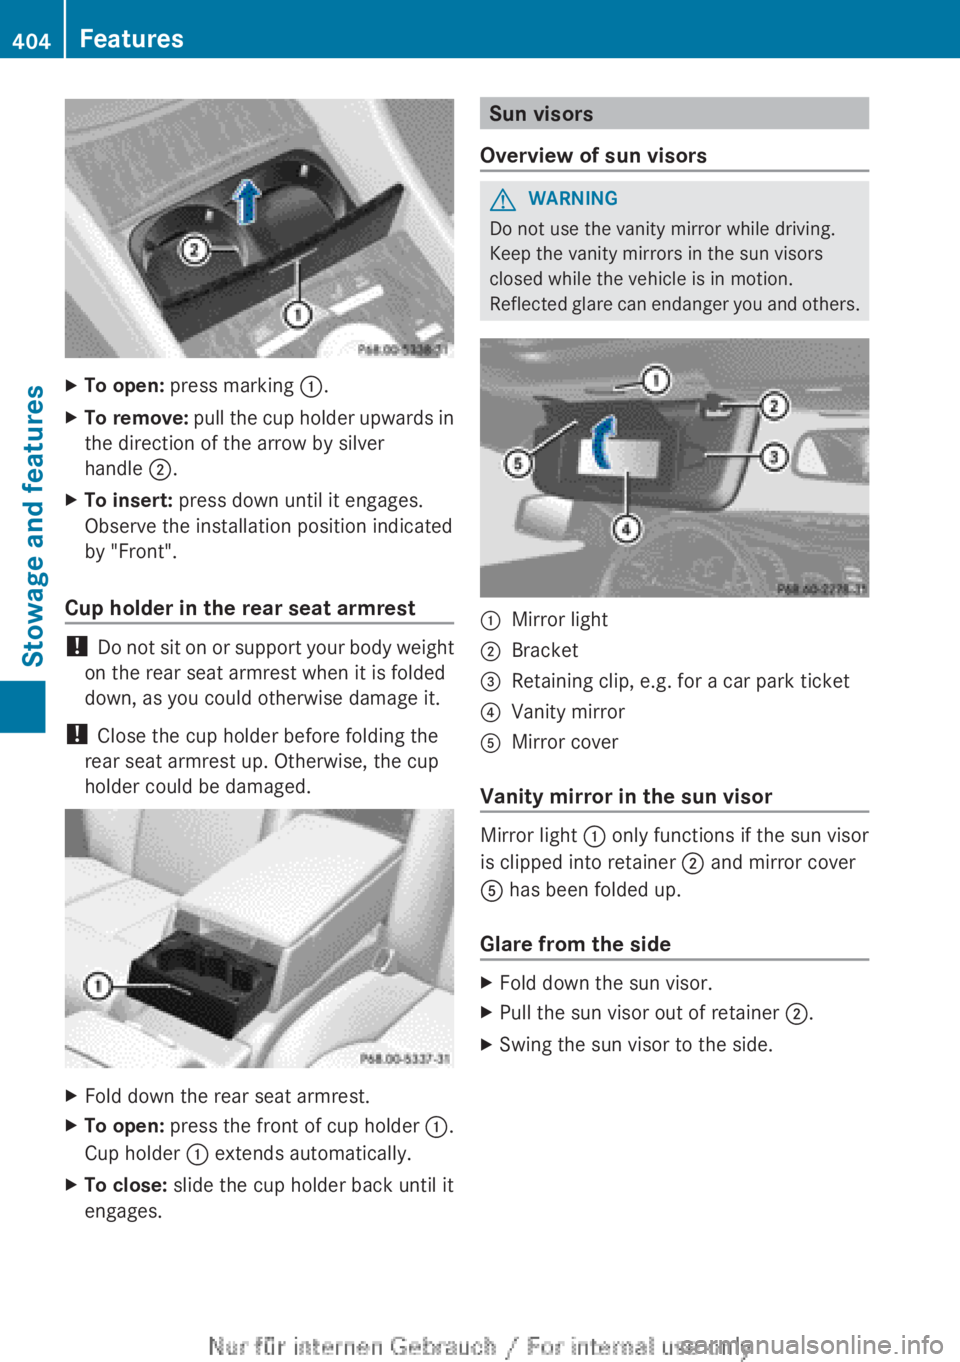
XTo open: press marking :.XTo remove: pull the cup holder upwards in
the direction of the arrow by silver
handle ;.XTo insert: press down until it engages.
Observe the installation position indicated
by "Front".
Cup holder in the rear seat armrest
! Do not sit on or support your body weight
on the rear seat armrest when it is folded
down, as you could otherwise damage it.
! Close the cup holder before folding the
rear seat armrest up. Otherwise, the cup
holder could be damaged.
XFold down the rear seat armrest.XTo open: press the front of cup holder :.
Cup holder : extends automatically.XTo close: slide the cup holder back until it
engages.Sun visors
Overview of sun visorsGWARNING
Do not use the vanity mirror while driving.
Keep the vanity mirrors in the sun visors
closed while the vehicle is in motion.
Reflected glare can endanger you and others.
:Mirror light;Bracket=Retaining clip, e.g. for a car park ticket?Vanity mirrorAMirror cover
Vanity mirror in the sun visor
Mirror light : only functions if the sun visor
is clipped into retainer ; and mirror cover
A has been folded up.
Glare from the side
XFold down the sun visor.XPull the sun visor out of retainer ;.XSwing the sun visor to the side.404FeaturesStowage and features
Page 416 of 496
maintenance information to the Mercedes-
Benz Customer Assistance Center. The
Mercedes-Benz Customer Assistance Center
then informs your authorized Mercedes-Benz
Service Center of the work required. This
happens automatically and does not require
any action from the driver. This function
allows the Mercedes-Benz Center to improve
appointment planning significantly and
ensures that your vehicle receives the best
service possible.
i The "Automatic retrieval of vehicle data
for the service due date" function is only
available if the relevant mobile phone
network is available and a data connection
is possible.
Stolen vehicle recovery service
If your vehicle has been stolen:
XNotify the police.
The police will issue a numbered incident
report.XThis number will be forwarded to the
Mercedes-Benz Customer Assistance
Center together with your PIN.
The Mercedes-Benz Customer Assistance
Center then attempts to locate the mbrace
system. The Mercedes-Benz Customer
Assistance Center contacts you and the
local law enforcement agency if the vehicle
is located. However, only the law
enforcement agency is informed of the
location of the vehicle.
i If the anti-theft alarm system is active for
longer than 30 seconds, mbrace
automatically informs the Mercedes-Benz
Customer Assistance Center.
Garage door opener
Important safety notes
GWARNING
When you operate or program the garage door
with the integrated garage door opener,
persons in the range of movement of the
garage door can become trapped or struck by
the garage door. There is a risk of injury.
When using the integrated garage door
opener, always make sure that nobody is
within the range of movement of the garage
door.GWARNING
Combustion engines emit poisonous exhaust
gases such as carbon monoxide. Inhaling
these exhaust gases leads to poisoning. There
is a risk of fatal injury. Therefore never leave
the engine running in enclosed spaces
without sufficient ventilation.
The HomeLink ®
garage door opener
integrated in the rear-view mirror allows you
to operate up to three different door and gate
systems.
Use the integrated garage door opener only
on garage doors that:
R have safety stop and reverse features and
R meet current U.S. federal safety standards
When programming a garage door opener,
park the vehicle outside the garage.
i Certain garage door drives are
incompatible with the integrated garage
door opener. If you have difficulty
programming the integrated garage door
opener, contact an authorized Mercedes-
Benz Center.
Alternatively, you can call the following
telephone assistance services:
R USA: Mercedes-Benz Customer
Assistance Center at
1-800-FOR-MERCedes
R Canada: Customer Service at
1-800-387-0100
R HomeLink ®
hotline 1-800-355-3515
(free of charge)
More information on HomeLink ®
and/or
compatible products is also available
online at http://www.homelink.com.
414FeaturesStowage and features
Page 417 of 496
iNotes on the declaration of conformity .
USA: FCC ID: CB2HMIHL4
Canada: IC: 279B-HMIHL4
Programming the integrated garage
door opener on the rear-view mirror
Programming buttons
Observe the "Important safety notes"
( Y page 414).
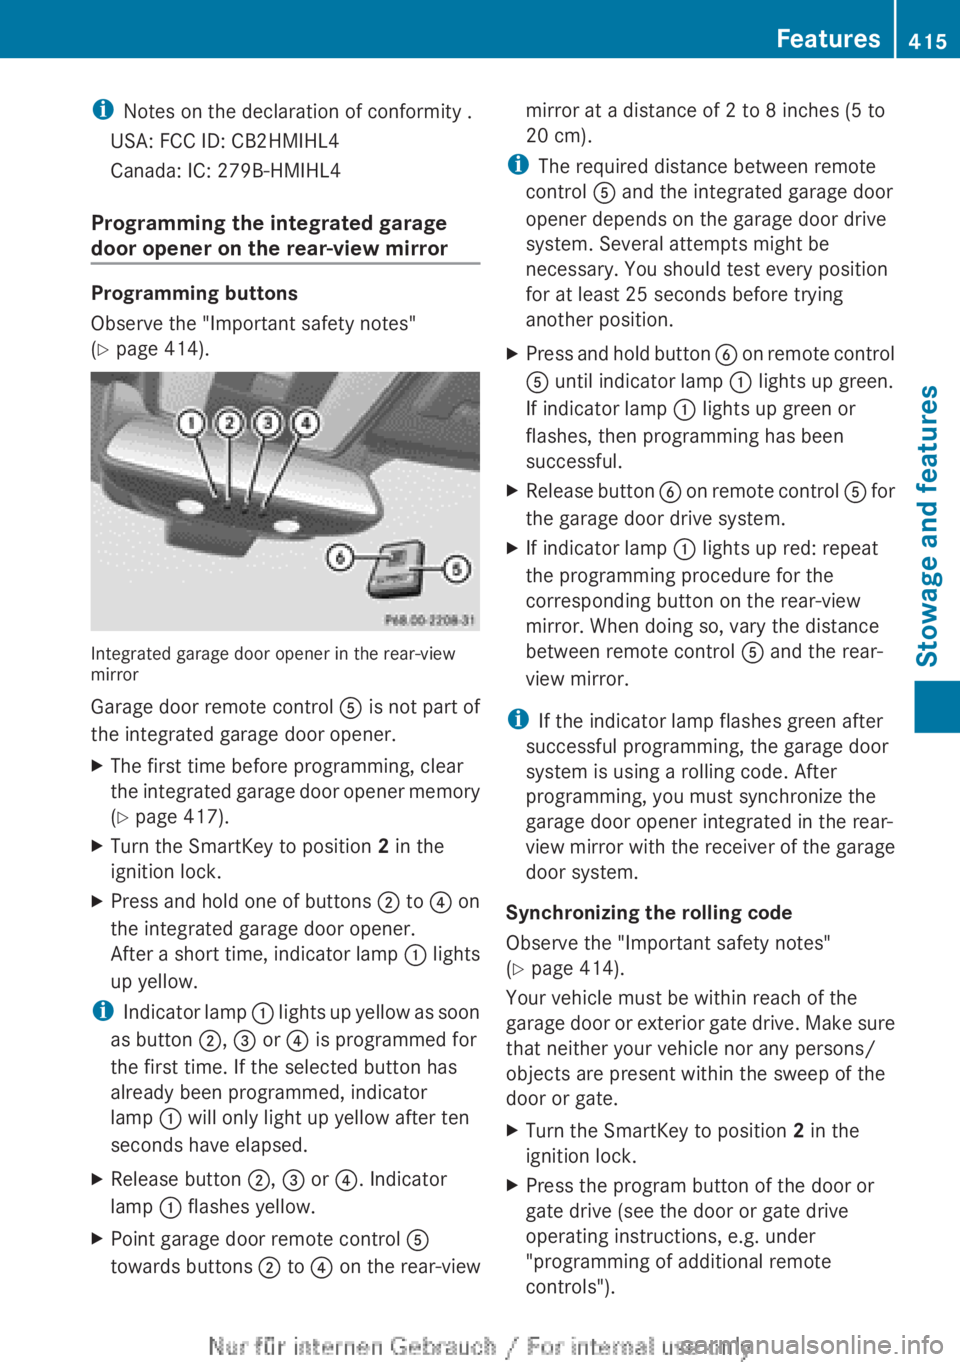
Integrated garage door opener in the rear-view
mirror
Garage door remote control A is not part of
the integrated garage door opener.
XThe first time before programming, clear
the integrated garage door opener memory
( Y page 417).XTurn the SmartKey to position 2 in the
ignition lock.XPress and hold one of buttons ; to ? on
the integrated garage door opener.
After a short time, indicator lamp : lights
up yellow.
i Indicator lamp : lights up yellow as soon
as button ;, = or ? is programmed for
the first time. If the selected button has
already been programmed, indicator
lamp : will only light up yellow after ten
seconds have elapsed.
XRelease button ;, = or ?. Indicator
lamp : flashes yellow.XPoint garage door remote control A
towards buttons ; to ? on the rear-viewmirror at a distance of 2 to 8 inches (5 to
20 cm).
i The required distance between remote
control A and the integrated garage door
opener depends on the garage door drive
system. Several attempts might be
necessary. You should test every position
for at least 25 seconds before trying
another position.
XPress and hold button B on remote control
A until indicator lamp : lights up green.
If indicator lamp : lights up green or
flashes, then programming has been
successful.XRelease button B on remote control A for
the garage door drive system.XIf indicator lamp : lights up red: repeat
the programming procedure for the
corresponding button on the rear-view
mirror. When doing so, vary the distance
between remote control A and the rear-
view mirror.
i If the indicator lamp flashes green after
successful programming, the garage door
system is using a rolling code. After
programming, you must synchronize the
garage door opener integrated in the rear-
view mirror with the receiver of the garage
door system.
Synchronizing the rolling code
Observe the "Important safety notes"
( Y page 414).
Your vehicle must be within reach of the
garage door or exterior gate drive. Make sure
that neither your vehicle nor any persons/
objects are present within the sweep of the
door or gate.
XTurn the SmartKey to position 2 in the
ignition lock.XPress the program button of the door or
gate drive (see the door or gate drive
operating instructions, e.g. under
"programming of additional remote
controls").Features415Stowage and featuresZ
Page 418 of 496
iUsually, you now have 30seconds to
initiate the next step.XPress previously programmed button ;,
= or ? of the integrated garage door
opener until the door closes.
The rolling code synchronization is then
complete.
Notes on programming the remote
control
Canadian radio frequency laws require a
"break" (or interruption) of the transmission
signals after broadcasting for a few seconds.
Therefore, these signals may not last long
enough for the integrated garage door
opener. The signal is not recognized during
programming. Comparable with Canadian
law, some U.S. garage door openers also
feature a "break".
Proceed as follows:
R if you live in Canada
R if you have difficulties programming the
garage door opener (regardless of where
you live) when using the programming
steps
XPress and hold one of buttons ; to ? on
the integrated garage door opener.
After a short time, indicator lamp : lights
up yellow.XRelease the button.
Indicator lamp : flashes yellow.XPress button B of garage door remote
control A for two seconds, then release it
for two seconds.XPress button B again for two seconds.XRepeat this sequence on button B of
remote control A until indicator lamp :
lights up green.
If indicator lamp : turns red, repeat the
process.XContinue with the other programming
steps (see above).Problems when programming
If you are experiencing problems
programming the integrated garage door
opener on the rear-view mirror, take note of
the following instructions:
R Check the transmitter frequency of garage
door drive remote control A. This can
usually be found on the back of the remote
control.
The integrated garage door opener is
compatible with devices that have units
which operate in the frequency range of
280to 433MHz.
R Replace the batteries in garage door
remote control A. This increases the
likelihood that garage door remote control
A will transmit a strong and precise signal
to the integrated garage door opener in the
rear-view mirror.
R When programming, hold remote control
A at varying distances and angles from the
button that you are programming. Try
various angles at a distance between 2and
12 inches ( 5to 30 cm) or at the same angle
but at varying distances.
R If another remote control for the same
garage door drive is available, repeat the
same programming steps with this remote
control. Before performing these steps,
make sure that new batteries have been
installed in garage door drive remote
control A.
R Note that some remote controls only
transmit for a limited amount of time (the
indicator lamp on the remote control goes
out). Press button B on remote control
A again before transmission ends.
R Align the antenna cable of the garage door
opener unit. This can improve signal
reception/transmission.
Opening/closing the garage door
After it has been programmed, the integrated
garage door opener performs the function of
the garage door system remote control.
416FeaturesStowage and features
Page 419 of 496
Please also read the operating instructions
for the garage door system.XTurn the SmartKey to position 2 in the
ignition lock.XPress button ;, = or ? which you have
programmed to operate the garage door.
Garage door system with a fixed code:
indicator lamp : lights up green.
Garage door system with a rolling code:
indicator lamp : flashes green.
i
The transmitter will transmit a signal as
long as the button is pressed. The
transmission is halted after a maximum of
ten seconds and indicator lamp : lights
up yellow. Press button ;, = or ? again
if necessary.
Clearing the memory of the integrated
garage door opener on the rear-view
mirror
XTurn the SmartKey to position 2 in the
ignition lock.XPress buttons ; and ?.
The indicator lamp lights up yellow.XPress and hold buttons ; and ? until the
indicator lamp turns green.
i Make sure that you clear the memory of
the integrated garage door opener before
selling the vehicle.
Floormat on the driver's side
GWARNING
Whenever you are using a floormat, make sure
there is enough clearance and that the
floormat is securely fastened.
The floormat should always be securely
fastened using the fastening equipment.
Before driving off, check that the floormat is
securely in place and adjust it if necessary. A
loose floormat could slip and hinder proper
functioning of the pedals.
Do not place several floormats on top of each
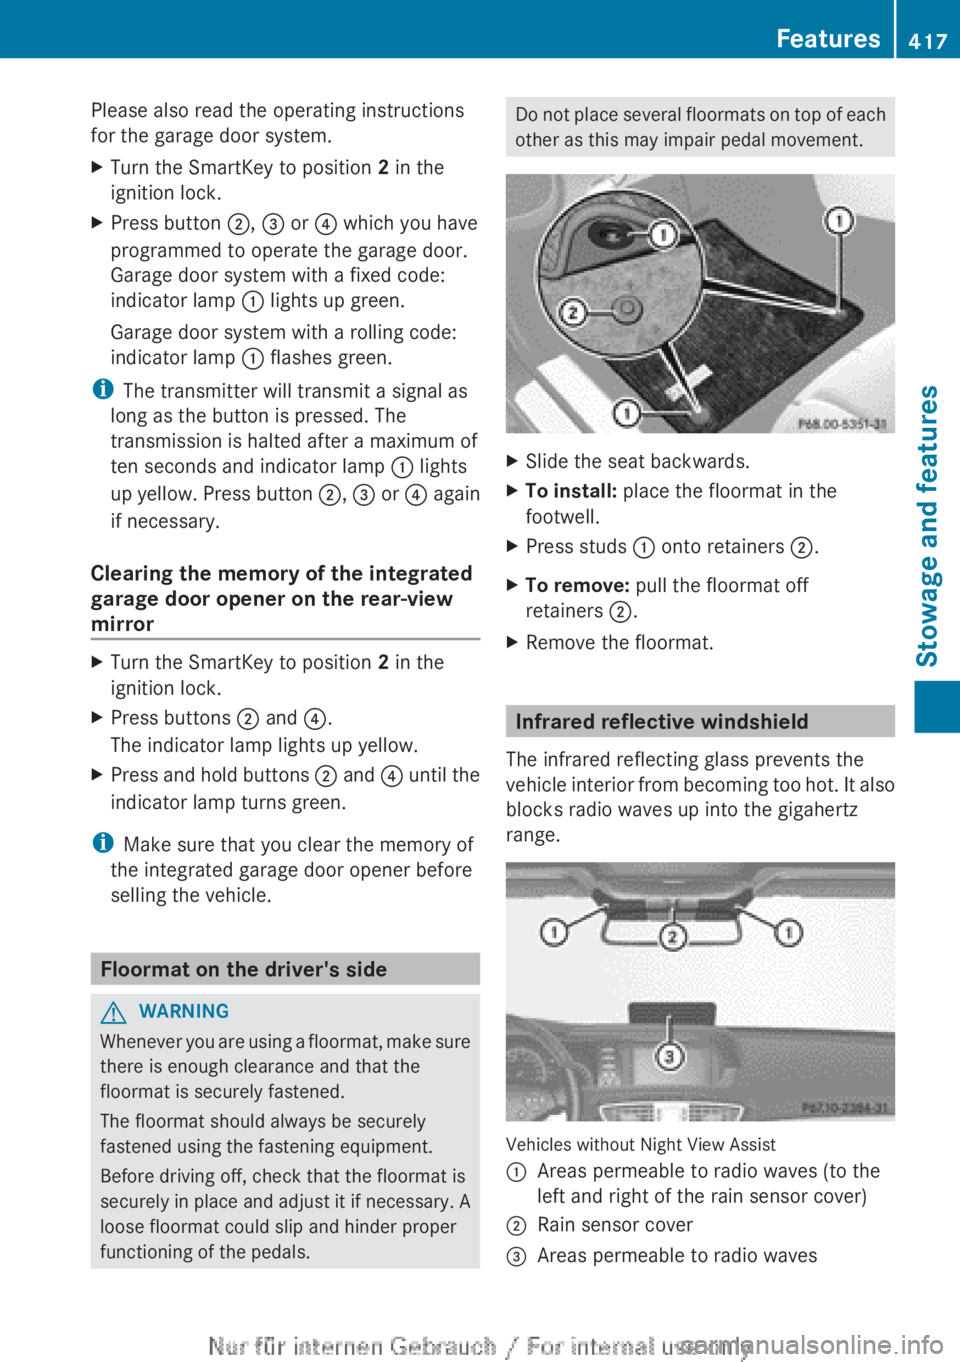
other as this may impair pedal movement.XSlide the seat backwards.XTo install: place the floormat in the
footwell.XPress studs : onto retainers ;.XTo remove: pull the floormat off
retainers ;.XRemove the floormat.
Infrared reflective windshield
The infrared reflecting glass prevents the
vehicle interior from becoming too hot. It also
blocks radio waves up into the gigahertz
range.
Vehicles without Night View Assist
:Areas permeable to radio waves (to the
left and right of the rain sensor cover);Rain sensor cover=Areas permeable to radio wavesFeatures417Stowage and featuresZ
Page 433 of 496

Cleaning the mirror turn signals
! Only use cleaning agents or cleaning
cloths that are suitable for plastic lenses.
Unsuitable cleaning agents or cleaning
cloths could scratch or damage the plastic
lenses of the mirror turn signals.
XClean the plastic lenses of the mirror turn
signals using a wet sponge and a mild
cleaning agent, e.g. Mercedes-Benz car
shampoo. Cleaning cloths may be used as
well.
Cleaning the sensors
XClean sensors : of the driving systems
with water, car shampoo and a soft cloth.
! If you clean the sensors with a power
washer, make sure that you keep a
distance of at least 11.8 in (30 cm) between
the vehicle and the power washer nozzle.
Information about the correct distance is
available from the equipment
manufacturer.
Cleaning the rear view cameraXUse clear water and a soft cloth to clean
camera lens :.
!
Do not clean the camera lens and the area
around the rear view camera with a power
washer.
Cleaning the exhaust pipes
Impurities combined with the effects of road
grit and corrosive environmental factors may
cause flash rust to form on the surface. You
can restore the original shine of the exhaust
tail pipe by cleaning it regularly, especially in
winter and after washing.
! Do not clean the exhaust tail pipes with
alkaline-based cleaning agents, such as
wheel cleaner.
XClean the exhaust tail pipes with a chrome
care product tested and approved by
Mercedes-Benz.
Interior care
Cleaning the display
XBefore cleaning the display, make sure that
it is switched off and has cooled down.XClean the display surface using a
commercially-available microfiber cloth
and TFT/LCD display cleaner.XDry the display surface using a dry
microfiber cloth.Care431Maintenance and careZ