steering MERCEDES-BENZ CL CLASS 2013 Owner's Guide
[x] Cancel search | Manufacturer: MERCEDES-BENZ, Model Year: 2013, Model line: CL CLASS, Model: MERCEDES-BENZ CL CLASS 2013Pages: 496, PDF Size: 7.5 MB
Page 107 of 496

should have a good overview of traffic
conditions.
Folding the exterior mirrors in or out
electrically
XMake sure that the SmartKey is in position
1 or 2 in the ignition lock.XBriefly press button :.
Both exterior mirrors fold in or out.
i Make sure that the exterior mirrors are
always folded out fully while driving. They
could otherwise vibrate.
Folding the exterior mirrors in or out
automatically
When the "Automatic mirror folding" function
is activated in COMAND ( Y page 236):
R the exterior mirrors fold in automatically as
soon as you lock the vehicle from the
outside.
R the exterior mirrors fold out again
automatically as soon as you unlock the
vehicle and then open the driver's or front-
passenger door.
i If the exterior mirrors have been folded in
manually, they do not fold out.
Exterior mirror out of position
If an exterior mirror has been pushed out of
position, proceed as follows:
XPress the mirror-folding button
( Y page 105) repeatedly until you hear the
mirror engage in position.
The mirror housing is engaged again and
you can adjust the exterior mirrors as usual
( Y page 104).
Automatic anti-glare mirrors
GWARNING
If incident light from headlamps is prevented
from striking the sensor in the rear-view
mirror, for instance, by luggage piled too high
in the vehicle, the mirror's automatic anti-
glare function will not operate.
Incident light could then blind you. This may
distract you from the traffic conditions and,
as a result, you may cause an accident.
The rear-view mirror and the exterior mirror
on the driver's side automatically go into anti-
glare mode if the ignition is switched on and
incident light from headlamps strikes the
sensor in the rear-view mirror.
The mirrors do not go into anti-glare mode if
reverse gear is engaged or the interior lighting
is switched on.
Parking position for the exterior
mirror on the front-passenger side
Setting and storing the parking position
You can position the front-passenger side
exterior mirror in such a way that you can see
the rear wheel on that side as soon as you
engage reverse gear. You can store this
position.
Mirrors105Seats, steering wheel and mirrorsZ
Page 108 of 496

XMake sure that the vehicle is stationary and
that the SmartKey is in position 2 in the
ignition lock.XPress button = for the exterior mirror on
the front-passenger side.XEngage reverse gear.
The exterior mirror on the front-passenger
side moves to the preset parking position.XUse adjustment button ; to adjust the
exterior mirror. You should see the rear
wheel and the curb in the exterior mirror.
The parking position is stored.
i If you shift the transmission to another
position, the exterior mirror on the front-
passenger side returns to the driving
position.
i You can also store the parking position
using memory button M : .
XMake sure that the SmartKey is in
position 2 in the ignition lock.XWith the exterior mirror on the front-
passenger side activated, use
adjustment button ; to adjust the
exterior mirror. You should see the
rear wheel and the curb in the exterior
mirror on the front-passenger side.XPress memory button M : and one of
the arrows on adjustment button ;
within three seconds.
The parking position is stored if the
exterior mirror does not move.
If the mirror moves out of position, repeat
the steps.
Calling up a stored parking position
settingXTurn the SmartKey to position 2 in the
ignition lock.XAdjust the exterior mirror on the front-
passenger side with the corresponding
button ( Y page 104).XEngage reverse gear.
The exterior mirror on the front-passenger
side moves to the stored parking position.
The exterior mirror on the front-passenger
side moves back to its original position:
R as soon as you exceed a speed of 9 mph
(15 km/h)
R about ten seconds after you have
disengaged reverse gear
R if you press button ? for the exterior
mirror on the driver's side
Memory function
Storing settings
GWARNING
Do not activate the memory function while
driving. Activating the memory function while
driving could cause the driver to lose control
of the vehicle.
With the memory function, you can store up
to three different settings, e.g. for three
different people.
The following settings are stored as a single
memory preset:
R seat, backrest, head restraint position and
contour of the backrest in the lumbar
region
R active multicontour seat: activated/
deactivated
R multicontour seat: the side bolsters of the
seat cushion and the backrest as well as
the contour of the backrest in the lumbar
and shoulder regions
106Memory functionSeats, steering wheel and mirrors
Page 109 of 496

Rdriver's side: steering wheel position
R driver's side: position of the exterior
mirrors on the driver's and front-passenger
sidesXAdjust the seat ( Y page 98).XOn the driver's side, adjust the steering
wheel (Y page 103) and the exterior mirrors
( Y page 104).XBriefly press the M memory button and
then press storage position button 1, 2 or
3 within three seconds until you hear an
acknowledgment tone.
The settings are stored in the selected
storage position.
Calling up a stored setting
XPress and hold the relevant storage
position button 1, 2 or 3 until the seat,
steering wheel and exterior mirrors are in
the stored position.
i If you release the storage position button,
the seat, steering wheel and mirror setting
functions stop immediately. The
multicontour seat setting or lumbar
support adjustment is still carried out.
Memory function107Seats, steering wheel and mirrorsZ
Page 119 of 496
For example, the "Navi" function can be used
from the driver's side while the "Video"
function is used on the front-passenger side.
Use the remote control to operate COMAND
from the front-passenger side with
SPLITVIEW.
Please bear the following in mind
R Your vehicle may be equipped with
SPLITVIEW, depending on its date of
production. The use of SPLITVIEW is
currently not permitted in the following
states: AL, AZ, CO, IL, LA, MA, MD, NH, PA,
VA, VT, WA, WI, and WV or in the Canadian
provinces of Manitoba, Newfoundland,
New Brunswick, and Prince Edward Island.
It is the driver's responsibility to observe
ALL regional legally prescribed regulations.
If your vehicle is registered in a state or
province in which SPLITVIEW is not
approved, this function must be
deactivated. Please contact an authorized
specialist dealer to check whether
SPLITVIEW is approved in your state or
province.
R Volume adjustment for the cordless
headphones can be carried out on the
headphones. Before putting on the
headphones, make sure that the volume
has not been set too high.
R The remote control can be used for the
volume adjustment of corded headphones.
R You can only use media from the driver's
and front-passenger sides separately if the
media are from different sources. Example:
on the driver's side, an audio CD is being
played by the DVD changer. This means
that on the front-passenger side, the DVD
changer cannot be used to play a different
disc type, for instance a video DVD.
However, other media can be used at the
same time on the front-passenger side,
including radio, memory card, MUSIC
REGISTER, Media Interface, USB or AUX.
R If you use the same medium on both sides,
settings for this medium can be carried out
from either side.R There must be intervisibility between the
headphones and the display so that
COMAND can optimally transmit music and
speech via the infrared signal on the front-
passenger's headphones. For this reason,
please also observe that the headphones
have left and right sides, and use them
correctly.
R Only entertainment functions, i.e. audio
and video, can be used separately via
SPLITVIEW.
R The multifunction steering wheel can only
be used for functions which relate to the
driver's side.
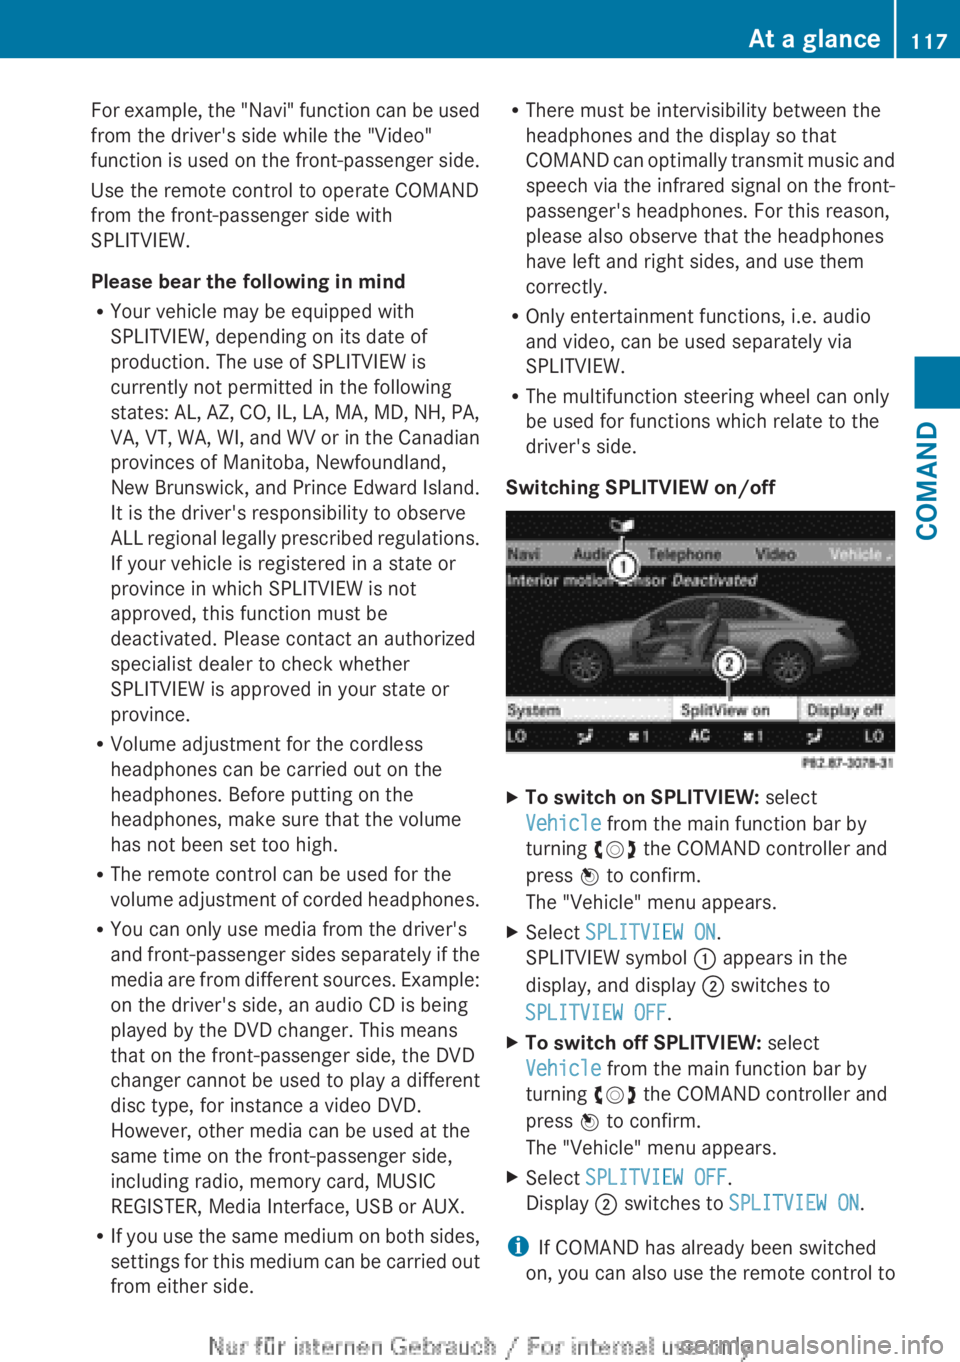
Switching SPLITVIEW on/offXTo switch on SPLITVIEW: select
Vehicle from the main function bar by
turning cVd the COMAND controller and
press W to confirm.
The "Vehicle" menu appears.XSelect SPLITVIEW ON .
SPLITVIEW symbol : appears in the
display, and display ; switches to
SPLITVIEW OFF .XTo switch off SPLITVIEW: select
Vehicle from the main function bar by
turning cVd the COMAND controller and
press W to confirm.
The "Vehicle" menu appears.XSelect SPLITVIEW OFF .
Display ; switches to SPLITVIEW ON .
i
If COMAND has already been switched
on, you can also use the remote control to
At a glance117COMANDZ
Page 128 of 496
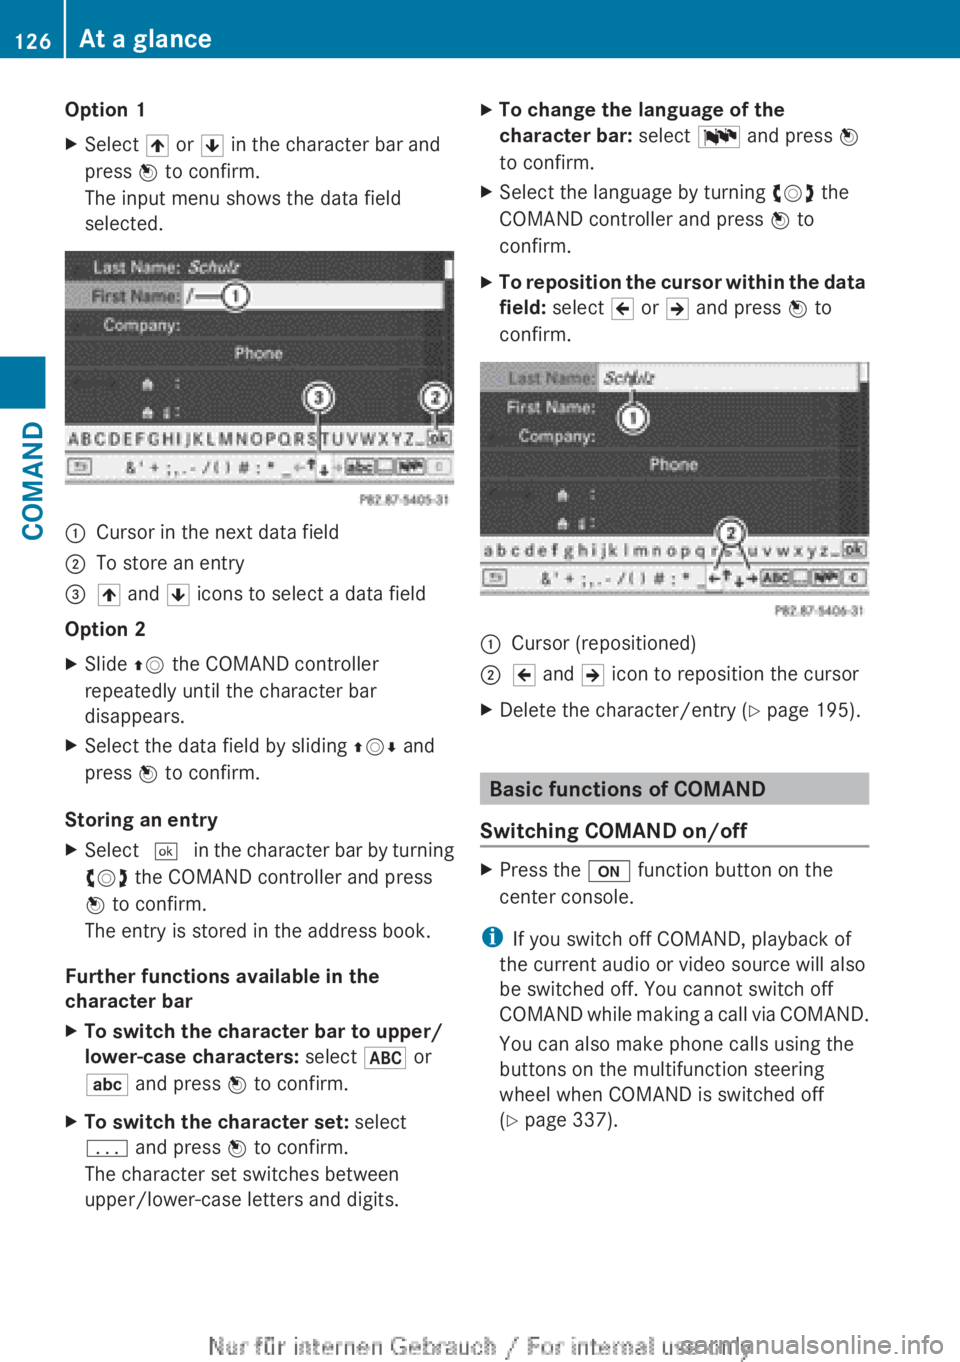
Option 1XSelect 4 or 5 in the character bar and
press W to confirm.
The input menu shows the data field
selected.:Cursor in the next data field;To store an entry=4 and 5 icons to select a data field
Option 2
XSlide ZV the COMAND controller
repeatedly until the character bar
disappears.XSelect the data field by sliding ZVÆ and
press W to confirm.
Storing an entry
XSelect ¬ in the character bar by turning
cVd the COMAND controller and press
W to confirm.
The entry is stored in the address book.
Further functions available in the
character bar
XTo switch the character bar to upper/
lower-case characters: select * or
E and press W to confirm.XTo switch the character set: select
p and press W to confirm.
The character set switches between
upper/lower-case letters and digits.XTo change the language of the
character bar: select B and press W
to confirm.XSelect the language by turning cVd the
COMAND controller and press W to
confirm.XTo reposition the cursor within the data
field: select 2 or 3 and press W to
confirm.:Cursor (repositioned);2 and 3 icon to reposition the cursorXDelete the character/entry ( Y page 195).
Basic functions of COMAND
Switching COMAND on/off
XPress the u function button on the
center console.
i If you switch off COMAND, playback of
the current audio or video source will also
be switched off. You cannot switch off
COMAND while making a call via COMAND.
You can also make phone calls using the
buttons on the multifunction steering
wheel when COMAND is switched off
( Y page 337).
126At a glanceCOMAND
Page 129 of 496
Switching the sound on or off
Switching audio and video sources on/off
XPress the 8 button on the multifunction
steering wheel.
The sound from the respective audio or
video source is switched on or off.
i When the sound is off, the system
displays the , symbol in the status line.
When you change the audio or video
source, or adjust the volume, sound
automatically switches on again.
i Even if the sound is switched off, you will
still hear traffic and navigation system
announcements.
Switching off traffic and navigation
announcements completely
XTraffic announcements: press the 8
button until the . message disappears
from the status bar of the display.
A confirmation tone sounds.XNavigation announcements: during an
announcement, press the 8 button on
the multifunction steering wheel.
Switching traffic and navigation
announcements on again
XTraffic announcements: press and hold
down the 8 button until the . display
appears in the status bar.
A confirmation tone sounds.XNavigation announcements: select the
y symbol in the navigation menu bar
and press W to confirm.
i
The navigation announcements are
activated again if you switch COMAND off
and on again or start a new route guidance.
Adjusting the volume
Adjusting the volume for the audio or
video source
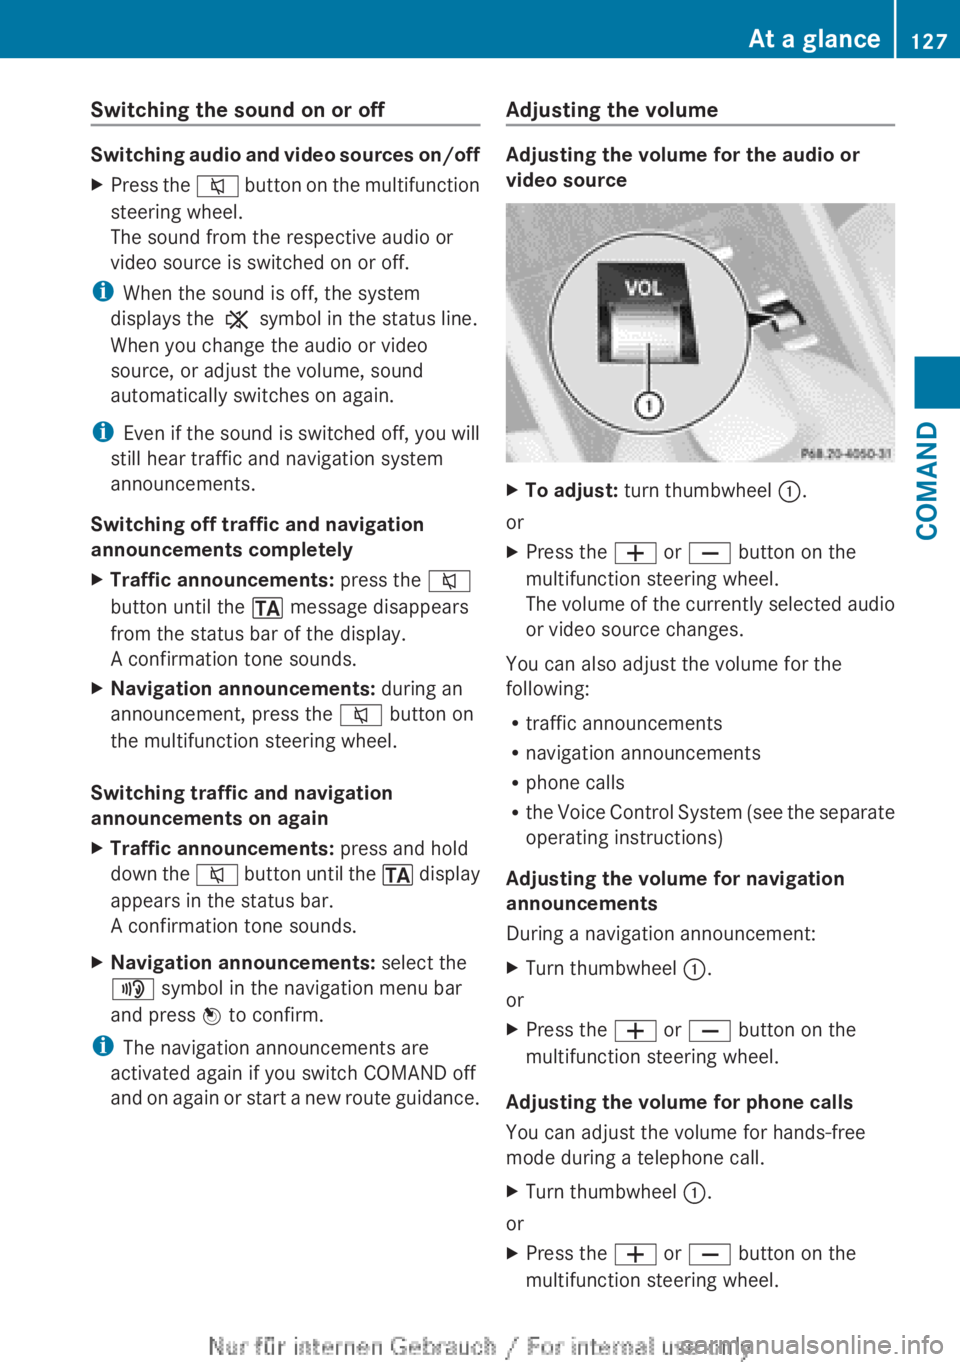
XTo adjust: turn thumbwheel :.
or
XPress the W or X button on the
multifunction steering wheel.
The volume of the currently selected audio
or video source changes.
You can also adjust the volume for the
following:
R traffic announcements
R navigation announcements
R phone calls
R the Voice Control System (see the separate
operating instructions)
Adjusting the volume for navigation
announcements
During a navigation announcement:
XTurn thumbwheel :.
or
XPress the W or X button on the
multifunction steering wheel.
Adjusting the volume for phone calls
You can adjust the volume for hands-free
mode during a telephone call.
XTurn thumbwheel :.
or
XPress the W or X button on the
multifunction steering wheel.At a glance127COMANDZ
Page 160 of 496
XSelect Cancel Route Guidance and press
W to confirm.
Continuing route guidance
XTo activate navigation mode: press the
S function button once or twice.XTo show the menu: press W the COMAND
controller.XSelect Destination in the navigation
system menu bar by turning cVd the
COMAND controller and press W to
confirm.XSelect Continue Route Guidance and
press W to confirm.
COMAND calculates the route.
Destination or area of destination
reached
When you reach your destination, COMAND
displays a checkered flag and route guidance
is automatically ended.
For certain points of interest (e.g. airports),
the Destination Reached display is shown
as well as the checkered flag.
Navigation announcements
Repeating navigation announcements
GWARNING
Navigation announcements are intended to
direct you while driving without diverting your
attention from the road and driving.
Please always use this feature instead of
consulting the map display for directions.
Looking at the icons or map display can
distract you from traffic conditions and
driving, and increase the risk of an accident.
i Audible navigation announcements are
muted during a telephone call.
If you have missed an announcement, you can
call up the current announcement at any
time.
XTo show the menu: press W the COMAND
controller.XIn the navigation menu bar, confirm RPT
with W.
Switching navigation announcements
on/off
XTo switch off: during the announcement,
press the 8 button on the multifunction
steering wheel.
You will briefly see the message: The
driving instructions have been
muted .XTo switch on: press W the COMAND
controller.XIn the + navigation menu bar, press W
to confirm.
i COMAND automatically switches the
navigation announcements back on when:
R you have a new route calculated.
R you start the engine again after having
left the vehicle.
Reducing volume during a navigation
announcement
The volume of an active audio or video source
can be automatically reduced during a
navigation announcement.
XSelect Navi in the main function bar by
sliding ZV and turning cVd the COMAND
controller and press W to confirm.XSelect Audio Fadeout and press W to
confirm.
The function is switched on O or off ª,
depending on the previous status.
Setting the volume manually
XSet the volume during a navigation
announcement.
or
XIn the map display when the menu is
shown, select + and adjust the volume.158NavigationCOMAND
Page 184 of 496
Call disconnection while the vehicle is
in motion
A call may be disconnected if:
R there is insufficient network coverage in
certain areas.
R you move from one transmitter/receiver
area (cell) into another and no channels are
free.
R you use a SIM card which is not compatible
with the network available.
R you are using a mobile phone with
"Twincard" and the mobile phone with the
second SIM card is already logged into the
network.
Operating options
You can operate the telephone by:
R using the COMAND controller:
turn cVd .
slide XVY or ZV Æ.
press W.
R the 6 or ~ button on the telephone
keypad on the center console
R the 6 or ~ button on the
multifunction steering wheel
R using the Voice Control System (see the
separate Voice Control System operating
instructions)
Unless otherwise indicated, the descriptions
and illustrations in this section refer to
COMAND and the telephone keypad. This
also means that to carry out the functions
described here, you must always be in the
Telephone menu. The fastest way to access
the Telephone menu is to press the S
function button.
Function restrictions
You will not be able to use the telephone, will
no longer be able to use the telephone, or you
may have to wait before using it, in the
following situations:
R when the mobile phone is switched off
R when the "Bluetooth ®
" function is switched
off in COMAND
R when the "Bluetooth ®
" function is switched
off on the mobile phone
R if the mobile phone is not logged into a
mobile phone network
i The telephone automatically tries to log
on to a network. If no network is available,
you will not be able to make a " 911"
emergency call. If you attempt to make an
outgoing call, the NO SERVICE message will
appear for a short while.
R if you remove the SmartKey from the
ignition lock during an active conversation
in hands-free mode, the conversation may
be continued for up to 30 minutes. After
that time, it will be interrupted.
You can prevent this interruption by switching
to "private call" ("private mode") on the
mobile phone before deactivating COMAND
(see mobile phone operating instructions).
If you wish to switch off COMAND during an
active conversation in hands-free mode, the
following message will appear: You cannot
shut off COMAND until you have
finished your telephone call
911 emergency call
GWARNING
The 911 emergency call system is a public
service. Using it without due cause is a
criminal offense.
The following requirements must be fulfilled
for a 911 emergency call:
R the mobile phone must be switched on.
R a network must be available.
182TelephoneCOMAND
Page 190 of 496
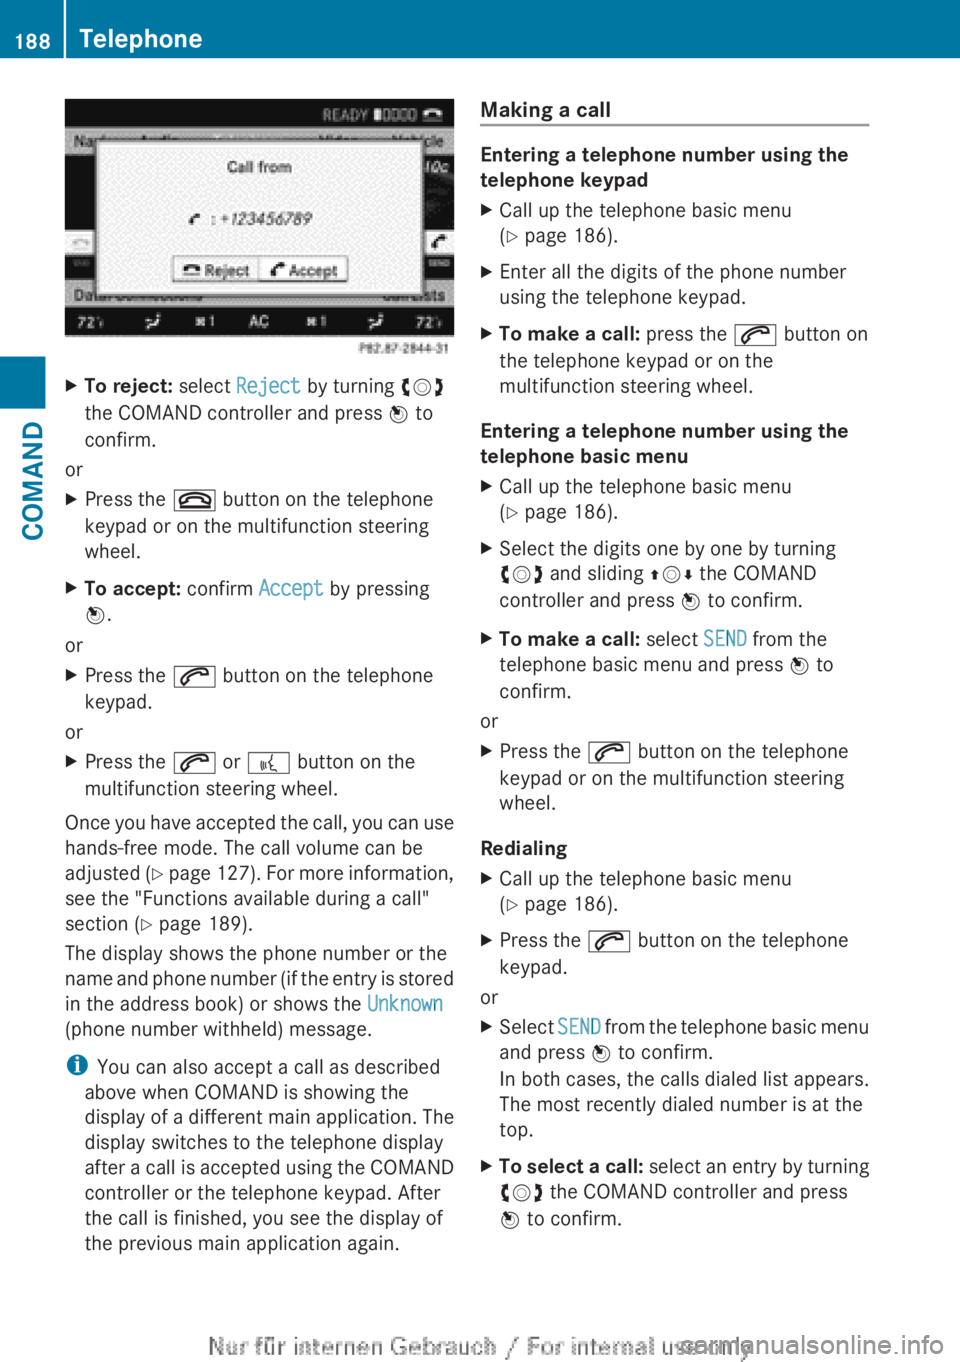
XTo reject: select Reject by turning cVd
the COMAND controller and press W to
confirm.
or
XPress the ~ button on the telephone
keypad or on the multifunction steering
wheel.XTo accept: confirm Accept by pressing
W .
or
XPress the 6 button on the telephone
keypad.
or
XPress the 6 or ? button on the
multifunction steering wheel.
Once you have accepted the call, you can use
hands-free mode. The call volume can be
adjusted (Y page 127). For more information,
see the "Functions available during a call"
section ( Y page 189).
The display shows the phone number or the
name and phone number (if the entry is stored
in the address book) or shows the Unknown
(phone number withheld) message.
i You can also accept a call as described
above when COMAND is showing the
display of a different main application. The
display switches to the telephone display
after a call is accepted using the COMAND
controller or the telephone keypad. After
the call is finished, you see the display of
the previous main application again.
Making a call
Entering a telephone number using the
telephone keypad
XCall up the telephone basic menu
( Y page 186).XEnter all the digits of the phone number
using the telephone keypad.XTo make a call: press the 6 button on
the telephone keypad or on the
multifunction steering wheel.
Entering a telephone number using the
telephone basic menu
XCall up the telephone basic menu
( Y page 186).XSelect the digits one by one by turning
cVd and sliding ZVÆ the COMAND
controller and press W to confirm.XTo make a call: select SEND from the
telephone basic menu and press W to
confirm.
or
XPress the 6 button on the telephone
keypad or on the multifunction steering
wheel.
Redialing
XCall up the telephone basic menu
( Y page 186).XPress the 6 button on the telephone
keypad.
or
XSelect SEND from the telephone basic menu
and press W to confirm.
In both cases, the calls dialed list appears.
The most recently dialed number is at the
top.XTo select a call: select an entry by turning
cVd the COMAND controller and press
W to confirm.188TelephoneCOMAND
Page 191 of 496
iThe redialing function is also available
using the on-board computer
( Y page 347).
Calling voicemail
This function is only available if it is supported
by the mobile phone network provider.
You can only call voicemail if the voicemail
number is stored as preset 1 on the SIM card.XPress and hold the 4 button on the
telephone keypad.
or
XUse the COMAND controller to select 1 and
confirm until dialing commences.
Connecting a call to an entry in a call list
or in the COMAND phone book
XOpen a call list and select an entry
( Y page 197).
or
XCall up the COMAND phone book and
select an entry ( Y page 193).
Functions available during a call
Overview
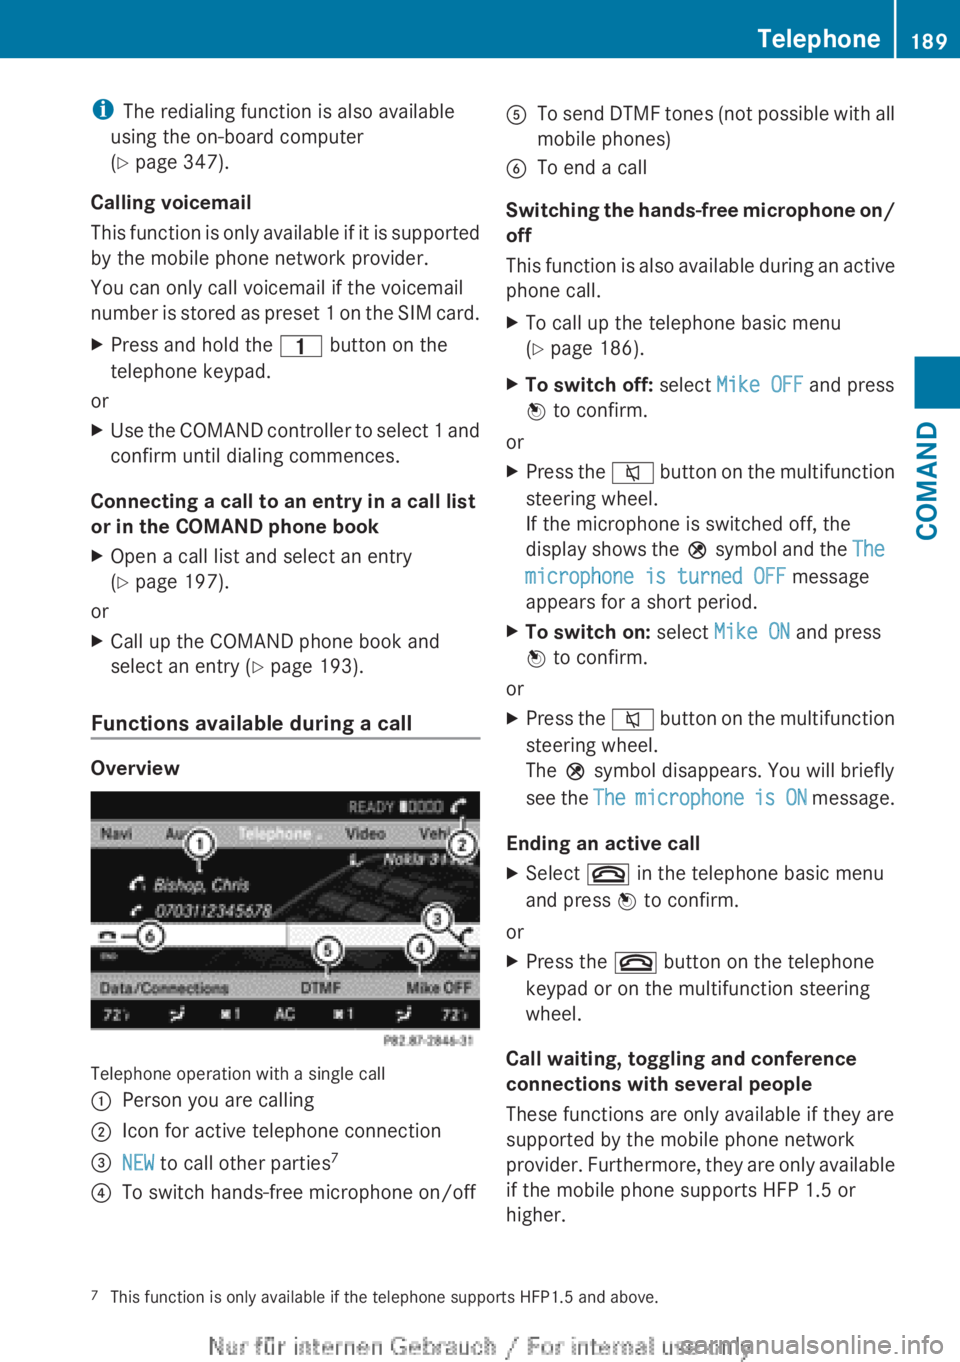
Telephone operation with a single call
:Person you are calling;Icon for active telephone connection=NEW to call other parties 7?To switch hands-free microphone on/offATo send DTMF tones (not possible with all
mobile phones)BTo end a call
Switching the hands-free microphone on/
off
This function is also available during an active
phone call.
XTo call up the telephone basic menu
( Y page 186).XTo switch off: select Mike OFF and press
W to confirm.
or
XPress the 8 button on the multifunction
steering wheel.
If the microphone is switched off, the
display shows the Q symbol and the The
microphone is turned OFF message
appears for a short period.XTo switch on: select Mike ON and press
W to confirm.
or
XPress the 8 button on the multifunction
steering wheel.
The Q symbol disappears. You will briefly
see the The microphone is ON message.
Ending an active call
XSelect ~ in the telephone basic menu
and press W to confirm.
or
XPress the ~ button on the telephone
keypad or on the multifunction steering
wheel.
Call waiting, toggling and conference
connections with several people
These functions are only available if they are
supported by the mobile phone network
provider. Furthermore, they are only available
if the mobile phone supports HFP 1.5 or
higher.
7 This function is only available if the telephone supports HFP1.5 and above.Telephone189COMANDZ