warning lights MERCEDES-BENZ CL CLASS 2013 Owner's Guide
[x] Cancel search | Manufacturer: MERCEDES-BENZ, Model Year: 2013, Model line: CL CLASS, Model: MERCEDES-BENZ CL CLASS 2013Pages: 496, PDF Size: 7.5 MB
Page 299 of 496
traffic because conditions do not allow safe
driving at a constant speed.
R The use of the cruise control can be
dangerous on slippery roads. Rapid
changes in tire traction can result in wheel
spin and loss of control.
R Deactivate the cruise control when driving
in fog.
The "Resume" function should only be
operated if the driver is fully aware of the
previously set speed and wishes to resume
this particular preset speed.
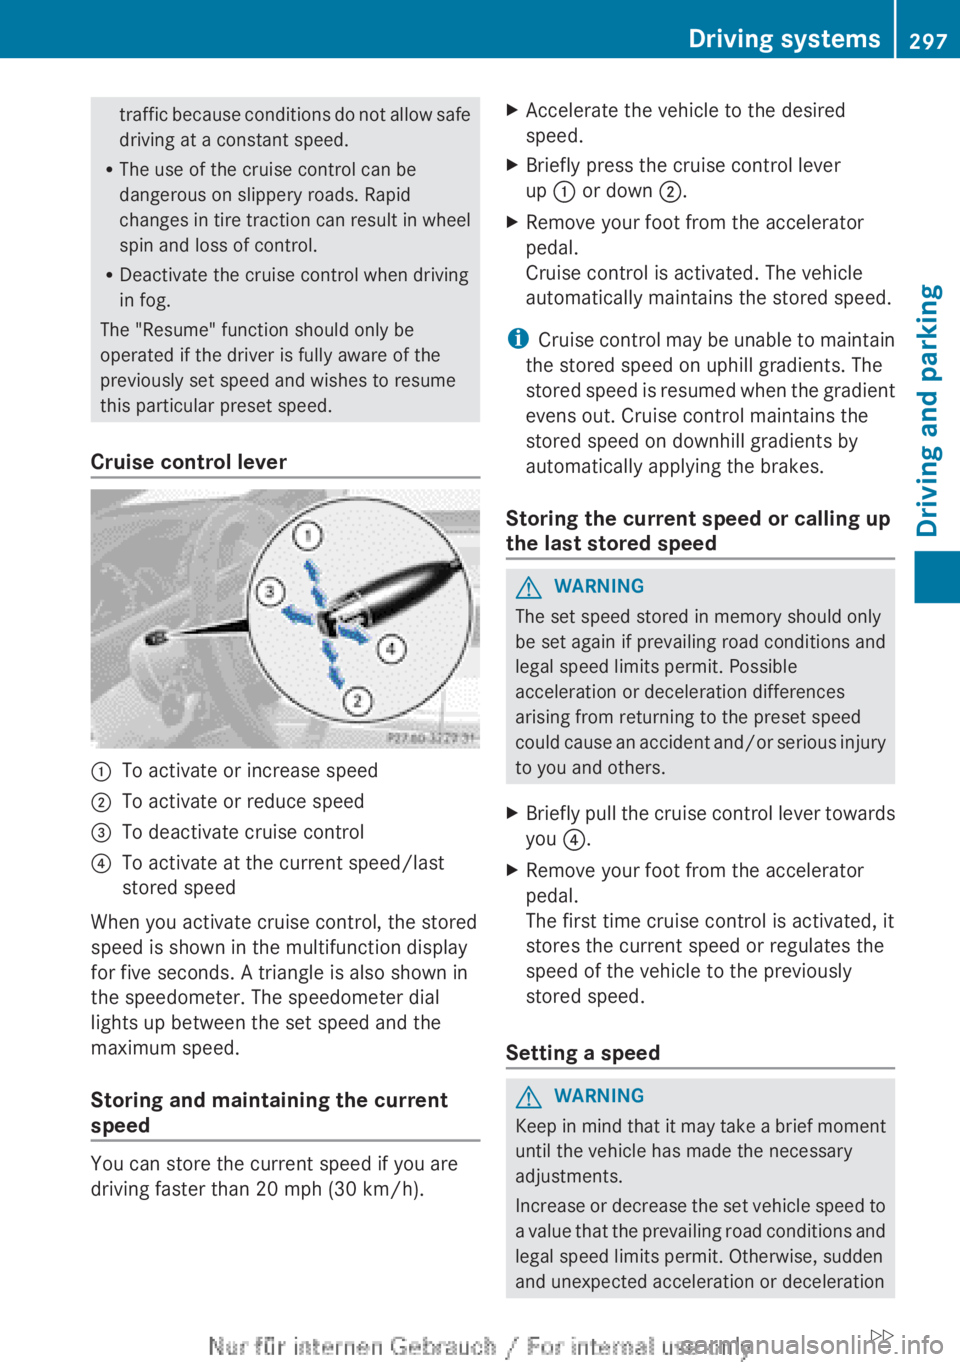
Cruise control lever:To activate or increase speed;To activate or reduce speed=To deactivate cruise control?To activate at the current speed/last
stored speed
When you activate cruise control, the stored
speed is shown in the multifunction display
for five seconds. A triangle is also shown in
the speedometer. The speedometer dial
lights up between the set speed and the
maximum speed.
Storing and maintaining the current
speed
You can store the current speed if you are
driving faster than 20 mph (30 km/h).
XAccelerate the vehicle to the desired
speed.XBriefly press the cruise control lever
up : or down ;.XRemove your foot from the accelerator
pedal.
Cruise control is activated. The vehicle
automatically maintains the stored speed.
i Cruise control may be unable to maintain
the stored speed on uphill gradients. The
stored speed is resumed when the gradient
evens out. Cruise control maintains the
stored speed on downhill gradients by
automatically applying the brakes.
Storing the current speed or calling up
the last stored speed
GWARNING
The set speed stored in memory should only
be set again if prevailing road conditions and
legal speed limits permit. Possible
acceleration or deceleration differences
arising from returning to the preset speed
could cause an accident and/or serious injury
to you and others.
XBriefly pull the cruise control lever towards
you ?.XRemove your foot from the accelerator
pedal.
The first time cruise control is activated, it
stores the current speed or regulates the
speed of the vehicle to the previously
stored speed.
Setting a speed
GWARNING
Keep in mind that it may take a brief moment
until the vehicle has made the necessary
adjustments.
Increase or decrease the set vehicle speed to
a value that the prevailing road conditions and
legal speed limits permit. Otherwise, sudden
and unexpected acceleration or deceleration
Driving systems297Driving and parkingZ
Page 311 of 496
AIRMATIC
Vehicle level
Important safety notes
Your vehicle regulates its height
automatically. All-round level control ensures
the best possible suspension and constant
ground clearance, even with a laden vehicle.
When you drive fast, the vehicle is lowered
automatically to improve driving safety and to
reduce fuel consumption.
The following vehicle levels are possible:
R Normal
R raised: the vehicle is raised by about
1.20 in (30 mm) when compared with the
normal level
R lowered: the vehicle is lowered by about
0.40 in (10 mm) when compared with the
normal level
The "Normal" and "Raised" vehicle levels can
be set manually.
The "Lowered" vehicle level is set
automatically at speeds over 60 mph
(100 km/h).
Setting the vehicle level
Select the "Normal" setting for normal road
surfaces and "Raised" for driving with snow
chains or on particularly poor road surfaces.
Your selection remains stored even if you
remove the SmartKey from the ignition lock.
GWARNING
To help avoid personal injury, keep hands and
feet away from wheel housing area, and stay
away from under the vehicle when lowering
the vehicle chassis.
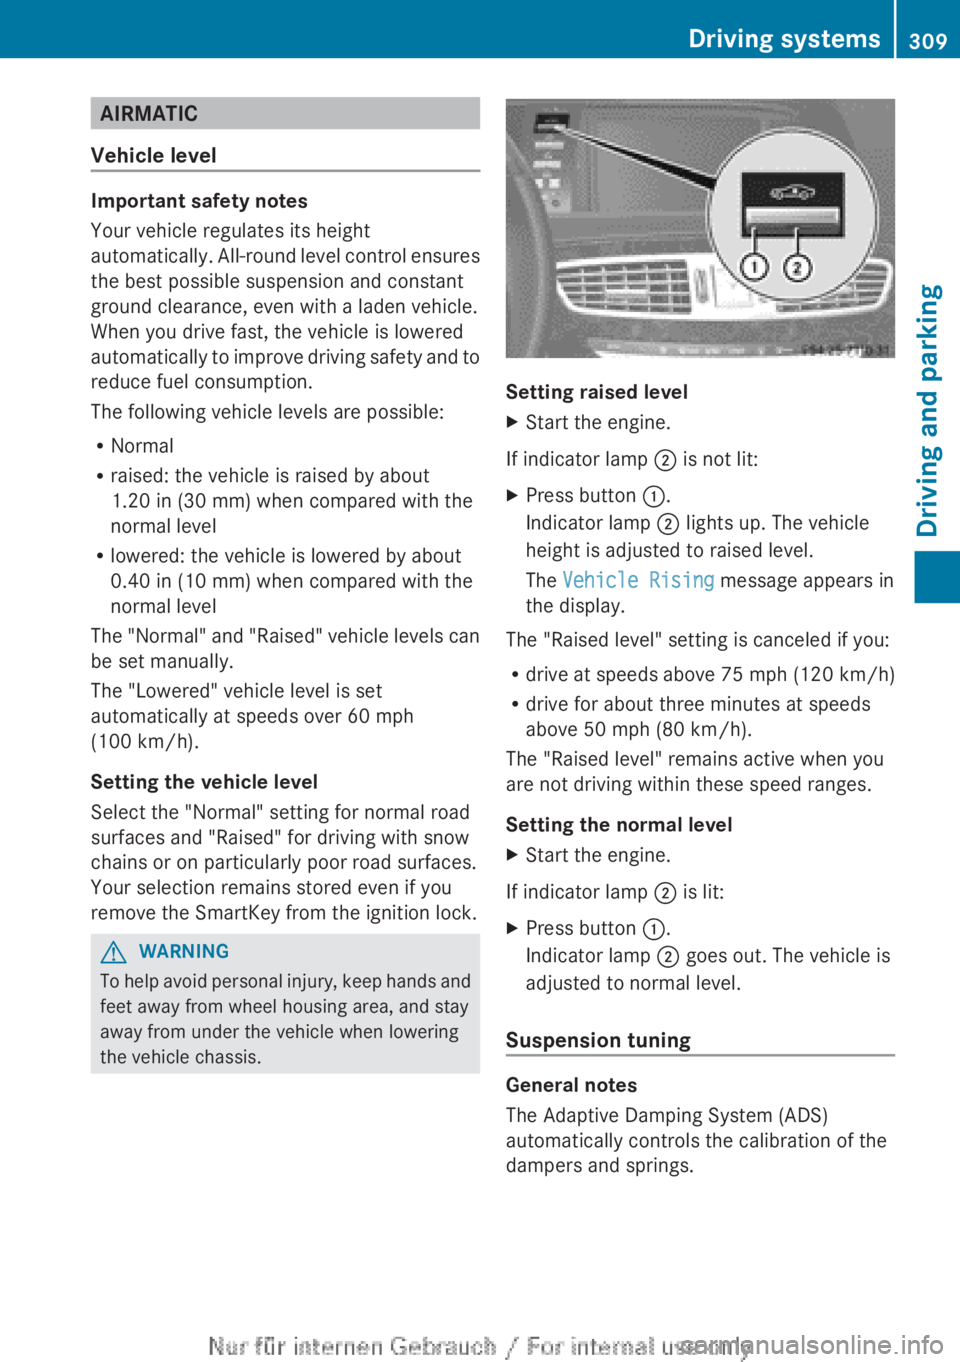
Setting raised level
XStart the engine.
If indicator lamp ; is not lit:
XPress button :.
Indicator lamp ; lights up. The vehicle
height is adjusted to raised level.
The Vehicle Rising message appears in
the display.
The "Raised level" setting is canceled if you:
R drive at speeds above 75 mph (120 km/h)
R drive for about three minutes at speeds
above 50 mph (80 km/h).
The "Raised level" remains active when you
are not driving within these speed ranges.
Setting the normal level
XStart the engine.
If indicator lamp ; is lit:
XPress button :.
Indicator lamp ; goes out. The vehicle is
adjusted to normal level.
Suspension tuning
General notes
The Adaptive Damping System (ADS)
automatically controls the calibration of the
dampers and springs.
Driving systems309Driving and parkingZ
Page 312 of 496
The damping is tuned individually to each
wheel and depends on:
R your driving style, e.g. sporty
R the road surface condition, e.g. bumps
R your individual selection, i.e. sports or
comfort
Your selection remains stored even if you
remove the SmartKey from the ignition lock.
Sports tuning
The firmer suspension tuning in Sport mode
ensures even better contact with the road.
Select this mode when employing a sporty
driving style, e.g. on winding country roads.
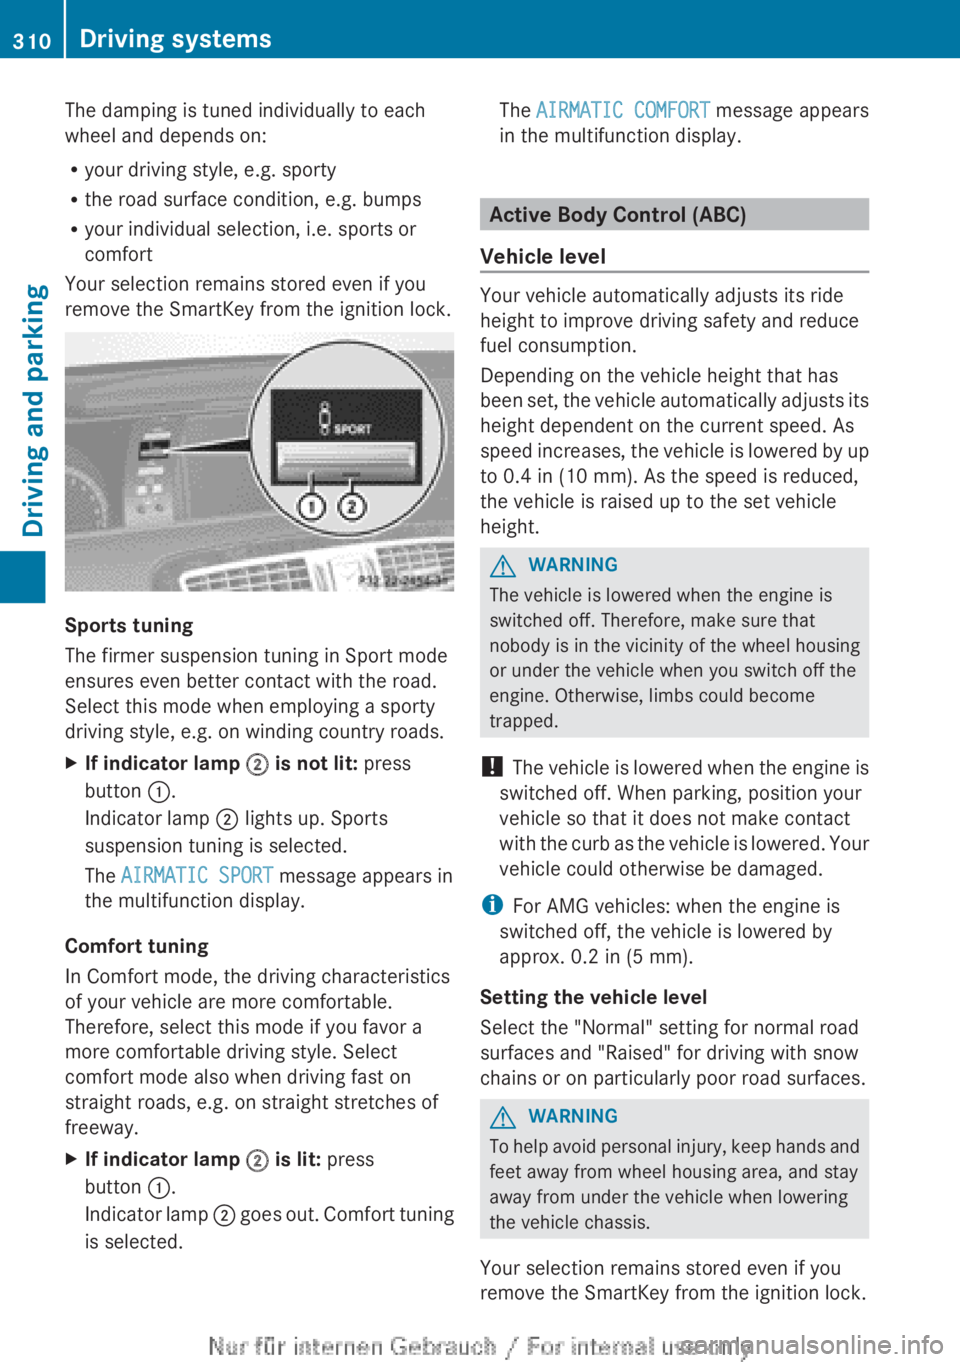
XIf indicator lamp ; is not lit: press
button :.
Indicator lamp ; lights up. Sports
suspension tuning is selected.
The AIRMATIC SPORT message appears in
the multifunction display.
Comfort tuning
In Comfort mode, the driving characteristics
of your vehicle are more comfortable.
Therefore, select this mode if you favor a
more comfortable driving style. Select
comfort mode also when driving fast on
straight roads, e.g. on straight stretches of
freeway.
XIf indicator lamp ; is lit: press
button :.
Indicator lamp ; goes out. Comfort tuning
is selected.The AIRMATIC COMFORT message appears
in the multifunction display.
Active Body Control (ABC)
Vehicle level
Your vehicle automatically adjusts its ride
height to improve driving safety and reduce
fuel consumption.
Depending on the vehicle height that has
been set, the vehicle automatically adjusts its
height dependent on the current speed. As
speed increases, the vehicle is lowered by up
to 0.4 in (10 mm). As the speed is reduced,
the vehicle is raised up to the set vehicle
height.
GWARNING
The vehicle is lowered when the engine is
switched off. Therefore, make sure that
nobody is in the vicinity of the wheel housing
or under the vehicle when you switch off the
engine. Otherwise, limbs could become
trapped.
! The vehicle is lowered when the engine is
switched off. When parking, position your
vehicle so that it does not make contact
with the curb as the vehicle is lowered. Your
vehicle could otherwise be damaged.
i For AMG vehicles: when the engine is
switched off, the vehicle is lowered by
approx. 0.2 in (5 mm).
Setting the vehicle level
Select the "Normal" setting for normal road
surfaces and "Raised" for driving with snow
chains or on particularly poor road surfaces.
GWARNING
To help avoid personal injury, keep hands and
feet away from wheel housing area, and stay
away from under the vehicle when lowering
the vehicle chassis.
Your selection remains stored even if you
remove the SmartKey from the ignition lock.
310Driving systemsDriving and parking
Page 316 of 496
yellow segments showing operational
readiness = light up.
The selected transmission position
determines which warning display is active
when the engine is running.Transmission
positionWarning displayDFront area activatedRRear and front areas
activatedNIf the electric parking
brake is engaged: no
areas are activated
If the electric parking
brake is released:
rear and front areas
are activatedPNo areas activated
One or more segments light up as the vehicle
approaches an obstacle, depending on the
vehicle's distance from the obstacle.
When the first red segment lights up, you hear
an intermittent warning for about two
seconds. From the second red segment, you
hear a continuous warning. This indicates that
you have now reached the minimum distance.
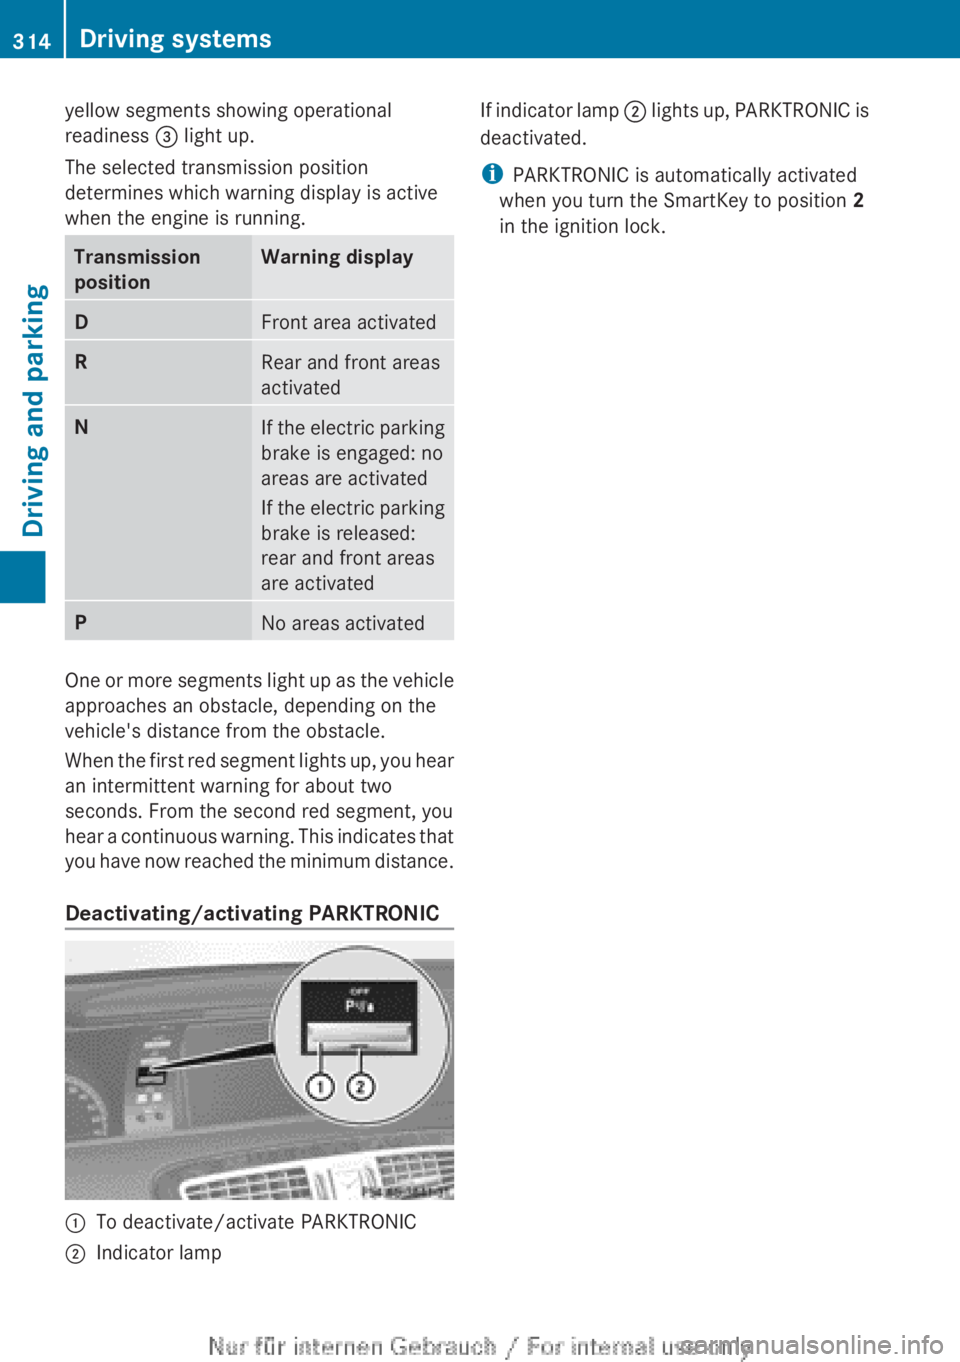
Deactivating/activating PARKTRONIC
:To deactivate/activate PARKTRONIC;Indicator lampIf indicator lamp ; lights up, PARKTRONIC is
deactivated.
i PARKTRONIC is automatically activated
when you turn the SmartKey to position 2
in the ignition lock.314Driving systemsDriving and parking
Page 317 of 496
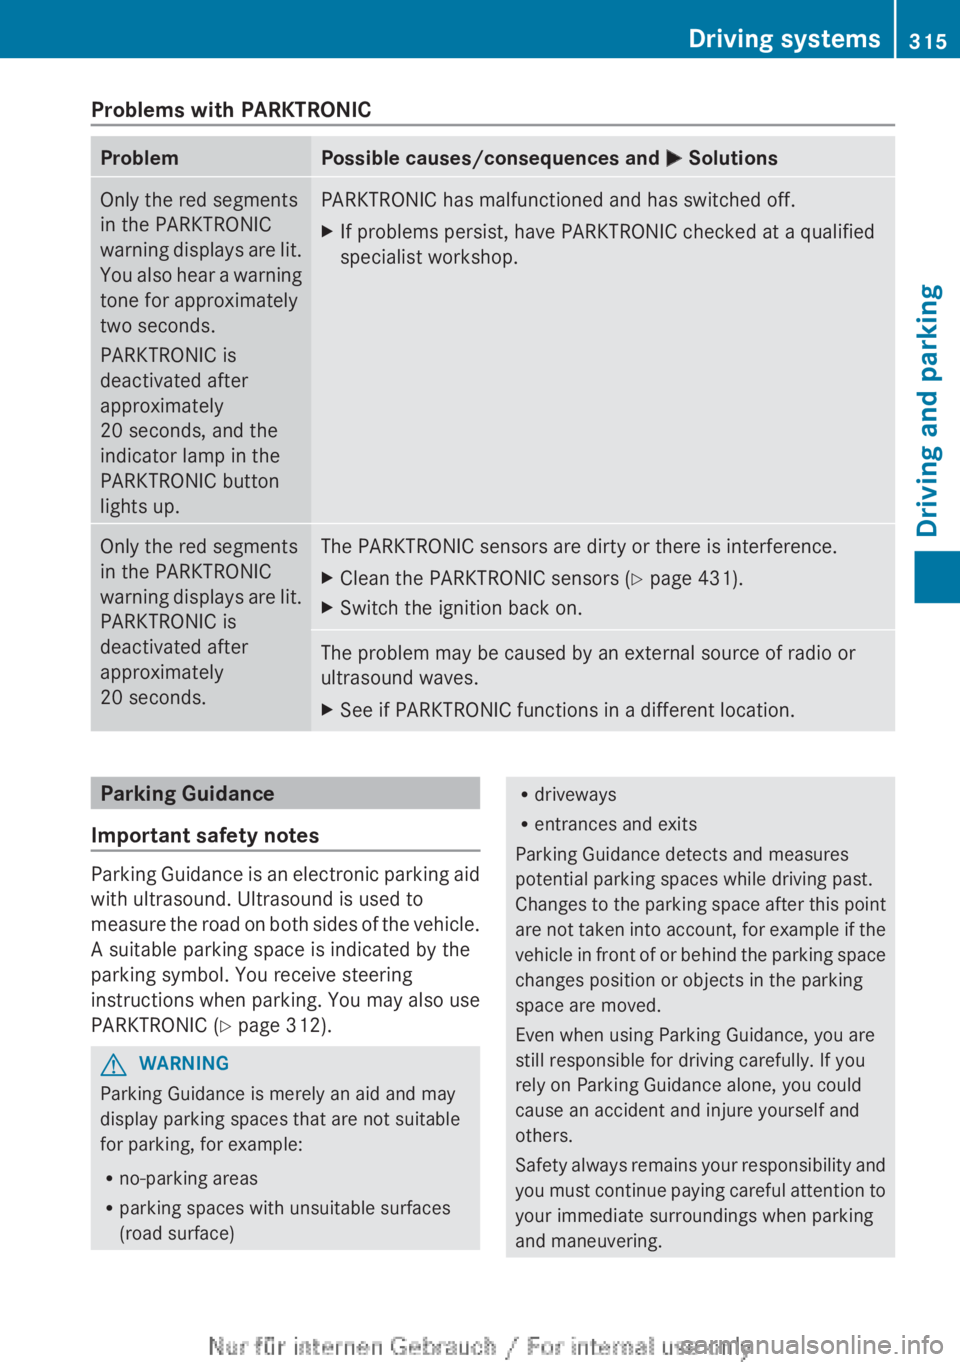
Problems with PARKTRONICProblemPossible causes/consequences and M SolutionsOnly the red segments
in the PARKTRONIC
warning displays are lit.
You also hear a warning
tone for approximately
two seconds.
PARKTRONIC is
deactivated after
approximately
20 seconds, and the
indicator lamp in the
PARKTRONIC button
lights up.PARKTRONIC has malfunctioned and has switched off.XIf problems persist, have PARKTRONIC checked at a qualified
specialist workshop.Only the red segments
in the PARKTRONIC
warning displays are lit.
PARKTRONIC is
deactivated after
approximately
20 seconds.The PARKTRONIC sensors are dirty or there is interference.XClean the PARKTRONIC sensors ( Y page 431).XSwitch the ignition back on.The problem may be caused by an external source of radio or
ultrasound waves.XSee if PARKTRONIC functions in a different location.Parking Guidance
Important safety notes
Parking Guidance is an electronic parking aid
with ultrasound. Ultrasound is used to
measure the road on both sides of the vehicle.
A suitable parking space is indicated by the
parking symbol. You receive steering
instructions when parking. You may also use
PARKTRONIC ( Y page 312).
GWARNING
Parking Guidance is merely an aid and may
display parking spaces that are not suitable
for parking, for example:
R no-parking areas
R parking spaces with unsuitable surfaces
(road surface)
R driveways
R entrances and exits
Parking Guidance detects and measures
potential parking spaces while driving past.
Changes to the parking space after this point
are not taken into account, for example if the
vehicle in front of or behind the parking space
changes position or objects in the parking
space are moved.
Even when using Parking Guidance, you are
still responsible for driving carefully. If you
rely on Parking Guidance alone, you could
cause an accident and injure yourself and
others.
Safety always remains your responsibility and
you must continue paying careful attention to
your immediate surroundings when parking
and maneuvering.Driving systems315Driving and parkingZ
Page 331 of 496
Due to the nature of the system:
R warnings may be issued in error when
driving close to crash barriers or similar
solid lane borders.
R the warning is canceled when driving for an
extended period next to long vehicles, such
as trucks.
Two Active Blind Spot Assist radar sensors
are integrated into the front and rear bumpers
respectively. An additional radar sensor is
located behind the cover in the radiator grill.
Make sure that the sensors and areas around
them are free of dirt, ice or slush. The rear
sensors must not be covered, for example by
cycle racks or overhanging cargo. Following
a severe impact or in the event of damage to
the bumpers, have the function of the sensors
checked at a qualified specialist workshop.
Blind Spot Assist may otherwise not work
properly.
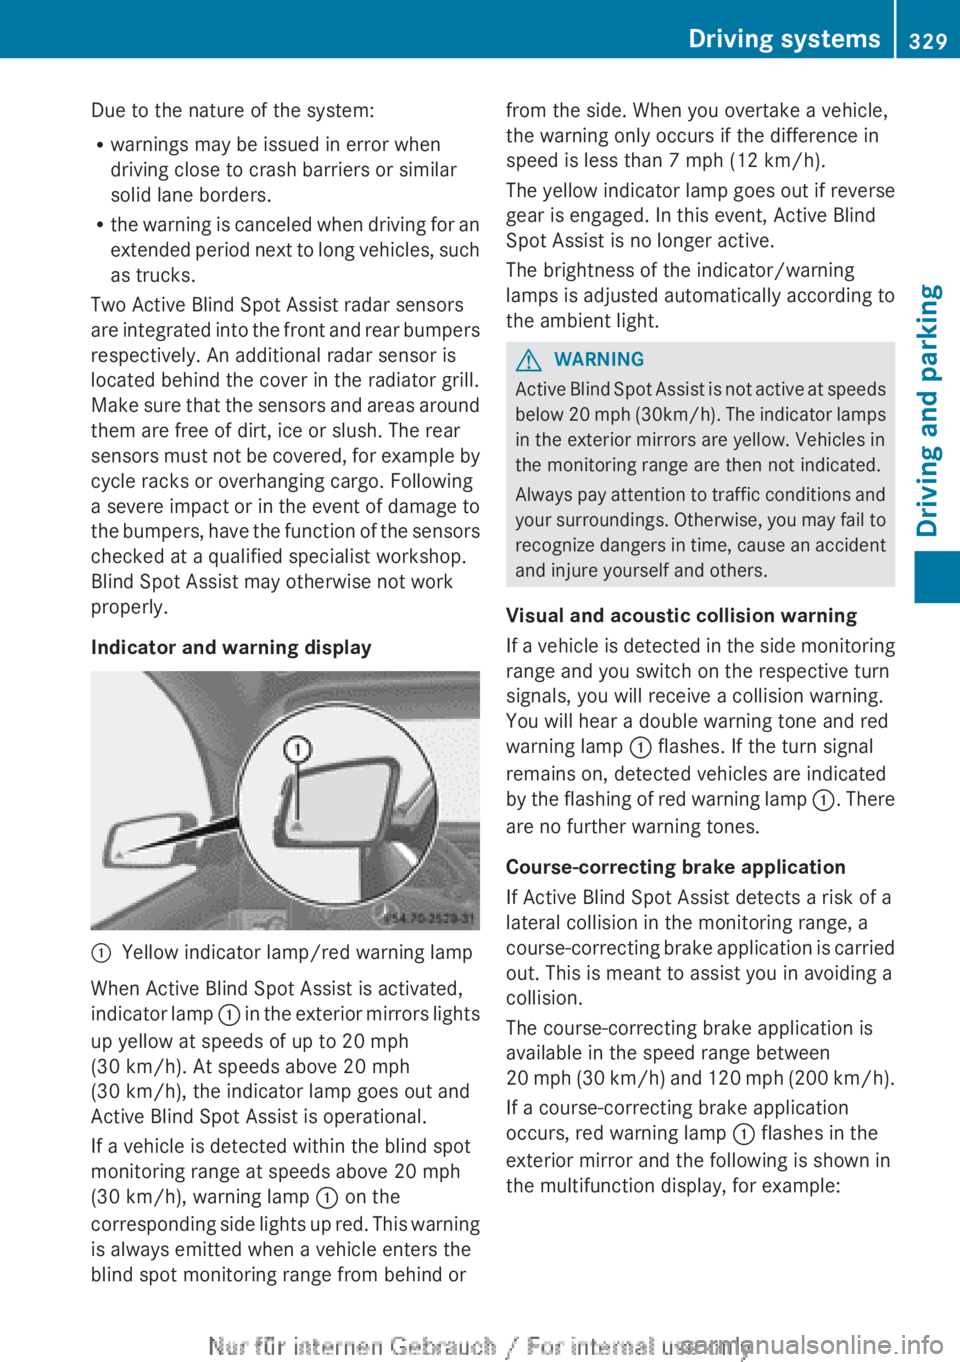
Indicator and warning display:Yellow indicator lamp/red warning lamp
When Active Blind Spot Assist is activated,
indicator lamp : in the exterior mirrors lights
up yellow at speeds of up to 20 mph
(30 km/h). At speeds above 20 mph
(30 km/h), the indicator lamp goes out and
Active Blind Spot Assist is operational.
If a vehicle is detected within the blind spot
monitoring range at speeds above 20 mph
(30 km/h), warning lamp : on the
corresponding side lights up red. This warning
is always emitted when a vehicle enters the
blind spot monitoring range from behind or
from the side. When you overtake a vehicle,
the warning only occurs if the difference in
speed is less than 7 mph (12 km/h).
The yellow indicator lamp goes out if reverse
gear is engaged. In this event, Active Blind
Spot Assist is no longer active.
The brightness of the indicator/warning
lamps is adjusted automatically according to
the ambient light.GWARNING
Active Blind Spot Assist is not active at speeds
below 20 mph ( 30km/h). The indicator lamps
in the exterior mirrors are yellow. Vehicles in
the monitoring range are then not indicated.
Always pay attention to traffic conditions and
your surroundings. Otherwise, you may fail to
recognize dangers in time, cause an accident
and injure yourself and others.
Visual and acoustic collision warning
If a vehicle is detected in the side monitoring
range and you switch on the respective turn
signals, you will receive a collision warning.
You will hear a double warning tone and red
warning lamp : flashes. If the turn signal
remains on, detected vehicles are indicated
by the flashing of red warning lamp :. There
are no further warning tones.
Course-correcting brake application
If Active Blind Spot Assist detects a risk of a
lateral collision in the monitoring range, a
course-correcting brake application is carried
out. This is meant to assist you in avoiding a
collision.
The course-correcting brake application is
available in the speed range between
20 mph (30 km/h) and 120 mph (200 km/h ).
If a course-correcting brake application
occurs, red warning lamp : flashes in the
exterior mirror and the following is shown in
the multifunction display, for example:
Driving systems329Driving and parkingZ
Page 360 of 496
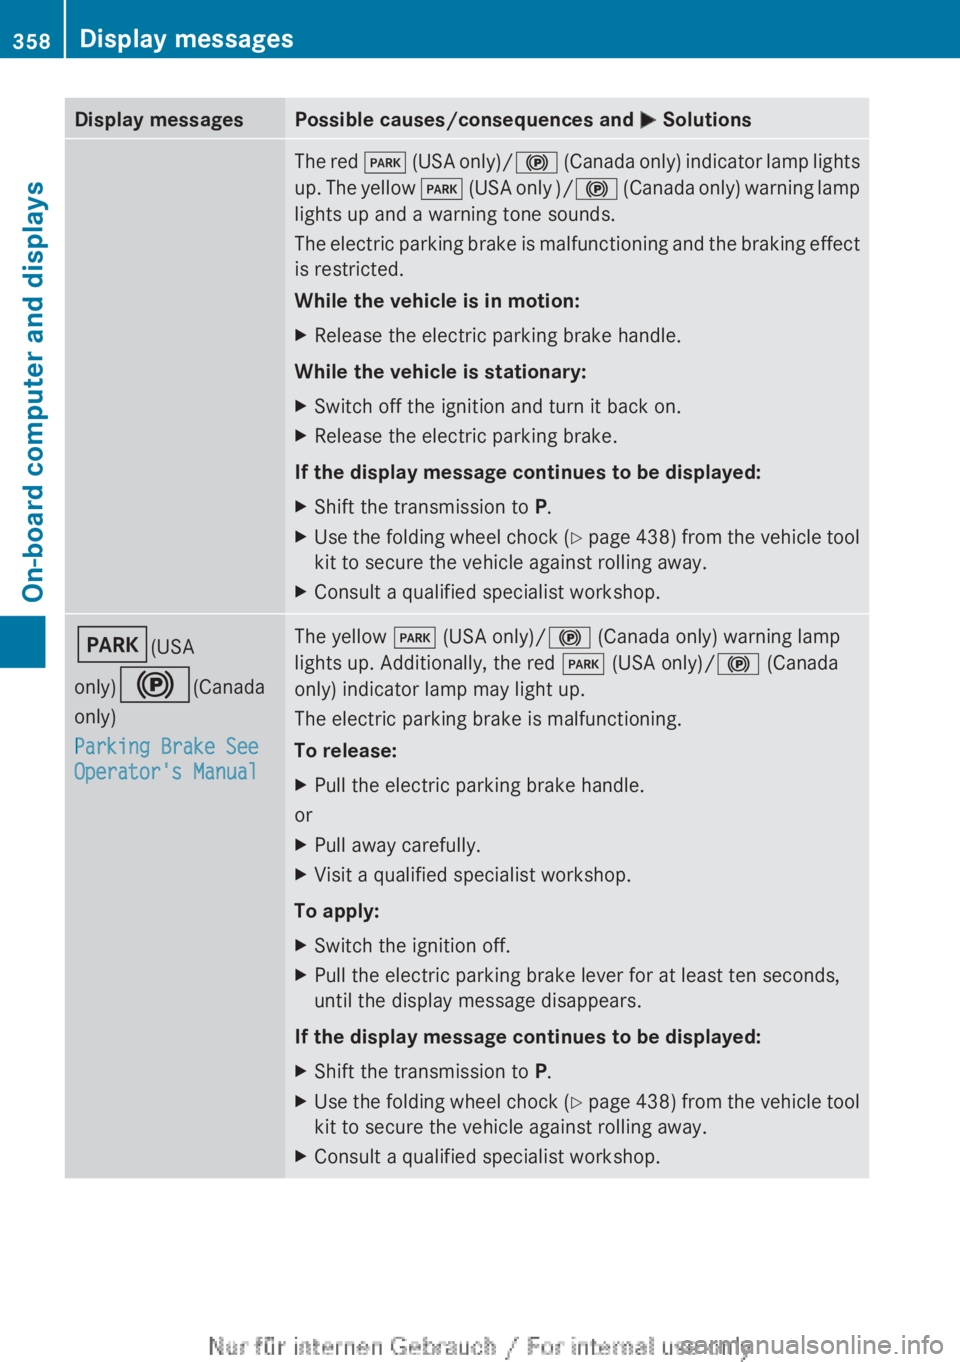
Display messagesPossible causes/consequences and M SolutionsThe red F (USA only)/ ! (Canada only) indicator lamp lights
up. The yellow F (USA only )/ ! (Canada only) warning lamp
lights up and a warning tone sounds.
The electric parking brake is malfunctioning and the braking effect
is restricted.
While the vehicle is in motion:XRelease the electric parking brake handle.
While the vehicle is stationary:
XSwitch off the ignition and turn it back on.XRelease the electric parking brake.
If the display message continues to be displayed:
XShift the transmission to P.XUse the folding wheel chock (Y page 438) from the vehicle tool
kit to secure the vehicle against rolling away.XConsult a qualified specialist workshop.F (USA
only) ! (Canada
only)
Parking Brake See
Operator's ManualThe yellow F (USA only)/ ! (Canada only) warning lamp
lights up. Additionally, the red F (USA only)/ ! (Canada
only) indicator lamp may light up.
The electric parking brake is malfunctioning.
To release:XPull the electric parking brake handle.
or
XPull away carefully.XVisit a qualified specialist workshop.
To apply:
XSwitch the ignition off.XPull the electric parking brake lever for at least ten seconds,
until the display message disappears.
If the display message continues to be displayed:
XShift the transmission to P.XUse the folding wheel chock (Y page 438) from the vehicle tool
kit to secure the vehicle against rolling away.XConsult a qualified specialist workshop.358Display messagesOn-board computer and displays
Page 361 of 496
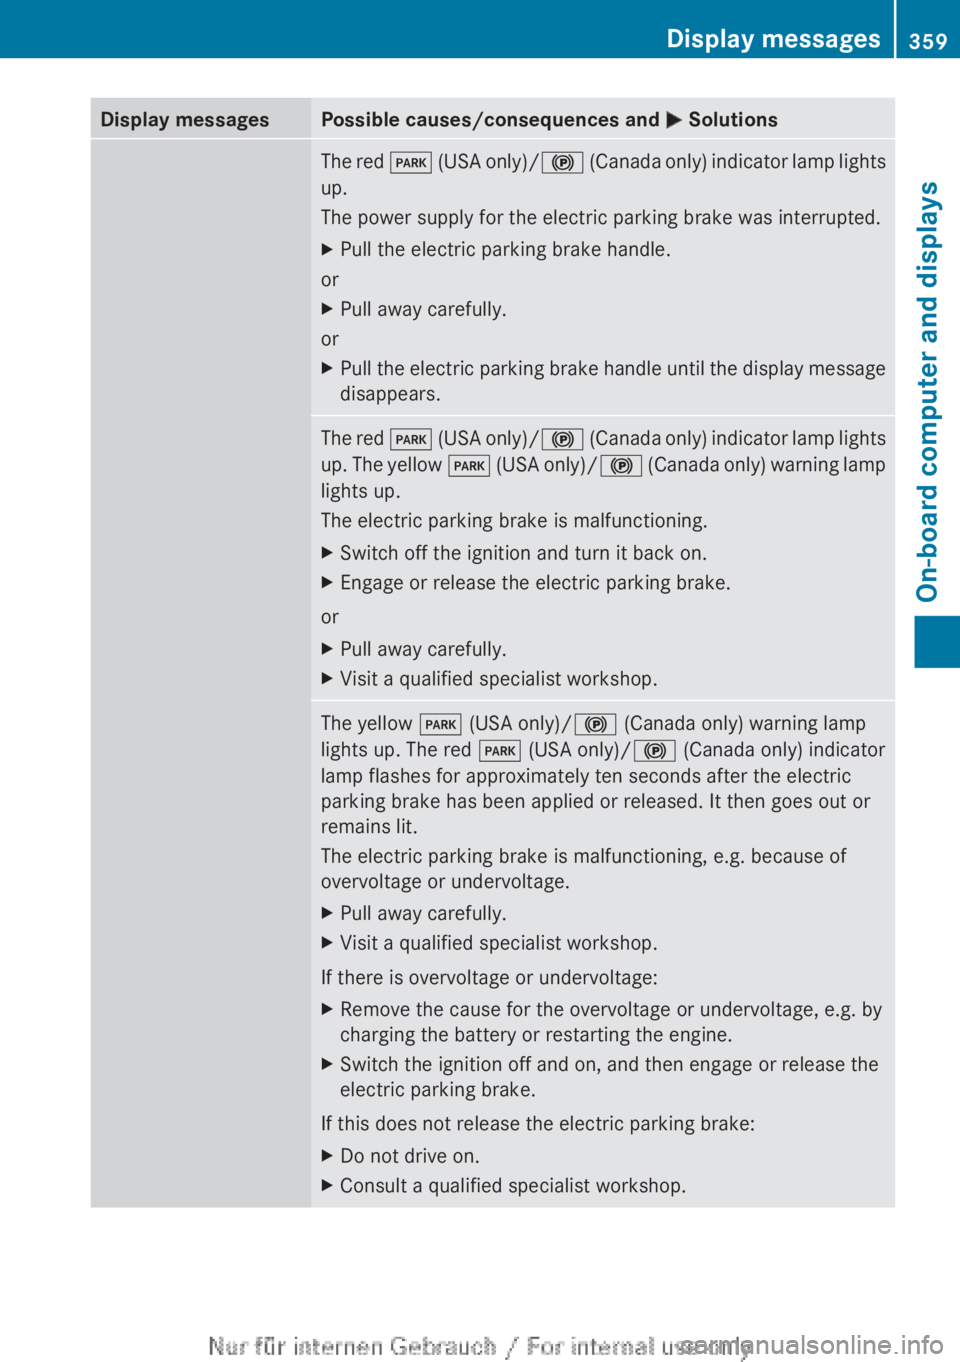
Display messagesPossible causes/consequences and M SolutionsThe red F (USA only)/ ! (Canada only) indicator lamp lights
up.
The power supply for the electric parking brake was interrupted.XPull the electric parking brake handle.
or
XPull away carefully.
or
XPull the electric parking brake handle until the display message
disappears.The red F (USA only)/ ! (Canada only) indicator lamp lights
up. The yellow F (USA only)/ ! (Canada only) warning lamp
lights up.
The electric parking brake is malfunctioning.XSwitch off the ignition and turn it back on.XEngage or release the electric parking brake.
or
XPull away carefully.XVisit a qualified specialist workshop.The yellow F (USA only)/ ! (Canada only) warning lamp
lights up. The red F (USA only)/ ! (Canada only) indicator
lamp flashes for approximately ten seconds after the electric
parking brake has been applied or released. It then goes out or
remains lit.
The electric parking brake is malfunctioning, e.g. because of
overvoltage or undervoltage.XPull away carefully.XVisit a qualified specialist workshop.
If there is overvoltage or undervoltage:
XRemove the cause for the overvoltage or undervoltage, e.g. by
charging the battery or restarting the engine.XSwitch the ignition off and on, and then engage or release the
electric parking brake.
If this does not release the electric parking brake:
XDo not drive on.XConsult a qualified specialist workshop.Display messages359On-board computer and displaysZ
Page 362 of 496
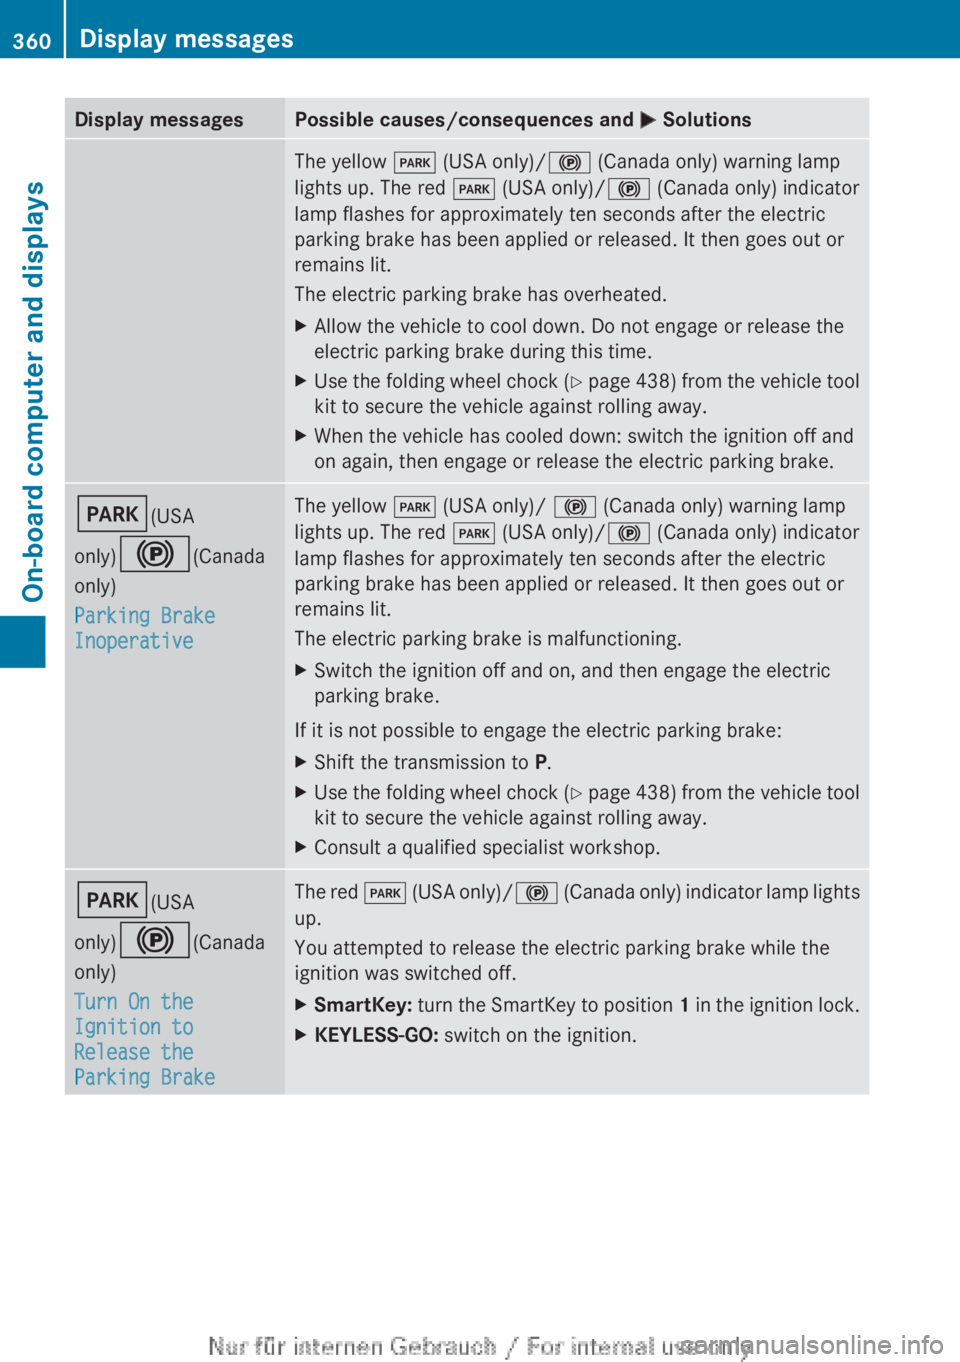
Display messagesPossible causes/consequences and M SolutionsThe yellow F (USA only)/ ! (Canada only) warning lamp
lights up. The red F (USA only)/ ! (Canada only) indicator
lamp flashes for approximately ten seconds after the electric
parking brake has been applied or released. It then goes out or
remains lit.
The electric parking brake has overheated.XAllow the vehicle to cool down. Do not engage or release the
electric parking brake during this time.XUse the folding wheel chock (Y page 438) from the vehicle tool
kit to secure the vehicle against rolling away.XWhen the vehicle has cooled down: switch the ignition off and
on again, then engage or release the electric parking brake.F (USA
only) ! (Canada
only)
Parking Brake
InoperativeThe yellow F (USA only)/ ! (Canada only) warning lamp
lights up. The red F (USA only)/ ! (Canada only) indicator
lamp flashes for approximately ten seconds after the electric
parking brake has been applied or released. It then goes out or
remains lit.
The electric parking brake is malfunctioning.XSwitch the ignition off and on, and then engage the electric
parking brake.
If it is not possible to engage the electric parking brake:
XShift the transmission to P.XUse the folding wheel chock (Y page 438) from the vehicle tool
kit to secure the vehicle against rolling away.XConsult a qualified specialist workshop.F (USA
only) ! (Canada
only)
Turn On the
Ignition to
Release the
Parking BrakeThe red F (USA only)/ ! (Canada only) indicator lamp lights
up.
You attempted to release the electric parking brake while the
ignition was switched off.XSmartKey: turn the SmartKey to position 1 in the ignition lock.XKEYLESS-GO: switch on the ignition.360Display messagesOn-board computer and displays
Page 363 of 496
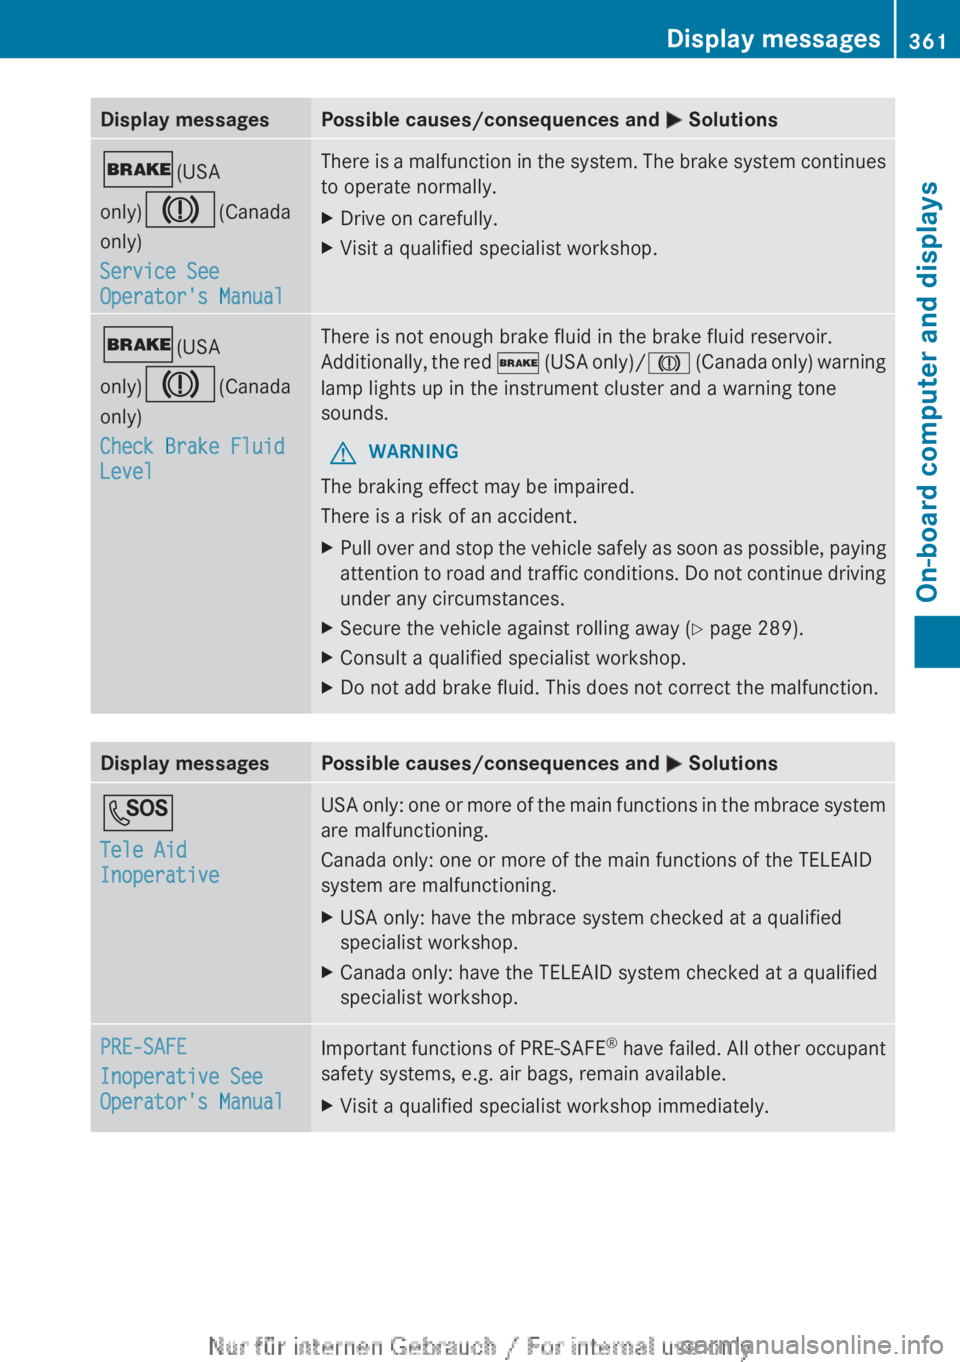
Display messagesPossible causes/consequences and M Solutions$ (USA
only) J (Canada
only)
Service See
Operator's ManualThere is a malfunction in the system. The brake system continues
to operate normally.XDrive on carefully.XVisit a qualified specialist workshop.$ (USA
only) J (Canada
only)
Check Brake Fluid
LevelThere is not enough brake fluid in the brake fluid reservoir.
Additionally, the red $ (USA only)/ J (Canada only) warning
lamp lights up in the instrument cluster and a warning tone
sounds.GWARNING
The braking effect may be impaired.
There is a risk of an accident.
XPull over and stop the vehicle safely as soon as possible, paying
attention to road and traffic conditions. Do not continue driving
under any circumstances.XSecure the vehicle against rolling away ( Y page 289).XConsult a qualified specialist workshop.XDo not add brake fluid. This does not correct the malfunction.Display messagesPossible causes/consequences and M SolutionsG
Tele Aid
InoperativeUSA only: one or more of the main functions in the mbrace system
are malfunctioning.
Canada only: one or more of the main functions of the TELEAID
system are malfunctioning.XUSA only: have the mbrace system checked at a qualified
specialist workshop.XCanada only: have the TELEAID system checked at a qualified
specialist workshop.PRE-SAFE
Inoperative See
Operator's ManualImportant functions of PRE-SAFE ®
have failed. All other occupant
safety systems, e.g. air bags, remain available.XVisit a qualified specialist workshop immediately.Display messages361On-board computer and displaysZ