radio MERCEDES-BENZ CL-Class 2014 C217 Comand Manual
[x] Cancel search | Manufacturer: MERCEDES-BENZ, Model Year: 2014, Model line: CL-Class, Model: MERCEDES-BENZ CL-Class 2014 C217Pages: 274, PDF Size: 5.76 MB
Page 41 of 274
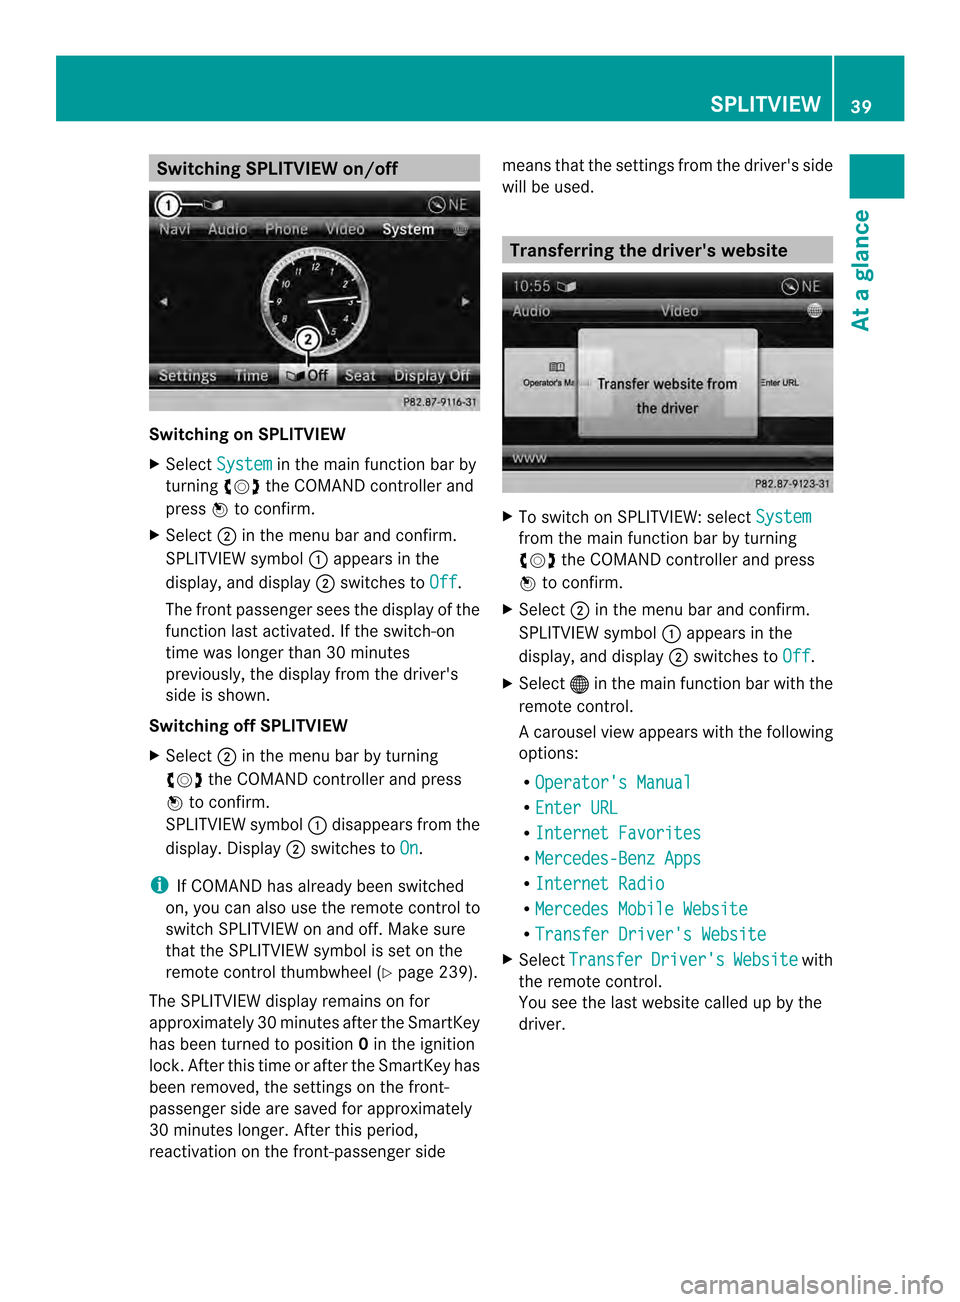
Switching SPLITVIEW on/off
Switching on SPLITVIEW
X
Select System in the main function bar by
turning 003C0012003Dthe COMAND controller and
press 0037to confirm.
X Select 0002in the menu bar and confirm.
SPLITVIEW symbol 0001appears in the
display, and display 0002switches to Off .
The front passenger sees the display of the
function last activated. If the switch-on
time was longer than 30 minutes
previously, the display from the driver's
side is shown.
Switching off SPLITVIEW
X Select 0002in the menu bar by turning
003C0012003D the COMAND controller and press
0037 to confirm.
SPLITVIEW symbol 0001disappears from the
display.D isplay0002switches to On .
i If COMAND has already been switched
on, you can also use the remote control to
switch SPLITVIEW on and off. Make sure
that the SPLITVIEW symbol is set on the
remote control thumbwheel (Y page 239).
The SPLITVIEW display remains on for
approximately 30 minutes after the SmartKey
has been turned to position 0in the ignition
lock. After this tim eor after the SmartKey has
been removed, the settings on the front-
passenger side are saved for approximately
30 minutes longer. After this period,
reactivation on the front-passenge rside means that the settings fro
mthe driver's side
will be used. Transferring the driver's website
X
To switch on SPLITVIEW: select System from the main function bar by turning
003C0012003D the COMAND controller and press
0037 to confirm.
X Select 0002in the menu bar and confirm.
SPLITVIEW symbol 0001appears in the
display, and display 0002switches to Off .
X Select 000Cin the main function bar with the
remote control.
Ac arousel view appears wit hthe following
options:
R Operator's Manual R
Enter URL R
Internet Favorites R
Mercedes-Benz Apps R
Internet Radio R
Mercedes Mobile Website R
Transfer Driver's Website X
Select Transfer Driver's Website with
the remote control.
You see the last website called up by the
driver. SPLITVIEW
39At a glance
Page 62 of 274
Your COMAND equipment
These operating instructions describe all the
standard and optional equipmen tfor your
COMAND system, as available at the time of
going to print. Country-specific differences
are possible. Please note that your COMAND
system may not be equipped with all the
features described. Introduction
Important safety notes
G
WARNING
If you operate information systems and
communication equipment integrated in the
vehicle while driving, you will be distracted
from traffic conditions. You could also lose
control of the vehicle. There is a risk of an
accident.
Only operate the equipment when the traffic
situation permits. If you are not sure that this
is possible, park the vehicle paying attention
to traffic conditions and operate the
equipment when the vehicle is stationary.
You must observe the legal requirements for
the country in which you are currently driving
when operating COMAND.
COMAND calculates the route to the
destination without taking account of the
following, for example:
R traffic lights
R stop and give way signs
R merging lanes
R parking or stopping in a no parking/no
stopping zone
R other road and traffic rules and regulations
R narrow bridges
COMAND can give incorrect navigation
commands if the actual street/traffic
situation does not correspond with the digital
map's data. Digital maps do not cover all
areas nor all routes in an area. For example, a route may have been diverted or the
direction of a one-way street may have
changed.
For this reason, you must always observe
road and traffic rules and regulations during
your journey. Road and traffic rules and
regulations always have priority over the
system's driving recommendations.
Navigation announcements are intended to
direct you while driving without diverting your
attention from the road and driving.
Please always use this feature instead of
consulting the map display for directions.
Looking at the icons or map display can
distract you from traffic conditions and
driving, and increase the risk of an accident.
General notes
Operational readiness of the navigation
system The navigation system must determine the
position of the vehicle before first use or
whenever operational status is restored.
Therefore, you may have to drive for a while
before precise route guidance is possible.
GPS reception
Among other things, correct functioning of
the navigation system depends on GPS
reception .Incertain situations, GPS
reception may be impaired, there may be
interference or there may be no reception at
all, e.g. in tunnels or parking garages.
i Using roof carriers may impair the correct
functioning of a roof antenna (phone,
satellite radio, GPS).
Entry restriction On vehicles for certain countries, there is a
restriction on entering data.
The restriction is active from a vehicle speed
of above approximately 3 mph (5 km/h). As
soon as the speed falls below approximately 60
IntroductionNavigation
Page 101 of 274

digital map. The vehicle is therefore in an off-
road position.
In the display, you will see the Off MappedRoad message, an arrow and the distance to
the destination. The direction arrow shows
the compass heading to the destination.
As soon as the system can assign the vehicle
position to the map again, route guidance
continues in the usual way. Traffic reports
Prerequisites
i This function is currently not available for
Canada.
To receive real-time traffic reports via
satellite radio, you require:
R optional satellite radio equipment
R a subscription to SIRIUS XM Satellite Radio
Traffic Message Service
Further information on satellite radio
(Y page 188).
COMAND can receive traffic reports via
satellite radio and take accoun tofthese for
route guidance in the navigation system.
Received traffic reports are displayed on the
map either as text or as symbols. Real-time traffic reports on the map
0001
Delimits the section of the route affected
0002 Indicates an incident on the route (traffic
flow) 0014
Destination
0013 Map scale
COMAND can show certain traffic incidents
on the map. Traffic reports are shown on the
map at scales of 0.05 mi to 20 mi.
X To hide the menu: slide00360012the COMAND
controller and, when the Full Screen menu item is shown, press
0037to confirm.
The map can be seen in the full-screen
display.
X Turn 003C0012003D the COMAND controller until the
desired map scale is set. Traffic reports
99Navigation Z
Page 116 of 274

X
To show the menu: press0037the COMAND
controller.
X Select Navi in the main function bar by
sliding 00360012and turning 003C0012003Dthe COMAND
controller and press 0037to confirm.
X Select Map Settings and press
0037to
confirm.
The map settings menu appears.
X Select Next Intersecting Street and
press 0037to confirm.
Depending on the previous status, switch
the optio non0010or off0003. Traffic information on the map
0001
Delimits the section of the route affected
0002 Indicates an incident on the route (traffic
flow)
If you subscribe to the SIRIUS XM Satellite
Radio Traffic Message Service, traffic
information can be displayed on the map. You
can select three categories for the display.
X To switch the display on/off: press0037
the COMAND controller to show the menu.
X Select Navi in the main function bar by
sliding 00360012and turning 003C0012003Dthe COMAND
controller and press 0037to confirm. X
Select Traffic Information On Map and
press 0037to confirm.
X Select Incidents and/or
Speed & Flow and/or
Free Flow and press
0037to
confirm.
Depending on the previous status, switch
the option on 0010or off 0003. Traffic
information Display on the map
Incidents Road sections with traffic
incidents are illustrated
with a yellow line and
arrows.
Speed &
Flow Road sections with traffic
jams are represented by
yellow or red lines.
Yellow lines: traffic jams,
average speed 25 - 45 mph
(40 - 72 km/h)
Red lines: traffic jams,
average speed
5-20mph
(8 - 32 km/h) Free Flow Free flowing road sections
are illustrated with a green
line and arrows.
Additional settings
Avoiding an area
General information COMAND enables you to avoid areas you do
not wish to drive through.
If you activate or deactivate a route block
while route guidance is active, COMAND will
calculate a new route. If you activate or
deactivate a route block while route guidance
is inactive, COMAND will use the new setting
for the next route guidance.114
Additional settingsNavigation
Page 119 of 274
X
To adjust the size of the area: turn
003C0012003D the COMAND controller.
The area is enlarged or reduced.
X To confirm the change: press0037the
COMAND controller.
The list appears and the change is entered.
Deleting aset area X
Call up the area list ( Ypage 116).
X Select an entry in the list by turning 003C0012003D
the COMAND controller.
X Slide 00120035the COMAND controller and
press 0037to confirm.
X Select Delete and press
0037to confirm.
Aq uery appears asking whether the entry
should be deleted.
X Select Yes or
No .
If you select Yes , the entry is deleted.
If you select No , the process will be
canceled. SIRIUS XM service
Displaying SIRIUS XM service
information You can display the SIRIUS XM service
information.
X To show the menu: press0037the COMAND
controller.
X Select Navi in the main function bar by
sliding 00360012and turning 003C0012003Dthe COMAND
controller and press 0037to confirm.
X Select SIRIUS Service and press
0037to
confirm.
The window on the right half of the display
shows the telephone number of the
provide r(SIRIUS XM) and the serial number
of your service module. Registering for the SIRIUS XM traffic
report service X
Call the traffic report provider's phone
number shown on the screen.
i You can also have the satellite service
activated online .To do so, visit the SIRIUS
XM Radio website at
http://www.sirius.com (USA).
Once the connection has been established:
X Follow the instructions of the operator.
The activation process may take up to ten
minutes.
If registration is not included when
purchasing the system, your credit card
details will be required to activate your
account. Compass function
You can view the current direction of travel,
the current height and the coordinates of the
current vehicle position in the compass view.
X To switch to navigation mode: press the
0012 button.
X To show the menu: press0037the COMAND
controller.
X Select Position in the navigation system
menu bar by sliding 00120008and turning 003C0012003D
the COMAND controller and press 0037to
confirm.
X Select Compass and press
0037to confirm. Additional settings
117Navigation Z
Page 121 of 274
Updating the digital map
Introduction The digital maps generated by the map
software become outdated in the same way
as conventional road maps. Optimal route
guidance can only be provided by
the navigation system in conjunction with the
most up-to-date map software.
Information about new versions of the digital
map can be obtained from an authorized
Mercedes-Benz Center. You can have the
digital map updated there with a DVD, or you
can update it yourself.
Important safety notes G
WARNING
Never leave the engine running in an enclosed
space. The exhaust gases contain carbon
monoxide. Inhaling exhaust gases constitutes
a health hazard and could lead to loss of
consciousness or even death.
Carrying out a manual update i
The update process can tak ealong time
(over an hour), depending on the size of the
digital map. During this time, you will only
be able to switch on radio mode and to
accept incoming calls. The update will be
completed more quickly if the vehicle is
stationary.
If you start the update with the engine
switched off and the starter battery has
insufficient power, COMAND may
automatically switch off .This protects the
battery. If this occurs, restart the update
with the engine running.
X Insert the DVD:
R
in the single DVD drive (Y page 194)
R in the DVD changer (Y page 194)
COMAND checks whether the digital map
on the DVD is compatible with the
navigation system and system software. Ap
rompt then appears asking if you want
to install the database. Versions of the
database currently installed and the
database that is to be installed are
displayed.
X Select Yes or
No and press
0037to confirm.
After selecting Yes , an activation code
must be entered when installing a database
for the first time. You will receive the
activation code when you buy the
navigation DVD.
If you select No , the process will be
canceled.
X Enter the activation code.
After entering the activation code
correctly, COMAND starts updating the
digital map. Once the update is finished,
you will see a message.
X To confirm the message: press0037the
COMAND controller.
X Take the DVD out of the slot.
While the update is running, you will see a
message to this effect and a progress bar.
The navigation system is not operational
until the update is complete.
i You cannot eject the DVD during the
update. If you switch off COMAND during
the update, the update is interrupted. It
then continues from where it was
interrupted when the system is restarted.
COMAND may prompt you to change the DVD
during the update.
X Press the 0009(for DVD changer) or
0007 (for single DVD drive) load/eject
button.
X Take the DVD out of the slot.
X Insert the requested DVD.
Once the update has been successfully
completed, you will see a message to this
effect.
X To confirm the message: press0037the
COMAND controller.
X Take the DVD out of the slot.
The update is complete. Additional settings
119Navigation Z
Page 161 of 274

Your COMAND equipment
................160
General notes .................................... 160
Establishing/ending the connection 160
Google™ local search .......................161
Destination/route download ...........164
Options .............................................. 167
Other services ................................... 170
Internet radio .................................... 171
Internet .............................................. 172 159Online and Internet functions
Page 173 of 274
The following examples show how to call up
a Mercedes-Benz App, for example Facebook,
and generally how to call up Google™
services.
To call up Facebook:
X
Select the 000Cicon in the main function bar
by turning 003C0012003Dthe COMAND controller
and press 0037to confirm.
The carousel view appears.
X Bring the Mercedes-Benz Apps panel to
the front by turning 003C0012003Dthe COMAND
controller and pressing 0037to confirm.
The Mercedes-Benz Apps menu is
displayed.
X Select Facebook by turning
003C0012003Dthe
COMAND controller and press 0037to
confirm.
The Facebook home page appears.
X To call up Google™ services: this is done
through Google™ Local Search
(Y page 164).
i Facebook is a social network. This App
allows you to log in from your vehicle and
use Facebook's many functions.
Google™ Street View allows you to view
streets in 360-degree panoramas.
Google™ Panoramio expands Google Local
Search to include photos at the selected
position. Internet radio
General notes
A good Internet connection is required to
transmit audio data efficiently. To ensure the
best-possible reception, your mobile phone
should be connected to the vehicle's exterior
antenna via the phone bracket (optional).
Bear in mind that a relatively large volume of
data can be transmitted when using the
Internet radio. An average 128 kbit per
second data transfer rate can transfer 56 MB
of data in one hour. The data transfer rate of a station is displayed
while receiving data. Calling up the Internet radio
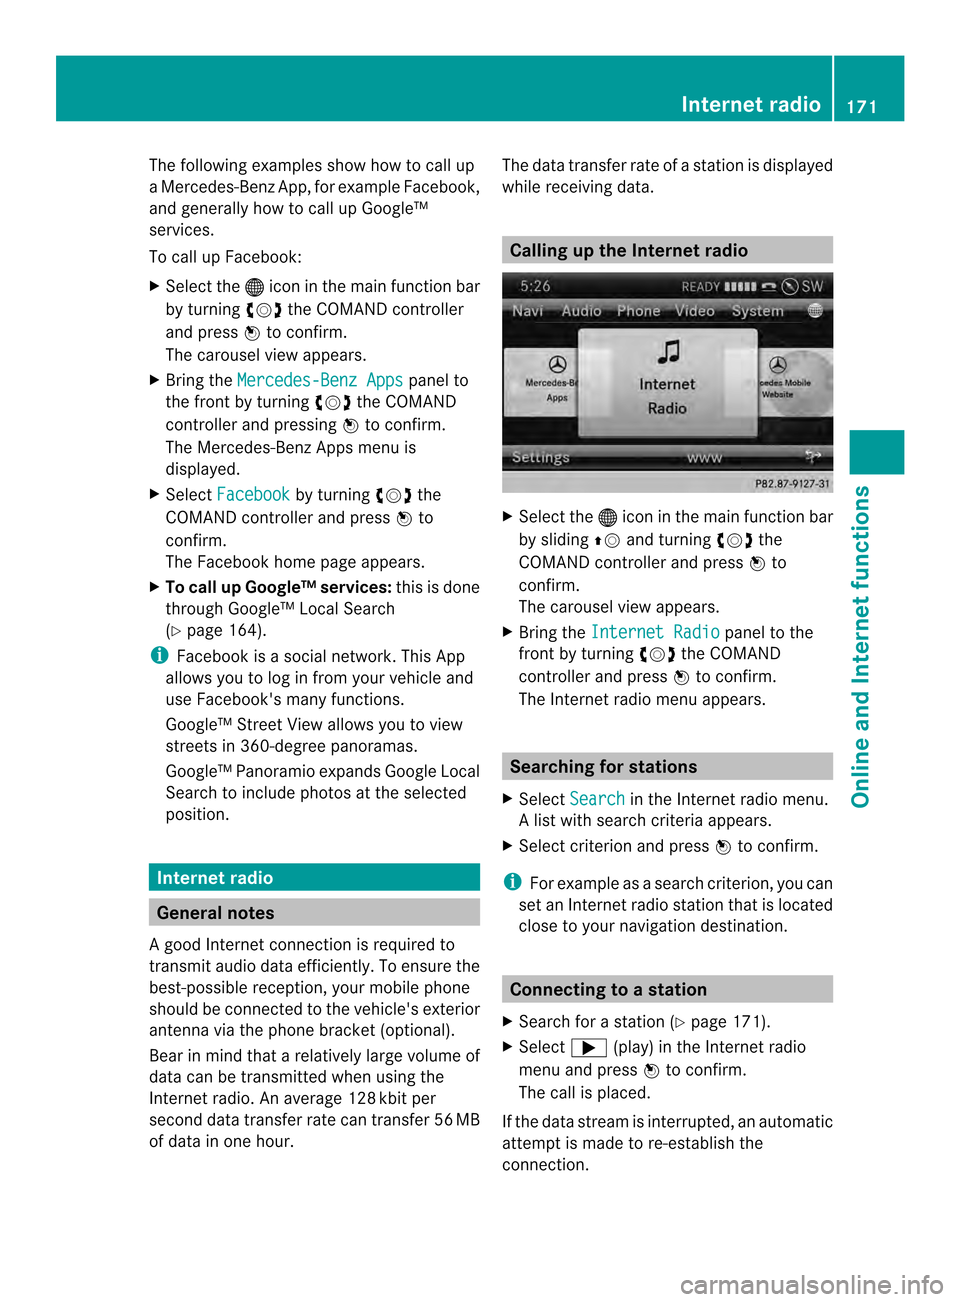
X
Select the 000Cicon in the main function bar
by sliding 00360012and turning 003C0012003Dthe
COMAND controller and press 0037to
confirm.
The carousel view appears.
X Bring the Internet Radio panel to the
front by turning 003C0012003Dthe COMAND
controller and press 0037to confirm.
The Internet radio menu appears. Searching for stations
X Select Search in the Internet radio menu.
Al ist with search criteria appears.
X Selec tcriterio nand press 0037to confirm.
i For example as a search criterion, you can
set an Internet radio statio nthat is located
close to your navigation destination. Connecting to
astation
X Search for a station (Y page 171).
X Select 000A(play) in the Internet radio
menu and press 0037to confirm.
The call is placed.
If the data stream is interrupted, an automatic
attempt is made to re-establish the
connection. Internet radio
171Online and Internet functions
Page 174 of 274
Manually re-establishing a connection
X
Select 000A(play) again in the Internet
radio menu and press 0037to confirm.
Ending data transfer:
X Select 0014(stop) in the Internet radio
menu and press 0037to confirm.
or
X Change to another audio source, for
example Disc .
If you change to a main function that is not an
audio source, e.g. navigation, the data
connection remains on. You can continue
listening to the set station. Internet
Display restriction
Internet pages cannot be shown while the
vehicle is in motion. Calling up
awebsite
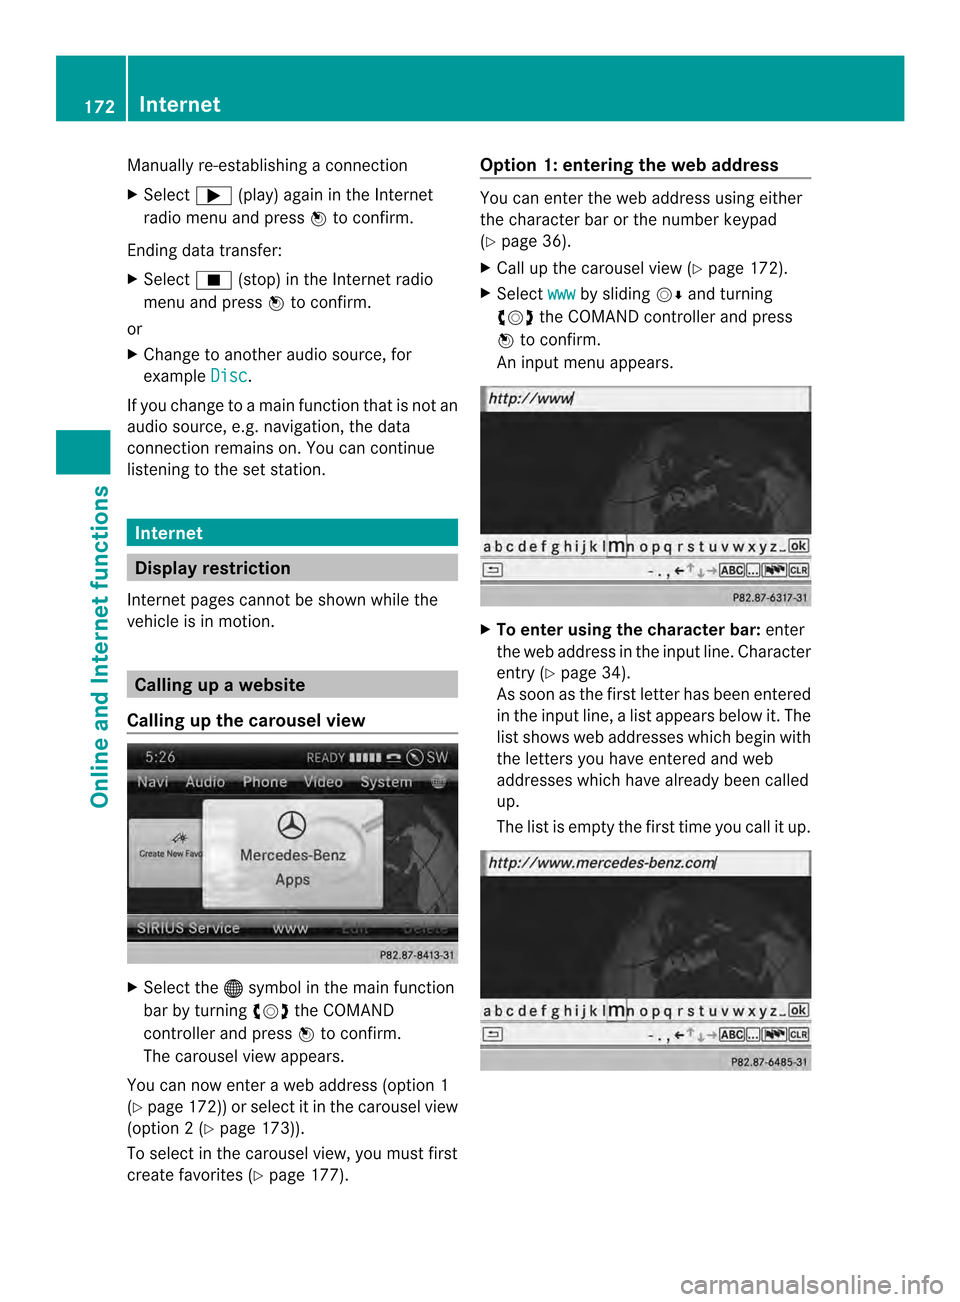
Calling up the carousel view X
Select the 000Csymbol in the main function
bar by turning 003C0012003Dthe COMAND
controller and press 0037to confirm.
The carousel view appears.
You can now enter a web address (option 1
(Y page 172)) or selec titinthe carousel view
(option 2(Ypage 173)).
To select in the carousel view, you must first
create favorites (Y page 177). Option 1: entering the web address You can enter the web address using either
the character bar or the number keypad
(Y
page 36).
X Call up the carousel view (Y page 172).
X Select www by sliding
00120008and turning
003C0012003D the COMAND controller and press
0037 to confirm.
An input menu appears. X
To enter using the character bar: enter
the web address in the input line. Character
entry (Y page 34).
As soon as the first letter has been entered
in the input line, a list appears below it. The
list shows web addresses which begin with
the letters you have entered and web
addresses which have already been called
up.
The list is empty the first time you call it up. 172
InternetOnline and Internet functions
Page 185 of 274
Your COMAND equipment
................184
Radio mode ........................................ 184
Satellite radio .................................... 188
CD/audio DVD and MP3 mode ........193
Music search ..................................... 206
MUSIC REGISTER .............................. 209
Bluetooth ®
audio mode .................... 213
Operation with the Media Interface 219
Audio AUX mode ............................... 225 183Audio