display MERCEDES-BENZ CL-Class 2014 C217 Owner's Manual
[x] Cancel search | Manufacturer: MERCEDES-BENZ, Model Year: 2014, Model line: CL-Class, Model: MERCEDES-BENZ CL-Class 2014 C217Pages: 494, PDF Size: 13.55 MB
Page 413 of 494
the connectio
nis being established.T he
Connecting Call message appears in the
multifunction display. The COMAND
display shows the Information Call Activated message. The audio output is
muted.
If a connection can be established, the CallConnected message appears in the
multifunction display.
The COMAND display shows the
Information Call Activated message.
If a cellularp hone network is available and
there is sufficient GPS reception, the mbrace
system transmits data to the Mercedes-Benz
Customer Assistance Center, for example:
R current location of the vehicle
R vehicle identification number
i The COMAND display shows that an
mbrace call is active. You can change to the
navigation menu by pressing the S
button during the call, for example.
Voice output is not available.
Av oice connection is established between
the Mercedes-Benz Customer Assistance
Center and the vehicle occupants. You can
obtain information on how to operate your
vehicle's systems, on the location of the
nearest authorized Mercedes-Benz Center,
and on further products and services offered
by Mercedes-Benz USA.
Further details on the mbrace system can be
found under http://www.mbusa.com 18
.
Log in under "Owners Online".
i The mbrace system failed to initiate an
MB Info call if:
R the indicator lamp in MB Info call
button :is flashing continuously.
R no voice connection to the Mercedes-
Benz Customer Assistance Center was
established.
This may be because the corresponding
mobile phone network is not available. The
Call Failed message appears in the
multifunction display.
The COMAND display shows the Call could not be connected! message.
Press Wto confirm the message.
X To end acall: press the ~button on the
multifunctio nsteering wheel.
or
X Press the corresponding button for ending
a phone call on the COMAND telephone
keypad.
Call priority When service calls are active, e.g
.Roadside
Assistance or MB Info calls, an emergency
call can still be initiated. In this case, an
emergency call will take priority and override
all other active calls.
The indicator lamp of the respective button
flashes until the call is ended. An emergency
call can only be terminated by the Mercedes-
Benz Customer Assistance Center. All other
calls can be ended by pressing the ~
button on the multifunction steering wheel or
the corresponding button for ending a
telephone call on the COMAND telephone
keypad.
Downloading destinations in COMAND i
The components and operating principles
of COMAND can be found on
(Y page 112).
i You can only use the Destination
Download function if the vehicle is
equipped with a navigation system.
Destination Download gives you access to a
database with over 15 million points of
interes t(POIs)/important destinations that
can be downloaded onto the navigation
system of your vehicle. If you know the
destination, you can download the address or
obtain the location of points of interest
18 USA only. Features
411Stowage and features Z
Page 415 of 494
sent. If you own multiple Mercedes-Benz
vehicles with mbrace and activated mbrace
accounts:
Each destination address sent can be
accessed by every vehicle which is
connected with the relevant e-mail
address.
Vehicle remote opening You can use the vehicle remote opening if you
have unintentionally locked your vehicle and
a replacement SmartKey is not available. The
vehicle can be opened by the Mercedes-Benz
Customer Assistance Center.
The vehicle can be opened remotely up to four
days after the ignition was last switched off.
X Contact the following service hotlines:
R
USA: Mercedes-Benz Customer
Assistance Center at
1-800-FOR-MERCedes
(1-800-367-6372) or 1-888-990-9007
R Canada: Customer Service at
1-888-923-8367
You will be asked for your password.
X Return to your vehicle at the time agreed
upon with the Mercedes-Benz Customer
Assistance Center.
X Pull on the trunk lid handle for at least
20 seconds until the indicator lamp in the
SOS button (Y page 408) flashes.
The Connecting Call message appears in
the multifunction display.
USA only: alternatively, the vehicle can be
opened via:
R the Internet, under the "Owners Online"
section
R the telephone application (e.g. iPhone ®
)
i Vehicle remote opening is only possible if
the corresponding mobile phone network
is accessible.
The SOS button flashes and the
Connecting Call message appears in the
multifunction display to confirm that the command for vehicle remote unlocking has
been received.
If the trunk lid handle is pulled for longer
than 20 seconds before authorization has
been received, you must wait for
15 minutes. Only then can you pull the
trunk lid handle once again.
Vehicle remote closing The remote closing feature can be used when
you have forgotten to lock the vehicle and you
are no longer nearby. The vehicle can then be
locked by the Mercedes-Benz Customer
Assistance Center.
The vehicle can be locked remotely up to four
days after the ignition was last switched off.
X
Contact the following service hotlines:
R
USA: Mercedes-Benz Customer
Assistance Center at
1-800-FOR-MERCedes
(1-800-367-6372) or 1-888-990-9007
R Canada: Customer Service at
1-888-923-8367
You will be asked for your PIN.
The next time you are in your vehicle and
switch on the ignition, the Tele Aid Doors
Locked Remotely message appears in the
multifunction display.
USA only: alternatively, the vehicle can be
locked via:
R the Internet, under the "Owners Online"
section
R the telephone application (e.g. iPhone ®
)
i The vehicle remote closing feature is
available when the relevant mobile phone
network is available and data connection is
possible.
Automatic vehicled ata retrieval for the
service due date You
rvehicle comes with a function which
improves the servicing of the vehicle
considerably. Shortly before the service due
date, mbrace sends important vehicle Features
413Stowage and features Z
Page 424 of 494
X
Slowly slide oil dipstick :into the guide
tube to the stop, and take it ou tagain.
If the level is between MIN mark =and
MAX mark ;, the oil level is correct.
X If the oil level has dropped to MIN mark
= or below, add 1.1 US qt (1.0 liter) of
engine oil.
Checking the oil level using the on-
board computer Measurement
X
Make sure that the SmartKey is in position
2in the ignition lock.
X Press the ;or= button to select the
Service menu.
X Press the :or9 button to select
Engine Oil Level .
X Press the abutton.
The multifunction display shows the
following message: Measuring EngineOil Level Accurate Only When
Vehicle Is Level
i
If you wish to cancel the measurement,
press the %button on the multifunction
steering wheel. 422
Engine compartmentMaintenance and care
Page 425 of 494
Display messages
The measuremen
ttakes a few seconds. You will see one of the following messages in the
multifunction display: Problem Possible causes/consequences and
M Solutions
Engine Oil Level OK The oil level is correct.
Add 1.0 l Engine
Oil At Next
Refueling . The oil level is too low.
X
add 1. 0lof engine oil. Add 1.5 l Engine
Oil At Next
Refueling . The oil level is too low.
X
add 1.5 l of engine oil. Add 2.0 l Engine
Oil At Next
Refueling . The oil level is too low.
X
add 2.0 l of engine oil. Engine Oil Level
Reduce Oil Level The engine oil level is too high.
X
Have excess engine oil siphoned off. For Engine Oil
Level Ignition
Must be On The ignition is switched off.
X
Turn the SmartKey to position 2in the ignition lock. Need More Time to
Check Engine Oil
Level The required waiting period was not observed.
X
If the engine is at normal operating temperature: repeat the
measurement after about five minutes.
If the engine is not at normal operating temperature (e.g. if the
engine was only started briefly): repeat the measurement after
about 30 minutes. Engine Oil Level
Not When Engine On The engine is running; oil level measurement is not possible.
X
Switch off the engine.
X If the engine is at normal operating temperature: wait about five
minutes before carrying out the measurement.
If the engine is not at normal operating temperature, e.g. if the
engine was only started briefly: wait approximately
30 minutes before carrying out the measurement. Adding engine oil
G
WARNING
If engine oil comes into contact with hot
engine parts, it may ignite and you could burn
yourself. Do not spill any engine oil on hot
engine parts. H
Environmental note
When adding oil, take care not to spill any. If
oil enters the soil or waterways, it is harmful
to the environment.
! Only use engine oils and oil filters that
have been approved for vehicles with a Engine compartment
423Maintenance and care Z
Page 426 of 494
service system. You can obtain a list of the
engine oils and oil filters tested and
approved in accordance with the
Mercedes-Benz Specifications for Service
Products at any Mercedes-Benz Service
center.
Damage to the engine or exhaust system is
caused by the following:
R
using engine oils and oil filters that have
not been specifically approved for the
service system
R replacing engine oil and oil filters after
the interval for replacement specified by
the service system has been exceeded
R using engine oil additives.
! Do not add too much oil. adding too much
engine oil can result in damage to the
engine or to the catalytic converter. Have
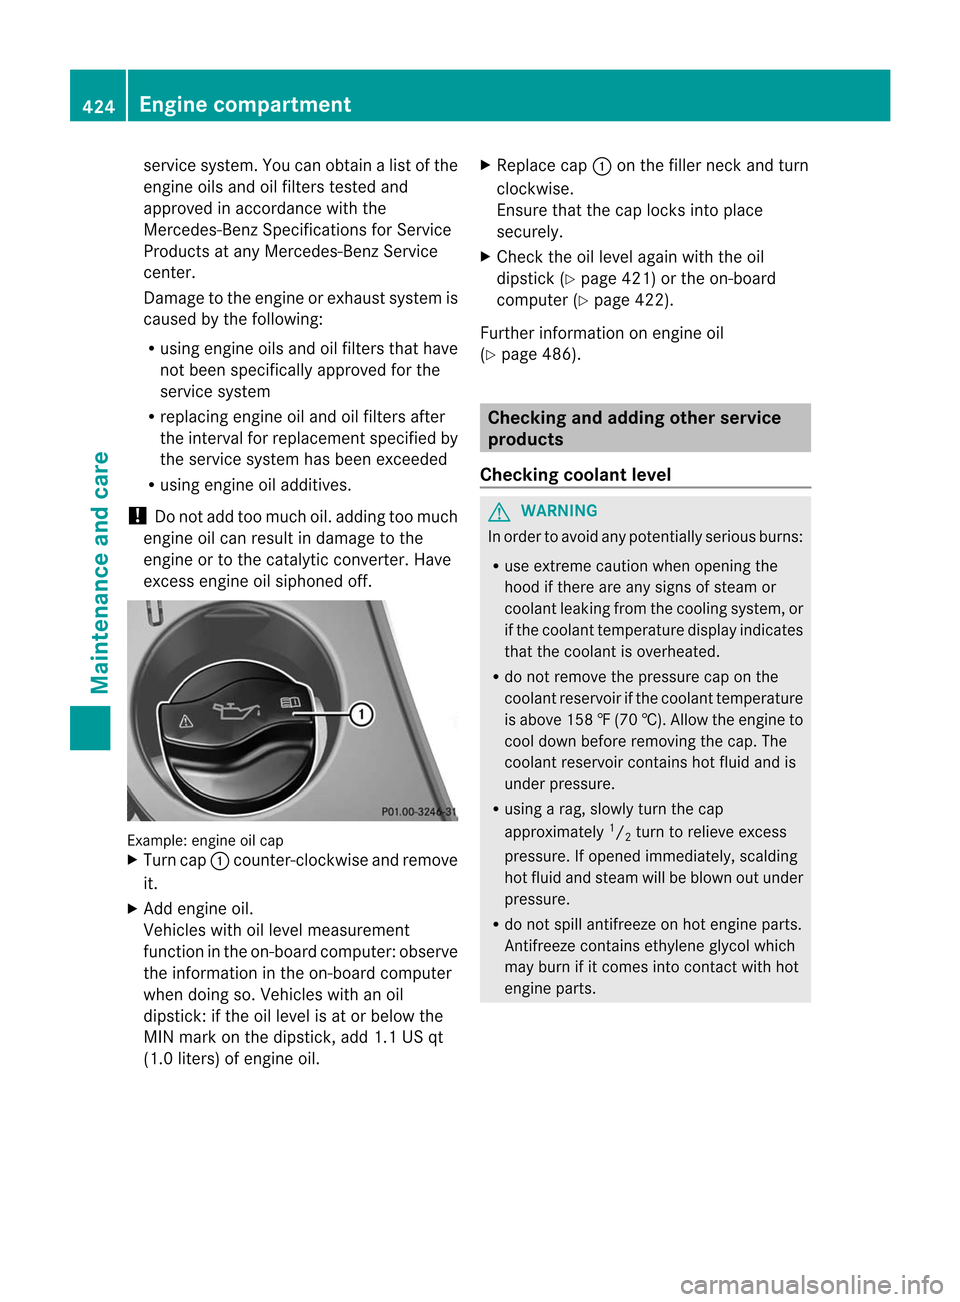
excess engine oil siphoned off. Example: engine oil cap
X
Turn cap :counter-clockwise and remove
it.
X Add engine oil.
Vehicles with oil level measurement
function in the on-board computer: observe
the information in the on-board computer
when doing so. Vehicles with an oil
dipstick: if the oil level is at or below the
MIN mark on the dipstick, add 1.1 US qt
(1.0 liters) of engine oil. X
Replace cap :on the filler neck and turn
clockwise.
Ensure that the cap locks into place
securely.
X Check the oil level againw ith the oil
dipstick (Y page 421) or the on-board
computer (Y page 422).
Further information on engine oil
(Y page 486). Checking and adding other service
products
Checking coolant level G
WARNING
In order to avoid any potentially serious burns:
R use extreme caution when opening the
hood if there are any signs of steam or
coolan tleaking from the cooling system, or
if the coolant temperature display indicates
that the coolant is overheated.
R do not remove the pressure cap on the
coolant reservoir if the coolant temperature
is above 158 ‡(70 †). Allow the engine to
cool dow nbefore removing the cap. The
coolant reservoir contains hot fluid and is
under pressure.
R using a rag, slowly turn the cap
approximately 1
/ 2 turn to relieve excess
pressure. If opened immediately, scalding
hot fluid and steam will be blown out under
pressure.
R do not spill antifreeze on hot engine parts.
Antifreeze contains ethylene glycol which
may burn if it comes into contact with hot
engine parts. 424
Engine compartmentMaintenance and care
Page 427 of 494
X
Park the vehicle on a level surface.
Only check the coolant level when the
vehicle is on a level surface and the engine
has cooled down.
X Turn the SmartKey to position 2in the
ignition lock (Y page 273).
On vehicles with KEYLESS-GO, press the
Start/Stop button twice (Y page 273).
X Check the coolant temperature display in
the instrument cluster.
The coolant temperature must be below
158 ‡ (70 †).
X Turn the SmartKey to position
0(Y page 273) in the ignition lock.
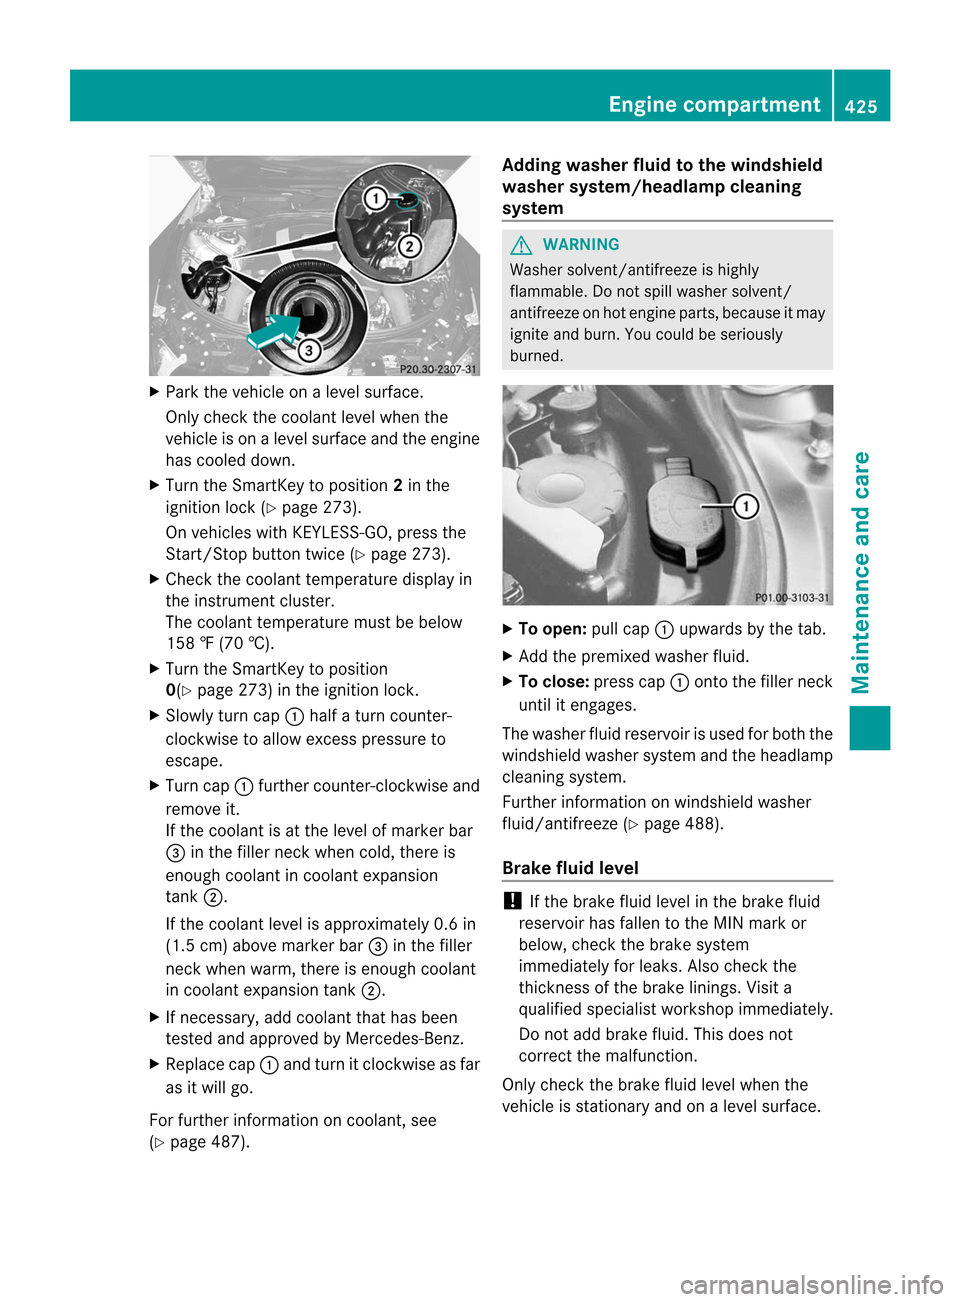
X Slowly turn cap :half a turn counter-
clockwise to allow excess pressure to
escape.
X Turn cap :further counter-clockwise and
remove it.
If the coolant is at the level of marker bar
= in the filler neck when cold, there is
enough coolant in coolant expansion
tank ;.
If the coolant level is approximately 0.6 in
(1.5 cm) above marker bar =in the filler
neck when warm, there is enough coolant
in coolant expansion tank ;.
X If necessary, add coolant that has been
tested and approved by Mercedes-Benz.
X Replace cap :and turn it clockwise as far
as it will go.
For further information on coolant, see
(Y page 487). Adding washer fluid to the windshield
washer system/headlam
pcleaning
system G
WARNING
Washer solvent/antifreeze is highly
flammable. Do not spill washer solvent/
antifreeze on hot engin eparts, because it may
ignite and burn .You could be seriously
burned. X
To open: pull cap:upwards by the tab.
X Add the premixed washer fluid.
X To close: press cap :onto the filler neck
until it engages.
The washer fluid reservoir is used for both the
windshield washer system and the headlamp
cleaning system.
Further information on windshield washer
fluid/antifreeze (Y page 488).
Brake fluid level !
If the brake fluid level in the brake fluid
reservoir has fallen to the MIN mark or
below, check the brake system
immediately for leaks. Also check the
thickness of the brake linings. Visit a
qualified specialist workshop immediately.
Do not add brake fluid. This does not
correct the malfunction.
Only check the brake fluid level when the
vehicle is stationary and on a level surface. Engine compartment
425Maintenance and care Z
Page 428 of 494
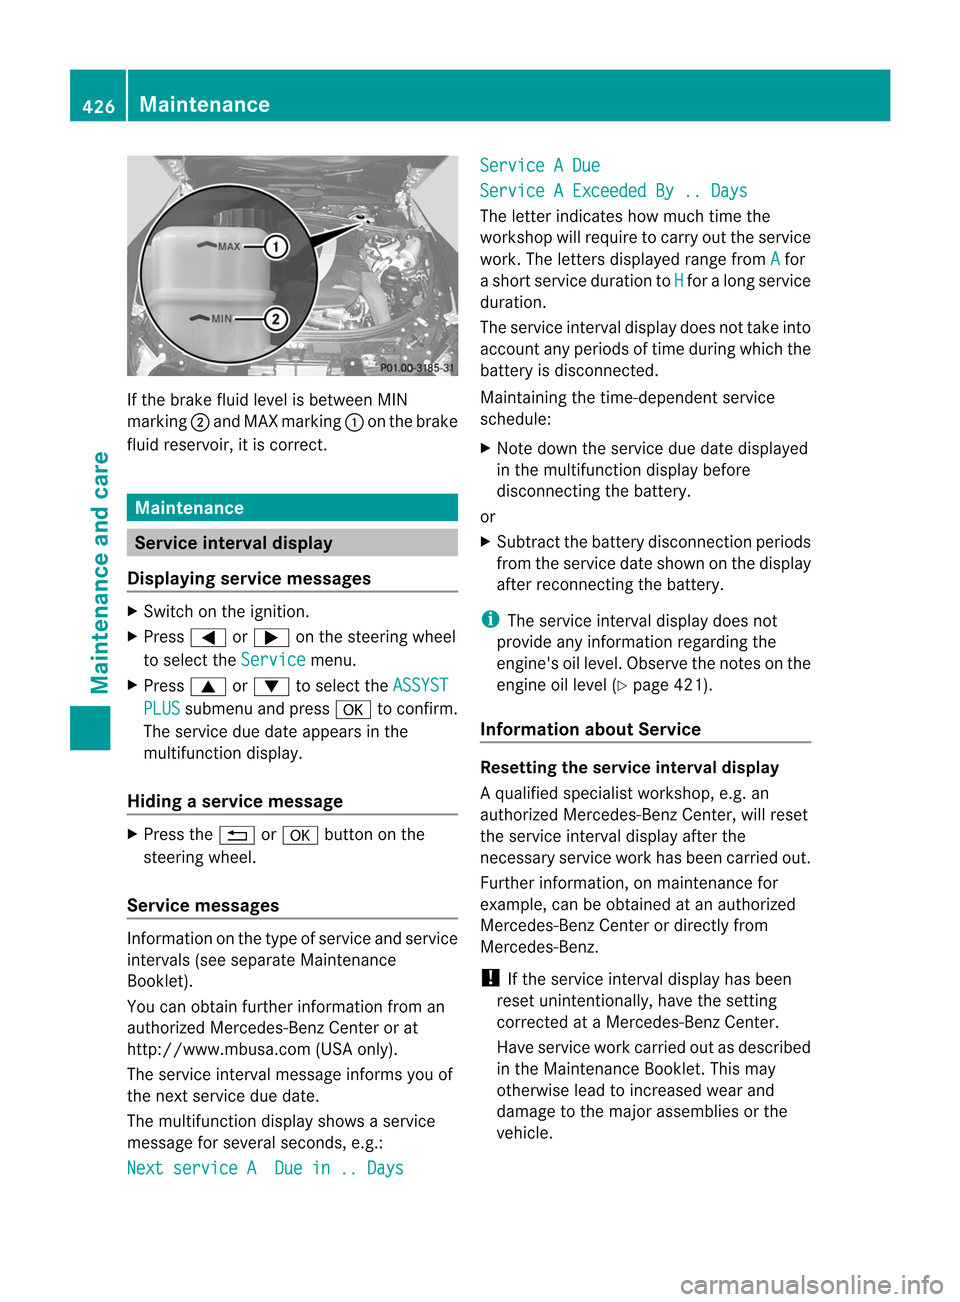
If the brake fluid level is betwee
nMIN
marking ;and MAX marking :on the brake
fluid reservoir, it is correct. Maintenance
Service interval display
Displaying service messages X
Switch on the ignition.
X Press =or; on the steering wheel
to select the Service menu.
X Press 9or: to select the ASSYST PLUS submenu and press
ato confirm.
The service due date appears in the
multifunction display.
Hiding aservice message X
Press the %ora button on the
steering wheel.
Service messages Information on the type of service and service
intervals (see separate Maintenance
Booklet).
You can obtain further information from an
authorized Mercedes-Ben
zCenter or at
http://www.mbusa.com (USA only).
The service interval message informs you of
the nexts ervice due date.
The multifunction display shows a service
message for several seconds, e.g.:
Next service A Due in .. Days Service A Due
Service A Exceeded By .. Days
The letter indicates how much time the
workshop will require to carry out the service
work. The letters displayed range from
A for
a short service duration to H for a long service
duration.
The service interval display does not take into
accoun tany periods of time during which the
battery is disconnected.
Maintaining the time-dependent service
schedule:
X Note down the service due date displayed
in the multifunctio ndisplay before
disconnecting the battery.
or
X Subtract the battery disconnection periods
fro mt he service date shown on the display
after reconnecting the battery.
i The service interval display does not
provide any information regarding the
engine's oil level. Observe the notes on the
engine oil level (Y page 421).
Information about Service Resetting the service interval display
Aq
ualified specialist workshop, e.g. an
authorized Mercedes-Ben zCenter, will reset
the service interval display after the
necessary service work has been carried out.
Further information, on maintenance for
example, can be obtained at an authorized
Mercedes-Benz Center or directly from
Mercedes-Benz.
! If the service interval display has been
reset unintentionally, have the setting
corrected at a Mercedes-Benz Center.
Have service work carried out as described
in the Maintenance Booklet. This may
otherwise lead to increased wear and
damage to the major assemblies or the
vehicle. 426
MaintenanceMaintenance and care
Page 433 of 494
Cleaning the mirror turn signals
!
Only use cleaning agents or cleaning
cloths that are suitable for plastic lenses.
Unsuitable cleaning agents or cleaning
cloths could scratch or damage the plastic
lenses of the mirror tur nsignals.
X Clean the plastic lenses of the mirror turn
signals using a wet sponge and a mild
cleaning agent, e.g. Mercedes-Ben zcar
shampoo. Cleaning cloths may be used as
well.
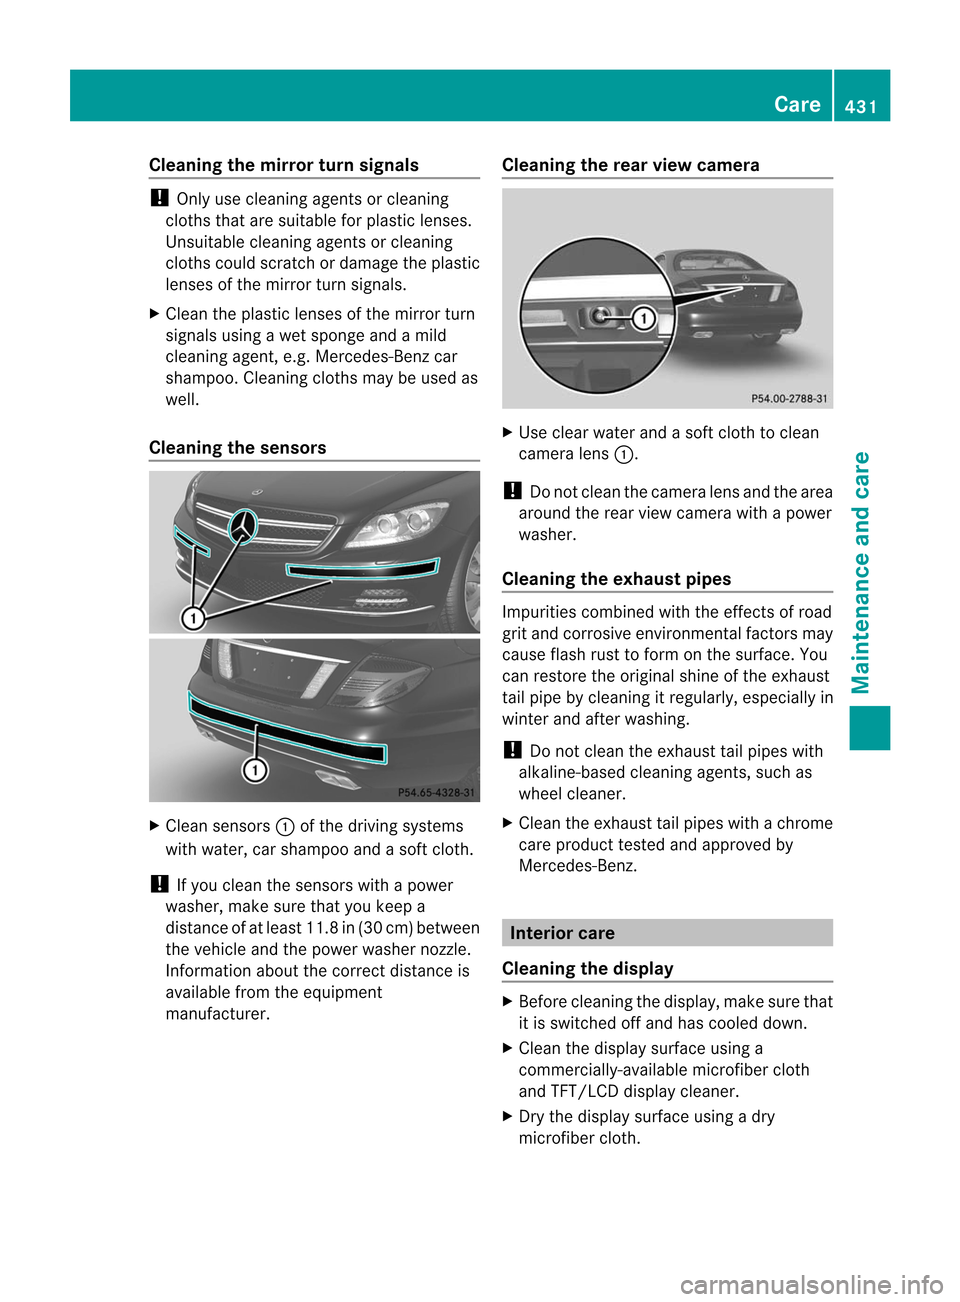
Cleaning the sensors X
Clean sensors :of the driving systems
with water, car shampoo and a sof tcloth.
! If you clean the sensors with a power
washer, make sure that you keep a
distance of at least 11. 8in(30 cm) between
the vehicle and the power washer nozzle.
Information about the correct distance is
available from the equipment
manufacturer. Cleaning the rear view camera X
Use clea rwate rand a sof tcloth to clean
camera lens :.
! Do not clean the camera lens and the area
around the rear view camera with a power
washer.
Cleaning the exhaust pipes Impurities combined with the effects of road
grit and corrosive environmental factors may
cause flash rust to form on the surface. You
can restore the original shine of the exhaust
tail pipe by cleaning it regularly, especially in
winter and after washing.
!
Do not clean the exhaust tail pipes with
alkaline-based cleaning agents, such as
wheel cleaner.
X Clean the exhaust tail pipes with a chrome
care produc ttested and approved by
Mercedes-Benz. Interior care
Cleaning the display X
Before cleaning the display, make sure that
it is switched off and has cooled down.
X Clean the display surface using a
commercially-available microfiber cloth
and TFT/LCD display cleaner.
X Dry the display surface using a dry
microfiber cloth. Care
431Maintenance and care Z
Page 434 of 494
!
For cleaning, do not use any of the
following:
R alcohol-based thinner or gasoline
R abrasive cleaning agents
R commercially-available household
cleaning agents
These may damage the display surface. Do
not put pressure on the display surface
when cleaning. This could lead to
irreparable damage to the display.
Cleaning Night View AssistP lus!
Never clean the camera lens. When
cleaning the field of vision of the driving
systems, make sure that you do not spray
glass cleaner on the camera lens. If the
camera lens is dirty, visit a qualified
specialist workshop. G
WARNING
Always remember that your primary
responsibility is to drive the vehicle. The driver
must always concentrate on the road. For
your safety and the safety of others, stop the
vehicle before trying to clean fogged-up
windows or to clean the window in fron tofthe
Night View Assist Plus camera.
Bear in mind that at a speed of only 30 mph
(approximately 50 km/h), the vehicle covers
a distance of 44 feet (approximately 14 m) per
second. X
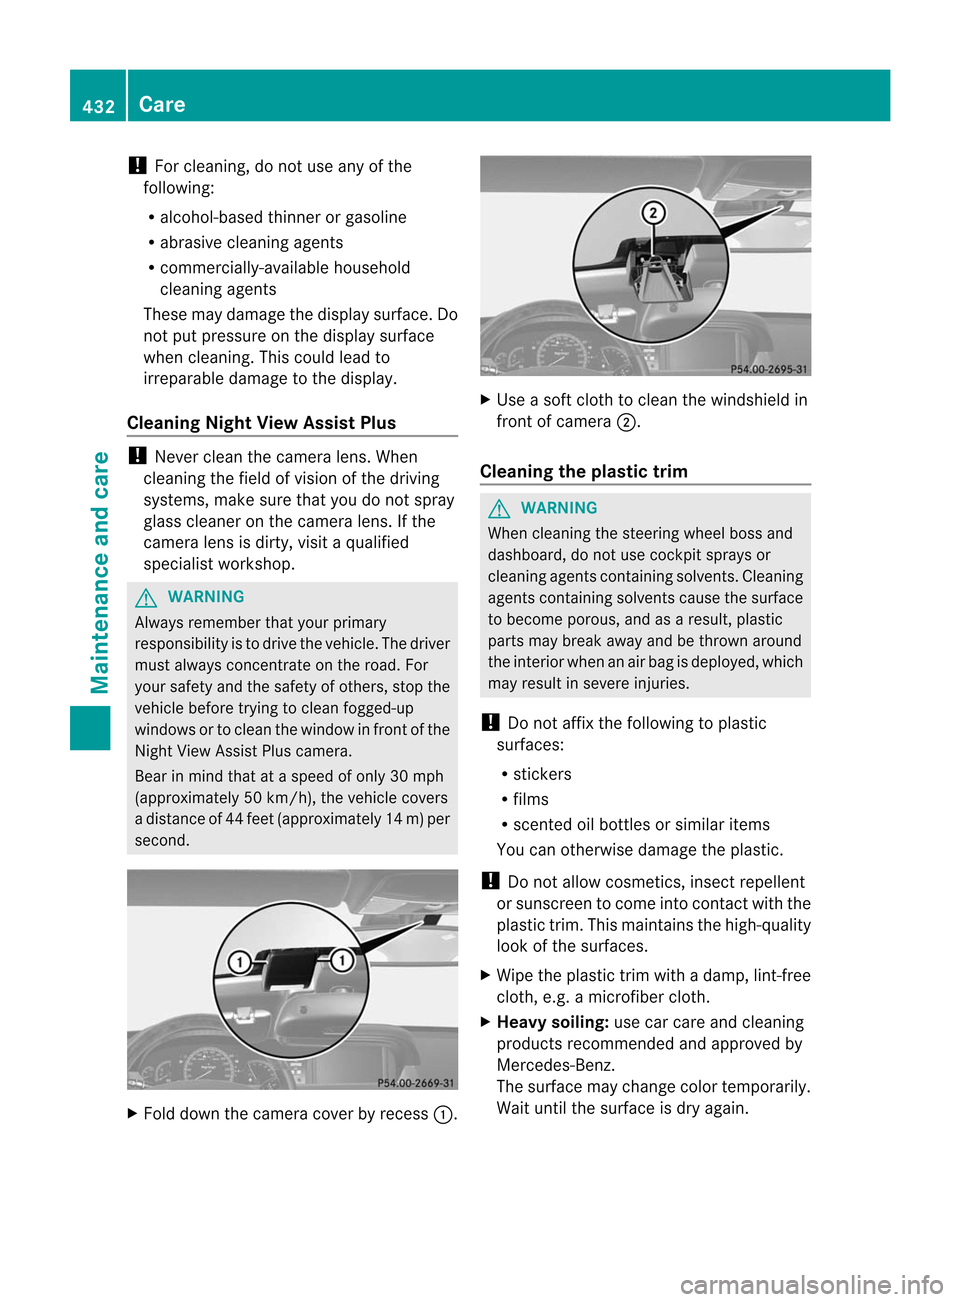
Fold down the camera cover by recess :. X
Use a soft cloth to clean the windshield in
front of camera ;.
Cleaning the plastic trim G
WARNING
When cleaning the steering wheel boss and
dashboard, do not use cockpit sprays or
cleaning agents containing solvents. Cleaning
agents containing solvents cause the surface
to become porous, and as aresult, plastic
parts may break away and be thrown around
the interior when an air bag is deployed, which
may result in severe injuries.
! Do not affix the following to plastic
surfaces:
R stickers
R films
R scented oil bottles or similar items
You can otherwise damage the plastic.
! Do not allow cosmetics, insect repellent
or sunscreen to come into contact with the
plastic trim .This maintains the high-quality
look of the surfaces.
X Wipe the plastic trim with a damp, lint-free
cloth, e.g. a microfiber cloth.
X Heavy soiling: use car care and cleaning
products recommended and approved by
Mercedes-Benz.
The surface may change color temporarily.
Wait until the surface is dry again. 432
CareMaintenance and care
Page 444 of 494
MOExtended tires may only be used in
conjunction with the activated tire pressure
loss warning system or with the activated tire
pressure monitoring system.
The driving distance in partially laden
condition is approximately 50 miles (80 km),
and approximately 18 miles (30 km) when
fully loaded.
In addition to the vehicle load, the driving
distance possible depends upon:
R speed
R road condition
R outside temperature
The driving distance possible in run-flat mode
may be reduced by extreme driving
conditions/maneuvers, or it can be increased
through a moderate style of driving.
The maximum permissible distance which
can be driven in run-flat mode is counted from
the moment the tire pressure loss warning
appears in the multifunction display.
Do not exceed a vehicle speed of 50 mph
(80 km/h). G
WARNING
When driving in emergency mode, the driving
characteristics deteriorate, e.g. when
cornering, accelerating quickly and when
braking. There is a risk of an accident.
Do not exceed the stated maximum speed.
Avoid abrupt steering and driving maneuvers,
and driving over obstacles (curbs, potholes,
off-road). This applies in particular to a laden
vehicle.
Stop driving in emergency mode if:
R you hear banging noises.
R the vehicle starts to shake.
R you see smoke and smell rubber.
R ESP ®
is intervening constantly.
R there are tears in the sidewalls of the tire.
After driving in emergency mode, have the
wheel rims checked at a qualified specialist
workshop with regard to their further use. The
defective tire must be replaced in every case. i
When replacing one or all tires, make sure
that you only use tires marked
MOExtended. Also ensure that they are of
the specified size for the vehicle. Battery
Important safety notes
Special tools and expert knowledge are
required when working on the battery, e.g.
removal and installing. You should therefore
have all work involving the battery carried out
at a qualified specialist workshop. G
WARNING
Work carried out incorrectly on the battery
can, for example, lead to a short circuit and
damage your vehicle's electronic system. This
can disrupt driving safety systems such as
ABS (anti-lock braking system) or ESP ®
(Electronic Stability Program).
R If ABS malfunctions, the wheels can lock
during braking. This limits the steerability
of the vehicle when braking and the braking
distance may increase. There is a risk of
accident.
R If ESP ®
malfunctions, the vehicle will not be
stabilized if it starts to skid or a wheel starts
to spin. There is a risk of accident.
You should therefore have all work involving
the battery carried out at a qualified specialist
workshop. G
WARNING
Comply with safety precautions and take
protective measures when handling batteries. Risk of explosion
Fire, open flames and
smoking are prohibited
when handling the battery.
Avoid creating sparks.442
BatteryBreakdown assistance