interior lights MERCEDES-BENZ CL-Class 2014 C217 Owner's Manual
[x] Cancel search | Manufacturer: MERCEDES-BENZ, Model Year: 2014, Model line: CL-Class, Model: MERCEDES-BENZ CL-Class 2014 C217Pages: 494, PDF Size: 13.55 MB
Page 9 of 494
Car
see Vehicle
Care
Carpet s.......................................... 433
Car wash ........................................ 427
Display ........................................... 431
Exterior lights ................................ 430
Gea rors electo rlever .................... 433
Interior ........................................... 431
Matte finish ................................... 429
Nigh tView Assist Plus ...................432
Notes ............................................. 427
Paint .............................................. 429
Plastic trim .................................... 432
Power washer ................................ 428
Rea rview camera .......................... 431
Roof lining ...................................... 433
Seat bel t........................................ 433
Seat cover ..................................... 433
Sensors ......................................... 431
Steering wheel ............................... 433
Tai lpipes ....................................... 431
Trim pieces .................................... 433
Washing by hand ........................... 428
Wheels ........................................... 429
Windows ........................................ 430
Wiper blades .................................. 430
Wooden trim .................................. 433
Cargo tie down rings .........................402
Car pool lanes .................................... 157
Car wash (care) ................................. 427
Category Satellite radio ................................ 206
CD
Cop yprotection ............................. 218
Fast forward/fast rewind ...............214
General information .......................218
Inserting ........................................ 209
Mode ,switchin gto........................ 210
Multisession .................................. 217
Notes on discs ............................... 218
Operating the player/changer
(on-board computer) ......................343
Pause function ............................... 211
Playback options ........................... 216
Player/change roperation
(COMAND )..................................... 209
Safety notes .................................. 209Selecting
amedia type .................. 212
Selecting atrack ............................ 213
Sound settings (balance, bass,
fader, treble ).................................. 128
Cell phone
see Mobile phone
Center console ..................................... 39
Central locking Automatic locking feature
(COMAND) ..................................... 239
SmartKey ......................................... 74
Changing bulbs
High-beam headlamps ...................257
Important safety notes ..................256
Overview of bul btypes .................. 257
Changing direction
Announcement phase ....................154
Change of direction phase .............155
Preparation phase .........................154
Changing the programming
SmartKey ......................................... 77
Character bar ..................................... 122
Characters Entering ......................................... 123
Entering (address book, phone
book) ............................................. 125
Entering (navigation) ......................122
Child-proof locks
Important safety notes ....................63
Children
In the vehicle ................................... 59
Restraint systems ............................ 59
Child seat
LATCH-type (ISOFIX) child seat
anchors ............................................ 62
Specia lseat belt retractor ...............61
Top Tether ....................................... 63
Cigarette lighter ................................ 406
Cleaning Mirro rturn signal ........................... 431
Climate control
Automatic climate control .............263
COMAND ....................................... 239
Controlling automatically ...............264
Controlling centrally (COMAND) ....242
Cooling with aird ehumidification..264
Cooling with aird ehumidification
(COMAND )..................................... 241 Index
7
Page 11 of 494
D
Dashboard see Cockpit
Data
see Technica ldata
Data medium
Audi oDVD ..................................... 217
CD/DVD ........................................ 218
MP3 ............................................... 217
MUSIC REGISTER ........................... 218
Date format, setting ..........................131
Day design, setting ...........................130
Daytime running lamps Display message ............................ 370
Switching on/off (on-board
computer) ...................................... 349
Switching on/off (switch) ..............251
Dealership
see Qualified specialist workshop
Delaye dswitch-off
Exterio rlighting (COMAND) ...........237
Interior lighting (COMAND) ............237
Destination (navigation)
Displaying information ...................160
Entering a destination by address .. 141
Entering a destination using the
map ............................................... 147
Entering an intermediate stop .......148
Entering a point of interest ............150
Saving ............................................ 167
Selecting from the destination
memory ......................................... 146
Selecting from the lis toflast
destination s................................... 146
Destination memory (navigation)
Deleting an entry ........................... 169
Entering/saving you rhome
address .......................................... 144
Previous destinations ....................169
Diagnostics connection ......................29
Dialing anumber (telephone) ........... 188
Digital speedometer .........................340
DIREC TSELECT lever
see Automatic transmission
Display
Selecting th edesign ...................... 130
Settings ......................................... 130Display (cleaning instructions)
........431
Displaying the arrival time ...............160
Displaying the distance to the
destination ......................................... 160
Display messages Calling up (on-board computer) .....352
Driving systems ............................. 375
Engine ............................................ 371
General notes ................................ 352
Hiding (on-board computer) ...........352
Lights ............................................ .367
Safety systems .............................. 353
Service interva ldisplay .................. 426
SmartKey ....................................... 387
Tires ............................................... 382
Vehicle .......................................... .385
Distance
see Navigation, route overview
Distance display (on-board
computer) .......................................... 347
Distance recorder ............................. 340
see Odometer
see Trip odometer
Distance warning (warning lamp) ....397
DISTRONIC PLUS Deactivating ................................... 305
Display message ............................ 380
Displays in the multifunction
displa y........................................... 305
Driving tips .................................... 306
Function/notes ............................. 298
Important safety notes ..................298
Setting the specified minimum
distance ......................................... 304
Warning lamp ................................. 397
Dolby ®
Digital .................................... 129
Doors Automatic locking ............................ 82
Control pane l................................... 41
Display message ............................ 387
Emergency locking ........................... 83
Emergency unlocking .......................83
Important safety notes ....................81
Opening (from inside) ......................82
Power closing feature ......................83
Drinking and driving .........................292 Index
9
Page 16 of 494
Light function, active
Display message ............................ 370
Lighting
Ligh tswitc h................................... 250
see Lights
Lights
Automatic headlamp mode ............251
Cornering light function .................254
Display message ............................ 367
Driving abroad ............................... 250
Fog lamps ...................................... 252
Hazard warning lamps ...................253
High beam flasher .......................... 253
High-beam headlamps ...................253
Low-beam headlamps ....................251
Rea rfog lamp ................................ 252
Standing lamps .............................. 250
Switching Adaptive Highbeam
Assist on/off ................................. 350
Switching the daytime running
lamps on/off (on-board computer) 349
Switching the daytime running
lamps on/off (switch) ....................251
Turn signals ................................... 252
see Changing bulbs
see Interior lighting
Light sensor (display message) .......370
Loading guidelines ............................400
Locator lighting setting (COMAND) .238
Locking Automatic ........................................ 82
Emergency locking ........................... 83
From inside the vehicle (central
locking button) ................................. 82
Locking verification signal (on-
board computer) ............................... 350
Logic 7 ®
(Harman Kardon ®
surround sound system) see 3D sound (Harman Kardon ®
surround sound system)
Low-beam headlamps
Display message ............................ 367
Setting for driving abroad
(symmetrical) ................................. 250
Switching on/off ........................... 251
Lubricant additives
see Additives Lumbar support
Adjusting ....................................... 101
Lumbar support (COMAND) .............. 243 M
M+S tires ............................................ 456
Maintenance see ASSYST PLUS service interval
display
Malfunction message
see Display messages
Map (navigation)
Adjusting the scal e........................ 170
Arrival time/distance to the
destination ..................................... 173
City mode l..................................... 174
Display ........................................... 172
Geo-coordinate displa y.................. 174
Heading ......................................... 172
Information in the displa y.............. 173
Moving ........................................... 171
North orientation ........................... 172
Notes ............................................. 170
Point of interest symbols ...............172
Roa ddisplay .................................. 173
Saving the crosshair position .........171
Setting to the vehicle destination ..171
Topographica lmap........................ 174
Map display (also see navigation)
Traffi creports ................................ 163
Massage function (PULSE) ...............246
Matte finish (cleaning instructions) 429
mbrace Automatic retrieval of vehicle data
(service due date ).......................... 413
Call priority .................................... 411
Display message ............................ 361
Downloading destinations
(COMAND) ..................................... 411
Emergency call .............................. 408
Important safety notes ..................407
Locating astolen vehicl e............... 414
MB info call button ........................410
Remote vehicle locking ..................413
Roadside Assistance button ..........409
Search &Send ............................... 412
Self-test ......................................... 40814
Index
Page 46 of 494
Useful information
i This Operator's Manual describes all
models and all standard and optional
equipment of your vehicle available at the
time of publication of the Operator's
Manual. Country-specific differences are
possible. Please note that your vehicle may
not be equipped with all features
described. This also applies to safety-
related systems and functions.
i Please read the information on qualified
specialist workshops (Y page 29).Occupant safety
Overview of occupant safety
In this section, you will learn the most
important facts about the restraint system
components of the vehicle.
The restraint system consists of:
R seat belts
R child restraint systems
R LATCH-type (ISOFIX) child seat anchors
Additional protection is provided by:
R SRS (Supplemental Restrain tSystem)
R NECK-PRO head restraints
R PRE-SAFE ®
R Airb ag system component swith:
- PASSENGER AI RBAG OFF indicator lamp
- front-passenge rseat with Occupant
Classification System (OCS)
The differen tair bag systems work
independently of each other. The protective
functions of the system work in conjunction
with each other. Not all air bags are deployed
in an accident. G
WARNING
Modifications to or work improperly
conducted on restraint system components
or their wiring, as well as tampering with
interconnected electronic systems, can lead to the restraint systems no longer functioning
as intended.
Air bags or Emergency Tensioning Devices
(ETDs), for example, could deploy
inadvertently or fail to deploy in accidents
although the deceleration threshold for air
bag deploymen tis exceeded. Therefore,
never modify the restraint systems. Do not
tamper with electronic components or their
software.
i See "Children in the vehicle"
(Y page 59) for more information on
infants and children traveling with you in
the vehicle and restraints for infants and
children. SRS (Supplemental Restraint System)
Introduction SRS consists of:
R
the 6 SRS warning lamp
R air bags
R air bag control unit (with crash sensors)
R Emergency Tensioning Devices
R belt force limiters
SRS reduces the risk of occupants coming
into contact with the vehicle's interior in the
event of an accident. It can also reduce the
effect of the forces to which occupants are
subjected during an accident.
SRS warning lamp SRS functions are checked regularly when
you switch on the ignition and when the
engine is running. Therefore, malfunctions
can be detected in good time.
The
6 SRS warning lamp in the instrument
cluster lights up when the ignition is switched
on. It goes out no later than a few seconds
after the engine is started.
The SRS components are in operational
readiness if the 6SRS warning lamp is not
lit while the engine is running. 44
Occupant safetySafety
Page 105 of 494
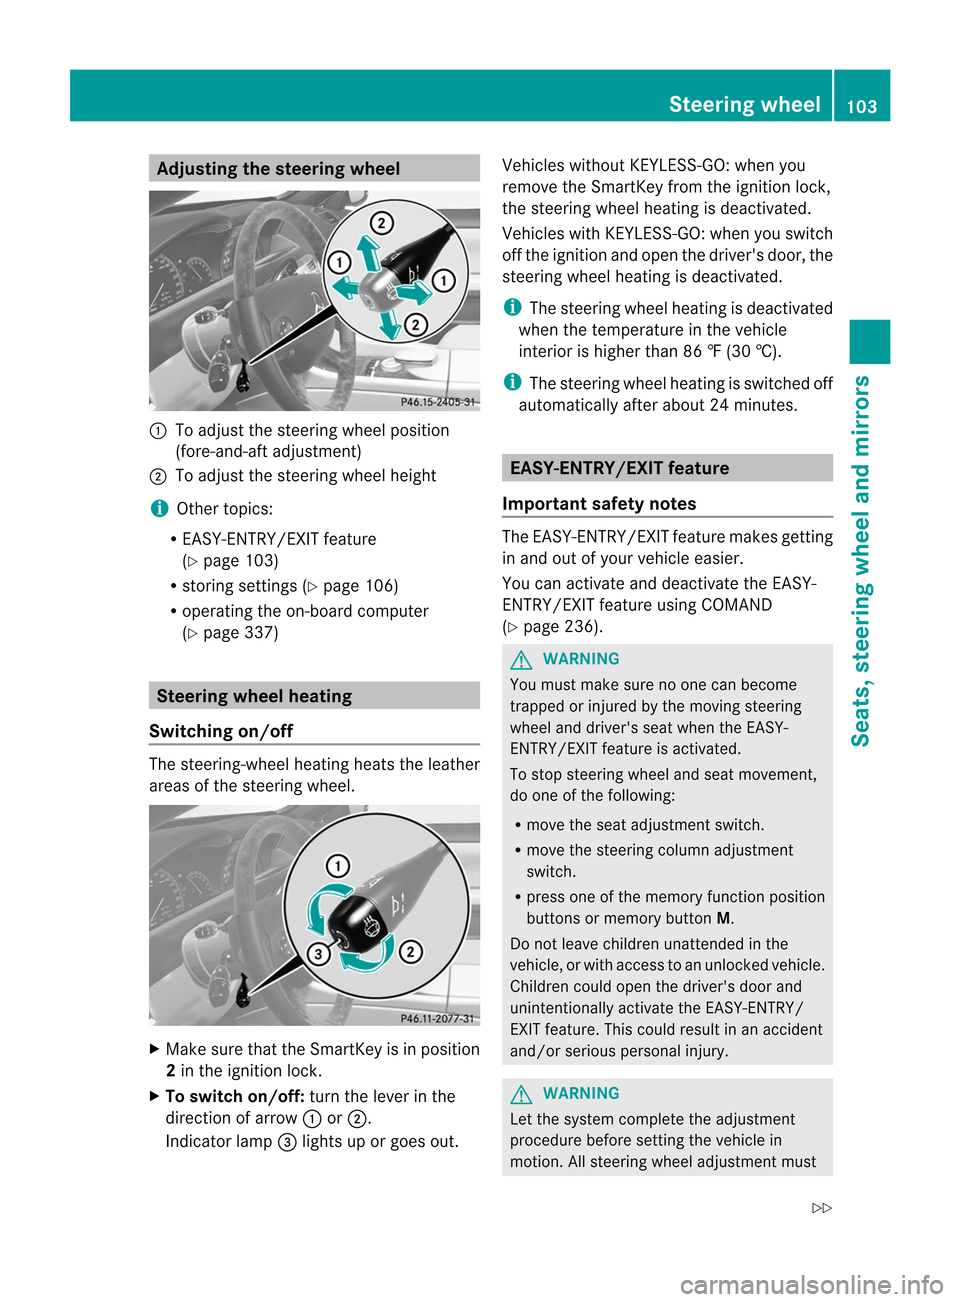
Adjusting the steering wheel
:
To adjust the steering wheel position
(fore-and-aft adjustment)
; To adjust the steering wheel height
i Other topics:
R EASY-ENTRY/EXIT feature
(Y page 103)
R storing settings (Y page 106)
R operating the on-board computer
(Y page 337) Steering wheel heating
Switching on/off The steering-wheel heating heat
sthe leather
areas of the steering wheel. X
Make sure that the SmartKey is in position
2 in the ignition lock.
X To switch on/off: turn the lever in the
direction of arrow :or;.
Indicator lamp =lights up or goes out. Vehicles without KEYLESS-GO: when you
remove the SmartKey from the ignition lock,
the steering wheel heating is deactivated.
Vehicles with KEYLESS-GO: when you switch
off the ignition and open the driver's door, the
steering wheel heating is deactivated.
i
The steering wheel heating is deactivated
when the temperature in the vehicle
interior is higher than 86 ‡ (30 †).
i The steering wheel heating is switched off
automatically after about 24 minutes. EASY-ENTRY/EXIT feature
Important safety notes The EASY-ENTRY/EXIT feature makes getting
in and out of your vehicle easier.
You can activate and deactivate the EASY-
ENTRY/EXIT feature using COMAND
(Y
page 236). G
WARNING
You must make sure no one can become
trapped or injured by the moving steering
wheel and driver's seat when the EASY-
ENTRY/EXIT feature is activated.
To stop steering wheel and seat movement,
do one of the following:
R move the seat adjustment switch.
R move the steering column adjustment
switch.
R press one of the memory function position
buttons or memory button M.
Do not leave children unattended in the
vehicle, or with access to an unlocked vehicle.
Children could open the driver's door and
unintentionally activate the EASY-ENTRY/
EXIT feature. This could result in an accident
and/or serious personal injury. G
WARNING
Let the system complete the adjustment
procedure before setting the vehicle in
motion. All steering wheel adjustment must Steering wheel
103Seats, steering wheel and mirrors
Z
Page 106 of 494
be completed before setting the vehicle in
motion. Driving off with the steering wheel
still adjusting could cause the driver to lose
control of the vehicle.
! Do not activate the EASY-ENTRY/EXIT
feature, if the seat backrest is reclined too
far backwards. This can damage the front
or rear seats. You must first move the
backrest to a vertical position.
Position of the steering wheel and the
driver's seat when the EASY-ENTRY/
EXIT feature is active The steering wheel tilts upwards and the
driver's seat moves backwards if you:
R
remove the SmartKey from the ignition lock
R open the driver's door when the SmartKey
is in the ignition lock or KEYLESS-GO is in
position 1
i The steering wheel only moves upwards if
it has not already reached the upper end
stop. The driver's seat only moves
backwards if it is not already in the
rearmost position.
Position of the steering wheel and the
driver's seat for driving If you insert the SmartKey into the ignition
lock with the driver's door closed, depending
on the setting, the position of the steering
wheel and the driver's seat will be changed to
the previously set position.
The last position of the steering wheel or seat
is stored if:
R
the ignition is switched off or
R the setting is stored with the memory
function.
Crash-responsive EASY-EXIT feature If the crash-responsive EASY-EXIT feature is
triggered in an accident, the steering column
will move upwards when the driver's door is
opened. This occurs irrespective of the position of the SmartKey in the ignition lock.
This makes it easier to exit the vehicle and
rescue the occupants.
The crash-responsive EASY-EXIT feature is
only operational if the EASY-EXIT/ENTRY
feature is activated in the on-board computer.
Mirrors
Exterior mirrors
Adjusting the exterior mirrors G
WARNING
Exercise care when using the passenger-side
exterior rear view mirror. The mirror surface
is convex (outwardly curved surface for a
wider field of view). Objects in mirror are
closer than they appear. Check your interior
rear view mirror and glance over your
shoulder before changing lanes.
The exterior mirrors are automatically heated
if the rear window defroster is switched on
and the outside temperature is low. X
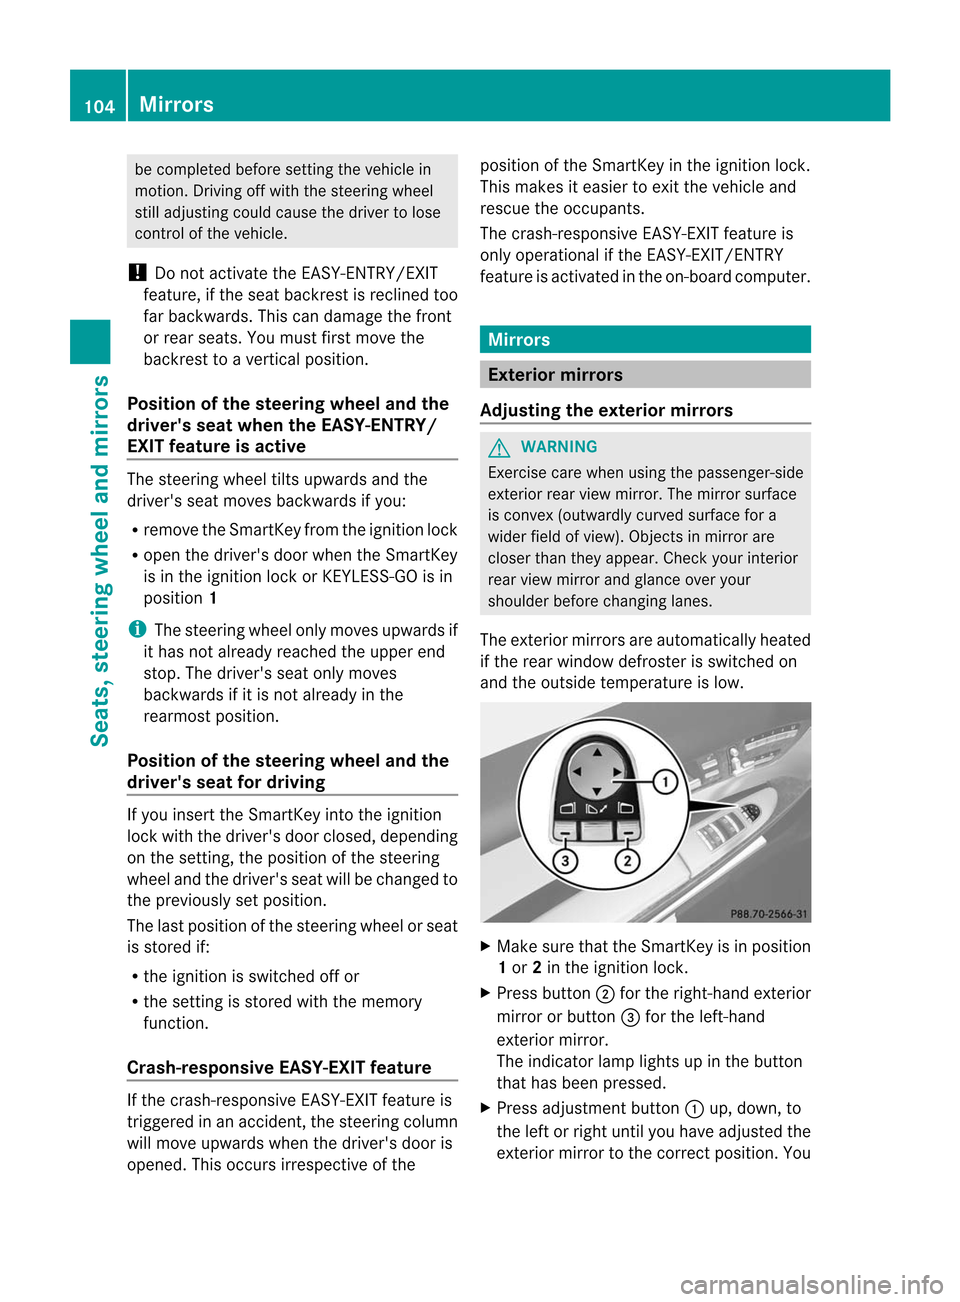
Make sure that the SmartKey is in position
1or 2in the ignition lock.
X Press button ;for the right-hand exterior
mirror or button =for the left-hand
exterior mirror.
The indicator lamp lights up in the button
that has been pressed.
X Press adjustment button :up, down, to
the left or right until you have adjusted the
exterior mirror to the correct position .You 104
MirrorsSeats, steering wheel and mirrors
Page 239 of 494
lever or press the position button of the
memory function.
If there is a risk of entrapmen tby the seat, you
can also cancel the adjustmen tprocedure by
moving the switch for seat adjustment. The
steering colum nand driver's sea tstop moving
immediately.
Never leave children unsupervised in the
vehicle. They could open the driver's door and
thereby unintentionally activate the EASY-
ENTRY/EXIT feature and become trapped.
You can make a setting in COMAND so that
the steering wheel swings upwards and/or
the driver's seat moves backwards before you
get into the vehicle. You can make the
following settings:
R Off : the function is switched off.
R Steering Column :t
he steering wheel
swings upwards.
R Steering Column and Seat :t
he steering
wheel swings upwards and the driver’s seat
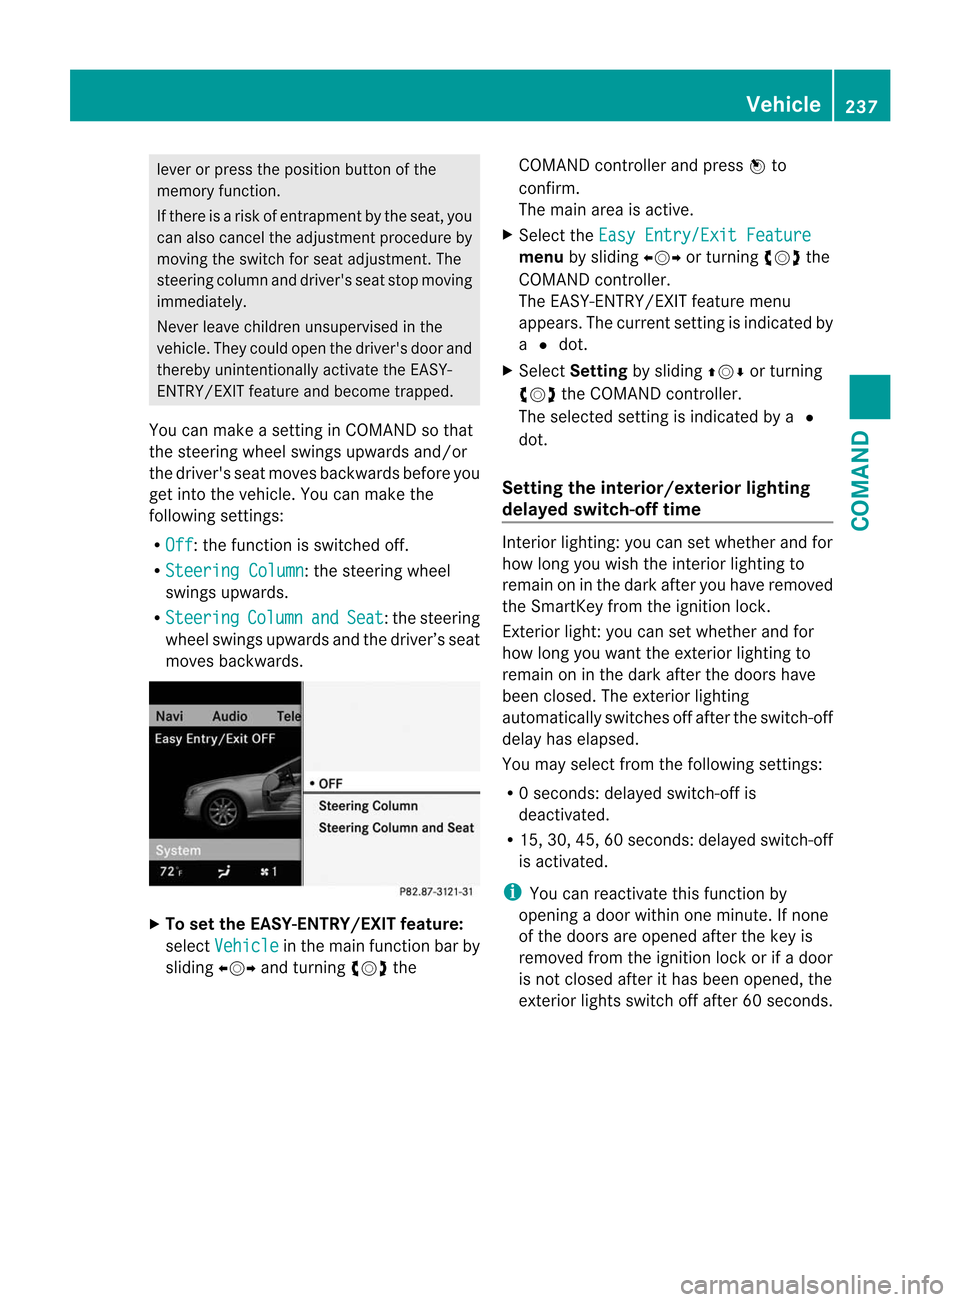
moves backwards. X
To set the EASY-ENTRY/EXIT feature:
select Vehicle in the main function bar by
sliding XVYand turning cVdthe COMAND controller and press
Wto
confirm.
The main area is active.
X Select the Easy Entry/Exit Feature menu
by sliding XVYor turning cVdthe
COMAND controller.
The EASY-ENTRY/EXIT feature menu
appears. The current setting is indicated by
a # dot.
X Select Setting by sliding ZVÆor turning
cVd the COMAND controller.
The selected setting is indicated by a #
dot.
Setting the interior/exterior lighting
delayed switch-off time Interior lighting: you can set whether and for
how long you wish the interior lighting to
remain on in the dark after you have removed
the SmartKey from the ignition lock.
Exterior light: you can set whether and for
how long you want the exterior lighting to
remain on in the dark after the doors have
been closed. The exterior lighting
automatically switches off after the switch-off
delay has elapsed.
You may select from the following settings:
R
0s econds: delayed switch-off is
deactivated.
R 15, 30, 45, 60 seconds: delayed switch-off
is activated.
i You can reactivate this function by
opening a door within one minute. If none
of the doors are opened after the key is
removed from the ignition lock or if a door
is not closed after it has been opened, the
exterior lights switch off after 60 seconds. Vehicle
237COMAND Z
Page 251 of 494
Useful information
............................250
Exterior lighting ................................ 250
Interior lighting ................................. 255
Replacing bulbs ................................. 256
Windshield wipers ............................257 249Lights and windshield wipers
Page 257 of 494
the high-beam headlamps are switched on
automatically. The Kindicator lamp in
the instrument cluste ralso lights up.
If you drive at speeds below approximately
30 mph (45 km/h) or if other road users
are identified or if the roads are sufficiently
illuminated:
the high-beam headlamps are switched off
automatically. The Kindicator lamp in
the instrumen tcluster goes out. The _
indicator lamp in the instrument cluster
stays on.
X To deactivate: move the combination
switch back to its normal position.
The _ indicator lamp in the instrument
cluster goes out. G
WARNING
The Adaptive Highbeam Assist is only an aid
intended to suppor tyou while driving. The
driver is and remains responsible for proper
vehicle lighting in accordance with the
prevailing light, sight and traffic conditions.
The system may be impaired or unavailable
when
R visibility is poor, e.g. due to snow, rain, fog,
or heavy spray
R the optical sensor area of the windshield is
dirty, fogged up, or covered by a sticker for
example
The system cannot recognize the following
road users:
R Road users without a lighting system of
their own, e.g. pedestrians
R Road users with dim lighting of their own,
e.g. cyclists
R Road users whose lighting is obstructed,
e.g. road users behind a guardrail
R In some seldom cases, even road users with
a lighting system of their own may be
recognized too late or not at all.
The automatic high-beam headlamps will then
not be deactivated or it will be activated in
spite of preceding or oncoming road users. This could endanger you and/or others and
cause an accident
.Always pay close attention
to the traffic situation and switch off the high
beam manually if necessary. Headlamps fogged up on the inside
The headlamps may fog up on the inside if
there is high atmospheric humidity.
X Drive with the headlamps switched on.
The level of moisture diminishes,
depending on the length of the journey and
the weather conditions (humidity and
temperature).
If the level of moisture does not diminish:
X Have the headlamps checked at a qualified
specialist workshop. Interior lighting
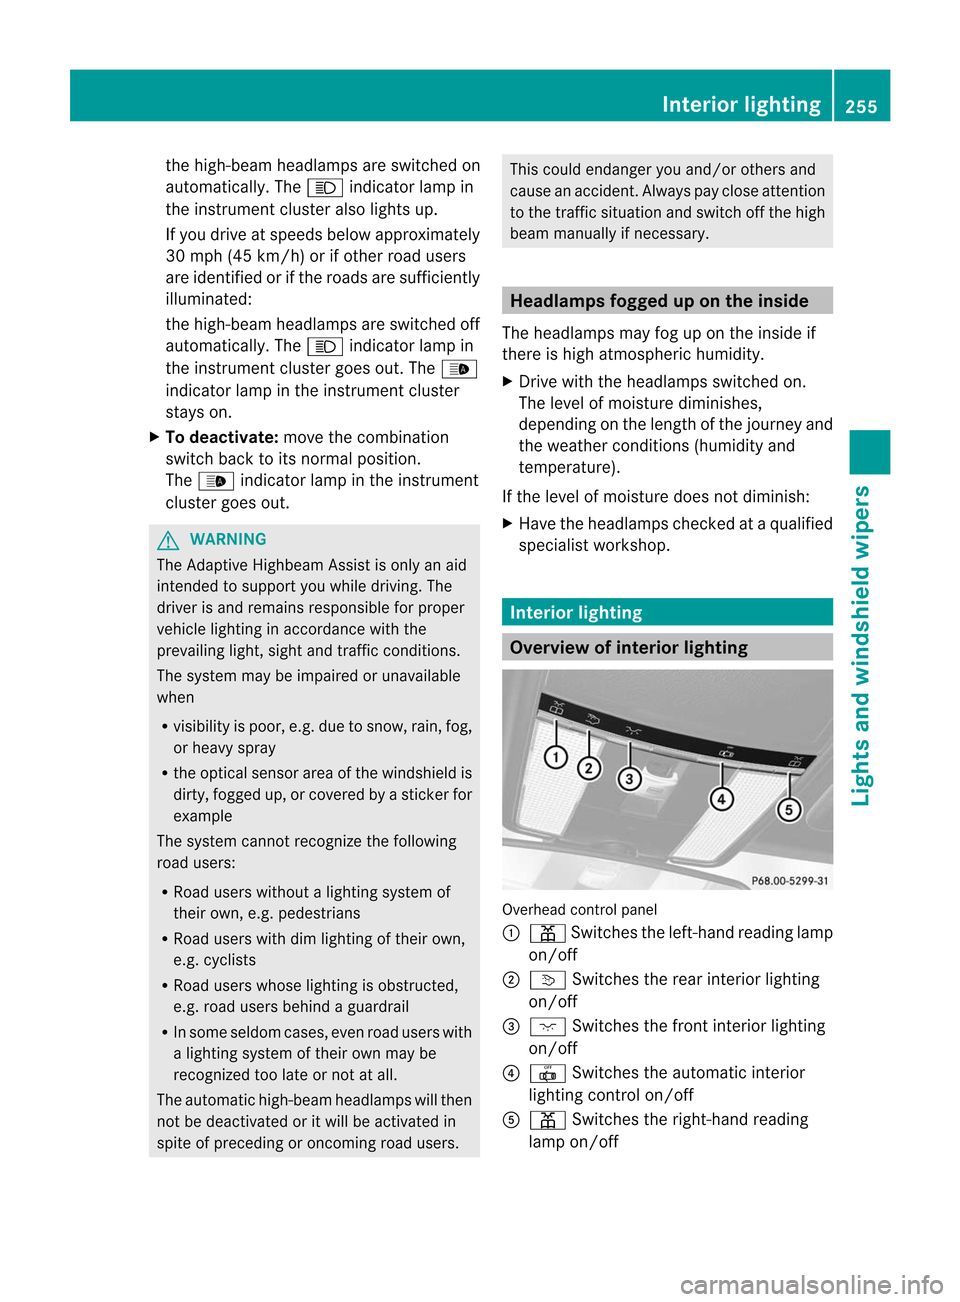
Overview of interior lighting
Overhead control panel
:
p Switches the left-hand reading lamp
on/off
; v Switches the rear interior lighting
on/off
= c Switches the front interior lighting
on/off
? | Switches the automatic interior
lighting control on/off
A p Switches the right-hand reading
lamp on/off Interior lighting
255Lights and windshield wipers Z
Page 258 of 494
Interior lighting control
Important notes In order to preven
tthe vehicle's battery from
discharging, the interior lighting functions are
automatically deactivated after some time
except for when the SmartKey is in position
2 in the ignition lock.
Automatic interior lighting control X
To switch on/off: press the|button.
The OFF indicator lamp shows whether the
automatic interior lighting control is
deactivated (indicator lamp on) or
activated (indicator lamp off).
The interior lighting automatically switches
on if you:
R unlock the vehicle
R open a door
R remove the SmartKey from the ignition lock
The interior light is activated for a short while
when the SmartKey is removed from the
ignition lock. You can activate this delayed
switch-off using COMAND (Y page 237).
Manual interior lighting control X
To switch the front interior lighting on/
off: press the cbutton.
X To switch the rear interior lighting on/
off: press the ubutton.
X To switch the reading lamps on/off:
press the pbutton. Replacing bulbs
Important safety notes
Xenon bulbs G
DANGER
Xenon bulbs carry a high voltage. You could
get an electric shock and be seriously or even
fatally injured if you touch the electric contacts on Xenon bulbs. Therefore, never
remove the cover from Xenon bulbs.
Do not change the Xenon bulbs yourself, but
have them replaced at a qualified workshop.
If your vehicle is equipped with Xenon bulbs,
you can recognize this by the following: the
cone of light from the Xenon bulbs moves
from the top to the bottom and back again
when you start the engine. For this to be
observed, the lights must be switched on
before starting the engine.
Bulbs and lamps are an important aspect of
vehicle safety. You must therefore make sure
that these function correctly at all times.
Have the headlamp setting checked regularly.
Other bulbs There are bulbs other than the Xenon bulbs
that you cannot replace. Replace only the
bulbs listed (Y
page 257). Have the bulbs that
you cannot replace yourself changed at a
qualified specialist workshop.
If you require assistance changing bulbs,
consult a qualified specialist workshop.
Do not touch the glass tube of new bulbs with
your bare hands. Even minor contamination
can burn into the glass surface and reduce
the service life of the bulbs. Always use a lint-
free cloth or only touch the base of the bulb
when installing.
Only use bulbs of the correct type.
If the new bulb still does not light up, consult
a qualified specialist workshop.
Bulbs and lamps are an important aspect of
vehicle safety. You must therefore make sure
that these function correctly at all times.
Have the headlamp setting checked regularly. G
WARNING
Bulbs and lamps can become very hot. For
this reason, allow them to cool down before
changing them. Otherwise, you could burn
yourself when you touch them. 256
Replacing bulbsLights and windshield wipers