fuse MERCEDES-BENZ CL COUPE 2009 Owners Manual
[x] Cancel search | Manufacturer: MERCEDES-BENZ, Model Year: 2009, Model line: CL COUPE, Model: MERCEDES-BENZ CL COUPE 2009Pages: 421, PDF Size: 10.78 MB
Page 12 of 421

Emergency running mode
Automatic transmission . . . . . . . . .359
Emergency unlocking
Boot . . . . . . . . . . . . . . . . . . . . . . . .366
Vehicle . . . . . . . . . . . . . . . . . . . . . .366
Engine
Running irregularl y.. . . . . . . . . . . .358
Starting problems . . . . . . . . . . . . .358
Starting with KEYLESS GO . . . . . . .203
Starting with the key . . . . . . . . . . .202
Switching off . . . . . . . . . . . . . . . . .206
Engine diagnostics warning lamp ..3 54
Engine electronics . . . . . . . . . . . . . ..394
Malfunction . . . . . . . . . . . . . . . . . .358
Engine number . . . . . . . . . . . . . . . . . .396
Engine oil . . . . . . . . . . . . . . . . . . . . . .398
Capacities . . . . . . . . . . . . . . . . . . .294
Checking the oil level (dipstick) . . .294
Checking the oil level (on-board
computer) . . . . . . . . . . . . . . . . . . .293
Consumption . . . . . . . . . . . . . . . . .293
Display message . . . . . . . . . .293, 347
Filler neck . . . . . . . . . . . . . . . . . . .294
Temperature display (on-board
computer) . . . . . . . . . . . . . . . . . . .220
Topping up . . . . . . . . . . . . . . . . . . .294
Ensemble . . . . . . . . . . . . . . . . . . . . . . .74
ESP ®
(Electronic Stability Program) .50
Activating/deactivating . . . . . . . . . .51
Activating/deactivating (on-
board computer) . . . . . . . . . . . . . .224
Display messages . . . . . . . . . . . . .334
Warning lamp . . . . . . . . . .50, 352, 353
ETS (Electronic Traction Support) . ..51
Exterior lighting see Exterior lighting
Exterior mirror parking position
Adjusting (COMAND ).. . . . . . . . . .165
Exterior mirrors
Adjusting . . . . . . . . . . . . . . . . . . . .189
Anti-dazzle mode (automatic) . . . .189
Convenience settings . . . . . . . . . . .165
Folding in/out (automatically). . ..1 89
Folding in/out (electrically).. . . . .189
Malfunction . . . . . . . . . . . . . . . . . .362
Parking position . . . . . . . . . . . . . . .191
Storing settings . . . . . . . . . . . . . . .190 Exterior view
Overview . . . . . . . . . . . . . . . . . . . . .24 F
Fault message see Display message . . . . . . . . . . .316
Favourites (COMAND) . . . . . . . . . . ..163
Fire extinguisher . . . . . . . . . . . . . . . .314
First-aid kit . . . . . . . . . . . . . . . . . . . . .314
Flat tyre Equipment . . . . . . . . . . . . . . . . . . .373
MOExtended run-flat system . . . . .381
Preparing the vehicle . . . . . . . . . . .373
TIREFIT kit . . . . . . . . . . . . . . . . . . .373
Floormat . . . . . . . . . . . . . . . . . . . . . . .287
Foglamps Display message . . . . . . . . . . . . . .345
Fording . . . . . . . . . . . . . . . . . . . . . . . .305
Frequencies Garage door opene r.. . . . . . . . . . .408
Front airbag . . . . . . . . . . . . . . . . . . . . .40
Front multicontour seat (COMAND) 173
Front-passenger airbag . . . . . . . . . . ..40
Front-passenger seat Adjusting from the driver's seat . . .184
Fuel . . . . . . . . . . . . . . . . . . . . . . . . . . .397
Gauge . . . . . . . . . . . . . . . . . . . . . . . .27
Loss . . . . . . . . . . . . . . . . . . . . . . . .357
Petrol . . . . . . . . . . . . . . . . . . . . . . .291
Fuel consumption
Current (on-board computer) . . . . .216
Notes . . . . . . . . . . . . . . . . . . . . . . .397
Fuel filler flap
Opening/closing . . . . . . . . . . . . . .290
Fuel gauge . . . . . . . . . . . . . . . . . . . . . .27
Fuel level Calling up the range (on-board
computer) . . . . . . . . . . . . . . . . . . .216
Fuel line
Malfunction . . . . . . . . . . . . . . . . . .357
Fuel tank
Defect . . . . . . . . . . . . . . . . . . . . . .357
Function buttons (COMAND) . . . . . ..60
Fuse allocation chart . . . . . . . . . . ..389 Index
9 216_AKB; 2; 3, en-GB
bjanott,
Version: 2.11.7.7 2009-02-27T14:54:17+01:00 - Seite 9Dateiname: 6515230602_buchblock.pdf; erzeugt am 04. Mar 2009 11:14:35; WK
Page 13 of 421

Fuse box
Dashboard . . . . . . . . . . . . . . . . . . .389
Engine compartment . . . . . . . . . . .390
Rea r.. . . . . . . . . . . . . . . . . . . . . . .390
Fuses . . . . . . . . . . . . . . . . . . . . . . . . . .389 G
Garage door Opening/closing (with the remote
control) . . . . . . . . . . . . . . . . . . . . .286
Garage door opener . . . . . . . . . . . . ..285
Clearing the memory . . . . . . . . . . .286
Frequencies . . . . . . . . . . . . . . . . . .408
Programming the remote control . .285
Gear indicator . . . . . . . . . . . . . . . . . .208
Gear indicator (on-board computer) 220
Genuine Mercedes-Benz parts . . . ..394
Glove compartment . . . . . . . . . . . . ..276 H
Hands-free system Switching on/off . . . . . . . . . . . . . .114
Switching to the mobile phone . . .116
Headlamp cleaning system . . . . . ..295
Headlamps Cleaning . . . . . . . . . . . . . . . . . . . . .309
Cleaning system . . . . . . . . . . . . . . .197
Misting up . . . . . . . . . . . . . . . . . . .360
Head restraints
Rear compartment . . . . . . . . . . . . .186
Heating
see Air conditioning
High-pressure cleaners . . . . . . . . . ..308
Hill start assist . . . . . . . . . . . . . . . . .204
HOLD . . . . . . . . . . . . . . . . . . . . . . . . . .245
Display message . . . . . . . . . . . . . .322
HomeLink ®
see Garage door opener I
Immobiliser . . . . . . . . . . . . . . . . . . . . .54
Indicator and warning lamp Automatic child seat recognition
(malfunction ).. . . . . . . . . . . . . . . .350
Brakes (red ).. . . . . . . . . . . . .352, 354
Brakes (yellow) . . . . . . . . . . . . . . . .354 Engine diagnostics . . . . . . . . . . . .
.354
ESP ®
. . . . . . . . . . . . . . . . . . . . . . .352
PASSENGER AIRBAG OFF . . . .44, 350
Reserve fuel . . . . . . . . . . . . . . . . . .356
Seat belt . . . . . . . . . . . . . . . . . . . . .355
SRS . . . . . . . . . . . . . . . . . . . . .37, 353
Indicator lamp
Display message . . . . . . . . . . . . . .344
see Indicator and warning lamp . . .351
Instrument cluster . . . . . . . . . . . . ..212
Overview . . . . . . . . . . . . . . . . . . . . .27
Intelligent Light System . . . . . . . . ..197
Display message . . . . . . . . . .323, 346
Menu (on-board computer) . . . . . .225
Tourist mode . . . . . . . . . . . . . . . . .225
Interior lighting
Ambient light (COMAND) . . . . . . . .166
Automatic control system . . . . . . .199
Emergency lighting . . . . . . . . . . . .199
Interior lighting . . . . . . . . . . . . . . . .166
Manual control . . . . . . . . . . . . . . . .198
Reading lamp . . . . . . . . . . . . . . . . .198
Interior motion sensor . . . . . . ..55, 167
ISOFIX child seat securing system ..47 J
Jack Operation . . . . . . . . . . . . . . . . . . . .378
Storage location . . . . . . . . . . . . . . .315
Jump-starting . . . . . . . . . . . . . . . . . . .384
Jump leads . . . . . . . . . . . . . . . . . . .384 K
Key . . . . . . . . . . . . . . . . . . . . . . . . . . .178
Checking the battery . . . . . . . . . . .367
Convenience closing . . . . . . . . . . .201
Convenience opening . . . . . . . . . . .201
Display message . . . . . . . . . . . . . .340
Loss . . . . . . . . . . . . . . . . . . . . . . . .363
Malfunction . . . . . . . . . . . . . . . . . .362
Modifying the programming . . . . . .179
KEYLESS GO
Button . . . . . . . . . . . . . . . . . . . . . .182
Changing the battery . . . . . . . . . . .368
Checking the battery . . . . . . . . . . .367
Convenience closing . . . . . . . . . . .202 10
Index 216_AKB; 2; 3, en-GB
bjanott,
Version: 2.11.7.7 2009-02-27T14:54:17+01:00 - Seite 10Dateiname: 6515230602_buchblock.pdf; erzeugt am 04. Mar 2009 11:14:35; WK
Page 174 of 421
X
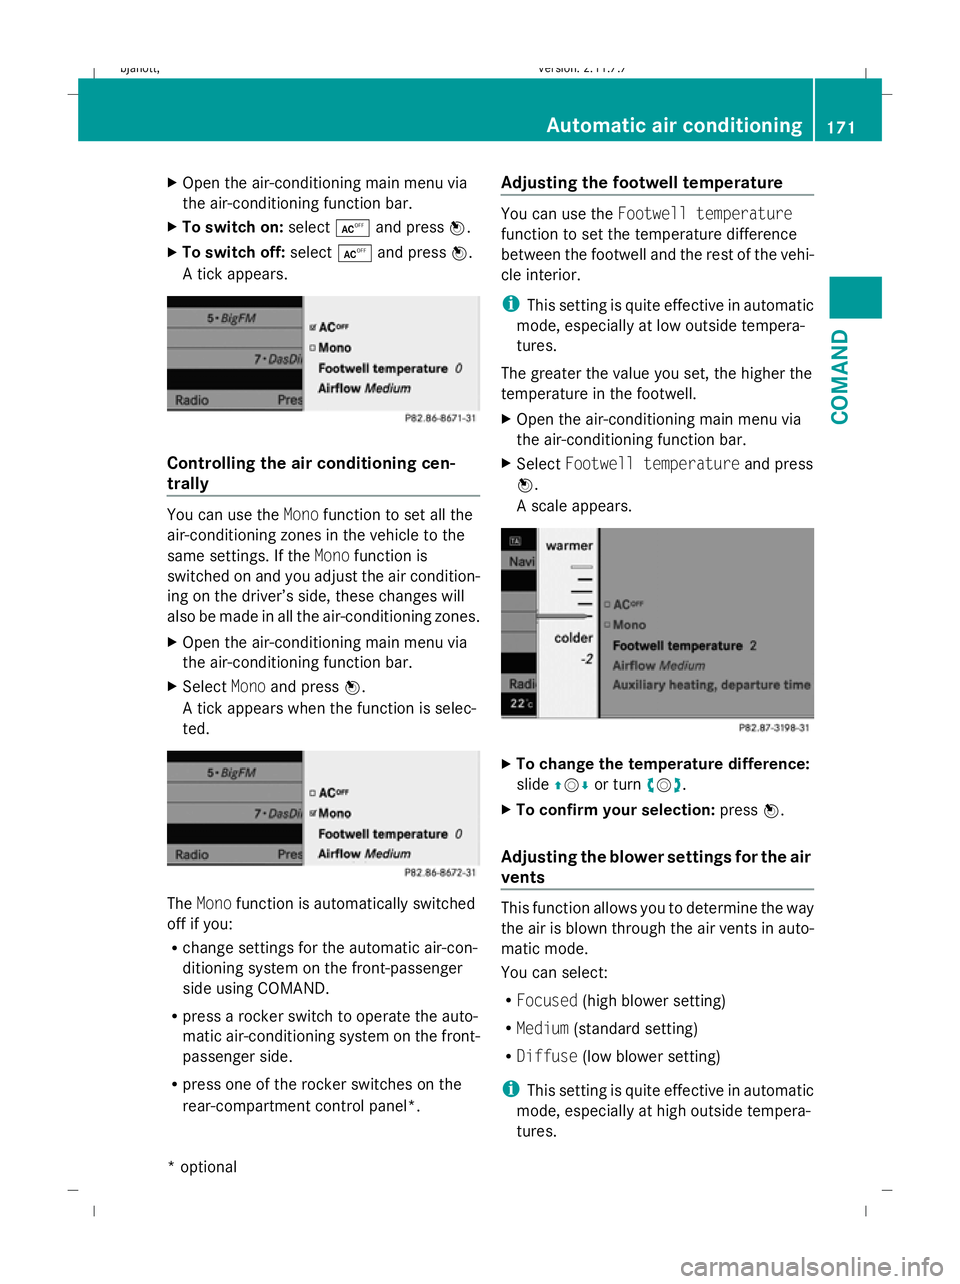
Open the air-conditioning main menu via
the air-conditioning function bar.
X To switch on: selectÆand press W.
X To switch off: selectÆand press W.
A tick appears. Controlling the air conditioning cen-
trally
You can use the
Monofunction to set all the
air-conditioning zones in the vehicle to the
same settings. If the Monofunction is
switched on and you adjust the air condition-
ing on the driver’s side, these changes will
also be made in all the air-conditioning zones.
X Open the air-conditioning main menu via
the air-conditioning function bar.
X Select Monoand press W.
A tick appears when the function is selec-
ted. The
Mono function is automatically switched
off if you:
R change settings for the automatic air-con-
ditioning system on the front-passenger
side using COMAND.
R press a rocker switch to operate the auto-
matic air-conditioning system on the front-
passenger side.
R press one of the rocker switches on the
rear-compartment control panel*. Adjusting the footwell temperature You can use the
Footwell temperature
function to set the temperature difference
between the footwell and the rest of the vehi-
cle interior.
i This setting is quite effective in automatic
mode, especially at low outside tempera-
tures.
The greater the value you set, the higher the
temperature in the footwell.
X Open the air-conditioning main menu via
the air-conditioning function bar.
X Select Footwell temperature and press
W.
A scale appears. X
To change the temperature difference:
slide ZVÆ or turn cVd.
X To confirm your selection: pressW.
Adjusting the blower settings for the air
vents This function allows you to determine the way
the air is blown through the air vents in auto-
matic mode.
You can select:
R
Focused (high blower setting)
R Medium (standard setting)
R Diffuse (low blower setting)
i This setting is quite effective in automatic
mode, especially at high outside tempera-
tures. Automatic air conditioning
171COMAND
* optional
216_AKB; 2; 3, en-GB
bjanott,
Version: 2.11.7.7 2009-02-27T14:54:17+01:00 - Seite 171 Z
Dateiname: 6515230602_buchblock.pdf; erzeugt am 04. Mar 2009 11:15:32; WK
Page 241 of 421
Activating when driving towards a sta-
tionary vehicle
If the vehicle in front of you is stationary, you
can only activate Distronic Plus once your
vehicle is stationary as well.
X Briefly pull the cruise control lever towards
you ?.
Distronic Plus is selected.
i Distronic Plus can only be activated at
under 30 km/h if a vehicle in front has been
detected. Therefore, the Distronic Plus dis-
tance display in the instrument cluster
should be activated.
X Keep the cruise control lever pressed
up : or down Auntil the desired speed
is set.
i You can use the cruise control lever to set
the stored speed and the thumbwheel on
the cruise control lever to set the specified
minimum distance (Y page 239).
Pulling away
X If the vehicle in front pulls away: remove
your foot from the brake pedal.
X Briefly pull the cruise control lever towards
you ?.
or
X Accelerate briefly.
Your vehicle pulls away and adapts its
speed to that of the vehicle in front.
Driving
If there is no vehicle in front, Distronic Plus
operates in the same way as cruise control.
If a slower-moving vehicle is detected in front,
Distronic Plus causes your vehicle to brake
and maintain a preset distance to the vehicle
in front.
If Distronic Plus detects a faster-moving vehi-
cle in front, it increases the driving speed, but
only up to the stored speed. G
Risk of accident
If you depress the brake, Distronic Plus is
deactivated unless your vehicle is stationary.
Distronic Plus then no longer brakes your
vehicle. The driver remains fully responsible
for the vehicle's distance from other vehicles,
its speed and for braking in good time.
Stopping G
Risk of accident
The Distronic Plus braking effect is cancelled
and the vehicle could roll away if:
R Distronic Plus is deactivated using the
cruise control lever.
R you accelerate.
R the system or the power supply is disrup-
ted, e.g. due to battery failure.
R the electrical system in the engine com-
partment or the fuses have been tampered
with.
R the battery is disconnected. G
Risk of accident
Never get out of the vehicle when Distronic
Plus is activated.
Distronic Plus must never be operated or
deactivated by a passenger or from outside
the vehicle.
Distronic Plus does not replace the electric
parking brake and must not be used for park-
ing.
If you wish to leave the vehicle or park it,
deactivate Distronic Plus and secure the vehi-
cle against rolling away.
If Distronic Plus detects that the vehicle in
front is stopping, it brakes your vehicle until
it is stationary.
Once your vehicle is stationary, it remains
stationary and you do not need to depress the
brake.
i After a time, the electric parking brake
secures the vehicle and relieves the service
brake. 238
Driving syste
msControls
216_AKB; 2; 3, en-GB
bjanott, Version: 2.11.7.7 2009-02-27T14:54:17+01:00 - Seite 238
Dateiname: 6515230602_buchblock.pdf; erzeugt am 04. Mar 2009 11:15:58; WK
Page 249 of 421
X
Rapidly continue to depress the brake until
HOLD :appears in the instrument cluster.
HOLD is activated. You can release the
brake pedal.
i You cannot activate HOLD when Distronic
Plus* is activated.
i The brake pedal does not return com-
pletely to the rest position while HOLD is
activated.
i If HOLD is not activated when you
depress the brake pedal, wait for a short
time and then try again. G
Risk of accident
The vehicle's brakes are applied when HOLD
is activated. For this reason, deactivate HOLD
if the vehicle is to be set in motion by other
means (e.g. in a car wash or by towing).
Deactivating HOLD HOLD is deactivated if:
R
you depress the accelerator pedal with the
transmission in position Dor R.
R you shift the automatic transmission to P.
R you release the brakes fully and apply them
again with a certain amount of pressure
until HOLD goes out in the instrument clus-
ter.
R you secure the vehicle using the electric
parking brake.
R you activate Distronic Plus*.
i After a time, the electric parking brake
secures the vehicle and relieves the service
brake. G
Risk of accident
Never get out of the vehicle when HOLD is
activated.
HOLD must never be operated or deactivated
by a passenger or from outside the vehicle. HOLD does not replace the electric parking
brake and must not be used for parking.
The HOLD braking effect is cancelled and the
vehicle can start moving if:
R HOLD is deactivated by depressing the
accelerator pedal or the brake pedal.
R there is a malfunction in the system or an
interruption in the power supply, e.g. bat-
tery failure.
R the electrical system in the engine com-
partment, the battery or the fuses are tam-
pered with.
R the battery is disconnected. G
Risk of accident
If you wish to leave the vehicle or park it,
deactivate HOLD and secure the vehicle
against rolling away. AIRMATIC*
Vehicle level Your vehicle automatically adjusts its ride
height to reduce petrol consumption and
improve driving safety.
The "Normal" and "Raised" vehicle levels can
be set.
Depending on the vehicle height that has
been set, the vehicle automatically adjusts its
height dependent on the current speed. The
vehicle is lowered by up to 10 mm as the
speed increases. As the speed is reduced, the
vehicle is raised up to the set vehicle height.
Setting the vehicle level manually
Select the "Normal" setting for normal road
surfaces and "Raised" for driving with snow
chains or on particularly poor road surfaces.
G
Risk of injury
Make sure that nobody is in the vicinity of the
wheel housing or under the vehicle while low-
ering the vehicle when it is stationary. Other-
wise, limbs could become trapped. 246
Driving sys
temsControls
* optional
216_AKB; 2; 3, en-GB
bjanott,
Version: 2.11.7.7 2009-02-27T14:54:17+01:00 - Seite 246
Dateiname: 6515230602_buchblock.pdf; erzeugt am 04. Mar 2009 11:16:01; WK
Page 310 of 421
Service A .. km overdue
i
If you fail to have the service performed
by the specified date, you may be violating
applicable laws. Your warranty may be inva-
lidated and goodwill settlements may be
refused. Calling up the service due date
Use the buttons on the multi-function steer-
ing wheel.
X Switch on the ignition.
X Press the =or; button to select the
Service menu.
X Press the 9or: button to select
ASSYST PLUS.
X Press a.
The multi-function display shows the
service due date. Care
Care and cleaning products
Regular care of your vehicle is a condition for
retaining the quality in the long term.
To care for your vehicle, use the care and
cleaning products recommended and
approved by Mercedes-Benz.
! For cleaning your vehicle, do not use any
of the following:
R dry, coarse or rough cloths
R abrasive cleaning agents
R solvents
R cleaning agents containing solvents
and do not scour.
Do not touch the surfaces or protective
films with hard objects, e.g. rings or ice
scrapers. You can otherwise scratch or
damage the surfaces or protective films. H
Environmental note
Dispose of empty packaging, cleaning cloths
and polishing wads in an environmentally
responsible manner.
! Do not park the vehicle for a long period
of time directly after cleaning, especially if
the wheels have just been cleaned with a
wheel cleaner. Wheel cleaners could cause
rapid corrosion of the brake discs and
brake pads/linings. After cleaning, park
the vehicle when it is at normal operating
temperature. Exterior care
Automatic car wash G
Risk of accident
The vehicle is braked when Hold or Distronic
Plus* is activated. Therefore, deactivate Hold
and Distronic Plus before the vehicle is
washed in an automatic car wash.
You can wash the vehicle in an automatic car
wash from the beginning.
! We recommend automatic car washes
with an adjustable 36
high-pressure pre-
cleaning program. In car washes that use
high water pressures, there is a danger that
a small quantity of water may leak into the
vehicle.
If the vehicle is very dirty, pre-wash it before
cleaning it in an automatic car wash.
! Make sure that the automatic car wash is
suitable for the size of the vehicle. Fold in
the exterior mirrors before the vehicle is
washed. There is otherwise a risk of dam-
age to the exterior mirrors.
! When washing your vehicle in a tow-
through car wash, make sure that the auto-
matic transmission is in position N, other-
wise the vehicle could be damaged.
36 In accordance with the specifications for cabriolet programs. Care
307Operation
* optional
216_AKB; 2; 3, en-GB
bjanott,
Version: 2.11.7.7 2009-02-27T14:54:17+01:00 - Seite 307 Z
Dateiname: 6515230602_buchblock.pdf; erzeugt am 04. Mar 2009 11:16:30; WK
Page 316 of 421
Where will I find...?
...........................314
Display messages ............................. 316
Troubleshooting ................................ 349
Locking/unlocking in an emer-
gency ................................................. 365
Replacing batteries (key, remote
control, etc.) ...................................... 367
Changing bulbs ................................. 369
Replacing the wiper blades ..............372
Flat tyre ............................................. 373
Battery ............................................... 382
Towing and tow-starting ..................386
Fuses .................................................. 389 313Practical advice
216_AKB; 2; 3, en-GB
bjanott,
Version: 2.11.7.7 2009-02-27T14:54:17+01:00 - Seite 313
Dateiname: 6515230602_buchblock.pdf; erzeugt am 04. Mar 2009 11:16:32; WK
Page 392 of 421
Fuses
Notes on changing fuses
The fuses in your vehicle serve to close down
faulty circuits. If a fuse blows, all the compo-
nents on the circuit and their functions will
fail.
Blown fuses must be replaced with fuses of
the same rating, which you can recognise by
the colour and value. The fuse ratings are lis-
ted in the fuse allocation chart. A Mercedes-
Benz Service Centre will be happy to advise
you. G
Risk of fire
Only use fuses that have been approved for
Mercedes-Benz vehicles and which have the
required fuse rating for the systems con-
cerned. Do not attempt to repair or bridge
faulty fuses. A circuit overload could other-
wise cause a fire. Have the cause traced and
rectified at a qualified specialist workshop,
e.g. a Mercedes-Benz Service Centre.
If the newly inserted fuse also blows, have the
cause traced and rectified at a qualified spe-
cialist workshop, e.g. a Mercedes-Benz
Service Centre.
! Only use fuses that have been approved
for Mercedes-Benz vehicles and which
have the correct fuse rating for the system
concerned. Otherwise, components or sys-
tems could be damaged.
! Turn off the internal on-board electrical
system of the vehicle if you are carrying out
work on the fuses. Further information can
be found in the index under "Disconnecting
the battery".
The fuses are located in various fuse boxes:
R fuse boxes on the right-hand and left-hand
sides of the dashboard
R fuse box in the engine compartment on the
left-hand side of the vehicle R
fuse box in the engine compartment on the
right-hand side of the vehicle
R fuse box in the rear
Fuse allocation chart The fuse allocation chart is located with the
vehicle tool kit in the stowage well under the
boot floor (Y
page 280). Before changing a fuse
X Park the vehicle.
X Switch off all electrical consumers.
X Remove the key from the ignition lock. Dashboard fuse boxes
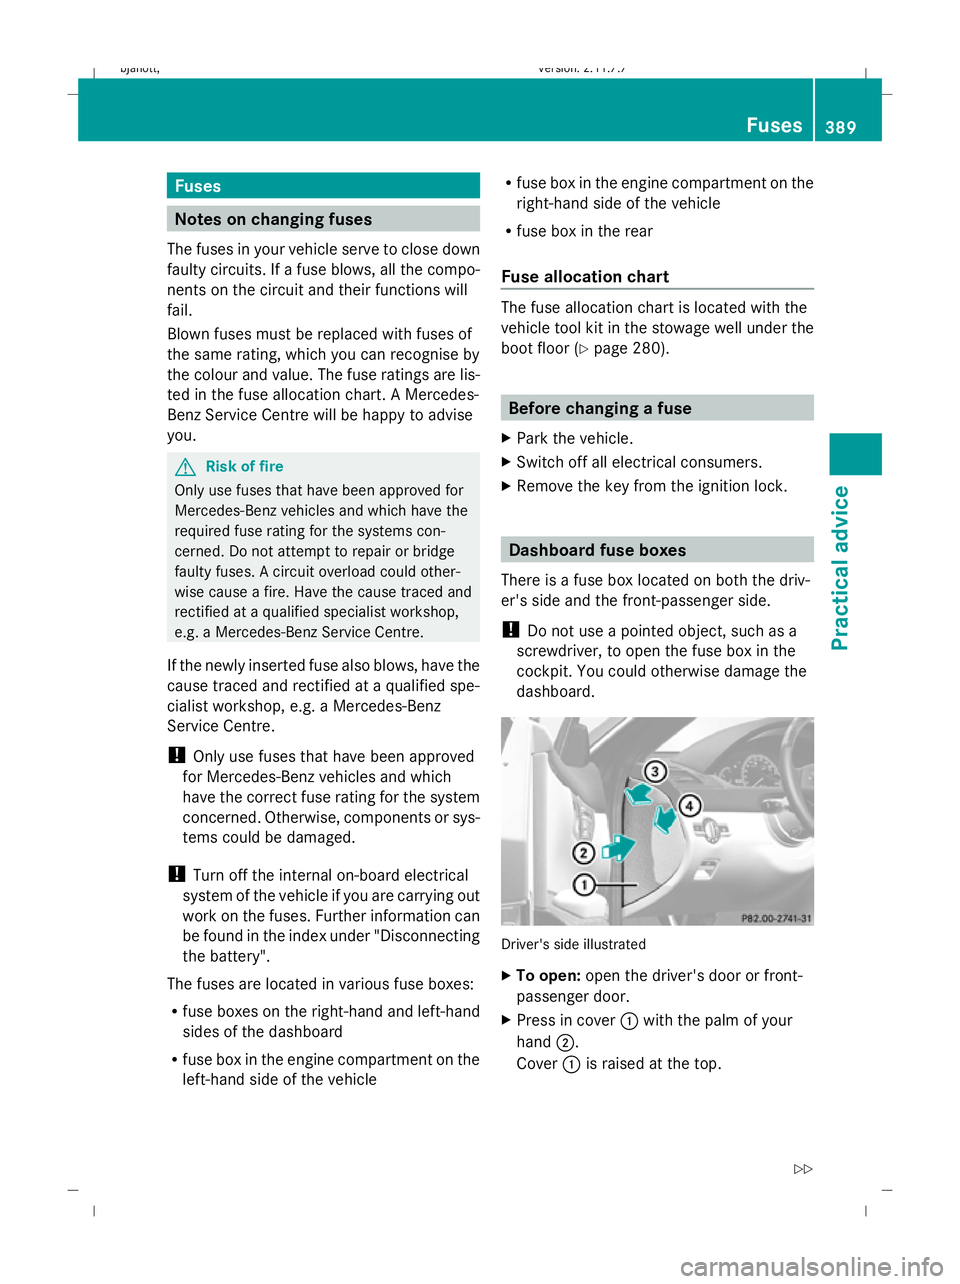
There is a fuse box located on both the driv-
er's side and the front-passenger side.
! Do not use a pointed object, such as a
screwdriver, to open the fuse box in the
cockpit. You could otherwise damage the
dashboard. Driver's side illustrated
X
To open: open the driver's door or front-
passenger door.
X Press in cover :with the palm of your
hand ;.
Cover :is raised at the top. Fuses
389Practical advice
216_AKB; 2; 3, en-GB
bjanott,V ersion: 2.11.7.7
2009-02-27T14:54:17+01:00 - Seite 389 Z
Dateiname: 6515230602_buchblock.pdf; erzeugt am 04. Mar 2009 11:16:54; WK
Page 393 of 421
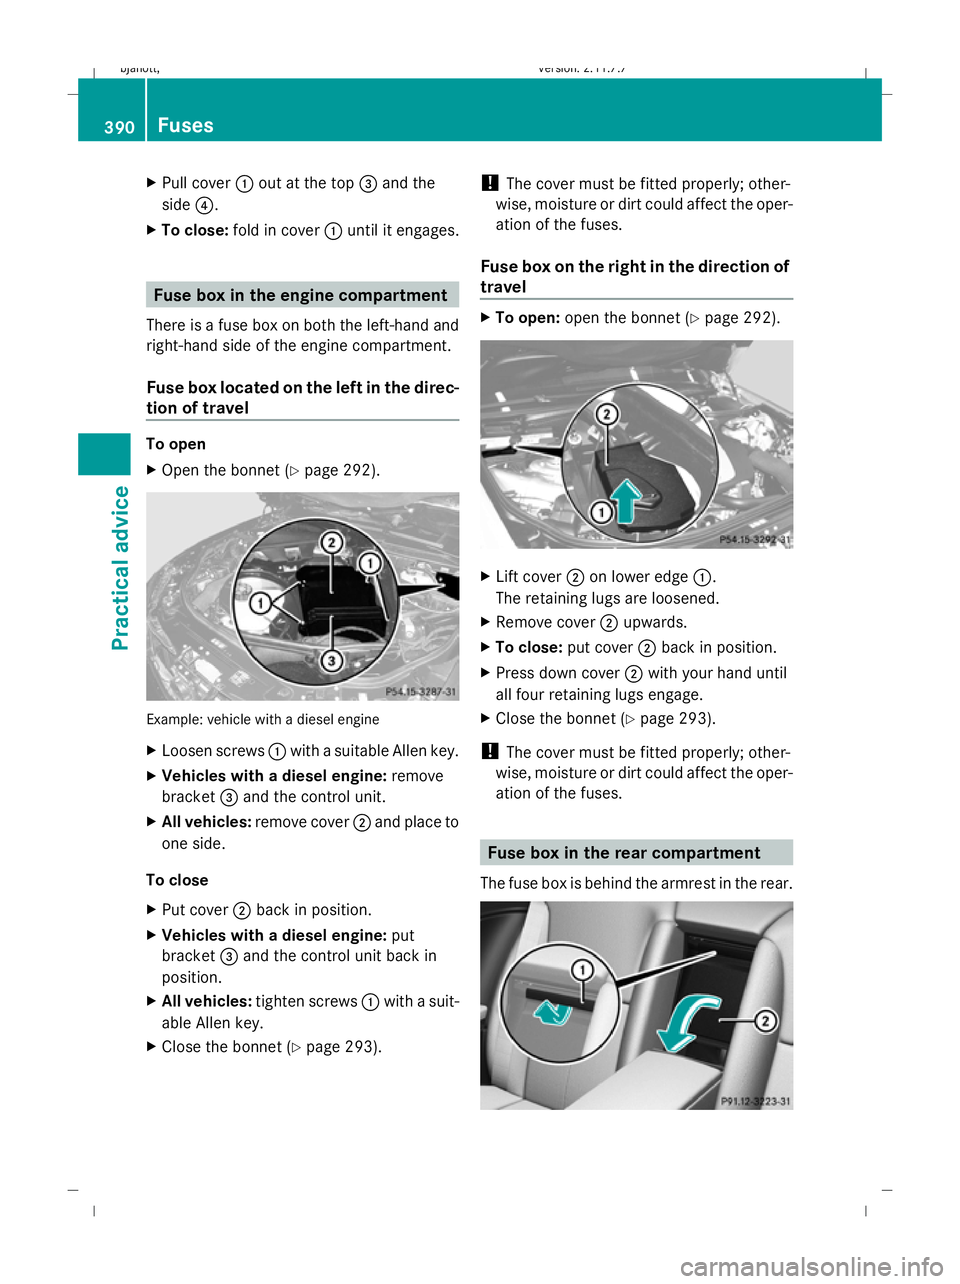
X
Pull cover :out at the top =and the
side ?.
X To close: fold in cover :until it engages. Fuse box in the engine compartment
There is a fuse box on both the left-hand and
right-hand side of the engine compartment.
Fuse box located on the left in the direc-
tion of travel To open
X
Open the bonnet (Y page 292). Example: vehicle with a diesel engine
X
Loosen screws :with a suitable Allen key.
X Vehicles with a diesel engine: remove
bracket =and the control unit.
X All vehicles: remove cover ;and place to
one side.
To close
X Put cover ;back in position.
X Vehicles with a diesel engine: put
bracket =and the control unit back in
position.
X All vehicles: tighten screws :with a suit-
able Allen key.
X Close the bonnet (Y page 293). !
The cover must be fitted properly; other-
wise, moisture or dirt could affect the oper-
ation of the fuses.
Fuse box on the right in the direction of
travel X
To open: open the bonnet (Y page 292). X
Lift cover ;on lower edge :.
The retaining lugs are loosened.
X Remove cover ;upwards.
X To close: put cover;back in position.
X Press down cover ;with your hand until
all four retaining lugs engage.
X Close the bonnet (Y page 293).
! The cover must be fitted properly; other-
wise, moisture or dirt could affect the oper-
ation of the fuses. Fuse box in the rear compartment
The fuse box is behind the armrest in the rear. 390
FusesPractical advice
216_AKB; 2; 3, en-GB
bjanott,
Version: 2.11.7.7 2009-02-27T14:54:17+01:00 - Seite 390
Dateiname: 6515230602_buchblock.pdf; erzeugt am 04. Mar 2009 11:16:55; WK
Page 394 of 421
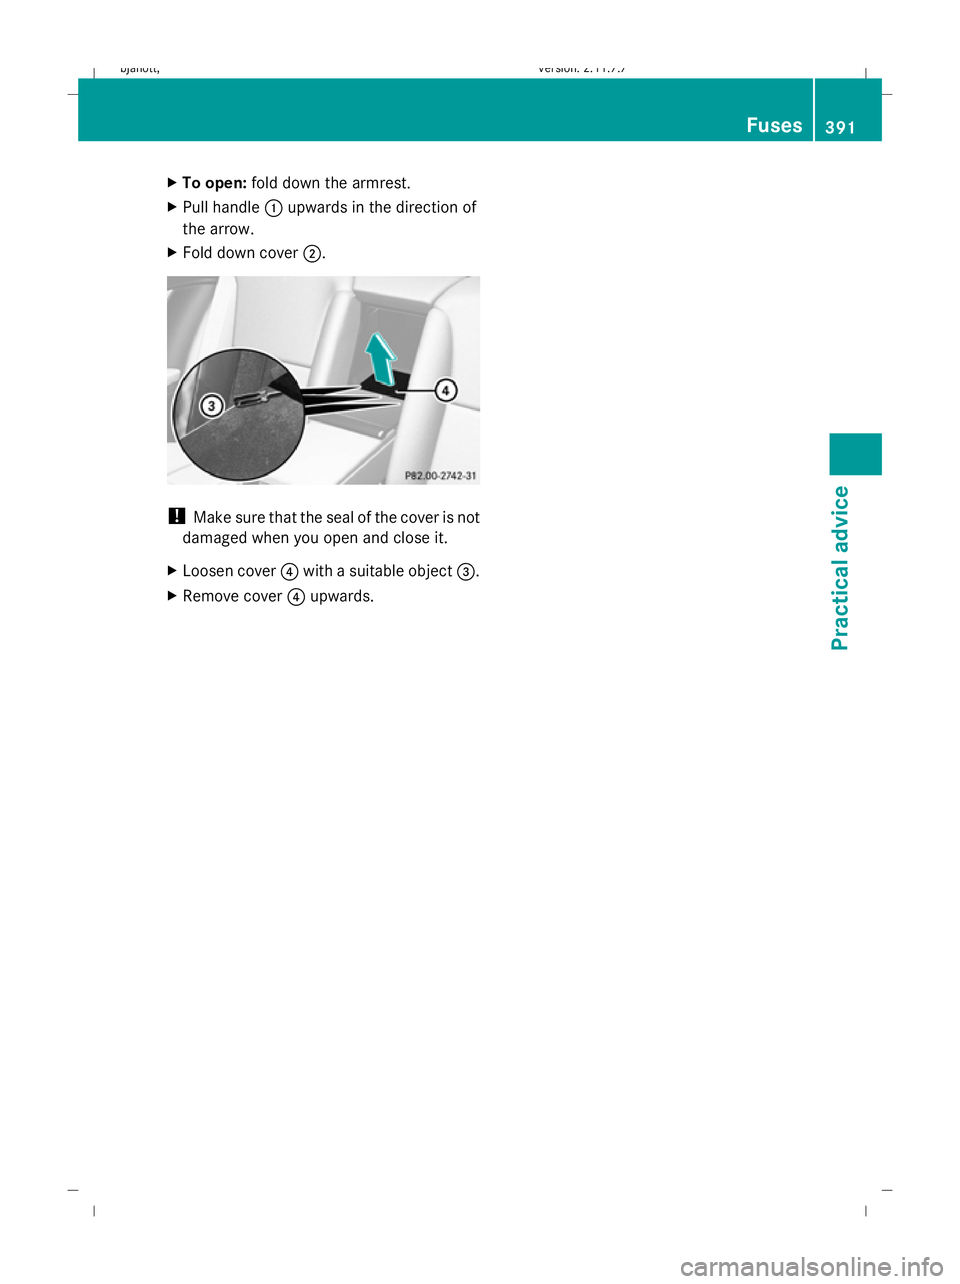
X
To open: fold down the armrest.
X Pull handle :upwards in the direction of
the arrow.
X Fold down cover ;. !
Make sure that the seal of the cover is not
damaged when you open and close it.
X Loosen cover ?with a suitable object =.
X Remove cover ?upwards. Fuses
391Practical advice
216_AKB; 2; 3, en-GB
bjanott, Version: 2.11.7.7 2009-02-27T14:54:17+01:00 - Seite 391 Z
Dateiname: 6515230602_buchblock.pdf; erzeugt am 04. Mar 2009 11:16:55; WK