check engine MERCEDES-BENZ CL500 2000 W140 User Guide
[x] Cancel search | Manufacturer: MERCEDES-BENZ, Model Year: 2000, Model line: CL500, Model: MERCEDES-BENZ CL500 2000 W140Pages: 424, PDF Size: 25.71 MB
Page 242 of 424
237 Automatic transmission
Te ch n ica l
data Instruments
and controlsOperationDrivingInstrument
cluster displayPractical hints Car care Index WWinter/Wet (snow and ice) mode
Press switch on symbol “W”. The vehicle starts
out in 2nd gear, except with selector lever in 1st
gear, or with accelerator pedal in kick-down
position.
The “W” mode helps to improve traction and
driving stability of the vehicle.
The gear shifting process occurs at lower vehicle
and engine speeds than in the “S” program mode.
Caution!
Never change the program mode when the selector lever
is out of position “P”. It could result in a change of
driving characteristics for which you may not be
prepared.
Important!
Always be certain of the program mode selected since
the vehicle driving characteristics change with the
selection of the program mode.
Dependent on the program mode selector switch
position “S” or “W” and the gear selector lever in
position “R”, the ratio of power transmission changes.Emergency operation
(Limp home mode)
If vehicle acceleration worsens or the transmission no
longer shifts, the transmission is most likely operating
in Limp Home Mode which engages when there is a
malfunction of the transmission. This condition may be
accompanied by the “CHECK ENGINE” malfunction
indicator lamp in the instrument cluster coming on.
In this mode only the 2nd gear or reverse gear can be
activated.
To engage 2nd gear or reverse:
1. Sto p t h e v e h i c l e .
2. Move selector lever to position “P”.
3. Turn off the engine.
4. Wait approx. 10 seconds.
5. Restart the engine.
6. Move selector lever to position “D” (for 2nd gear), or
move selector lever to position “R” (for reverse gear).
Have the transmission checked at your authorized
Mercedes-Benz Center as soon as possible.
Page 245 of 424
240 Driving instructions
Te ch n ica l
data Instruments
and controlsOperationDrivingInstrument
cluster displayPractical hints Car care Index
Pedals
Power assistanceBrakes
The condition of the parking brake system is checked
each time the vehicle is in the shop for the required
maintenance service.
If the parking brake is released and the brake warning
lamp in the instrument cluster stays on, the brake fluid
level in the reservoir is too low.
Brake pad wear or a leak in the system may be the
reason for low brake f luid in the reservoir.
Wa r n i n g !
Keep driver’s foot area clear at all times. Objects
stored in this area may impair pedal movement.Wa r n i n g !
When the engine is not running, the brake and
steering systems are without power assistance.
Under these circumstances, a much greater effort is
necessary to stop or steer the vehicle.
Wa r n i n g !
After driving in heavy rain for some time without
applying the brakes or through water deep enough
to wet brake components, the first braking action
may be somewhat reduced and increased pedal
pressure may be necessary to obtain expected
braking effect. Be sure to maintain a safe distance
from vehicles in front.Resting your foot on the brake pedal will cause
excessive and premature wear of the brake pads.It can also result in the brakes overheating thereby
significantly reducing their effectiveness. It may
not be possible to stop the vehicle in sufficient time
to avoid an accident.
Page 246 of 424
241 Driving instructions
Te ch n ica l
data Instruments
and controlsOperationDrivingInstrument
cluster displayPractical hints Car care Index Have the brake system inspected at an authorized
Mercedes-Benz Center immediately.
All checks and service work on the brake system should
be carried out by an authorized Mercedes-Benz Center.
Install only brake pads and brake fluid recommended by
Mercedes-Benz.Caution!
When driving down long and steep grades, relieve the
load on the brakes by shifting into a lower gear to use
the engine’s braking power. This helps prevent
overheating of the brakes and reduces brake pad wear.
After hard braking, it is advisable to drive on for some
time, rather than immediately parking, so the air stream
will cool down the brakes faster.
Driving off
Apply the service brakes to test them briefly after
driving off. Perform this procedure only when the road
is clear of other traffic.
Warm up the engine smoothly. Do not place full load on
the engine until the operating temperature has been
reached.
When starting off on a slippery surface, do not allow one
drive wheel to spin for an extended period with the ESP
switched off. Doing so may cause serious damage to the
drive train which is not covered by the Mercedes-Benz
Limited Warranty.
Wa r n i n g !
If other than recommended brake pads are
installed, or other than recommended brake fluid
is used, the braking properties of the vehicle can be
degraded to an extent that safe braking is
substantially impaired. This could result in an
accident.
Page 252 of 424
247 Driving instructions
Te ch n ica l
data Instruments
and controlsOperationDrivingInstrument
cluster displayPractical hints Car care Index Winter driving
Have your vehicle winterized at your authorized
Mercedes-Benz Center before the onset of winter.
•Change the engine oil if the engine contains an oil
which is not approved for winter operation. For
viscosity (SAE/CCMC class) and filling quantity,
see page 395.
•Check engine coolant anticorrosion/antifreeze
concentration.
•Additive for the windshield washer and headlamp
cleaning system: Add MB Concentrate “S” to a
premixed windshield washer solvent/antifreeze
which is formulated for below freezing
temperatures, see page 334.•Test battery: Battery capacity drops with decreasing
ambient temperature. A well charged battery helps
to ensure that the engine can be started, even at low
ambient temperatures.
•Tires: We recommend M+S rated radial-ply tires on
all four wheels for the winter season. Observe
permissible maximum speed for M+S rated
radial-ply tires and the legal speed limit.
In winter operation, the maximum effectiveness of the
ABS and ESP can only be achieved with M+S rated
radial-ply tires and/or snow chains recommended by
Mercedes-Benz. Snow chains maximize performance.
Page 256 of 424
251 Driving systems
Te ch n ica l
data Instruments
and controlsOperationDrivingInstrument
cluster displayPractical hints Car care Index 3Canceling
To cancel the cruise control, briefly push lever to
position 3.
When you step on the brake pedal or the vehicle
speed drops below approx. 25 mph (40 km/h), for
example when driving upgrade, the cruise control
will be canceled.
If the illuminated speedometer segments begin to
blink (e.g. when aquaplaning or when moving the
gear selector lever to position “N” while driving), the
cruise control is automatically switched off.
If the cruise control cancels by itself and remains
inoperative until the engine is restarted, have the
system checked at your authorized Mercedes-Benz
Center as soon as possible.4Resume
If the lever is briefly pushed to position 4 when
driving at a speed exceeding approx. 25 mph
(40 km/h), the vehicle resumes the speed which
was set prior to the cancellation of the cruise
control.
The selected speed is shown for approx. 5 seconds
in the multifunction display, and the corresponding
speedometer segments from the selected speed to
the vehicle maximum speed are illuminated.
The last memorized speed is canceled when the
electronic key in the starter switch is turned to
position 1 or 0.
Important!
Moving gear selector lever to position “N” switches the
cruise control off.
Page 262 of 424
257 Driving systems
Te ch n ica l
data Instruments
and controlsOperationDrivingInstrument
cluster displayPractical hints Car care Index •For a more precise setting the speed can be
increased in increments of 1 mph (Canada: 1 km/h)
by briefly pulling the control lever in direction (4).
Caution!
If the driver’s foot is not fully removed from the
accelerator pedal, the Distronic control system will be
overridden and it will not regulate the preset vehicle
speed and following distance. The vehicle speed and
following distance will be determined only by the
accelerator pedal position.Invalid attempts to activate
The multifunction display will show “–––” during
invalid attempts to activate Distronic:
•below a speed of approx. 25 mph
(Canada: 30 km/h),
•while the electronic stability program (ESP) is
switched off – ESP warning lampv in
speedometer dial is illuminated, see page 114,
•by moving the distronic control lever in “RESUME”
direction (4) when no speed is stored in memory,
•during the initialization and self-test phase after the
engine is started – this can take up to 2 minutes,
•while depressing the service brake pedal,
•while the parking brake is set – check ;warning
lamp (Canada: !) in instrument cluster, see
page 114,
•with the gear selector lever in position “P”, “R”
or “N” – check gear range indicator display in
instrument cluster, see page 114.
Wa r n i n g !
Distronic brakes (up to 20% of vehicle braking
power) the vehicle to restore the preset distance or
to maintain the speed. The brake pedal is
automatically retracted as this happens.Keep driver’s foot area clear at all times, including
the area under the brake pedal. Objects stored in
this area may impair pedal movement which could
interfere with the braking ability of the Distronic
system.Do not place your foot under the brake pedal – your
foot could become caught.
Page 275 of 424
270 Driving systems
Te ch n ica l
data Instruments
and controlsOperationDrivingInstrument
cluster displayPractical hints Car care Index
ABS control
The ABS malfunction indicator lamp- in the
instrument cluster comes on with the electronic key in
starter switch position 2 and should go out with the
engine running.
When the ABS malfunction indicator lamp in the
instrument cluster comes on while the engine is
running, it indicates that the ABS has detected a
malfunction and has switched off. In this case, the brake
system functions in the usual manner, but without
antilock assistance.
For ABS malfunction indicator lamp, see page 294.
With the ABS malfunctioning, the BAS and ESP are also
switched off. Both malfunction indicator lamps come on
with the engine running.
If the charging voltage falls below 10 volts, the
malfunction indicator lamp comes on and the ABS is
switched off. When the voltage is above this value again,
the malfunction indicator lamp should go out and the
ABS is operational.If the ABS malfunction indicator lamp stays illuminated,
have the system checked at your authorized
Mercedes-Benz Center as soon as possible.
Note:
To alert following vehicles to slippery road conditions
you discover, operate your hazard warning flashers as
appropriate.
Wa r n i n g !
ABS cannot prevent the natural laws of physics
from acting on the vehicle, nor can it increase
braking or steering efficiency beyond that afforded
by the condition of the vehicle brakes and tires or
the traction afforded. The ABS cannot prevent
accidents, including those resulting from excessive
speed in turns, following another vehicle too
closely, or aquaplaning. Only a safe, attentive, and
skillful driver can prevent accidents. The
capabilities of a ABS equipped vehicle must never
be exploited in a reckless or dangerous manner
which could jeopardize the user’s safety or the
safety of others.
Page 277 of 424
272 Driving systems
Te ch n ica l
data Instruments
and controlsOperationDrivingInstrument
cluster displayPractical hints Car care Index
Notes:
The yellow ESP warning lampv in the speedometer
dial comes on with the electronic key in starter switch
position 2. It should go out with the engine running.
If the ESP warning message is displayed, a malfunction
has been detected in the system. Only partial engine
output will be available.
Have the ESP checked at your authorized
Mercedes-Benz Center as soon as possible.
For ESP warning message, see page 303.
With the ABS malfunctioning, the ESP is also switched
off.
Driving the vehicle with varied size tires will cause the
wheels to rotate at different speeds, therefore the ESP
may activate (yellow ESP warning lamp in speedometer
dial comes on). For this reason, all wheels, including the
spare wheel, must have the same tire size. When testing the parking brake on a brake test
dynamometer, the engine must be shut off. Otherwise,
the ESP will immediately be engaged and will apply the
rear wheel brakes.
In winter operation, the maximum effectiveness of the
ESP is only achieved with Mercedes-Benz recommended
M+S rated radial-ply tires and/or snow chains.
Synchronizing ESP
If the power supply was interrupted (battery
disconnected or empty), the ESP warning message may
be displayed with the engine running.
Turn steering wheel completely to the left and then to
the right. The ESP warning message should go out.
Page 290 of 424
285 What you should know at the gas station
Te ch n ica l
data Instruments
and controlsOperationDrivingInstrument
cluster displayPractical hints Car care Index Leaving the engine running and the fuel cap open can
cause the “CHECK ENGINE” lamp to illuminate, see
page 290 for notes on the “CHECK ENGINE” lamp.
Fuel tank capacity approx. 23.2 US gal (88.0 l).
This includes approx. 2.9 US gal (11.0 l) reserve.
Use premium unleaded gasoline:
CL 500, CL 55 AMG:
Posted Octane Index 91 (Average of 96 RON/86 MON).
CL 600:
Posted Octane Index 93 (Average of 98 RON/88 MON).Engine oil
Checking oil level, see instructions on pages 154
and 331.
CL 500 and CL 55 AMG only:
Fill quantity between upper and lower dipstick marking
level: 2.1 US qt (2.0 l).
Recommended engine oils, see Approved Service
Products sheet.
Coolant
For normal replenishing, use water (potable water
quality). For further information refer to page 333.
Page 292 of 424
287 Check regularly and before a long trip
Te ch n ica l
data Instruments
and controlsOperationDrivingInstrument
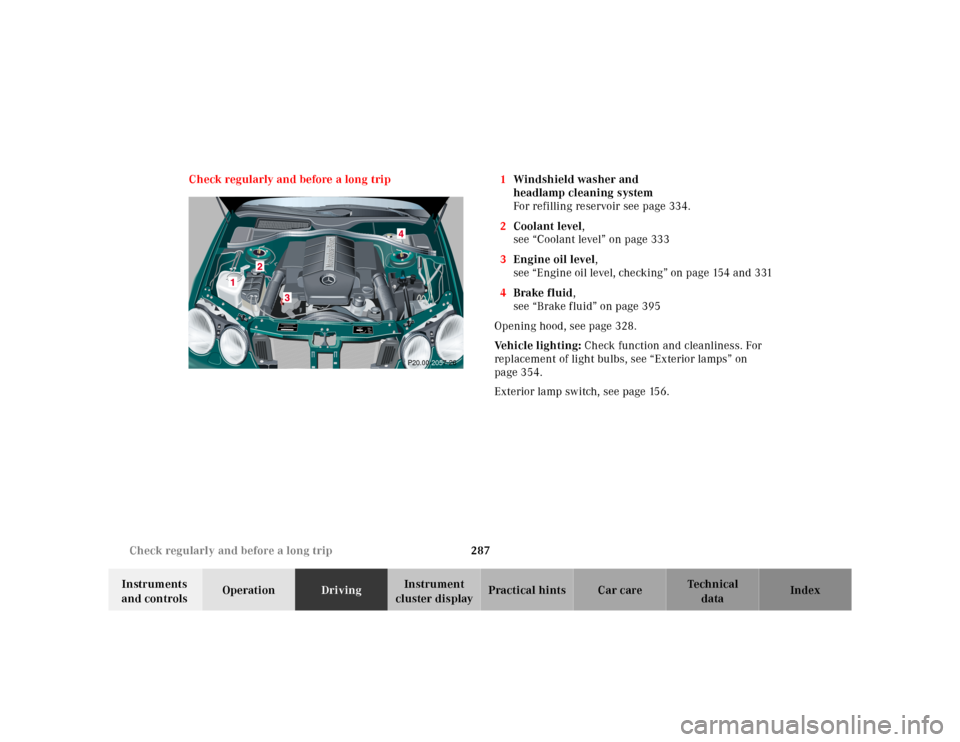
cluster displayPractical hints Car care Index Check regularly and before a long trip 1Windshield washer and
headlamp cleaning system
For refilling reservoir see page 334.
2Coolant level,
see “Coolant level” on page 333
3Engine oil level,
see “Engine oil level, checking” on page 154 and 331
4Brake fluid,
see “Brake fluid” on page 395
Opening hood, see page 328.
Ve h i c l e l i g h t i n g : Check function and cleanliness. For
replacement of light bulbs, see “Exterior lamps” on
page 354.
Exterior lamp switch, see page 156.
P20.00-2057-26