ECO mode MERCEDES-BENZ CL550 2010 W216 User Guide
[x] Cancel search | Manufacturer: MERCEDES-BENZ, Model Year: 2010, Model line: CL550, Model: MERCEDES-BENZ CL550 2010 W216Pages: 500, PDF Size: 9.5 MB
Page 174 of 500
When the audio disc does not contain text
information, COMAND can recognize
unknown audio tracks using the Gracenote
®
Media Database. The respective information
must be stored in the Gracenote ®
Media
Database and the function Gracenote
Media Database in the CD submenu must be
activated.
COMAND will then display the accompanying
data such as artist, album name and track
name.
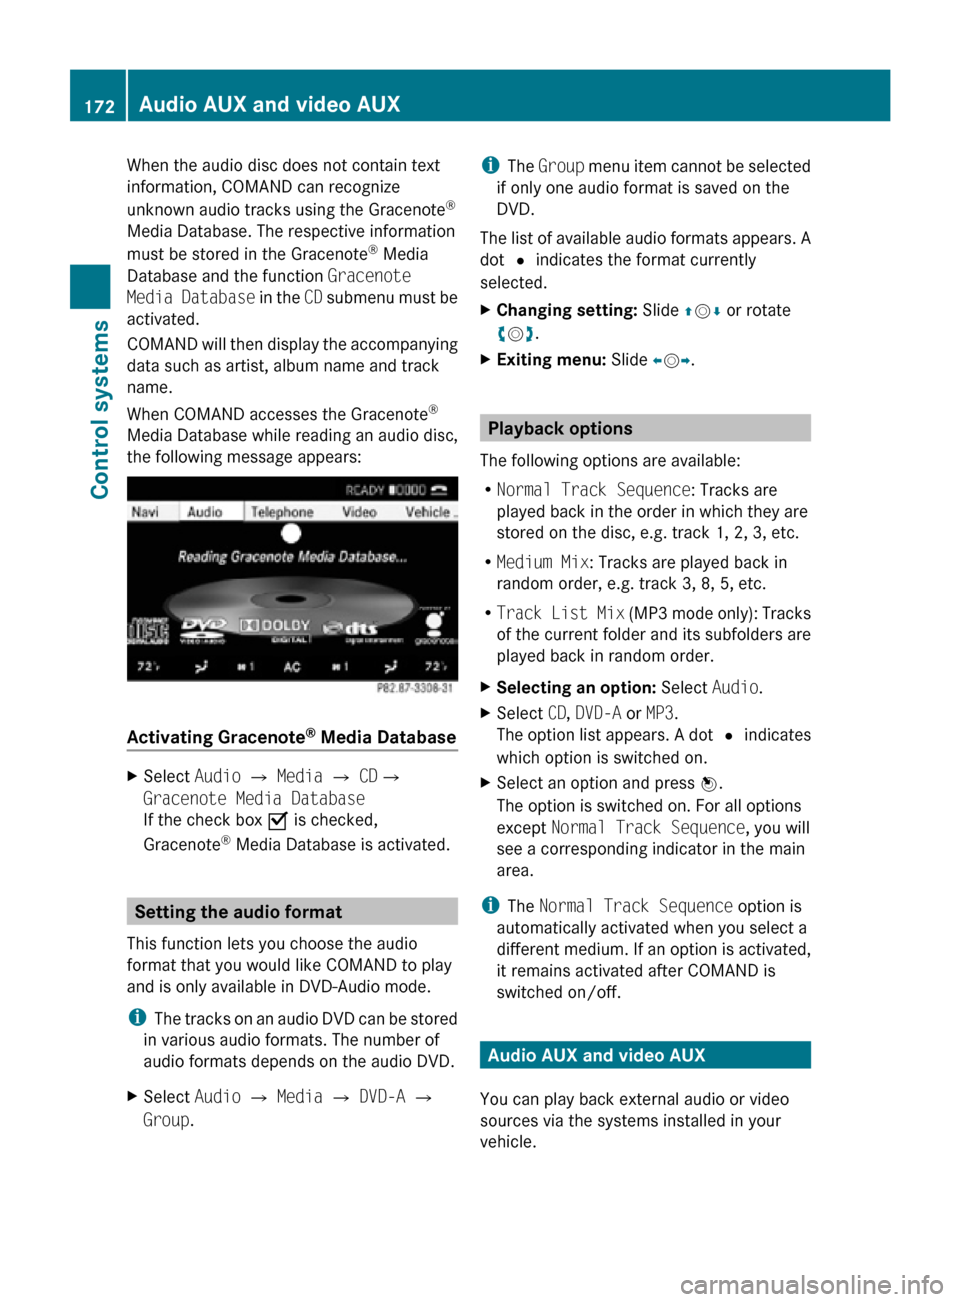
When COMAND accesses the Gracenote ®
Media Database while reading an audio disc,
the following message appears: Activating Gracenote
®
Media Database X
Select Audio £ Media £ CD£
Gracenote Media Database
If the check box Ç is checked,
Gracenote ®
Media Database is activated. Setting the audio format
This function lets you choose the audio
format that you would like COMAND to play
and is only available in DVD-Audio mode.
i The tracks on an audio DVD can be stored
in various audio formats. The number of
audio formats depends on the audio DVD.
X Select Audio Q Media Q DVD-A Q
Group. i
The Group menu item cannot be selected
if only one audio format is saved on the
DVD.
The list of available audio formats appears. A
dot # indicates the format currently
selected.
X Changing setting: Slide ZVÆ or rotate
cVd.
X Exiting menu: Slide XVY. Playback options
The following options are available:
R Normal Track Sequence: Tracks are
played back in the order in which they are
stored on the disc, e.g. track 1, 2, 3, etc.
R Medium Mix: Tracks are played back in
random order, e.g. track 3, 8, 5, etc.
R Track List Mix (MP3 mode only): Tracks
of the current folder and its subfolders are
played back in random order.
X Selecting an option: Select Audio.
X Select CD, DVD-A or MP3.
The option list appears. A dot # indicates
which option is switched on.
X Select an option and press W.
The option is switched on. For all options
except Normal Track Sequence, you will
see a corresponding indicator in the main
area.
i The Normal Track Sequence option is
automatically activated when you select a
different medium. If an option is activated,
it remains activated after COMAND is
switched on/off. Audio AUX and video AUX
You can play back external audio or video
sources via the systems installed in your
vehicle. 172
Audio AUX and video AUXControl systems
216_AKB; 3; 90, en-US
d2ureepe,
Version: 2.11.8.1 2009-05-15T11:47:50+02:00 - Seite 172
Page 175 of 500
The sockets for external audio and video
sources (AUX) are located in the glove box.
i
For operation of the external audio and
video sources, refer to the operating
instructions of the respective device. You
may have to adjust the proper video
standard on the external audio and video
source to ensure proper replay.
Do not leave external devices in the vehicle.
Proper function of the device could be
impaired due to excessive temperatures,
for example when exposing to direct
sunlight or when the outside temperature
is extremely low. Mercedes-Benz does not
assume liability for damage to external
devices. G
Warning!
Operating an external audio source while the
vehicle is in motion will distract you. You may
not notice changing road and/or traffic
conditions which may cause an accident.
Bear in mind that at a speed of just 30 mph
(approximately 50 km/h), your vehicle is
covering a distance of 44 feet (approximately
14 m) every second.
For your safety and the safety of others, pull
over to a safe location and stop before
operating an external audio source. G
Warning!
Due to the different volumes of the external
audio sources, system messages of the
vehicle may be much louder. You may need to
disable these system messages or adjust the
volume of these messages manually.
i The volume of external audio sources is
extremely variable. It is possible that a
device connected as an external audio
source will sound quieter or louder in the
vehicle or that the usual maximum volume
cannot be achieved. On certain devices the
volume can be set separately. In this case,
start at a moderate volume and increase it
slowly. In this way, you can determine whether the system is capable of playback
without distortion, even at high volume.
X Connect external audio and video sources
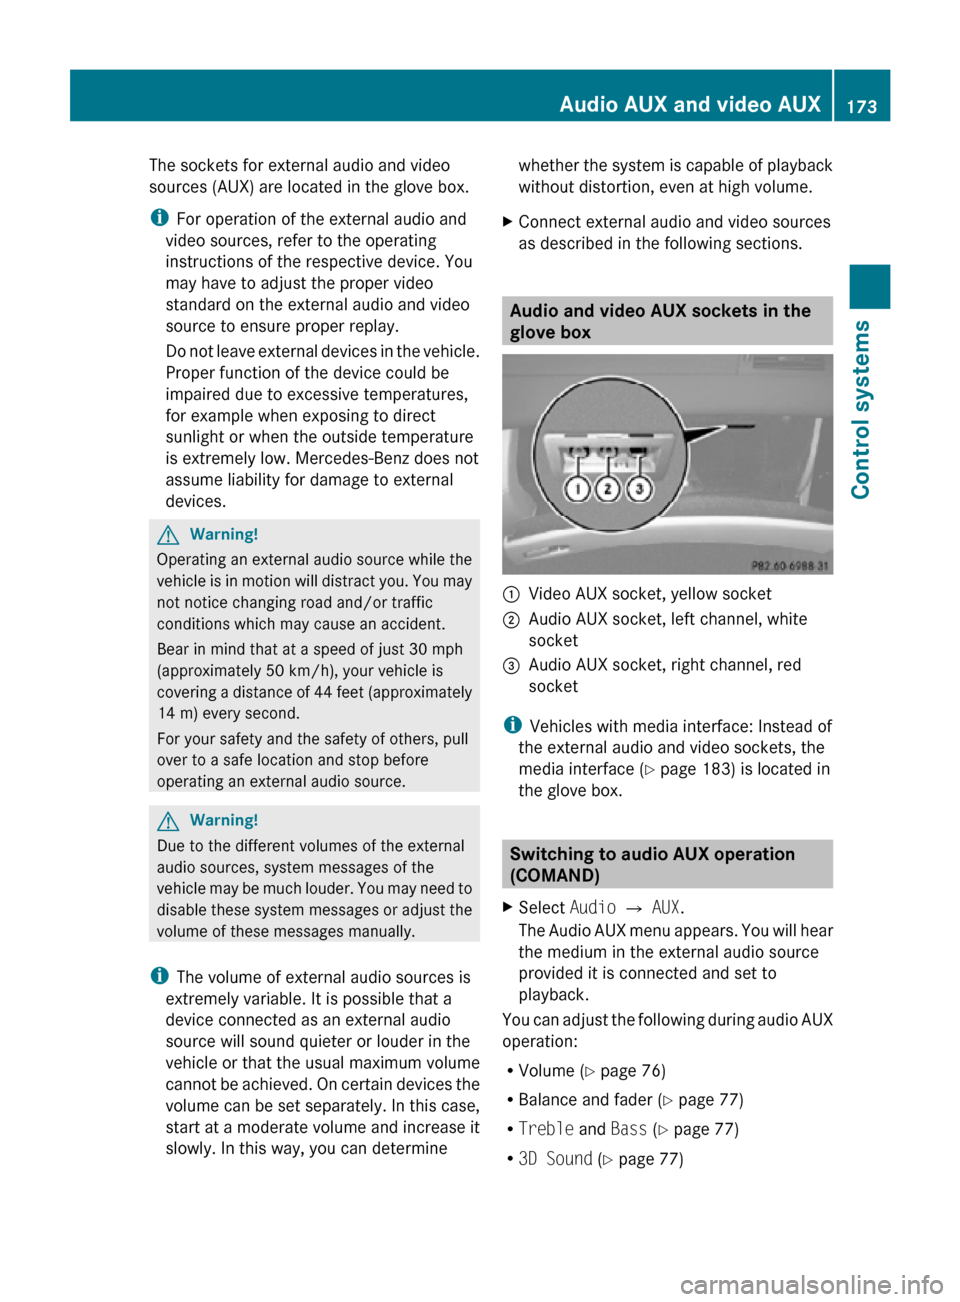
as described in the following sections. Audio and video AUX sockets in the
glove box
:
Video AUX socket, yellow socket
; Audio AUX socket, left channel, white
socket
= Audio AUX socket, right channel, red
socket
i Vehicles with media interface: Instead of
the external audio and video sockets, the
media interface ( Y page 183) is located in
the glove box. Switching to audio AUX operation
(COMAND)
X Select Audio Q AUX.
The Audio AUX menu appears. You will hear
the medium in the external audio source
provided it is connected and set to
playback.
You can adjust the following during audio AUX
operation:
R Volume ( Y page 76)
R Balance and fader ( Y page 77)
R Treble and Bass (Y page 77)
R 3D Sound (Y page 77) Audio AUX and video AUX
173Control systems
216_AKB; 3; 90, en-US
d2ureepe, Version: 2.11.8.1 2009-05-15T11:47:50+02:00 - Seite 173 Z
Page 178 of 500
number of times you have to press the
shortcut button depends on the previously
set mode.
Showing/hiding the DVD control
menu
X Showing the menu: Slide ZVÆ.
X Hiding the menu: Slide ZVÆ.
or
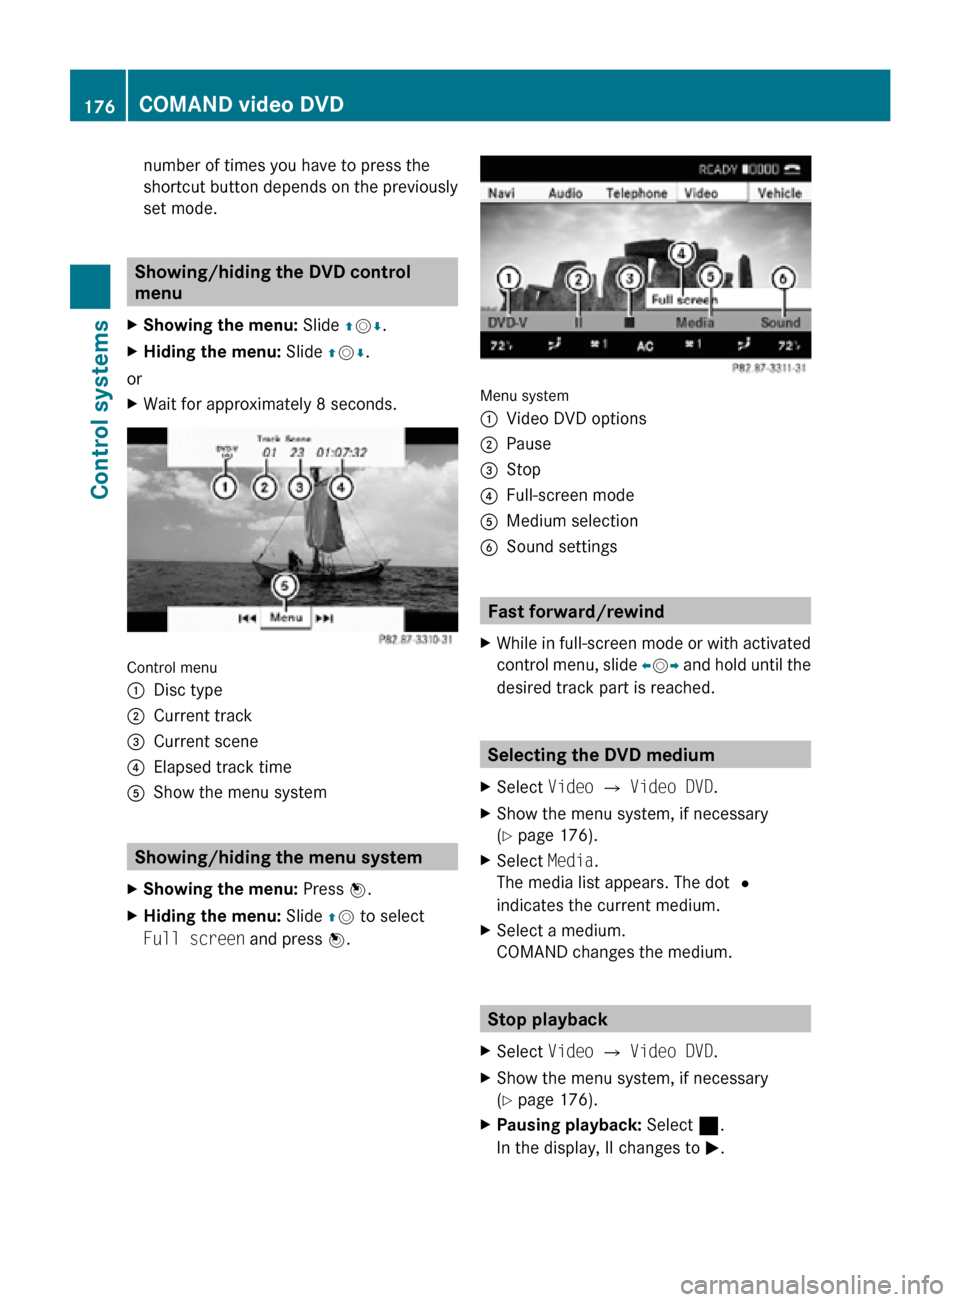
X Wait for approximately 8 seconds. Control menu
:
Disc type
; Current track
= Current scene
? Elapsed track time
A Show the menu system Showing/hiding the menu system
X Showing the menu: Press W.
X Hiding the menu: Slide ZV to select
Full screen and press W. Menu system
:
Video DVD options
; Pause
= Stop
? Full-screen mode
A Medium selection
B Sound settings Fast forward/rewind
X While in full-screen mode or with activated
control menu, slide XVY and hold until the
desired track part is reached. Selecting the DVD medium
X Select Video Q Video DVD.
X Show the menu system, if necessary
(Y page 176).
X Select Media.
The media list appears. The dot #
indicates the current medium.
X Select a medium.
COMAND changes the medium. Stop playback
X Select Video Q Video DVD.
X Show the menu system, if necessary
(Y page 176).
X Pausing playback: Select ¯.
In the display, II changes to M. 176
COMAND video DVDControl systems
216_AKB; 3; 90, en-US
d2ureepe,
Version: 2.11.8.1 2009-05-15T11:47:50+02:00 - Seite 176
Page 188 of 500

From another main function
X
Press shortcut button R.
COMAND activates the last selected disc
mode.
i When media interface operation was
selected before, it is now activated.
X Select MediaQ Media Interface.
The media list appears. The dot #
indicates the currently played medium.
i When no device is connected, Media
Interface instead of the device name
appears.
If COMAND does not support the
connected device, the message Device
incompatible. appears. The device will
be listed in the media list as Not
Available. When two devices are
connected, the message Please ensure
that only one device is connected.
appears.
X Confirm with W.
COMAND activates a connected device. A
corresponding message appears.
Afterwards, the basic display appears. Example illustration: iPod
®
operation
: Disc type
; Track number
= Track name
? Elapsed track time (graphical display)
A Elapsed track time B
Track number (graphical display)
C Current playback option (no display in
“Normal Track Sequence”)
D Sound settings
E Media list
F Album name (if available)
G Categories, playlists and/or folders
H Artist (if available)
I Submenu for basic settings
i The connected disc type : is identified
by the respective symbols for iPod ®
, MP3
player, or USB storage device.
i When the connected device does not
contain tracks that can be played, a
corresponding message appears.
Within the audio functions X
Connect an external device (Y page 184).
COMAND activates the device. Afterwards,
the basic display appears.
or
X Select Audio Q Media Interface. Selecting audio files
i COMAND lists the stored data on an
iPod ®
, MP3 player, or USB storage device
according to their own respective file
structure.
Selecting by skipping tracks X
Skipping forward or backward: Slide
XVY or rotate cVd.
or
X Press button 9 or : on the
multifunction steering wheel 24
.
i The skip forward function takes you to the
next track. The skip backward function
takes you to the beginning of the current
24 Function is only available if the Audio menu is selected in the instrument cluster. 186
Media InterfaceControl systems
216_AKB; 3; 90, en-US
d2ureepe,
Version: 2.11.8.1 2009-05-15T11:47:50+02:00 - Seite 186
Page 216 of 500
X
Press button a again if you would like
to change the current status.
Depending on the previous status, Blind
Spot Assist will be Enabled or Disabled
For more information on Blind Spot Assist,
see ( Y page 335). Service menu
In the Service menu the following functions
are available:
R Vehicle status message memory
(Y page 214)
R Checking tire inflation pressure
electronically with the Advanced TPMS
(Y page 377)
R Calling up the maintenance service
indicator display ( Y page 402)
R Checking engine oil level (CL 600 and
CL 65 AMG) ( Y page 370)
Vehicle status message memory Use the vehicle status message memory
function to scan malfunction and warning
messages that may be stored in the system.
Such messages appear in the multifunction
display and are based on conditions or
system status the vehicle’s system has
recorded.
The vehicle status message memory function
only appears if there are any messages
stored.
G
Warning!
Malfunction and warning messages are only
indicated for certain systems and are
intentionally not very detailed. The
malfunction and warning messages are
simply a reminder with respect to the
operation of certain systems. They do not
replace the owner’s and/or driver’s
responsibility to maintain the vehicle’s
operating safety. Have all required
maintenance and safety checks performed on the vehicle. Bring the vehicle to an authorized
Mercedes-Benz Center to address the
malfunction and warning messages.
X Press button = or ; to select the
Service menu.
If conditions have occurred causing status
messages to be recorded, the number of
messages appears in the multifunction
display: 2 Messages.
X Press button : or 9 to select the
Messages function.
X Press button a to confirm.
For malfunction and warning messages,
see “Vehicle status messages in the
multifunction display” ( Y page 414).
X Use button : or 9 to scroll through
the messages.
If you turn the SmartKey in the starter switch
to position 0 and then back to position 2, all
messages will be deleted from the message
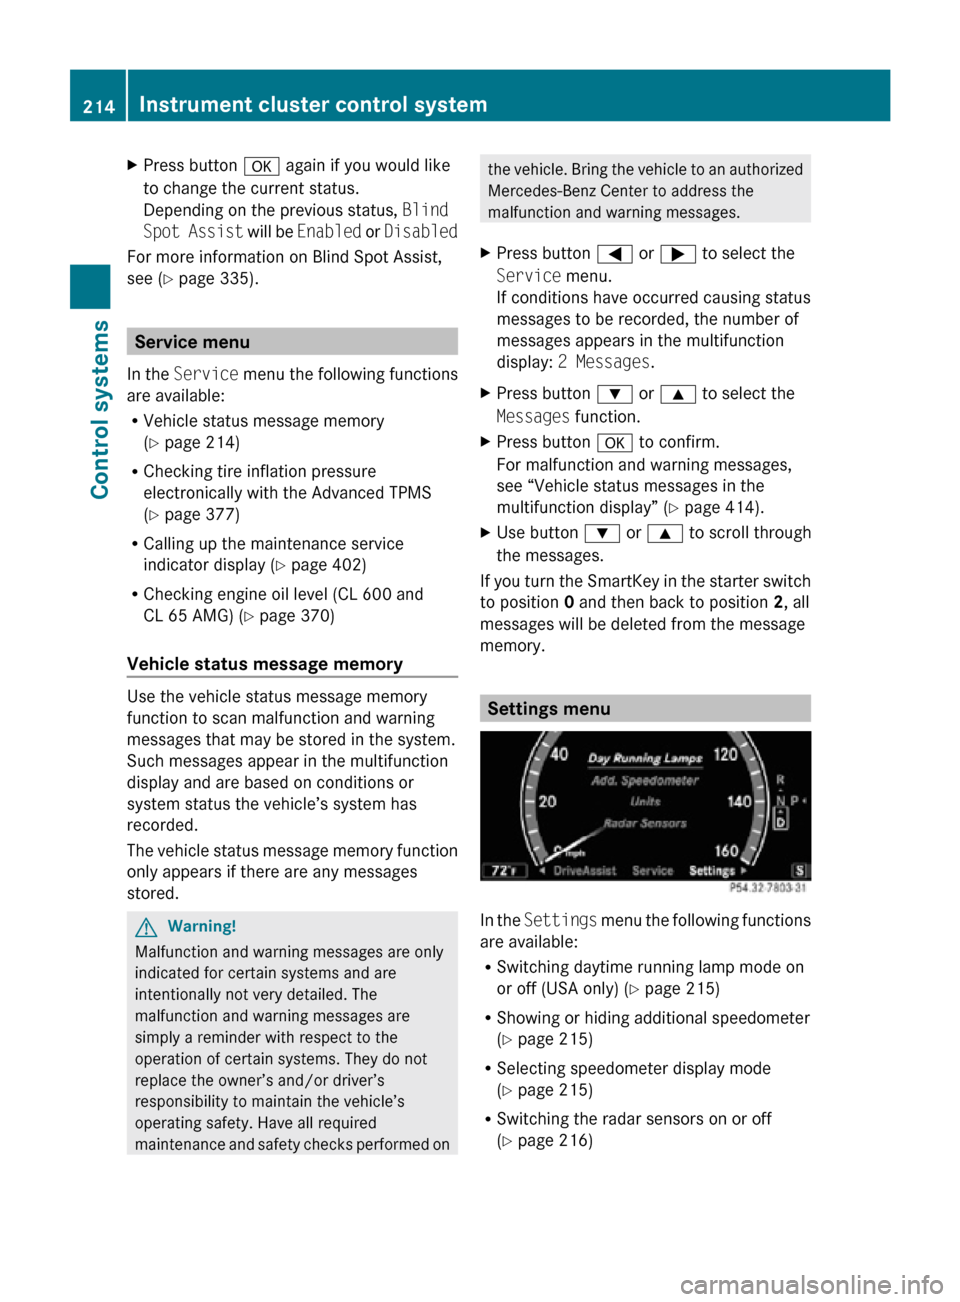
memory. Settings menu
In the
Settings menu the following functions
are available:
R Switching daytime running lamp mode on
or off (USA only) (Y page 215)
R Showing or hiding additional speedometer
(Y page 215)
R Selecting speedometer display mode
(Y page 215)
R Switching the radar sensors on or off
(Y page 216) 214
Instrument cluster control systemControl systems
216_AKB; 3; 90, en-US
d2ureepe,
Version: 2.11.8.1 2009-05-15T11:47:50+02:00 - Seite 214
Page 219 of 500
Voice Control System introduction
Safety notes
G
Warning!
Only use the Voice Control System when road
and traffic conditions permit you to do so.
Otherwise you could be involved in an
accident in which you or others could be
injured. G
Warning!
Please devote your attention first and
foremost to the traffic situation you are in.
While the system permits hands-free phone
operation, attention
to traffic may be diverted
not only by physical operation of a phone, but
also by the distraction of a phone
conversation while driving. As such, for safety
reasons, we encourage the driver to stop the
vehicle in a safe place before answering or
placing a phone call.
For safety reasons, you should only select a
destination when the vehicle is stationary.
While the navigation system provides
directional assistance, the driver must remain
focused on safe driving behavior, especially
attention to traffic and street signs, and
should utilize the system’s audio cues while
driving.
The navigation system does not supply any
information on stop signs, yield signs, traffic
regulations or traffic safety rules. Their
observance always remains in the driver’s
personal responsibility. Maps do not cover all
areas nor all routes within an area.
Traffic regulations always have priority over
any route recommendations given.
Bear in mind that at a speed of just 30 mph
(approximately 50 km/h), your vehicle is
covering a distance of 44 feet (approximately
14 m) every second. G
Warning!
Navigation announcements are intended to
direct you
while driving without diverting your
attention from the road and driving.
Please always use navigation announcements
instead of consulting the map display for
directions. Consulting the symbols or map
display for directions may cause you to divert
your attention from driving and increase your
risk of an accident. G
Warning!
Please do not use the Voice Control System
in an emergency, as the tone of your voice
may change
in a stressful situation. This could
cause a delay in completing your phone call
in a timely manner. This could distract you in
an emergency situation and cause you to be
involved in an accident. General information
Depending on vehicle equipment, you can
operate the following systems via the Voice
Control System:
R Telephone ( Y page 225)
R Navigation ( Y page 219)
R Address book (Y page 229)
R Audio ( Y page 231) (AM/FM radio,
Satellite radio, CD/DVD changer, MP3
mode (SD
card, USB, Music Register, Media
Interface), AUX)
R Video
You control these systems using spoken
commands. Moreover, controls such as the
buttons on the multifunction steering wheel
(Y page 218) allow you to keep your hands
on the steering wheel.
The Voice Control System recognizes
commands and number sequences,
irrespective of the speaker. To optimize
speech recognition for your voice follow the
individualization process ( Y page 250). Voice Control System introduction
217
Control systems
216_AKB; 3; 90, en-US
d2ureepe, Version: 2.11.8.1 2009-05-15T11:47:50+02:00 - Seite 217 Z
Page 222 of 500

Navigation operation
You can use the Voice Control System to
R enter a country, state or province
R enter a city
R enter a district or a center
R enter a street
R enter an intersection
R enter a house number
R enter a zip code
R find address
R enter a POI (point of interest)
R select one of your last destinations
R calling up route information
R save a destination
R navigate to a destination stored in the
destination memory of the address book
R display the map
R zoom the map in or out
R listen to the destination memory
R cancel route guidance
R start route guidance
R turn guide instructions on or off
Selecting navigation mode X
Press button ?.
X Speak the command “Navigation”.
X Press button ?.
X Speak one of the navigation commands.
i You can use spoken navigation
commands even when COMAND is in a
mode other than navigation mode. Navigation commands
i You cannot
start the route guidance until
all necessary address data has been
entered. For a list of commands, see (
Y page 237).
“Help navigation” Use the command “Help navigation” to read
out an option list of available functions and
commands that can be used in conjunction
with the navigation system.
Entering an address
Speak the commands and address data in
whole words.
The system guides you completely through
the dialog to route guidance. As soon as a
valid address is entered (at least the town),
you can use the “Start route guidance”
command to start the route guidance.
When multiple choices for an entry are
available, the system offers a numbered list
of possible entries in the COMAND display.
You will then have to select a line number.
This number is taken over by the system.
i You can
use the commands “Continue” or
“Back” to scroll up or down in lists.
The command “Correction” lets you repeat
the entry.
Sample dialog: _
The system shows a numbered list of
states recognized by the system.
^ Please select a line number.
\ Number two.
^ Number two accepted.
The selected entry is adopted from the list.
i Address entries for Puerto Rico must be
spelled. For information on spelling, see
(Y page 247).
“Enter state”, “Enter province” Use the command “Enter state” or “Enter
province” to select a different state or
province on the navigation system.220
Voice Control System navigation
Control systems
216_AKB; 3; 90, en-US
d2ureepe,
Version: 2.11.8.1 2009-05-15T11:47:50+02:00 - Seite 220
Page 238 of 500
“Track 1” to “Track 99”
Use the commands “Track 1” to “Track 99”
to select a title number from a loaded
medium.
“Next track”
Use the command “Next track” to select the
next track.
“Previous track”, “Repeat track”
Use the command “Previous track” or
“Repeat
track”
to play again the track you are
listening to. When you speak the command
during the first seconds of the track, the
previous track is played back.
“Group 1” to “Group 9” The “Group 1” to “Group 9” commands are
used
to
select a group on the inserted audio-
DVD.
“Next group”, “Previous group” Use the command “Next group” or “Previous
group” to select a group on the inserted
audio-DVD.
“DVD audio”
Use the command “DVD audio” to start an
audio DVD in the COMAND.
“DVD video”
Use the command “DVD video” to start a
video DVD in the COMAND.
“Select scene”, “Select chapter”
Use the command “Select scene” or “Select
chapter” to select a scene or chapter on the
current video DVD. “Hard disk”, “Music Register” Use the command “Hard disk” or “Music
Register” to switch to the internal hard disk
(Music Register) of the COMAND.
“Memory card”
The “Memory card” command is used to
switch from the DVD drive to the SD card.
Voice Control System external
devices
Operation
You can use the Voice Control System to
R switch to audio AUX mode
R switch to media interface mode
R switch to the USB interface
X Selecting application: Press
button ? on the multifunction steering
wheel.
X Speak one of the following commands. Commands
For a list of commands, see ( Y page 237).
Help commands Use the following commands to hear all
commands for external devices:
R
“Help Media Interface”
R “Help USB-Interface”
“Audio AUX” Use the command “Audio AUX” to switch to
audio AUX mode.
“Video AUX”
Use the command “Video AUX” to switch to
video AUX mode.236
Voice Control System external devices
Control systems
216_AKB; 3; 90, en-US
d2ureepe,
Version: 2.11.8.1 2009-05-15T11:47:50+02:00 - Seite 236
Page 279 of 500
USA only
You can only switch on the high-beam
headlamps in low ambient lighting conditions.
The high-beam flasher is available at all times.
When the engine is running, and you turn the
exterior lamp switch to position T or
L, the manual headlamp mode has
priority over the daytime running lamp mode.
The corresponding exterior lamps come on
(Y page 275).
Fog lamps
Fog lamps cannot be switched on with the
exterior lamp switch in position c.
G
Warning!
In low ambient lighting or foggy conditions,
only switch from position c to L with
the vehicle at a standstill in a safe location.
Switching from c to L will briefly
switch off the headlamps. Doing so while
driving in low ambient lighting conditions may
result in an accident.
Fog lamps will operate with the parking lamps
and/or the low-beam headlamps on. Fog
lamps should only be used in conjunction with
low-beam headlamps. Consult your State or
Province Motor Vehicle Regulations
regarding permissible lamp operation.
X Switch on the ignition.
X Turn the exterior lamp switch to position
T or L (Y page 275).
X Switching on front fog lamps: Pull out the
exterior lamp switch to first stop.
The green indicator lamp N in the
exterior lamp switch comes on.
X Switching on rear fog lamp: Pull out the
exterior lamp switch to second stop.
The rear fog lamp, the front fog lamps, the
green N and the yellow indicator lamp
R in the exterior lamp switch come on.
X Switching off front fog lamps/rear fog
lamp: Push in the exterior lamp switch to
its stop. Locator lighting and night security
illumination The locator lighting and night security
illumination are described in the COMAND
vehicle menu section under (Y page 191).
Combination switch
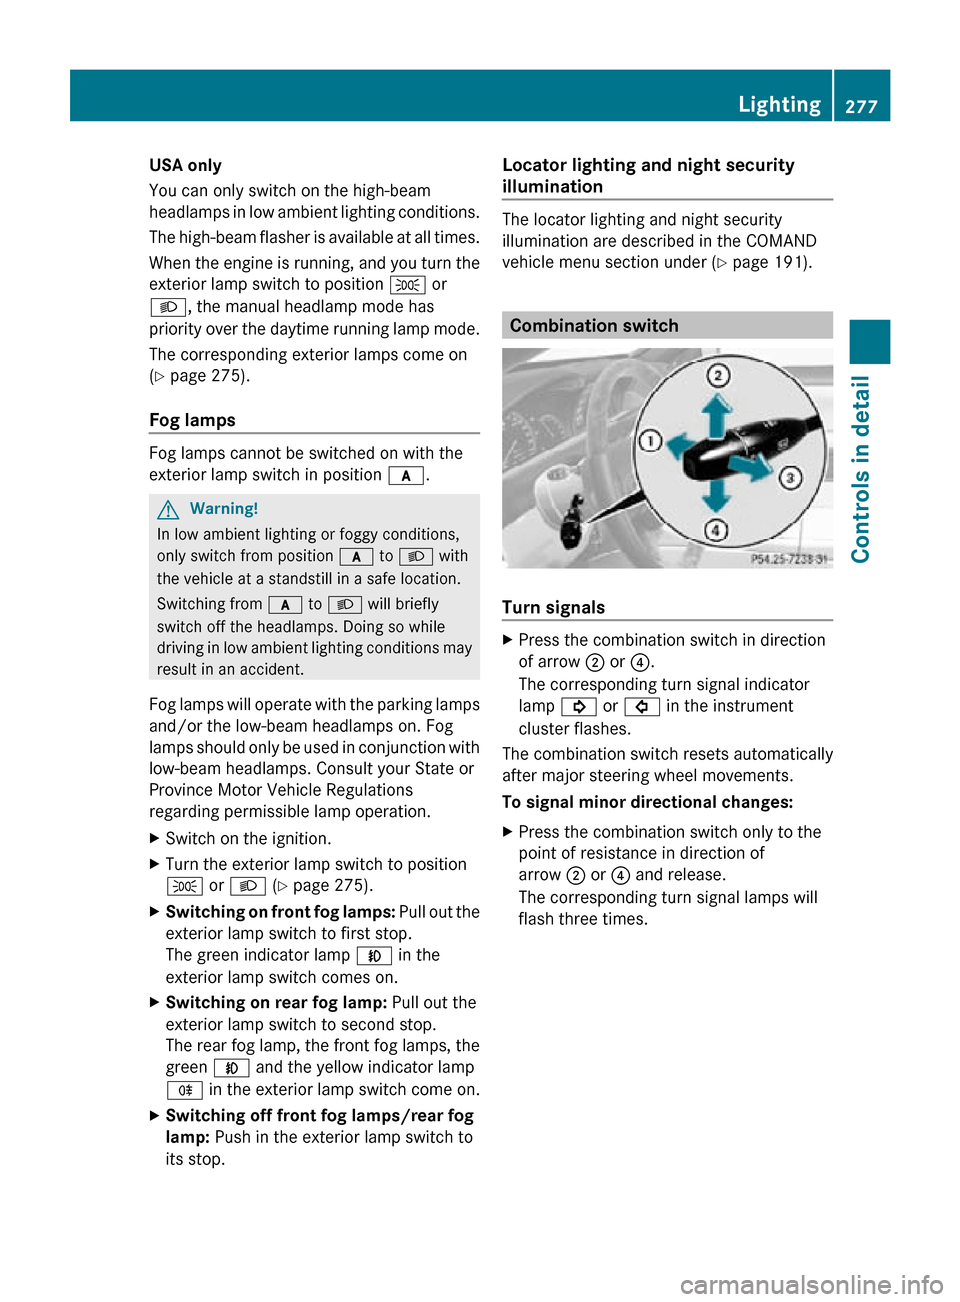
Turn signals
X
Press the combination switch in direction
of arrow ; or ?.
The corresponding turn signal indicator
lamp ! or # in the instrument
cluster flashes.
The combination switch resets automatically
after major steering wheel movements.
To signal minor directional changes:
X Press the combination switch only to the
point of resistance in direction of
arrow ; or ? and release.
The corresponding turn signal lamps will
flash three times. Lighting
277Controls in detail
216_AKB; 3; 90, en-US
d2ureepe, Version: 2.11.8.1 2009-05-15T11:47:50+02:00 - Seite 277 Z
Page 284 of 500
R
Turn off the engine by pressing the
KEYLESS-GO start/stop button and
open the driver’s door (with the driver’s
door open, starter switch is in position
0, same
as with SmartKey removed from
starter switch).
R Engage the parking brake.
R Remove blockage.
R Turn the windshield wipers on again.
If the windshield wipers fail to function at
all with the combination switch in position
Ä or Å,
R set the combination switch to the next
higher wiper speed
R have the windshield wipers checked at
the nearest authorized Mercedes-Benz
Center Power windows
Opening and closing
The windows are opened and closed
electrically. The switches for all windows are
located on
the driver’s door. The switches for
the respective windows are located on the
passenger door and the rear side trim panels.
i Operating the rear side windows from the
rear is not possible when you activate the
override switch ( Y page 55). G
Observe Safety notes, see page 51. G
Warning!
When opening or closing the windows, make
sure there is no danger of anyone being
harmed by the opening/closing procedure.
The door windows are equipped with the
express operation and automatic reversal
function. If
in express operation mode a door
window encounters an obstruction that
blocks its path, the automatic reversal
function will stop the door window and open
it slightly. The windows operate differently when the
switch is pulled and held. See the “Closing
when a window is blocked” section in this
chapter for details.
The closing of the door windows can be
immediately
halted
by releasing the switch or,
if the switch was pulled past the resistance
point and released, by either pressing or
pulling the respective switch.
The closing of the rear side windows can be
immediately halted by releasing the switch.
Activate the override switch when children
are riding in the back seats of the vehicle. The
children may otherwise injure themselves,
e.g. by becoming trapped in the window
opening. G
Warning!
Do not keep any part of your body up against
the window
pane when opening a window. The
downward motion of the pane may pull that
part of your body down between the window
pane and the door frame and trap it there. If
there is a risk of entrapment, release the
switch and pull it to close the window.
i You can also open or close the windows
using the SmartKey, see “Summer opening
feature” ( Y page 283) and “Convenience
closing feature” ( Y page 284).
i After switching off the ignition or
removing the SmartKey from the starter
switch, you can operate the windows until
you open a door. If no door was opened you
can operate the windows for up to
5 minutes. 282
Power windowsControls in detail
216_AKB; 3; 90, en-US
d2ureepe,
Version: 2.11.8.1 2009-05-15T11:47:50+02:00 - Seite 282