jack MERCEDES-BENZ CL550 2010 W216 Owner's Manual
[x] Cancel search | Manufacturer: MERCEDES-BENZ, Model Year: 2010, Model line: CL550, Model: MERCEDES-BENZ CL550 2010 W216Pages: 500, PDF Size: 9.5 MB
Page 13 of 500
Interior storage spaces
see Storage compartments
Intermittent wiping
...........................281
Rain sensor .................................... 281
iPod ®
(media interface) ....................183
ISOFIX (Child seat anchors –
LATCH-type)
see Children in the vehicle J
Jack ..................................................... 413
Jump starting ..................................... 471K
Key, Mechanical
Loss of ........................................... 256
Replacing
....................................... 256
Unlocking/locking manually .......... 460
Valet locking .................................. 261
Key, SmartKey
Battery check lamp ........................ 255
Checking batteries ......................... 255
Factory setting ...................... 253, 255
Global locking (KEYLESS-
GO) ................................................ 255
Global locking (SmartKey) .............253
Global unlocking (KEYLESS-
GO) ................................................ 255
Global unlocking
(SmartKey) ..................................... 253
Important notes on KEYLESS-GO ...254
Locking/unlocking ........................252
Loss of ........................................... 256
Messages in the multifunction
display ........................................... 440
Opening, trunk ............................... 258
Opening and closing the power
tilt/sliding sunroof ......................... 283
Opening and closing the windows . 283
Remote control .............................. 252
Replacing ....................................... 256
Replacing batteries ........................ 461
Restoring to factory setting ... 253, 255
Selective setting .................... 253, 255
Starter switch positions ................. 262KEYLESS-GO
Starter switch positions
.................262
Keypad (COMAND) .............................. 70
Kickdown ........................................... 295
Kickdown (manual shift program) ... 299
Kilopascal (air pressure unit) ...........394
Knee bag .............................................. 40 L
Labels
Certification ................................... 480
Emission control information ......... 481
Tire and Loading Information
placard
........................................... 381
Tire inflation pressure ....................376
Lamps, exterior
Exterior lamp switch ...................... 275
Messages in the multifunction
display ........................................... 446
Switching on/off ........................... 275
Lamps, indicator and warning
ABS .......................................... 29, 451
Brakes ........................................... 451
Distance warning lamp .......... 307, 457
Engine malfunction ........................ 457
ESC .......................................... 29, 456
ESC OFF ........................................ 456
Fog lamps ...................................... 277
Front passenger front air bag
off ............................................ 41, 459
Fuel tank reserve ........................... 457
High-beam headlamps .............29, 278
Instrument cluster .........................450
Low tire pressure/TPMS
malfunction telltale ........................ 458
Seat belt telltale ................29, 48, 454
SRS .......................................... 36, 455
Turn signals ..................................... 29
Language settings ............................... 81
LATCH-type child seat anchors (ISOFIX) see Children in the vehicle
License plate lamps
Messages in the multifunction
display ........................................... 447
Light alloy wheels, cleaning .............408
Lighter see Cigarette lighter Index
11 216_AKB; 3; 90, en-US
d2ureepe,
Version: 2.11.8.1 2009-05-15T11:47:50+02:00 - Seite 11
Page 20 of 500
Treadwear indicators .............
386, 395
Vehicle maximum load on .............. 395
Wear pattern
.................................. 388
Winter tires ............................ 395, 486
Tire speed rating .......................390, 395
Top tether see Children in the vehicle
Total load limit ................................... 395
Towing
Towing eye bolt .............................. 474
Vehicle ........................................... 473
Towing eye bolt ................................. 474
Traction ...................................... 387, 395
Traffic messages ............................... 125
Transfer case ..................................... 299
Transmission see Automatic transmission
Transmission fluid level .................... 371
Transmission gear selector lever see Gear selector lever
Transmission positions ....................294
Traveling abroad ............................... 401
Tread (tires) ....................................... 395
Tread depth (tires) ....................386, 395
Treadwear .......................................... 387
Treadwear indicators (tires) .... 386, 395
Trip menu ........................................... 204
Trunk
Closing ........................................... 258
Messages in the multifunction
display ........................................... 439
Opening ......................................... 258
Opening/closing system ............... 259
Opening-height restriction ............. 193
Trunk lid emergency release .......... 260
Unlocking manually .......................461
Valet locking .................................. 261
Turning off the engine ......................290
Turn signals ....................................... 277
Cleaning lenses ............................. 406
Indicator lamps ................................ 29
Messages in the multifunction
display ........................................... 449 U
Uniform Tire Quality Grading
Standards .................................. 387, 395
Units Selecting speedometer display
mode ............................................. 215
Unleaded gasoline, premium ........... 493
Unlocking the vehicle
KEYLESS-GO .................................. 253
Manually
........................................ 460
SmartKey ....................................... 252
Upholstery, cleaning .........................409
USB devices (media interface) .........183
USB socket ........................................... 72
Useful features .................................. 350 V
Valet locking ...................................... 261
Vehicle
Battery ........................................... 469
Care ............................................... 403
Control system .............................. 201
Identification Number (VIN) ........... 480
Individual settings ..........................214
Locking/unlocking ........................ 252
Lowering (wheel change)
............... 469
Modifications and alterations,
Operating safety .............................. 22
Towing ........................................... 473
Unlocking/locking manually .......... 460
Vehicle dimensions
see Vehicle specification
Vehicle Identification Number
(VIN) ................................................... 480
Vehicle jack see Jack
Vehicle level control
see AIRMATIC
Vehicle lighting .................................. 274
Vehicle loading
Instructions .................................... 347
Load limit ....................................... 382
Terminology ................................... 393
Vehicle maximum load on the tire ... 395 18
Index 216_AKB; 3; 90, en-US
d2ureepe,
Version: 2.11.8.1 2009-05-15T11:47:50+02:00 - Seite 18
Page 71 of 500
COMAND components
COMAND can be used to operate:
R Audio functions
R Navigation system
R Telephone
R External audio and video sources
R Video DVD
R Various vehicle settings
COMAND consists of the following:
R COMAND shortcut buttons
R COMAND display
R Telephone keypad
R COMAND controller
R Built-in USB socket to connect USB storage
devices
R Optional media interface in the glove box
to connect external devices via iPod ®
cable, jack plug, or USB cable
i For information about cleaning and care
of displays, see ( Y page 409).
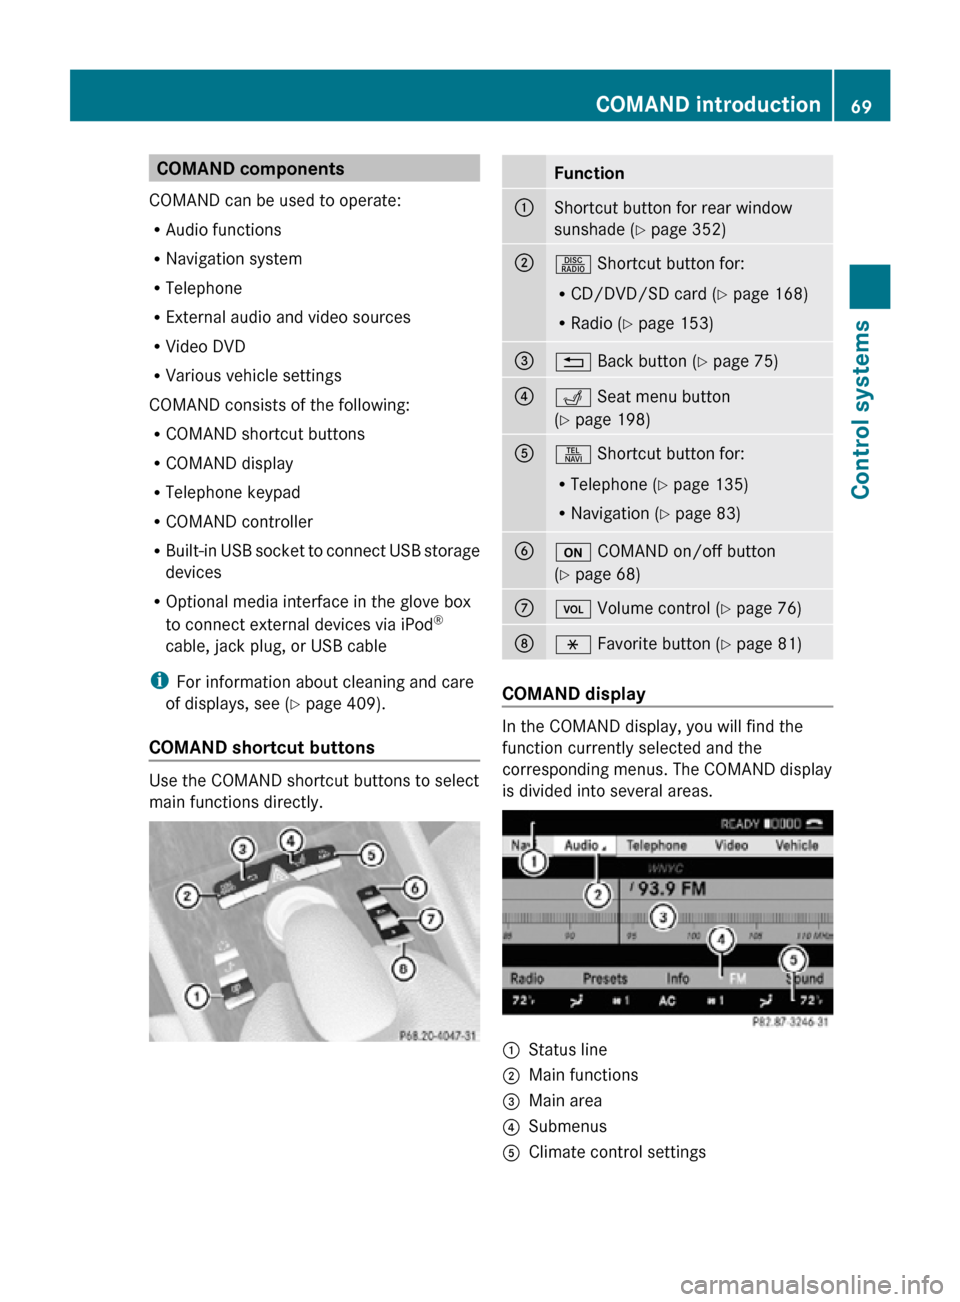
COMAND shortcut buttons Use the COMAND shortcut buttons to select
main functions directly. Function
:
Shortcut button for rear window
sunshade (
Y page 352) ;
R Shortcut button for:
R
CD/DVD/SD card (Y page 168)
R Radio ( Y page 153) =
% Back button (Y page 75)
?
T Seat menu button
(Y page 198)
A
S Shortcut button for:
R
Telephone ( Y page 135)
R Navigation ( Y page 83) B
u COMAND on/off button
(Y page 68)
C
H Volume control (Y page 76)
D
h Favorite button (
Y page 81) COMAND display
In the COMAND display, you will find the
function currently selected and the
corresponding menus. The COMAND display
is divided into several areas.
:
Status line
; Main functions
= Main area
? Submenus
A Climate control settings COMAND introduction
69Control systems
216_AKB; 3; 90, en-US
d2ureepe, Version: 2.11.8.1 2009-05-15T11:47:50+02:00 - Seite 69 Z
Page 84 of 500
You can switch the massage function for
the driver’s seat on or off.
R Front Passenger Seat Massage
(Y page 199)
You can switch the massage function for
the passenger seat on or off.
R Driver and Front Passenger Seat
Massage (Y page 199)
You can switch the massage function for
the driver’s and passenger seat on or off.
R Display OFF (Y page 79)
You can use the favorite button to switch
the COMAND display on or off.
R Repeat Navigation Command
(Y page 122)
When route guidance is activated, you can
use the favorite button to generate or call
up a current navigation announcement.
X Select Vehicle Q System Q
Favorites Button *.
The list of predefined functions appears.
The dot
#
in front of the list entry indicates
the current setting.
X Changing setting: Rotate
c
Vd and select
desired function.
X Saving setting and exiting the menu:
Press W. Upload/Download of Data
This function
lets you transfer COMAND data
to a memory card or a USB storage device and
vice versa.
The following COMAND data can be
transferred:
R Navigation destination memory and last
destination
R Address book entries
R Audio/Video presets memory
R System settings i
You can
use this function, for example, to
save your COMAND data and transfer them
to another vehicle.
X Insert an SD card into the SD card slot
(Y page 166) or connect a USB storage
device to the built-in USB socket in the
glove box
(Y page 72). The USB jack of the
optional media interface is not intended for
this purpose.
X Select Vehicle Q System Q Upload/
Download Data.
X Download: Select Copy Data to
Storage Medium Q On the Memory
Card or On USB.
X Select Start Copying.
X Upload: Select Import Data from
Storage Medium Q From Memory Card
or From USB.
X Select Start Data Import.
X Exiting menu without data transfer:
Select Back. Reset
i You can reset COMAND back to its
factory settings.
Among other things, all personal data are
deleted, for example
R the address book entries
R the entries in the destination memory
R the list of last destinations of the
navigation system
X Select Vehicle Q System Q Reset.
A prompt appears asking whether you
really want to reset.
X Select Yes or No.
If you select Yes another prompt will
appear asking whether you really want to
reset.
X Select Yes or No.
If you select Yes, COMAND will be reset
and restarted. 82
COMAND system settings
Control systems
216_AKB; 3; 90, en-US
d2ureepe,
Version: 2.11.8.1 2009-05-15T11:47:50+02:00 - Seite 82
Page 187 of 500
i
Do not leave external devices in the
vehicle. Proper function of the device could
be impaired due to excessive
temperatures, for example when exposing
to direct sunlight or when the outside
temperature is extremely low. Mercedes-
Benz does not assume liability for damage
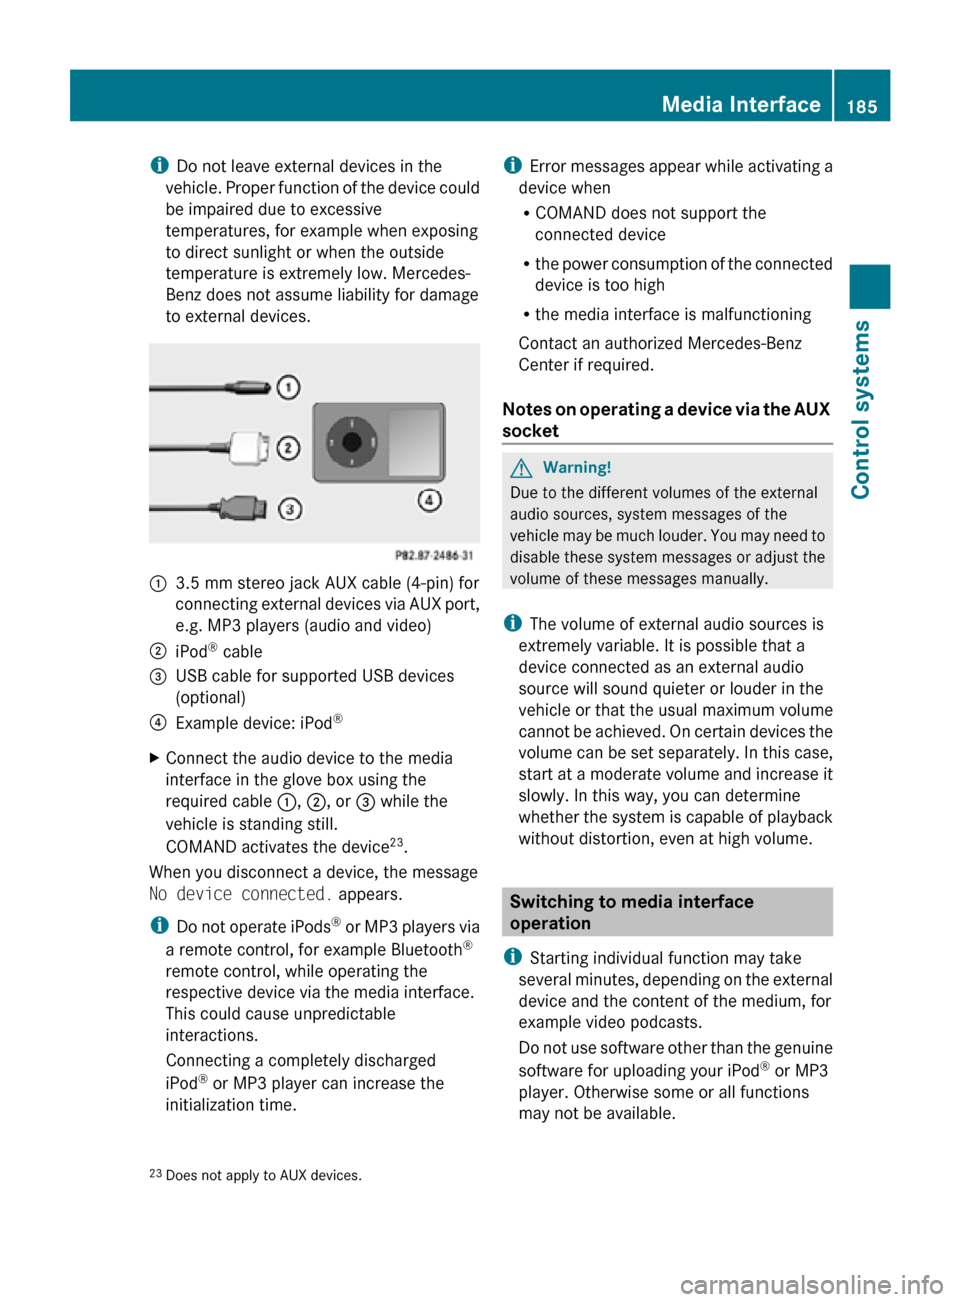
to external devices. :
3.5 mm stereo jack AUX cable (4-pin) for
connecting external devices via AUX port,
e.g. MP3 players (audio and video)
; iPod ®
cable
= USB cable for supported USB devices
(optional)
? Example device: iPod ®
X Connect the audio device to the media
interface in the glove box using the
required cable :, ;, or = while the
vehicle is standing still.
COMAND activates the device 23
.
When you disconnect a device, the message
No device connected. appears.
i Do not operate iPods ®
or MP3 players via
a remote control, for example Bluetooth ®
remote control, while operating the
respective device via the media interface.
This could cause unpredictable
interactions.
Connecting a completely discharged
iPod ®
or MP3 player can increase the
initialization time. i
Error messages appear while activating a
device when
R COMAND does not support the
connected device
R the power consumption of the connected
device is too high
R the media interface is malfunctioning
Contact an authorized Mercedes-Benz
Center if required.
Notes on operating a device via the AUX
socket G
Warning!
Due to the different volumes of the external
audio sources, system messages of the
vehicle may be much louder. You may need to
disable these system messages or adjust the
volume of these messages manually.
i The volume of external audio sources is
extremely variable. It is possible that a
device connected as an external audio
source will sound quieter or louder in the
vehicle or that the usual maximum volume
cannot be achieved. On certain devices the
volume can be set separately. In this case,
start at a moderate volume and increase it
slowly. In this way, you can determine
whether the system is capable of playback
without distortion, even at high volume. Switching to media interface
operation
i Starting individual function may take
several minutes, depending on the external
device and the content of the medium, for
example video podcasts.
Do not use software other than the genuine
software for uploading your iPod ®
or MP3
player. Otherwise some or all functions
may not be available.
23 Does not apply to AUX devices. Media Interface
185Control systems
216_AKB; 3; 90, en-US
d2ureepe, Version: 2.11.8.1 2009-05-15T11:47:50+02:00 - Seite 185 Z
Page 324 of 500
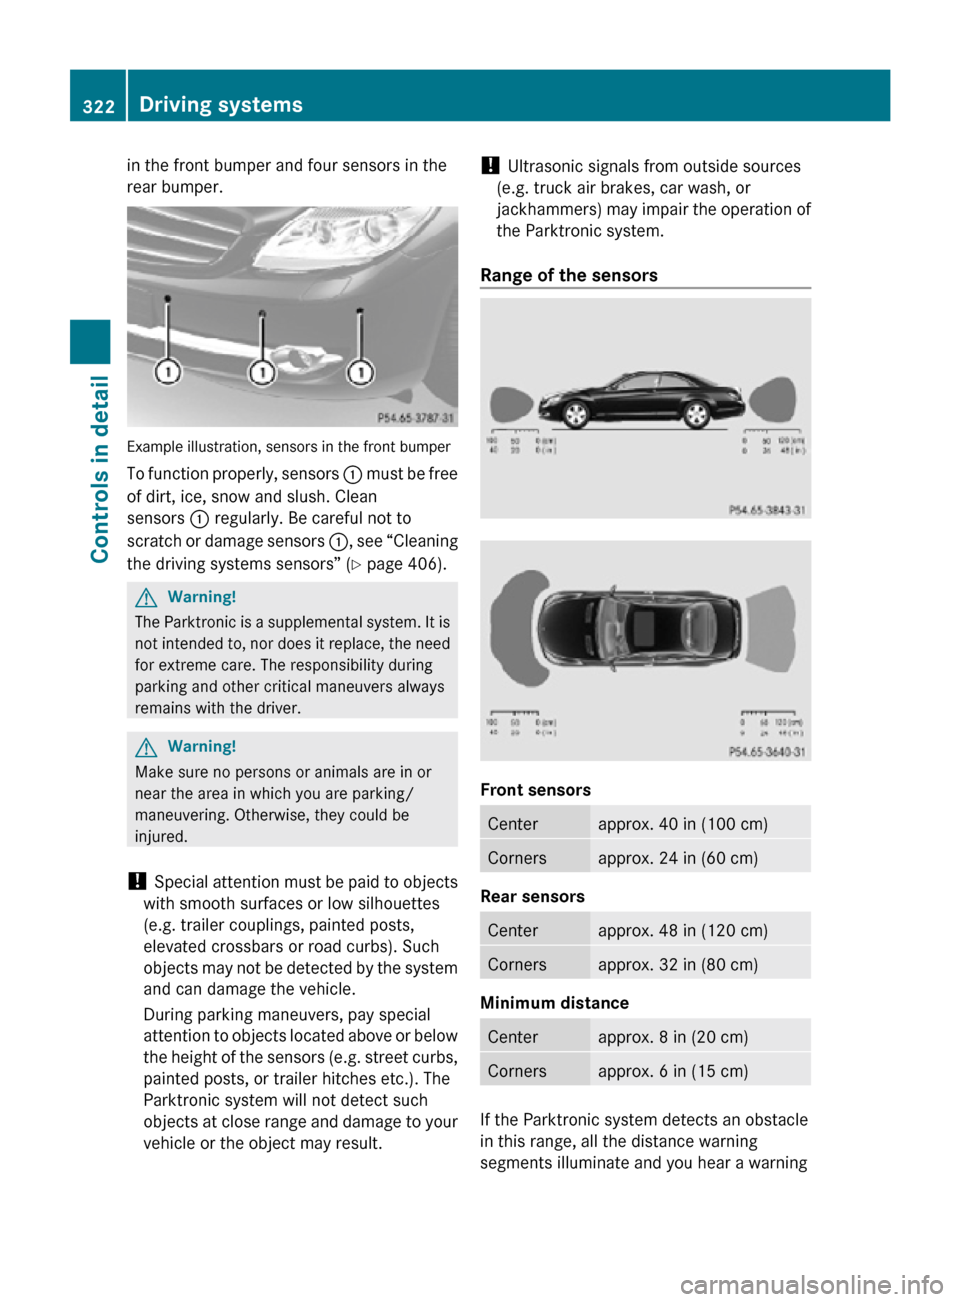
in the front bumper and four sensors in the
rear bumper.
Example illustration, sensors in the front bumper
To function properly, sensors
: must be free
of dirt, ice, snow and slush. Clean
sensors : regularly. Be careful not to
scratch or damage sensors :, see “Cleaning
the driving systems sensors” (Y page 406). G
Warning!
The Parktronic is a supplemental system. It is
not intended to, nor does it replace, the need
for extreme care. The responsibility during
parking and other critical maneuvers always
remains with the driver. G
Warning!
Make sure no persons or animals are in or
near the area in which you are parking/
maneuvering. Otherwise, they could be
injured.
! Special attention must be paid to objects
with smooth surfaces or low silhouettes
(e.g. trailer couplings, painted posts,
elevated crossbars or road curbs). Such
objects may not be detected by the system
and can damage the vehicle.
During parking maneuvers, pay special
attention to objects located above or below
the height of the sensors (e.g. street curbs,
painted posts, or trailer hitches etc.). The
Parktronic system will not detect such
objects at close range and damage to your
vehicle or the object may result. !
Ultrasonic signals from outside sources
(e.g. truck air brakes, car wash, or
jackhammers) may impair the operation of
the Parktronic system.
Range of the sensors Front sensors
Center approx. 40 in (100 cm)
Corners approx. 24 in (60 cm)
Rear sensors
Center approx. 48 in (120 cm)
Corners approx. 32 in (80 cm)
Minimum distance
Center approx. 8 in (20 cm)
Corners approx. 6 in (15 cm)
If the Parktronic system detects an obstacle
in this range, all the distance warning
segments illuminate and you hear a warning322
Driving systemsControls in detail
216_AKB; 3; 90, en-US
d2ureepe,
Version: 2.11.8.1 2009-05-15T11:47:50+02:00 - Seite 322
Page 326 of 500
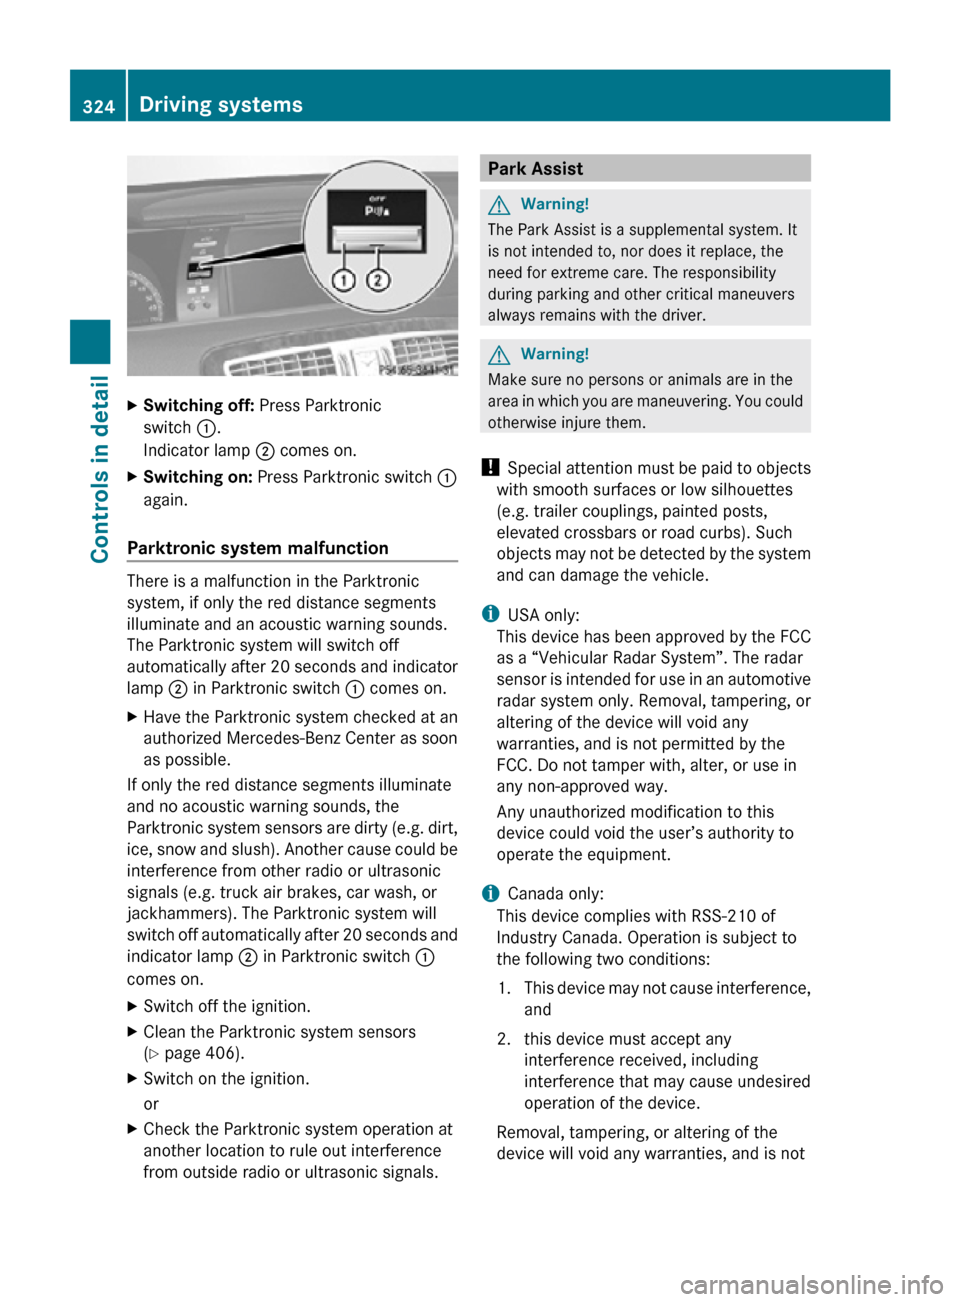
X
Switching off: Press Parktronic
switch :.
Indicator lamp ; comes on.
X Switching on: Press Parktronic switch :
again.
Parktronic system malfunction There is a malfunction in the Parktronic
system, if only the red distance segments
illuminate and an acoustic warning sounds.
The Parktronic system will switch off
automatically after 20 seconds and indicator
lamp
; in Parktronic switch : comes on.
X Have the Parktronic system checked at an
authorized Mercedes-Benz Center as soon
as possible.
If only the red distance segments illuminate
and no acoustic warning sounds, the
Parktronic system sensors are dirty (e.g. dirt,
ice, snow and slush). Another cause could be
interference from other radio or ultrasonic
signals (e.g. truck air brakes, car wash, or
jackhammers). The Parktronic system will
switch off automatically after 20 seconds and
indicator lamp ; in Parktronic switch :
comes on.
X Switch off the ignition.
X Clean the Parktronic system sensors
(Y page 406).
X Switch on the ignition.
or
X Check the Parktronic system operation at
another location to rule out interference
from outside radio or ultrasonic signals. Park Assist
G
Warning!
The Park Assist is a supplemental system. It
is not intended to, nor does it replace, the
need for extreme care. The responsibility
during parking and other critical maneuvers
always remains with the driver. G
Warning!
Make sure no persons or animals are in the
area in which you are maneuvering. You could
otherwise injure them.
! Special attention must be paid to objects
with smooth surfaces or low silhouettes
(e.g. trailer couplings, painted posts,
elevated crossbars or road curbs). Such
objects may not be detected by the system
and can damage the vehicle.
i USA only:
This device has been approved by the FCC
as a “Vehicular Radar System”. The radar
sensor is intended for use in an automotive
radar system only. Removal, tampering, or
altering of the device will void any
warranties, and is not permitted by the
FCC. Do not tamper with, alter, or use in
any non-approved way.
Any unauthorized modification to this
device could void the user’s authority to
operate the equipment.
i Canada only:
This device complies with RSS-210 of
Industry Canada. Operation is subject to
the following two conditions:
1. This device may not cause interference, and
2. this device must accept any interference received, including
interference that may cause undesired
operation of the device.
Removal, tampering, or altering of the
device will void any warranties, and is not 324
Driving systemsControls in detail
216_AKB; 3; 90, en-US
d2ureepe,
Version: 2.11.8.1 2009-05-15T11:47:50+02:00 - Seite 324
Page 414 of 500
Vehicle equipment
i This Operator’s Manual describes all
features, standard or optional, potentially
available for your vehicle at the time of
purchase. Please be aware that your
vehicle might not be equipped with all
features described in this manual. Where will I find ...?
First aid kit
i Check expiration dates and contents for
completeness at least once a year and
replace missing/expired items.
The first aid kit is located in the trunk on the
right side storage pocket, secured by a
tensioning strap. X
Loosen tensioning strap :.
First aid kit ; can be removed. Vehicle tool kit
The vehicle tool kit is located in the space
underneath the trunk floor.
i Vehicles without spare wheel are not
factory-equipped with the tools required for
a wheel change such as a jack or a wheel
wrench. Some tools required for a wheel
change are specific to your vehicle.
Contact an authorized Mercedes-Benz Center to obtain the tools approved for
your vehicle.
The vehicle tool kit includes:
R Alignment bolt 35
R Collapsible wheel chock 35
R Fuse chart
R Jack 35
R Pair of gloves 35
R Towing eye bolt
R Wheel wrench 35
X Removing: Open the trunk (Y page 257).
X Lift the trunk floor using the floor handle.
X Engage the floor handle on the upper trunk
lip.
! To prevent damage, always disengage the
floor handle from the upper trunk lip and
lower the trunk floor before closing the
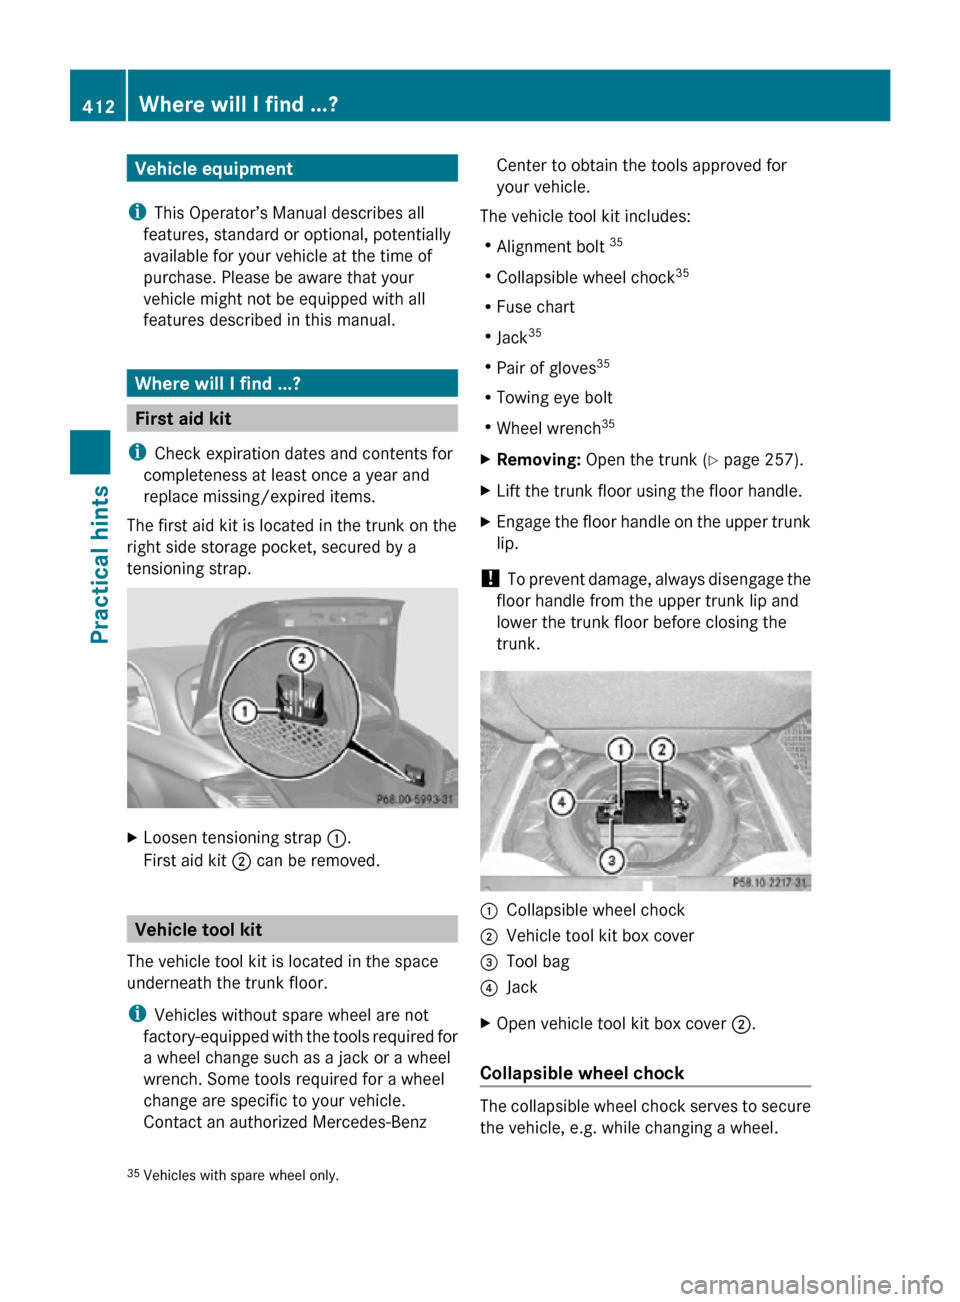
trunk. :
Collapsible wheel chock
; Vehicle tool kit box cover
= Tool bag
? Jack
X Open vehicle tool kit box cover ;.
Collapsible wheel chock The collapsible wheel chock serves to secure
the vehicle, e.g. while changing a wheel.
35 Vehicles with spare wheel only. 412
Where will I find ...?Practical hints
216_AKB; 3; 90, en-US
d2ureepe,
Version: 2.11.8.1 2009-05-15T11:47:50+02:00 - Seite 412
Page 415 of 500
X
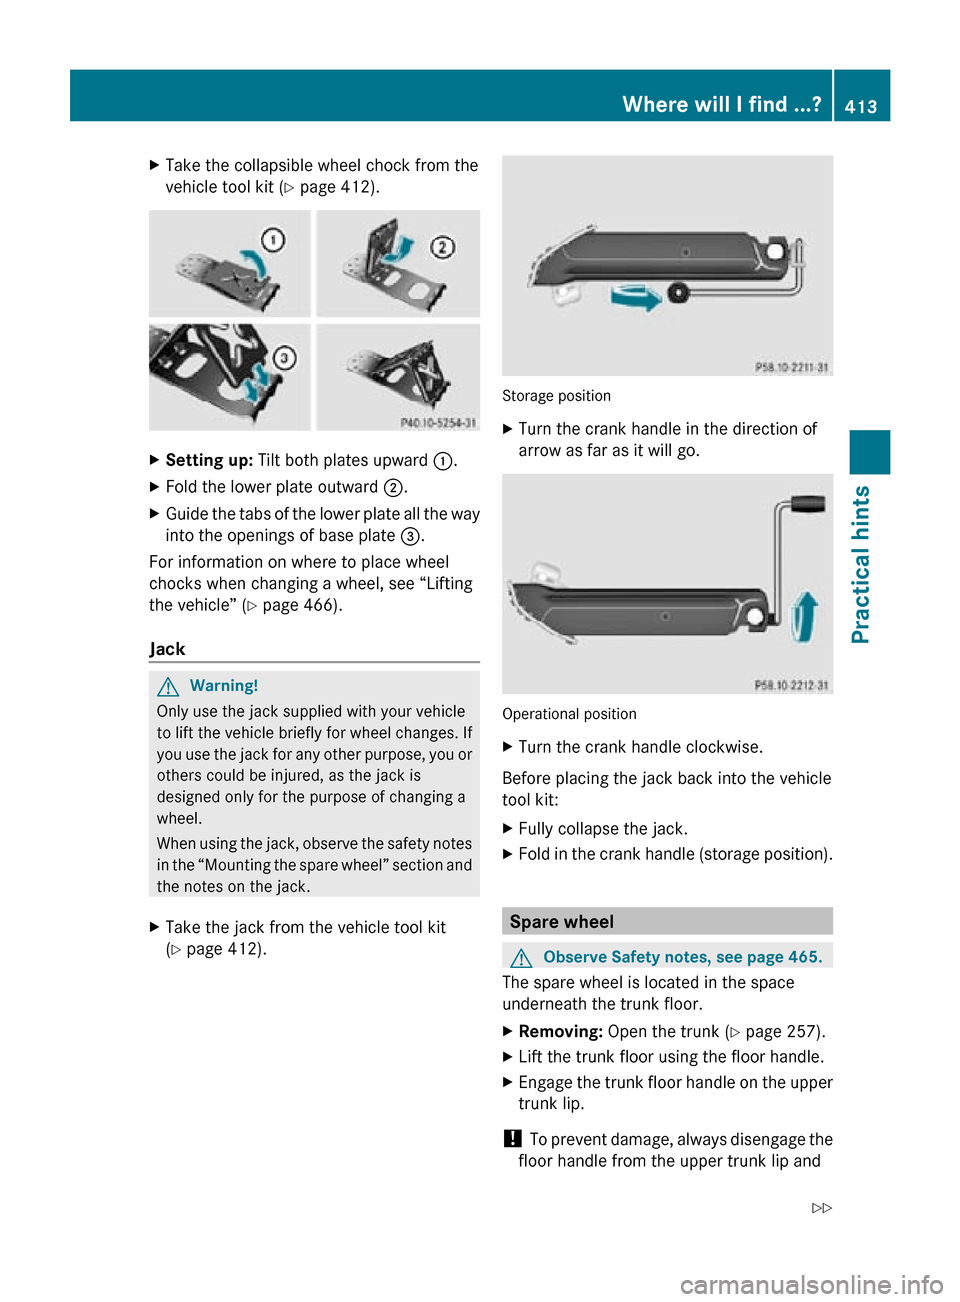
Take the collapsible wheel chock from the
vehicle tool kit (Y page 412). X
Setting up: Tilt both plates upward :.
X Fold the lower plate outward ;.
X Guide the tabs of the lower plate all the way
into the openings of base plate =.
For information on where to place wheel
chocks when changing a wheel, see “Lifting
the vehicle” ( Y page 466).
Jack G
Warning!
Only use the jack supplied with your vehicle
to lift the vehicle briefly for wheel changes. If
you use the jack for any other purpose, you or
others could be injured, as the jack is
designed only for the purpose of changing a
wheel.
When using the jack, observe the safety notes
in the “Mounting the spare wheel” section and
the notes on the jack.
X Take the jack from the vehicle tool kit
(Y page 412). Storage position
X
Turn the crank handle in the direction of
arrow as far as it will go. Operational position
X
Turn the crank handle clockwise.
Before placing the jack back into the vehicle
tool kit:
X Fully collapse the jack.
X Fold in the crank handle (storage position). Spare wheel
G
Observe Safety notes, see page 465.
The spare wheel is located in the space
underneath the trunk floor.
X Removing: Open the trunk (Y page 257).
X Lift the trunk floor using the floor handle.
X Engage the trunk floor handle on the upper
trunk lip.
! To prevent damage, always disengage the
floor handle from the upper trunk lip and Where will I find ...?
413Practical hints
216_AKB; 3; 90, en-US
d2ureepe, Version: 2.11.8.1 2009-05-15T11:47:50+02:00 - Seite 413 Z
Page 468 of 500
Mounting the spare wheel
Introduction X
Prepare the vehicle as described
(Y page 465).
X Take the following out of the vehicle:
R
spare wheel
R jack
R vehicle tool kit
R wheel bolts for spare wheel
For information on where to find the
respective items, see “Where will I find ...?”
(Y page 412) and ( Y page 413).
i Vehicles without spare wheel are not
factory-equipped with
the tools required for
a wheel change such as a jack or a wheel
wrench. Some tools required for a wheel
change are specific to your vehicle.
Contact an authorized Mercedes-Benz
Center to obtain the tools approved for
your vehicle. This section describes the
wheel change using the tools approved and
recommended for your vehicle.
Lifting the vehicle G
Warning!
When jacking up the vehicle, only use the jack
which has been specifically approved by
Mercedes-Benz for your vehicle.
The jack
is designed exclusively for jacking up
the vehicle at the jack take-up brackets built
into both sides of the vehicle. Make sure the
jack arm is fully seated in the jack take-up
bracket. The jack must always be vertical
when in use, especially on inclines or
declines.
The jack is intended only for lifting the vehicle
briefly for wheel changes. It is not suited for
performing maintenance work under the
vehicle. To help avoid personal injury, use the
jack only to lift the vehicle during a wheel
change. Never get beneath the vehicle while it is
supported by the jack. Keep hands and feet
away from the area under the lifted vehicle.
Always lower the vehicle onto sufficient
capacity
jackstands
before working under the
vehicle.
Always make sure the electronic parking
brake is engaged. In addition, block the
wheels with wheel chocks or other sizeable
objects before raising the vehicle with the
jack. Do not disengage the electronic parking
brake while the vehicle is raised.
Make sure that the ground on which the
vehicle is standing and where you place the
jack is solid, level and not slippery. If
necessary, use a large underlay. On slippery
surfaces, such as tiled floors, you should use
a non-slip underlay, for example a rubber mat.
Do not use wooden blocks or similar objects
to support the jack. Otherwise the jack may
not be able to achieve its load-bearing
capacity if it is not at its full height.
Never start the engine when the vehicle is
raised.
Also observe the notes on the jack.
X Prevent the vehicle from rolling away by
blocking wheels
with wheel chocks or other
sizeable objects.
When your vehicle is equipped with a wheel
chock, it is included with the vehicle tool kit
(Y page 412). For information on setting up
the collapsible wheel chock, see
(Y page 412).
When changing a wheel on a level surface:
X Place a wheel chock or other sizeable
object in
front of and another wheel chock
or other sizeable object behind the wheel
that is diagonally opposite to the wheel
being changed. 466
Flat tire
Practical hints
216_AKB; 3; 90, en-US
d2ureepe,
Version: 2.11.8.1 2009-05-15T11:47:50+02:00 - Seite 466