wiper blades MERCEDES-BENZ CL550 2010 W216 Owner's Manual
[x] Cancel search | Manufacturer: MERCEDES-BENZ, Model Year: 2010, Model line: CL550, Model: MERCEDES-BENZ CL550 2010 W216Pages: 500, PDF Size: 9.5 MB
Page 21 of 500
Vehicle specification
CL 550 4MATIC ............................. 483
CL 600 ........................................... 483
CL 63 AMG .................................... 484
CL 65 AMG .................................... 485
Vehicle status message memory .... 214
Vehicle tool kit .................................. 412
Vehicle washing see Vehicle care
Vehicle weights
see Vehicle specification
Video .................................................. 174
Video Aux ........................................... 172
Voice Control System
Address book ................................. 229
CD/DVD changer/MP3 .................234
Command list ................................ 237
External devices ............................. 236
Individualization ............................. 250
Introduction ................................... 217
Navigation ..................................... 219
Radio ............................................. 231
Settings ........................................... 80
Telephone ...................................... 225
Troubleshooting ............................. 247 W
Warning sounds Advanced Parking Guidance ..........330
DISTRONIC PLUS ........................... 307
Driver’s or passenger’s seat belt
.....48
Electronic parking brake ................ 431
Park Assist ..................................... 326
Parktronic system ..........................324
Seat belt telltale ............................ 454
Warranty coverage ............................ 480
Washer and headlamp cleaning
system ................................................ 496
Washer fluid
Mixing ratio .................................... 496
Refilling .......................................... 372
Washing the vehicle .......................... 403
Wear pattern (tires) ..........................388
Weights (vehicle) see Vehicle specification Wheel
Changing ....................................... 465
Removing ....................................... 467
Spare ............................................. 465
Tightening torque ........................... 469
Wheels, sizes
..................................... 486
Wheels, Tires and .............................. 373
Window curtain air bags ..................... 41
Windows see Power windows
Windows, cleaning ............................408
Windshield Cleaning wiper blades .................... 408
Defogging ...................................... 343
Infrared reflecting ..........................364
Washer fluid ................................... 496
Wipers ........................................... 280
Windshield wipers
Replacing wiper blades .................. 464
Winter driving
Instructions .................................... 396
Snow chains .................................. 396
Tires ............................................... 395
Winter tires ................................ 395, 486
Wood trims, cleaning ........................ 410 Z
ZAGAT ®
Rating Service .....................115 Index
19 216_AKB; 3; 90, en-US
d2ureepe,
Version: 2.11.8.1 2009-05-15T11:47:50+02:00 - Seite 19
Page 28 of 500
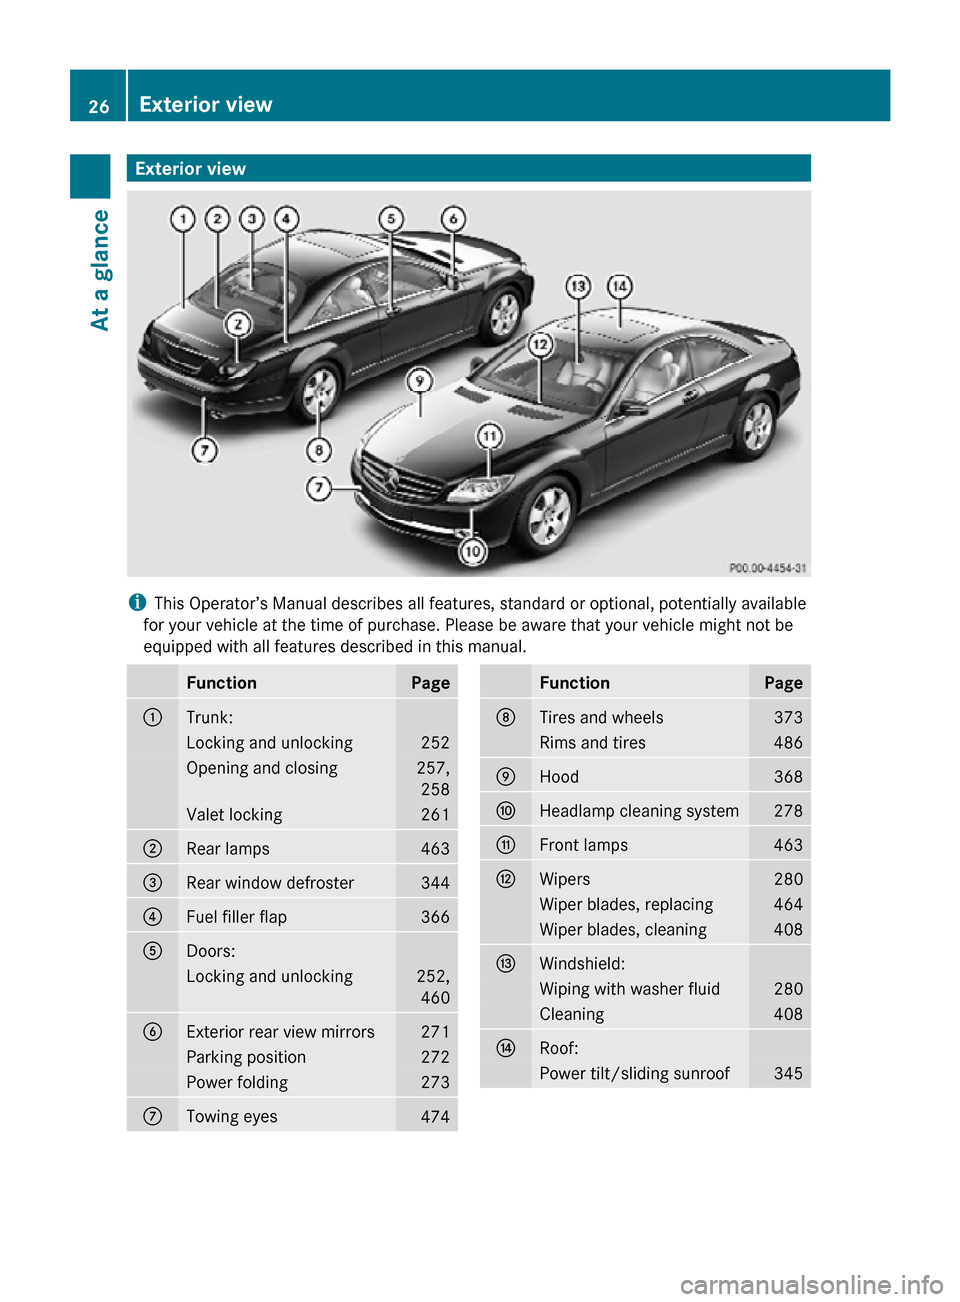
Exterior view
i
This Operator’s Manual describes all features, standard or optional, potentially available
for your vehicle at the time of purchase. Please be aware that your vehicle might not be
equipped with all features described in this manual. Function Page
:
Trunk:
Locking and unlocking 252
Opening and closing 257,
258 Valet locking 261
;
Rear lamps 463
=
Rear window defroster 344
?
Fuel filler flap 366
A
Doors:
Locking and unlocking 252,
460 B
Exterior rear view mirrors 271
Parking position 272
Power folding 273
C
Towing eyes
474 Function Page
D
Tires and wheels 373
Rims and tires 486
E
Hood 368
F
Headlamp cleaning system 278
G
Front lamps 463
H
Wipers 280
Wiper blades, replacing 464
Wiper blades, cleaning 408
I
Windshield:
Wiping with washer fluid 280
Cleaning 408
J
Roof:
Power tilt/sliding sunroof 34526
Exterior viewAt a glance
216_AKB; 3; 90, en-US
d2ureepe,
Version: 2.11.8.1 2009-05-15T11:47:50+02:00 - Seite 26
Page 282 of 500
R
unlock the vehicle
R remove the SmartKey from the starter
switch ( Interior Lighting Delayed
Switch-off must be switched on
(Y page 191))
R open a door
The interior lighting goes out after a short
time (Y page 191).
i If a door remains open, the interior lamps
go out automatically after approximately
5 minutes.
X Deactivating: Press button ~.
The OFF indicator lamp next to the button
comes on.
Manual control X
Switching front interior lighting on/
off: Press button c.
X Switching rear interior lighting on/off:
Press button s.
X Switching front reading lamps on/off:
Press respective button p.
i The brightness of the ambient lighting is
adjusted via COMAND ( Y page 192).
Emergency lighting The interior lighting comes on automatically
if the vehicle is involved in an accident.
Switching off:
X
Press hazard warning flasher switch
(Y page 278).
or
X Press switch ~.
or
X Unlock the vehicle with the SmartKey. Wipers
Notes
! Do not operate the wipers when the
windshield is dry. Dust that accumulates on
a windshield might scratch the glass and/
or damage the wiper blades when wiping
occurs on a dry windshield. If it is necessary
to operate the wipers in dry weather
conditions, always operate the wipers with
washer fluid.
! If the windshield wipers leave smears on
the windshield after the car has been driven
through an automatic car wash, then wax
or other residue is on the windshield.
Shortly after washing the car in an
automatic car wash, clean the windshield
with washer fluid. Windshield wipers
X Observe notes on page (Y page 280).
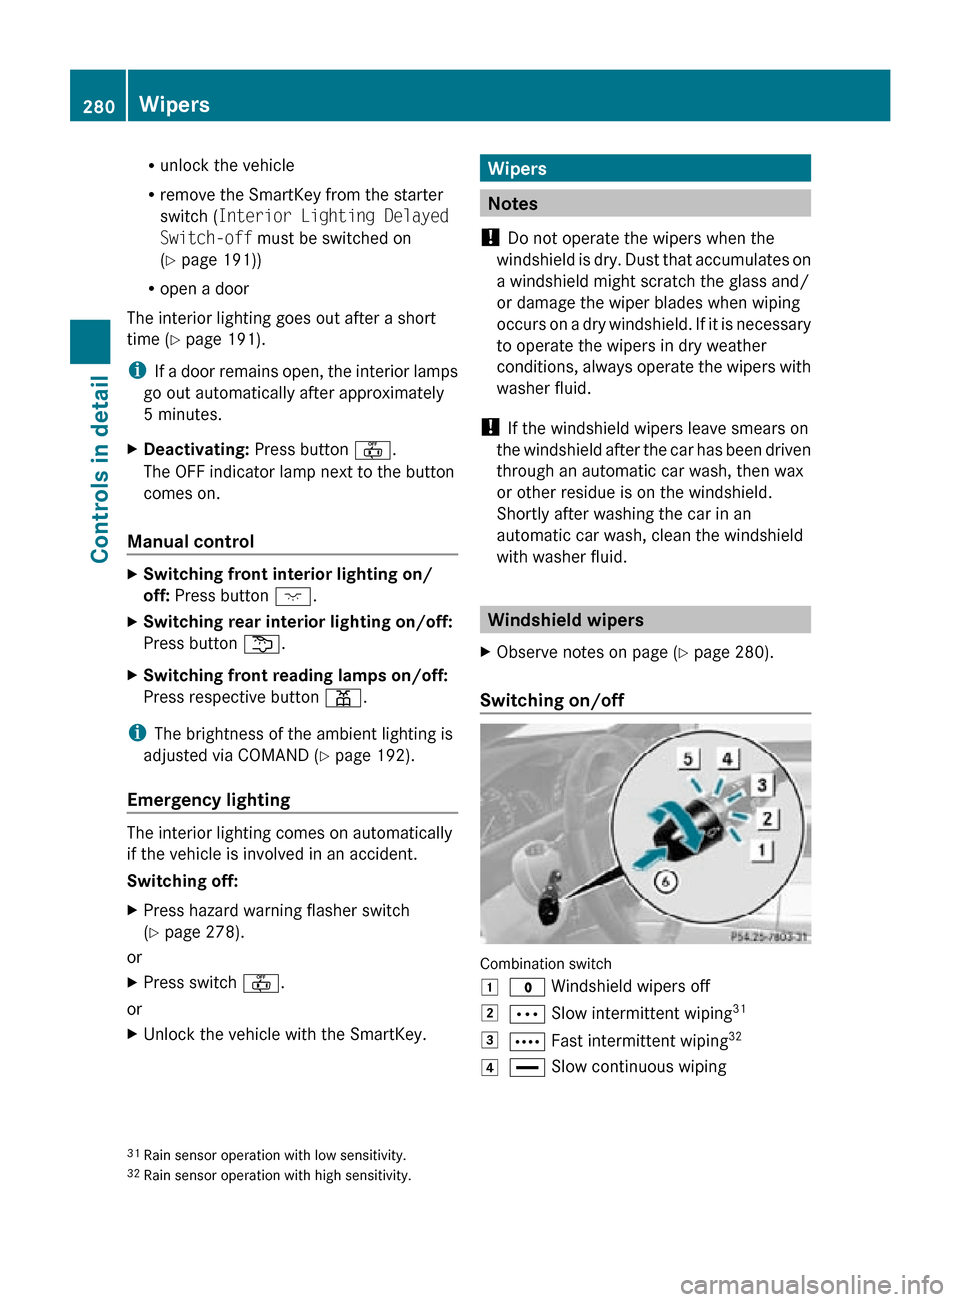
Switching on/off Combination switch
1
$ Windshield wipers off
2 Ä Slow intermittent wiping 31
3 Å Fast intermittent wiping 32
4 ° Slow continuous wiping
31 Rain sensor operation with low sensitivity.
32 Rain sensor operation with high sensitivity. 280
WipersControls in detail
216_AKB; 3; 90, en-US
d2ureepe,
Version: 2.11.8.1 2009-05-15T11:47:50+02:00 - Seite 280
Page 283 of 500
5
¯ Fast continuous wiping
B í Single wipe/ î Wiping with
washer fluid
X Switch on the ignition.
X Turn the combination switch to the desired
position, depending on the intensity of the
rain.
i When the
windshield wipers are switched
on and you stop the vehicle, the wipers
operate more slowly.
Intermittent wiping Only switch on intermittent wiping under wet
weather conditions or in the presence of
precipitation.
When
you
select intermittent wiping, the rain
sensor is activated. The rain sensor sets a
suitable wiping interval depending on the
wetness of the sensor surface automatically.
! Do not leave windshield wipers on an
intermittent setting when the vehicle is
taken to an automatic car wash or during
windshield cleaning. Windshield wipers will
operate in the presence of water sprayed
on the windshield, and windshield wipers
may be damaged as a result.
! If you have set intermittent wiping, dirt on
the surface of the rain sensor or optical
effects may cause the windshield wipers to
wipe in an undesired fashion. This could
then damage the windshield wiper blades
or scratch the windshield. You should
therefore switch off the windshield wipers
when weather conditions are dry.
X Turn the combination switch to position
Ä or Å.
After the initial wipe, pauses between
wipes are controlled by the rain sensor
automatically.
Intermittent wiping is interrupted when the
vehicle is
at a standstill and a door is opened.
This protects persons getting into or out of
the vehicle from being sprayed. Intermittent wiping will be continued when all
doors are closed and
R
the automatic transmission is in drive
position D or reverse gear R
or
R the wiper setting is changed using the
combination switch
Single wipe X
Press the combination switch briefly in
direction of arrow B to the resistance
point.
The windshield wipers wipe one time
without washer fluid.
Wiping with washer fluid X
Press the combination switch in direction
of arrow B past the resistance point.
The windshield
wipers operate with washer
fluid.
i To prevent smears on the windshield or
noisy/chattering wiper blades, wipe with
washer fluid
every now and then even when
it is raining.
For information on filling up the washer
reservoir, see “Washer system and headlamp
cleaning system” ( Y page 372).
For information on cleaning the headlamps
with washer fluid, see “Headlamp cleaning
system” ( Y page 278). Problems with wipers
! If anything blocks the windshield wipers
(leaves, snow, etc.), switch them off
immediately.
For safety
reasons, do the following before
attempting to remove any blockage:
R Stop the vehicle in a safe location.
R Remove the SmartKey from the starter
switch.
or Wipers
281
Controls in detail
216_AKB; 3; 90, en-US
d2ureepe, Version: 2.11.8.1 2009-05-15T11:47:50+02:00 - Seite 281 Z
Page 370 of 500
R
Washer system and headlamp cleaning
system (Y page 372)
R Brake fluid ( Y page 373) Engine compartment
Hood
G
Warning!
Do not pull the release lever while the vehicle
is in motion. Otherwise the hood could be
forced open by passing air flow.
This could cause the hood to come loose and
injure you and/or others.
Opening G
Warning!
If you see flames or smoke coming from the
engine compartment, or if the coolant
temperature gauge indicates that the engine
is overheated, do not open the hood. Move
away from vehicle and do not open the hood
until the engine has cooled. If necessary, call
the fire department. G
Warning!
You could be injured when the hood is open –
even when the engine is turned off.
Parts of the engine can become very hot. To
prevent burns, let the engine cool completely
before touching any components on the
vehicle. Comply with all relevant safety
precautions. G
Warning!
To help prevent personal injury, stay clear of
moving parts when the hood is open and the
engine is running.
The radiator fan may continue to run for
approximately 30 seconds or may even
restart after the engine has been turned off.
Stay clear of fan blades. G
Warning!
The engine is equipped with a transistorized
ignition system. Because of the high voltage
it is dangerous to touch any components
(ignition coils, spark plug sockets, diagnostic
socket) of the ignition system
R with the engine running
R while starting the engine
R when the ignition is switched on and the
engine is turned manually X
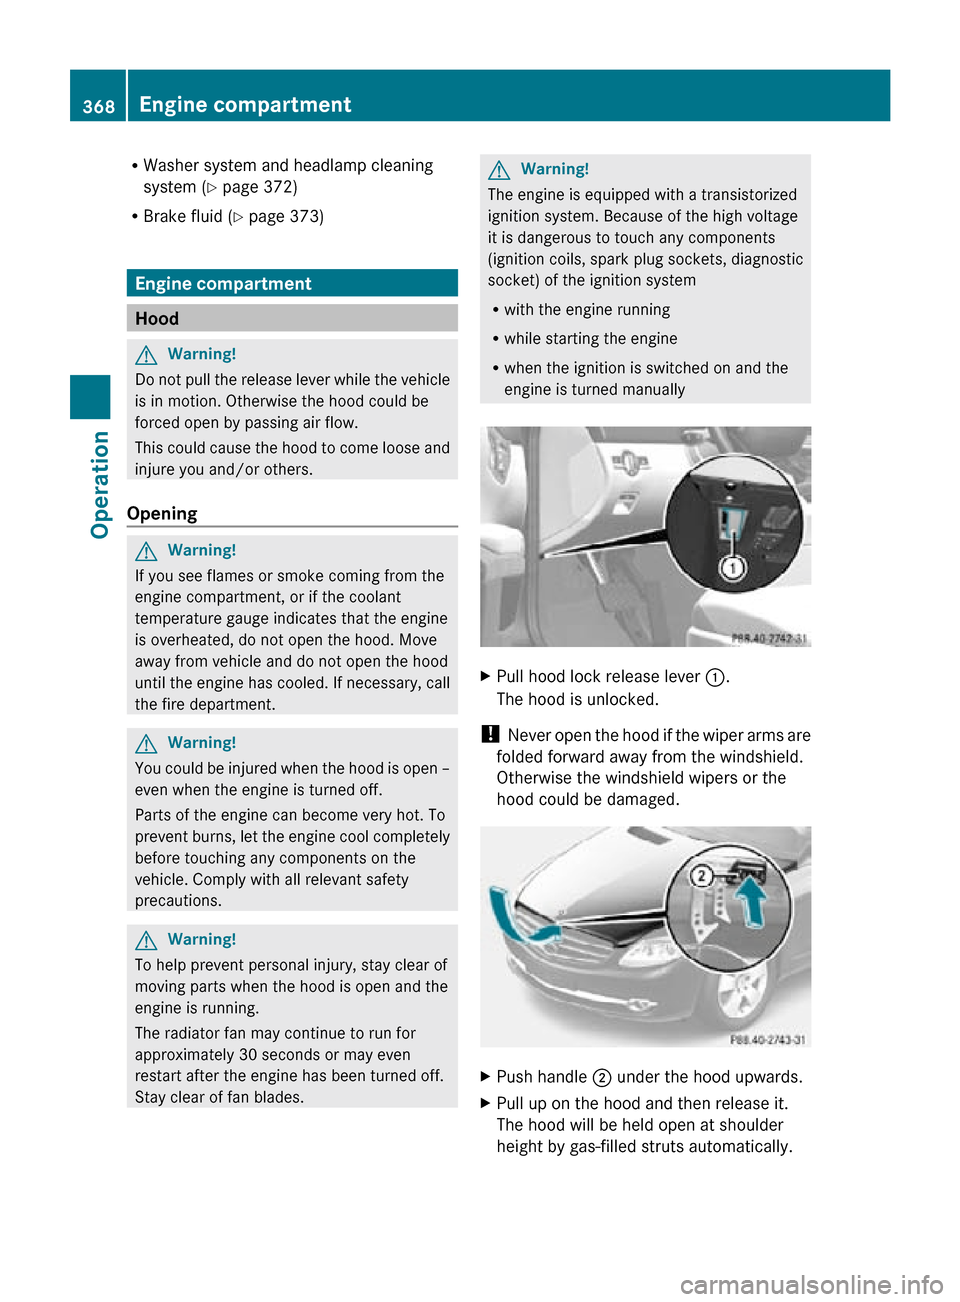
Pull hood lock release lever :.
The hood is unlocked.
! Never open the hood if the wiper arms are
folded forward away from the windshield.
Otherwise the windshield wipers or the
hood could be damaged. X
Push handle ; under the hood upwards.
X Pull up on the hood and then release it.
The hood will be held open at shoulder
height by gas-filled struts automatically. 368
Engine compartmentOperation
216_AKB; 3; 90, en-US
d2ureepe,
Version: 2.11.8.1 2009-05-15T11:47:50+02:00 - Seite 368
Page 410 of 500
Cleaning the windows and the wiper
blades
!
The windshield wipers must be in a
vertical position before folding them away
from the windshield. They could otherwise
damage the hood.
Never open
the hood when the wiper arms
are folded forward.
X Make sure the hood is fully closed.
X Switch on the ignition.
X Turn combination switch to wiper setting
° (Y page 280).
X With wiper arms in vertical position, switch
off the ignition. G
Warning!
For safety reasons, switch off wipers and
remove SmartKey from starter switch before
cleaning the windshield and/or the wiper
blades. Vehicles with KEYLESS-GO: Make
sure the vehicle’s on-board electronics have
status 0. Otherwise, the wiper motor could
suddenly turn on and cause injury.
! Do not pull on the wiper blade inserts.
They could tear.
X Fold the wiper arms forward until they snap
into place.
X Clean the windshield and the wiper blade
inserts with a clean cloth and mild
detergent solution.
X Use a soft, clean cloth and a mild window
cleaning solution on all outside and inside
glass surfaces.
An automotive glass cleaner is
recommended.
! Fold the
windshield wiper arms back onto
the windshield before turning the SmartKey
in the starter switch or pressing the
KEYLESS-GO start/stop button.
Hold on to the wiper when folding the wiper
arm back. If released, the force of the impact from the tensioning spring could
crack the windshield.
! To clean the window interior, do not use
a dry
cloth, abrasives, solvents or cleaners
containing solvents. Do not touch the
inside of the windows with hard objects
such as an ice scraper or ring. Doing so may
damage the windows.
Light alloy wheels If possible, clean wheels once a week.
X
Use Mercedes-Benz approved Wheel Care,
a soft bristle brush and a strong spray of
water for cleaning the light alloy wheels.
! Only use acid-free cleaning materials.
Acid may cause corrosion or damage the
clear coat.
! The vehicle should not be parked for an
extended period of time immediately after
it has
been cleaned. This applies especially
after the wheel rims have been cleaned
with wheel rim cleaner. Wheel rim cleaners
can lead to increased corrosion of the
brake disks and brake pads. Non-approved
wheel cleaners may also damage the wheel
paint if the vehicle is not driven after
cleaning.
Therefore, the vehicle’s brake system
should always be warmed-up before it is
parked after cleaning. Drive your vehicle for
several minutes to allow the brakes to dry.
When applying Mercedes-Benz approved
Tire Care and Mercedes-Benz approved
Wheel Care products, take care not to
spray them on the brake disks. 408
Vehicle careOperation
216_AKB; 3; 90, en-US
d2ureepe,
Version: 2.11.8.1 2009-05-15T11:47:50+02:00 - Seite 408
Page 413 of 500
Vehicle equipment ............................
412
Where will I find ...? .......................... 412
Vehicle status messages in the
multifunction display ....................... 414
What to do if … .................................. 450
Unlocking/locking manually ...........460
Replacing SmartKey batteries ......... 461
Replacing bulbs ................................. 463
Replacing wiper blades ....................464
Flat tire .............................................. 465
Battery ............................................... 469
Jump starting .................................... 471
Towing the vehicle ............................473
Fuses .................................................. 476 411Practical hints
216_AKB; 3; 90, en-US
d2ureepe,
Version: 2.11.8.1 2009-05-15T11:47:50+02:00 - Seite 411
Page 466 of 500
Replacing bulbs for rear lamps
Tail lamp unit The tail lamps are equipped with HiP bulbs
and LEDs. Have them replaced at an
authorized Mercedes-Benz Center.
Replacing wiper blades
Safety notes
G
Warning!
For safety reasons, switch off the wipers and
remove the SmartKey from the starter switch
(vehicles with KEYLESS-GO: Make sure the
vehicle’s on-board electronics have status 0)
before replacing a wiper blade. Otherwise, the
wiper motor could suddenly turn on and cause
injury. G
Warning!
Wiper blades are components that are subject
to wear and tear. Replace the wiper blades
twice a year, preferably in the spring and fall.
Otherwise the windshield will not be wiped
properly. As a result, you may not be able to
observe surrounding traffic conditions and
could cause an accident.
! To avoid damage to the hood, the wiper
arms should only be folded forward when
in the vertical position.
! Never open the hood when a wiper arm is
folded forward.
Hold on to the wiper when folding a wiper
arm back. If released, the force of the
impact from the tensioning spring could
crack the windshield.
Do not allow a wiper arm to contact the
windshield glass without a wiper blade
inserted.
Mercedes-Benz recommends that you have
this work carried out at an authorized
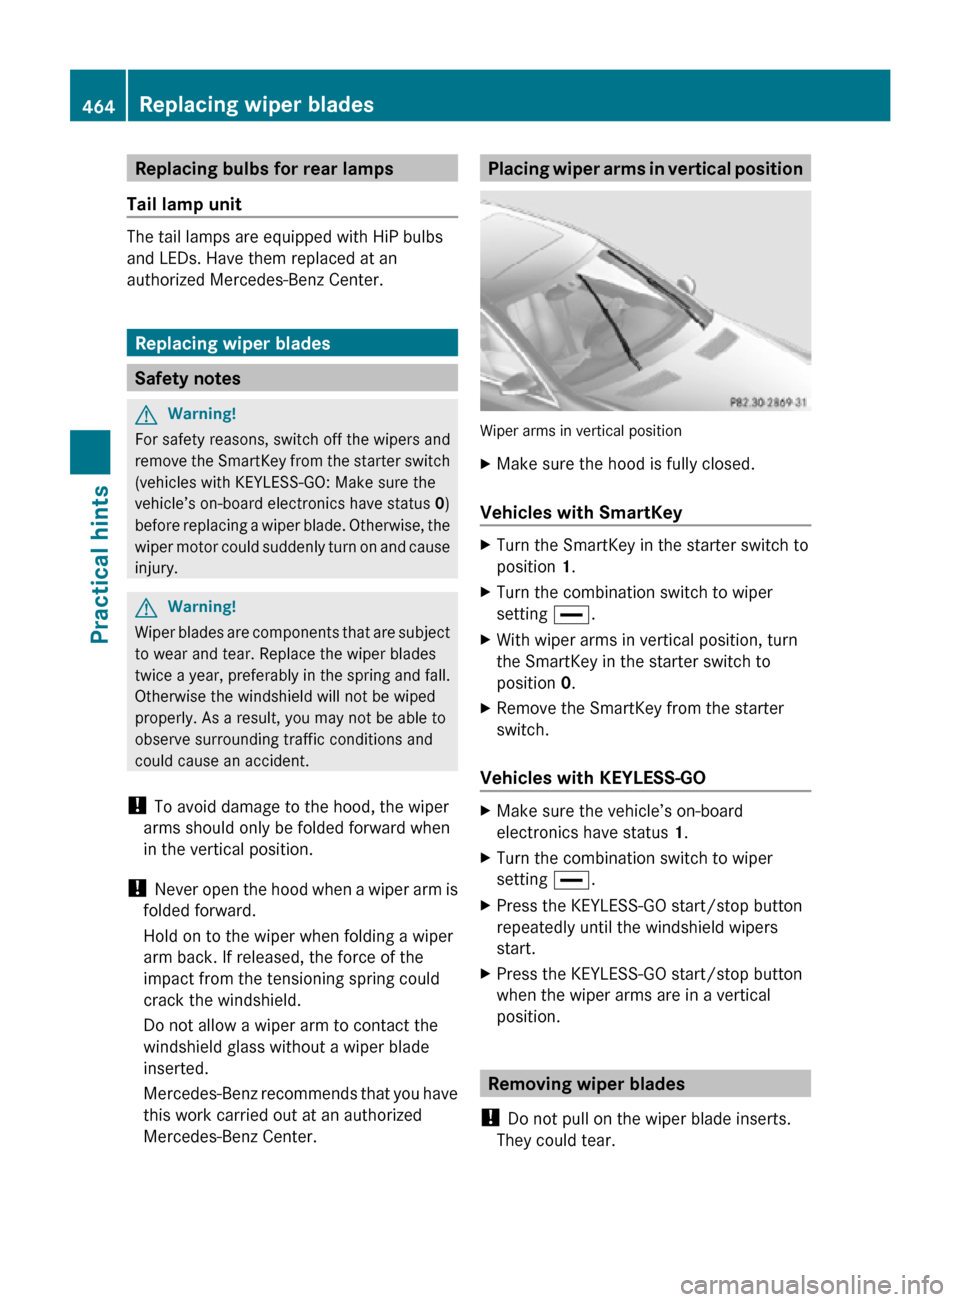
Mercedes-Benz Center. Placing wiper arms in vertical position
Wiper arms in vertical position
X
Make sure the hood is fully closed.
Vehicles with SmartKey X
Turn the SmartKey in the starter switch to
position 1.
X Turn the combination switch to wiper
setting °.
X With wiper arms in vertical position, turn
the SmartKey in the starter switch to
position 0.
X Remove the SmartKey from the starter
switch.
Vehicles with KEYLESS-GO X
Make sure the vehicle’s on-board
electronics have status 1.
X Turn the combination switch to wiper
setting °.
X Press the KEYLESS-GO start/stop button
repeatedly until the windshield wipers
start.
X Press the KEYLESS-GO start/stop button
when the wiper arms are in a vertical
position. Removing wiper blades
! Do not pull on the wiper blade inserts.
They could tear. 464
Replacing wiper bladesPractical hints
216_AKB; 3; 90, en-US
d2ureepe,
Version: 2.11.8.1 2009-05-15T11:47:50+02:00 - Seite 464
Page 467 of 500
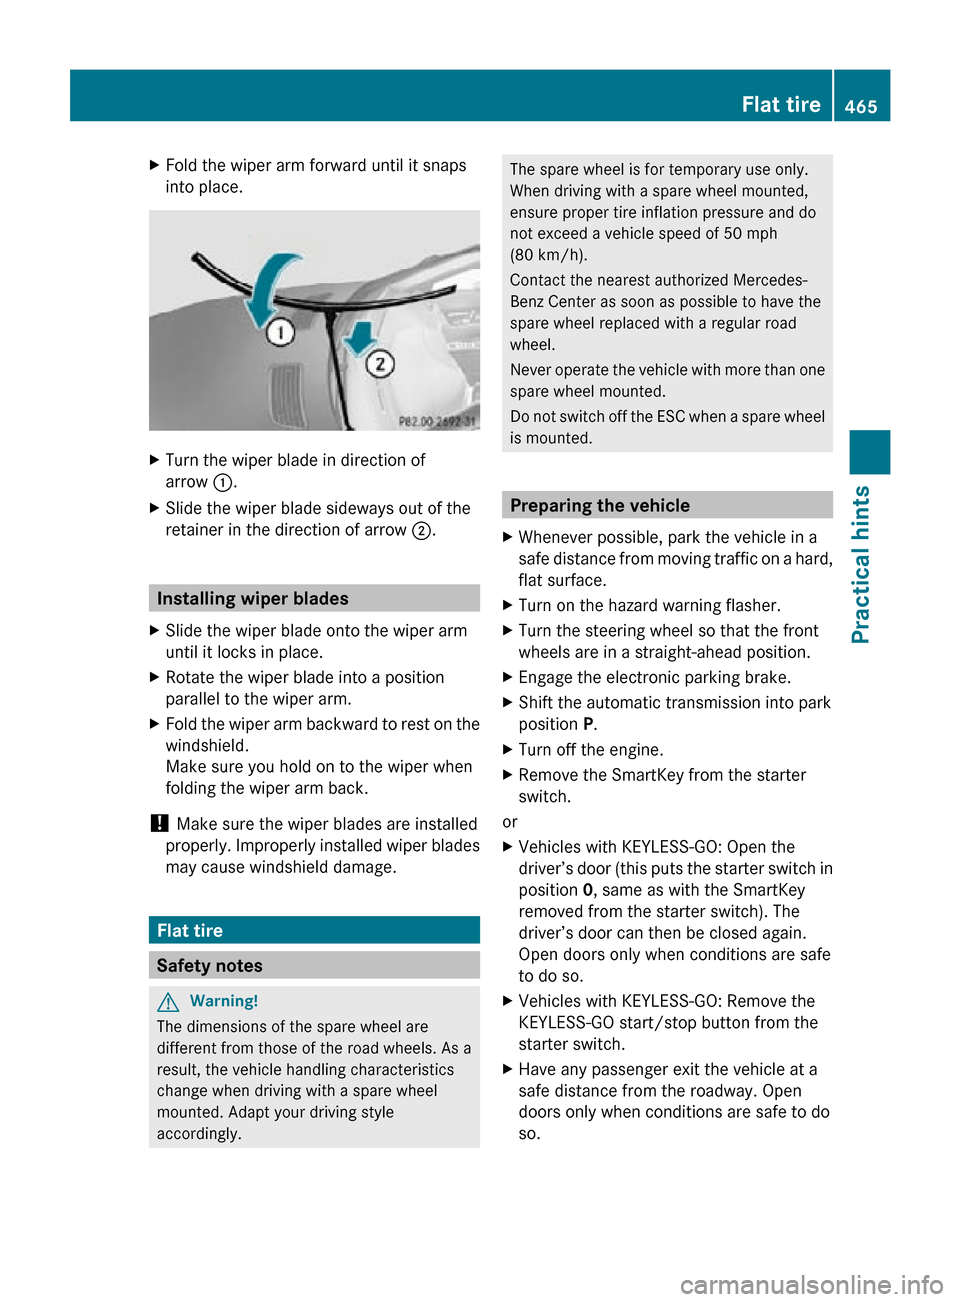
X
Fold the wiper arm forward until it snaps
into place. X
Turn the wiper blade in direction of
arrow :.
X Slide the wiper blade sideways out of the
retainer in the direction of arrow ;. Installing wiper blades
X Slide the wiper blade onto the wiper arm
until it locks in place.
X Rotate the wiper blade into a position
parallel to the wiper arm.
X Fold the wiper arm backward to rest on the
windshield.
Make sure you hold on to the wiper when
folding the wiper arm back.
! Make sure the wiper blades are installed
properly. Improperly installed wiper blades
may cause windshield damage. Flat tire
Safety notes
G
Warning!
The dimensions of the spare wheel are
different from those of the road wheels. As a
result, the vehicle handling characteristics
change when driving with a spare wheel
mounted. Adapt your driving style
accordingly. The spare wheel is for temporary use only.
When driving with a spare wheel mounted,
ensure proper tire inflation pressure and do
not exceed a vehicle speed of 50 mph
(80 km/h).
Contact the nearest authorized Mercedes-
Benz Center as soon as possible to have the
spare wheel replaced with a regular road
wheel.
Never operate the vehicle with more than one
spare wheel mounted.
Do not switch off the ESC when a spare wheel
is mounted.
Preparing the vehicle
X Whenever possible, park the vehicle in a
safe distance from moving traffic on a hard,
flat surface.
X Turn on the hazard warning flasher.
X Turn the steering wheel so that the front
wheels are in a straight-ahead position.
X Engage the electronic parking brake.
X Shift the automatic transmission into park
position P.
X Turn off the engine.
X Remove the SmartKey from the starter
switch.
or
X Vehicles with KEYLESS-GO: Open the
driver’s door (this puts the starter switch in
position 0, same as with the SmartKey
removed from the starter switch). The
driver’s door can then be closed again.
Open doors only when conditions are safe
to do so.
X Vehicles with KEYLESS-GO: Remove the
KEYLESS-GO start/stop button from the
starter switch.
X Have any passenger exit the vehicle at a
safe distance from the roadway. Open
doors only when conditions are safe to do
so. Flat tire
465Practical hints
216_AKB; 3; 90, en-US
d2ureepe, Version: 2.11.8.1 2009-05-15T11:47:50+02:00 - Seite 465 Z