MERCEDES-BENZ CL55AMG 2001 C215 Owner's Manual
Manufacturer: MERCEDES-BENZ, Model Year: 2001, Model line: CL55AMG, Model: MERCEDES-BENZ CL55AMG 2001 C215Pages: 424, PDF Size: 27.87 MB
Page 201 of 424
198 Interior equipment
Te ch n ica l
data Instruments
and controlsOperationDrivingInstrument
cluster displayPractical hints Car care Index
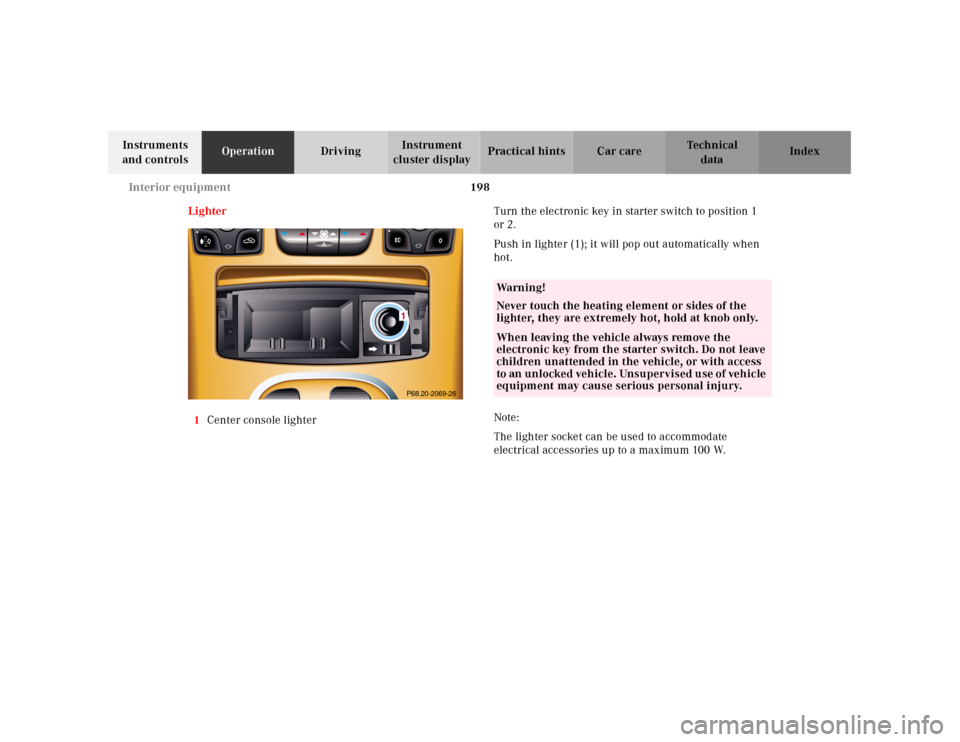
Lighter
1Center console lighterTurn the electronic key in starter switch to position 1
or 2.
Push in lighter (1); it will pop out automatically when
hot.
Note:
The lighter socket can be used to accommodate
electrical accessories up to a maximum 100 W.
P68.20-2069-261
Wa r n i n g !
Never touch the heating element or sides of the
lighter, they are extremely hot, hold at knob only.When leaving the vehicle always remove the
electronic key from the starter switch. Do not leave
children unattended in the vehicle, or with access
to an unlocked vehicle. Unsupervised use of vehicle
equipment may cause serious personal injury.
Page 202 of 424
199 Interior equipment
Te ch n ica l
data Instruments
and controlsOperationDrivingInstrument
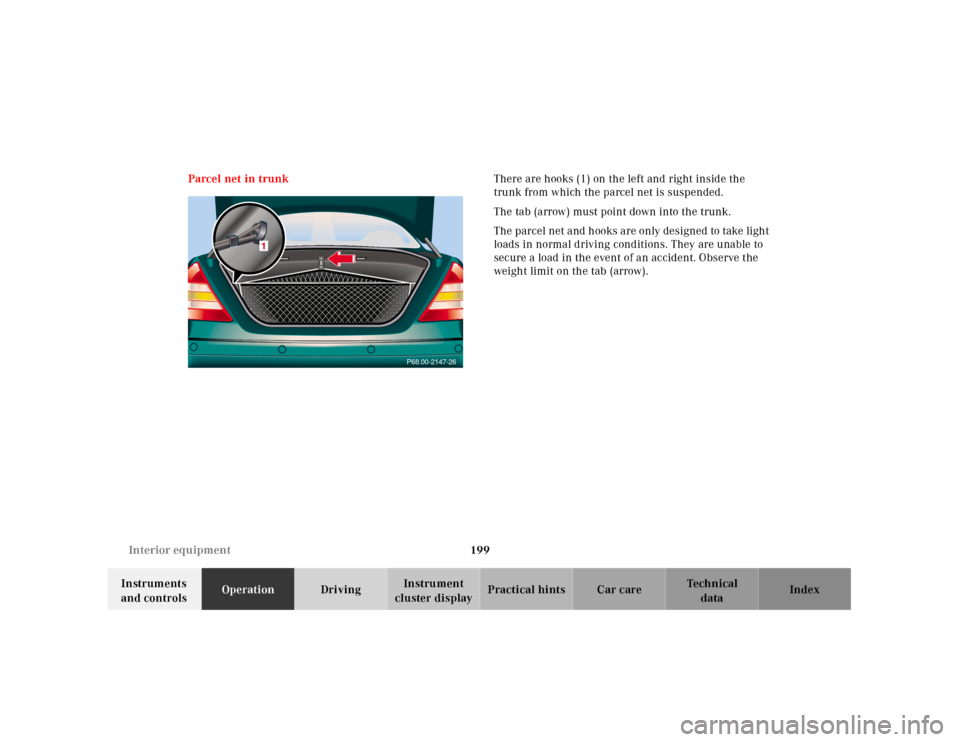
cluster displayPractical hints Car care Index Parcel net in trunkThere are hooks (1) on the left and right inside the
trunk from which the parcel net is suspended.
The tab (arrow) must point down into the trunk.
The parcel net a nd h ooks a re only designed to take ligh t
loads in normal driving conditions. They are unable to
secure a load in the event of an accident. Observe the
weight limit on the tab (arrow).
P68.00-2147-26
1
Page 203 of 424
200 Interior equipment
Te ch n ica l
data Instruments
and controlsOperationDrivingInstrument
cluster displayPractical hints Car care Index
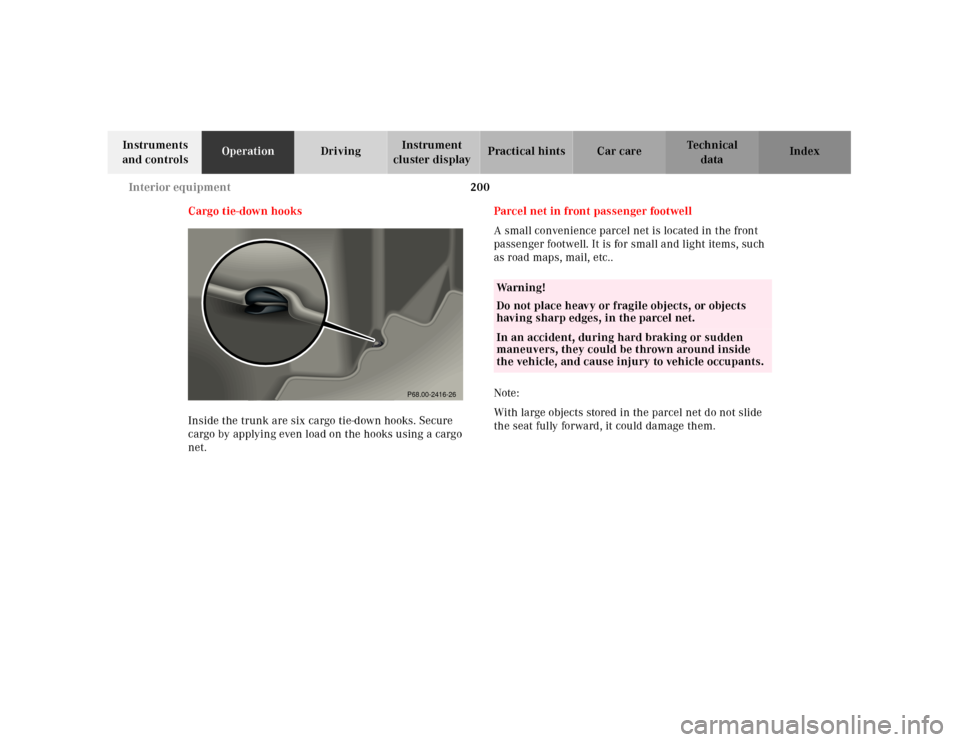
Cargo tie-down hooks
Inside the trunk are six cargo tie-down hooks. Secure
cargo by applying even load on the hooks using a cargo
net.Parcel net in front passenger footwell
A small convenience parcel net is located in the front
passenger footwell. It is for small and light items, such
as road maps, mail, etc..
Note:
With large objects stored in the parcel net do not slide
the seat fully forward, it could damage them.
P68.00-2416-26
Wa r n i n g !
Do not place heavy or fragile objects, or objects
having sharp edges, in the parcel net.In an accident, during hard braking or sudden
maneuvers, they could be thrown around inside
the vehicle, and cause injury to vehicle occupants.
Page 204 of 424
201 Interior equipment
Te ch n ica l
data Instruments
and controlsOperationDrivingInstrument
cluster displayPractical hints Car care Index Telephone, general
See separate instruction manual for instructions on how
to operate the telephone.
Wa r n i n g !
A driver’s attention to the road must always be his/
her primary focus when driving. For your safety
and the safety of others, we recommend that you
pull over to a safe location and stop before placing
or taking a telephone call. If you choose to use the
telephone while driving, please use the hands-free
device and only use the telephone when road and
traffic conditions permit.Some jurisdictions prohibit the driver from using a
cellular telephone while driving a vehicle.
Bear in mind that at a speed of just 30 mph
(approximately 50 km/h), your vehicle is covering
a distance of approximately 50 feet (approximately
14 m) every second. Never operate radio transmitters equipped with a
built-in or attached antenna (i.e. without being
connected to an external antenna) from inside the
vehicle while the engine is running. Doing so could
lead to a malfunction of the vehicle’s electronic
system, possibly resulting in an accident and
personal injury.
Page 205 of 424
202 Garage door opener
Te ch n ica l
data Instruments
and controlsOperationDrivingInstrument
cluster displayPractical hints Car care Index
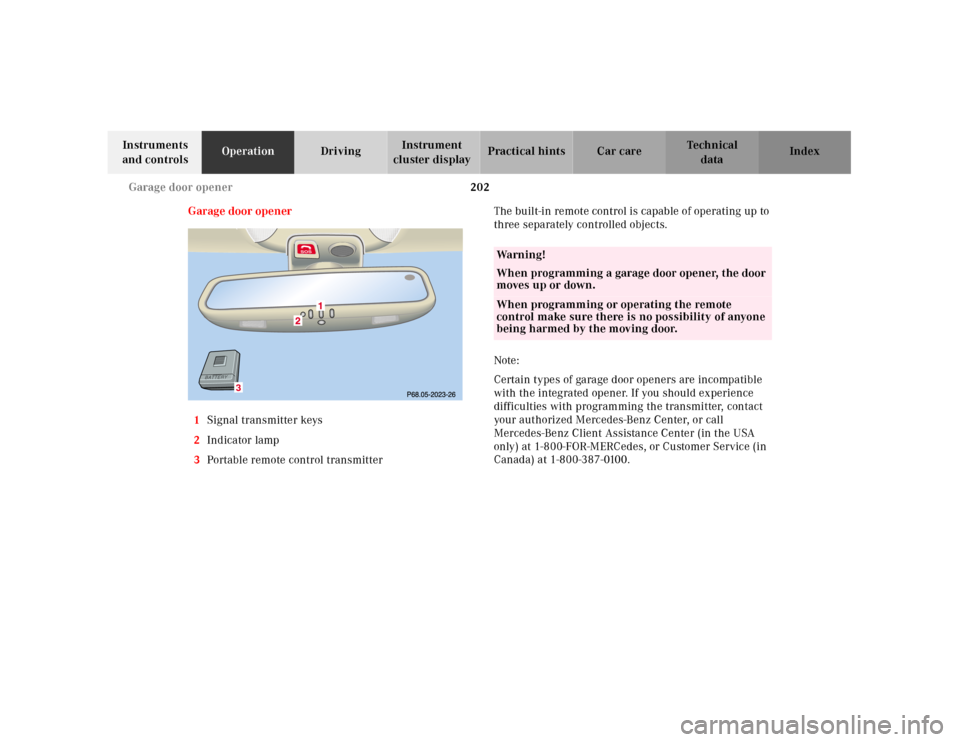
Garage door opener
1Signal transmitter keys
2Indicator lamp
3Portable remote control transmitterThe built-in remote control is capable of operating up to
three separately controlled objects.
Note:
Certain types of garage door openers are incompatible
with the integrated opener. If you should experience
difficulties with programming the transmitter, contact
your authorized Mercedes-Benz Center, or call
Mercedes-Benz Client Assistance Center (in the USA
only) at 1-800-FOR-MERCedes, or Customer Service (in
Canada) at 1-800-387-0100.
3
Wa r n i n g !
When programming a garage door opener, the door
moves up or down.When programming or operating the remote
control make sure there is no possibility of anyone
being harmed by the moving door.
Page 206 of 424
203 Garage door opener
Te ch n ica l
data Instruments
and controlsOperationDrivingInstrument
cluster displayPractical hints Car care Index For operation in the USA only: This device complies
with Part 15, Subpart C, Section 209 of the FCC Rules.
Operation is subject to the following two conditions:
(1) This device may not cause harmful interference, and
(2) this device must accept any interference received,
including interference that may cause undesired
operation.
WARNING: Changes or modification not expressly
a p pr ove d by pa rt y r e s po n si b l e f or c o mpl ia n c e c o u l d vo i d
the user’s authority to operate the equipment.
Programming or reprogramming the integrated
remote control:
1. Turn electronic key in starter switch to position 1
or 2.
2. Hold the end of the hand-held transmitter of the
d evice you w ish to train approxim ately 2 to 5 inch es
(5 cm to 12 cm) away from the surface of the
integrated remote control located on the inside rear
view mirror, keeping the indicator lamp in view.3. Using both hands, simultaneously push the hand-
held transmitter button and the desired integrated
remote control button. Do not release the buttons
until completing step 4.
4. The indicator lamp on the integrated remote control
will flash, first slowly and then rapidly. When the
indicator lamp f lashes rapidly, both buttons may be
released (the rapid flashing lamp indicates
successful programming of the new frequency
signal). To program the remaining two buttons,
follow ste ps 1 through 4.
Note:
If, after repeated attempts, you do not successfully
program the integrated remote control device to learn
the signal of the hand-held transmitter, the garage door
opener could be equipped with the “rolling code
feature”.
Page 207 of 424
204 Garage door opener
Te ch n ica l
data Instruments
and controlsOperationDrivingInstrument
cluster displayPractical hints Car care Index
Rolling code programming:
To train a garage door opener (or other rolling code
devices) with the rolling code feature, follow these
instructions after completing the “Programming”
portion of this text. (A second person may make the
following training procedures quicker and easier.)
1. Locate training button on the garage door opener
motor head unit. Exact location and color of the
button may vary by garage door opener brand. If
there is difficulty locating the transmitting button,
reference to garage door opener operator’s manual.
2. Press “training” button on the garage door opener
motor head unit (which activated the “training
light”).
Note:
Following step 2, there are 30 seconds to initiate
step 3.3. Firmly press and release the programmed
integrated remote control transmit button. Press
and release same button a second time to complete
the training process. (Some garage door openers
may require you to do this procedure a third time to
complete the training.)
4. Confirm the garage door operation by pressing the
programmed button on the integrated remote
control transmitter.
Canadian programming:
During programming, your hand-held transmitter may
automatically stop transmitting. Continue to press and
hold the integrated remote control transmitter button
(note steps 2 through 4 in the “Programming” portion)
while you press and re-press (“cycle”) your hand-held
transmitter every two seconds until the frequency
signal has been learned. The indicator lamp will flash
slowly and then rapidly after several seconds upon
successful training.
Page 208 of 424
205 Garage door opener
Te ch n ica l
data Instruments
and controlsOperationDrivingInstrument
cluster displayPractical hints Car care Index Operation of remote control:
1. Turn electronic key in starter switch to position 1
or 2.
2. Select and press the appropriate button to activate
the remote controlled device. The integrated remote
control transmitter continues to send the signal as
long as the button is pressed – up to 20 seconds.Erasing the remote control memory:
1. Turn electronic key in starter switch to position 1
or 2.
2. Simultaneously holding down the left and right side
buttons for approximately 20 seconds, or until the
control lamp blinks rapidly, will erase the codes of
all three channels.
Page 209 of 424
206 Infrared reflecting windshield
Te ch n ica l
data Instruments
and controlsOperationDrivingInstrument
cluster displayPractical hints Car care Index
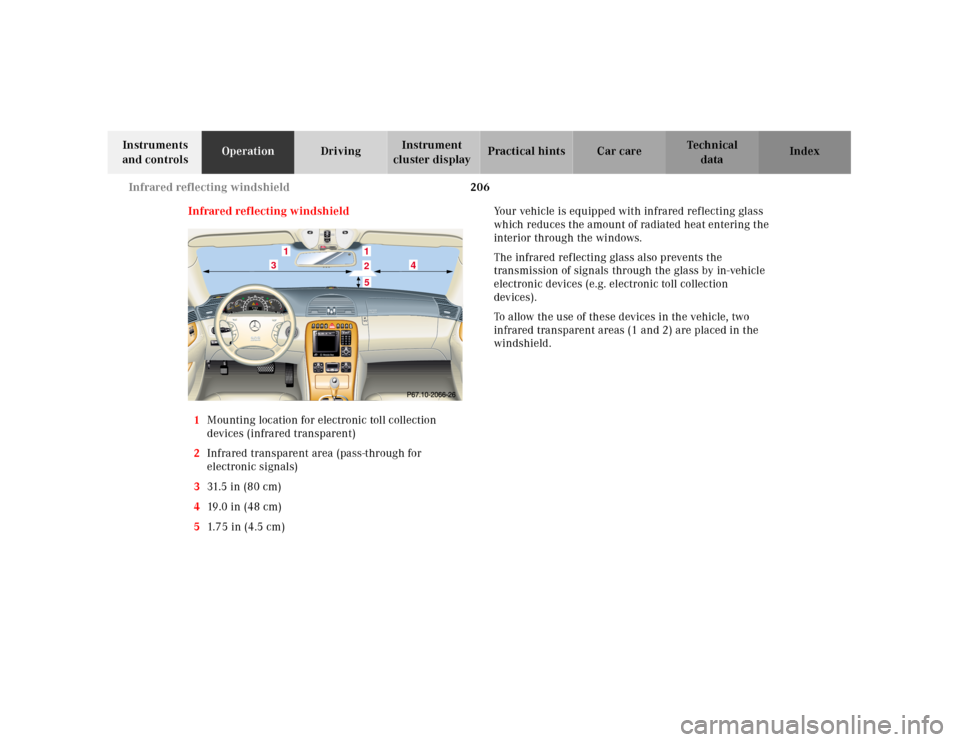
Infrared reflecting windshield
1Mounting location for electronic toll collection
devices (infrared transparent)
2Infrared transparent area (pass-through for
electronic signals)
331.5 i n ( 8 0 c m )
419 . 0 i n ( 4 8 c m )
51.75 in (4.5 cm)Your vehicle is equipped with infrared reflecting glass
which reduces the amount of radiated heat entering the
interior through the windows.
The infrared reflecting glass also prevents the
transmission of signals through the glass by in-vehicle
electronic devices (e.g. electronic toll collection
devices).
To allow the use of these devices in the vehicle, two
infrared transparent areas (1 and 2) are placed in the
windshield.
3
1
3
4
125
Page 210 of 424
207 Infrared reflecting windshield
Te ch n ica l
data Instruments
and controlsOperation DrivingInstrument
cluster displayPractical hints Car care Index