fog light MERCEDES-BENZ CLA 2013 User Guide
[x] Cancel search | Manufacturer: MERCEDES-BENZ, Model Year: 2013, Model line: CLA, Model: MERCEDES-BENZ CLA 2013Pages: 352, PDF Size: 5.37 MB
Page 117 of 352
The bulb may explode if:
R you touch it
R it is hot
R you drop it
R you scratch it
Only operate bulbs in enclosed lamps
designed for that purpose. Only fit spare
bulbs of the same type and the specified volt-
age.
Marks on the glass tube reduce the service
life of the bulbs. Do not touch the glass tube
with your bare hands. If necessary, clean the
glass tube when cold with alcohol or spirit and
rub it off with a lint-free cloth.
Protect bulbs from moisture during opera-
tion. Do not allow bulbs to come into contact
with liquids.
There are bulbs other than the xenon bulbs
that you cannot replace yourself. Replace
only the bulbs listed ( Y page 115). Have the
bulbs that you cannot replace yourself
replaced at a qualified specialist workshop.
If you require assistance replacing bulbs, con-
sult a qualified specialist workshop.
If the new bulb still does not light up, consult
a qualified specialist workshop.
Bulbs and lamps are an important aspect of
vehicle safety. You must therefore make sure
that these function correctly at all times.
Have the headlamp setting checked regularly.
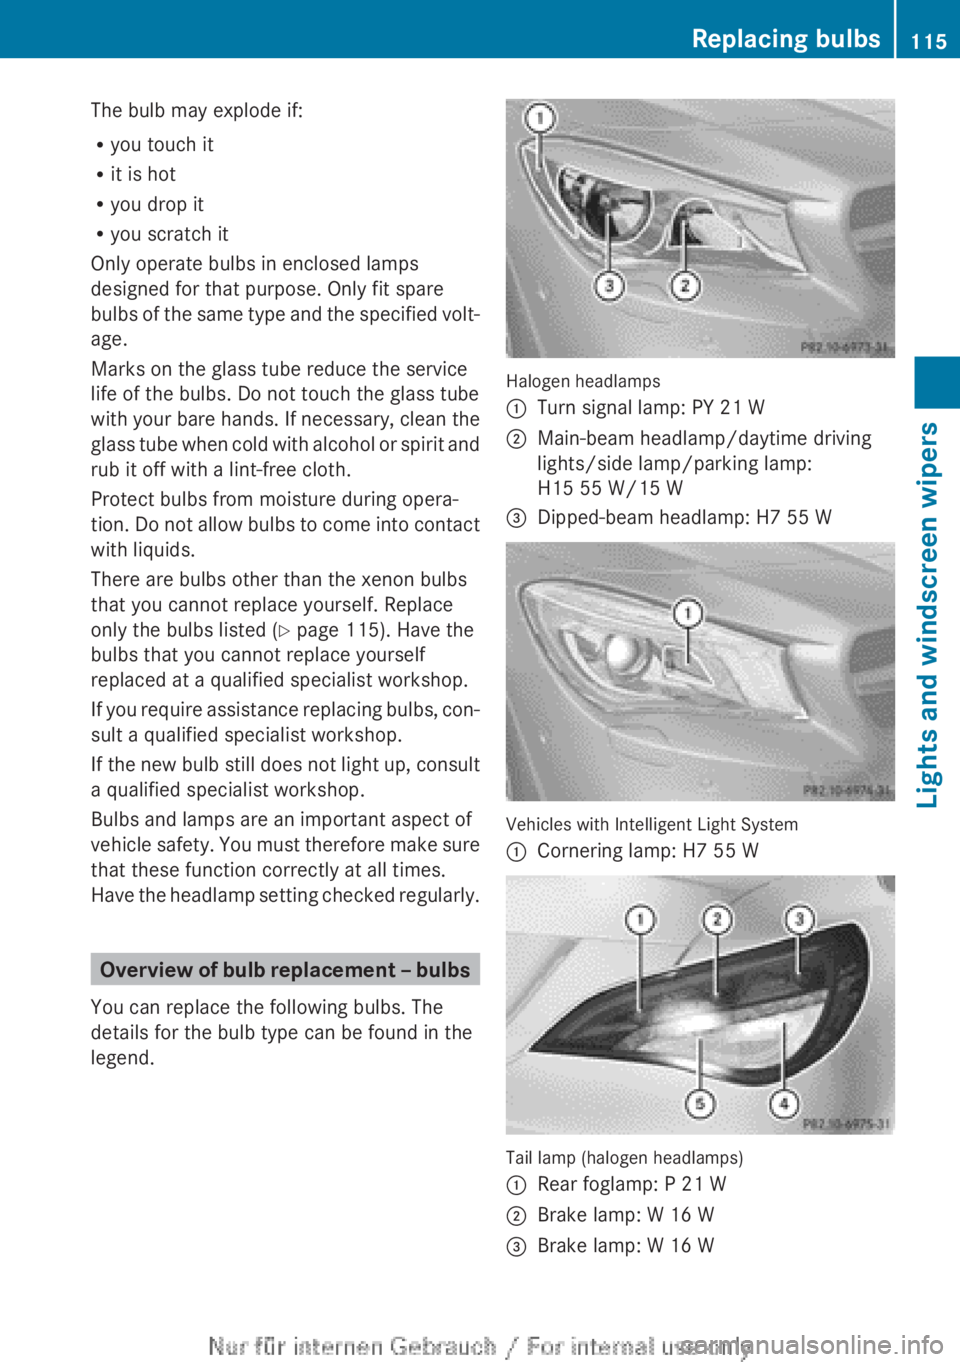
Overview of bulb replacement – bulbs
You can replace the following bulbs. The
details for the bulb type can be found in the
legend.
Halogen headlamps
:Turn signal lamp: PY 21 W;Main-beam headlamp/daytime driving
lights/side lamp/parking lamp:
H15 55 W/15 W=Dipped-beam headlamp: H7 55 W
Vehicles with Intelligent Light System
:Cornering lamp: H7 55 W
Tail lamp (halogen headlamps)
:Rear foglamp: P 21 W;Brake lamp: W 16 W=Brake lamp: W 16 WReplacing bulbs115Lights and windscreen wipersZ
Page 120 of 352
XTo open: loosen side trim panel : at the
top and fold it down in the direction of the
arrow.XTo close: insert side panel :.
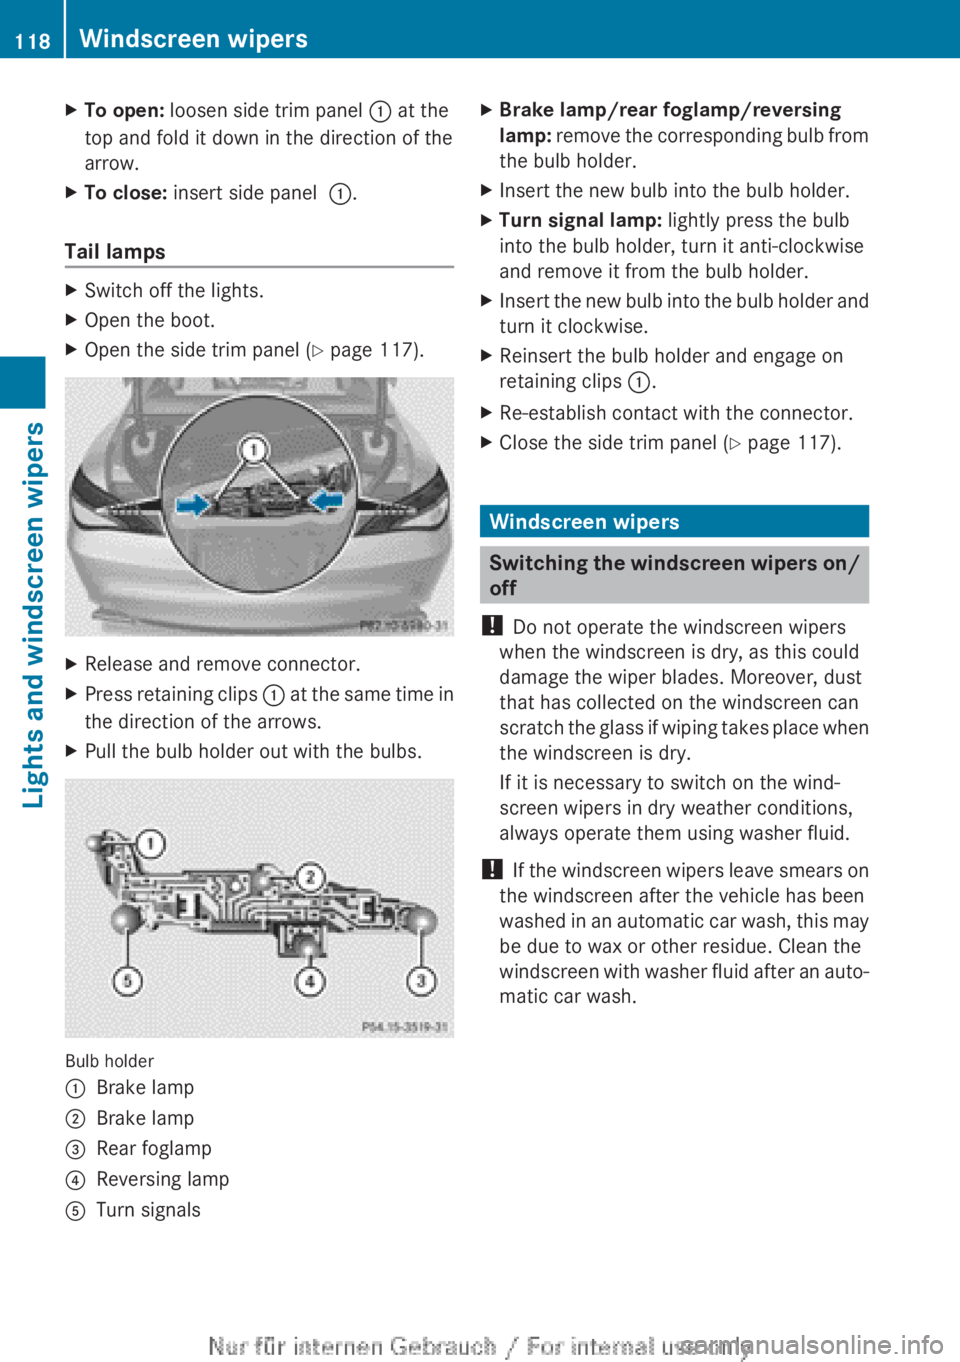
Tail lamps
XSwitch off the lights.XOpen the boot.XOpen the side trim panel ( Y page 117).XRelease and remove connector.XPress retaining clips : at the same time in
the direction of the arrows.XPull the bulb holder out with the bulbs.
Bulb holder
:Brake lamp;Brake lamp=Rear foglamp?Reversing lampATurn signalsXBrake lamp/rear foglamp/reversing
lamp: remove the corresponding bulb from
the bulb holder.XInsert the new bulb into the bulb holder.XTurn signal lamp: lightly press the bulb
into the bulb holder, turn it anti-clockwise
and remove it from the bulb holder.XInsert the new bulb into the bulb holder and
turn it clockwise.XReinsert the bulb holder and engage on
retaining clips :.XRe-establish contact with the connector.XClose the side trim panel ( Y page 117).
Windscreen wipers
Switching the windscreen wipers on/
off
! Do not operate the windscreen wipers
when the windscreen is dry, as this could
damage the wiper blades. Moreover, dust
that has collected on the windscreen can
scratch the glass if wiping takes place when
the windscreen is dry.
If it is necessary to switch on the wind-
screen wipers in dry weather conditions,
always operate them using washer fluid.
! If the windscreen wipers leave smears on
the windscreen after the vehicle has been
washed in an automatic car wash, this may
be due to wax or other residue. Clean the
windscreen with washer fluid after an auto-
matic car wash.
118Windscreen wipersLights and windscreen wipers
Page 193 of 352
A warning tone sounds. The parking symbol
disappears and the multifunction display
shows the Park Assist cancelled mes-
sage.
When Active Parking Assist is cancelled, you
must steer again yourself.
Towing a trailer
For vehicles with a trailer tow hitch, the min-
imum required length for parking spaces is
slightly increased.
If you have attached a trailer to your vehicle,
you should not use Active Parking Assist.
Once the electrical connection is established
between your vehicle and the trailer, Active
Parking Assist is no longer available. PARK-
TRONIC is deactivated for the rear area.
Reversing camera
General notes
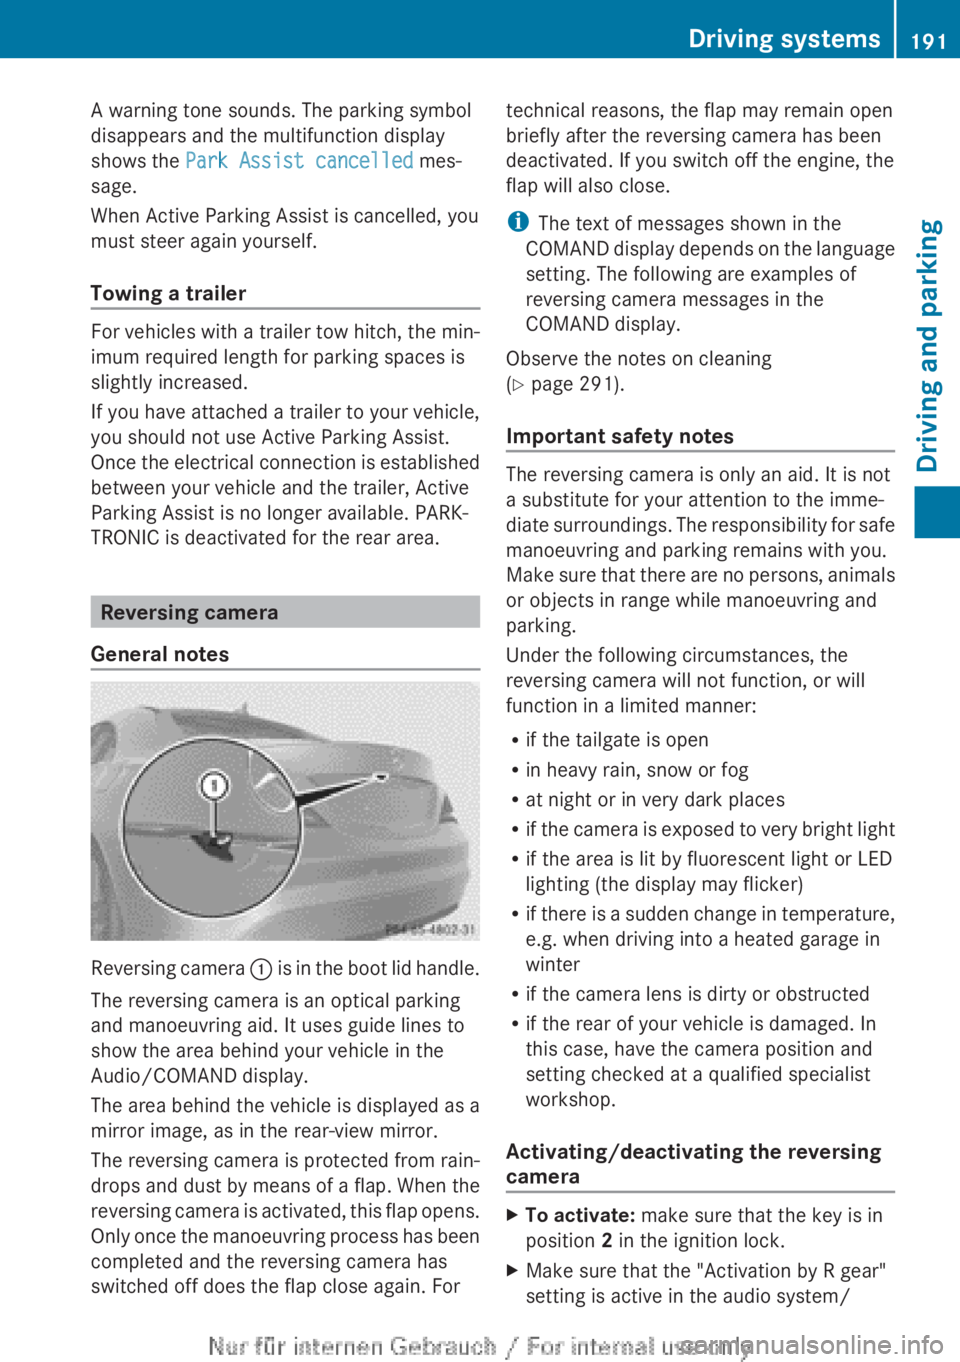
Reversing camera : is in the boot lid handle.
The reversing camera is an optical parking
and manoeuvring aid. It uses guide lines to
show the area behind your vehicle in the
Audio/COMAND display.
The area behind the vehicle is displayed as a
mirror image, as in the rear-view mirror.
The reversing camera is protected from rain-
drops and dust by means of a flap. When the
reversing camera is activated, this flap opens.
Only once the manoeuvring process has been
completed and the reversing camera has
switched off does the flap close again. For
technical reasons, the flap may remain open
briefly after the reversing camera has been
deactivated. If you switch off the engine, the
flap will also close.
i The text of messages shown in the
COMAND display depends on the language
setting. The following are examples of
reversing camera messages in the
COMAND display.
Observe the notes on cleaning
( Y page 291).
Important safety notes
The reversing camera is only an aid. It is not
a substitute for your attention to the imme-
diate surroundings. The responsibility for safe
manoeuvring and parking remains with you.
Make sure that there are no persons, animals
or objects in range while manoeuvring and
parking.
Under the following circumstances, the
reversing camera will not function, or will
function in a limited manner:
R if the tailgate is open
R in heavy rain, snow or fog
R at night or in very dark places
R if the camera is exposed to very bright light
R if the area is lit by fluorescent light or LED
lighting (the display may flicker)
R if there is a sudden change in temperature,
e.g. when driving into a heated garage in
winter
R if the camera lens is dirty or obstructed
R if the rear of your vehicle is damaged. In
this case, have the camera position and
setting checked at a qualified specialist
workshop.
Activating/deactivating the reversing
camera
XTo activate: make sure that the key is in
position 2 in the ignition lock.XMake sure that the "Activation by R gear"
setting is active in the audio system/Driving systems191Driving and parkingZ
Page 223 of 352
XPress the : or 9 button to select the
Daytime driving lights function.
If the Daytime driving lights function
has been switched on, the cone of light and
the W symbol in the multifunction dis-
play are shown in red.XPress the a button to save the setting.
Further information on daytime driving lights
( Y page 107).
Switching the Intelligent Light System
on/off
XPress the = or ; button on the steer-
ing wheel to select the Settings menu.XPress the : or 9 button to select the
Light submenu.XPress a to confirm.XPress the : or 9 button to select the
Intell. Light System function.
If the Intell. Light System function has
been switched on, the cone of light and the
L symbol in the multifunction display
are shown in red.XPress the a button to save the setting.
If you activate the Intell. Light System
function, you activate the following functions:
R Motorway mode
R Active light function
R Cornering light function
R Extended range foglamps
If you set the dipped-beam headlamps for
driving on the right/left ( Y page 221), the
multifunction display shows the Intell.
Light System: System inoperative
Inactive for left-side traffic or
Intell. Light System: System inoper‐
ative Inactive for right-side traf‐
fic display message instead of the Intell.
Light System: function in the Light sub-
menu.
Further information on the Intelligent Light
System ( Y page 110).
Setting the dipped-beam headlamps for
driving on the left/rightXPress the = or ; button on the steer-
ing wheel to select the Settings menu.XPress the : or 9 button to select the
Light submenu.XPress a to confirm.XPress : or 9 to select the Dipped
beams Setting for: function.
You will see the selected setting: Right-
side traffic or Left-side traffic .XPress the a button to save the setting.
If you change the setting, conversion does
not take place until the next time the vehi-
cle is stationary.
This function is only available on vehicles with
the Intelligent Light System.
You can use this function to switch between
symmetrical and asymmetrical dipped beam
( Y page 106).
If you set the dipped-beam headlamps for
driving on the left/right, then motorway
mode and the extended range foglamps are
unavailable.
You can also have the dipped-beam head-
lamps set for driving on the right/left at a
qualified specialist workshop, e.g. a
Mercedes-Benz Service Centre.
Switching Adaptive Highbeam Assist on/
off
XPress the = or ; button on the steer-
ing wheel to select the Settings menu.XPress the : or 9 button to select the
Light submenu.XPress a to confirm.XPress the : or 9 button to select the
Adapt. main beam function.
If the Adapt. main beam function has
been switched on, the cone of light and the
_ symbol in the upper multifunction
display are shown in red.XPress the a button to save the setting.Menus and submenus221On-board computer and displaysZ
Page 224 of 352
This function is only available on vehicles with
the Intelligent Light System.
For further information about Adaptive High-
beam Assist, see ( Y page 111).
Setting the brightness of the ambient
lightingXPress the = or ; button on the steer-
ing wheel to select the Settings menu.XPress the : or 9 button to select the
Light submenu.XPress a to confirm.XPress the : or 9 button to select the
Amb. light +/- function.
You will see the selected setting.XPress a to confirm.XPress the : or 9 button to adjust the
brightness to any level from Off toLevel
5 (bright) .XPress the a or % button to save the
setting.
Activating/deactivating the surround
lighting and exterior lighting delayed
switch-off
If you have activated the Surround light‐
ing function and the light switch is set to
à , the following functions are activated
when it is dark:
R surround lighting: the exterior lighting
remains lit for 40 seconds after unlocking
with the key. If you start the engine, the
surround lighting is switched off and auto-
matic headlamp mode is activated
( Y page 107).
R exterior lighting delayed switch-off: the
exterior lighting remains lit for
60 seconds after the engine is switched off.
If you close all the doors and the boot lid,
the exterior lighting goes off after
15 seconds.
XPress the = or ; button on the steer-
ing wheel to select the Settings menu.XPress the : or 9 button to select the
Light submenu.XPress a to confirm.XPress the : or 9 button to select the
Surround lighting function.
When the Surround lighting function is
activated, the light cone and the area
around the vehicle are displayed in red in
the multifunction display.XPress the a button to save the setting.
Deactivating delayed switch-off of the exte-
rior lighting temporarily:
XBefore leaving the vehicle, turn the key to
position 0 in the ignition lock.XTurn the key to position 2 in the ignition
lock.
The exterior lighting delayed switch-off is
deactivated.
Delayed switch-off of the exterior lighting is
reactivated the next time you start the
engine.
i Depending on your vehicle's equipment,
when the surround lighting and delayed
switch-off exterior lighting are on, the fol-
lowing light up:
R Side lamps
R Foglamps
R Dipped-beam headlamps
R Daytime driving lights
R Surround lighting in the exterior mirrors
Activating/deactivating the interior light-
ing delayed switch-off
If you activate the Lighting delayed sw.
off function, the interior lighting remains on
for 20 seconds after you remove the key from
the ignition lock.
XPress the = or ; button on the steer-
ing wheel to select the Settings menu.XPress the : or 9 button to select the
Light submenu.XPress a to confirm.222Menus and submenusOn-board computer and displays