driver seat adjustment MERCEDES-BENZ CLA 2013 Owners Manual
[x] Cancel search | Manufacturer: MERCEDES-BENZ, Model Year: 2013, Model line: CLA, Model: MERCEDES-BENZ CLA 2013Pages: 352, PDF Size: 5.37 MB
Page 18 of 352
Fastening ......................................... 48
Important safety guidelines .............46
Rear seat belt status indicator .........49
Releasing ......................................... 49
Switching belt adjustment on/off
(on-board computer) ......................225
Warning lamp ................................. 255
Warning lamp (function) ................... 49
Seats
Adjusting (electrically) .....................96
Adjusting (manually) ........................96
Adjusting the 4-way lumbar sup-
port .................................................. 98
Adjusting the head restraint ............97
Cleaning the cover .........................293
Correct driver's seat position ........... 94
Important safety notes ....................95
Seat heating problem ....................100
Storing settings (memory function) 103
Switching seat heating on/off .........99
Sensors (cleaning instructions) ....... 291
Service see ASSYST PLUS
Service menu (on-board computer) . 219
Service products Brake fluid ..................................... 341
Coolant (engine) ............................ 341
Engine oil ....................................... 340
Fuel ................................................ 337
Important safety notes ..................336
Washer fluid ................................... 342
Settings
Factory (on-board computer) .........225
On-board computer .......................219
Setting the air distribution ............... 131
Setting the airflow ............................ 131
Shifting to neutral (manual trans-
mission) ............................................. 152
Sidebag ................................................ 44
Side lamps Switching on/off ........................... 108
Side windows
Convenience closing ........................88
Convenience opening ......................88
Important safety notes ....................86
Opening/closing .............................. 87
Problem (malfunction) .....................89
resetting .......................................... 88Sliding sunroof
see Panorama sliding sunroof
Snow chains ...................................... 319
Socket Centre console .............................. 277
Points to observe before use .........277
Rear compartment .........................277
Specialist workshop ............................ 24
Spectacles compartment ................. 269
Speed, controlling see Cruise control
Speed Limit Assist
Activating/deactivating the warn-
ing function .................................... 218
Displaying ...................................... 217
Display message ............................ 243
Display message in the multifunc-
tion display .................................... 197
Function/notes ............................. 196
Important safety notes ..................196
Speedometer
Activating/deactivating the addi-
tional speedometer ........................220
Digital ............................................ 212
In the Instrument cluster .................30
Segments ...................................... 209
Selecting the unit of measurement 220
see Instrument cluster
SPEEDTRONIC
Deactivating variable .....................172
Display message ............................ 247
Function/notes ............................. 171
Important safety notes ..................171
LIM indicator lamp .........................171
Permanent ..................................... 173
Selecting ........................................ 171
Storing the current speed ..............172
Variable ......................................... 171
SRS (Supplemental Restraint Sys-
tem) Display message ............................ 235
Introduction ..................................... 41
Warning lamp ................................. 261
Warning lamp (function) ................... 41
Start/stop function
see ECO start/stop function
Starting (engine) ................................ 145
STEER CONTROL .................................. 7016Index
Page 48 of 352
Windowbags are deployed:
R at the start of an accident with a high rate
of lateral vehicle deceleration or accelera-
tion, e.g. in a side impact
R on the side on which an impact occurs
R on the driver's and the front passenger's
side if the vehicle overturns and the system
determines that deployment can offer addi-
tional protection to that provided by the
seat belt
R independently of the use of the seat belt
R regardless of whether the front-passenger
seat is occupied
R independently of the front airbags
PRE-SAFE ®
(anticipatory occupant
protection)
! Make sure that there are no objects in the
footwell or behind the seats when moving
the seat back. There is a risk that the seats
and/or the objects could be damaged.
PRE-SAFE ®
takes pre-emptive measures to
protect occupants in certain hazardous sit-
uations. Although your vehicle is equipped
with a PRE-SAFE ®
system, the possibility of
injury in the event of an accident cannot be
ruled out.
Always adapt your driving style to suit the
prevailing road and weather conditions and
maintain a safe distance from the vehicle in
front. Drive carefully.
PRE-SAFE ®
intervenes:
R when BAS activates, e.g. in emergency
braking situations.
R when adaptive Brake Assist intervenes
powerfully on vehicles with DISTRONIC
PLUS.
R in critical driving situations, e.g. when phys-
ical limits are exceeded and the vehicle
understeers or oversteers severely.
PRE-SAFE ®
takes the following measures
depending on the hazardous situation detec-
ted:
R the front seat belts are pre-tensioned.
R vehicles with the memory function: the
front-passenger seat is adjusted if it is in an
unfavourable position.
R if the vehicle skids, the panorama sliding
sunroof and the side windows are closed so
that only a small gap remains.
If the hazardous situation passes without
resulting in an accident, PRE-SAFE ®
slackens
the belt pretensioning. All settings made by
PRE-SAFE ®
can then be reversed.
If the seat belts are not released:XMove the backrest or seat back slightly, but
only when the vehicle is stationary.
Seat belt pretensioning is reduced and the
locking mechanism is released.
The seat-belt adjustment is an integral part of
the PRE-SAFE ®
convenience function. More
information about seat-belt adjustment can
be found under "Seat-belt adjustment"
( Y page 48).
Seat belts
Important safety notes
GWARNING
A seat belt which is not worn correctly, or
which has not been engaged in the seat belt
buckle correctly, cannot provide the intended
level of protection. Under certain circumstan-
ces, this could cause severe or even fatal inju-
ries in the event of an accident.
Therefore, make sure that all occupants — in
particular, pregnant women — wear their seat
belts correctly at all times.
R The seat belt must fit snugly on your body
and must not be twisted.Therefore, avoid
wearing bulky clothing, e.g. a winter coat.
The shoulder section of the belt must be
routed across the centre of your shoulder
46Occupant safetySafety
Page 50 of 352
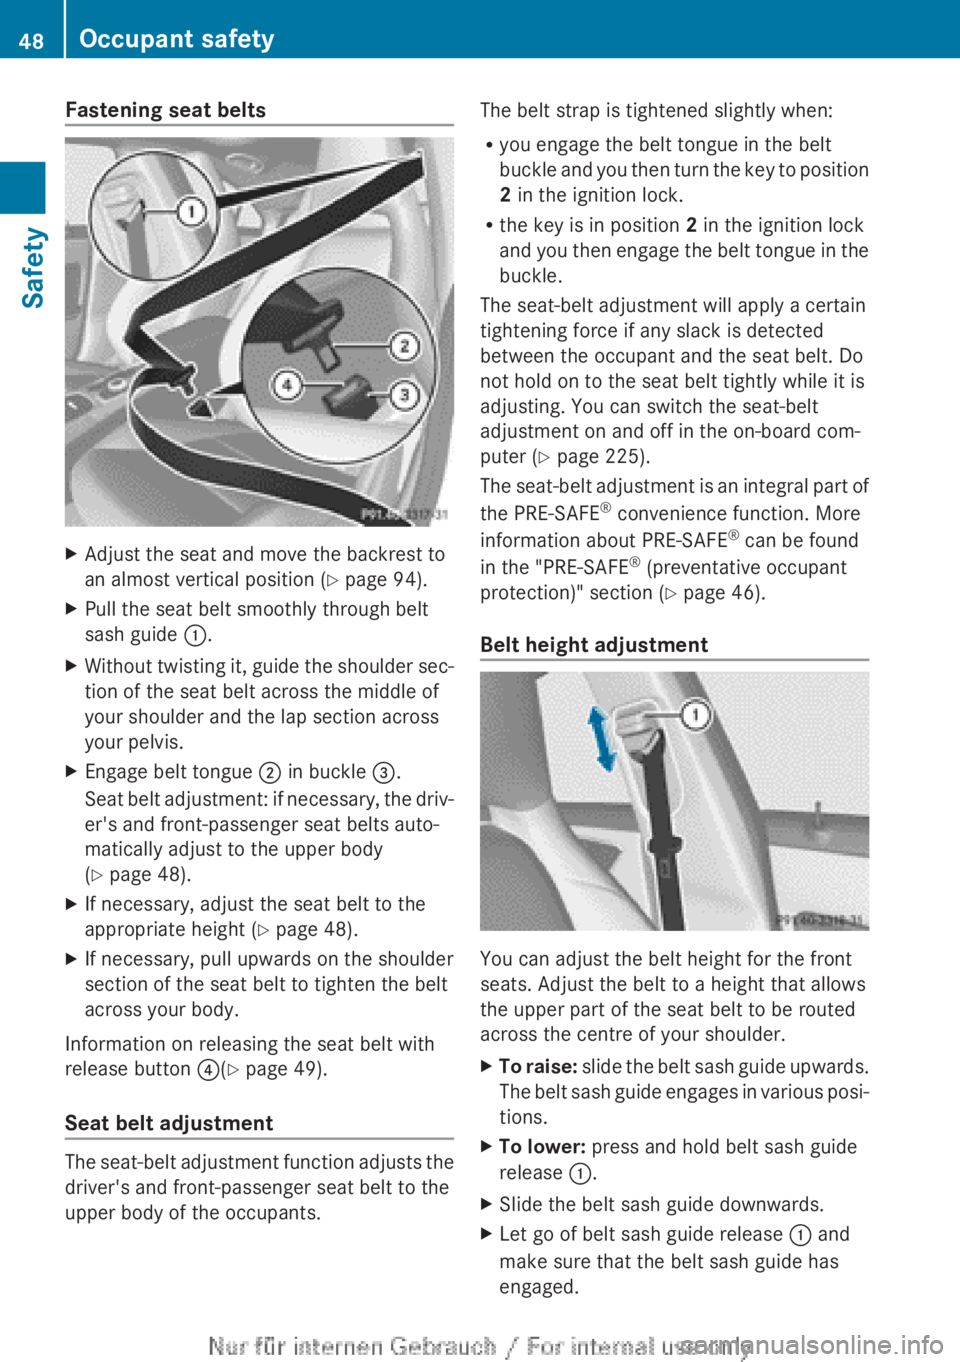
Fastening seat beltsXAdjust the seat and move the backrest to
an almost vertical position ( Y page 94).XPull the seat belt smoothly through belt
sash guide :.XWithout twisting it, guide the shoulder sec-
tion of the seat belt across the middle of
your shoulder and the lap section across
your pelvis.XEngage belt tongue ; in buckle =.
Seat belt adjustment: if necessary, the driv-
er's and front-passenger seat belts auto-
matically adjust to the upper body
( Y page 48).XIf necessary, adjust the seat belt to the
appropriate height ( Y page 48).XIf necessary, pull upwards on the shoulder
section of the seat belt to tighten the belt
across your body.
Information on releasing the seat belt with
release button ?(Y page 49).
Seat belt adjustment
The seat-belt adjustment function adjusts the
driver's and front-passenger seat belt to the
upper body of the occupants.
The belt strap is tightened slightly when:
R you engage the belt tongue in the belt
buckle and you then turn the key to position
2 in the ignition lock.
R the key is in position 2 in the ignition lock
and you then engage the belt tongue in the
buckle.
The seat-belt adjustment will apply a certain
tightening force if any slack is detected
between the occupant and the seat belt. Do
not hold on to the seat belt tightly while it is
adjusting. You can switch the seat-belt
adjustment on and off in the on-board com-
puter ( Y page 225).
The seat-belt adjustment is an integral part of
the PRE-SAFE ®
convenience function. More
information about PRE-SAFE ®
can be found
in the "PRE-SAFE ®
(preventative occupant
protection)" section ( Y page 46).
Belt height adjustment
You can adjust the belt height for the front
seats. Adjust the belt to a height that allows
the upper part of the seat belt to be routed
across the centre of your shoulder.
XTo raise: slide the belt sash guide upwards.
The belt sash guide engages in various posi-
tions.XTo lower: press and hold belt sash guide
release :.XSlide the belt sash guide downwards.XLet go of belt sash guide release : and
make sure that the belt sash guide has
engaged.48Occupant safetySafety
Page 59 of 352
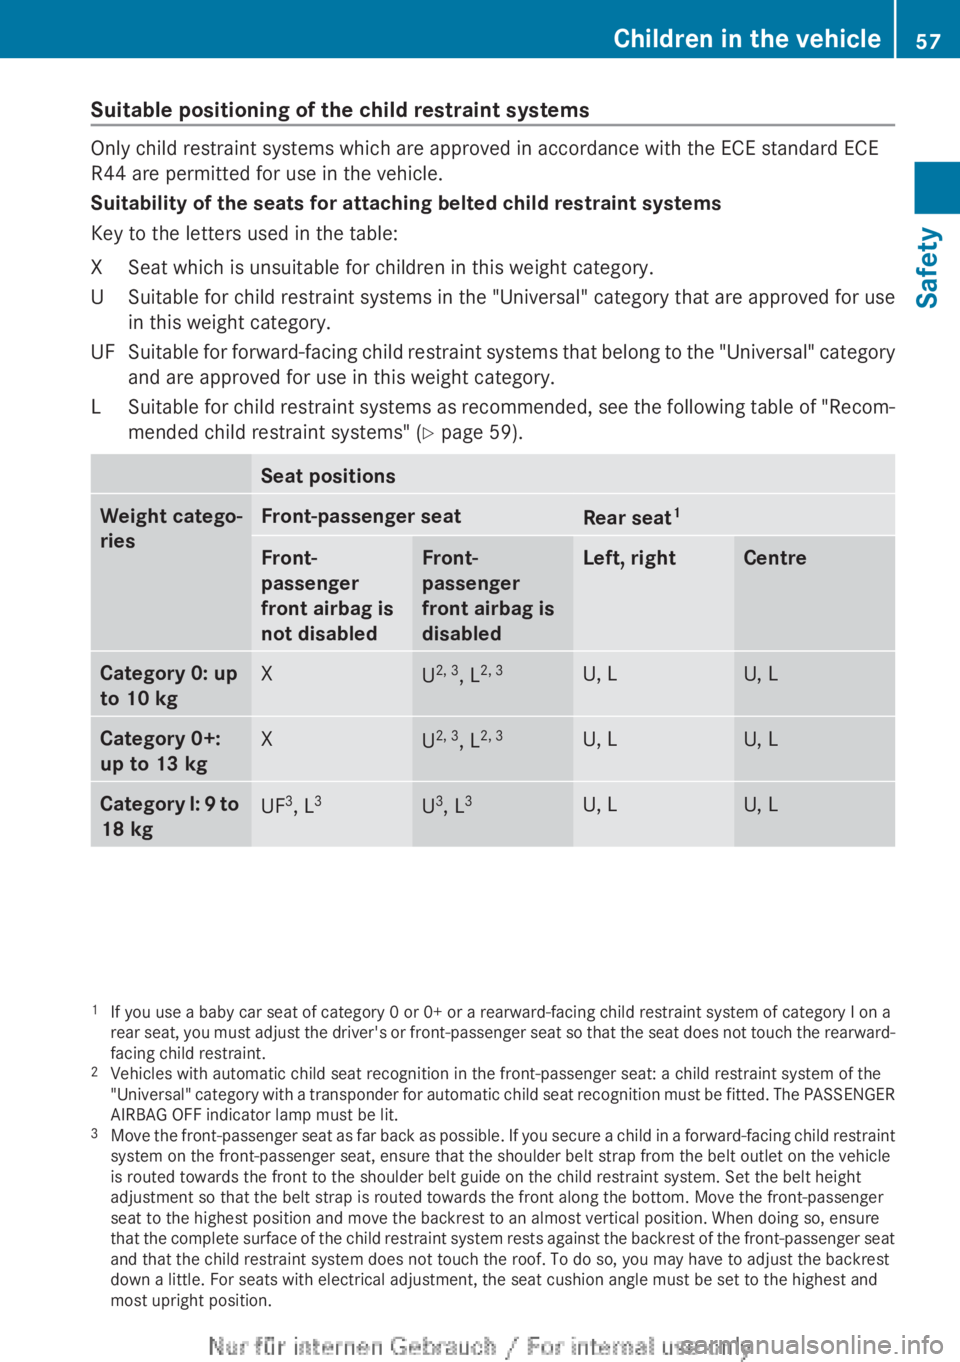
Suitable positioning of the child restraint systems
Only child restraint systems which are approved in accordance with the ECE standard ECE
R44 are permitted for use in the vehicle.
Suitability of the seats for attaching belted child restraint systems
Key to the letters used in the table:
XSeat which is unsuitable for children in this weight category.USuitable for child restraint systems in the "Universal" category that are approved for use
in this weight category.UFSuitable for forward-facing child restraint systems that belong to the "Universal" category
and are approved for use in this weight category.LSuitable for child restraint systems as recommended, see the following table of "Recom-
mended child restraint systems" ( Y page 59).Seat positionsWeight catego-
riesFront-passenger seatRear seat 1Front-
passenger
front airbag is
not disabledFront-
passenger
front airbag is
disabledLeft, rightCentreCategory 0: up
to 10 kgXU 2, 3
, L2, 3U, LU, LCategory 0+:
up to 13 kgXU 2, 3
, L2, 3U, LU, LCategory I:
9 to
18 kgUF 3
, L 3U3
, L 3U, LU, L1
If you use a baby car seat of category 0 or 0+ or a rearward-facing child restraint system of category I on a
rear seat, you must adjust the driver's or front-passenger seat so that the seat does not touch the rearward-
facing child restraint.
2 Vehicles with automatic child seat recognition in the front-passenger seat: a child restraint system of the
"Universal" category with a transponder for automatic child seat recognition must be fitted. The PASSENGER
AIRBAG OFF indicator lamp must be lit.
3 Move the front-passenger seat as far back as possible. If you secure a child in a forward-facing child restraint
system on the front-passenger seat, ensure that the shoulder belt strap from the belt outlet on the vehicle
is routed towards the front to the shoulder belt guide on the child restraint system. Set the belt height
adjustment so that the belt strap is routed towards the front along the bottom. Move the front-passenger
seat to the highest position and move the backrest to an almost vertical position. When doing so, ensure
that the complete surface of the child restraint system rests against the backrest of the front-passenger seat
and that the child restraint system does not touch the roof. To do so, you may have to adjust the backrest
down a little. For seats with electrical adjustment, the seat cushion angle must be set to the highest and
most upright position.Children in the vehicle57SafetyZ
Page 60 of 352
Seat positionsWeight catego-
riesFront-passenger seatRear seat 1Front-
passenger
front airbag is
not disabledFront-
passenger
front airbag is
disabledLeft, rightCentreCategory II: 15
to 25 kgUF 3
, L 3U3
, L 3U, LU, LCategory III:
22 to 36 kgUF 3, 4
, L3, 4UF 3, 4
, L3, 4U, L 4U, L4
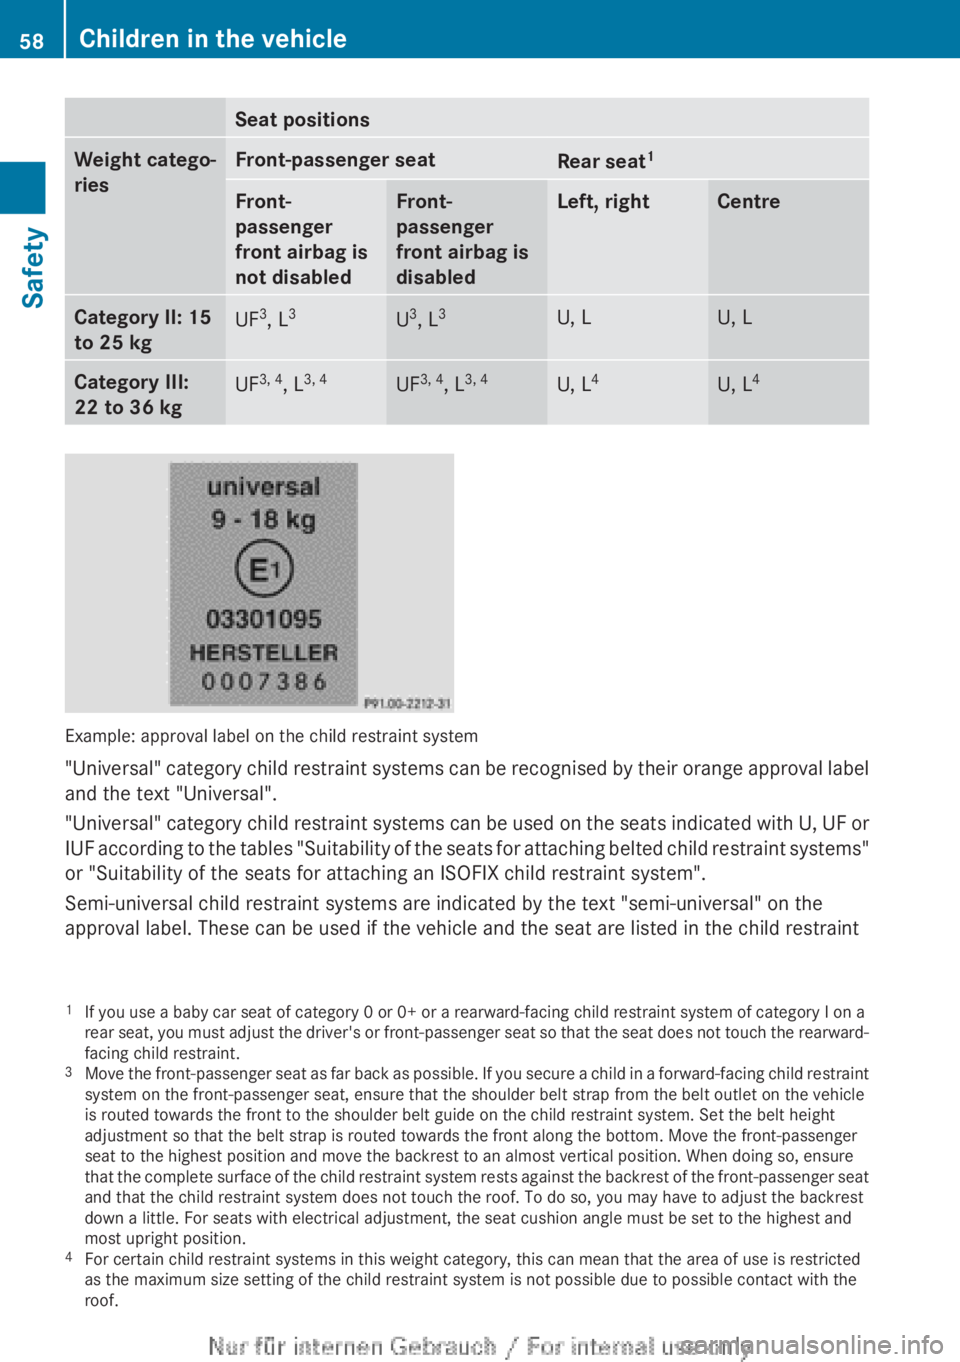
Example: approval label on the child restraint system
" Universal" category child restraint systems can be recognised by their orange approval label
and the text "Universal".
" Universal" category child restraint systems can be used on the seats indicated with U, UF or
IUF according to the tables "Suitability of the seats for attaching belted child restraint systems"
or "Suitability of the seats for attaching an ISOFIX child restraint system".
Semi-universal child restraint systems are indicated by the text "semi-universal" on the
approval label. These can be used if the vehicle and the seat are listed in the child restraint
1 If you use a baby car seat of category 0 or 0+ or a rearward-facing child restraint system of category I on a
rear seat, you must adjust the driver's or front-passenger seat so that the seat does not touch the rearward-
facing child restraint.
3 Move the front-passenger seat as far back as possible. If you secure a child in a forward-facing child restraint
system on the front-passenger seat, ensure that the shoulder belt strap from the belt outlet on the vehicle
is routed towards the front to the shoulder belt guide on the child restraint system. Set the belt height
adjustment so that the belt strap is routed towards the front along the bottom. Move the front-passenger
seat to the highest position and move the backrest to an almost vertical position. When doing so, ensure
that the complete surface of the child restraint system rests against the backrest of the front-passenger seat
and that the child restraint system does not touch the roof. To do so, you may have to adjust the backrest
down a little. For seats with electrical adjustment, the seat cushion angle must be set to the highest and
most upright position.
4 For certain child restraint systems in this weight category, this can mean that the area of use is restricted
as the maximum size setting of the child restraint system is not possible due to possible contact with the
roof.58Children in the vehicleSafety
Page 96 of 352
Useful information
i This Owner's Manual describes all mod-
els, series and optional equipment for your
vehicle that were available at the time of
going to press. National variations are pos-
sible. Note that your vehicle may not be
equipped with all of the functions descri-
bed. This is also the case for systems and
functions relevant to safety.
i Read the information on qualified special-
ist workshops: ( Y page 24).
Correct driver's seat position
GWARNING
You could lose control of the vehicle while
driving if you:
R adjust the driver's seat, steering wheel or
mirrors
R fasten the seat belt
There is a risk of an accident.
Adjust the driver's seat, head restraint, steer-
ing wheel and mirrors and fasten your seat
belt before starting the engine.
Observe the safety notes on seat adjustment
( Y page 95).
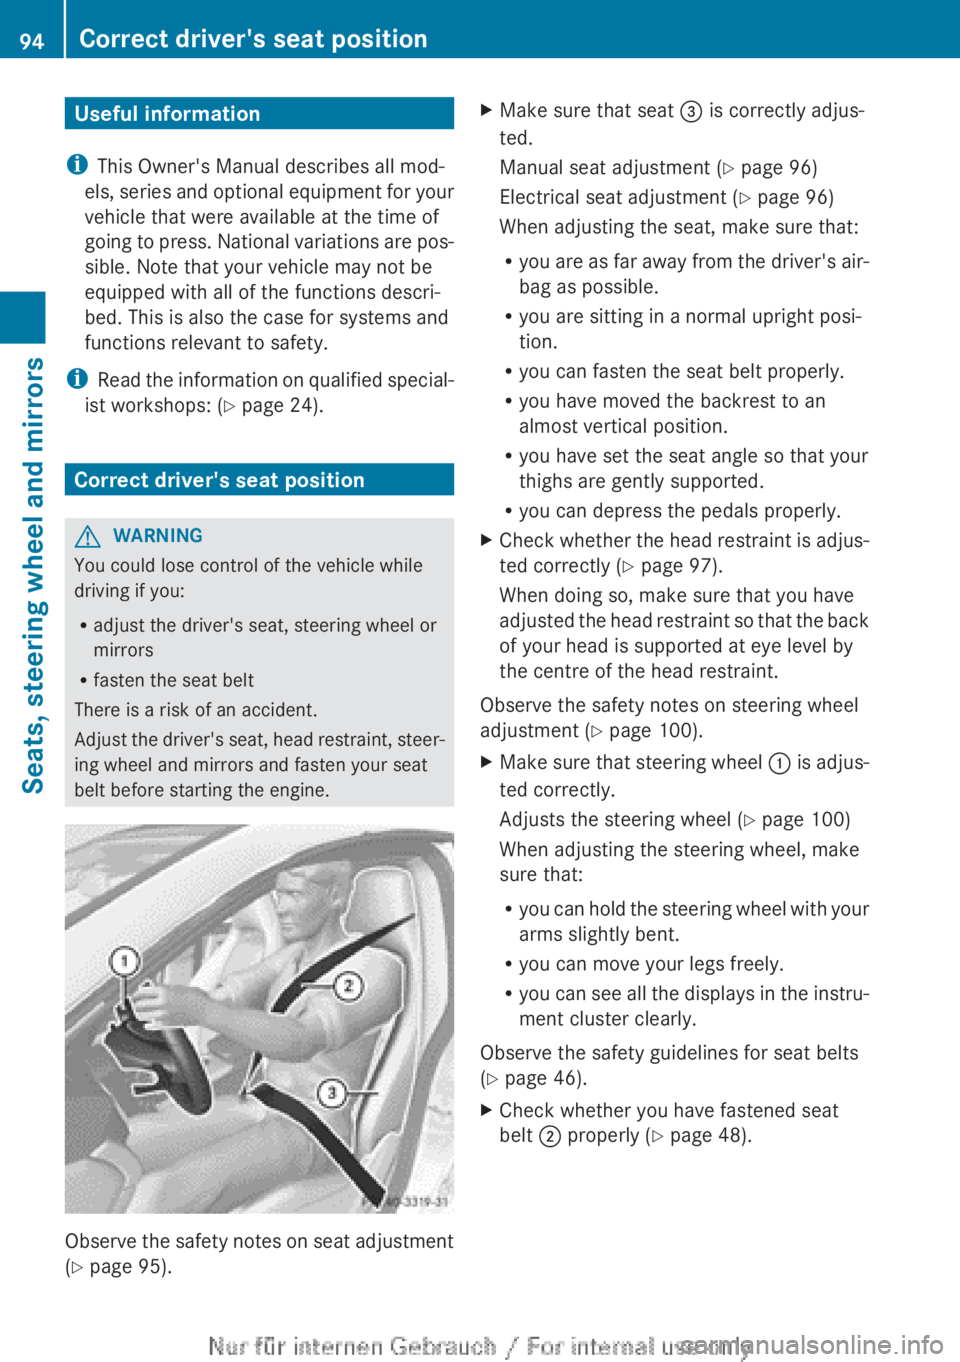
XMake sure that seat = is correctly adjus-
ted.
Manual seat adjustment ( Y page 96)
Electrical seat adjustment ( Y page 96)
When adjusting the seat, make sure that:
R you are as far away from the driver's air-
bag as possible.
R you are sitting in a normal upright posi-
tion.
R you can fasten the seat belt properly.
R you have moved the backrest to an
almost vertical position.
R you have set the seat angle so that your
thighs are gently supported.
R you can depress the pedals properly.XCheck whether the head restraint is adjus-
ted correctly ( Y page 97).
When doing so, make sure that you have
adjusted the head restraint so that the back
of your head is supported at eye level by
the centre of the head restraint.
Observe the safety notes on steering wheel
adjustment ( Y page 100).
XMake sure that steering wheel : is adjus-
ted correctly.
Adjusts the steering wheel ( Y page 100)
When adjusting the steering wheel, make
sure that:
R you can hold the steering wheel with your
arms slightly bent.
R you can move your legs freely.
R you can see all the displays in the instru-
ment cluster clearly.
Observe the safety guidelines for seat belts
( Y page 46).
XCheck whether you have fastened seat
belt ; properly ( Y page 48).94Correct driver's seat positionSeats, steering wheel and mirrors
Page 97 of 352
The seat belt should:
R fit snugly across your body
R be routed across the middle of your
shoulder
R be routed in your pelvic area across the
hip jointsXBefore starting off, adjust the rear-view mir-
ror and the exterior mirrors ( Y page 101)
so that you have a good view of road and
traffic conditions.XVehicles with a memory function: save
the seat and exterior mirror settings
( Y page 103).
Seats
Important safety notes
GWARNING
If children adjust the seats, they could
become trapped, especially if they are unat-
tended. There is a risk of injury.
When leaving the vehicle, always take the key
with you and lock the vehicle. Never leave
children unattended in the vehicle.
GWARNING
You could lose control of the vehicle while
driving if you:
R adjust the driver's seat, steering wheel or
mirrors
R fasten the seat belt
There is a risk of an accident.
Adjust the driver's seat, head restraint, steer-
ing wheel and mirrors and fasten your seat
belt before starting the engine.
GWARNING
If you adjust the seat height carelessly, you or
other vehicle occupants could be trapped and
thereby injured. Children in particular could
accidentally press the electrical seat adjust-
ment buttons and become trapped. There is
a risk of injury.
While moving the seats, make sure that your
hands or other body parts do not get under
the lever assembly of the seat adjustment
system.GWARNING
When adjusting a seat, you or another vehicle
occupant could become trapped by the guide
rail of the seat, for instance. There is a risk of
injury.
Make sure that no one has any part of their
body within the sweep of the seat when
adjusting it.
GWARNING
The seat belt does not offer the intended level
of protection if the backrest is not in the
upright position. When braking or in the event
of an accident, you could slide underneath the
seat belt and sustain abdomen or neck inju-
ries, for example. This poses an increased risk
of injury or even fatal injury.
Adjust the seat properly before beginning
your journey. Always make sure that the seat
is in the upright position.
GWARNING
The head restraints cannot provide the inten-
ded protection unless they are fitted and
adjusted correctly. There is an increased risk
of injury to the head and neck in the event of
an accident or sudden braking, for example.
Always drive with the head restraints fitted.
Ensure that the centre of the head restraints
support the back of each vehicle occupant's
head at eye level before driving off.
! To avoid damage to the seats and the seat
heating, observe the following information:
R do not spill any liquids on the seats. If
liquid is spilled on the seats, dry them as
soon as possible.
R if the seat covers are damp or wet, do not
switch on the seat heating. The seat
heating should also not be used to dry
the seats.
Seats95Seats, steering wheel and mirrorsZ
Page 102 of 352
Problems with the seat heatingProblemPossible causes/consequences and M SolutionsThe seat heating has
switched off prema-
turely or cannot be
switched on.The on-board voltage is too low because too many electrical con-
sumers are switched on.XSwitch off electrical consumers that you do not need, such as
the rear window heating or interior lighting.
Once the battery is sufficiently charged, the seat heating will
switch back on automatically.Steering wheel
Important safety notes
GWARNING
You could lose control of the vehicle while
driving if you:
R adjust the driver's seat, steering wheel or
mirrors
R fasten the seat belt
There is a risk of an accident.
Adjust the driver's seat, head restraint, steer-
ing wheel and mirrors and fasten your seat
belt before starting the engine.
GWARNING
Children could become trapped by the steer-
ing wheel if they adjust it. There is a risk of
injury.
When leaving the vehicle, always take the key
with you and lock the vehicle. Never leave
children unattended in the vehicle.
Adjusting the steering wheel
GWARNING
The steering wheel may move unexpectedly if
you adjust it while driving. This could cause
you to lose control of the vehicle. There is a
risk of an accident.
Make sure that the steering wheel is locked
before driving off. Never unlock the steering
wheel when the vehicle is in motion.
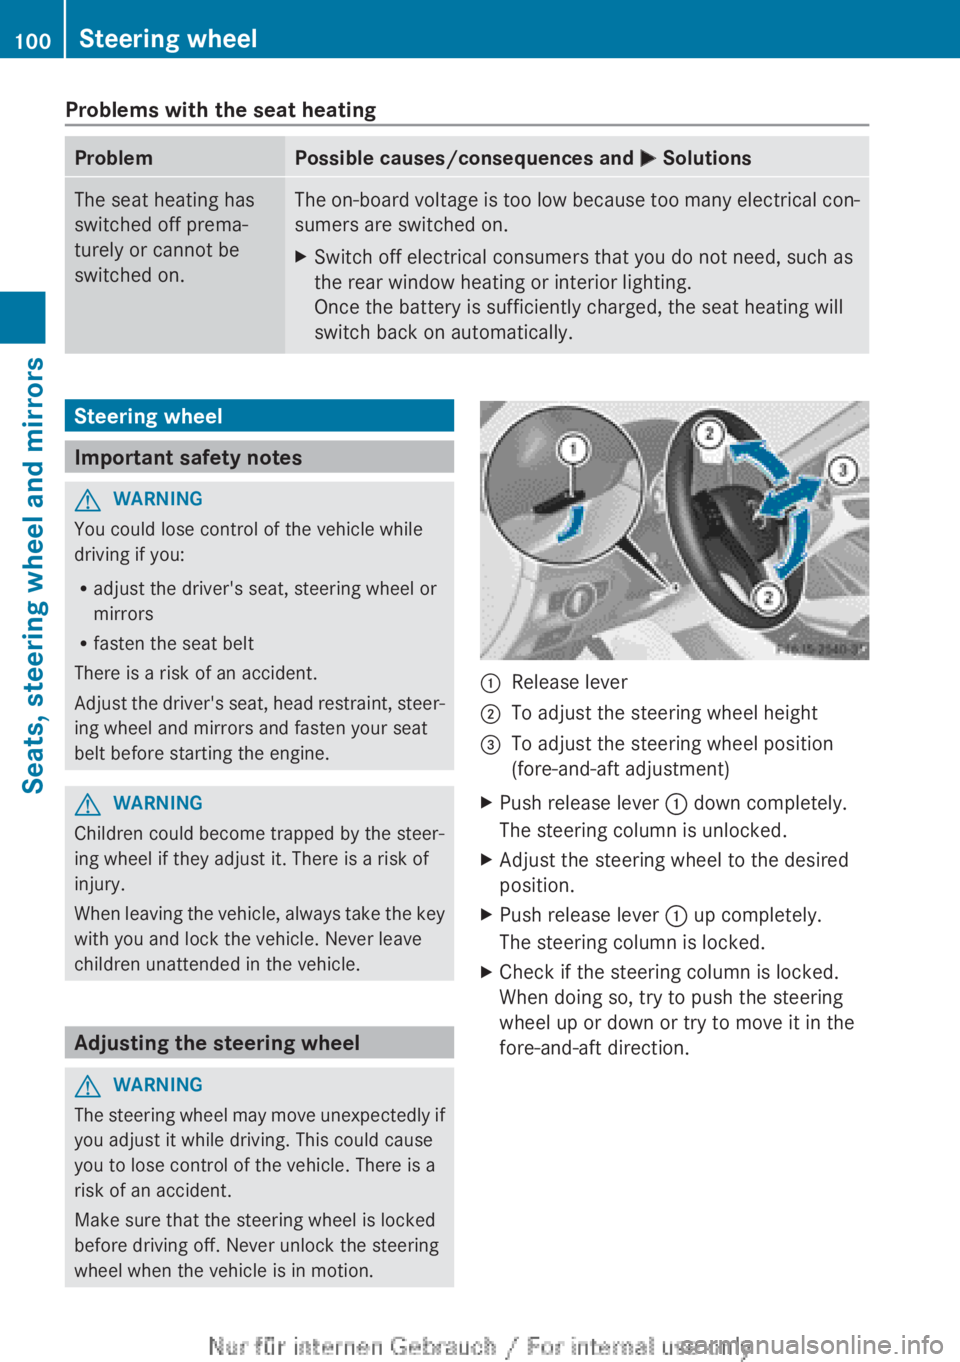
:Release lever;To adjust the steering wheel height=To adjust the steering wheel position
(fore-and-aft adjustment)XPush release lever : down completely.
The steering column is unlocked.XAdjust the steering wheel to the desired
position.XPush release lever : up completely.
The steering column is locked.XCheck if the steering column is locked.
When doing so, try to push the steering
wheel up or down or try to move it in the
fore-and-aft direction.100Steering wheelSeats, steering wheel and mirrors
Page 105 of 352
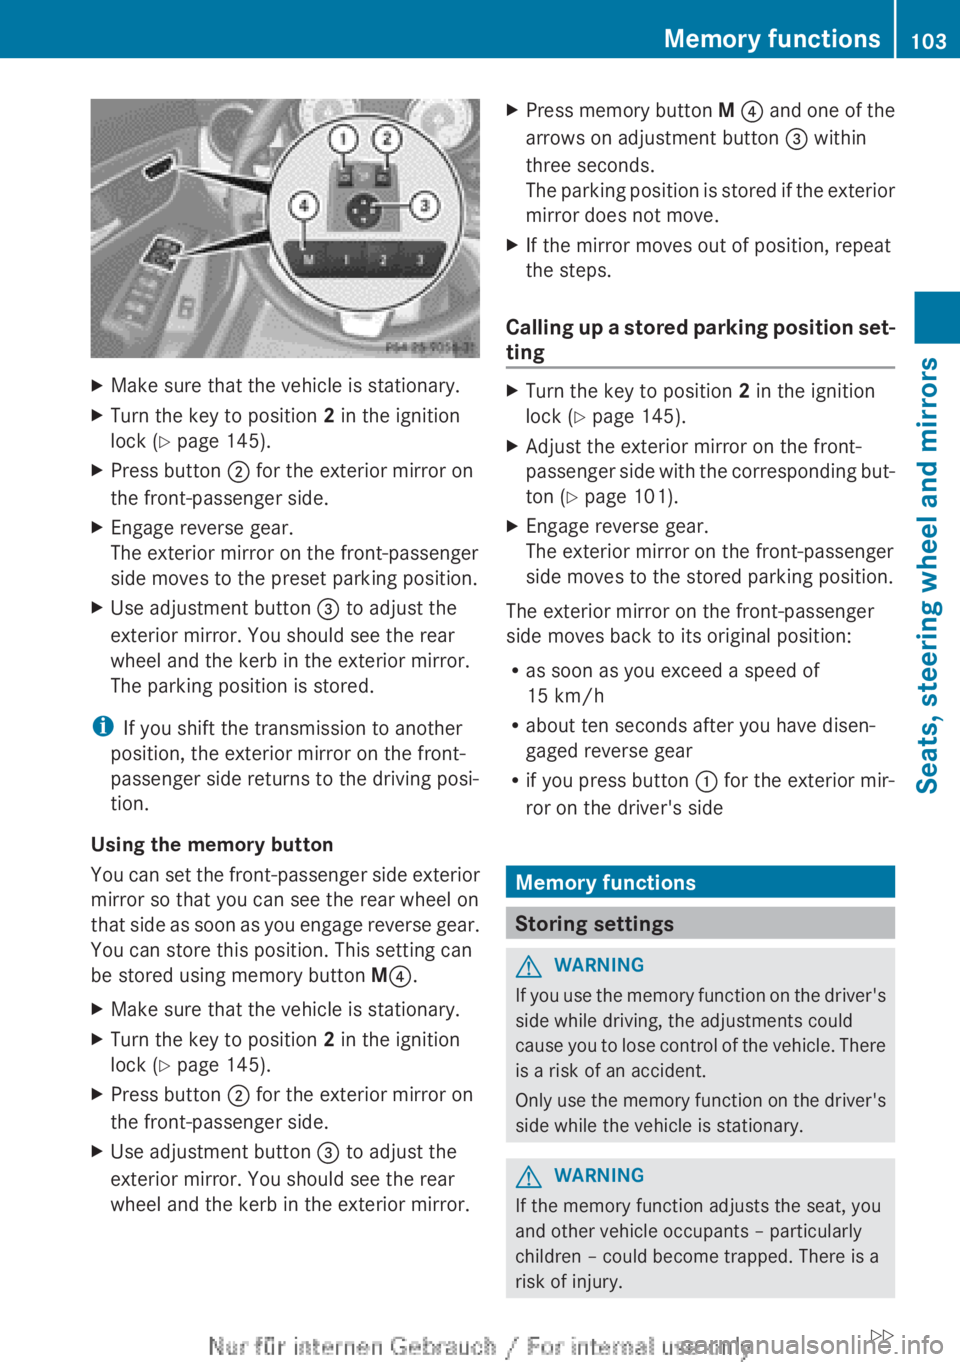
XMake sure that the vehicle is stationary.XTurn the key to position 2 in the ignition
lock ( Y page 145).XPress button ; for the exterior mirror on
the front-passenger side.XEngage reverse gear.
The exterior mirror on the front-passenger
side moves to the preset parking position.XUse adjustment button = to adjust the
exterior mirror. You should see the rear
wheel and the kerb in the exterior mirror.
The parking position is stored.
i If you shift the transmission to another
position, the exterior mirror on the front-
passenger side returns to the driving posi-
tion.
Using the memory button
You can set the front-passenger side exterior
mirror so that you can see the rear wheel on
that side as soon as you engage reverse gear.
You can store this position. This setting can
be stored using memory button M? .
XMake sure that the vehicle is stationary.XTurn the key to position 2 in the ignition
lock ( Y page 145).XPress button ; for the exterior mirror on
the front-passenger side.XUse adjustment button = to adjust the
exterior mirror. You should see the rear
wheel and the kerb in the exterior mirror.XPress memory button M ? and one of the
arrows on adjustment button = within
three seconds.
The parking position is stored if the exterior
mirror does not move.XIf the mirror moves out of position, repeat
the steps.
Calling up a stored parking position set-
ting
XTurn the key to position 2 in the ignition
lock ( Y page 145).XAdjust the exterior mirror on the front-
passenger side with the corresponding but-
ton ( Y page 101).XEngage reverse gear.
The exterior mirror on the front-passenger
side moves to the stored parking position.
The exterior mirror on the front-passenger
side moves back to its original position:
R as soon as you exceed a speed of
15 km/h
R about ten seconds after you have disen-
gaged reverse gear
R if you press button : for the exterior mir-
ror on the driver's side
Memory functions
Storing settings
GWARNING
If you use the memory function on the driver's
side while driving, the adjustments could
cause you to lose control of the vehicle. There
is a risk of an accident.
Only use the memory function on the driver's
side while the vehicle is stationary.
GWARNING
If the memory function adjusts the seat, you
and other vehicle occupants – particularly
children – could become trapped. There is a
risk of injury.
Memory functions103Seats, steering wheel and mirrorsZ
Page 106 of 352
While the memory function is making adjust-
ments, make sure that no one has any part of
their body within the sweep of the seat. If
someone becomes trapped, immediately
release the memory function position button.
The adjustment is stopped.GWARNING
If children activate the memory function, they
could become trapped, especially if they are
unattended. There is a risk of injury.
When leaving the vehicle, always take the key
with you and lock the vehicle. Never leave
children unattended in the vehicle.
With the memory function, you can store up
to three different settings, e.g. for three dif-
ferent people.
The following settings are stored as a single
memory preset:
R position of the seat, backrest and head
restraint
R driver's side: position of the exterior mir-
rors on the driver's and front-passenger
sides
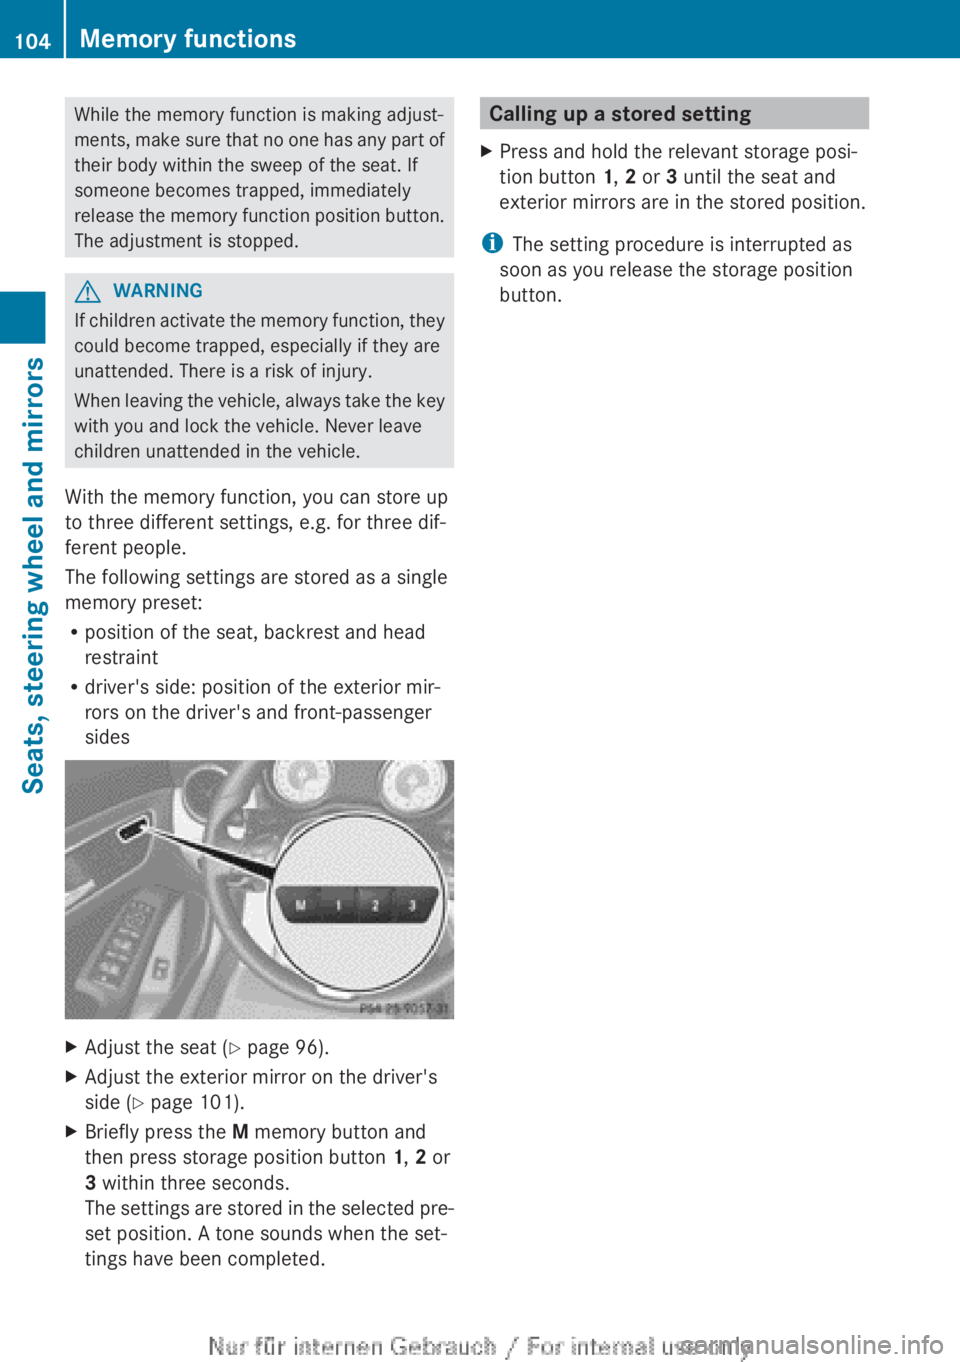
XAdjust the seat ( Y page 96).XAdjust the exterior mirror on the driver's
side ( Y page 101).XBriefly press the M memory button and
then press storage position button 1, 2 or
3 within three seconds.
The settings are stored in the selected pre-
set position. A tone sounds when the set-
tings have been completed.Calling up a stored settingXPress and hold the relevant storage posi-
tion button 1, 2 or 3 until the seat and
exterior mirrors are in the stored position.
i The setting procedure is interrupted as
soon as you release the storage position
button.
104Memory functionsSeats, steering wheel and mirrors