instrument panel MERCEDES-BENZ CLA 2013 Owners Manual
[x] Cancel search | Manufacturer: MERCEDES-BENZ, Model Year: 2013, Model line: CLA, Model: MERCEDES-BENZ CLA 2013Pages: 352, PDF Size: 5.37 MB
Page 10 of 352
Setting a speed .............................. 170
Storing and maintaining current
speed ............................................. 169
Cup holder
Centre console .............................. 274
Important safety notes ..................274
Rear compartment .........................275
D
Dashboard see Instrument cluster
Dashboard lighting
see Instrument cluster lighting
Data
see Technical data
Daytime driving lights
Display message ............................ 239
Switching on/off (on-board com-
puter) ............................................. 220
Switching on/off (switch) ..............107
Declarations of conformity ................. 23
Delayed switch-off Exterior lighting (on-board com-
puter) ............................................. 222
Interior lighting .............................. 222
Diagnostics connection ...................... 23
Diesel .................................................. 339
Digital speedometer ......................... 212
Dipped-beam headlamps Changing bulbs .............................. 116
Display message ............................ 236
Setting for driving abroad (sym-
metrical) ........................................ 106
Setting for driving on the right/left 221
Switching on/off ........................... 107
DIRECT SELECT lever
see Automatic transmission
Display (cleaning instructions) ........ 292
Display message ASSYST PLUS ................................ 286
General information .......................226
Hiding (on-board computer) ...........226
Display messages
Calling up (on-board computer) .....226
Driving systems ............................. 242
Engine ............................................ 240
Key ................................................ 254
Lights ............................................. 236
Safety systems .............................. 227
Tyres .............................................. 248
Vehicle ........................................... 250
Distance recorder
see Trip meter
Distance warning function
Activating/deactivating .................218
Function/notes ................................ 65
Warning lamp ................................. 264
DISTRONIC PLUS
Activation conditions .....................175
Cruise control lever .......................174
Deactivating ................................... 178
Display message ............................ 246
Displays in the multifunction dis-
play ................................................ 179
Driving tips .................................... 180
Function/notes ............................. 173
Important safety notes ..................173
Selecting ........................................ 175
Setting the specified minimum
distance ......................................... 178
Warning lamp ................................. 264
Door
Automatic locking (on-board com-
puter) ............................................. 223
Automatic locking (switch) ............... 83
Central locking/unlocking (key) ......77
Control panel ................................... 37
Display message ............................ 252
Emergency locking ........................... 84
Emergency unlocking .......................83
Important safety notes ....................81
Opening (from the inside) ................82
Drive program
Automatic ...................................... 156
Display (DIRECT SELECT lever) ......153
Manual ........................................... 156
Driver's door
see Door
Driving abroad
Service24h .................................... 288
Symmetrical dipped beam .............106
Driving on flooded roads .................. 167
Driving safety system Adaptive Brake Assist ......................66
COLLISION PREVENTION ASSIST ....658Index
Page 29 of 352
Cockpit ................................................. 28
Instrument cluster ..............................30
Multifunction steering wheel .............33
Centre console .................................... 34
Overhead control panel ......................36
Door control panel .............................. 3727At a glance
Page 30 of 352
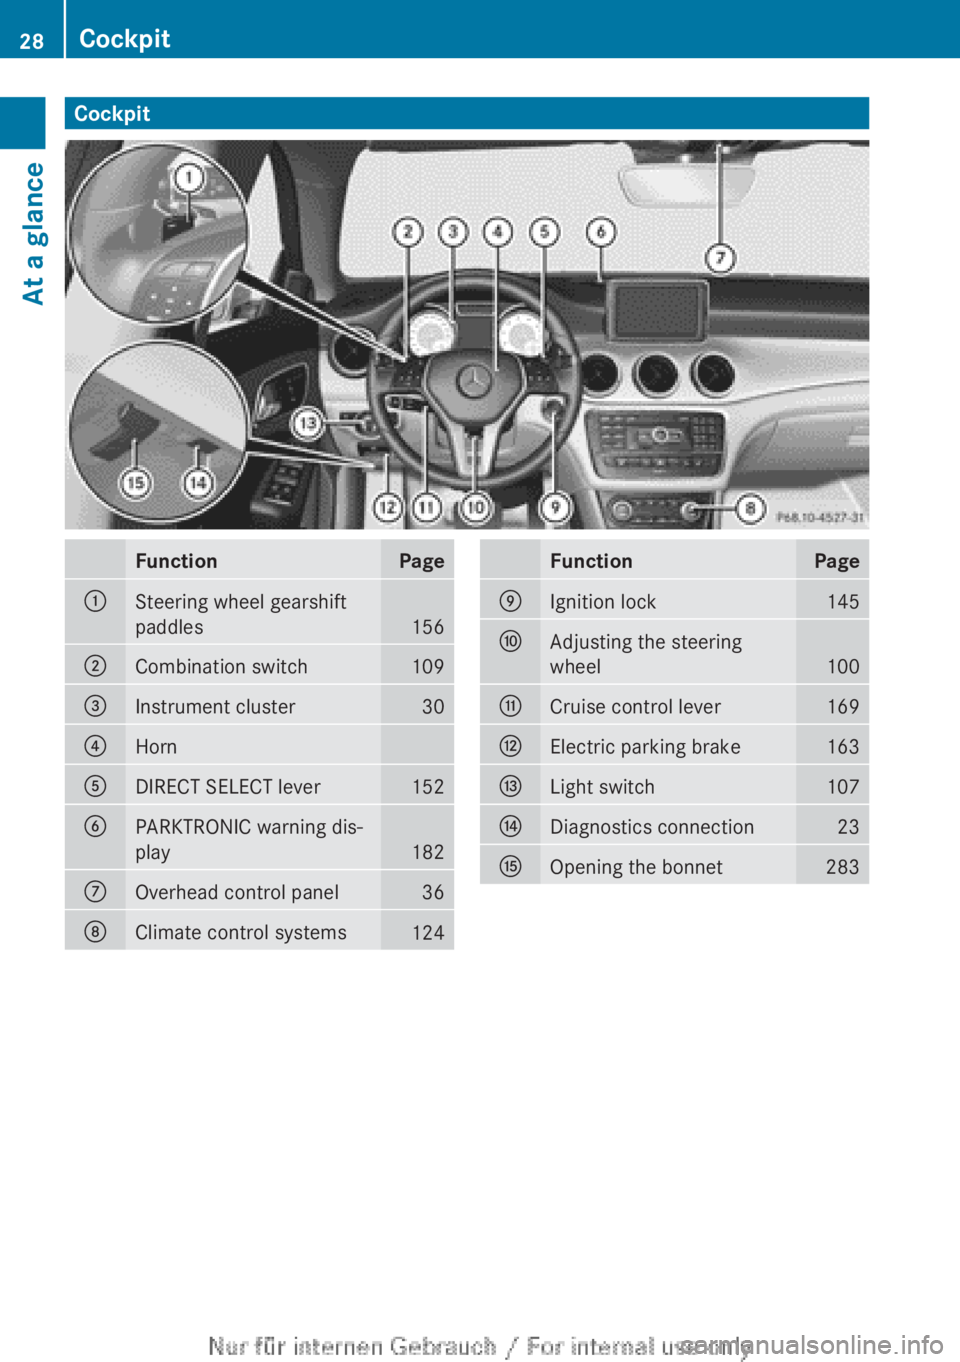
CockpitFunctionPage:Steering wheel gearshift
paddles
156
;Combination switch109=Instrument cluster30?HornADIRECT SELECT lever152BPARKTRONIC warning dis-
play
182
COverhead control panel36DClimate control systems124FunctionPageEIgnition lock145FAdjusting the steering
wheel
100
GCruise control lever169HElectric parking brake163ILight switch107JDiagnostics connection23KOpening the bonnet28328CockpitAt a glance
Page 31 of 352
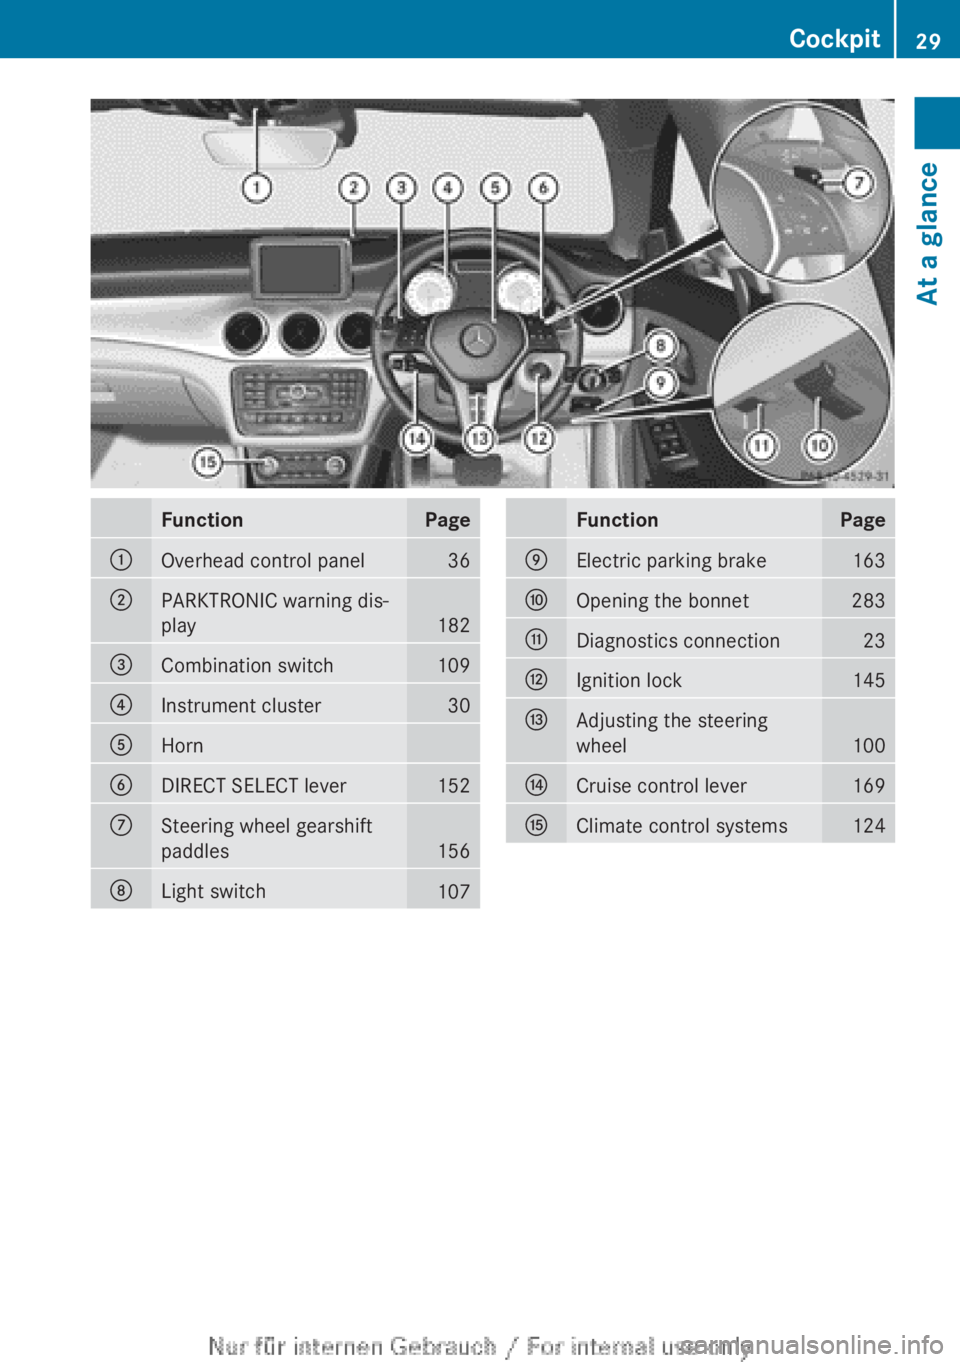
FunctionPage:Overhead control panel36;PARKTRONIC warning dis-
play
182
=Combination switch109?Instrument cluster30AHornBDIRECT SELECT lever152CSteering wheel gearshift
paddles
156
DLight switch107FunctionPageEElectric parking brake163FOpening the bonnet283GDiagnostics connection23HIgnition lock145IAdjusting the steering
wheel
100
JCruise control lever169KClimate control systems124Cockpit29At a glance
Page 51 of 352
Releasing the seat belts
! Make sure that the seat belt is fully rolled
up. Otherwise, the seat belt or belt tongue
will be trapped in the door or in the seat
mechanism. This could damage the door,
the door trim panel and the seat belt. Dam-
aged seat belts can no longer fulfil their
protective function and must be replaced.
Visit a qualified specialist workshop.
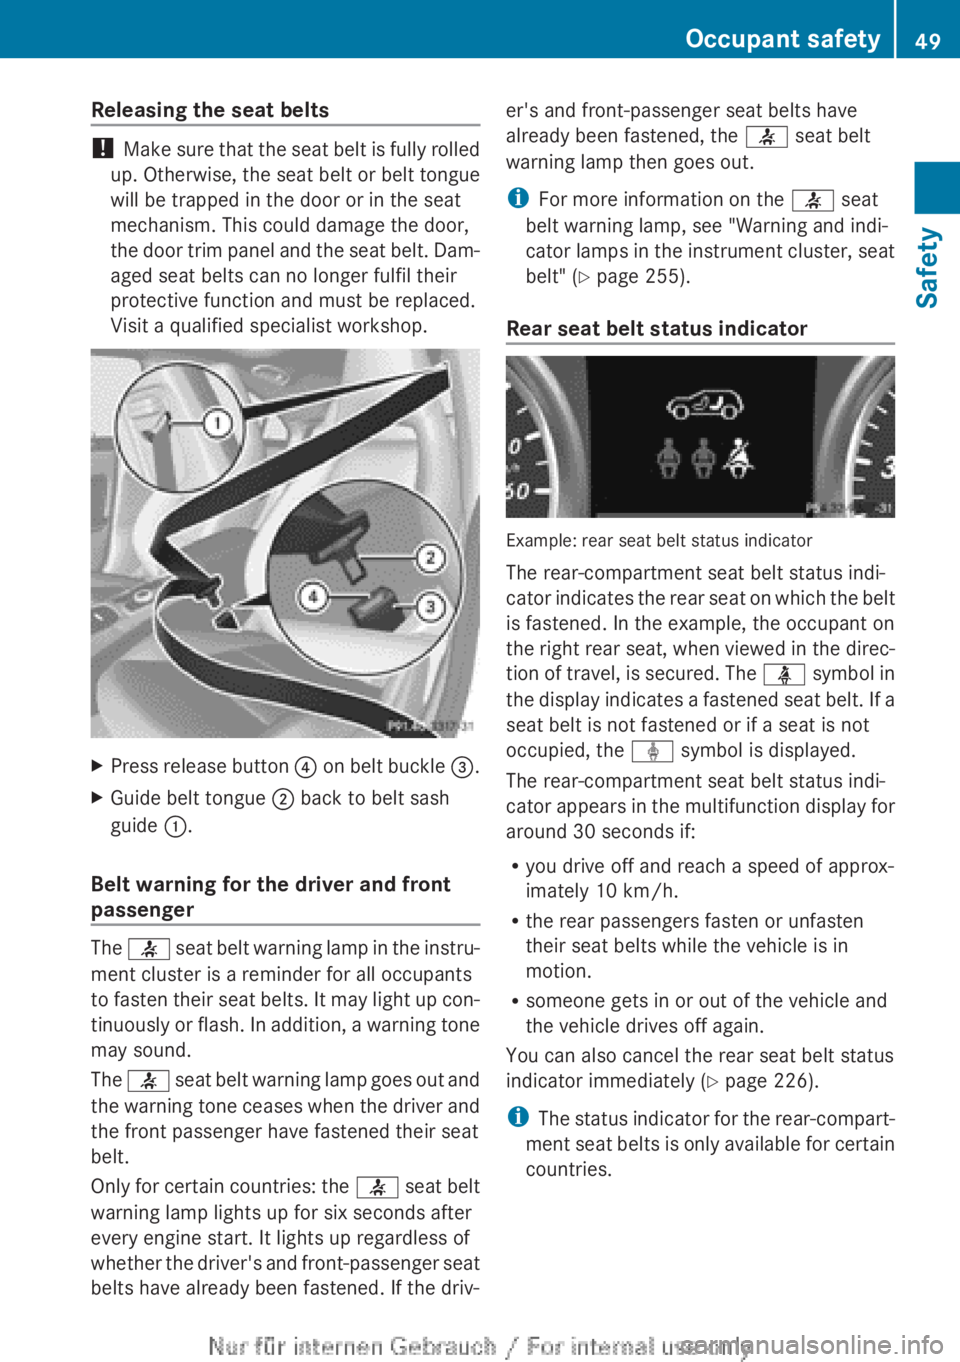
XPress release button ? on belt buckle =.XGuide belt tongue ; back to belt sash
guide :.
Belt warning for the driver and front
passenger
The 7 seat belt warning lamp in the instru-
ment cluster is a reminder for all occupants
to fasten their seat belts. It may light up con-
tinuously or flash. In addition, a warning tone
may sound.
The 7 seat belt warning lamp goes out and
the warning tone ceases when the driver and
the front passenger have fastened their seat
belt.
Only for certain countries: the 7 seat belt
warning lamp lights up for six seconds after
every engine start. It lights up regardless of
whether the driver's and front-passenger seat
belts have already been fastened. If the driv-
er's and front-passenger seat belts have
already been fastened, the 7 seat belt
warning lamp then goes out.
i For more information on the 7 seat
belt warning lamp, see "Warning and indi-
cator lamps in the instrument cluster, seat
belt" ( Y page 255).
Rear seat belt status indicator
Example: rear seat belt status indicator
The rear-compartment seat belt status indi-
cator indicates the rear seat on which the belt
is fastened. In the example, the occupant on
the right rear seat, when viewed in the direc-
tion of travel, is secured. The ü symbol in
the display indicates a fastened seat belt. If a
seat belt is not fastened or if a seat is not
occupied, the ý symbol is displayed.
The rear-compartment seat belt status indi-
cator appears in the multifunction display for
around 30 seconds if:
R you drive off and reach a speed of approx-
imately 10 km/h.
R the rear passengers fasten or unfasten
their seat belts while the vehicle is in
motion.
R someone gets in or out of the vehicle and
the vehicle drives off again.
You can also cancel the rear seat belt status
indicator immediately ( Y page 226).
i The status indicator for the rear-compart-
ment seat belts is only available for certain
countries.
Occupant safety49SafetyZ
Page 114 of 352
In very rare cases, Adaptive Highbeam Assist
recognises road users too late or not at all. In
this, or in similar situations, the automatic
main-beam headlamps will not be deactivated
or activated regardless. There is a risk of an
accident.
Always carefully observe the traffic conditions
and switch off the main-beam headlamps in
good time.
Adaptive Highbeam Assist cannot take into
account road, weather or traffic conditions.
Adaptive Highbeam Assist is only an aid. You
are responsible for adjusting the vehicle's
lighting to the prevailing light, visibility and
traffic conditions.
In particular, the detection of obstacles can
be restricted if there is:
R poor visibility, e.g. due to fog, heavy rain or
snow
R dirt on the sensors or the sensors are
obscured
General notes
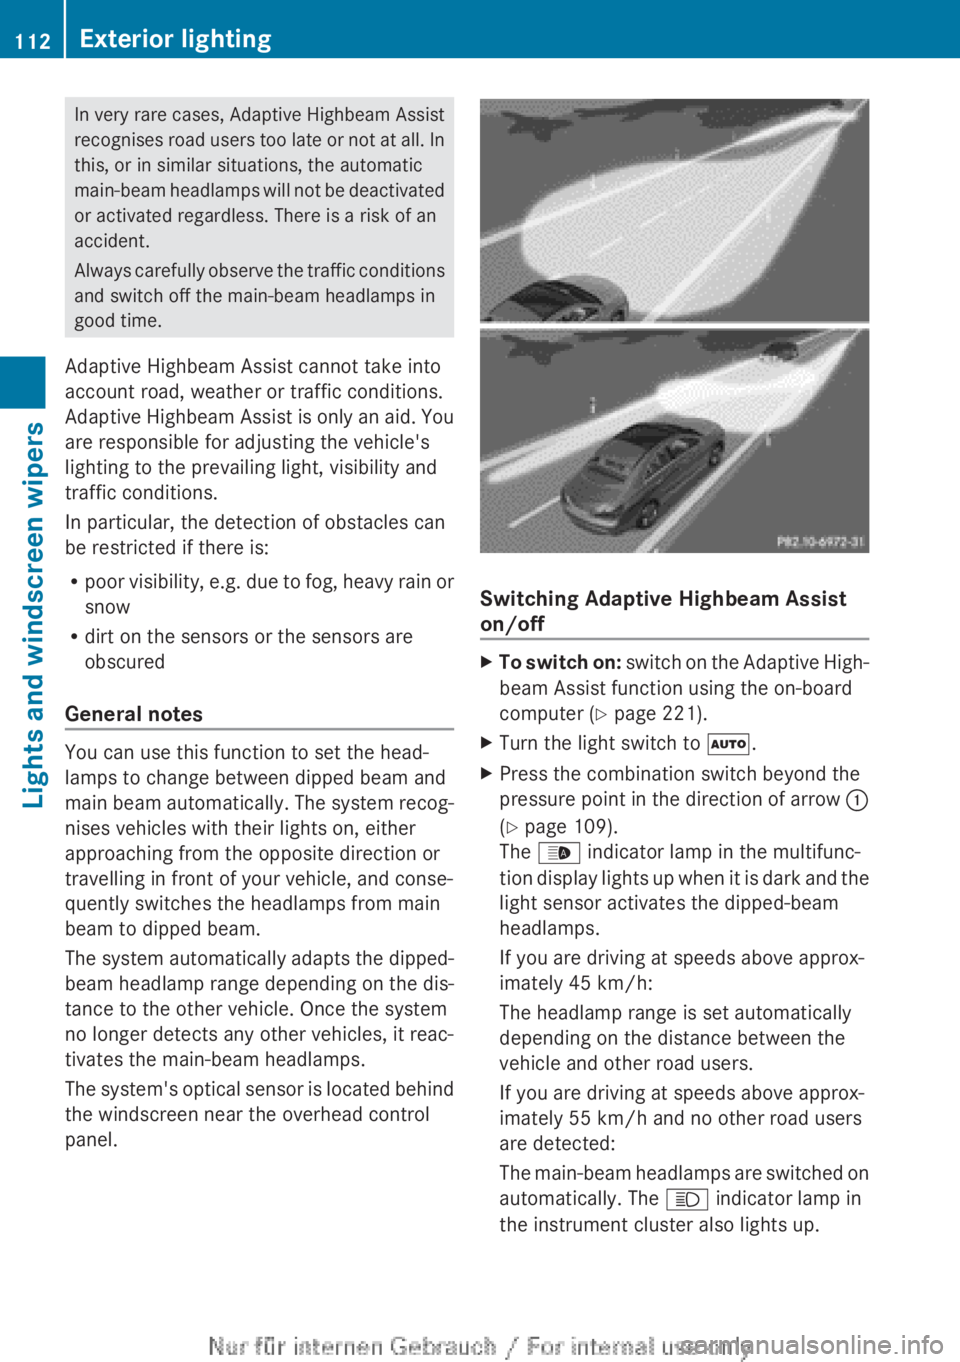
You can use this function to set the head-
lamps to change between dipped beam and
main beam automatically. The system recog-
nises vehicles with their lights on, either
approaching from the opposite direction or
travelling in front of your vehicle, and conse-
quently switches the headlamps from main
beam to dipped beam.
The system automatically adapts the dipped-
beam headlamp range depending on the dis-
tance to the other vehicle. Once the system
no longer detects any other vehicles, it reac-
tivates the main-beam headlamps.
The system's optical sensor is located behind
the windscreen near the overhead control
panel.
Switching Adaptive Highbeam Assist
on/off
XTo switch on: switch on the Adaptive High-
beam Assist function using the on-board
computer ( Y page 221).XTurn the light switch to Ã.XPress the combination switch beyond the
pressure point in the direction of arrow :
( Y page 109).
The _ indicator lamp in the multifunc-
tion display lights up when it is dark and the
light sensor activates the dipped-beam
headlamps.
If you are driving at speeds above approx-
imately 45 km/h:
The headlamp range is set automatically
depending on the distance between the
vehicle and other road users.
If you are driving at speeds above approx-
imately 55 km/h and no other road users
are detected:
The main-beam headlamps are switched on
automatically. The K indicator lamp in
the instrument cluster also lights up.112Exterior lightingLights and windscreen wipers
Page 115 of 352
If you are driving at speeds below
45 km/h or other road users are detected
or the roads are adequately lit:
The main-beam headlamps are switched off
automatically. The K indicator lamp in
the instrument cluster goes out. The _
indicator lamp in the multifunction display
remains lit.XTo deactivate: move the combination
switch back to its normal position.
The _ indicator lamp in the multifunc-
tion display goes out.
Headlamps misted up on the inside
The headlamps may mist up on the inside if
there is high atmospheric humidity.
XSwitch on the lights and drive off.
The level of moisture diminishes, depend-
ing on the length of the journey and the
weather conditions (humidity and temper-
ature).
If the level of moisture does not diminish:
XHave the headlamps checked at a qualified
specialist workshop.Interior lighting
Overview of interior lighting
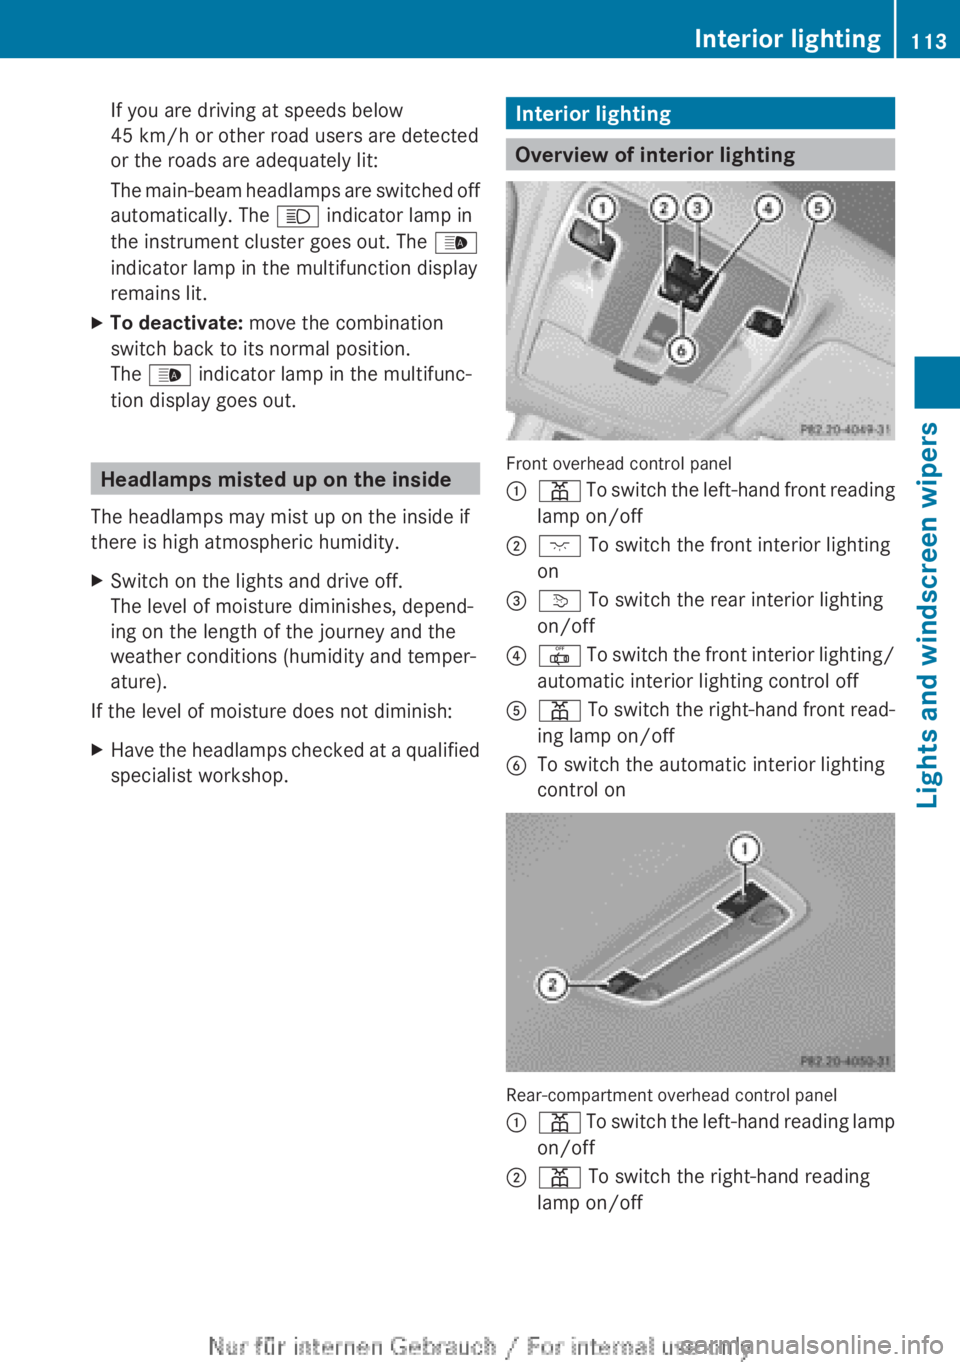
Front overhead control panel
:p To switch the left-hand front reading
lamp on/off;c To switch the front interior lighting
on=v To switch the rear interior lighting
on/off?| To switch the front interior lighting/
automatic interior lighting control offAp To switch the right-hand front read-
ing lamp on/offBTo switch the automatic interior lighting
control on
Rear-compartment overhead control panel
:p To switch the left-hand reading lamp
on/off;p To switch the right-hand reading
lamp on/offInterior lighting113Lights and windscreen wipersZ
Page 210 of 352
Useful information
i This Owner's Manual describes all mod-
els, series and optional equipment for your
vehicle that were available at the time of
going to press. National variations are pos-
sible. Note that your vehicle may not be
equipped with all of the functions descri-
bed. This is also the case for systems and
functions relevant to safety.
i Read the information on qualified special-
ist workshops: ( Y page 24).
Important safety notes
GWARNING
Operating the integrated information systems
and communications equipment in the vehicle
while driving will distract you from traffic con-
ditions. You could then lose control of the
vehicle. There is a risk of an accident.
Only operate these devices if road traffic con-
ditions permit. If you are unsure about the
surrounding conditions, pull over to a safe
location and make entries only while the vehi-
cle is stationary.
GWARNING
If the instrument cluster has failed or mal-
functioned, you may not recognise function
restrictions relevant to safety. The operating
safety of your vehicle may be impaired. There
is a risk of an accident.
Drive on carefully. Have the vehicle checked
at a qualified specialist workshop immedi-
ately.
You must observe the legal requirements for
the country in which you are currently driving
when operating the on-board computer.
The on-board computer only shows messages
or warnings from certain systems in the mul-
tifunction display. You should therefore make
sure your vehicle is operating safely at all
times. Otherwise, a vehicle that is not oper-
ating safely may cause an accident.
For an overview, see the instrument panel
illustration ( Y page 30).
Displays and operation
Instrument cluster lighting
The lighting in the instrument cluster, in the
displays and the controls in the vehicle inte-
rior can be adjusted using the brightness con-
trol knob.
The brightness control knob is on the bottom
left of the instrument cluster ( Y page 30).
XTurn the brightness control knob clockwise
or anti-clockwise.
If the light switch is set to Ã, T or
L , the brightness is dependant upon
the brightness of the ambient light.
i The light sensor in the instrument cluster
automatically controls the brightness of
the multifunction display.
In daylight, the displays in the instrument
cluster are not illuminated.
Coolant temperature gauge
GWARNING
If you open the bonnet while the engine is
overheating or while there is a fire in the
engine compartment, you could come into
contact with hot gases or other leaking
service products. There is a danger of injury.
Allow an overheating engine to cool down
before opening the bonnet. If there is a fire in
the engine compartment, leave the bonnet
closed and notify the fire brigade.
The coolant temperature gauge is in the
instrument cluster on the right-hand side.
Under normal operating conditions and with
the specified coolant level, the coolant tem-
perature may rise to 120 †.
208Displays and operationOn-board computer and displays