turn signal MERCEDES-BENZ CLA 2016 Owners Manual
[x] Cancel search | Manufacturer: MERCEDES-BENZ, Model Year: 2016, Model line: CLA, Model: MERCEDES-BENZ CLA 2016Pages: 374, PDF Size: 9.97 MB
Page 8 of 374
Display message ............................ 240
Brakes
ABS .................................................. 65
Adaptive Brake Assist ...................... 68
BAS .................................................. 66
Brake fluid (notes) ........................ .3 69
Display message ............................ 228
EBD ................................................. .7 2
Hill start assist ............................... 151
HOLD function ............................... 187
Important safety notes .................. 175
Maintenance .................................. 176
Parking brake ................................ 171
Riding tips ...................................... 175
Warning lamp ................................. 260
Breakdown
Where will I find...? ........................ 310
see Flat tire
see Tow-starting
see Towing away
Brightness control (instrument
cluster lighting) ................................... 31
Buttons on the steering wheel ......... 211
C
California
Important notice for retail cus-
tomers and lessees .......................... 23
Calling up a malfunction
see Display messages
Car
see Vehicle
Care
Car wash ........................................ 302
Carpets .......................................... 308
Display ........................................... 306
Exhaust pipe .................................. 306
Exterior lights ................................ 305
Gear or selector lever .................... 307
Interior ........................................... 306
Matte finish ................................... 304
Notes ............................................. 301
Paint .............................................. 303
Plastic trim .................................... 306
Power washer ................................ 303
Rear view camera .......................... 306
Roof lining ...................................... 308 Seat belt ........................................ 308
Seat cover ..................................... 307
Sensors ......................................... 305
Steering wheel ............................... 307
Trim pieces .................................... 307
Washing by hand ........................... 302
Wheels ........................................... 304
Windows ........................................ 304
Wiper blades .................................. 305
Wooden trim .................................. 307
Cargo compartment enlargement ... 275
Cargo tie down rings ......................... 276
CD player (on-board computer) ........ 217
Center console
Lower section .................................. 36
Upper section .................................. 35
Central locking
Automatic locking (on-board com-
puter) ............................................. 222
Locking/unlocking (SmartKey) ........ 76
Changing bulbs
Brake lamps ................................... 123
Cornering light function ................. 123
High-beam headlamps ................... 122
Low-beam headlamps .................... 122
Rear fog lamp ................................ 123
Turn signals (front) ......................... 123
Turn signals (rear) .......................... 123
Child
Restraint system .............................. 59
Child seat
Forward-facing restraint system ...... 63
LATCH-type (ISOFIX) child seat
anchors ............................................ 60
On the front-passenger seat ............ 62
Rearward-facing restraint system .... 63
Top Tether ....................................... 61
Child-proof locks
Important safety no tes .................... 63
R
ear doors ....................................... 64
Children
Special seat belt retractor ............... 59
Cigarette lighter ................................ 280
Cleaning
Mirror turn signal ........................... 305
Climate control
Air-conditioning system ................. 1316
Index
Page 13 of 374
Important safety notes .................. 290
Opening/closing the garage door .. 292
Programming (button in the rear-
view mirror) ................................... 290
Synchronizing the rolling code ....... 291
Gasoline ............................................ .3 66
Gear indicator (on-board com-
puter, Mercedes-AMG vehicles) ....... 223
Genuine parts ...................................... 21
Glove box .......................................... .2 73
H Handbrake
see Parking brake
Hazard warning lamps
Display message ............................ 256
Switching on/off ........................... 117
Head restraints
Adjusting ....................................... 103
Adjusting (manually) ..................... .1 03
Adjusting (rear) .............................. 104
Headlamps
Fogging up ..................................... 119
see Automatic headlamp mode
Heating
see Climate control
High beam flasher ............................ .1 17
High-beam headlamps
Adaptive Highbeam Assist ............. 118
Changing bulbs .............................. 122
Display message ............................ 241
Switching on/off ........................... 116
Hill start assist .................................. 151
HOLD function
Activating ....................................... 188
Deactivating ................................... 188
Display message ............................ 246
Function/notes ............................ .1 87
Hood
Closing .......................................... .2 97
Display message ............................ 255
Important safety notes .................. 296
Opening ......................................... 296
Horn ...................................................... 30
Hydroplaning ..................................... 177 I Ignition lock
see Key positions
Immobilizer .......................................... 73
Indicator and warning lamps
COLLISION PREVENTION ASSIST
PLUS .............................................. 269
Indicator lamps
see Warning and indicator lamps
Indicators
see Turn signals
Instrument cluster
Overview .......................................... 31
Settings ......................................... 221
Warning and indicator lamps ........... 32
Instrument cluster lighting .............. 210
Interior lighting
Control .......................................... .1 20
Emergency lighting ........................ 120
Overview ........................................ 119
Reading lamp ................................. 119
J Jack
Storage location ............................ 310
Using ............................................. 352
Jump starting (engine) ..................... .3 19
K
Key positions
Start/Stop button .......................... 147
KEYLESS-GO
Convenience closing feature ............ 90
Deactivation ..................................... 77
Locking ............................................ 77
Unlocking ......................................... 77
Kickdown
Driving tips ................................... .1 61
Manual gearshifting ....................... 166
Knee bag .............................................. 50
L
Lamps
see Warning and indicator lamps Index 11
Page 14 of 374
Lane Keeping Assist
Activating/deactivating (on-
board computer) ............................ 220
Display message ............................ 246
Function/information .................... 207
Lane Tracking package .................... .2 05
Lap time (RACETIMER) ..................... .2 24
LATCH-type (ISOFIX) child seat
anchors ................................................ 60
License plate lamp (display mes-
sage) ................................................... 241
Light function, active
Display message ............................ 242
Light sensor (display message) ....... 242
Lights
Adaptive Highbeam Assist ............. 118
Automatic headlamp mode ............ 114
Cornering light function ................. 117
Fog lamps ...................................... 115
Fogged up headlamps .................... 119
Hazard warning lamps ................... 117
High beam flasher .......................... 117
High-beam headlamps ................... 116
Light switch ................................... 114
Low-beam headlamps .................... 115
Parking lamps ................................ 116
Rear fog lamp ................................ 116
Setting exterior lighting ................. 114
Standing lamps .............................. 116
Switching the daytime running
lamps on/off (on-board com-
puter) ............................................. 222
Turn signals ................................... 116
LIM indicator lamp
DISTRONIC PLUS ........................... 182
Loading guidelines ............................ 272
Locking
see Central locking
Locking (doors)
Automatic ........................................ 84
Emergency locking ........................... 85
From inside (central locking but-
ton) ................................................. .8 4
Locking centrally
see Cent ral loc king
Locking
verification signal (on-
board computer) .............................. .2 22 Low-beam headlamps
Changing bulbs .............................. 122
Display message ............................ 240
Switching on/off ........................... 115
Lumbar support
Adjusting the 4-way lumbar sup-
port ................................................ 104
M M+S tires ............................................ 330
Malfunction message
see Display messages
Matte finish (cleaning instruc-
tions) ................................................. .3 04
mbrace
Call priority ................................... .2 85
Display message ............................ 234
Downloading destinations
(COMAND) ..................................... 286
Downloading routes ....................... 289
Emergency call .............................. 283
General notes ................................ 282
Geo fencing ................................... 289
Locating a stolen vehicle .............. .2 88
MB info call button ........................ 285
Remote fault diagnosis .................. 288
Remote vehicle locking .................. 287
Roadside Assistance button .......... 284
Search & Send ............................... 286
Self-test ......................................... 282
Speed alert .................................... 289
System .......................................... 282
Triggering the vehicle alarm ........... 289
Vehicle remote unlocking .............. 287
Mechanical key
Function/notes ................................ 78
Inserting .......................................... 79
Locking vehicle ................................ 85
Removing ......................................... 79
Unlocking the driver's door .............. 85
Memory card (audio) ......................... 217
Memory function ............................... 110
Message memory (on-board com-
puter) .................................................. 227
Messages
see Display messages12
Index
Page 15 of 374
Mirror turn signal
Cleaning ........................................ .3 05
Mirrors
see Exterior mirrors
see Rear-view mirror
see Vanity mirror (in the sun visor)
Mobile phone
Frequencies ................................... 362
Installation ..................................... 362
Menu (on-board computer) ............ 218
Transmission output (maximum) .... 362
Modifying the programming
(SmartKey) .......................................... .7 8
MOExtended tires .............................. 311
Mounting wheels
Lowering the vehicle ...................... 355
Mounting a new wheel ................... 354
Preparing the vehicle .................... .3 51
Raising the vehicle ......................... 352
Removing a wheel .......................... 354
Securing the vehicle against roll-
ing away ........................................ 352
MP3
Operation ....................................... 217
Multifunction display
Function/notes ............................ .2 13
Permanent display ......................... 222
Multifunction steering wheel
Operating the on-board computer .. 211
Overview .......................................... 33
N
Navigation
Menu (on-board computer) ............ 215
Notes on breaking-in a new vehi-
cle ....................................................... 146
O
Occupant Classification System
(OCS)
Conditions ....................................... 51
Faults ............................................... 55
Operation ......................................... 51
System self-test ............................... 53 Occupant safety
Automatic measures after an acci-
dent ................................................. 58
Children in the vehicle ..................... 58
Important safety notes .................... 43
Introduction to the restraint sys-
tem ................................................. .4 2
Occupant Classification System
(OCS) ............................................... 51
PASSENGER AIR BAG indicator
lamps ............................................... 43
Pets in the vehicle ........................... 64
Restraint system warning lamp ........ 43
Seat belt .......................................... 44
OCS
Conditions ....................................... 51
Faults ............................................... 55
Operation ......................................... 51
System self-test .............................. .5 3
Odometer .......................................... .2 13
On-board computer
AMG menu ..................................... 223
Assistance graphic menu .............. .2 19
Assistance menu ........................... 219
Audio menu ................................... 217
Convenience submenu .................. 223
Display messages .......................... 227
Displaying a service message ....... .3 01
DISTRONIC PLUS ........................... 185
Factory settings ............................ .2 23
Important safety notes .................. 210
Instrument cluster submenu .......... 221
Lighting submenu .......................... 222
Menu overview .............................. 213
Message memory .......................... 227
Navigati on menu ............................ 215
Operati on
....................................... 211
RACETIMER ................................... 224
Service menu ................................. 221
Settings menu ............................... 221
Standard display ............................ 213
Telephone menu ............................ 218
Trip menu ...................................... 213
Vehicle submenu ........................... 222
Video DVD operation ..................... 217
Opening and closing the side trim
panels ................................................. 123 Index 13
Page 21 of 374
Notes for 4MATIC vehicles ............ 324
Removing the towing eye ............... 323
Transporting the vehicle ................ 324
With both axles on the ground ....... 323
With front axle raised .................... .3 23
Towing eye ......................................... 310
Transmission
see Automatic transmission
Transmission position display
(DIRECT SELECT lever) ..................... .1 57
Transporting the vehicle .................. 324
Trim pieces (cleaning instruc-
tions) ................................................. .3 07
Trip computer (on-board com-
puter) ................................................. .2 14
Trip odometer
Calling up ....................................... 213
Resetting (on-board computer) ...... 215
Trunk
Emergency release .......................... 87
Emergency release button .............. .8 8
Important safety notes .................... 85
Opening (automatically from out-
side) ................................................ .8 6
Opening automatically from
inside ............................................... 87
Opening/closing (manually from
outside) ............................................ 86
Trunk emergency release button ...... .8 8
Trunk lid
Display message ............................ 255
Opening dimensions ...................... 371
Trunk load (maximum) ...................... 371
Turn signals
Changing bulbs (front) ................... 123
Changing bulbs (rear) .................... 123
Display message ............................ 240
Switching on/off ........................... 116
Two-way radio
Frequencies ................................... 362
Installation ..................................... 362
Transmission output (maximum) .... 362
Type identification plate
see Vehicle identification plate U Unlocking
Emergency unlocking ....................... 85
From inside the vehicle (central
unlocking button) ............................. 84
Upshift indicator (on-board com-
puter, Mercedes-AMG vehicles) ....... 223
V Vanity mirror (in the sun visor) ........ 279
Vehicle
Correct use ...................................... 26
Data acquisition ............................... 27
Display message ............................ 253
Equipment ....................................... 22
Individual settings .......................... 221
Limited Warranty ............................. 26
Loading .......................................... 339
Locking (in an emergency) ............... 85
Locking (SmartKey) .......................... 76
Lowering ........................................ 355
Maintenance .................................... 23
Parking for a long period ................ 172
Pulling away ................................... 150
Raising ........................................... 352
Reporting problems ......................... 26
Securing from rolling away ............ 352
Transporting .................................. 324
Unlocking (in an emergency) ........... 85
Unlocking (SmartKey) ...................... 76
Vehicle data ................................... 371
Vehicle data
Roof load (maximum) ..................... 371
Trunk load (maximum) ................... 371
Vehicle dimensions ........................... 371
Vehicle emergency locking ................ 85
Vehicle identification number
see VIN
Vehicle identification plate .............. 364
Vehicle tool kit .................................. 310
Ventilation
Setting the vents ........................... 142
Video
Operating the DVD ......................... 217
VIN
Seat ............................................... 364 Index 19
Page 79 of 374
The SmartKey centrally locks/unlocks: R
the doors R
the trunk lid R
the fuel filler flap
The turn signals flash once when unlocking
and three times when locking.
When the locator lighting is activated in Audio
20/COMAND, it lights up when it is dark after
the vehicle is unlocked with the remote con-
trol (see separate operating instructions).
You can also set an audible signal to confirm
that the vehicle has been locked. The audible
signal can be activated and deactivated using
the on-board computer ( Y
page 222).X
To open the trunk lid automatically:
press and hold the �T button until the
trunk lid opens ( Y
page 86).
KEYLESS-GO
General notes
Bear in mind that the engine can be started by
any of the vehicle occupants if there is a
SmartKey in the vehicle.
Locking and unlocking
You can start, lock or unlock the vehicle using
KEYLESS-GO. To do this, you only need carry
the SmartKey with you. You can combine the
functions of KEYLESS-GO with those of a con-
ventional SmartKey. Unlock the vehicle by
using KEYLESS-GO, for instance, and lock it
using the �7 button on the SmartKey.
The driver's door and the door at which the
handle is used, must both be closed. The
SmartKey must be outside the vehicle. When
locking or unlocking with KEYLESS-GO, the
distance between the SmartKey and the cor-
responding door handle must not be greater
than 3 ft (1 m). A check which periodically establishes a radio
connection between the vehicle and the
SmartKey determines whether a valid Smart-
Key is in the vehicle. This occurs, for example: R
when starting the engine R
whilst driving R
when the external door handles are
touched R
during convenience closing
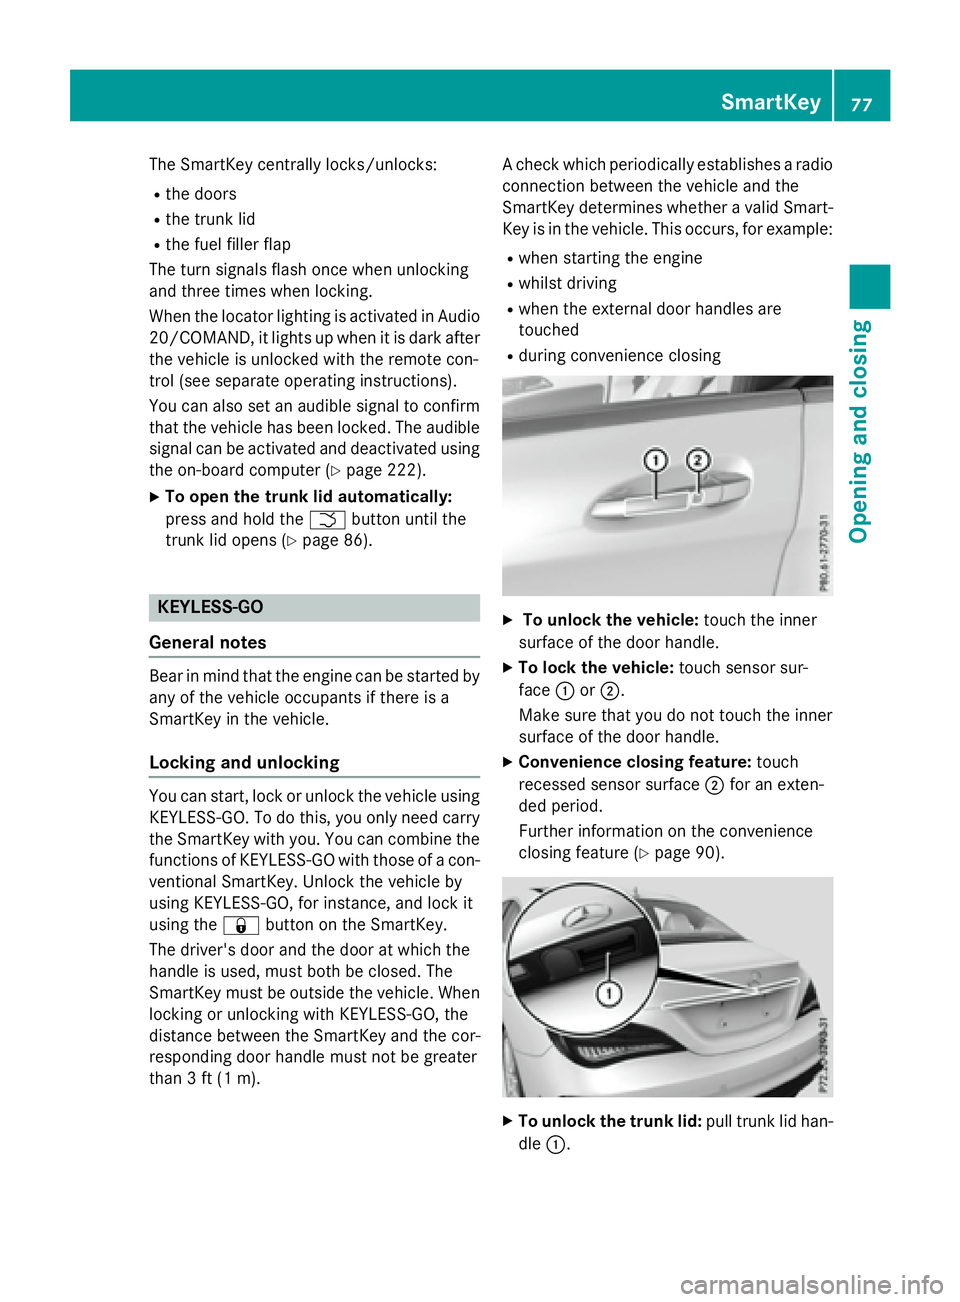
X
To unlock the vehicle: touch the inner
surface of the door handle. X
To lock the vehicle: touch sensor sur-
face �C or �D .
Make sure that you do not touch the inner
surface of the door handle. X
Convenience closing feature: touch
recessed sensor surface �D for an exten-
ded period.
Further information on the convenience
closing feature ( Y
page 90).
X
To unlock the trunk lid: pull trunk lid han-
dle �C . SmartKey 77
Opening and closing Z
Page 80 of 374
Deactivating an d activatingIf you do no t intend to use th e vehicle fo r a
longer period of time, you can deactivat e KEY-
LESS-GO . The SmartKey will then use ver y lit -
tl e power, thereby conservin g battery power.
Fo r th e purposes of activation/deactivation ,
th e vehicle mus t no t be nearby.X
To deactivate : press th e �7 butto n on
th e SmartKey twic e in rapid succession .
The battery chec k lamp of th e SmartKey
flashes twic e briefly and lights up once ,
then KEYLESS-GO is deactivated
( Y
page 79) .X
To activate : press any butto n on th e
SmartKey.
or X
Inser t th e SmartKey into th e ignition lock.
KEYLESS-GO and all of it s associated fea-
tures are available again .
KEYLESS-G O star t function
General notes
Bear in min d that th e engin e can be started by
any of th e vehicle occupant s if there is a
SmartKey in th e vehicle.
Changin g th e settings of th e locking
syste m
You can chang e th e setting s of th e locking
system. Thi s means that only th e driver's doo r
and th e fue l filler flap are unlocke d when th e
vehicle is unlocked. Thi s is useful if you fre-
quentl y trave l on your own .X
To change th e setting: press and hol d th e
�6 and �7 buttons simultaneousl y fo r approximately six seconds until th e battery
indicator lamp flashes twic e ( Y
page 79) .
If th e setting of th e locking system is changed
within th e signal range of th e vehicle, press-
in g th e �7 or �6 button: R
locks or R
unlocks th e vehicle
The SmartKey no w function s as follows :X
To unlock : press th e �6 butto n once .X
To unlock centrally : press th e �6 but -
to n twice. X
To lock centrally : press th e �7 button.
The KEYLESS-GO function is changed as fol-
lows : X
To unlock th e driver's door: touch th e
inne r surfac e of th e doo r handle on th e
driver's door. X
To unlock centrally : touch th e inne r sur -
fac e of th e doo r handle on th e front-
passenger doo r or th e rea r door.X
To lock centrally : touch th e outer sensor
surfac e on on e of th e doo r handles .X
To restor e th e factory settings: press
and hol d th e �6 and �7 buttons simul-
taneousl y fo r approximately six seconds
until th e battery chec k lamp flashes twic e
( Y
page 79).
Mechanica l key
General notes
If th e vehicle can no longer be locke d or
unlocke d wit h th e SmartKey or KEYLESS-GO ,
use th e mechanical key.
If you use th e mechanical ke y to unloc k and
ope n th e driver's doo r or th e trunk lid, th e
anti-thef t alar m system will be triggere d
( Y
page 73).
There are severa l ways to turn of f th e alarm:X
To deactivate th e alarm wit h th e key :
press th e �6 or �7 butto n on th e key.
or78
SmartKey
Opening and closing
Page 118 of 374
Rear fog lamp
The rear fog lamp improves visibility of your
vehicle for the traffic behind in the event of
thick fog. Please take note of the country-
specific regulations for the use of rear fog
lamps. X
To switch on the rear fog lamp: turn the
SmartKey in the ignition lock to position 2
or start the engine. X
Turn the light switch to �X or �X .X
Press the �^ button.
The yellow �^ indicator lamp in the
instrument cluster lights up. X
To switch off the rear fog lamp: press the
�^ button.
The yellow �^ indicator lamp in the
instrument cluster goes out.
i When the rear fog lamp is switched on,
the center brake lamp in the tail lamp
switches off due to a legal requirement.
Parking lamps
! If the battery has been excessively dis-
charged, the parking lamps or standing
lamps are automatically switched off to
enable the next engine start. Always park
your vehicle safely and sufficiently lit
according to legal standards. Avoid the
continuous use of the �` parking lamps
for several hours. If possible, switch on the
�d right or the �c left standing lamp.X
To switch on: turn the light switch to �` .
The green �` indicator lamp in the instru-
ment cluster lights up.
Standing lamps
Switching on the standing lamps ensures the
corresponding side of the vehicle is illumina-
ted. X
To switch on the standing lamps: the
Sma rtKey should not be in the ignition lock
or it should be in position 0 .X
Turn the light switch to �c (left-hand side
of the vehicle) or �d (right-hand side of
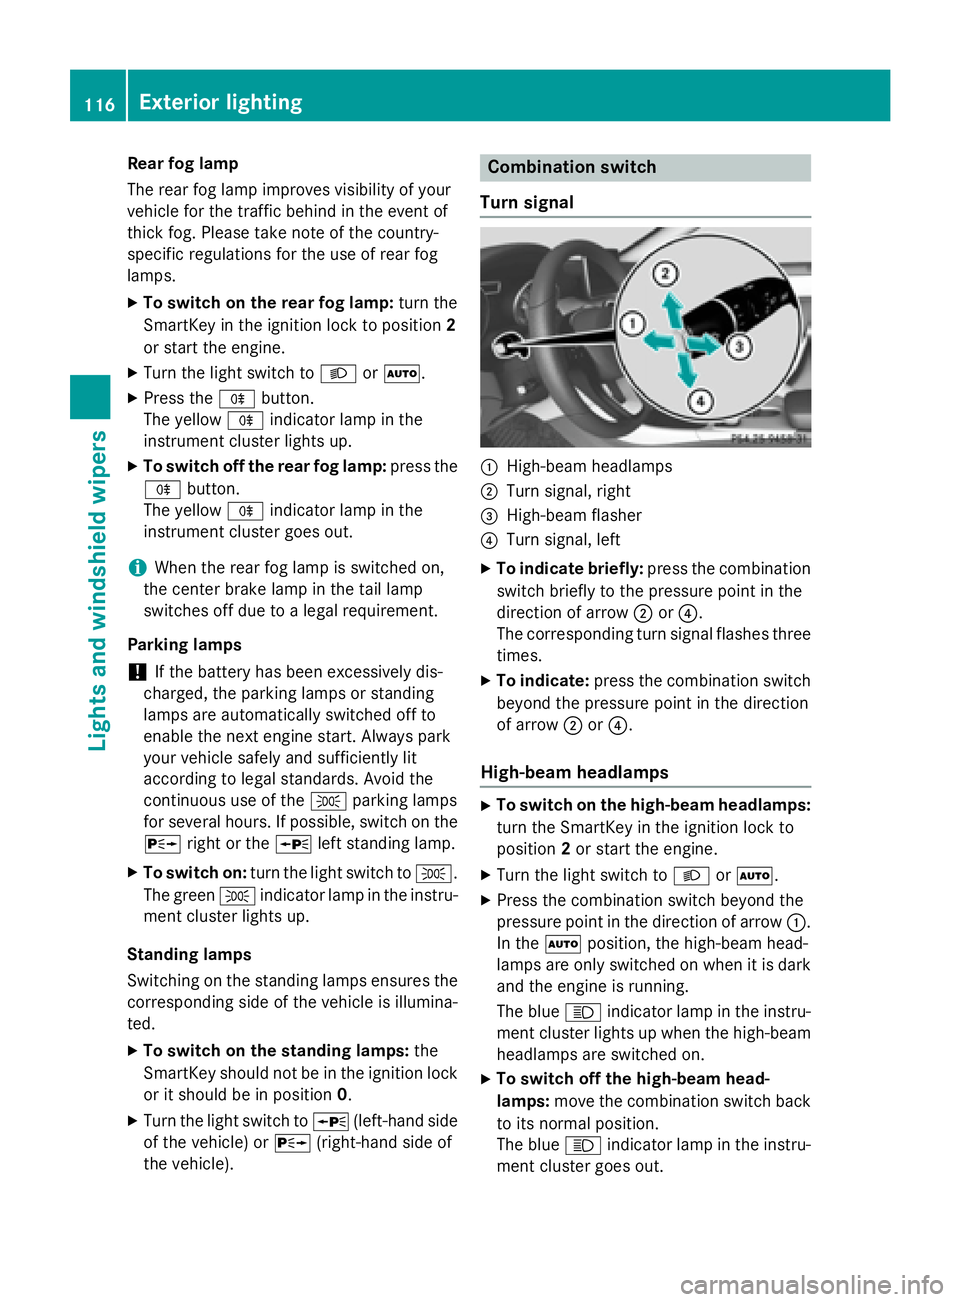
the vehicle). Combination switch
Turn signal
�C
High-beam headlamps �D
Turn signal, right �
Page 123 of 374
Do not use a bulb that has been dropped or if
its glass tube has been scratched.
The bulb may explode if: R
you touch it R
it is hot R
you drop it R
you scratch it
Only operate bulbs in enclosed lamps
designed for that purpose. Only install spare
bulbs of the same type and the specified volt-
age.
Marks on the glass tube reduce the service
life of the bulbs. Do not touch the glass tube
with your bare hands. If necessary, clean the
glass tube when cold with alcohol or spirit and
rub it off with a lint-free cloth.
Protect bulbs from moisture during opera-
tion. Do not allow bulbs to come into contact
with liquids.
There are bulbs other than the Xenon bulbs
that you cannot replace. Only replace the
bulbs listed ( Y
page 121). Have the bulbs that
you cannot replace yourself changed at a
qualified specialist workshop.
If you require assistance replacing bulbs, con-
sult a qualified specialist workshop.
If the new bulb still does not light up, consult
a qualified specialist workshop.
Bulbs and lamps are an important aspect of
vehicle sa
fety. Y ou must therefore make sure
th at these function correctly at all times.
Have the headlamp setting checked regularly.
Overview: changing bulbs/bulb types
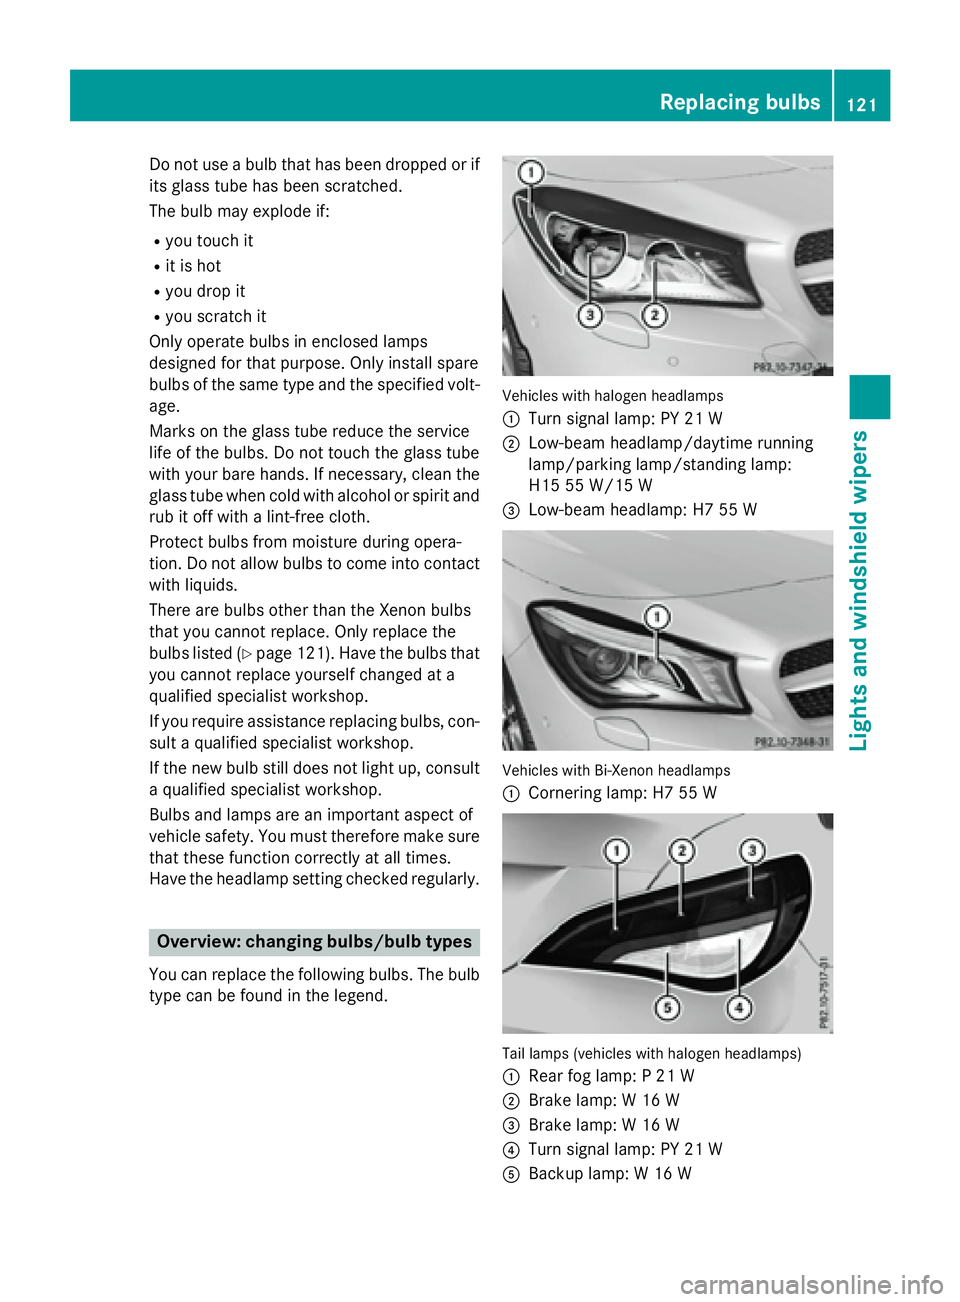
You can replace the following bulbs. The bulb
type can be found in the legend. Vehicles with halogen headlamps
�C
Turn signal lamp: PY 21 W �D
Low-beam headlamp/daytime running
lamp/parking lamp/standing lamp:
H15 55 W/15 W �
Page 124 of 374
Changing the front bulbs
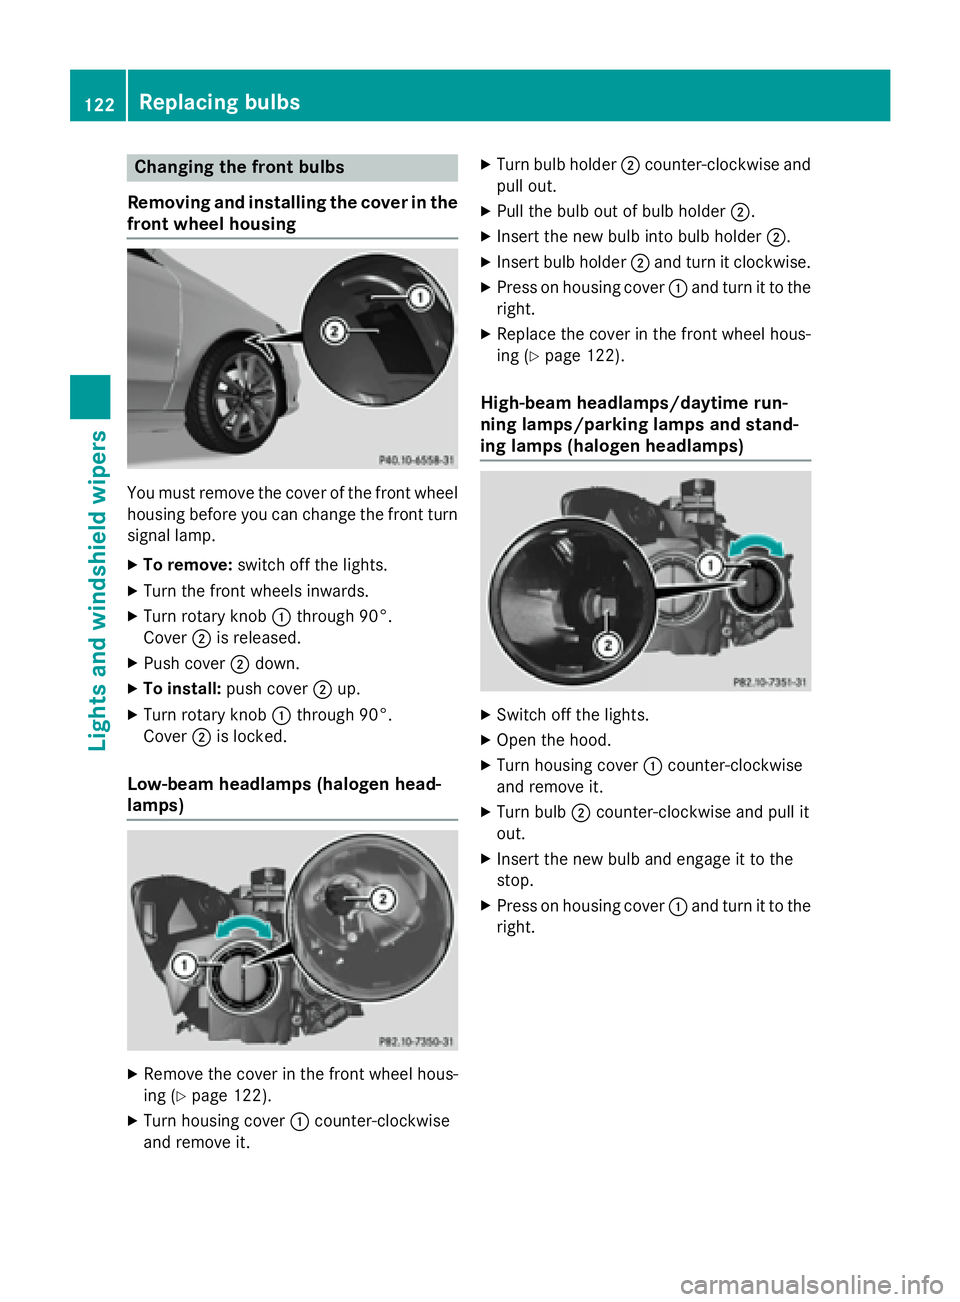
Removing and installing the cover in the
front wheel housing
You must remove the cover of the front wheel
housing before you can change the front turn
signal lamp. X
To remove: switch off the lights.X
Turn the front wheels inwards. X
Turn rotary knob �C through 90°.
Cover �D is released.X
Push cover �D down.X
To install: push cover �D up.X
Turn rotary knob �C through 90°.
Cover �D is locked.
Low-beam headlamps (halogen head-
lamps)
X
Remove the cover in the front wheel hous-
ing ( Y
page 122).X
Turn housing cover �C counter-clockwise
and remove it. X
Turn bulb holder �D counter-clockwise and
pull out. X
Pull the bulb out of bulb holder �D .X
Insert the new bulb into bulb holder �D .X
Insert bulb holder �D and turn it clockwise.X
Press on housing cover �C and turn it to the
right. X
Replace the cover in the front wheel hous-
ing ( Y
page 122).
High-beam headlamps/daytime run-
ning lamps/parking lamps and stand-
ing lamps (halogen headlamps)
X
Switch off the lights. X
Open the hood. X
Turn housing cover �C counter-clockwise
and remove it. X
Turn bulb �D counter-clockwise and pull it
out. X
Insert the new bulb and engage it to the
stop. X
Press on housing cover �C and turn it to the
right.122
Replacing bulbs
Lights and windshield wipers