oil change MERCEDES-BENZ CLA 2017 Owners Manual
[x] Cancel search | Manufacturer: MERCEDES-BENZ, Model Year: 2017, Model line: CLA, Model: MERCEDES-BENZ CLA 2017Pages: 318, PDF Size: 9.9 MB
Page 260 of 318

ASSYST PLUS
Service message The ASSYS T PLU S servic e interval display
inform s you of th e next servic e due date.
You can fin d information on th e typ e of servic e
and servic e intervals in th e Maintenance Book -
let .
You can obtain further information from an
authorize d Mercedes-Benz Cente r or at
http://www.mbusa.co m (US A only).
i The ASSYS T PLU S servic e interval display
does no t sho w any information on th e engin e
oil level. Observ e th e note s on th e engin e oil
level ( Y
page 255).
The multifunction display shows a servic e mes -
sage for several seconds, e.g. :R
Servic e A in .. day sR
Servic e A dueR
Servic e A overdu e by .. day s
Dependin g on th e operating condition s of th e
vehicle, th e remaining time or distanc e until th e
next servic e due dat e is displayed.
The lette r A or B , possibl y in connection wit h a
number or another letter, indicates th e typ e of
service. A stand s for a minor servic e and B for a
major service.
You can obtain further information from an
authorize d Mercedes-Benz Center.
The ASSYS T PLU S servic e interval display does
no t tak e int o accoun t any periods of time during
whic h th e battery is disconnected.
Maintainin g th e time-dependen t servic e sched-
ule: X
Not e down th e servic e due dat e displayed in
th e multifunction display before disconnect -
ing th e battery.
or X
Afte r reconnecting th e battery, subtrac t th e
battery disconnection periods from th e ser -
vic e dat e shown on th e display.
Hiding a service message X
Press th e �v or �8 butto n on th e steering
wheel. Displaying service messages X
Switc h on th e ignition .X
Press th e �Y or �e butto n to select th e
Serv. menu. X
Press th e �c or �d butto n to select th e
ASSYST PLU S submen u and confirm by press-
ing th e �v button.
The servic e due dat e appear s in th e multi-
function display.
Infor ma ti on about Service
Resetting the ASSYST PLUS service
interval display
! If th e ASSYS T PLU S servic e interval display
has been inadvertentl y reset , this setting can
be correcte d at a qualified specialist work-
shop.
Hav e servic e wor k carrie d out as described in
th e Maintenance Booklet . This may otherwise
lead to increased wear and damag e to th e
major assemblies or th e vehicle.
A qualified specialist workshop , e.g. an author-
ized Mercedes-Benz Center, will reset th e
ASSYS T PLU S servic e interval display after th e
servic e wor k has been carrie d out . You can also
obtain further information on maintenance
work, for example.
Special service requirements The specifie d maintenance interval takes only
th e normal operation of th e vehicl e int o
account. Under arduous operating condition s or
increased load on th e vehicle, maintenance
wor k mus t be carrie d out mor e frequently, for
example: R
regular cit y drivin g wit h frequen t intermediat e
stops R
if th e vehicl e is primarily used to travel short
distances R
use in mountainous terrain or on poor road
surfaces R
if th e engin e is often lef t idlin g for lon g periodsR
in particularly dust y conditions, or if air-recir-
culation mod e is frequentl y used
In these or similar operating conditions, hav e
th e interior filter, engin e air cleaner, engin e oil
and oil filter, for example, changed mor e fre-258
ASSYST PLUS
Maintenance and care
Page 266 of 318

X
Wipe the plastic trim with a damp, lint-free
cloth, e.g. a microfiber cloth. X
Heavy soiling: use care and cleaning prod-
ucts recommended and approved by
Mercedes-Benz.
The surface may change color temporarily.
Wait until the surface is dry again.
Cleaning the steering wheel and gear or
selector lever X
Thoroughly wipe with a damp cloth or use
leather care agents that have been recom-
mended and approved by Mercedes-Benz.
Cleaning genuine wood and trim ele-
ments
! Do not use solvent-based cleaning agents
such as tar remover, wheel cleaners, polishes
or waxes. There is otherwise a risk of damag-
ing the surface.
! Do not use chrome polish on trim pieces.
The trim pieces have a chrome look but are
mostly made of anodized aluminum and can
lose their shine if chrome polish is used. Use
a damp, lint-free cloth instead when cleaning
the trim pieces.
If the chrome-plated trim pieces are very
dirty, you can use a chrome polish. If you are
unsure as to whether the trim pieces are
chrome-plated or not, consult an authorized
Mercedes-Benz Center. X
Wipe the wooden trim and trim pieces with a
damp, lint-free cloth, e.g. a microfiber cloth. X
Heavy soiling: use care and cleaning prod-
ucts recommended and approved by
Mercedes-Benz.
Cleaning the seat covers
General notes
! Do not use a microfiber cloth to clean covers
made out of real leather, artificial leather or
DINAMICA. If used often, these can damage
the cover.
Note that regular care is essential to ensure that
the appearance and comfort of the covers is
retained over time. Genuine leather seat covers
! To retain the natural appearance of the
leather, observe the following cleaning
instructions: R
Clean genuine leather covers carefully with
a damp cloth and then wipe the covers
down with a dry cloth. R
Make sure that the leather does not
become soaked. It may otherwise become
rough and cracked. R
Only use leather care agents that have
been tested and approved by Mercedes-
Benz. You can obtain these from a qualified
specialist workshop.
Leather is a natural product.
It exhibits natural surface characteristics, for
example: R
differences in the texture R
marks caused by growth and injury R
slight nuances of color
These are characteristics of leather and not
material defects.
Seat covers of other materials
! Observe the following when cleaning: R
clean artificial leather covers with a cloth
moistened with a solution containing 1%
detergent (e.g. dish washing liquid). R
clean cloth covers with a microfiber cloth
moistened with a solution containing 1%
detergent (e.g. dish washing liquid). Rub
carefully and always wipe entire seat sec-
tions to avoid leaving visible lines. Leave
the seat to dry afterwards. Cleaning results
depend on the type of dirt and how long it
has been there. R
clean DINAMICA covers with a damp cloth.
Make sure that you wipe entire seat sec-
tions to avoid leaving visible lines.
Cleaning the seat belts
G WARNING
Seat belts can become severely weakened if
bleached or dyed. This could cause the seat
belts to tear or fail, for instance, in the event of
an accident. This poses an increased risk of
injury or fatal injury.
Never bleach or dye the seat belts.264
Care
Maintenance and care
Page 304 of 318

Tire-mounting tools should not be used near
the valve. This could damage the electronic
components.
Only have tires changed at a qualified spe-
cialist workshop.
Observe the instructions and safety notes in the
"Changing a wheel" section ( Y
page 301).
The wear patterns on the front and rear tires
differ, depending on the operating conditions.
Rotate the wheels before a clear wear pattern
has formed on the tires. Front tires typically
wear more on the shoulders and the rear tires in
the center.
On vehicles that have the same size front and
rear wheels, you can rotate the wheels accord-
ing to the intervals in the tire manufacturer's
warranty book in your vehicle documents. If no
warranty book is available, the tires should be
rotated every 3,000 to 6,000 miles (5,000 to
10,000 km). Depending on tire wear, this may
be required earlier. Do not change the direction
of wheel rotation.
Clean the contact surfaces of the wheel and the
brake disc thoroughly every time a wheel is rota-
ted. Check the tire pressure and, if necessary,
restart the tire pressure loss warning system
(Canada only) or the tire pressure monitor (USA
only).
Direction of rotation Tires with a specified direction of rotation have
additional benefits, e.g. if there is a risk of hydro-
planing. These advantages can only be gained if
the tires are installed corresponding to the
direction of rotation.
An arrow on the sidewall of the tire indicates its
correct direction of rotation.
Storing wheels Store wheels that are not being used in a cool,
dry and preferably dark place. Protect the tires
from oil, grease, gasoline and diesel. Mounting a wheel
Preparing the vehicle X
Stop the vehicle on solid, non-slippery and
level ground. X
Apply the electric parking brake manually. X
Bring the front wheels into the straight-ahead
position. X
Shift the transmission to position P .X
Switch off the engine. X
Vehicles without KEYLESS-GO: remove the
SmartKey from the ignition lock. X
Vehicles with KEYLESS-GO start-function
or KEYLESS-GO: open the driver's door.
The vehicle electronics now have status 0 .
This is the same as the SmartKey having been
removed. X
Vehicles with KEYLESS-GO start-function
or KEYLESS-GO: remove the Start/Stop but-
ton from the ignition lock ( Y
page 121).X
Make sure that the engine cannot be started
via your smartphone ( Y
page 122).X
If included in the vehicle equipment, remove
the tire-change tool kit from the vehicle. X
Safeguard the vehicle against rolling away
( Y
page 140).
Securing the vehicle to prevent it from
rolling away
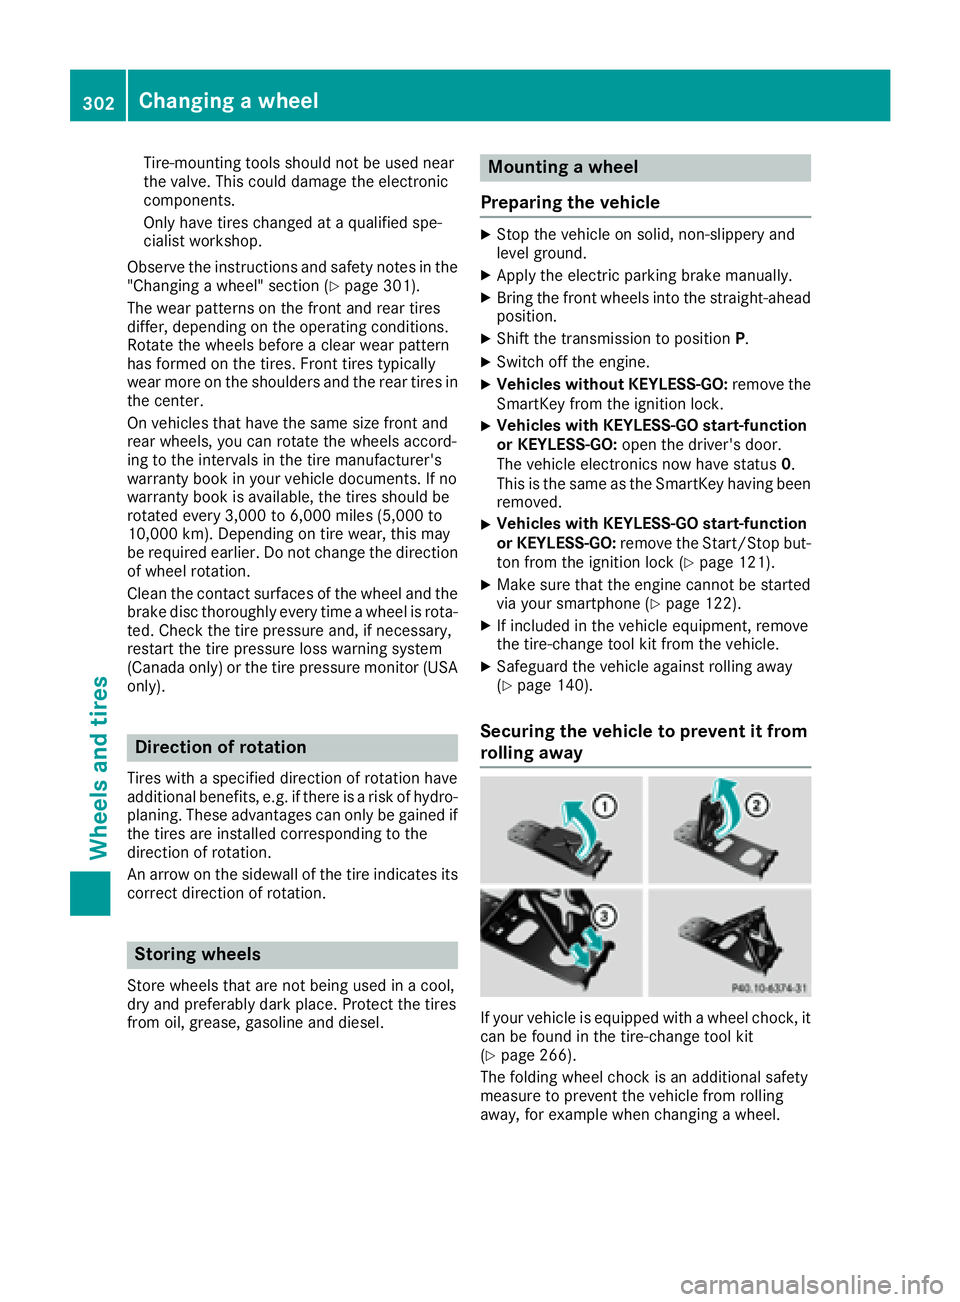
If your vehicle is equipped with a wheel chock, it
can be found in the tire-change tool kit
( Y
page 266).
The folding wheel chock is an additional safety
measure to prevent the vehicle from rolling
away, for example when changing a wheel.302
Changing a wheel
Wheels and tires
Page 313 of 318

R
M100 (1 00% methanol)R
Gasoline with metalliferous additives R
Diesel
Do not mix such fuels with the fuel recom-
mended for your vehicle.
! To ensure the longevity and full perform-
ance of the engine, only premium-grade
unleaded gasoline must be used.
If standard unleaded gasoline is unavailable
and you have to refuel with unleaded gasoline
of a lower grade, observe the following pre-
cautions: R
Only fill the fuel tank to half full with regular
unleaded gasoline and fill the rest with pre-
mium-grade unleaded gasoline as soon as
possible. R
Do not drive at the maximum speed. R
Avoid sudden acceleration and engine
speeds over 3,000 rpm.
You will usually find information about the fuel
grade on the pump. If you cannot find the label
on the pump, ask the staff for assistance.
i For further information, consult a qualified
specialist workshop or visit
http://www.mbusa.com (USA only).
CLA 250, CLA 250 Sport, CLA 250 4MATIC,
CLA 250 Sport 4MATIC: as a temporary meas-
ure, if the recommended fuel is not available,
you may also use regular unleaded gasoline with
an octane rating of 88 AKI/93 RON.
All other models: as a temporary measure, if
the recommended fuel is not available, you may
also use regular unleaded gasoline with an
octane rating of 87 AKI/91 RON. This may
reduce engine performance and increase fuel
consumption. Avoid driving at full throttle and
sudden acceleration. Never refuel using gaso-
line with a lower AKI.
Information on refueling ( Y
page 138).
Additives
! Operating the engine with fuel additives
added later ca n lead to engine failure. Do not
mi x fuel additives with fuel. This does not
include additives for the removal and preven-
tion of residue buildup. gasoline must only be
mixed with additives recommended by
Mercedes-Benz. Comply with the instructions
for use on the product label. More information
about recommended additives can be obtained from any authorized Mercedes-Benz
Center.
Mercedes-Benz recommends that you use bran-
ded fuels that have additives.
The fuel quality available in some countries may
not be sufficient. Residue could build up in the
fuel injection system as a result. In such cases,
and in consultation with an authorized
Mercedes-Benz Center, the fuel may be mixed
with the cleaning additive recommended by
Mercedes-Benz. You must observe the notes
and mixing ratios specified on the container.
Engine oil
General notes
! Never use engine oil or an oil filter of a spec-
ification other than is necessary to fulfill the
prescribed service intervals. Do not change
the engine oil or oil filter in order to achieve
longer replacement intervals than those pre-
scribed. You could otherwise cause engine
damage or damage to the exhaust gas after-
treatment.
Follow the instructions in the service interval
display regarding the oil change. Otherwise,
you may damage the engine and the exhaust
gas aftertreatment.
When handling engine oil, observe the important
safety notes on service products ( Y
page 309).
The engine oils are matched to the performance
of Mercedes-Benz engines and service intervals.
You should therefore only use engine oils and oil
filters that are approved for vehicles with main-
tenance systems.
For a list of approved engine oils and oil filters,
consult an authorized Mercedes-Benz Center.
Or visit the website
http://bevo.mercedes-benz.com.Service products and filling capacities 311
Technical data Z
Page 314 of 318

The table shows which engine oils have been
approved for your vehicle.
Model MB-Freigabe or
MB-Approval
All models
229.5
Use only SAE 0W-40 or SAE 5W-40 engine oils
for Mercedes-AMG vehicles.
i MB approval is indicated on the oil contain-
ers.
Filling capacities The following values refer to an oil change
including the oil filter.
Model Capacity
Mercedes ‑ AMG vehicles
5.8 US qt (5.5 l)
All other models
5.9 US qt (5.6 l)
Additives
! Do not use any additives in the engine oil.
This could damage the engine.
Brake fluid
G WARNING
The brake fluid constantly absorbs moisture
from the air. This lowers the boiling point of
the brake fluid. If the boiling point of the brake
fluid is too low, vapor pockets may form in the
brake system when the brakes are applied
hard. This would impair braking efficiency.
There is a risk of an accident.
You should have the brake fluid renewed at
the specified intervals.
When handling brake fluid, observe the impor-
tant safety notes on service products
( Y
page 309).
The brake fluid change intervals can be found in
the Maintenance Booklet.
Only use brake fluid approved by Mercedes-
Benz in accordance with MB-Freigabe or MB-
Approval 331.0.
Information about approved brake fluid can be
obtained at any qualified specialist workshop or on the Internet at
http://bevo.mercedes-benz.com.
i Have the brake fluid regularly replaced at a
qualified specialist workshop and the replace-
ment confirmed in the Maintenance Booklet.
Coolant
Important safety notes
G WARNING
If antifreeze comes into contact with hot com-
ponents in the engine compartment, it may
ignite. There is a risk of fire and injury.
Let the engine cool down before you add anti-
freeze. Make sure that antifreeze is not spilled
next to the filler neck. Thoroughly clean the
antifreeze from components before starting
the engine.
! Only add coolant that has been premixed
with the desired antifreeze protection. You
could otherwise damage the engine.
Further information on coolants can be found
in the Mercedes-Benz Specifications for Ser-
vice Products, MB BeVo 310.1, e.g. on the
Internet at http://bevo.mercedes-benz.com.
Or contact a qualified specialist workshop.
! Always use a suitable coolant mixture, even
in countries where high temperatures prevail.
Otherwise, the engine cooling system is not
sufficiently protected from corrosion and
overheating.
i Have the coolant regularly replaced at a
qualified specialist workshop and the replace-
ment confirmed in the Maintenance Booklet.
Comply with the important safety precautions
for service products when handling coolant
( Y
page 309).
The coolant is a mixture of water and corrosion
inhibitor/antifreeze concentrate. It performs
the following tasks: R
Anti-corrosion protection R
Antifreeze protection R
Raising the boiling point
If the coolant has antifreeze protection down to
-35 ‡ (-37 †), the boiling point of the coolant312
Service products and filling capacities
Technical data