battery MERCEDES-BENZ CLA 2019 Owners Manual
[x] Cancel search | Manufacturer: MERCEDES-BENZ, Model Year: 2019, Model line: CLA, Model: MERCEDES-BENZ CLA 2019Pages: 330, PDF Size: 23.57 MB
Page 5 of 330
Features .............................................. 244
Maintenance and care......................260
Engine compartment ........................... 260
ASSYST PLUS ...................................... 264
Care ..................................................... 265
Breakdown assistance.....................273
Where will I find...? .............................. 273
Flat tire ................................................ 274
Battery (vehicle) .................................. 279
Jump-starting ....................................... 282
Towing and tow-starting ...................... 284
Fuses ................................................... 287
Wheels and tires...............................290
Important safety notes ........................ 290
Operation ............................................ 290
Winter operation .................................. 292
Tire pressure ....................................... 293
Loading the vehicle .............................. 301
All about wheels and tires ................... 304
Changing a wheel ................................ 310
Wheel and tire combinations ............... 315
Emergency spare wheel ....................... 315
Technical data...................................317
Information regarding technical data ... 317
Vehicle electronics .............................. 317
Identification plates ............................. 318
Service products and filling capaci-
ties ...................................................... 319
Vehicle data ......................................... 325
Contents3
Page 8 of 330
Automatic transmission emer-
gency mode.......................................139
B
Back button....................................... 232
Backup lamp
Display message ............................ 205
BAS (Brake Assist System)................. 61
Battery (SmartKey)
Checking .......................................... 73
Important safety notes .................... 73
Replacing ......................................... 73
Battery (vehicle)
Charging ........................................ 281
Display message ............................ 208
Important safety notes .................. 279
Jump starting ................................. 282
Replacing ....................................... 281
Belt
see Seat belts
Belt warning......................................... 44
Blind Spot Assist
Activating/deactivating (on-
board computer) ............................ 188
Display message ............................ 210
Notes/function .............................. 174
Bluetooth®
Searching for a mobile phone ........235
Searching for a mobile phone
(device manager) ........................... 236
see also Digital Operator's Man-
ual ..................................................231
Telephony ...................................... 235
Brake Assist System
see BAS (Brake Assist System)
Brake fluid
Display message ............................ 199
Notes ............................................. 322
Brake force distribution
see EBD (electronic brake force
distribution)
Brake lamp
Replacing bulbs .............................107
Brake lamps
Display message ............................ 204
Brakes
ABS ..................................................61
BAS .................................................. 61
Brake fluid (notes) ......................... 322
Braking assistance appropriate to
the situation ..................................... 63
Display message............................ 194
EBD .................................................. 67
Hill start assist ............................... 126
HOLD function ............................... 158
Important safety notes .................. 147
Maintenance .................................. 148
Parking brake ................................ 143
Riding tips ...................................... 147
Warning lamp ................................. 221
Braking assistance appropriate to
the situation
Function/notes................................ 63
Breakdown assistance
Where will I find...? ........................ 273
see Flat tire
see Tow-starting
see Towing away
Brightness control (instrument
cluster lighting)................................... 33
Buttons on the steering wheel......... 179
C
California
Important notice for retail cus-
tomers and lessees .......................... 25
Calling up a malfunction
see Display messages
Car
see Vehicle
Care
Car wash ........................................ 265
Carpets .......................................... 272
Display ........................................... 270
Exhaust pipe .................................. 270
Exterior lights ................................ 269
Gear or selector lever .................... 271
Interior ........................................... 270
Matte finish ................................... 267
Notes ............................................. 265
Paint .............................................. 267
Plastic trim .................................... 270
Power washer................................ 266
Rear view camera .......................... 269
6Index
Page 19 of 330
Folding the backrest (rear com-
partment) forwards/back .............. 242
Important safety notes .................... 91
Seat heating problem ...................... 96
Storing settings (memory func-
tion) ............................................... 100
Switching seat heating on/off ......... 95
Section
Trunk ............................................... 78
Securing cargo.................................. 243
Selector lever
Cleaning ......................................... 271
Sensors (cleaning instructions)....... 269
Service center
see Qualified specialist workshop
Service Center
see Qualified specialist workshop
Service menu (on-board com-
puter).................................................. 188
Service message
see ASSYST PLUS
Service products
Brake fluid ..................................... 322
Coolant (engine) ............................ 323
Engine oil ....................................... 322
Fuel ................................................ 319
Important safety notes .................. 319
Refrigerant (air-conditioning sys-
tem) ............................................... 324
Washer fluid ................................... 323
Setting the air distribution............... 117
Setting the airflow............................ 118
Setting the date/time format
see also Digital Operator's Man-
ual .................................................. 231
Setting the language
see also Digital Operator's Man-
ual .................................................. 231
Setting the time
see also Digital Operator's Man-
ual .................................................. 231
Settings
Factory (on-board computer) ......... 190
On-board computer ....................... 188
SETUP (on-board computer,
Mercedes-AMG vehicles).................. 191
Side impact air bag............................. 47
Side marker lamp (display mes-
sage)................................................... 206
Side windows
Cleaning ......................................... 268
Convenience closing feature ............ 84
Convenience opening feature .......... 83
Important safety information ........... 82
Opening/closing .............................. 83
Problem (malfunction) ..................... 85
Resetting ......................................... 85
Reversing feature ............................. 83
SIRIUS services
see also Digital Operator's Man-
ual .................................................. 231
Sliding sunroof
see Panorama roof with power
tilt/sliding panel
SmartKey
Changing the battery ....................... 73
Changing the programming ............. 72
Checking the battery ....................... 73
Convenience closing feature ............ 84
Convenience opening feature .......... 83
Display message............................ 218
Door central locking/unlocking ....... 70
Important safety notes .................... 70
KEYLESS-GO start function .............. 71
Loss ................................................. 74
Mechanical key ................................ 72
Positions (ignition lock) ................. 123
Problem (malfunction) ..................... 74
Starting the engine ........................ 125
SmartKey positions (ignition lock).. 123
Smartphone
Starting the engine ........................ 125
SMS
see also Digital Operator's Man-
ual .................................................. 231
Snow chains...................................... 293
Sockets
Center console .............................. 247
General notes ................................ 247
Rear compartment ......................... 248
Trunk ............................................. 248
Sound
Switching on/off........................... 232
Special seat belt retractor.................. 55
Index17
Page 30 of 330
Diagnostic connector
The diagnostics connection is only intended forthe connection of diagnostic equipment at aqualified specialist workshop.
GWARNING
If you connect equipment to a diagnostics
connection in the vehicle, it may affect the
operation of vehicle systems. As a result, the
operating safety of the vehicle could be affec-
ted. There is a risk of an accident.
Only connect equipment to a diagnostics con-
nection in the vehicle, which is approved for
your vehicle by Mercedes-Benz.
GWARNING
Objects in the driver's footwell can restrict the
pedal travel or obstruct a depressed pedal.
The operating and road safety of the vehicle is
jeopardized. There is a risk of an accident.
Make sure that all objects in the vehicle are
stowed correctly, and that they cannot enter
the driver's footwell. Install the floormats
securely and as specified in order to ensure
sufficient clearance for the pedals. Do not use
loose floormats and do not place floormats on
top of one another.
!If the engine is switched off and equipmenton the diagnostics connection is used, thestarter battery may discharge.
Connecting equipment to the diagnostics con-nection can lead to emissions monitoring infor-mation being reset, for example. This may leadto the vehicle failing to meet the requirements ofthe next emissions test during the main inspec-tion.
Qualified specialist workshop
An authorized Mercedes-Benz Center is a quali-fied specialist workshop. It has the necessaryspecialist knowledge, tools and qualifications tocorrectly carry out the work required on yourvehicle. This is especially the case for work rel-evant to safety.
Observe the notes in the Maintenance Booklet.
Always have the following work carried out at anauthorized Mercedes-Benz Center:
Rwork relevant to safety
Rservice and maintenance work
Rrepair work
Ralterations, installation work and modifica-tions
Rwork on electronic components
Correct use
If you remove any warning stickers, you or oth-ers could fail to recognize certain dangers.Leave warning stickers in position.
Observe the following information when drivingyour vehicle:
Rthe safety notes in this manual
Rtechnical data for the vehicle
Rtraffic rules and regulations
Rlaws and safety standards pertaining to motorvehicles
Problems with your vehicle
If you should experience a problem with yourvehicle, particularly one that you believe mayaffect its safe operation, we urge you to contactan authorized Mercedes-Benz Center immedi-ately to have the problem diagnosed and recti-fied. If the problem is not resolved to your sat-isfaction, please discuss the problem again withan authorized Mercedes-Benz Center or, if nec-essary, contact us at one of the followingaddresses.
In the USA
Customer Assistance Center
Mercedes-Benz USA, LLC
3 Mercedes Drive
Montvale, NJ 07645-0350
In Canada
Customer Relations Department
Mercedes-Benz Canada, Inc.
98 Vanderhoof Avenue
Toronto, Ontario M4G 4C9
Reporting safety defects
USA only:
28Operating safety
Int roduction
Page 70 of 330
You should therefore adapt your driving style
to the different handling characteristics. Have
the brake system checked at a qualified spe-
cialist workshop.
Please observe the information on warning andindicator lamps (Ypage 222)
(Ypage 222) as well as on display messages(Ypage 196).
ADAPTIVE BRAKE
ADAPTIVE BRAKE enhances braking safety andoffers increased braking comfort. In addition tothe braking function, ADAPTIVE BRAKE also hasthe HOLD function (Ypage 158) and hill startassist (Ypage 126).
STEER CONTROL
General information
STEER CONTROL helps you by transmitting anoticeable steering force to the steering wheelin the direction required for vehicle stabilization.
This steering assistance is provided in particularif:
Rboth right wheels or both left wheels are on awet or slippery road surface when you brake
Rthe vehicle begins to skid
Important safety notes
iObserve the "Important safety notes" sec-tion (Ypage 61).
No steering assistance is provided from STEERCONTROL, if:
RESP®is malfunctioning
Rthe steering is malfunctioning
If ESP®is malfunctioning, you will be assistedfurther by the electrical power steering.
Protection against theft
Immobilizer
The immobilizer prevents your vehicle frombeing started without the correct SmartKey.
XTo activate with the SmartKey:remove theSmartKey from the ignition lock.
XTo activate with KEYLESS-GO start-func-tion or KEYLESS-GO:switch the ignition offand open the driver's door.
XTo deactivate:switch on the ignition.
When leaving the vehicle, always take theSmartKey with you and lock the vehicle. Anyonecan start the engine if a valid SmartKey has beenleft inside the vehicle.
iThe immobilizer is always deactivated whenyou start the engine.
In the event that the engine cannot be started(yet the vehicle's battery is charged), the sys-tem is not operational. Contact an authorizedMercedes-Benz Center or call1-800-FOR-MERCedes (in the USA) or1-800-387-0100(in Canada).
ATA (anti-theft alarm system)
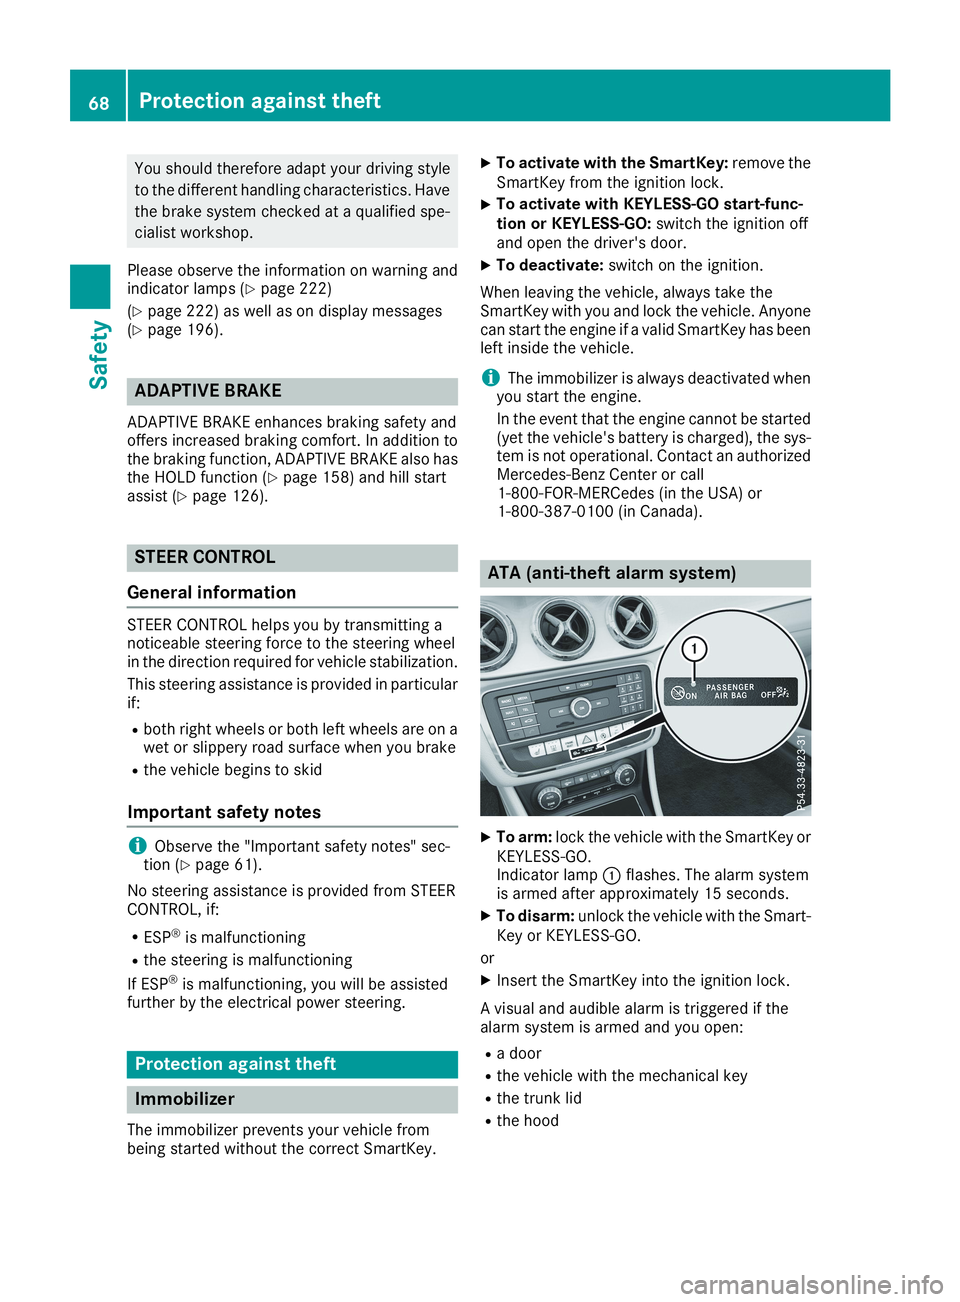
XTo arm:lock the vehicle with the SmartKey orKEYLESS-GO.Indicator lamp�Cflashes. The alarm systemis armed after approximately 15 seconds.
XTo disarm:unlock the vehicle with the Smart-Key or KEYLESS-GO.
or
XInsert the SmartKey into the ignition lock.
A visual and audible alarm is triggered if thealarm system is armed and you open:
Ra door
Rthe vehicle with the mechanical key
Rthe trunk lid
Rthe hood
68Protection against theft
Safety
Page 73 of 330
KEYLESS-GO
General notes
Bear in mind that the engine can be started byany of the vehicle occupants if there is a Smart-Key in the vehicle.
Locking and unlocking
You can start, lock or unlock the vehicle usingKEYLESS-GO. To do this, you only need carry theSmartKey with you. You can combine the func-tions of KEYLESS-GO with those of a conven-tional SmartKey. Unlock the vehicle by usingKEYLESS-GO, for instance, and lock it using the�7button on the SmartKey.
The driver's door and the door at which the han-dle is used, must both be closed. The SmartKeymust be outside the vehicle. When locking orunlocking with KEYLESS-GO, the distancebetween the SmartKey and the correspondingdoor handle must not be greater than three feet(one meter).
A check which periodically establishes a radioconnection between the vehicle and the Smart-Key determines whether a valid SmartKey is inthe vehicle. This occurs, for example:
Rwhen starting the engine
Rwhile driving
Rwhen using HANDS-FREE ACCESS
Rwhen the external door handles are touched
Rduring convenience closing
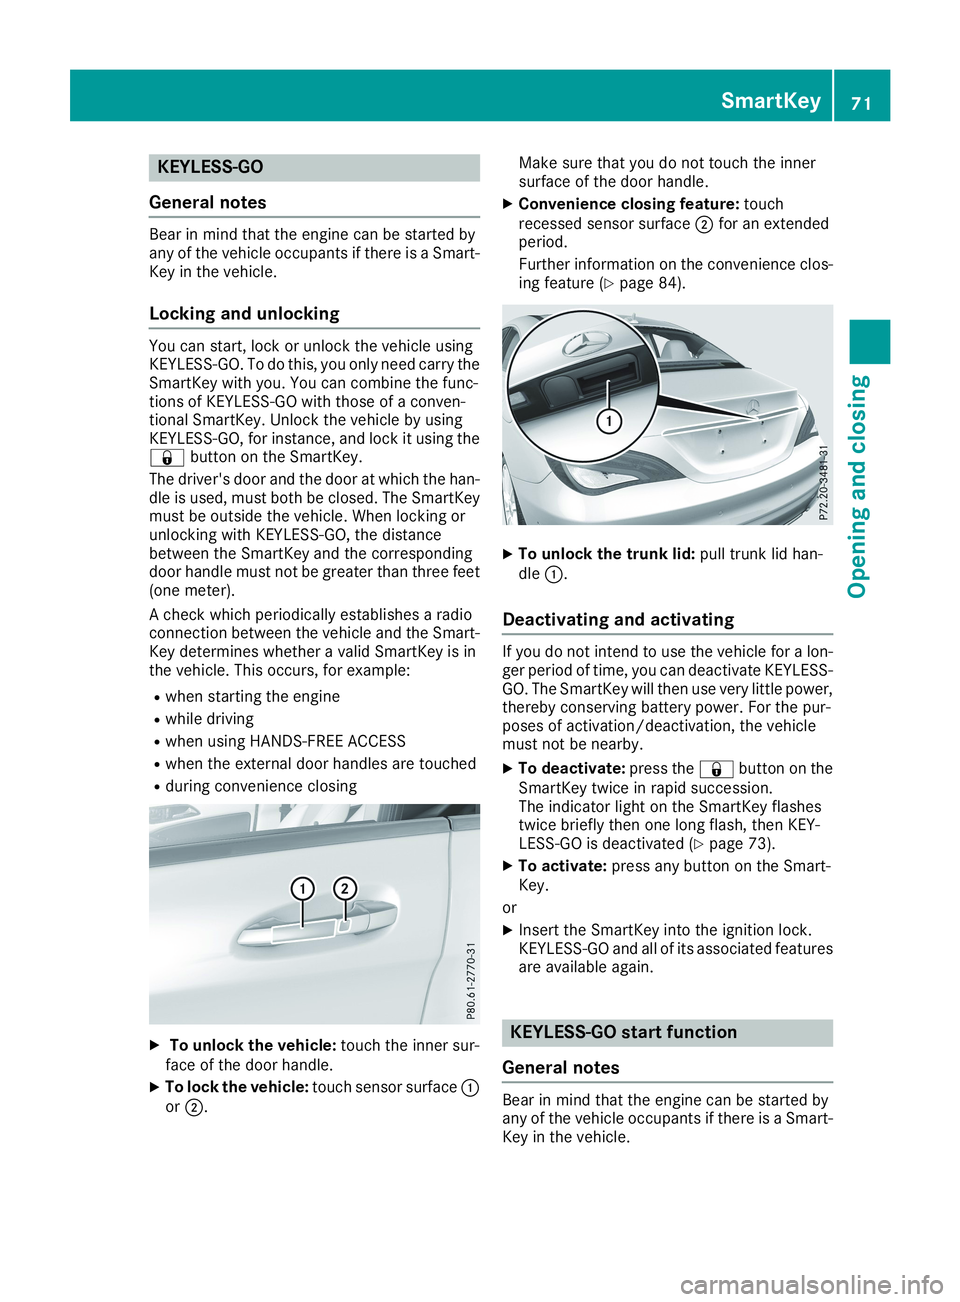
XTo unlock the vehicle:touch the inner sur-face of the door handle.
XTo lock the vehicle:touch sensor surface�Cor�D.
Make sure that you do not touch the innersurface of the door handle.
XConvenience closing feature:touchrecessed sensor surface�Dfor an extendedperiod.
Further information on the convenience clos-ing feature (Ypage 84).
XTo unlock the trunk lid:pull trunk lid han-dle�C.
Deactivating and activating
If you do not intend to use the vehicle for a lon-ger period of time, you can deactivate KEYLESS-GO. The SmartKey will then use very little power,thereby conserving battery power. For the pur-poses of activation/deactivation, the vehiclemust not be nearby.
XTo deactivate:press the�7button on theSmartKey twice in rapid succession.The indicator light on the SmartKey flashestwice briefly then one long flash, then KEY-LESS-GO is deactivated (Ypage 73).
XTo activate:press any button on the Smart-Key.
or
XInsert the SmartKey into the ignition lock.KEYLESS-GO and all of its associated featuresare available again.
KEYLESS-GO start function
General notes
Bear in mind that the engine can be started byany of the vehicle occupants if there is a Smart-Key in the vehicle.
SmartKey71
Opening and closing
Z
Page 74 of 330
Changing the settings of the locking
system
You can change the settings of the locking sys-tem. This means that only the driver's door andthe fuel filler flap are unlocked when the vehicleis unlocked. This is useful if you frequently travelon your own.
XTo change the setting:press and hold the�6and�7buttons simultaneously forapproximately six seconds until the batteryindicator lamp flashes twice (Ypage 73).
If the setting of the locking system is changedwithin the signal range of the vehicle, pressingthe�7or�6button:
Rlocks or
Runlocks the vehicle
The SmartKey now functions as follows:
XTo unlock:press the�6button once.
XTo unlock centrally:press the�6buttontwice.
XTo lock centrally:press the�7button.
The KEYLESS-GO function is changed as fol-lows:
XTo unlock the driver's door:touch the innersurface of the door handle on the driver'sdoor.
XTo unlock centrally:touch the inner surfaceof the door handle on the front-passengerdoor or the rear door.
XTo lock centrally:touch the outer sensorsurface on one of the door handles.
XTo restore the factory settings:press andhold the�6and�7buttons simultane-ously for approximately six seconds until thebattery check lamp flashes twice(Ypage 73).
Mechanical key
General notes
If the vehicle can no longer be locked orunlocked with the SmartKey or KEYLESS-GO,use the mechanical key.
If you use the mechanical key to unlock andopen the driver's door or the trunk lid, the anti-theft alarm system will be triggered (Ypage 68).
There are several ways to turn off the alarm:
XTo deactivate the alarm with the key:pressthe�6or�7button on the key.
or
XInsert the SmartKey into the ignition lock.
or
XTo deactivate the alarm with KEYLESS-GO:press the Start/Stop button in the ignitionlock. The SmartKey must be in the vehicle.
or
XLock or unlock the vehicle using KEYLESS-GO. The SmartKey must be outside the vehi-cle.
If you unlock the vehicle using the mechanicalkey, the fuel filler flap will not be unlocked auto-matically.
XTo unlock the fuel filler flap:insert theSmartKey into the ignition lock.
Removing the mechanical key
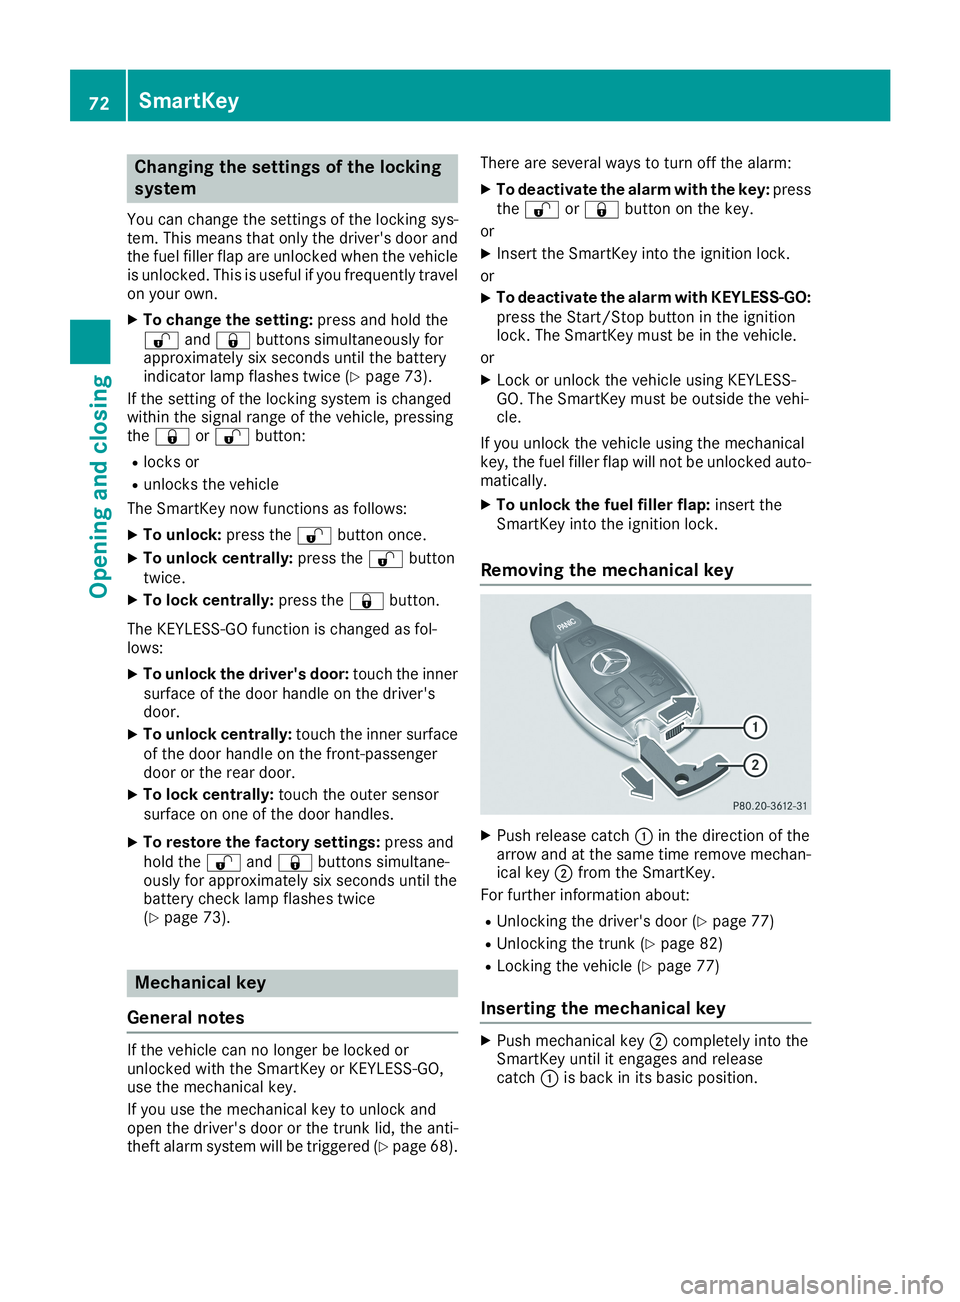
XPush release catch�Cin the direction of thearrow and at the same time remove mechan-ical key�Dfrom the SmartKey.
For further information about:
RUnlocking the driver's door (Ypage 77)
RUnlocking the trunk (Ypage 82)
RLocking the vehicle (Ypage 77)
Inserting the mechanical key
XPush mechanical key�Dcompletely into theSmartKey until it engages and releasecatch�Cis back in its basic position.
72SmartKey
Opening and closing
Page 75 of 330
SmartKey battery
Important safety notes
GWARNING
Batteries contain toxic and corrosive substan-
ces. If batteries are swallowed, it can result in
severe health problems. There is a risk of fatal
injury.
Keep batteries out of the reach of children. If
a battery is swallowed, seek medical attention
immediately.
The SmartKey batteries contain perchloratematerial, which may require special handlingand regard for the environment. National guide-lines must be observed during disposal. In Cal-ifornia, seewww.dtsc.ca.gov/HazardousWaste/Perchlorate/index.cfm.
Mercedes-Benz recommends that you have thebattery replaced at a qualified specialist work-shop.
Checking the battery
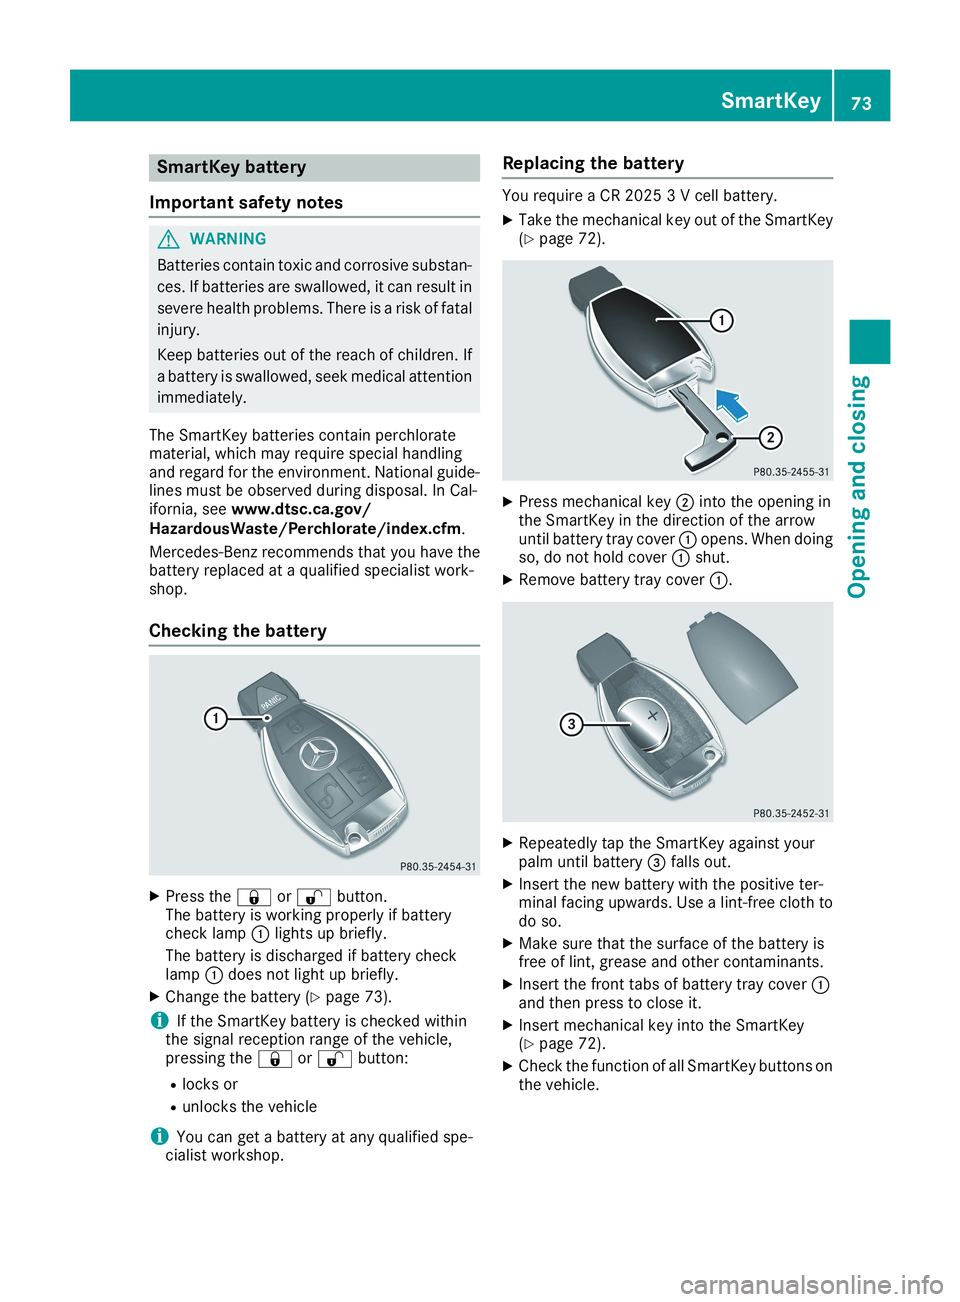
XPress the�7or�6button.The battery is working properly if batterycheck lamp�Clights up briefly.
The battery is discharged if battery checklamp�Cdoes not light up briefly.
XChange the battery (Ypage 73).
iIf the SmartKey battery is checked withinthe signal reception range of the vehicle,pressing the�7or�6button:
Rlocks or
Runlocks the vehicle
iYou can get a battery at any qualified spe-cialist workshop.
Replacing the battery
You require a CR 2025 3 V cell battery.
XTake the mechanical key out of the SmartKey(Ypage 72).
XPress mechanical key�Dinto the opening inthe SmartKey in the direction of the arrowuntil battery tray cover�Copens. When doingso, do not hold cover�Cshut.
XRemove battery tray cover�C.
XRepeatedly tap the SmartKey against yourpalm until battery�
Page 76 of 330
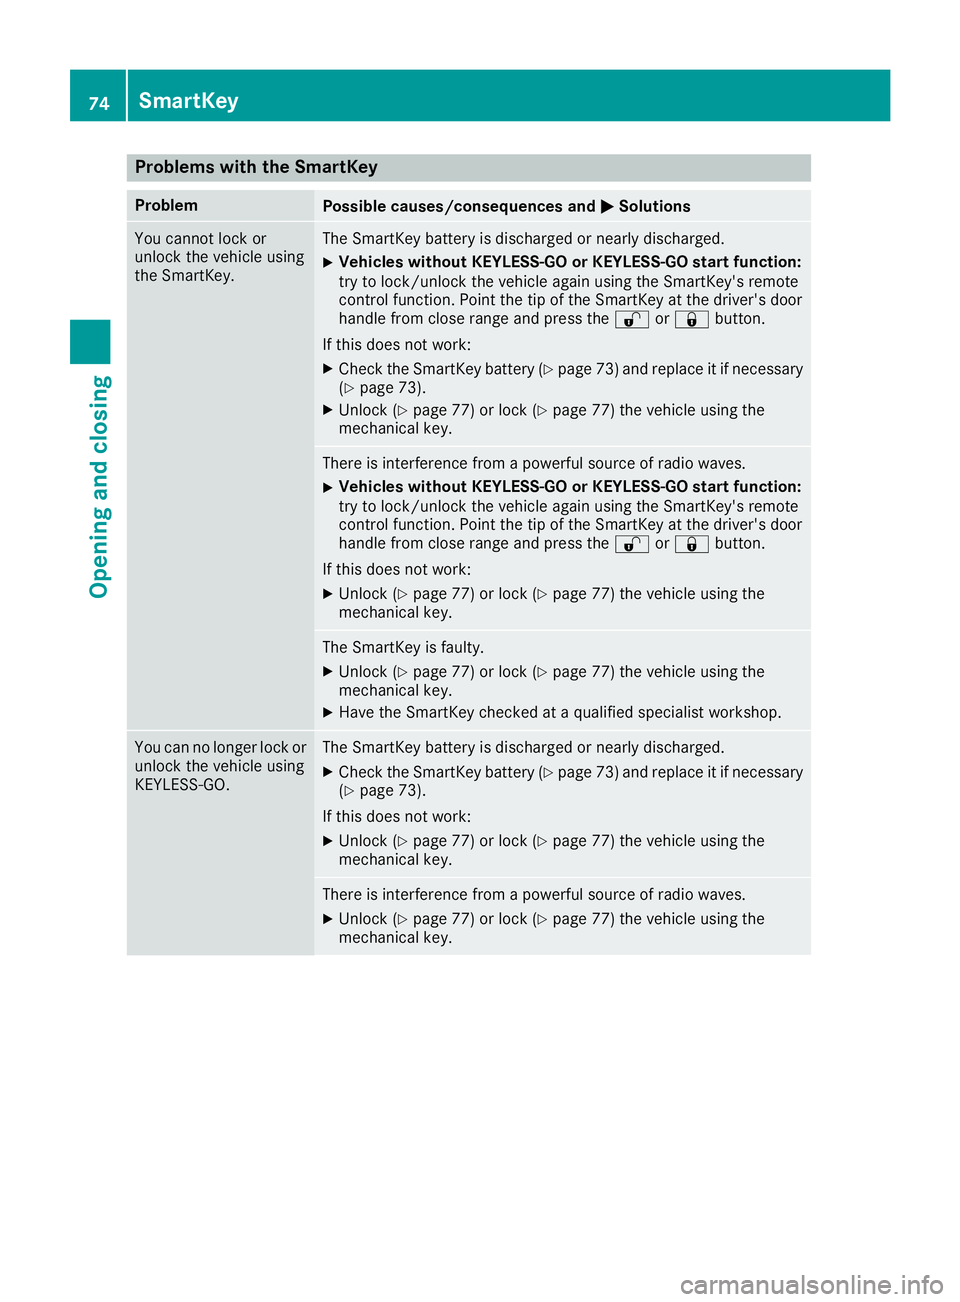
Problems with the SmartKey
ProblemPossible causes/consequences and�P�PSolutions
You cannot lock orunlock the vehicle usingthe SmartKey.
The SmartKey battery is discharged or nearly discharged.
XVehicles without KEYLESS-GO or KEYLESS-GO start function:try to lock/unlock the vehicle again using the SmartKey's remotecontrol function. Point the tip of the SmartKey at the driver's doorhandle from close range and press the�6or�7button.
If this does not work:
XCheck the SmartKey battery (Ypage 73) and replace it if necessary(Ypage 73).
XUnlock (Ypage 77) or lock (Ypage 77) the vehicle using themechanical key.
There is interference from a powerful source of radio waves.
XVehicles without KEYLESS-GO or KEYLESS-GO start function:try to lock/unlock the vehicle again using the SmartKey's remotecontrol function. Point the tip of the SmartKey at the driver's doorhandle from close range and press the�6or�7button.
If this does not work:
XUnlock (Ypage 77) or lock (Ypage 77) the vehicle using themechanical key.
The SmartKey is faulty.
XUnlock (Ypage 77) or lock (Ypage 77) the vehicle using themechanical key.
XHave the SmartKey checked at a qualified specialist workshop.
You can no longer lock orunlock the vehicle usingKEYLESS-GO.
The SmartKey battery is discharged or nearly discharged.
XCheck the SmartKey battery (Ypage 73) and replace it if necessary(Ypage 73).
If this does not work:
XUnlock (Ypage 77) or lock (Ypage 77) the vehicle using themechanical key.
There is interference from a powerful source of radio waves.
XUnlock (Ypage 77) or lock (Ypage 77) the vehicle using themechanical key.
74SmartKey
Opening and closing
Page 77 of 330
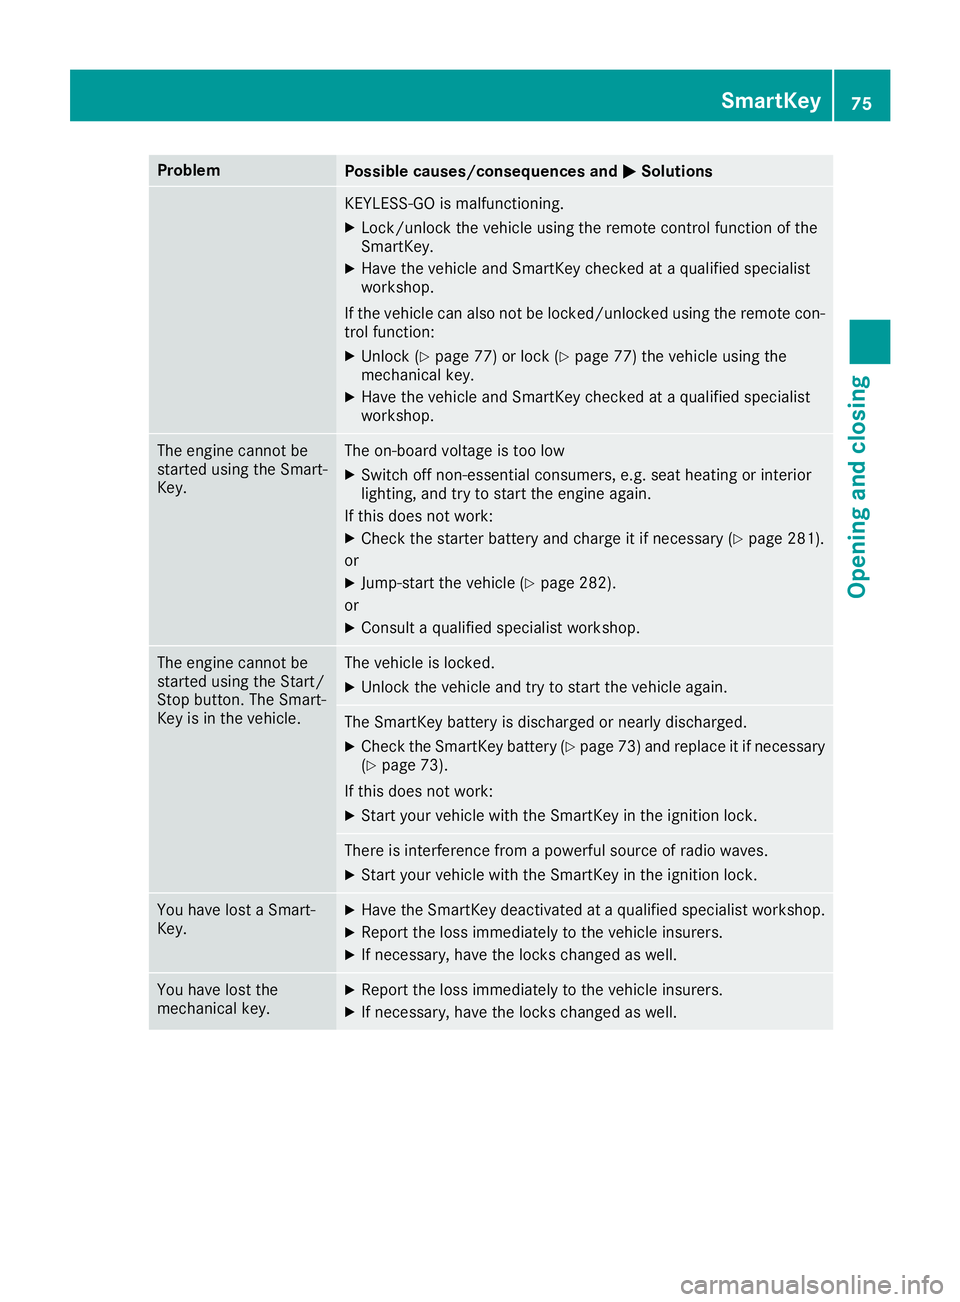
ProblemPossible causes/consequences and�P�PSolutions
KEYLESS-GO is malfunctioning.
XLock/unlock the vehicle using the remote control function of theSmartKey.
XHave the vehicle and SmartKey checked at a qualified specialistworkshop.
If the vehicle can also not be locked/unlocked using the remote con-trol function:
XUnlock (Ypage 77) or lock (Ypage 77) the vehicle using themechanical key.
XHave the vehicle and SmartKey checked at a qualified specialistworkshop.
The engine cannot bestarted using the Smart-Key.
The on-board voltage is too low
XSwitch off non-essential consumers, e.g. seat heating or interiorlighting, and try to start the engine again.
If this does not work:
XCheck the starter battery and charge it if necessary (Ypage 281).
or
XJump-start the vehicle (Ypage 282).
or
XConsult a qualified specialist workshop.
The engine cannot bestarted using the Start/Stop button. The Smart-Key is in the vehicle.
The vehicle is locked.
XUnlock the vehicle and try to start the vehicle again.
The SmartKey battery is discharged or nearly discharged.
XCheck the SmartKey battery (Ypage 73) and replace it if necessary(Ypage 73).
If this does not work:
XStart your vehicle with the SmartKey in the ignition lock.
There is interference from a powerful source of radio waves.
XStart your vehicle with the SmartKey in the ignition lock.
You have lost a Smart-Key.XHave the SmartKey deactivated at a qualified specialist workshop.
XReport the loss immediately to the vehicle insurers.
XIf necessary, have the locks changed as well.
You have lost themechanical key.XReport the loss immediately to the vehicle insurers.
XIf necessary, have the locks changed as well.
SmartKey75
Opening and closing
Z