load capacity MERCEDES-BENZ CLA 2019 Owners Manual
[x] Cancel search | Manufacturer: MERCEDES-BENZ, Model Year: 2019, Model line: CLA, Model: MERCEDES-BENZ CLA 2019Pages: 330, PDF Size: 23.57 MB
Page 22 of 330
Optional equipment weight (defi-
nition) ............................................ 310
PSI (pounds per square inch) (def-
inition) ...........................................310
Replacing ....................................... 310
Service life ..................................... 291
Sidewall (definition) ....................... 310
Speed rating (definition) ................ 309
Storing ...........................................311
Structure and characteristics
(definition) ..................................... 308
Summer tires ................................. 292
Temperature .................................. 305
TIN (Tire Identification Number)
(definition) ..................................... 310
Tire bead (definition) ......................310
Tire pressure (definition) ................ 310
Tire pressures (recommended) ...... 309
Tire size (data) ............................... 315
Tire size designation, load-bearing
capacity, speed rating .................... 305
Tire tread ....................................... 291
Tire tread (definition) ..................... 310
Total load limit (definition) ............. 310
Traction ......................................... 304
Traction (definition) ....................... 310
Tread wear..................................... 304
Uniform Tire Quality Grading
Standards ...................................... 304
Uniform Tire Quality Grading
Standards (definition) .................... 309
Wear indicator (definition) ............. 310
Wheel rim (definition) .................... 309
see Flat tire
Top Tether............................................ 57
Tow-starting
Emergency engine starting ............ 287
Important safety notes .................. 284
Installing the towing eye ................ 285
Removing the towing eye ............... 286
Towing
Permitted towing methods ............ 287
Towing a trailer
ESP®(Electronic Stability Pro-
gram) ............................................... 67
Towing away
Important safety guidelines ........... 284
Installing the towing eye ................ 285
Notes for 4MATIC vehicles ............ 287
Removing the towing eye ............... 286
Transporting the vehicle ................ 287
With both axles on the ground ....... 286
With the front axle raised ............... 286
Towing eye......................................... 274
Traffic reports
see also Digital Operator's Man-
ual .................................................. 231
Transmission
see Automatic transmission
Transmission position display
(DIRECT SELECT lever)...................... 131
Transporting the vehicle.................. 287
Trim pieces (cleaning instruc-
tions).................................................. 271
Trip computer (on-board com-
puter).................................................. 182
Trip odometer
Calling up ....................................... 182
Resetting (on-board computer) ...... 183
Trunk
Emergency release .......................... 82
Emergency release button ............... 82
Important safety notes .................... 78
Opening (automatically from out-
side) ................................................. 79
Opening (from outside the vehi-
cle, HANDS-FREE ACCESS) .............. 80
Opening automatically from
inside ............................................... 81
Opening/closing (manually from
outside) ............................................ 79
Trunk lid
Display message ............................ 217
see Tailgate
Turn signals
Display message ............................ 204
Replacing bulbs (front) ................... 107
Switching on/off........................... 102
Two-way radio
Frequencies ................................... 317
Installation ..................................... 317
Transmission output (maximum) .... 317
Type identification plate
see Vehicle identification plate
20Index
Page 244 of 330
Observe the loading guidelines (Ypage 239).
Cargo compartment enlargement
Important safety notes
GWARNING
If the rear bench seat/rear seat and seat
backrest are not engaged they could fold for-
wards, e.g. when braking suddenly or in the
event of an accident.
RThe vehicle occupant would thereby be
pushed into the seat belt by the rear bench
seat/rear seat or by the seat backrest. The
seat belt can no longer offer the intended
level of protection and could even cause
injuries.
RObjects or loads in the trunk cannot be
restrained by the seat backrest.
There is an increased risk of injury.
Before every trip, make sure that the seat
backrests and the rear bench seat/rear seat
are engaged.
!Before folding the backrest in the rear com-partment forwards, make sure that the rearcompartment armrest and the cup holder arefolded in. They may otherwise be damaged.
Observe the loading guidelines (Ypage 239).
The left-hand and right-hand rear seat backrestscan be folded forwards separately to increasethe trunk capacity.
Folding the rear seat backrest forward
and back
Folding the rear seat backrests forward
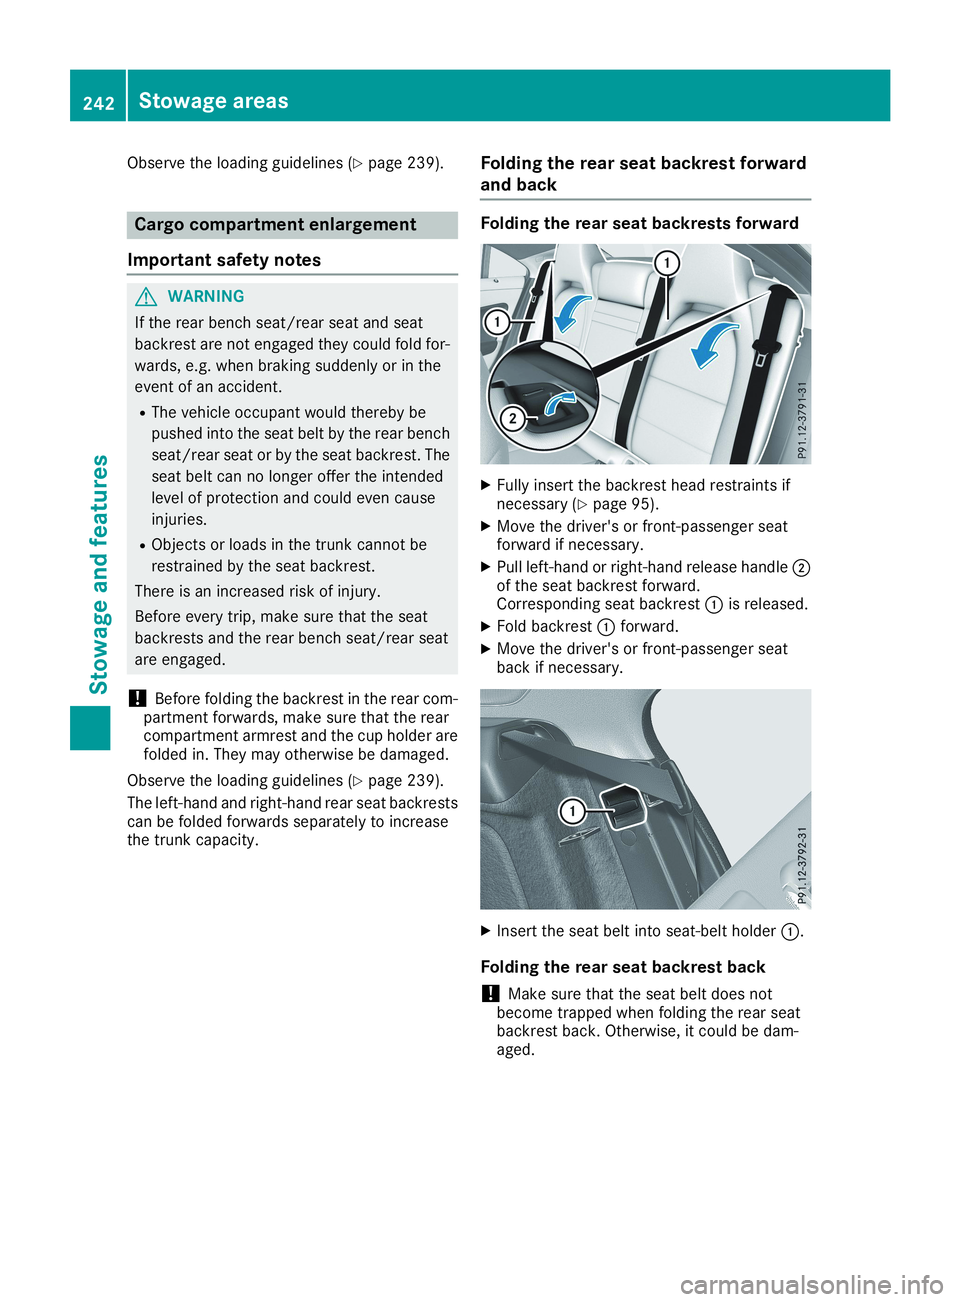
XFully insert the backrest head restraints ifnecessary (Ypage 95).
XMove the driver's or front-passenger seatforward if necessary.
XPull left-hand or right-hand release handle�Dof the seat backrest forward.Corresponding seat backrest�Cis released.
XFold backrest�Cforward.
XMove the driver's or front-passenger seatback if necessary.
XInsert the seat belt into seat-belt holder�C.
Folding the rear seat backrest back
!Make sure that the seat belt does notbecome trapped when folding the rear seatbackrest back. Otherwise, it could be dam-aged.
242Stowage areas
Stowage and features
Page 247 of 330
Do not touch the hot heating elements of the
cup holder. Always make sure that children
cannot access the hot heating elements of the
cup holder. Never leave children unsuper-
vised in the vehicle.
GWARNING
If objects in the passenger compartment are
stowed incorrectly, they can slide or be
thrown around and hit vehicle occupants. In
addition, cup holders, open stowage spaces
and mobile phone brackets cannot always
retain all objects they contain. There is a risk
of injury, particularly in the event of sudden
braking or a sudden change in direction.
RAlways stow objects so that they cannot be
thrown around in such situations.
RAlways make sure that objects do not pro-
trude from stowage spaces, parcel nets or
stowage nets.
RClose the lockable stowage spaces before
starting a journey.
RAlways stow and secure heavy, hard, poin-
ted, sharp-edged, fragile or bulky objects in
the trunk.
!Only use the cup holders for containers ofthe right size and which have lids. The drinkscould otherwise spill.
Observe the loading guidelines (Ypage 239).
The stowage compartments in the doors providespace for bottles:
Rfront: capacity up to 34 fl. oz. (1.0l)
Rrear: capacity up to 17 fl. oz. (0.5 l)
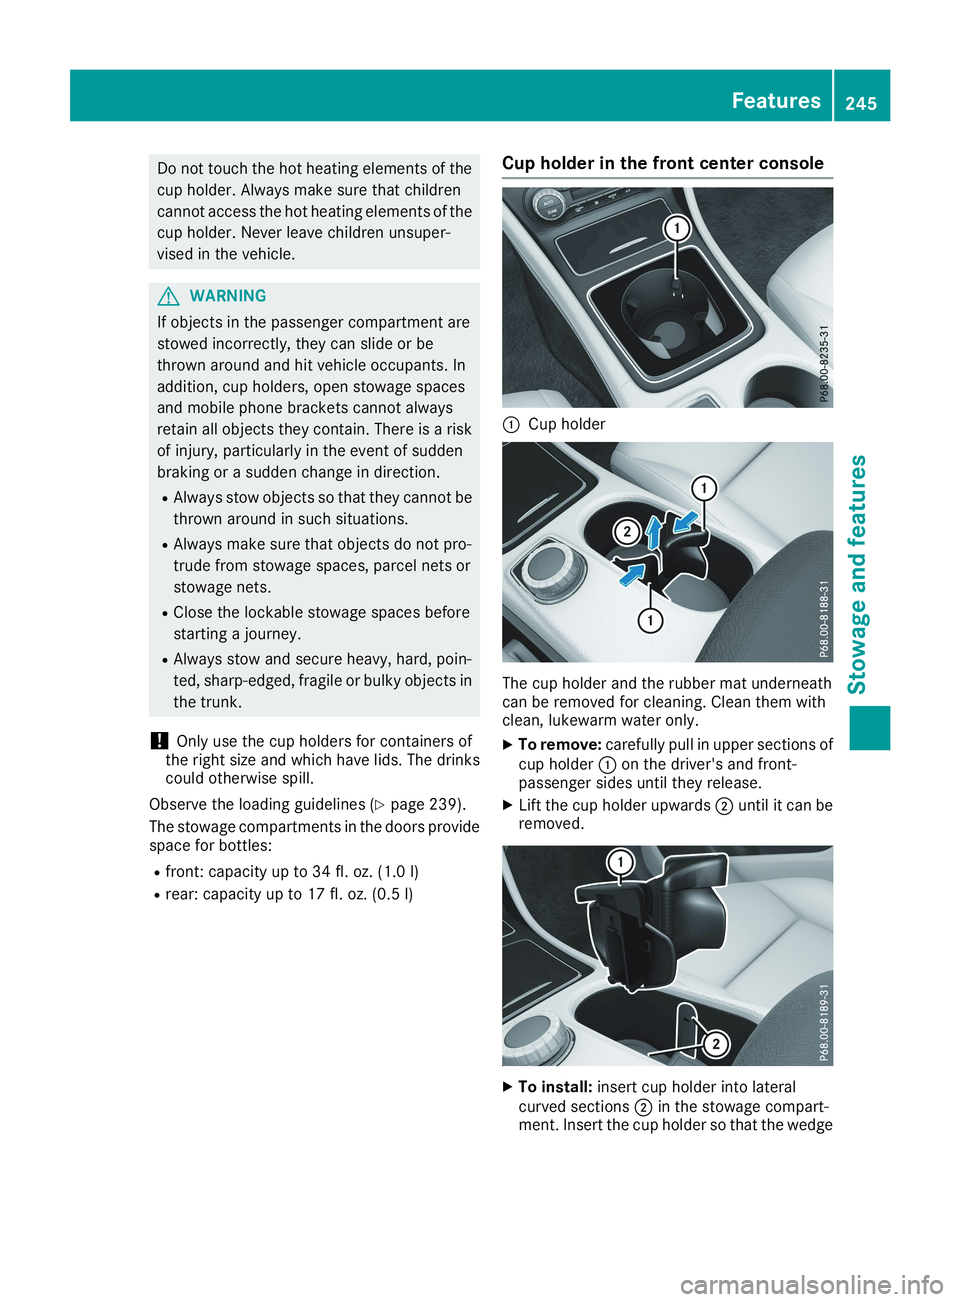
Cup holder in the front center console
�CCup holder
The cup holder and the rubber mat underneathcan be removed for cleaning. Clean them withclean, lukewarm water only.
XTo remove:carefully pull in upper sections ofcup holder�Con the driver's and front-passenger sides until they release.
XLift the cup holder upwards�Duntil it can beremoved.
XTo install:insert cup holder into lateralcurved sections�Din the stowage compart-ment. Insert the cup holder so that the wedge
Features245
Stowage and features
Z
Page 277 of 330
XMake sure that the engine cannot be startedvia your smartphone (Ypage 124).
XMake sure that the passengers are not endan-gered as they do so. Make sure that no one isnear the danger area while a wheel is beingchanged. Anyone who is not directly assistingin the wheel change should, for example,stand behind the barrier.
XGet out of the vehicle. Pay attention to trafficconditions when doing so.
XClose the driver's door.
MOExtended tires (tires with run-flat
properties)
General notes
With MOExtended tires (tires with run flat char-acteristics), you can continue to drive your vehi-cle even if there is a total loss of pressure in oneor more tires. The affected tire must not showany clearly visible damage.
You can recognize a MOExtended tire by theMOExtended marking which appears on thesidewall of the tire. You will find this markingnext to the tire size designation, the load-bear-ing capacity and the speed index (Ypage 305).
MOExtended tires may be used only in conjunc-tion with an activated tire pressure loss warningsystem (Canada only) or tire pressure monitor(USA only).
If a pressure loss warning message appearsin the multifunction display:
Robserve the instructions in the display mes-sages (Ypage 213).
Rcheck the tire for damage
Rif driving on, observe the following notes
The driving distance possible in run-flat mode isapproximately 50 miles (80 km) when the vehi-cle is partially laden. When the vehicle is fullyladen it is approximately 19 miles (30 km).
In addition to the vehicle load, the driving dis-tance possible depends upon:
Rvehicle speed
Rroad condition
Routside temperature
The driving distance possible in run-flat modemay be reduced by extreme driving conditionsor maneuvers, or it can be increased through amoderate style of driving.
The driving distance possible in run-flat mode iscounted from the moment the tire pressure losswarning appears in the multifunction display.
You must not exceed a maximum speed of50 mph (80 km/h).
When replacing one or all tires, please observethe following specifications for your vehicle'stires:
Rsize
Rtype and
Rthe "MOExtended" marking
If a tire has gone flat and cannot be replacedwith a MOExtended tire, a standard tire may beused as a temporary measure. Make sure thatyou use the proper size and type (summer orwinter tire).
Vehicles equipped with MOExtended tires arenot equipped with a TIREFIT kit at the factory. Itis therefore recommended that you additionallyequip your vehicle with a TIREFIT kit if you mounttires that do not feature run-flat properties, e.g.winter tires. A TIREFIT kit may be obtained froma qualified specialist workshop.
Important safety notes
GWARNING
When driving in emergency mode, the driving
characteristics deteriorate, e.g. when corner-
ing, accelerating quickly and when braking.
There is a risk of an accident.
Do not exceed the stated maximum speed.
Avoid abrupt steering and driving maneuvers,
and driving over obstacles (curbs, potholes,
off-road). This applies in particular to a laden
vehicle.
Stop driving in emergency mode if:
Ryou hear banging noises.
Rthe vehicle starts to shake.
Ryou see smoke and smell rubber.
RESP®is intervening constantly.
Rthere are tears in the sidewalls of the tire.
After driving in emergency mode, have the
wheel rims checked at a qualified specialist
workshop with regard to their further use. The
defective tire must be replaced in every case.
Flat tire275
Breakdown assistance
Z
Page 304 of 330
Maximum permissible gross vehicle
weight rating
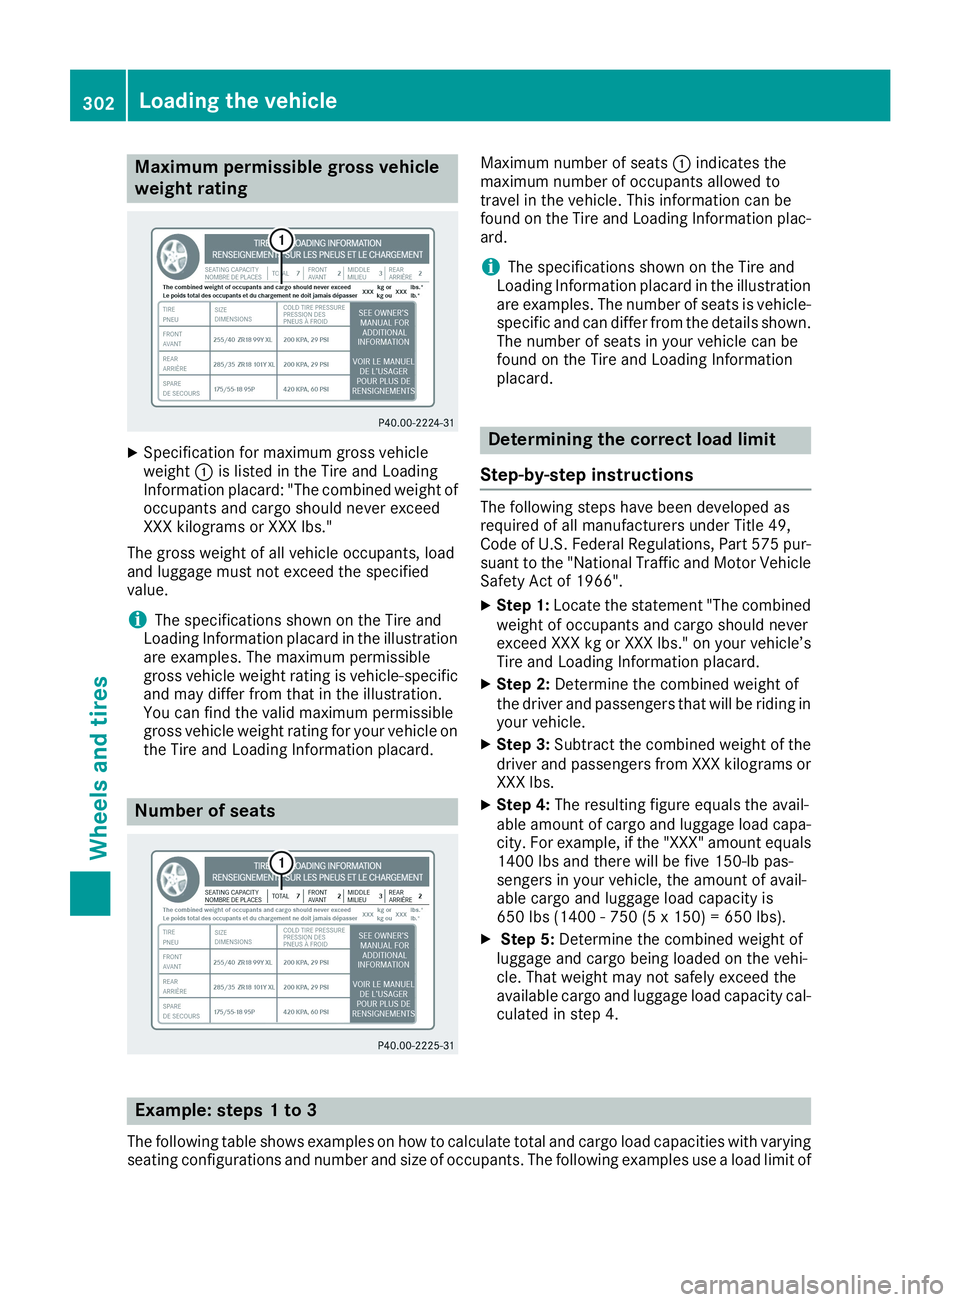
XSpecification for maximum gross vehicleweight�Cis listed in the Tire and LoadingInformation placard: "The combined weight ofoccupants and cargo should never exceedXXX kilograms or XXX lbs."
The gross weight of all vehicle occupants, loadand luggage must not exceed the specifiedvalue.
iThe specifications shown on the Tire andLoading Information placard in the illustrationare examples. The maximum permissiblegross vehicle weight rating is vehicle-specificand may differ from that in the illustration.You can find the valid maximum permissiblegross vehicle weight rating for your vehicle onthe Tire and Loading Information placard.
Number of seats
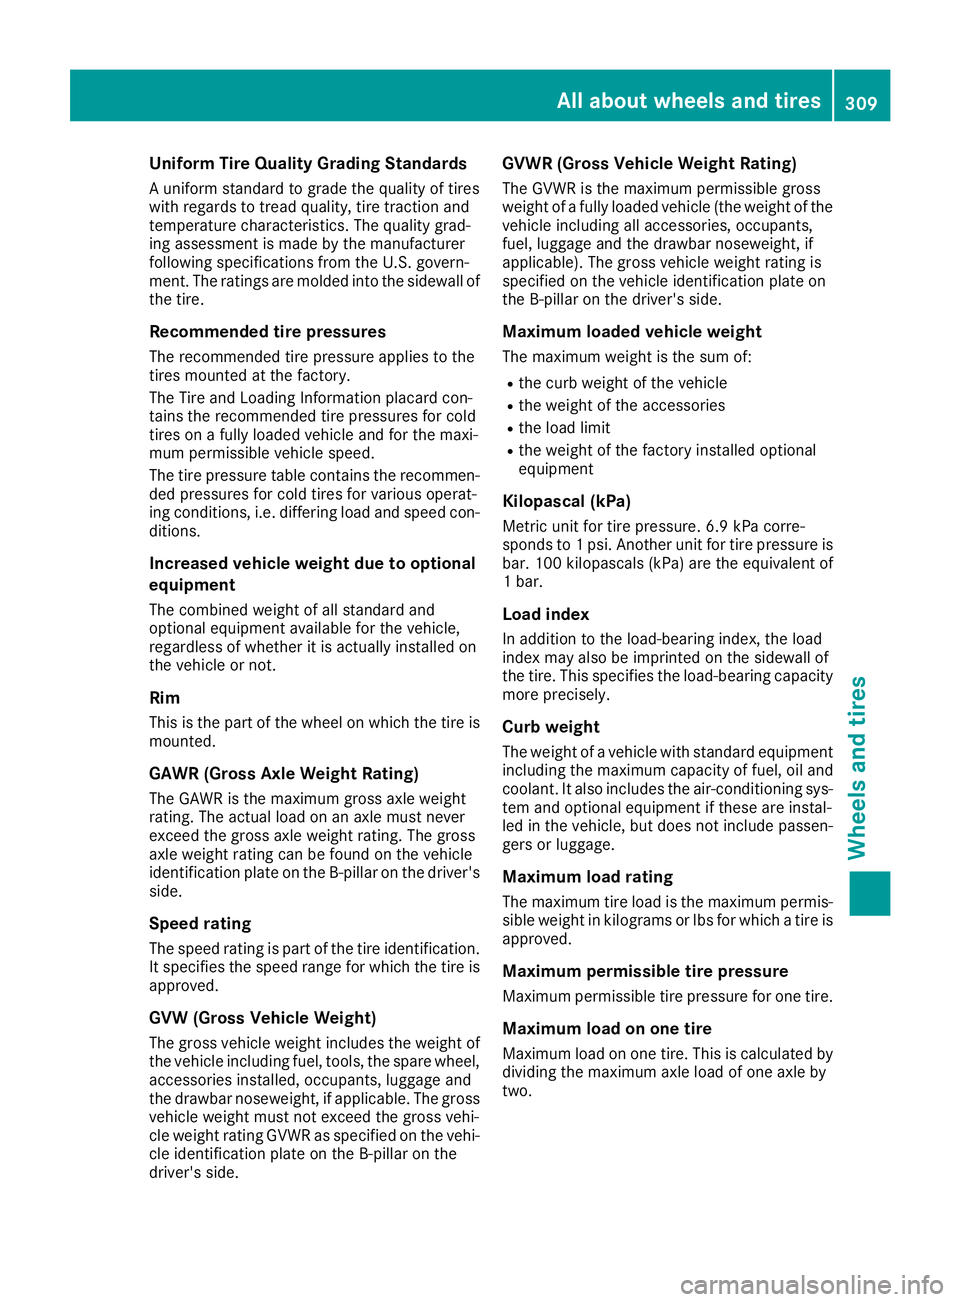
Maximum number of seats�Cindicates themaximum number of occupants allowed totravel in the vehicle. This information can befound on the Tire and Loading Information plac-ard.
iThe specifications shown on the Tire andLoading Information placard in the illustrationare examples. The number of seats is vehicle-specific and can differ from the details shown.The number of seats in your vehicle can befound on the Tire and Loading Informationplacard.
Determining the correct load limit
Step-by-step instructions
The following steps have been developed asrequired of all manufacturers under Title 49,Code of U.S. Federal Regulations, Part 575 pur-suant to the "National Traffic and Motor VehicleSafety Act of 1966".
XStep 1:Locate the statement "The combinedweight of occupants and cargo should neverexceed XXX kg or XXX lbs." on your vehicle’sTire and Loading Information placard.
XStep 2:Determine the combined weight ofthe driver and passengers that will be riding inyour vehicle.
XStep 3:Subtract the combined weight of thedriver and passengers from XXX kilograms orXXX lbs.
XStep 4:The resulting figure equals the avail-able amount of cargo and luggage load capa-city. For example, if the "XXX" amount equals1400 lbs and there will be five 150-lb pas-sengers in your vehicle, the amount of avail-able cargo and luggage load capacity is650 lbs (1400 - 750 (5 x 150) = 650 lbs).
XStep 5:Determine the combined weight ofluggage and cargo being loaded on the vehi-cle. That weight may not safely exceed theavailable cargo and luggage load capacity cal-culated in step 4.
Example: steps 1 to 3
The following table shows examples on how to calculate total and cargo load capacities with varyingseating configurations and number and size of occupants. The following examples use a load limit of
302Loading the vehicle
Wheels and tires
Page 311 of 330
Uniform Tire Quality Grading Standards
A uniform standard to grade the quality of tireswith regards to tread quality, tire traction andtemperature characteristics. The quality grad-ing assessment is made by the manufacturerfollowing specifications from the U.S. govern-ment. The ratings are molded into the sidewall ofthe tire.
Recommended tire pressures
The recommended tire pressure applies to thetires mounted at the factory.
The Tire and Loading Information placard con-tains the recommended tire pressures for coldtires on a fully loaded vehicle and for the maxi-mum permissible vehicle speed.
The tire pressure table contains the recommen-ded pressures for cold tires for various operat-ing conditions, i.e. differing load and speed con-ditions.
Increased vehicle weight due to optional
equipment
The combined weight of all standard andoptional equipment available for the vehicle,regardless of whether it is actually installed onthe vehicle or not.
Rim
This is the part of the wheel on which the tire ismounted.
GAWR (Gross Axle Weight Rating)
The GAWR is the maximum gross axle weightrating. The actual load on an axle must neverexceed the gross axle weight rating. The grossaxle weight rating can be found on the vehicleidentification plate on the B-pillar on the driver'sside.
Speed rating
The speed rating is part of the tire identification.It specifies the speed range for which the tire isapproved.
GVW (Gross Vehicle Weight)
The gross vehicle weight includes the weight ofthe vehicle including fuel, tools, the spare wheel,accessories installed, occupants, luggage andthe drawbar noseweight, if applicable. The grossvehicle weight must not exceed the gross vehi-cle weight rating GVWR as specified on the vehi-cle identification plate on the B-pillar on thedriver's side.
GVWR (Gross Vehicle Weight Rating)
The GVWR is the maximum permissible grossweight of a fully loaded vehicle (the weight of thevehicle including all accessories, occupants,fuel, luggage and the drawbar noseweight, ifapplicable). The gross vehicle weight rating isspecified on the vehicle identification plate onthe B-pillar on the driver's side.
Maximum loaded vehicle weight
The maximum weight is the sum of:
Rthe curb weight of the vehicle
Rthe weight of the accessories
Rthe load limit
Rthe weight of the factory installed optionalequipment
Kilopascal (kPa)
Metric unit for tire pressure. 6.9 kPa corre-sponds to 1 psi. Another unit for tire pressure isbar. 100 kilopascals (kPa) are the equivalent of1 bar.
Load index
In addition to the load-bearing index, the loadindex may also be imprinted on the sidewall ofthe tire. This specifies the load-bearing capacitymore precisely.
Curb weight
The weight of a vehicle with standard equipmentincluding the maximum capacity of fuel, oil andcoolant. It also includes the air-conditioning sys-tem and optional equipment if these are instal-led in the vehicle, but does not include passen-gers or luggage.
Maximum load rating
The maximum tire load is the maximum permis-sible weight in kilograms or lbs for which a tire isapproved.
Maximum permissible tire pressure
Maximum permissible tire pressure for one tire.
Maximum load on one tire
Maximum load on one tire. This is calculated bydividing the maximum axle load of one axle bytwo.
All about wheels and tires309
Wheels and tires
Z