set clock MERCEDES-BENZ CLA 2019 Owners Manual
[x] Cancel search | Manufacturer: MERCEDES-BENZ, Model Year: 2019, Model line: CLA, Model: MERCEDES-BENZ CLA 2019Pages: 330, PDF Size: 23.57 MB
Page 79 of 330
Meanwhile, the fuel filler flap will not be lockedor unlocked.
You cannot unlock the vehicle centrally from theinside if the vehicle has been locked with theSmartKey or KEYLESS-GO.
You can open a door from inside the vehicleeven if it has been locked. You can open the reardoors from inside the vehicle unless they aresecured by the child-proof lock (Ypage 60).
If the vehicle has previously been locked withthe SmartKey from the outside, opening a doorfrom the inside will trigger the anti-theft alarmsystem. Switch off the alarm (Ypage 68).
If a locked door is opened from the inside, theprevious unlock status of the vehicle will betaken into consideration if:
Rthe vehicle was locked using the locking but-ton for the central locking, or
Rif the vehicle was locked automatically
The vehicle will be fully unlocked if it had previ-ously been fully unlocked. If only the driver'sdoor had been previously unlocked, only thedoor which has been opened from the inside isunlocked.
Automatic locking feature
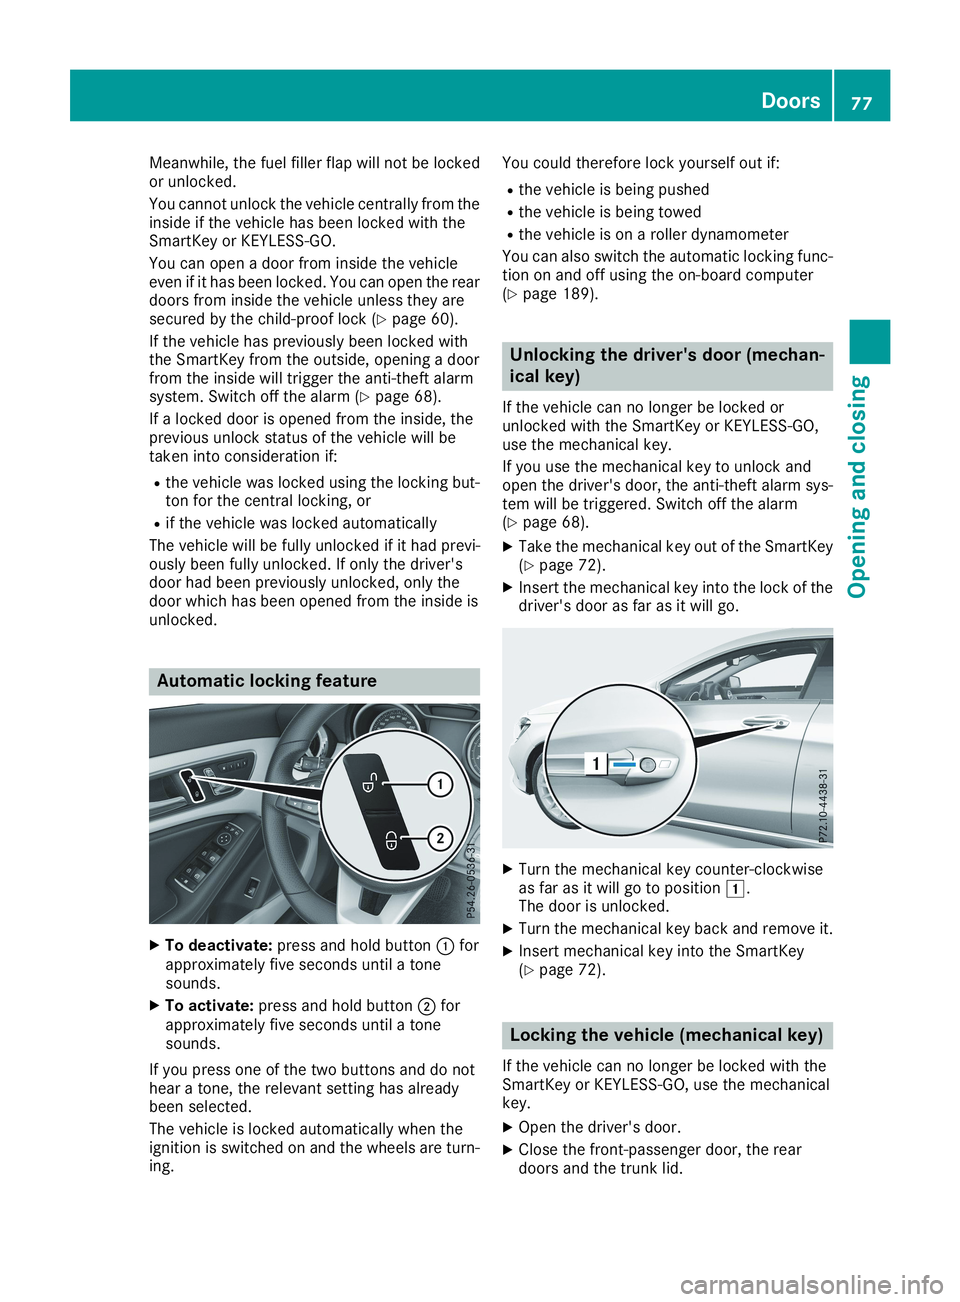
XTo deactivate:press and hold button�Cforapproximately five seconds until a tonesounds.
XTo activate:press and hold button�Dforapproximately five seconds until a tonesounds.
If you press one of the two buttons and do nothear a tone, the relevant setting has alreadybeen selected.
The vehicle is locked automatically when theignition is switched on and the wheels are turn-ing.
You could therefore lock yourself out if:
Rthe vehicle is being pushed
Rthe vehicle is being towed
Rthe vehicle is on a roller dynamometer
You can also switch the automatic locking func-tion on and off using the on-board computer(Ypage 189).
Unlocking the driver's door (mechan-
ical key)
If the vehicle can no longer be locked orunlocked with the SmartKey or KEYLESS-GO,use the mechanical key.
If you use the mechanical key to unlock andopen the driver's door, the anti-theft alarm sys-tem will be triggered. Switch off the alarm(Ypage 68).
XTake the mechanical key out of the SmartKey(Ypage 72).
XInsert the mechanical key into the lock of thedriver's door as far as it will go.
XTurn the mechanical key counter-clockwiseas far as it will go to position�G.The door is unlocked.
XTurn the mechanical key back and remove it.
XInsert mechanical key into the SmartKey(Ypage 72).
Locking the vehicle (mechanical key)
If the vehicle can no longer be locked with theSmartKey or KEYLESS-GO, use the mechanicalkey.
XOpen the driver's door.
XClose the front-passenger door, the reardoors and the trunk lid.
Doors77
Opening and closing
Z
Page 120 of 330
iYou can also activate several air distributionsettings simultaneously. To do this, pressmultiple air distribution buttons. The air isthen directed through various vents.
iRegardless of the air distribution setting,airflow is always directed through the side airvents. The side air vents can only be closed ifthe adjusters are turned clockwise until theyengage.
Setting the air distribution
XTurn the SmartKey to position�Hin the igni-tion lock (Ypage 123).
XPress one or more of the�
Page 123 of 330
iIf you activate the residual heat function athigh temperatures, only the ventilation will beactivated. The blower runs at medium speed.
iYou cannot use the ventilation to cool thevehicle interior to a temperature lower thanthe outside temperature.
Activating/deactivating
XTurn the SmartKey to position�Zin the igni-tion lock or remove it (Ypage 123).
XPress the�Kbutton.The indicator lamp in the�Kbutton lightsup or goes out.
The indicator lamp in the button indicates thatthe respective function is activated.
iResidual heat is deactivated automatically:
Rafter approximately 30 minutes
Rwhen the ignition is switched on
Rif the battery voltage drops
Air vents
Important safety notes
GWARNING
Very hot or very cold air can flow from the air
vents. This could result in burns or frostbite in
the immediate vicinity of the air vents. There
is a risk of injury.
Make sure that all vehicle occupants always
maintain a sufficient distance to the air out-
lets. If necessary, redirect the airflow to
another area of the vehicle interior.
In order to ensure the direct flow of fresh airthrough the air vents into the vehicle interior,please observe the following notes:
Rkeep the air inlet between the windshield andthe hood free of blockages, such as ice, snowor leaves.
Rnever cover the air vents or air intake grilles inthe vehicle interior.
iFor optimal climate control in the vehicle,open the air vents completely and set theadjusters to the central position.
Setting the air vents
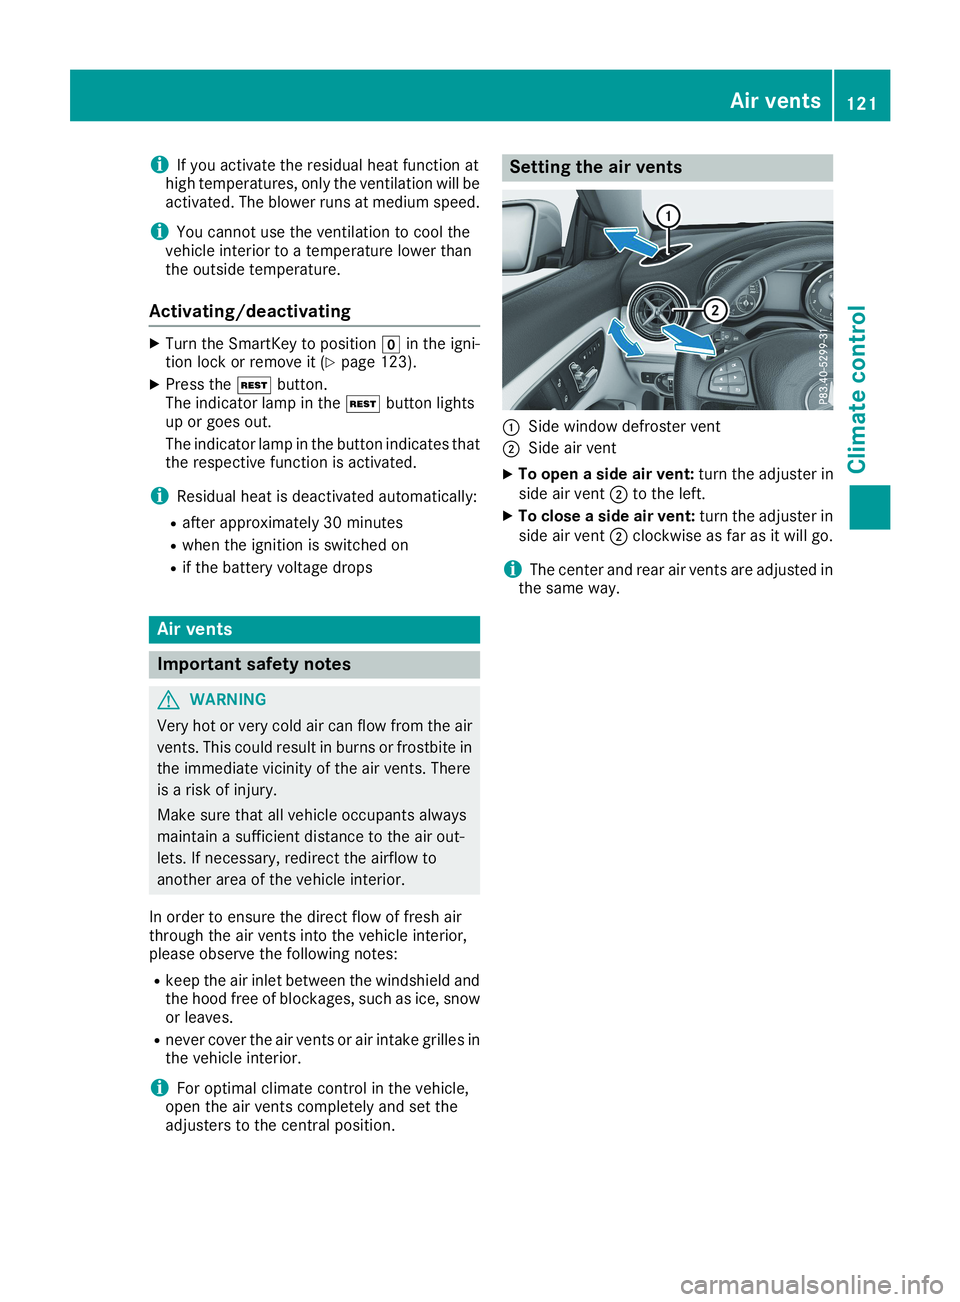
�CSide window defroster vent
�DSide air vent
XTo open a side air vent:turn the adjuster inside air vent�Dto the left.
XTo close a side air vent:turn the adjuster inside air vent�Dclockwise as far as it will go.
iThe center and rear air vents are adjusted inthe same way.
Air vents121
Climate control
Z
Page 180 of 330
Important safety notes
GWARNING
If you operate information systems and com-
munication equipment integrated in the vehi-
cle when driving, you may be distracted from
the traffic situation. You could also lose con-
trol of the vehicle. There is a risk of an acci-
dent.
Only operate this equipment when the traffic
situation permits. If you are not sure that this
is possible, park the vehicle paying attention
to traffic conditions and operate the equip-
ment when the vehicle is stationary.
You must observe the legal requirements for thecountry in which you are currently driving whenoperating the on-board computer.
GWARNING
If the instrument cluster has failed or mal-
functioned, you may not recognize function
restrictions in systems relevant to safety. The
operating safety of your vehicle may be
impaired. There is a risk of an accident.
Drive on carefully. Have the vehicle checked
at a qualified specialist workshop immedi-
ately.
The on-board computer only shows messages orwarnings from certain systems in the multifunc-tion display. You should therefore make sureyour vehicle is operating safely at all times.
If the operating safety of your vehicle isimpaired, pull over as soon as it is safe to do so.Contact a qualified specialist workshop.
For an overview, see the instrument panel illus-tration (Ypage 33).
Displays and operation
Instrument cluster lighting
The light sensor in the instrument cluster auto-matically controls the brightness of the multi-function display. In daylight, the displays in theinstrument cluster are not illuminated.
The lighting in the instrument cluster, in the dis-plays and the controls in the vehicle interior canbe adjusted using the brightness control knob.
The brightness control knob is located on thebottom left of the instrument cluster(Ypage 33).
XTurn the brightness control knob clockwise orcounter-clockwise.If the light switch is set to the�X,�`or�Xposition, the brightness is dependentupon the brightness of the ambient light.
Speedometer with segments
The speedometer is only divided into segmentsin vehicles with Active Distance AssistDISTRONIC.
The segments in the speedometer indicatewhich speed range is available.
RActive Distance Assist DISTRONIC activated(Ypage 152):
One or two segments in the set speed rangelight up.
RActive Distance Assist DISTRONIC detects avehicle in front moving more slowly than thestored speed:
The segments between the speed of the vehi-cle in front and the stored speed light up.
Tachometer
!Do not drive in the overrevving range, as thiscould damage the engine.
The red band in the tachometer indicates theengine's overrevving range.
The engine is limited within a range to protectthe engine when the red band is reached.
Outside temperature display
You should pay special attention to road condi-tions when temperatures are around freezingpoint.
Bear in mind that the outside temperature dis-play indicates the temperature measured anddoes not record the road temperature.
The outside temperature display is in the multi-function display (Ypage 181).
178Displays and operation
On-board computer and displays
Page 192 of 330
Activating/deactivating the acoustic
locking verification signal
If you switch on theAcousticAcousticLockLockfunction, anacoustic signal sounds when you lock the vehi-cle.
XPress the�Yor�ebutton on the steeringwheel to select theSett.Sett.menu.
XPress the�dor�cbutton to select theVehicleVehiclesubmenu.
XPress�vto confirm.
XPress the�dor�cbutton to select theAcoustic LockAcoustic Lockfunction.If theAcoustic LockAcoustic Lockfunction is activated,the multifunction display shows the�7symbol in orange.
XPress the�vbutton to save the setting.
Comfort
Switching the fold-in mirrors when lock-
ing feature on/off
This function is only available in Canada.
This function is only available when the vehicle isequipped with the electrical fold-in function.
When you activate theAuto.Auto.MirrorMirrorFoldingFoldingfunction, the exterior mirrors are folded in whenthe vehicle is locked. If you unlock the vehicleand then open the driver's or front-passengerdoor, the exterior mirrors fold out again.
If you have switched on theAuto. MirrorAuto. MirrorFoldingFoldingfunction and you fold in the exteriormirrors using the button on the door(Ypage 98), they will not fold out automatically.The exterior mirrors can then only be folded outusing the button on the door.
XPress the�Yor�ebutton on the steeringwheel to select theSett.Sett.menu.
XPress the�dor�cbutton to select theConvenienceConveniencesubmenu.
XPress�vto confirm.
XPress the�dor�cbutton to select theAuto. Mirror FoldingAuto. Mirror Foldingfunction.If theAuto. Mirror FoldingAuto. Mirror Foldingfunction isswitched on, the multifunction display showsthe exterior mirror in orange.
XPress the�vbutton to save the setting.
Restoring the factory settings
XPress the�Yor�ebutton on the steeringwheel to select theSett.Sett.menu.
XPress the�dor�cbutton to select theFactory SettingFactory Settingsubmenu.
XPress�vto confirm.TheReset All Settings?Reset All Settings?functionappears.
XPress the�dor�cbutton to selectNoNoorYesYes.
XPress the�vbutton to confirm the selec-tion.If you have selectedYesYes, the multifunctiondisplay shows a confirmation message.
For safety reasons, theDaytime RunningDaytime RunningLightsLightsfunction in theLightLightsubmenu is onlyreset if the vehicle is stationary.
AMG menu (Mercedes-AMG vehicles)
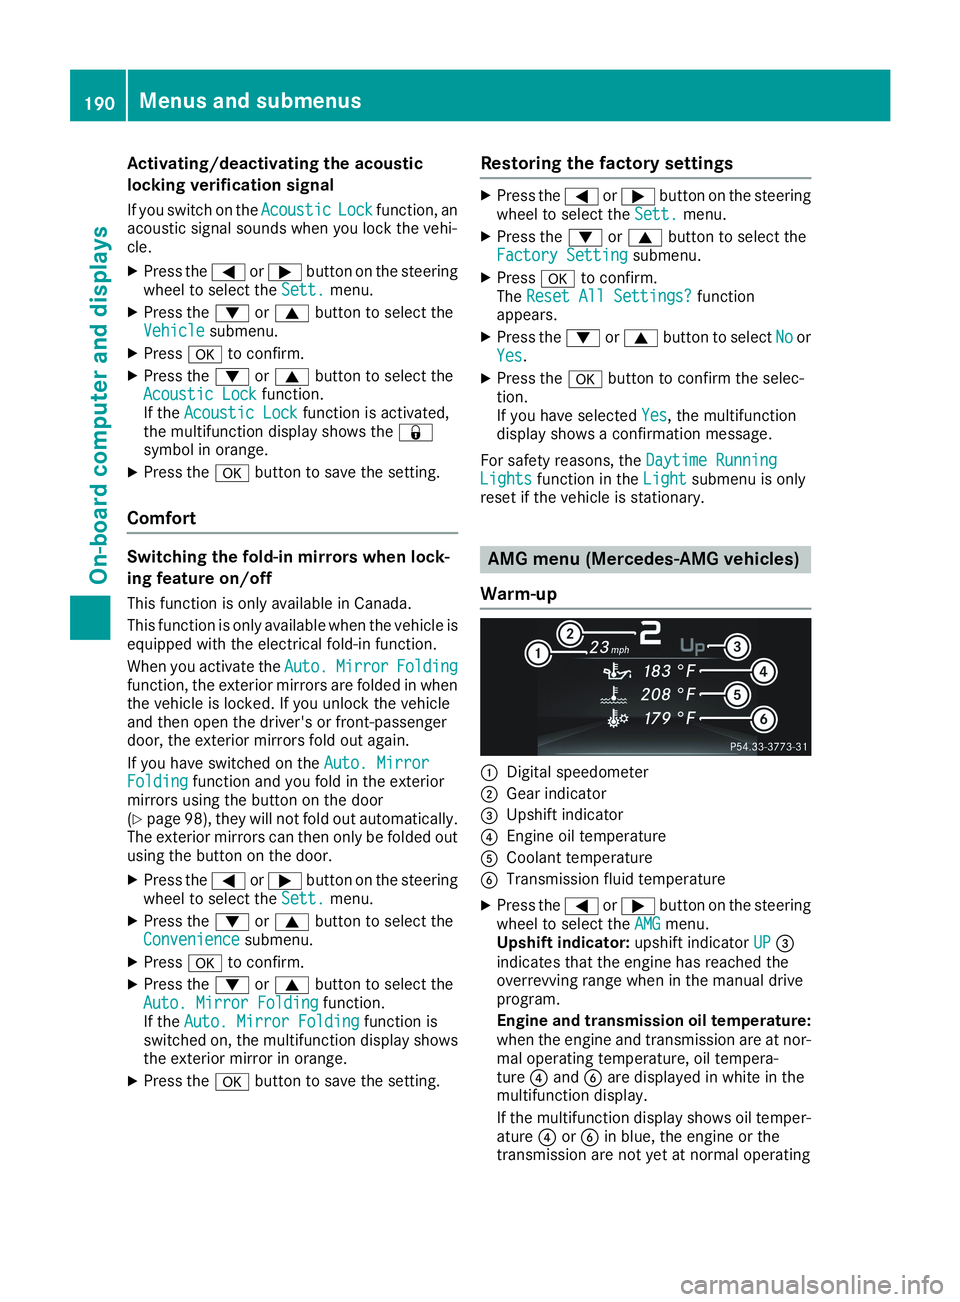
Warm-up
�CDigital speedometer
�DGear indicator
�
Page 283 of 330
Only replace a battery with a battery that hasbeen recommended by Mercedes-Benz.
Remove the SmartKey if you park the vehicleand do not require any electrical consumers.The vehicle will then use very little energy, thusconserving battery power.
If the power supply has been interrupted, e.g. ifyou reconnect the battery, you will have to:
Rset the clock using the multimedia system(see the Digital Operator's Manual)
Rreset the function for folding the exterior mir-rors in/out automatically, by folding the mir-rors out once (Ypage 98)
Charging the battery
GWARNING
During charging and jump-starting, explosive
gases can escape from the battery. There is a
risk of an explosion.
Particularly avoid fire, open flames, creating
sparks and smoking. Ensure there is sufficient
ventilation while charging and jump-starting.
Do not lean over a battery.
GWARNING
Battery acid is caustic. There is a risk of injury.
Avoid contact with skin, eyes or clothing. Do
not inhale any battery gases. Do not lean over
the battery. Keep children away from batter-
ies. Wash away battery acid immediately with
plenty of clean water and seek medical atten-
tion.
GWARNING
A discharged battery can freeze at tempera-
tures below freezing point. When jump-start-
ing the vehicle or charging the battery, gases
can escape from the battery. There is a risk of
an explosion.
Allow the frozen battery to thaw out before
charging it or jump-starting.
!Only use battery chargers with a maximumcharging voltage of 14.8 V.
!Only charge the battery using the jump-starting connection point.
The jump-starting connection point is in theengine compartment (Ypage 282).
XOpen the hood.
XConnect the battery charger to the positiveterminal and ground point in the same orderas when connecting the donor battery in thejump-starting procedure (Ypage 282).
If the indicator/warning lamps do not light up inthe instrument cluster at low temperatures, it isvery likely that the discharged battery has fro-zen. In this case you may neither jump-start thevehicle nor charge the battery. The service life ofa thawed-out battery may be shorter. The start-ing characteristics can be impaired, particularlyat low temperatures. Have the thawed-out bat-tery checked at a qualified specialist workshop.
Only charge the installed battery with a batterycharger which has been tested and approved byMercedes-Benz. A battery charger unit speciallyadapted for Mercedes-Benz vehicles and testedand approved by Mercedes-Benz is available asan accessory. It permits the charging of the bat-tery in its installed position. Contact an author-ized Mercedes-Benz Center for further informa-tion and availability. Read the battery charger'soperating instructions before charging the bat-tery.
Replacing the 12 V battery
Observe the notes on the 12 V battery(Ypage 279).
Mercedes-Benz recommends that you have the12 V battery replaced at a qualified specialistworkshop, e.g. at an authorized Mercedes-BenzCenter.
If you want to replace the battery yourself,observe the following notes:
RAlways replace a defective battery with a bat-tery which meets the specific requirements ofthe vehicle.
The vehicle is equipped with a battery usingAGM (absorbent glass mat) technology or abattery using EFB (enhanced flooded battery)technology. Full vehicle functionality is guar-anteed only with an AGM or EFB battery. Ifreplacement is necessary, always use the bat-tery technology originally installed. Switchingbetween the battery technologies is not per-mitted. For safety reasons, Mercedes-Benzrecommends that you only use batteries
Battery (vehicle)281
Breakdown assistance
Z
Page 288 of 330
The towing eye is located with the vehicle toolkit under the cargo compartment floor(Ypage 274).
Vehicles with the TIREFIT kit: the towing eye isbeneath the tire inflation compressor(Ypage 274).
XPress the mark on cover�Cinwards in thedirection of the arrow.
XTake cover�Coff the opening.
XScrew in the towing eye clockwise to the stop.
Removing the towing eye
XUnscrew and remove the towing eye.
XAttach cover�Cto the bumper and press untilit engages.
XPlace the towing eye in the stowage wellbeneath the cargo compartment floor in thecargo compartment (Ypage 274).
XVehicles with the TIREFIT kit: put back the tireinflation compressor (Ypage 274).
Towing the vehicle with the front axle
raised
Observe the important safety notes when tow-ing your vehicle with the front axle raised(Ypage 284).
Only vehicles without 4MATIC can be towedwith the front axle raised.
!Vehicles with 4MATIC must not be towedwith either the front or the rear axle raised, asdoing so will damage the transmission.
Vehicles with 4MATIC may either be towed awaywith both axles on the ground or be loaded upand transported.
!The ignition must be switched off if the vehi-cle is being towed with the front axle raised.
Otherwise, ESP®may intervene and damagethe brake system.
XOn vehicles with KEYLESS-GO or the KEY-LESS-GO start function:you must use theSmartKey instead of the Start/Stop button(Ypage 124).
XMake sure that the vehicle is stationary.
XTurn the SmartKey to position�Hin the igni-tion lock.
XWhen the vehicle is stationary, depress thebrake pedal and keep it depressed.
XShift the automatic transmission to position�].
XRelease the brake pedal.
XRelease the electric parking brake.
XSwitch off the automatic locking(Ypage 189).
XSwitch on the hazard warning lamps(Ypage 103).
XTurn the SmartKey in the ignition lock to posi-tion�Zand leave the SmartKey in the ignitionlock.
Towing a vehicle with both axles on
the ground
It is important that you observe the safetyinstructions when towing away your vehicle(Ypage 284).
XOn vehicles with KEYLESS-GO or the KEY-LESS-GO start function:you must use theSmartKey instead of the Start/Stop button(Ypage 124).
The automatic transmission automatically shiftsto position�]when you open the driver's orfront-passenger door or when you remove theSmartKey from the ignition lock. In order toensure that the automatic transmission stays inposition�\\when towing away the vehicle, youmust observe the following points:
XMake sure that the vehicle is stationary.
XTurn the SmartKey to position�Hin the igni-tion lock.
XDepress and hold the brake pedal.
XShift the automatic transmission to position�\\.
XLeave the SmartKey in position�Hin the igni-tion lock.
XRelease the brake pedal.
XRelease the electric parking brake.
XSwitch on the hazard warning lamps(Ypage 103).
iIn order to signal a change of direction whentowing the vehicle with the hazard warninglamps switched on, use the combinationswitch as usual. In this case, only the indicatorlamps for the direction of travel flash. Afterresetting the combination switch, the hazardwarning lamp starts flashing again.
286Towing and tow-starting
Breakdown assistance