ignition MERCEDES-BENZ CLA-CLASS 2013 Owners Manual
[x] Cancel search | Manufacturer: MERCEDES-BENZ, Model Year: 2013, Model line: CLA-CLASS, Model: MERCEDES-BENZ CLA-CLASS 2013Pages: 352, PDF Size: 5.64 MB
Page 13 of 352
Important safety notes ..................337
Low outside temperatures .............339
Problem (malfunction) ...................161
Quality (diesel) ............................... 339
Refuelling ....................................... 159
Tank content/reserve fuel .............337
Fuel filler flap
Opening/closing ............................ 160
Fuel filter (white display message) . 242
Fuel level Calling up the range (on-board
computer) ...................................... 212
Gauge .............................................. 30
Fuel reserve
see Fuel
Fuel tank
Capacity ........................................ 337
Problem (malfunction) ...................161
Fuses
Allocation chart ............................. 313
Before changing ............................. 312
Fuse box in the engine compart-
ment .............................................. 312
Fuse box in the front-passenger
footwell .......................................... 313
Important safety notes ..................312
G
Gear or selector lever (cleaning
instructions) ...................................... 293
Genuine Mercedes-Benz parts ........... 21
Glove compartment .......................... 269
H
Handbrake see Parking brake
Hazard warning lamps ...................... 110
Display message ............................ 254
Headlamp
Cleaning system (function) ............110
Cleaning system (notes) ................342
Headlamps
Misting up ...................................... 113
Topping up the cleaning system ....286
see Automatic headlamp mode
Head restraints
Adjusting ......................................... 97
Adjusting (electrically) .....................98
Adjusting (manually) ........................97
Adjusting (rear) ................................ 98
Fitting/removing (rear) ....................98
Heating
see Climate control
High-pressure cleaners .................... 289
Hill start assist .................................. 147
HOLD function Deactivating ................................... 182
Display message ............................ 243
Function/notes ............................. 181
I
Ignition lock see Key positions
Immobiliser .......................................... 71
Indicator and warning lamps Coolant .......................................... 262
DISTRONIC PLUS ........................... 264
Engine diagnostics .........................262
Indicator lamps
Display message ............................ 237
see Warning and indicator lamps
Indicators
see Turn signals
Inspection
see ASSYST PLUS
Instrument cluster
Overview .......................................... 30
Settings ......................................... 220
Warning and indicator lamps ...........32
Instrument cluster lighting .............. 208
Intelligent Light System Activating/deactivating .................221
Display message ............................ 239
Overview ........................................ 110
Setting the dipped-beam head-
lamps for driving on the right/left . 221
Interior lighting ................................. 113
Automatic control system ..............114
Delayed switch-off (on-board
computer) ...................................... 222
Emergency lighting ........................114
Manual control ............................... 114
Index11ProCarManuals.com
Page 14 of 352
Overview ........................................ 113
Reading lamp ................................. 113
Setting the ambient lighting
brightness (on-board computer) ....222
Interior motion sensor ........................ 72
ISOFIX child seat securing system .... 54
J
Jack Storage location ............................ 297
Using ............................................. 326
Jump starting (engine) ...................... 306
K
Key Changing the battery .......................79
Checking the battery .......................78
Convenience closing feature ............88
Convenience opening feature ..........88
Display message ............................ 254
Door central locking/unlocking .......77
Emergency key element ................... 77
Important safety notes ....................76
Loss ................................................. 80
Modifying the programming .............77
Positions (ignition lock) .................145
Problem (malfunction) .....................80
Starting the engine ........................146
Key positions (ignition lock) ............ 145
Kickdown Driving tips .................................... 155
Manual drive program ....................157
Kneebag ............................................... 44
L
Lamps see Warning and indicator lamps
Lane Keeping Assist
Activating/deactivating .................219
Display message ............................ 244
Function/information ....................199
Lane package ..................................... 197
Lashing eyelets ................................. 272
Licence plate lamp (display mes-
sage) ................................................... 238
Lights
Activating/deactivating the Intel-
ligent Light System ........................221
Activating/deactivating the inte-
rior lighting delayed switch-off .......222
Active light function .......................110
Automatic headlamp mode ............107
Cornering light function .................111
Dipped-beam headlamps ...............107
Display message ............................ 236
Driving abroad ............................... 106
Foglamps ....................................... 108
Foglamps (extended range) ...........111
Hazard warning lamps ...................110
Headlamp flasher ........................... 109
Headlamp range ............................ 108
Light switch ................................... 107
Main-beam headlamps ................... 109
Motorway mode ............................. 111
Parking lamps ................................ 108
Rear foglamp ................................. 108
Setting the ambient lighting
brightness (on-board computer) ....222
Side lamps ..................................... 108
Switching Adaptive Highbeam
Assist on/off ................................. 221
Switching the daytime driving
lights on/off (on-board computer) . 220
Switching the daytime driving
lights on/off (switch) .....................107
Switching the exterior lighting
delayed switch-off on/off (on-
board computer) ............................ 222
Switching the surround lighting
on/off (on-board computer) ..........222
Turn signals ................................... 109
see Interior lighting
see Replacing bulbs
Light sensor (display message) ....... 239
LIM indicator lamp Cruise control ................................ 169
DISTRONIC PLUS ........................... 174
Variable SPEEDTRONIC .................171
Limiting the speed
see SPEEDTRONIC
Loading guidelines ............................ 268
Locking see Central locking 12IndexProCarManuals.com
Page 25 of 352
GWARNING
If you switch off the ignition while driving,
safety-relevant functions are only available
with limitations, or not at all. This could affect,
for example, the power steering and the brake
boosting effect. You will require considerably
more effort to steer and brake. There is a risk
of an accident.
Do not switch off the ignition while driving.
GWARNING
Modifications to electronic components, their
software as well as wiring could effect their
function and/or the operation of other net-
worked components. This could in particular
also be the case for systems relevant to
safety. They might not function properly any
more and/or jeopardise the operational
safety of the vehicle. There is an increased
risk of an accident and injury.
Do not attempt to modify the wiring as well as
electronic components or their software.
Always have work on electrical and electronic
components carried out at a qualified special-
ist workshop.
! There is a risk of damage to the vehicle if:
R the vehicle makes contact with the
ground, e.g. on a high kerb or a loose
road surface
R you drive too quickly over an obstacle,
e.g. a kerb or a pothole
R a heavy object hits the underbody or
chassis component
In these or similar situations, the vehicle
body, the underbody, chassis components,
wheels or tyres could be damaged even if
this is not visible. Components that have
been damaged in this way can unexpect-
edly fail or no longer be able to assimilate
the loads occurring in the event of an acci-
dent.
If the underbody panelling is damaged,
flammable material, such as leaves, grass
or twigs, could collect between the under-
body and underbody panelling. These
materials could ignite if they remain in con-
tact with hot components of the exhaust
system for an extended period.
Have the vehicle checked and repaired
immediately at a qualified specialist work-
shop. If you become aware when continu-
ing the journey that driving safety has been
effected, stop as soon as possible in
accordance with the traffic conditions. In
such cases, consult a qualified specialist
workshop.
Declarations of conformity
Wireless vehicle components
The following information applies to all com-
ponents of the vehicle and the information
systems and communication devices integra-
ted into the vehicle which receive and/or
transmit radio waves:
The components of this vehicle that receive
and/or transmit radio waves are compliant
with the basic requirements and all other rel-
evant conditions of Directive 1999/5/EC.
You can obtain further information from any
Mercedes-Benz Service Centre.
Electromagnetic compatibility
The electromagnetic compatibility of the vehi-
cle components has been checked and certi-
fied according to the currently valid version
of Regulation ECE-R 10.
Diagnostics connection
The diagnostics connection is only intended
for the connection of diagnostic equipment at
a qualified specialist workshop.
GWARNING
If you connect equipment to a diagnostics
connection in the vehicle, it can affect the
operation of the vehicle systems. This may
affect the operating safety of the vehicle.
There is a risk of an accident.
Introduction23ZProCarManuals.com
Page 30 of 352
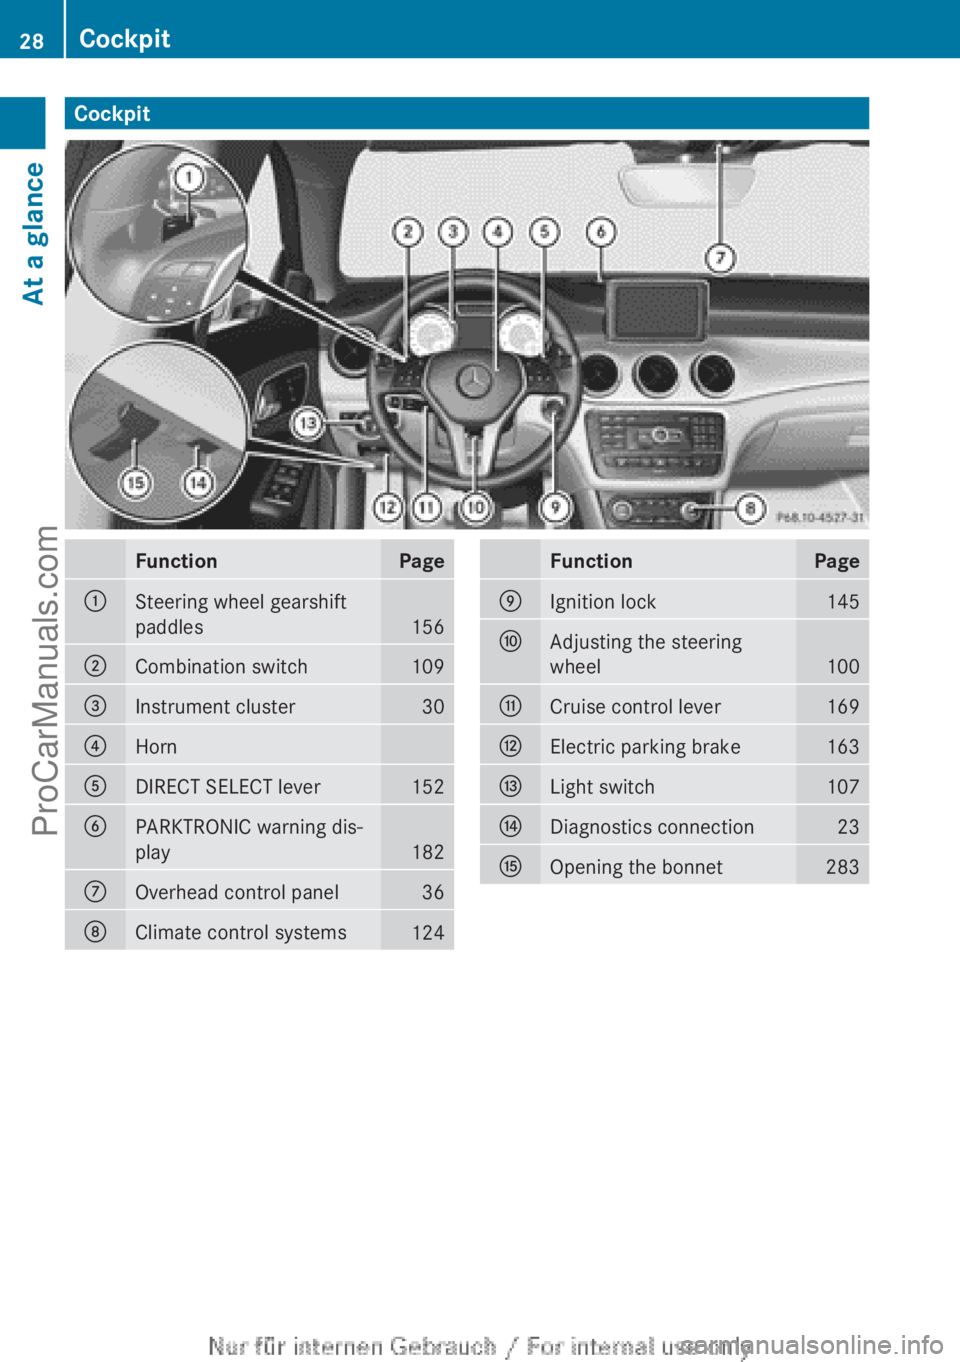
CockpitFunctionPage:Steering wheel gearshift
paddles
156
;Combination switch109=Instrument cluster30?HornADIRECT SELECT lever152BPARKTRONIC warning dis-
play
182
COverhead control panel36DClimate control systems124FunctionPageEIgnition lock145FAdjusting the steering
wheel
100
GCruise control lever169HElectric parking brake163ILight switch107JDiagnostics connection23KOpening the bonnet28328CockpitAt a glance
ProCarManuals.com
Page 31 of 352
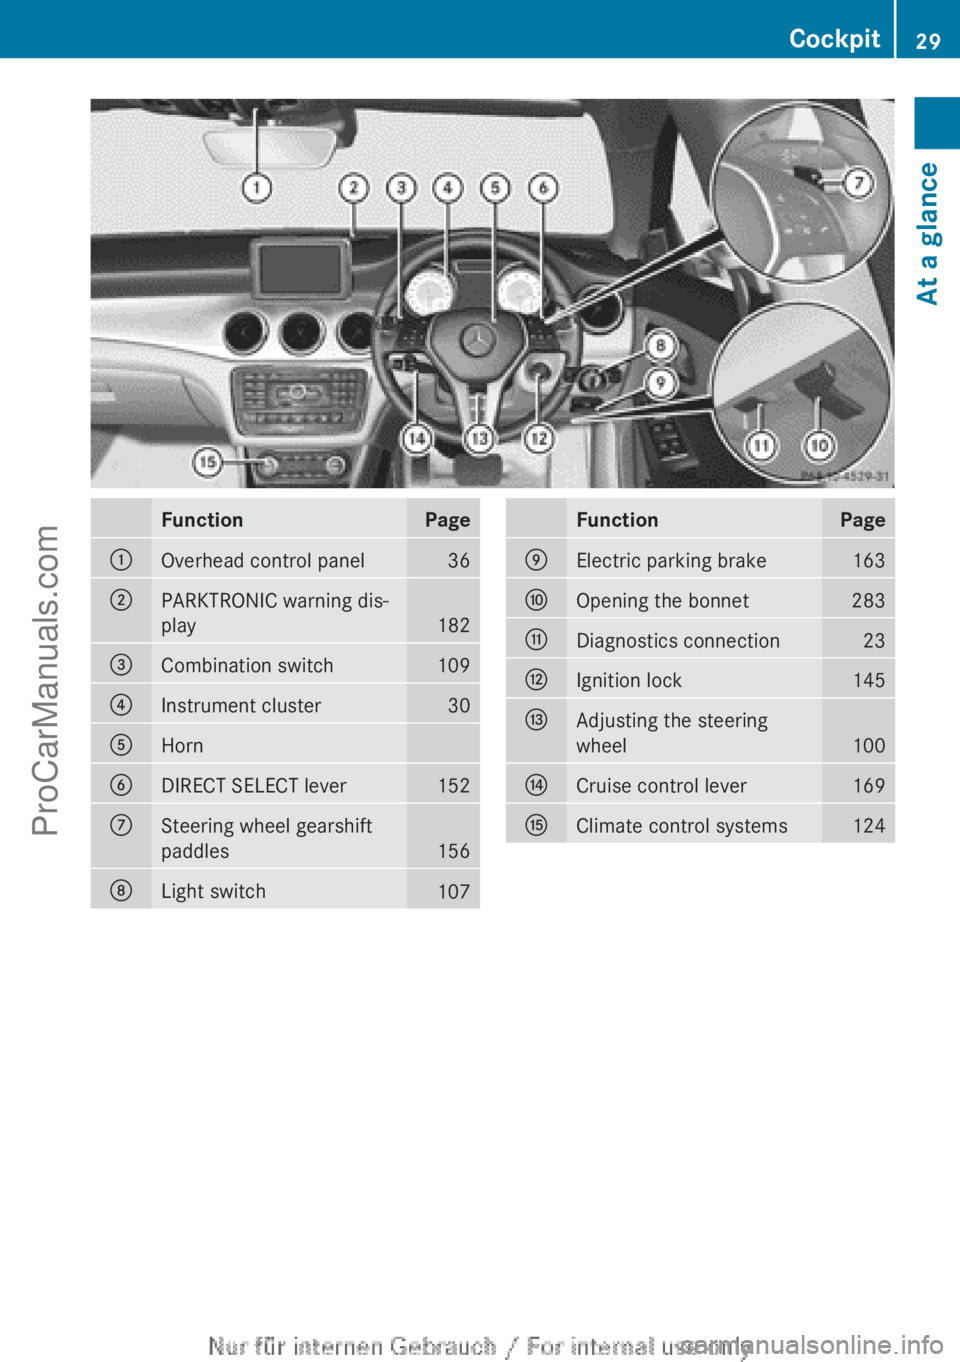
FunctionPage:Overhead control panel36;PARKTRONIC warning dis-
play
182
=Combination switch109?Instrument cluster30AHornBDIRECT SELECT lever152CSteering wheel gearshift
paddles
156
DLight switch107FunctionPageEElectric parking brake163FOpening the bonnet283GDiagnostics connection23HIgnition lock145IAdjusting the steering
wheel
100
JCruise control lever169KClimate control systems124Cockpit29At a glanceProCarManuals.com
Page 42 of 352
Useful information
i This Owner's Manual describes all mod-
els, series and optional equipment for your
vehicle that were available at the time of
going to press. National variations are pos-
sible. Note that your vehicle may not be
equipped with all of the functions descri-
bed. This is also the case for systems and
functions relevant to safety.
i Read the information on qualified special-
ist workshops: ( Y page 24).
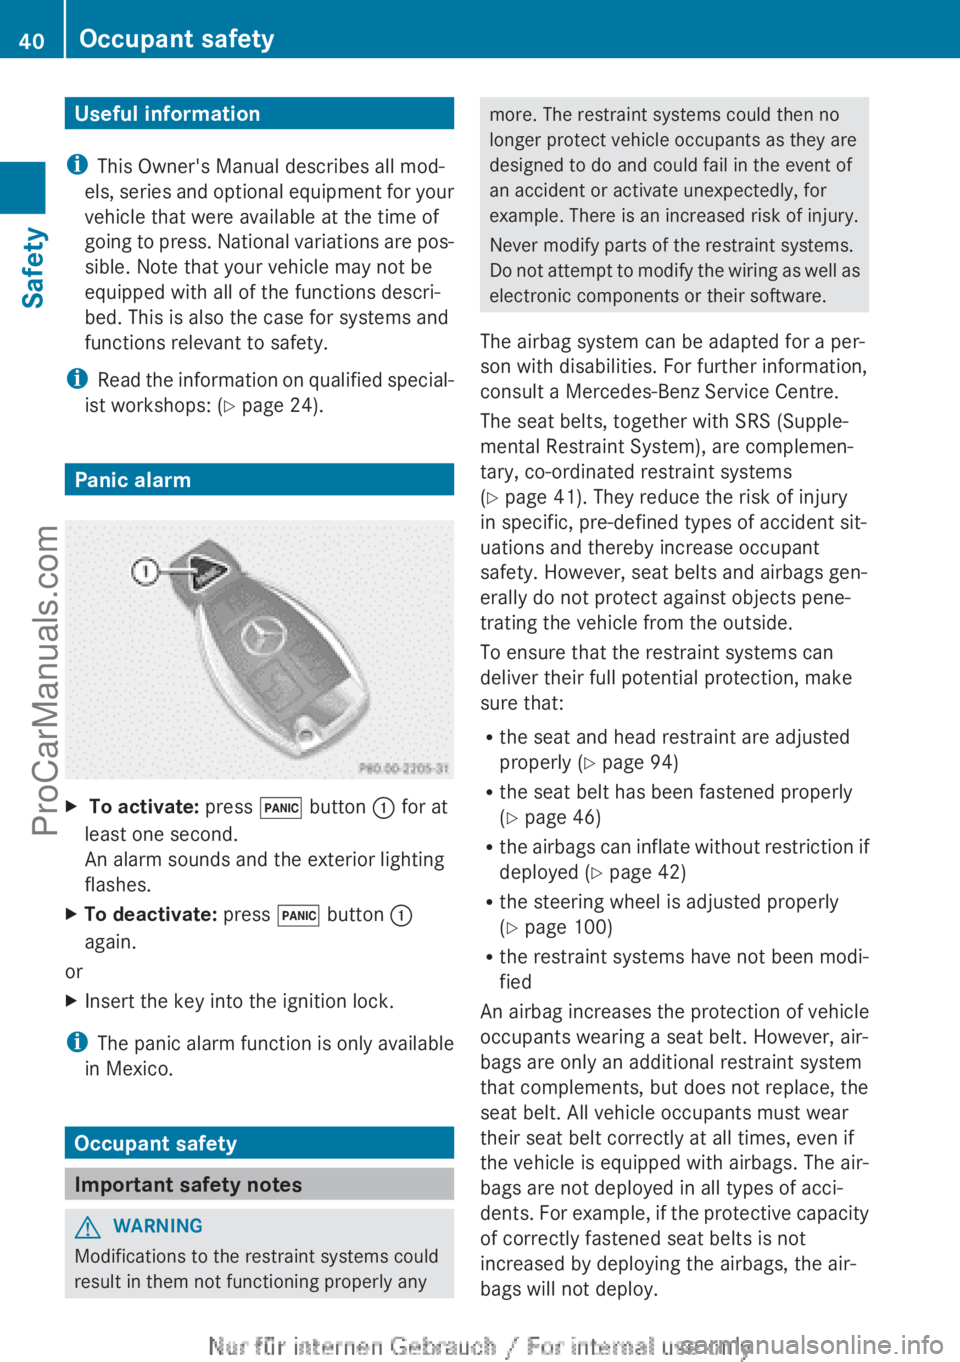
Panic alarm
X To activate: press ! button : for at
least one second.
An alarm sounds and the exterior lighting
flashes.XTo deactivate: press ! button :
again.
or
XInsert the key into the ignition lock.
i The panic alarm function is only available
in Mexico.
Occupant safety
Important safety notes
GWARNING
Modifications to the restraint systems could
result in them not functioning properly any
more. The restraint systems could then no
longer protect vehicle occupants as they are
designed to do and could fail in the event of
an accident or activate unexpectedly, for
example. There is an increased risk of injury.
Never modify parts of the restraint systems.
Do not attempt to modify the wiring as well as
electronic components or their software.
The airbag system can be adapted for a per-
son with disabilities. For further information,
consult a Mercedes-Benz Service Centre.
The seat belts, together with SRS (Supple-
mental Restraint System), are complemen-
tary, co-ordinated restraint systems
( Y page 41). They reduce the risk of injury
in specific, pre-defined types of accident sit-
uations and thereby increase occupant
safety. However, seat belts and airbags gen-
erally do not protect against objects pene-
trating the vehicle from the outside.
To ensure that the restraint systems can
deliver their full potential protection, make
sure that:
R the seat and head restraint are adjusted
properly ( Y page 94)
R the seat belt has been fastened properly
( Y page 46)
R the airbags can inflate without restriction if
deployed ( Y page 42)
R the steering wheel is adjusted properly
( Y page 100)
R the restraint systems have not been modi-
fied
An airbag increases the protection of vehicle
occupants wearing a seat belt. However, air-
bags are only an additional restraint system
that complements, but does not replace, the
seat belt. All vehicle occupants must wear
their seat belt correctly at all times, even if
the vehicle is equipped with airbags. The air-
bags are not deployed in all types of acci-
dents. For example, if the protective capacity
of correctly fastened seat belts is not
increased by deploying the airbags, the air-
bags will not deploy.40Occupant safetySafety
ProCarManuals.com
Page 43 of 352
Airbag deployment only provides increased
protection if the seat belt is worn correctly.
The seat belt helps, firstly, to keep the vehicle
occupant in the best position in relation to the
airbag. Secondly, in a head-on collision, for
example, the seat belt restricts movement of
the vehicle occupant towards the point of
impact.
SRS (Supplemental Restraint System)
Introduction
Supplemental Restraint System (SRS) with:
R the 6 SRS warning lamp
R airbags
R airbag control unit (with crash sensors)
R belt tensioners for the front seat belts and
the outer seat belts in the rear
R seat belt force limiters for the front seat
belts and the outer seat belts in the rear
SRS reduces the risk of vehicle occupants
coming into contact with parts of the vehi-
cle's interior in the event of an accident. It can
also reduce the forces to which vehicle occu-
pants are subjected during an accident.
SRS warning lamp
GWARNING
If SRS is malfunctioning, child restraint sys-
tem components may be triggered uninten-
tionally or might not be triggered at all in the
event of an accident with a high rate of vehicle
deceleration. There is an increased risk of
injury, possibly even fatal.
Have SRS checked and repaired immediately
at a qualified specialist workshop.
SRS functions are checked regularly when
you switch on the ignition and when the
engine is running. Therefore, malfunctions
can be detected in good time.
The 6 SRS warning lamp in the instrument
cluster lights up when the ignition is switched
on. It goes out no later than a few seconds
after the engine is started.
The SRS components are in operational read-
iness when the 6 SRS warning lamp goes
out while the engine is running.
A malfunction has occurred if:
R the 6 SRS warning lamp does not light
up when the ignition is switched on
R the engine is running and the 6 SRS
warning lamp does not go out after a few
seconds
R the engine is running and the 6 SRS
warning lamp lights up again
Triggering of belt tensioners and air-
bags
During the first stage of a collision, the airbag
control unit evaluates important physical
data relating to vehicle deceleration or accel-
eration, such as:
R duration
R direction
R magnitude
Based on the evaluation of this data, the air-
bag control unit pre-emptively triggers the
belt tensioners in the first stage.
If there is an even higher rate of vehicle decel-
eration or acceleration in a longitudinal direc-
tion, the front airbags are also deployed.
Your vehicle has adaptive, two-stage front air-
bags. The airbag control unit evaluates vehi-
cle deceleration or acceleration in the event
of a collision. In the first deployment stage,
the front airbag is filled with enough propel-
lant gas to reduce the risk of injuries. The
front airbag is fully deployed if a second
deployment threshold is reached within a few
milliseconds.
The belt tensioner and airbag triggering
thresholds are variable and are adapted to the
detected rate of deceleration or acceleration
of the vehicle. This process is pre-emptive in
nature. The triggering process must take
place in good time at the start of the collision.
Occupant safety41SafetyZProCarManuals.com
Page 50 of 352
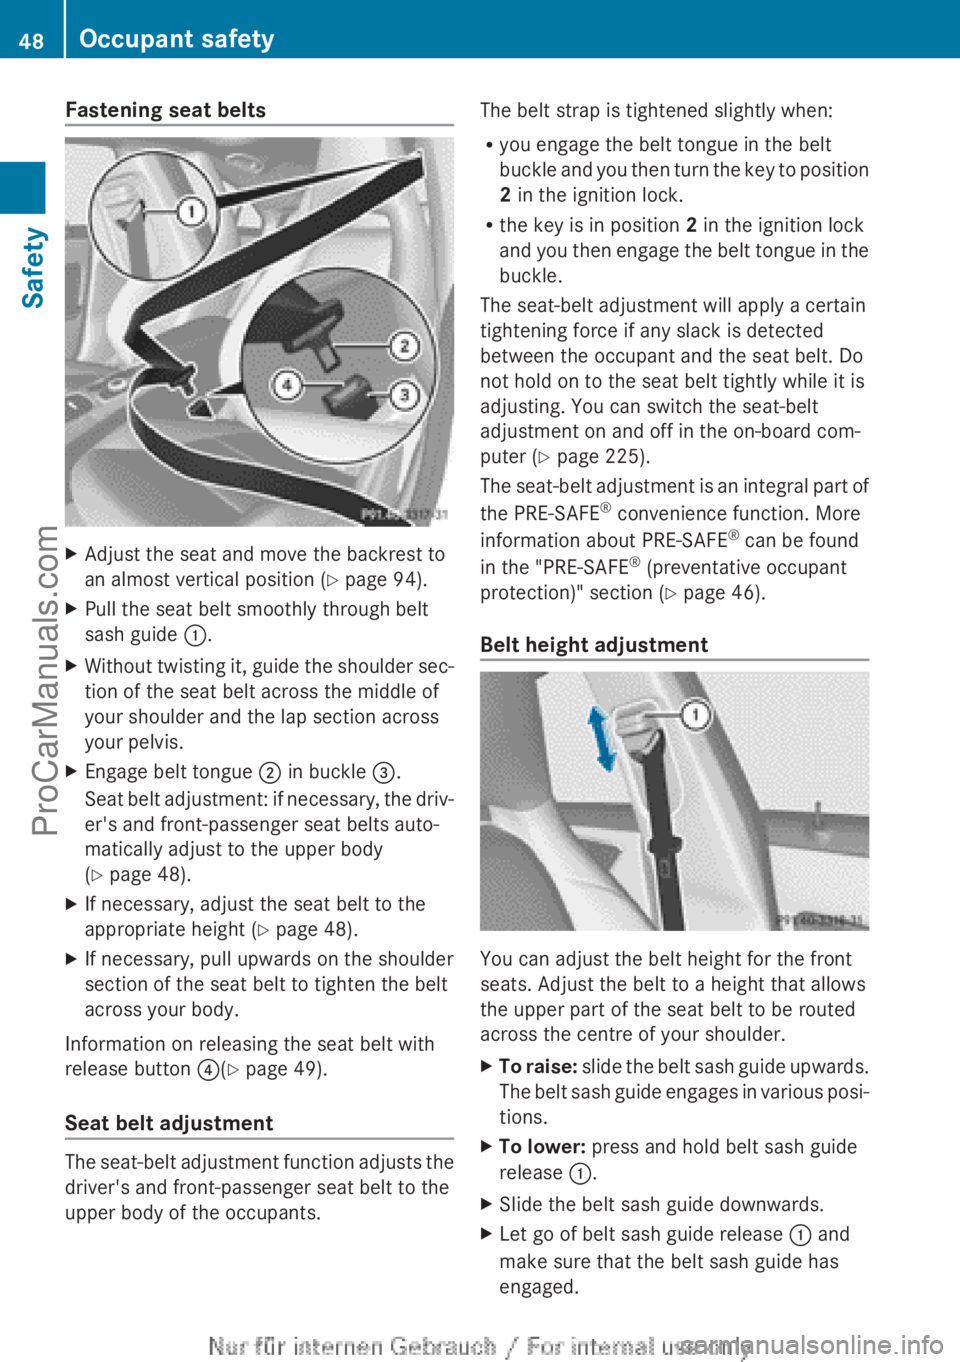
Fastening seat beltsXAdjust the seat and move the backrest to
an almost vertical position ( Y page 94).XPull the seat belt smoothly through belt
sash guide :.XWithout twisting it, guide the shoulder sec-
tion of the seat belt across the middle of
your shoulder and the lap section across
your pelvis.XEngage belt tongue ; in buckle =.
Seat belt adjustment: if necessary, the driv-
er's and front-passenger seat belts auto-
matically adjust to the upper body
( Y page 48).XIf necessary, adjust the seat belt to the
appropriate height ( Y page 48).XIf necessary, pull upwards on the shoulder
section of the seat belt to tighten the belt
across your body.
Information on releasing the seat belt with
release button ?(Y page 49).
Seat belt adjustment
The seat-belt adjustment function adjusts the
driver's and front-passenger seat belt to the
upper body of the occupants.
The belt strap is tightened slightly when:
R you engage the belt tongue in the belt
buckle and you then turn the key to position
2 in the ignition lock.
R the key is in position 2 in the ignition lock
and you then engage the belt tongue in the
buckle.
The seat-belt adjustment will apply a certain
tightening force if any slack is detected
between the occupant and the seat belt. Do
not hold on to the seat belt tightly while it is
adjusting. You can switch the seat-belt
adjustment on and off in the on-board com-
puter ( Y page 225).
The seat-belt adjustment is an integral part of
the PRE-SAFE ®
convenience function. More
information about PRE-SAFE ®
can be found
in the "PRE-SAFE ®
(preventative occupant
protection)" section ( Y page 46).
Belt height adjustment
You can adjust the belt height for the front
seats. Adjust the belt to a height that allows
the upper part of the seat belt to be routed
across the centre of your shoulder.
XTo raise: slide the belt sash guide upwards.
The belt sash guide engages in various posi-
tions.XTo lower: press and hold belt sash guide
release :.XSlide the belt sash guide downwards.XLet go of belt sash guide release : and
make sure that the belt sash guide has
engaged.48Occupant safetySafety
ProCarManuals.com
Page 52 of 352
Belt tensioners, belt force limitersGWARNING
Pyrotechnic seat belt tensioners that have
been deployed are no longer operational and
are unable to perform their intended protec-
tive function. This poses an increased risk of
injury or even fatal injury.
Therefore, have pyrotechnic belt tensioners
which have been triggered immediately
replaced at a qualified specialist workshop.
! If the front-passenger seat is not occu-
pied, do not engage the seat belt tongue in
the buckle on the front-passenger seat.
Otherwise, the belt tensioner could be trig-
gered in the event of an accident.
i Vehicles with PRE-SAFE ®
: belt tensioners
that are triggered by an electric motor can
be deployed as often as desired and do not
need to be replaced.
The front seat belts and the outer seat belts
in the rear are equipped with belt tensioners
and belt force limiters.
The belt tensioners tighten the seat belts in
an accident, pulling them close against the
body.
Belt tensioners do not correct incorrect seat
positions or incorrectly fastened seat belts.
Belt tensioners do not pull vehicle occupants
back towards the backrest.
The belt tensioners can only be activated
when:
R the ignition is switched on
R the restraint systems are operational; see
" 6 SRS warning lamp"( Y page 41)
R the belt tongue is engaged in the buckle on
each of the front seat belts.
The belt tensioners on the outside seats in the
rear compartment are triggered independ-
ently of the lock status of the seat belts.
The belt tensioners are triggered depending
on the type and severity of an accident:
R if, in the event of a head-on or rear-end col-
lision the vehicle decelerates or acceler-
ates rapidly in a longitudinal direction dur-
ing the initial stages of the impact
R if, in the event of a side impact, on the side
opposite the impact the vehicle deceler-
ates or accelerates rapidly in a lateral direc-
tion
R in certain situations where the vehicle over-
turns and the system determines that it can
provide additional protection
If the airbags are deployed, you will hear a
bang, and a small amount of powder may also
be released. Only in rare cases will the bang
affect your hearing. The powder that is
released generally does not constitute a
health hazard and does not indicate that there
is a fire in the vehicle. The powder may cause
short-term breathing difficulties to persons
suffering from asthma or other pulmonary
conditions. In order to prevent potential
breathing difficulties, you should leave the
vehicle as soon as it is safe to do so. You can
also open the window to allow fresh air to
enter the vehicle interior. The 6 SRS warn-
ing lamp lights up.
If the seat belt is also fitted with a belt force
limiter and this is triggered, the force exerted
by the seat belt on the vehicle occupant is
reduced.
The belt force limiters on the front seats are
synchronised with the front airbags, which
take on a part of the deceleration force. This
results in the load being distributed over a
greater area.
Children in the vehicle
Child restraint systems
Important safety notes
GWARNING
To reduce the risk of serious or even fatal
injury to the child in the event of a sudden
change in direction, braking or an accident:
R Children less than 1.50 m tall and under
twelve years of age must always be secured
50Children in the vehicleSafety
ProCarManuals.com
Page 56 of 352
GWARNING
Electronic devices on the front-passenger
seat can affect the function of the automatic
child seat recognition, for example:
R laptop
R mobile phone
R transponder cards such as ski passes or
access passes
The front-passenger front airbag could deploy
unintentionally or not function as intended
during an accident. This poses an increased
risk of injury or even fatal injury.
Do not place any of the devices mentioned
above or similar devices on the front-
passenger seat.
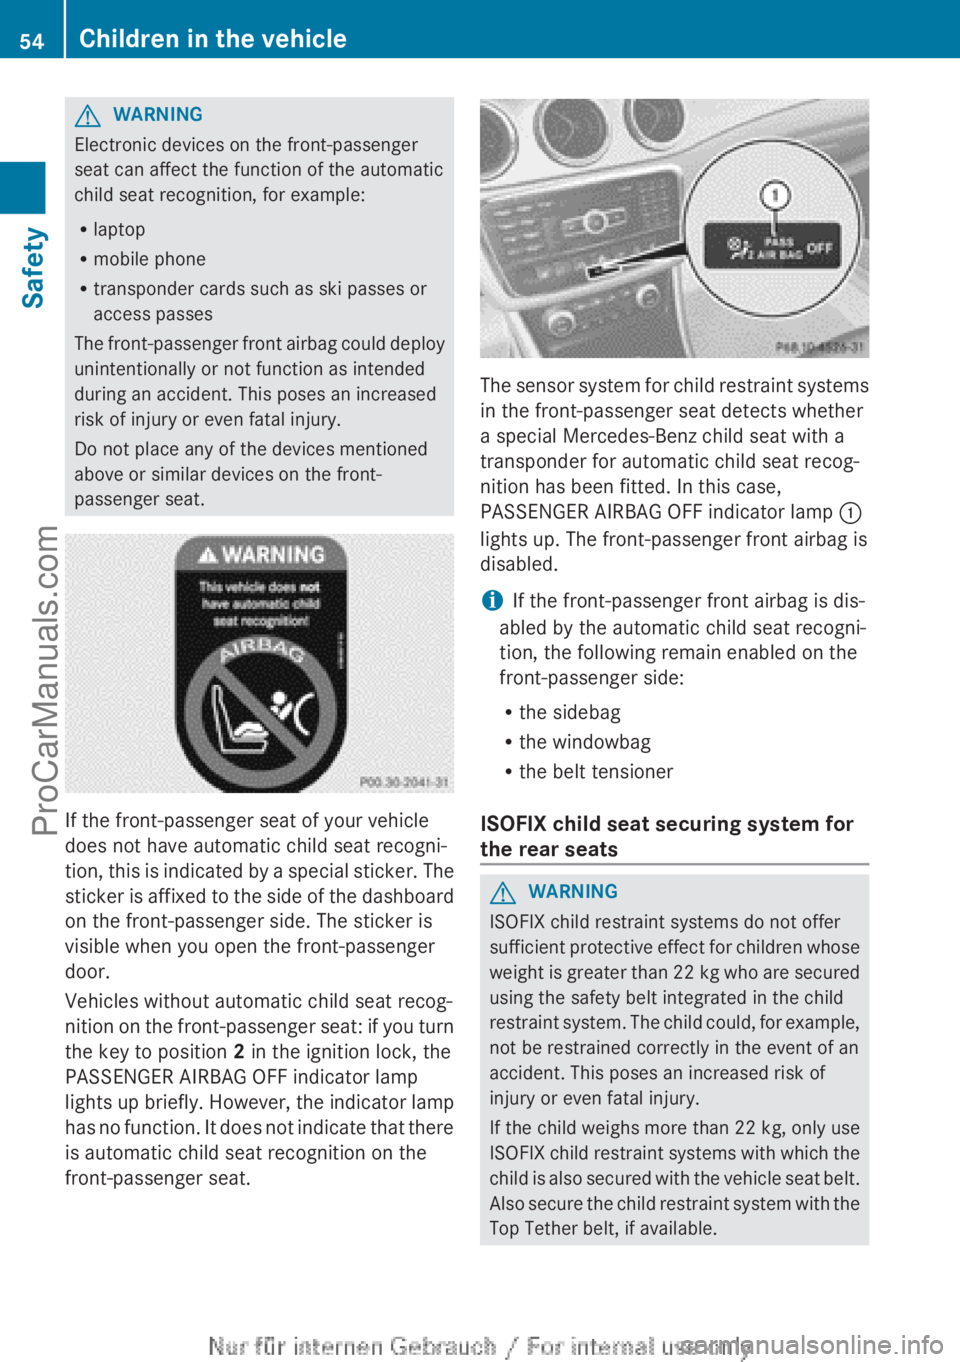
If the front-passenger seat of your vehicle
does not have automatic child seat recogni-
tion, this is indicated by a special sticker. The
sticker is affixed to the side of the dashboard
on the front-passenger side. The sticker is
visible when you open the front-passenger
door.
Vehicles without automatic child seat recog-
nition on the front-passenger seat: if you turn
the key to position 2 in the ignition lock, the
PASSENGER AIRBAG OFF indicator lamp
lights up briefly. However, the indicator lamp
has no function. It does not indicate that there
is automatic child seat recognition on the
front-passenger seat.
The sensor system for child restraint systems
in the front-passenger seat detects whether
a special Mercedes-Benz child seat with a
transponder for automatic child seat recog-
nition has been fitted. In this case,
PASSENGER AIRBAG OFF indicator lamp :
lights up. The front-passenger front airbag is
disabled.
i If the front-passenger front airbag is dis-
abled by the automatic child seat recogni-
tion, the following remain enabled on the
front-passenger side:
R the sidebag
R the windowbag
R the belt tensioner
ISOFIX child seat securing system for
the rear seats
GWARNING
ISOFIX child restraint systems do not offer
sufficient protective effect for children whose
weight is greater than 22 kg who are secured
using the safety belt integrated in the child
restraint system. The child could, for example,
not be restrained correctly in the event of an
accident. This poses an increased risk of
injury or even fatal injury.
If the child weighs more than 22 kg, only use
ISOFIX child restraint systems with which the
child is also secured with the vehicle seat belt.
Also secure the child restraint system with the
Top Tether belt, if available.
54Children in the vehicleSafety
ProCarManuals.com