navigation system MERCEDES-BENZ CLA-Class 2014 C117 Comand Manual
[x] Cancel search | Manufacturer: MERCEDES-BENZ, Model Year: 2014, Model line: CLA-Class, Model: MERCEDES-BENZ CLA-Class 2014 C117Pages: 270, PDF Size: 5.82 MB
Page 22 of 270
Your COMAND equipment
These operating instructions describe all the
standard and optional equipment for your
COMAND system, as available at the time of
going to print. Country-specific differences
are possible. Please note that your
COMAND system may not be equipped with
all the features described. COMAND operating system
Overview
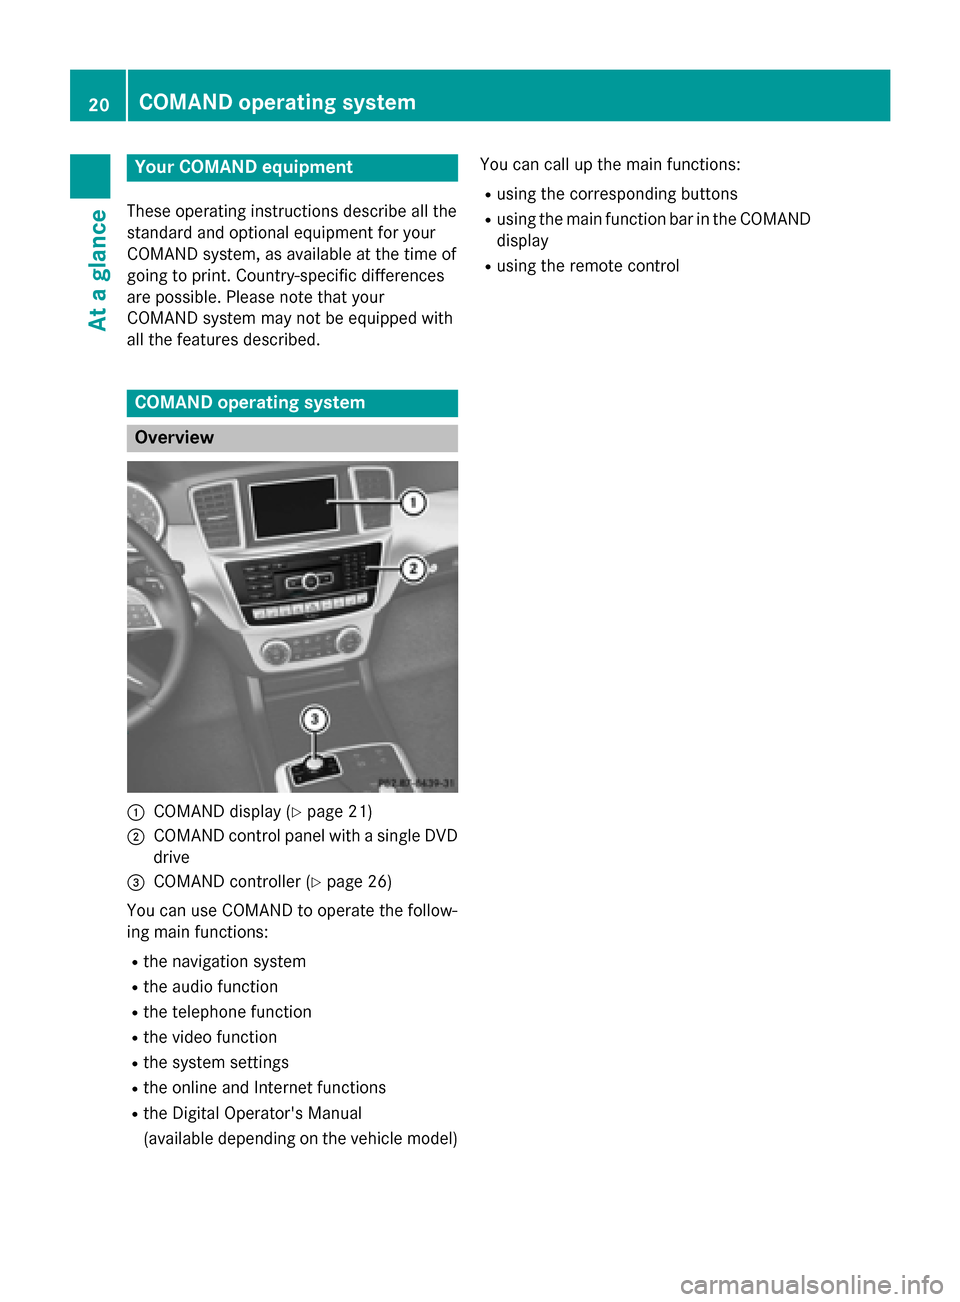
0043
COMAND display (Y page 21)
0044 COMAND control panel with a single DVD
drive
0087 COMAND controller (Y page 26)
You can use COMAND to operate the follow-
ing main functions: R the navigation system
R the audio function
R the telephone function
R the video function
R the system settings
R the online and Internet functions
R the Digital Operator's Manual
(available depending on the vehicle model) You can call up the main functions:
R using the corresponding buttons
R using the main function bar in the COMAND
display
R using the remote control 20
COMAND ope
rating systemAt a glance
Page 23 of 270
COMAND display
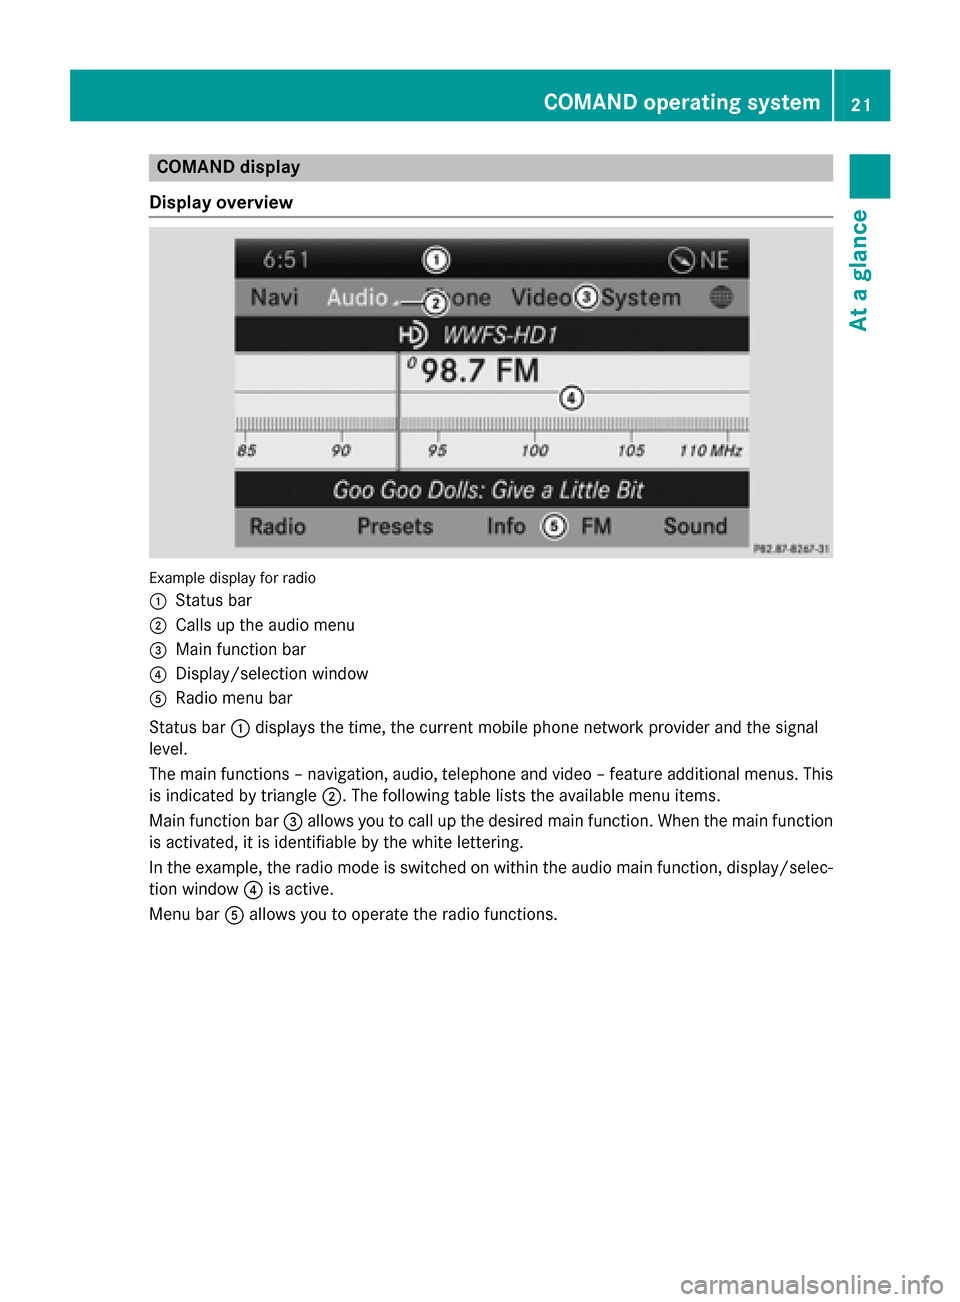
Display overview Example display for radio
0043 Status bar
0044 Calls up the audio menu
0087 Main function bar
0085 Display/selection window
0083 Radio menu bar
Status bar 0043displays the time, the current mobile phone network provider and the signal
level.
The main functions – navigation, audio, telephone and video – feature additional menus. This
is indicated by triangle 0044. The following table lists the available menu items.
Main function bar 0087allows you to call up the desired main function. When the main function
is activated, it is identifiable by the white lettering.
In the example, the radio mode is switched on within the audio main function, display/selec-
tion window 0085is active.
Menu bar 0083allows you to operate the radio functions. COMAND operating system
21At a glance
Page 27 of 270
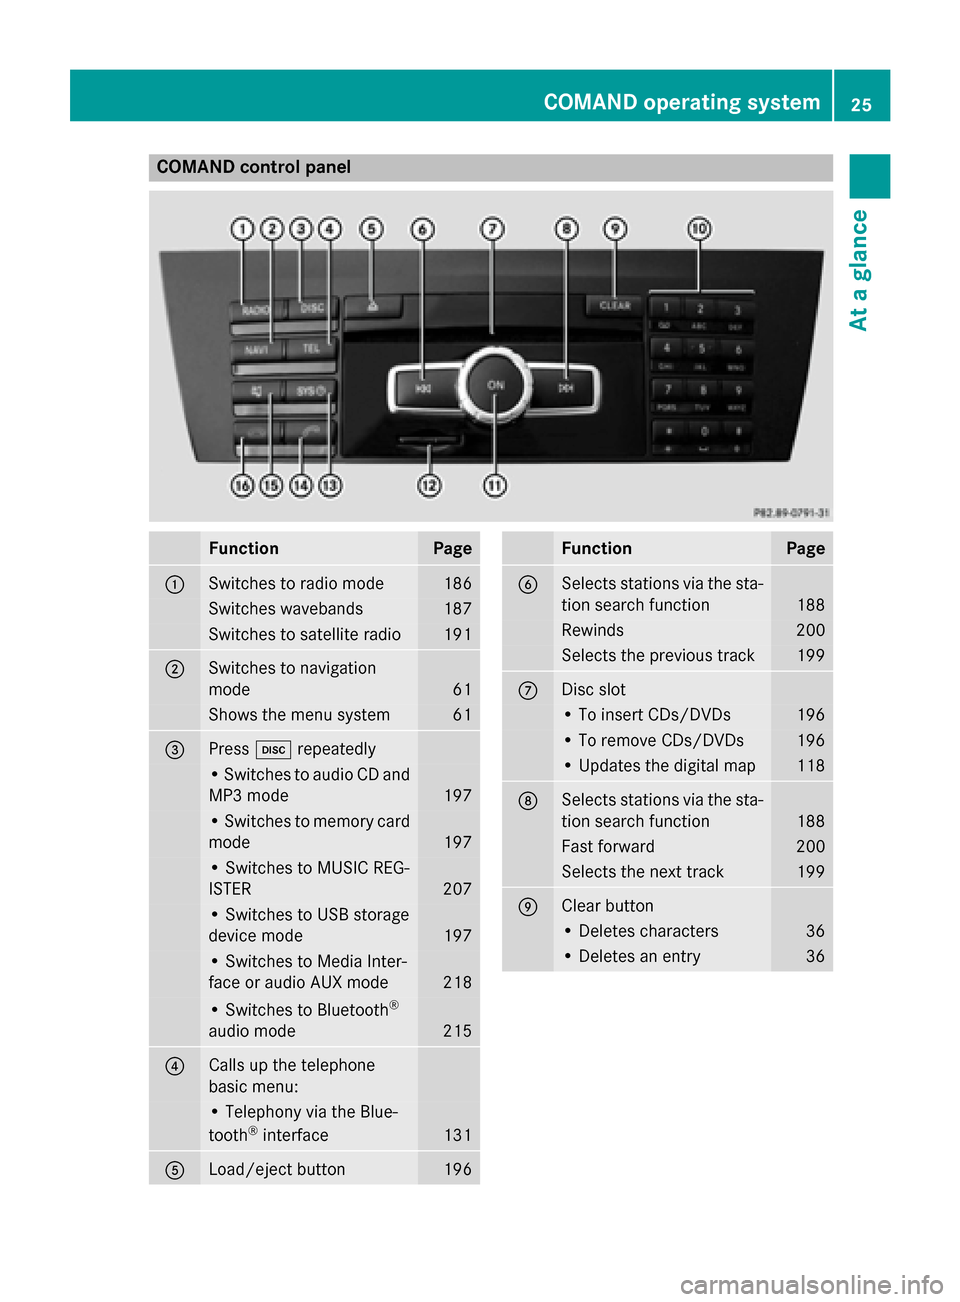
COMAND control panel
Function Page
0043
Switches to radio mode 186
Switches wavebands 187
Switches to satellite radio 191
0044
Switches to navigation
mode 61
Shows the menu system 61
0087
Press
003Arepeatedly • Switches to audio CD and
MP3 mode 197
• Switches to memory card
mode 197
• Switches to MUSIC REG-
ISTER
207
• Switches to USB storage
device mode
197
• Switches to Media Inter-
face or audio AUX mode
218
• Switches to Bluetooth
®
audio mode 215
0085
Calls up the telephone
basic menu: • Telephony via the Blue-
tooth ®
interface 131
0083
Load/eject button 196 Function Page
0084
Selects stations via the sta-
tion search function 188
Rewinds 200
Selects the previous track 199
006B
Disc slot
• To insert CDs/DVDs 196
• To remove CDs/DVDs 196
• Updates the digital map 118
006C
Selects stations via the sta-
tion search function 188
Fast forward 200
Selects the next track 199
006D
Clear button
• Deletes characters 36
• Deletes an entry 36COMAND operating system
25At a glance
Page 28 of 270
Function Page
006E
Number pad
• Selects stations via the
station presets
188
• Stores stations manually 188
• Mobile phone authoriza-
tion 128
• Telephone number entry 132
• Sends DTMF tones 134
• Character entry 35
• Selects a location for the
weather forecast from the
memory 261
0090
Displays the current
track being played 201
007D
Selects stations by
entering the frequency
manually 188
007D
Selects a track 199
006F
Switches COMAND on/off 29
Adjusts the volume 29 Function Page
0070
SD memory card slot 196
0071
Calls up the system menu 42
0072
Accepts a call 132
Dials a number 132
Redial 133
Accepts a waiting call 134
0073
Switches the sound on or
off
29
Switches the microphone
on/off
134
Cancels the text message
read-aloud function
145
Switches off navigation
announcements
29
0074
Rejects a call 132
Ends an active call 135
Rejects a waiting call 134
COMAND controller
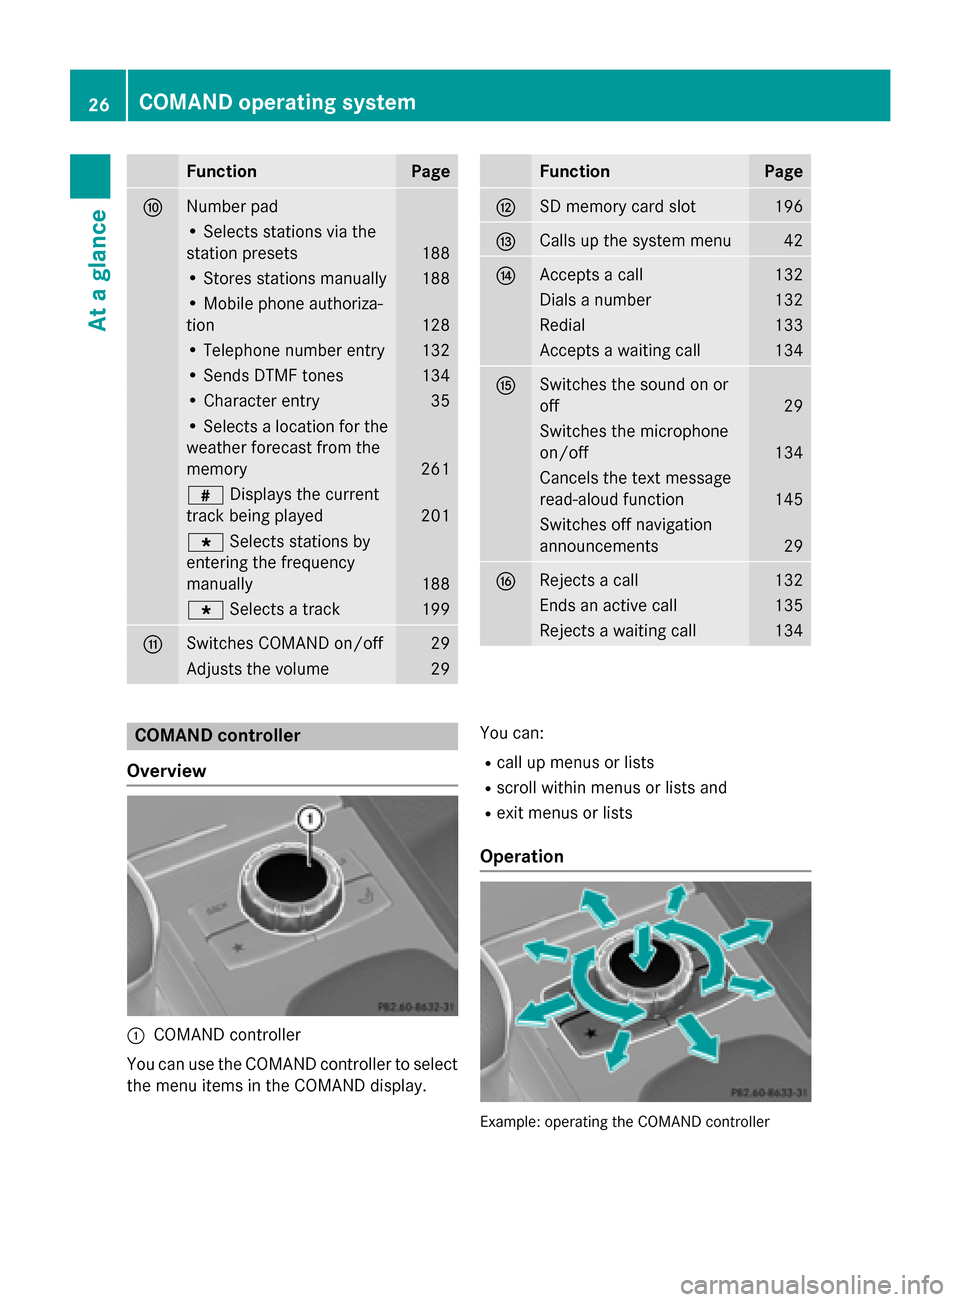
Overview 0043
COMAND controller
You can use the COMAND controller to select
the menu items in the COMAND display. You can:
R call up menus or lists
R scroll within menus or lists and
R exit menus or lists
Operation Example: operating the COMAND controller26
COMAND operating systemAt a glance
Page 30 of 270
Using COMAND
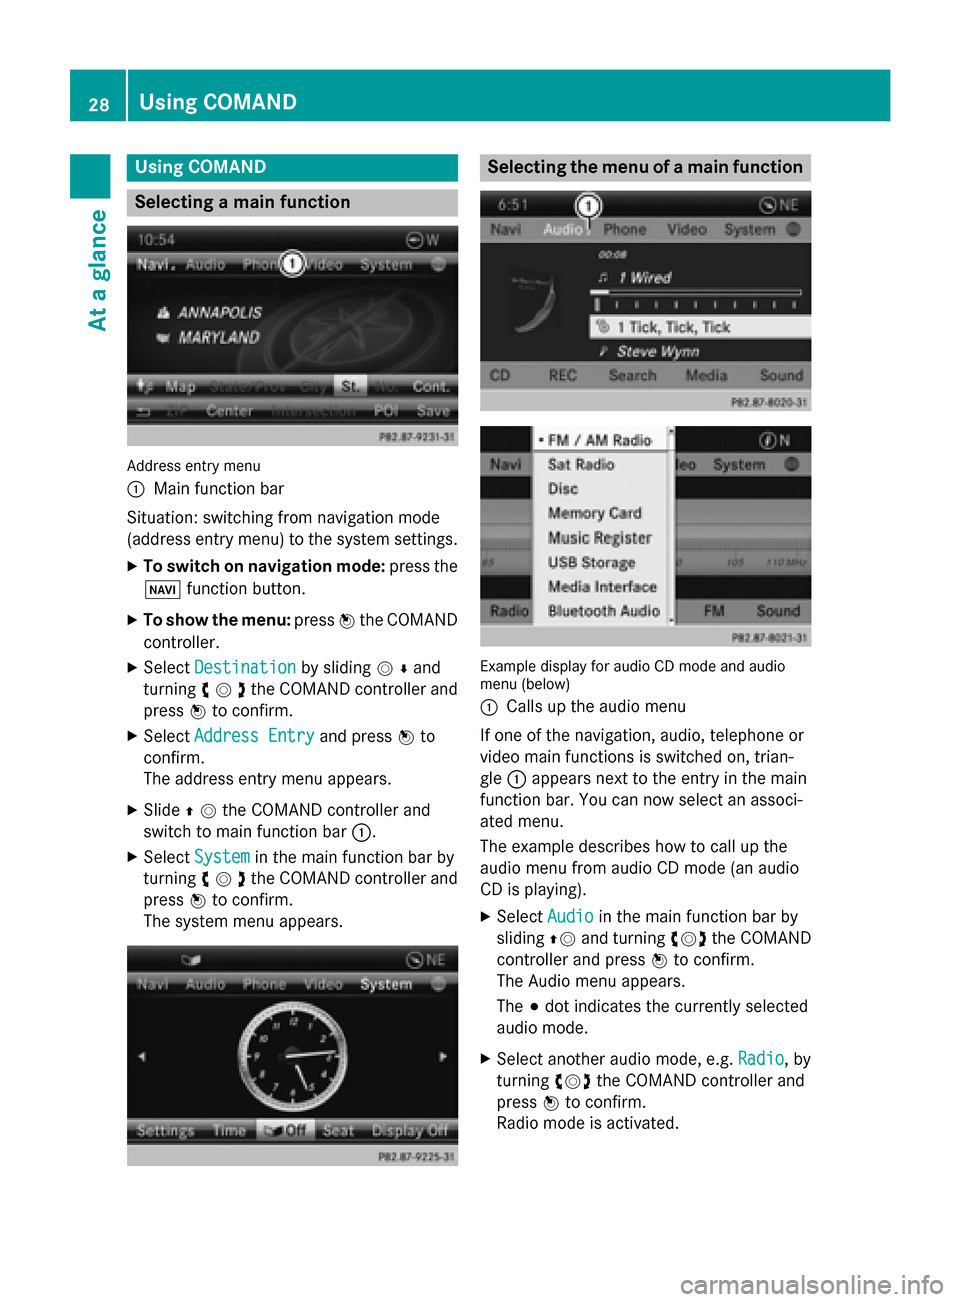
Selecting a main function
Address entry menu
0043
Main function bar
Situation: switching from navigation mode
(address entry menu) to the system settings.
X To switch on navigation mode: press the
00BE function button.
X To show the menu: press0098the COMAND
controller.
X Select Destination
Destination by sliding00520064and
turning 00790052007Athe COMAND controller and
press 0098to confirm.
X Select Address Entry Address Entry and press0098to
confirm.
The address entry menu appears.
X Slide 00970052the COMAND controller and
switch to main function bar 0043.
X Select System
System in the main function bar by
turning 00790052007Athe COMAND controller and
press 0098to confirm.
The system menu appears. Selecting the menu of a main function
Example display for audio CD mode and audio
menu (below)
0043
Calls up the audio menu
If one of the navigation, audio, telephone or
video main functions is switched on, trian-
gle 0043appears next to the entry in the main
function bar. You can now select an associ-
ated menu.
The example describes how to call up the
audio menu from audio CD mode (an audio
CD is playing).
X Select Audio Audioin the main function bar by
sliding 00970052and turning 00790052007Athe COMAND
controller and press 0098to confirm.
The Audio menu appears.
The 003Bdot indicates the currently selected
audio mode.
X Select another audio mode, e.g. Radio Radio, by
turning 00790052007Athe COMAND controller and
press 0098to confirm.
Radio mode is activated. 28
Using COMANDAt a glance
Page 31 of 270
Selecting a menu item
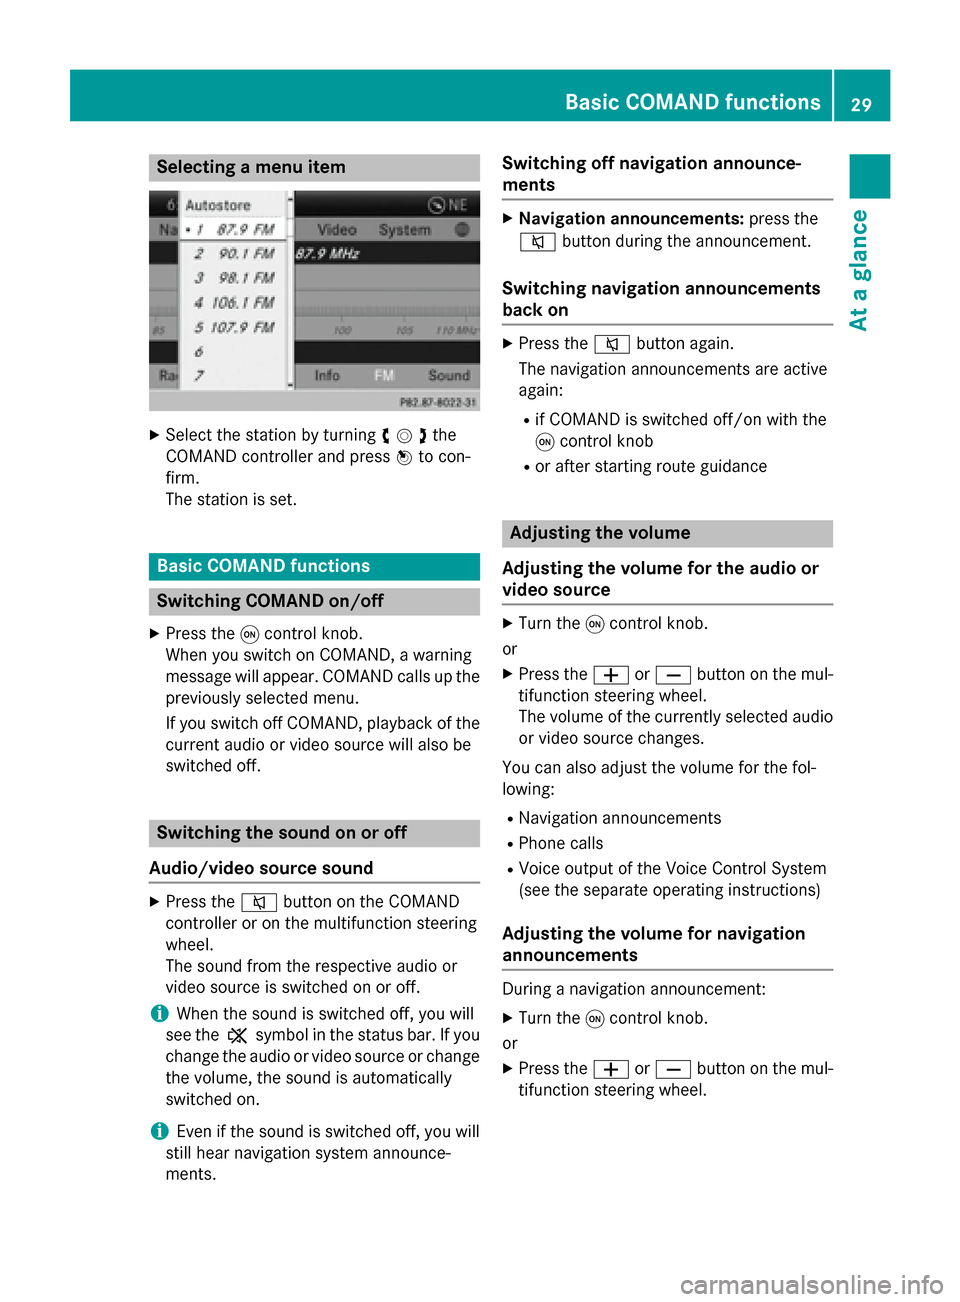
X
Select the station by turning 00790052007Athe
COMAND controller and press 0098to con-
firm.
The station is set. Basic COMAND functions
Switching COMAND on/off
X Press the 0043control knob.
When you switch on COMAND, a warning
message will appear. COMAND calls up the previously selected menu.
If you switch off COMAND, playback of the
current audio or video source will also be
switched off. Switching the sound on or off
Audio/video source sound X
Press the 0063button on the COMAND
controller or on the multifunction steering
wheel.
The sound from the respective audio or
video source is switched on or off.
i When the sound is switched off, you will
see the 006Bsymbol in the status bar. If you
change the audio or video source or change
the volume, the sound is automatically
switched on.
i Even if the sound is switched off, you will
still hear navigation system announce-
ments. Switching off navigation announce-
ments X
Navigation announcements: press the
0063 button during the announcement.
Switching navigation announcements
back on X
Press the 0063button again.
The navigation announcements are active
again:
R if COMAND is switched off/on with the
0043 control knob
R or after starting route guidance Adjusting the volume
Adjusting the volume for the audio or
video source X
Turn the 0043control knob.
or X Press the 0081or0082 button on the mul-
tifunction steering wheel.
The volume of the currently selected audio
or video source changes.
You can also adjust the volume for the fol-
lowing:
R Navigation announcements
R Phone calls
R Voice output of the Voice Control System
(see the separate operating instructions)
Adjusting the volume for navigation
announcements During a navigation announcement:
X Turn the 0043control knob.
or
X Press the 0081or0082 button on the mul-
tifunction steering wheel. Basic COMAND functions
29At a glance
Page 41 of 270
longer. After this period, reactivation on the
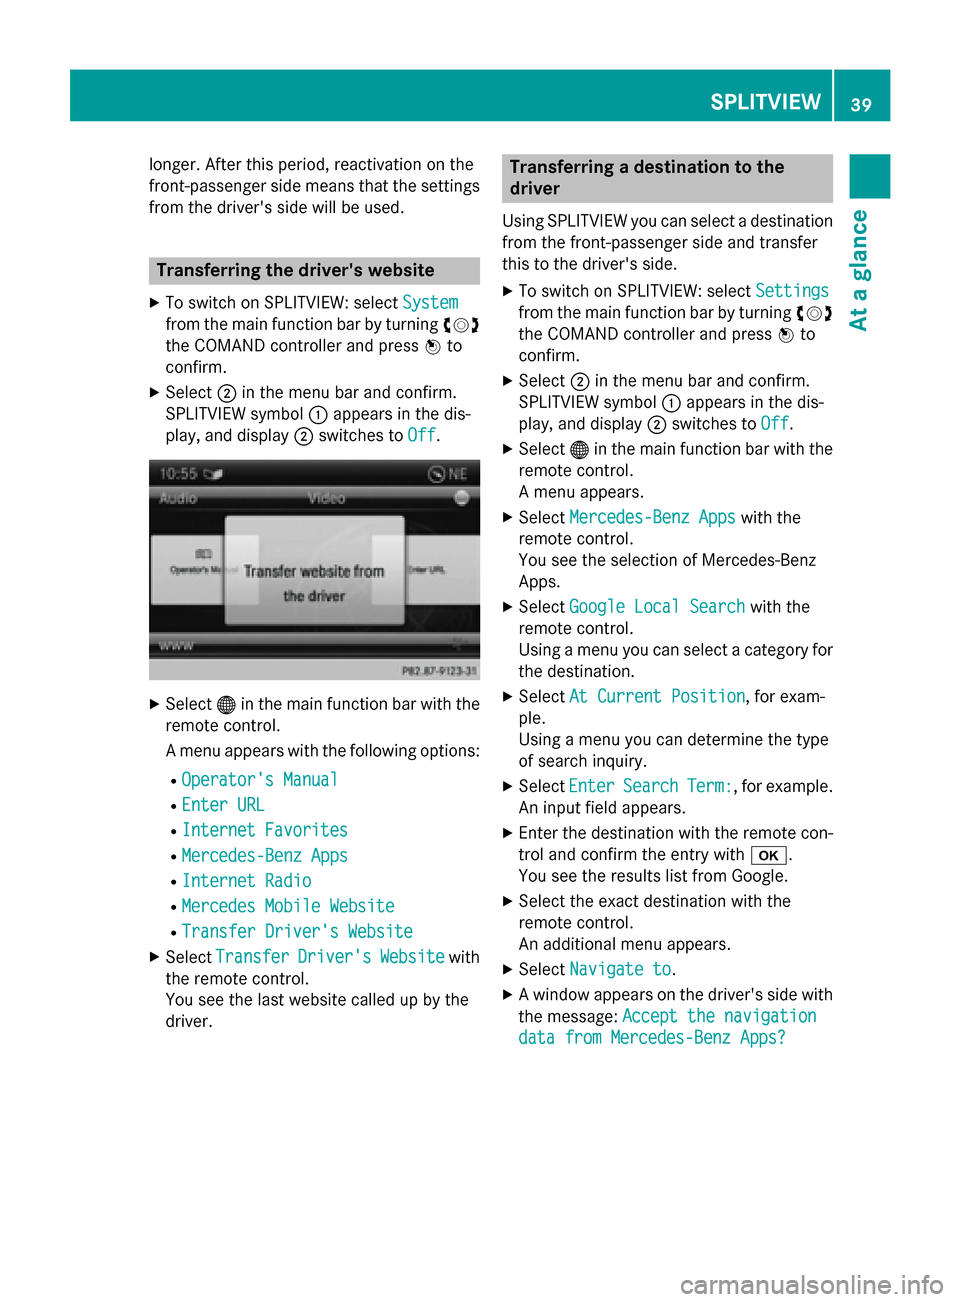
front-passenger side means that the settings from the driver's side will be used. Transferring the driver's website
X To switch on SPLITVIEW: select System
System
from the main function bar by turning 00790052007A
the COMAND controller and press 0098to
confirm.
X Select 0044in the menu bar and confirm.
SPLITVIEW symbol 0043appears in the dis-
play, and display 0044switches to Off
Off. X
Select 00A7in the main function bar with the
remote control.
A menu appears with the following options:
R Operator's Manual
Operator's Manual
R Enter URL Enter URL
R Internet Favorites
Internet Favorites
R Mercedes-Benz Apps
Mercedes-Benz Apps
R Internet Radio
Internet Radio
R Mercedes Mobile Website
Mercedes Mobile Website
R Transfer Driver's Website
Transfer Driver's Website
X Select Transfer
Transfer Driver's
Driver'sWebsite
Websitewith
the remote control.
You see the last website called up by the
driver. Transferring a destination to the
driver
Using SPLITVIEW you can select a destination
from the front-passenger side and transfer
this to the driver's side.
X To switch on SPLITVIEW: select Settings Settings
from the main function bar by turning 00790052007A
the COMAND controller and press 0098to
confirm.
X Select 0044in the menu bar and confirm.
SPLITVIEW symbol 0043appears in the dis-
play, and display 0044switches to Off Off.
X Select 00A7in the main function bar with the
remote control.
A menu appears.
X Select Mercedes-Benz Apps Mercedes-Benz Apps with the
remote control.
You see the selection of Mercedes-Benz
Apps.
X Select Google Local Search Google Local Search with the
remote control.
Using a menu you can select a category for the destination.
X Select At Current Position At Current Position , for exam-
ple.
Using a menu you can determine the type
of search inquiry.
X Select Enter Enter Search
Search Term:
Term:, for example.
An input field appears.
X Enter the destination with the remote con-
trol and confirm the entry with 0070.
You see the results list from Google.
X Select the exact destination with the
remote control.
An additional menu appears.
X Select Navigate to Navigate to.
X A window appears on the driver's side with
the message: Accept the navigation
Accept the navigation
data from Mercedes-Benz Apps?
data from Mercedes-Benz Apps? SPLITVIEW
39At a glance
Page 44 of 270
Your COMAND equipment
These operating instructions describe all the
standard and optional equipment for your
COMAND system, as available at the time of
going to print. Country-specific differences
are possible. Please note that your
COMAND system may not be equipped with
all the features described. Display settings
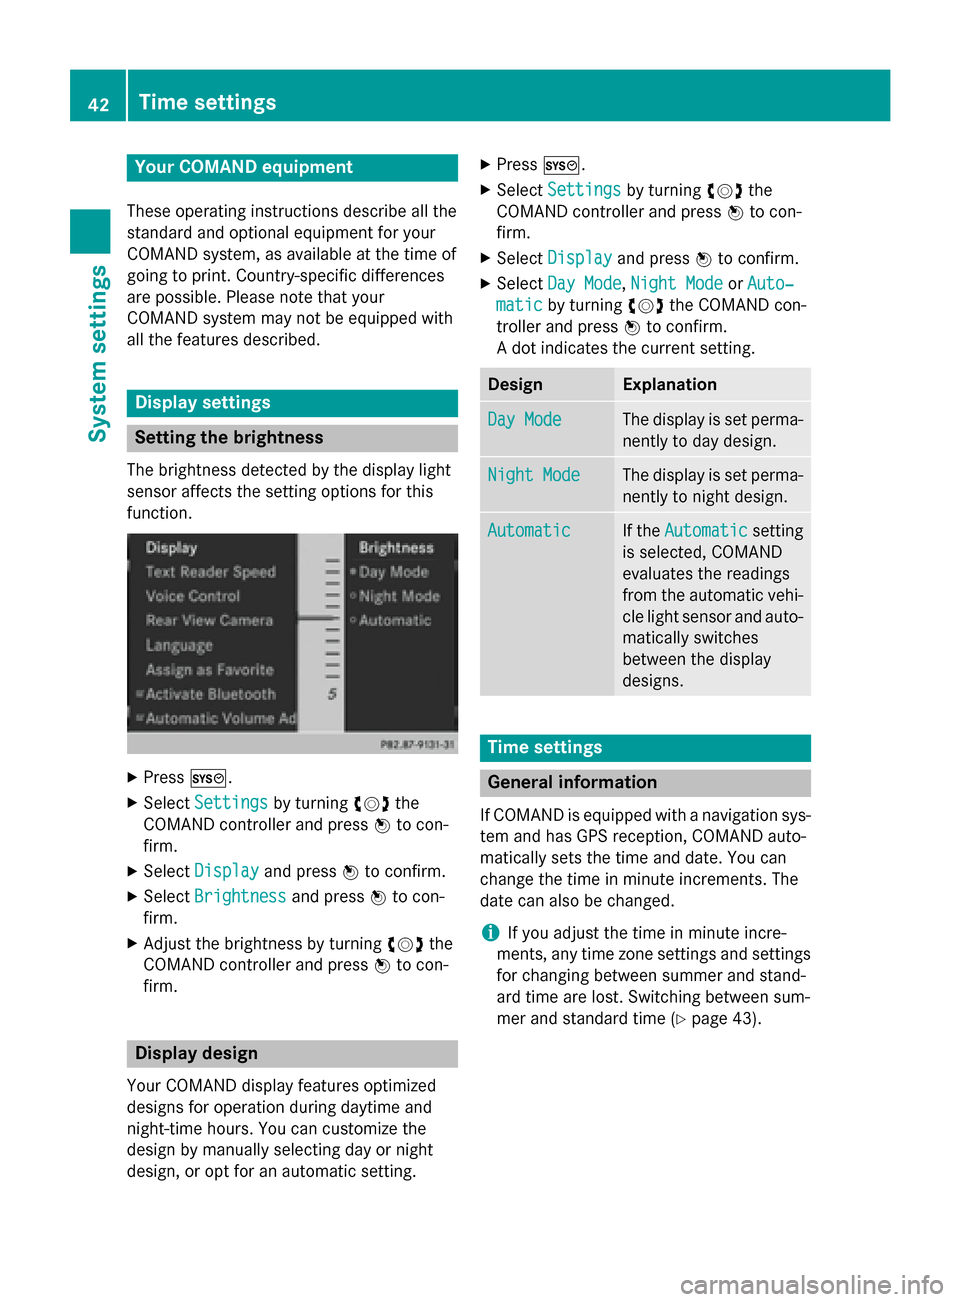
Setting the brightness
The brightness detected by the display light
sensor affects the setting options for this
function. X
Press 0066.
X Select Settings Settings by turning 00790052the
COMAND controller and press 0098to con-
firm.
X Select Display
Display and press 0098to confirm.
X Select Brightness
Brightness and press0098to con-
firm.
X Adjust the brightness by turning 00790052the
COMAND controller and press 0098to con-
firm. Display design
Your COMAND display features optimized
designs for operation during daytime and
night-time hours. You can customize the
design by manually selecting day or night
design, or opt for an automatic setting. X
Press 0066.
X Select Settings Settings by turning 00790052the
COMAND controller and press 0098to con-
firm.
X Select Display
Display and press 0098to confirm.
X Select Day Mode
Day Mode ,Night Mode
Night Mode orAuto‐
Auto‐
matic
matic by turning 00790052the COMAND con-
troller and press 0098to confirm.
A dot indicates the current setting. Design Explanation
Day Mode
Day Mode The display is set perma-
nently to day design. Night Mode
Night Mode The display is set perma-
nently to night design. Automatic
Automatic If the
Automatic
Automatic setting
is selected, COMAND
evaluates the readings
from the automatic vehi- cle light sensor and auto-
matically switches
between the display
designs. Time settings
General information
If COMAND is equipped with a navigation sys- tem and has GPS reception, COMAND auto-
matically sets the time and date. You can
change the time in minute increments. The
date can also be changed.
i If you adjust the time in minute incre-
ments, any time zone settings and settings for changing between summer and stand-
ard time are lost. Switching between sum-
mer and standard time (Y page 43).42
Time settingsSystem settings
Page 45 of 270
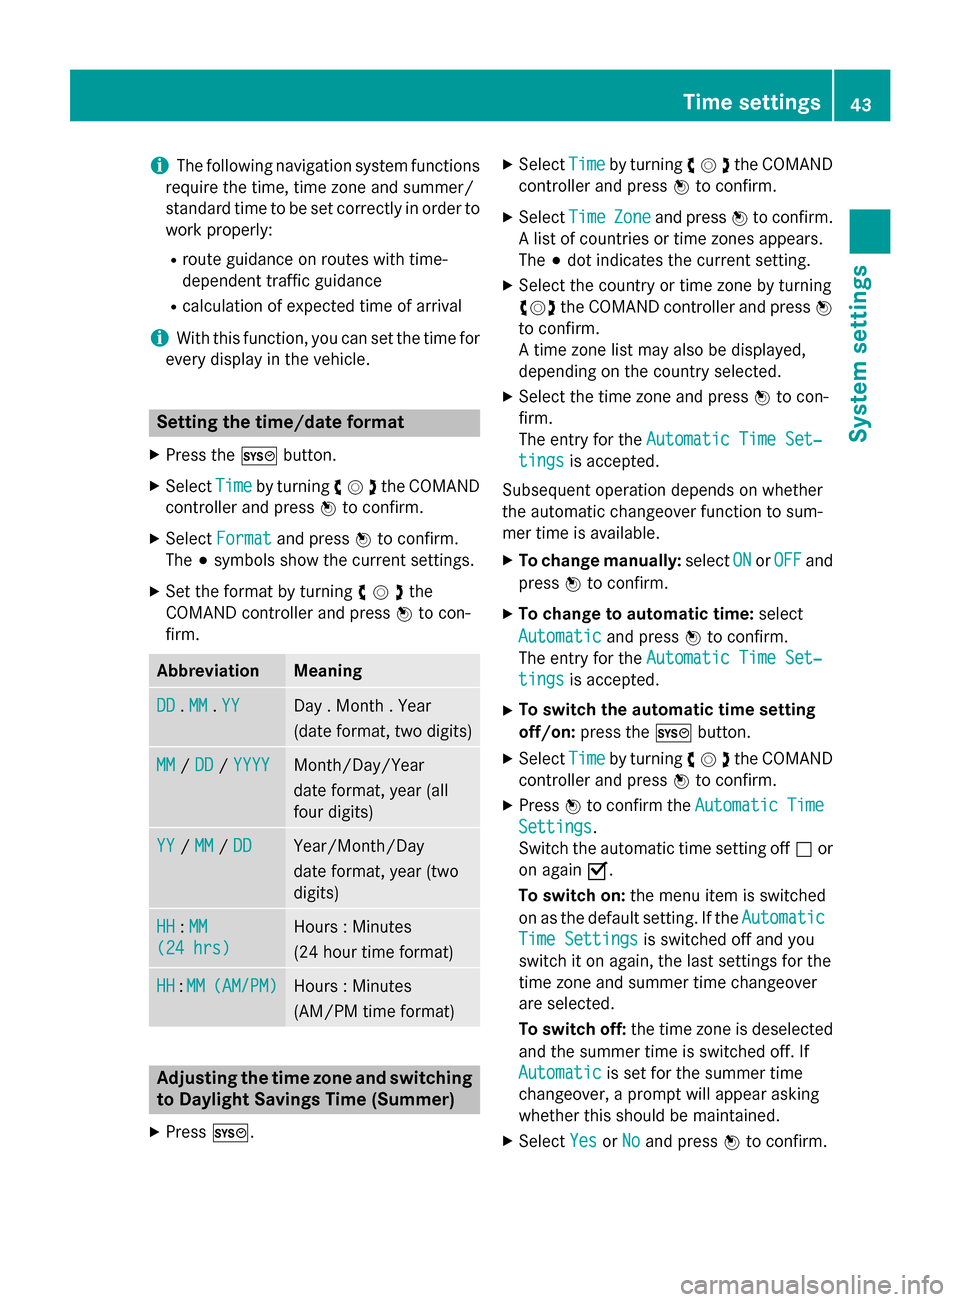
i
The following navigation system functions
require the time, time zone and summer/
standard time to be set correctly in order to
work properly:
R route guidance on routes with time-
dependent traffic guidance
R calculation of expected time of arrival
i With this function, you can set the time for
every display in the vehicle. Setting the time/date format
X Press the 0066button.
X Select Time
Timeby turning 00790052007Athe COMAND
controller and press 0098to confirm.
X Select Format
Format and press 0098to confirm.
The 003Bsymbols show the current settings.
X Set the format by turning 00790052007Athe
COMAND controller and press 0098to con-
firm. Abbreviation Meaning
DD
DD
.MM
MM .YY
YY Day . Month . Year
(date format, two digits)
MM MM
/DD
DD /YYYY
YYYY Month/Day/Year
date format, year (all
four digits)
YY YY
/MM
MM /DD
DD Year/Month/Day
date format, year (two
digits)
HH HH
:MM
MM
(24 hrs)
(24 hrs) Hours : Minutes
(24 hour time format)
HH HH
:MM
MM (AM/PM)
(AM/PM) Hours : Minutes
(AM/PM time format)
Adjusting the time zone and switching
to Daylight Savings Time (Summer)
X Press 0066. X
Select Time
Time by turning 00790052007Athe COMAND
controller and press 0098to confirm.
X Select Time TimeZone
Zoneand press 0098to confirm.
A list of countries or time zones appears.
The 003Bdot indicates the current setting.
X Select the country or time zone by turning
00790052007A the COMAND controller and press 0098
to confirm.
A time zone list may also be displayed,
depending on the country selected.
X Select the time zone and press 0098to con-
firm.
The entry for the Automatic Time Set‐
Automatic Time Set‐
tings tings is accepted.
Subsequent operation depends on whether
the automatic changeover function to sum-
mer time is available.
X To change manually: selectON ONorOFF
OFF and
press 0098to confirm.
X To change to automatic time: select
Automatic
Automatic and press0098to confirm.
The entry for the Automatic Time Set‐
Automatic Time Set‐
tings
tings is accepted.
X To switch the automatic time setting
off/on: press the 0066button.
X Select Time
Time by turning 00790052007Athe COMAND
controller and press 0098to confirm.
X Press 0098to confirm the Automatic AutomaticTime
Time
Settings
Settings.
Switch the automatic time setting off 0053or
on again 0073.
To switch on: the menu item is switched
on as the default setting. If the Automatic Automatic
Time Settings
Time Settings is switched off and you
switch it on again, the last settings for the
time zone and summer time changeover
are selected.
To switch off: the time zone is deselected
and the summer time is switched off. If
Automatic
Automatic is set for the summer time
changeover, a prompt will appear asking
whether this should be maintained.
X Select Yes YesorNo
No and press 0098to confirm. Time settings
43System settings
Page 47 of 270
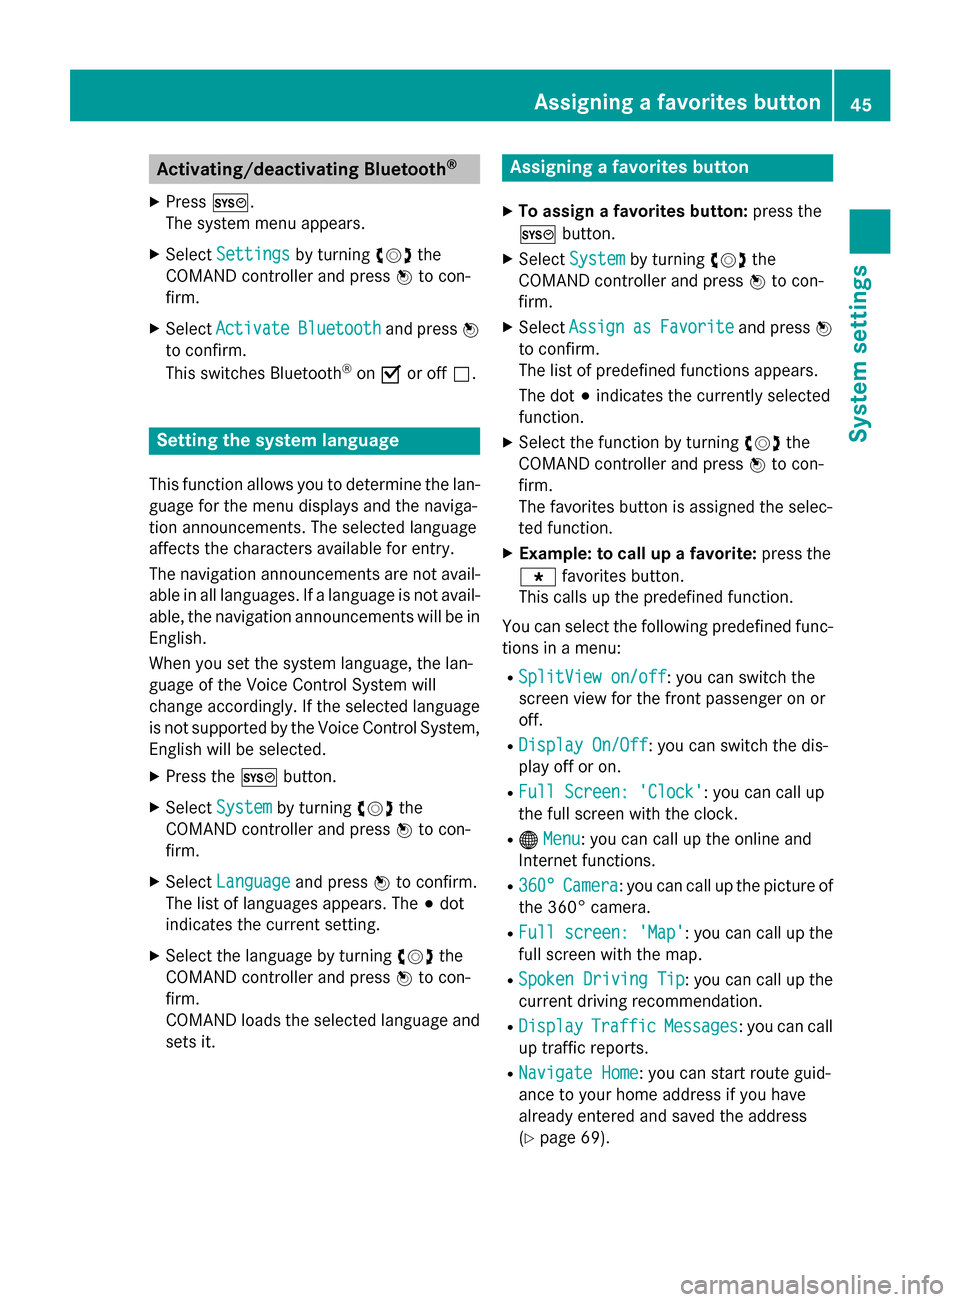
Activating/deactivating Bluetooth
®
X Press 0066.
The system menu appears.
X Select Settings
Settings by turning 00790052007Athe
COMAND controller and press 0098to con-
firm.
X Select Activate Activate Bluetooth Bluetooth and press0098
to confirm.
This switches Bluetooth ®
on 0073 or off 0053. Setting the system language
This function allows you to determine the lan-
guage for the menu displays and the naviga-
tion announcements. The selected language
affects the characters available for entry.
The navigation announcements are not avail-
able in all languages. If a language is not avail- able, the navigation announcements will be in English.
When you set the system language, the lan-
guage of the Voice Control System will
change accordingly. If the selected language
is not supported by the Voice Control System,
English will be selected.
X Press the 0066button.
X Select System
System by turning 00790052007Athe
COMAND controller and press 0098to con-
firm.
X Select Language Language and press0098to confirm.
The list of languages appears. The 003Bdot
indicates the current setting.
X Select the language by turning 00790052007Athe
COMAND controller and press 0098to con-
firm.
COMAND loads the selected language and
sets it. Assigning a favorites button
X To assign a favorites button: press the
0066 button.
X Select System System by turning 00790052007Athe
COMAND controller and press 0098to con-
firm.
X Select Assign
Assign as
asFavorite
Favorite and press0098
to confirm.
The list of predefined functions appears.
The dot 003Bindicates the currently selected
function.
X Select the function by turning 00790052007Athe
COMAND controller and press 0098to con-
firm.
The favorites button is assigned the selec-
ted function.
X Example: to call up a favorite: press the
007D favorites button.
This calls up the predefined function.
You can select the following predefined func-
tions in a menu:
R SplitView on/off SplitView on/off : you can switch the
screen view for the front passenger on or
off.
R Display On/Off Display On/Off : you can switch the dis-
play off or on.
R Full Screen: 'Clock'
Full Screen: 'Clock': you can call up
the full screen with the clock.
R 00A7 Menu
Menu: you can call up the online and
Internet functions.
R 360°
360° Camera
Camera : you can call up the picture of
the 360° camera.
R Full screen: 'Map'
Full screen: 'Map' : you can call up the
full screen with the map.
R Spoken Driving Tip
Spoken Driving Tip : you can call up the
current driving recommendation.
R Display
Display Traffic
Traffic Messages
Messages: you can call
up traffic reports.
R Navigate Home
Navigate Home: you can start route guid-
ance to your home address if you have
already entered and saved the address
(Y page 69). Assigning a favorites button
45System settings