display MERCEDES-BENZ CLA-Class 2014 C117 Comand Manual
[x] Cancel search | Manufacturer: MERCEDES-BENZ, Model Year: 2014, Model line: CLA-Class, Model: MERCEDES-BENZ CLA-Class 2014 C117Pages: 270, PDF Size: 5.82 MB
Page 98 of 270
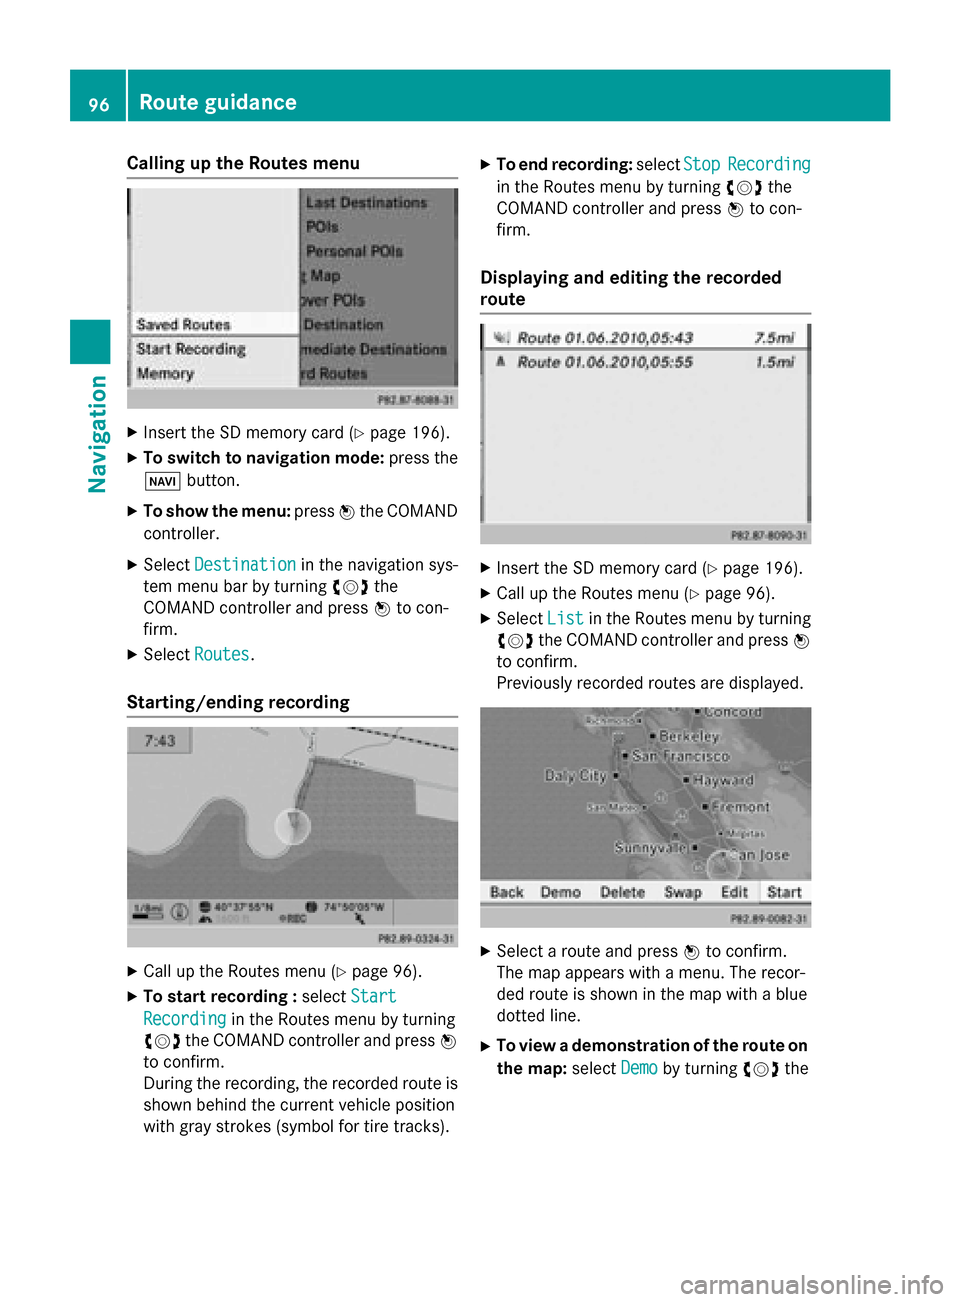
Calling up the Routes menu
X
Insert the SD memory card (Y page 196).
X To switch to navigation mode: press the
00BE button.
X To show the menu: press0098the COMAND
controller.
X Select Destination
Destination in the navigation sys-
tem menu bar by turning 00790052007Athe
COMAND controller and press 0098to con-
firm.
X Select Routes
Routes .
Starting/ending recording X
Call up the Routes menu (Y page 96).
X To start recording : selectStart
Start
Recording
Recording in the Routes menu by turning
00790052007A the COMAND controller and press 0098
to confirm.
During the recording, the recorded route is
shown behind the current vehicle position
with gray strokes (symbol for tire tracks). X
To end recording: selectStop StopRecording Recording
in the Routes menu by turning 00790052007Athe
COMAND controller and press 0098to con-
firm.
Displaying and editing the recorded
route X
Insert the SD memory card (Y page 196).
X Call up the Routes menu (Y page 96).
X Select List Listin the Routes menu by turning
00790052007A the COMAND controller and press 0098
to confirm.
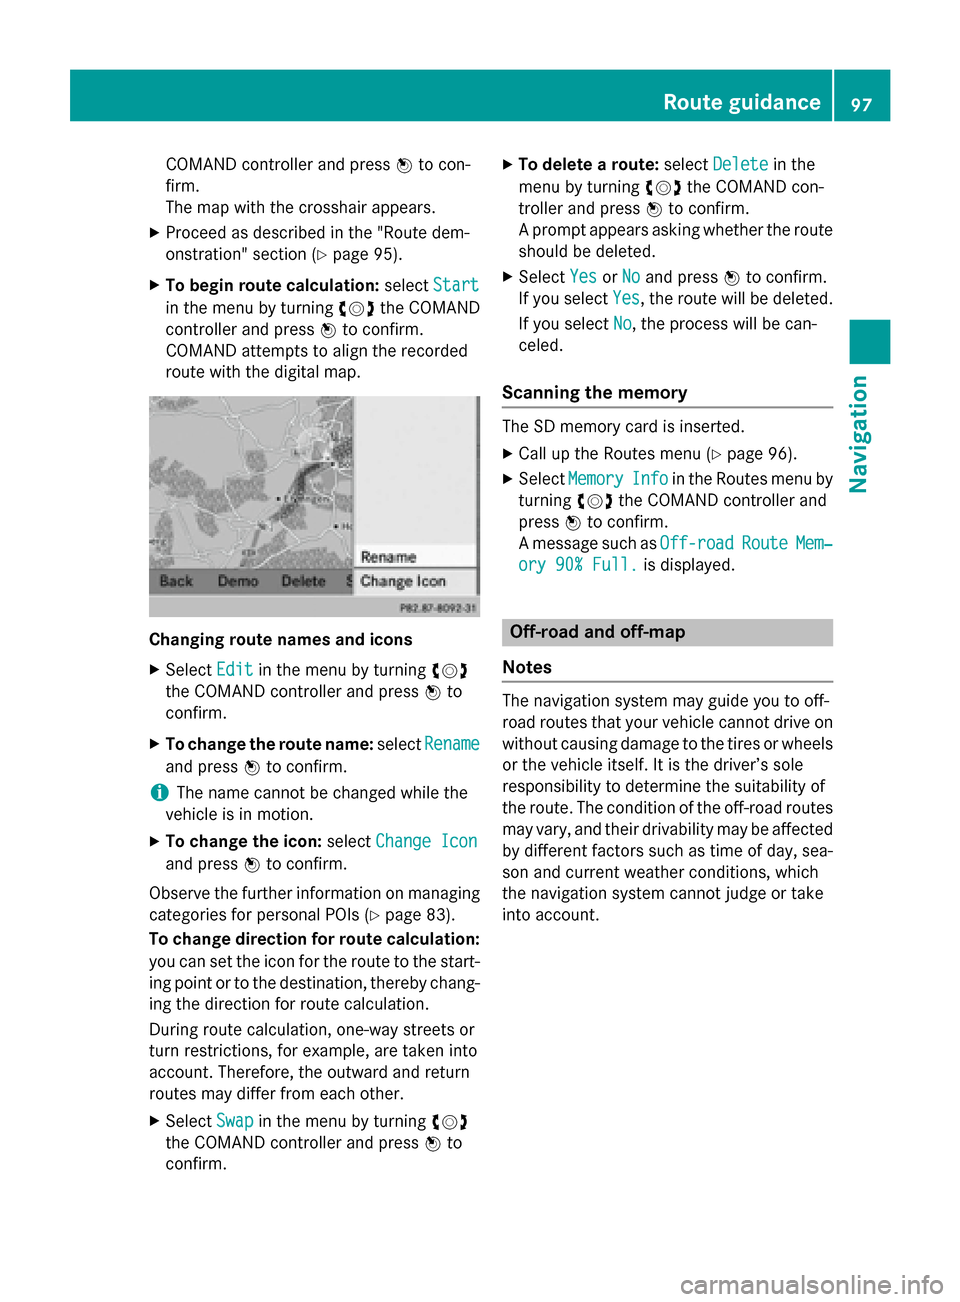
Previously recorded routes are displayed. X
Select a route and press 0098to confirm.
The map appears with a menu. The recor-
ded route is shown in the map with a blue
dotted line.
X To view a demonstration of the route on
the map: selectDemo
Demo by turning 00790052007Athe 96
Route guidanceNavigation
Page 99 of 270
COMAND controller and press
0098to con-
firm.
The map with the crosshair appears.
X Proceed as described in the "Route dem-
onstration" section (Y page 95).
X To begin route calculation: selectStart
Start
in the menu by turning 00790052007Athe COMAND
controller and press 0098to confirm.
COMAND attempts to align the recorded
route with the digital map. Changing route names and icons
X
Select Edit Editin the menu by turning 00790052007A
the COMAND controller and press 0098to
confirm.
X To change the route name: selectRename
Rename
and press 0098to confirm.
i The name cannot be changed while the
vehicle is in motion.
X To change the icon: selectChange Icon
Change Icon
and press 0098to confirm.
Observe the further information on managing categories for personal POIs (Y page 83).
To change direction for route calculation: you can set the icon for the route to the start-
ing point or to the destination, thereby chang- ing the direction for route calculation.
During route calculation, one-way streets or
turn restrictions, for example, are taken into
account. Therefore, the outward and return
routes may differ from each other.
X Select Swap
Swap in the menu by turning 00790052007A
the COMAND controller and press 0098to
confirm. X
To delete a route: selectDelete Delete in the
menu by turning 00790052007Athe COMAND con-
troller and press 0098to confirm.
A prompt appears asking whether the route should be deleted.
X Select Yes YesorNo
No and press 0098to confirm.
If you select Yes
Yes, the route will be deleted.
If you select No
No, the process will be can-
celed.
Scanning the memory The SD memory card is inserted.
X Call up the Routes menu (Y page 96).
X Select Memory
Memory Info
Infoin the Routes menu by
turning 00790052007Athe COMAND controller and
press 0098to confirm.
A message such as Off-road Off-roadRoute RouteMem‐
Mem‐
ory 90% Full.
ory 90% Full. is displayed. Off-road and off-map
Notes The navigation system may guide you to off-
road routes that your vehicle cannot drive on
without causing damage to the tires or wheelsor the vehicle itself. It is the driver’s sole
responsibility to determine the suitability of
the route. The condition of the off-road routes
may vary, and their drivability may be affected by different factors such as time of day, sea-
son and current weather conditions, which
the navigation system cannot judge or take
into account. Route guidance
97Navigation Z
Page 100 of 270

Route guidance to a destination that is
not on a digitized road Example: route guidance to an off-road destination
0043 Off-road destination
0044 Off-road route section (blue dashes)
0087 Current vehicle position (the tip of the tri-
angle indicates the vehicle’s direction of
travel)
0085 Off-road (if available)
COMAND can guide you to destinations
which are within the area of the digital map,
but which are not themselves recorded on the map.
These destinations are known as off-road
destinations, which you can enter using the
map, for example. In these cases, COMAND
guides you for as long as possible with navi-
gation announcements and displays on roads
known to the system.
If the vehicle reaches an area which is not part
of the digital map, the display appears as a
split-screen view. On the right, an arrow
appears that points to off-road destina-
tion 0043. You will hear the announcement:
"Please follow the arrow on the display". As
the vehicle approaches the destination, the
Area of destination reached
Area of destination reached message
appears.
Route guidance from an off-road loca-
tion to a destination If the vehicle position is within the area cov-
ered by the digital map, but the map does not
contain any information about that location,
the vehicle is in an off-road location. COMAND is also able to guide you to a des-
tination even from an off-road location.
At the start of route guidance, you will see the Off Mapped Road Off Mapped Road message, an arrow and
the distance to the destination. The arrow
shows the compass heading to the actual
destination.
The route is highlighted blue, starting from
the last recognized street the vehicle was on
before it left the map.
As soon as the vehicle is back on a road
known to the system, route guidance contin- ues in the usual way.
Route guidance from an off-map loca-
tion to a destination If the vehicle position is outside the area cov-
ered by the digital map, then the vehicle is in an off-map location. COMAND is also able to
guide you to a destination even from an off-
map location.
At the start of route guidance, you will see the
Off Mapped Road Off Mapped Road message, an arrow and
the distance to the destination. The direction
arrow shows the compass heading to the des- tination.
The route is highlighted in blue from the near- est road known to the system.
As soon as the vehicle is back on a road
known to the system, route guidance contin-
ues in the usual way.
Off-road during route guidance Due to road works, for example, there may be
differences between the data on the digital
map and the actual course of the road.
In such cases, the system will temporarily be
unable to locate the vehicle position on the
digital map. The vehicle is therefore in an off- road position.
In the display, you will see the Off Mapped Off Mapped
Road
Road message, an arrow and the distance to
the destination. The direction arrow shows
the compass heading to the destination. 98
Route guidanceNavigation
Page 101 of 270
As soon as the system can assign the vehicle
position to the map again, route guidance
continues in the usual way. Traffic reports
Prerequisites
i This function is currently not available for
Canada.
To receive real-time traffic reports via satel-
lite radio, you require:
R optional satellite radio equipment
R a subscription to SIRIUS XM Satellite Radio
Traffic Message Service
Further information on satellite radio
(Y page 190).
COMAND can receive traffic reports via sat-
ellite radio and take account of these for
route guidance in the navigation system.
Received traffic reports are displayed on the
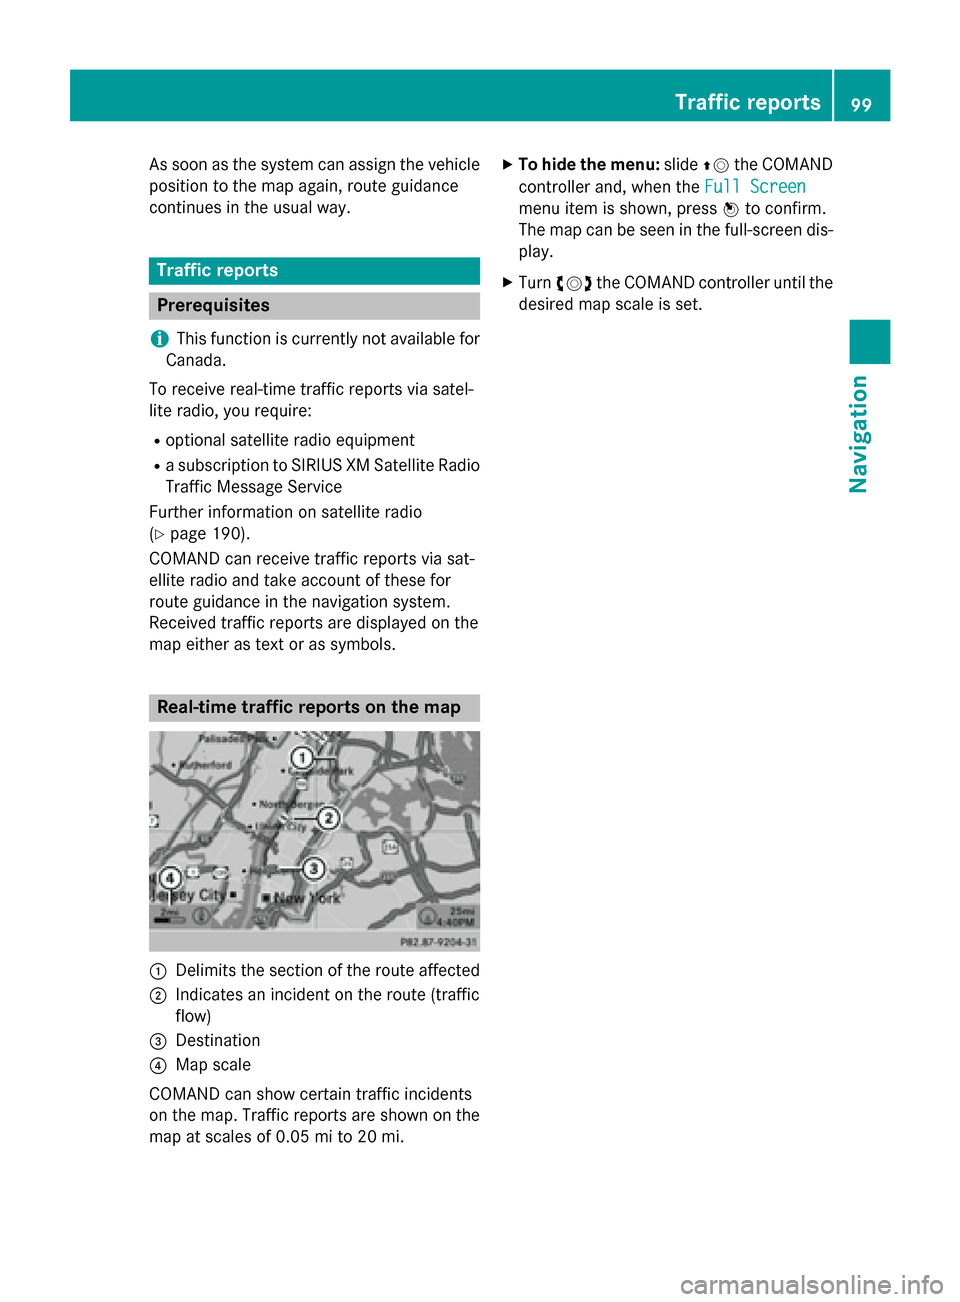
map either as text or as symbols. Real-time traffic reports on the map
0043
Delimits the section of the route affected
0044 Indicates an incident on the route (traffic
flow)
0087 Destination
0085 Map scale
COMAND can show certain traffic incidents
on the map. Traffic reports are shown on the map at scales of 0.05 mi to 20 mi. X
To hide the menu: slide00970052the COMAND
controller and, when the Full Screen Full Screen
menu item is shown, press 0098to confirm.
The map can be seen in the full-screen dis- play.
X Turn 00790052007A the COMAND controller until the
desired map scale is set. Traffic reports
99Navigation Z
Page 102 of 270
Symbols used in real-time traffic reports
Unimpeded traffic flow
Green line with arrows
The arrows can be seen on a map scale of 200 m (0.25 mi) and smaller.
Heavy/slow-moving traffic
Together with a yellow line
The symbol marks average speeds of 25 – 45 mph (40 – 72 km/h).
Caution, traffic incident
Traffic jam
Together with a red line and arrows
The symbol marks average speeds of 5 - 20 mph (8 - 32 km/h).
The arrows can be seen on a map scale of 200 m (0.25 mi) and smaller.
Warning message
Together with a red/white striped line and arrows
The arrows can be seen on a map scale of 200 m (0.25 mi) and smaller. Blocked route section
Possibly in combination with X X X X
Displaying real-time traffic reports
Starting a search for traffic reports X
To switch to navigation mode: press the
00BE button.
X To show the menu: press0098the COMAND
controller.
X Select Traffic Traffic by turning 00790052007Athe
COMAND controller and press 0098to con-
firm.
A menu appears.
If No Traffic Messages No Traffic Messages appears, this
means either:
R no traffic reports have been received yet,
or
R no traffic reports are available.
X To end the search: selectCancel
Cancel and
press 0098to confirm.
X To close the report window: selectOK OK
and press 0098to confirm. Traffic symbol information
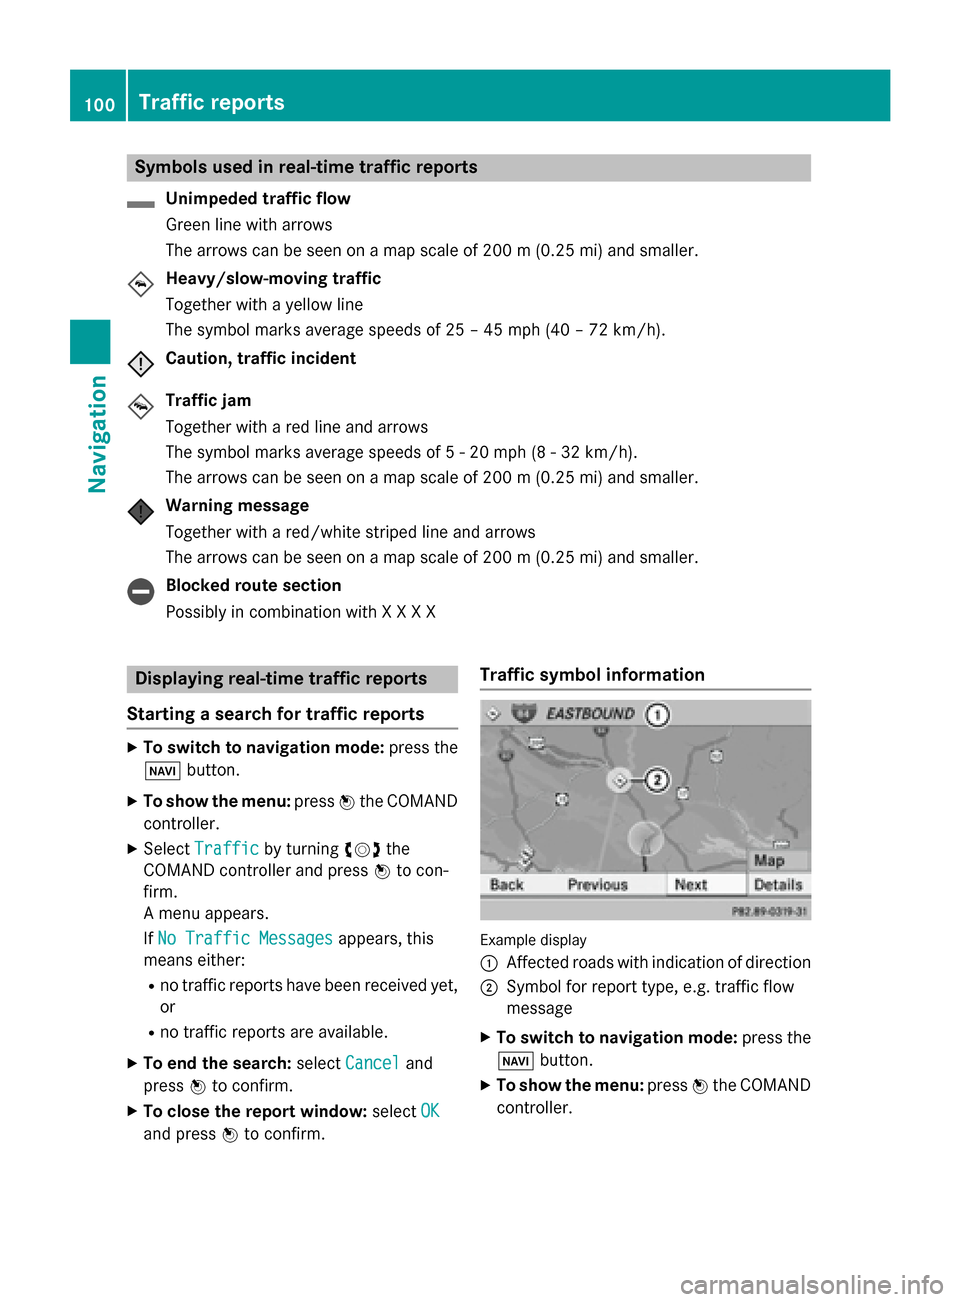
Example display
0043
Affected roads with indication of direction
0044 Symbol for report type, e.g. traffic flow
message
X To switch to navigation mode: press the
00BE button.
X To show the menu: press0098the COMAND
controller. 100
Traffic reportsNavigation
Page 103 of 270
X
Select Traffic
Traffic in the navigation system
menu bar by turning 00790052007Athe COMAND
controller and press 0098to confirm.
X Select Traffic Symbol Information
Traffic Symbol Information by
turning 00790052007Athe COMAND controller and
press 0098to confirm.
X Select Next
Next orPrevious
Previous by turning 00790052007A
the COMAND controller and press 0098to
confirm in order to continue highlighting
traffic symbols.
X To change the map scale: selectMap
Map by
sliding 00970052the COMAND controller and
press 0098to confirm.
You can now zoom in or out of the map. Example: details on traffic symbol information
X To show the detailed view: select
Details
Details and press 0098to confirm.
X To close the detailed view: slide009500520096 the
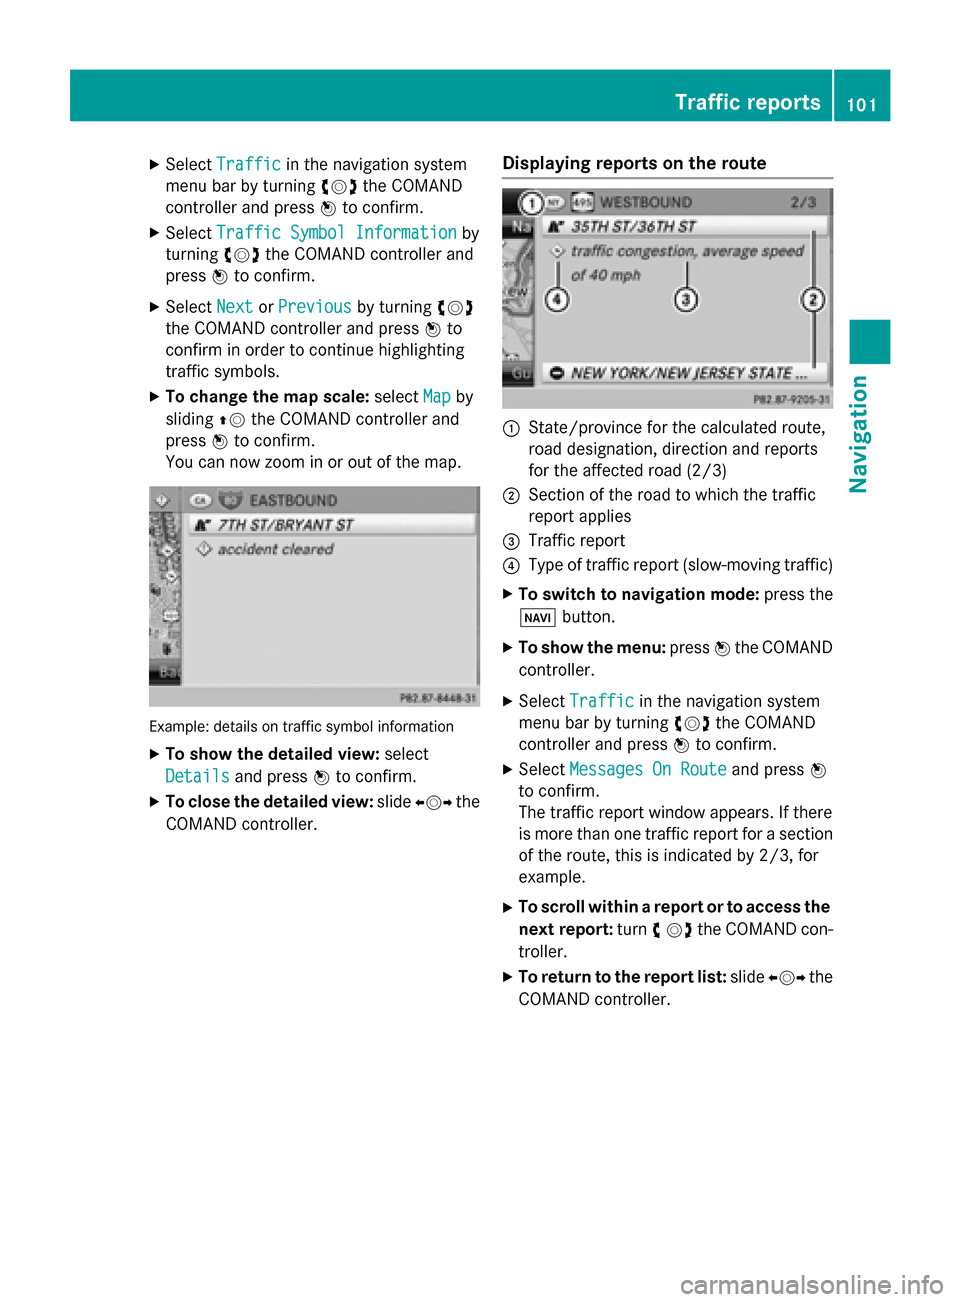
COMAND controller. Displaying reports on the route 0043
State/province for the calculated route,
road designation, direction and reports
for the affected road (2/3)
0044 Section of the road to which the traffic
report applies
0087 Traffic report
0085 Type of traffic report (slow-moving traffic)
X To switch to navigation mode: press the
00BE button.
X To show the menu: press0098the COMAND
controller.
X Select Traffic Traffic in the navigation system
menu bar by turning 00790052007Athe COMAND
controller and press 0098to confirm.
X Select Messages On Route
Messages On Route and press0098
to confirm.
The traffic report window appears. If there
is more than one traffic report for a section of the route, this is indicated by 2/3, for
example.
X To scroll within a report or to access the
next report: turn00790052the COMAND con-
troller.
X To return to the report list: slide009500520096 the
COMAND controller. Traffic reports
101Navigation Z
Page 104 of 270

Displaying all traffic reports
X
To switch to navigation mode: press the
00BE button.
X To show the menu: press0098the COMAND
controller.
X Select Traffic
Traffic in the navigation system
menu bar by turning 00790052007Athe COMAND
controller and press 0098to confirm.
X Select All
All Messages
Messages and press0098to con-
firm.
A list is shown containing all roads, areas or
regions affected by traffic reports. Roads,
areas or regions not on the route also
appear in the list.
X To show a traffic report: select a road,
area or region and press 0098to confirm.
The traffic report is displayed. There may be
several traffic reports for the affected road. You can find an example of a traffic report
here: (Y page 101).
X To close a report: slide009500520096 the COMAND
controller. Reading out traffic reports on the
route
Introduction The read-aloud function is only available while
route guidance is active. It reads out traffic
reports affecting the current route. You can select the following text reader prop-
erties:
R Language (Y page 45)
R Text reader speed (Y page 44)
You can start the text reader function man-
ually or set it to automatic.
Starting the text reader function man-
ually X
To switch to navigation mode: press the
00BE button.
X To show the menu: press0098the COMAND
controller.
X Select Traffic Traffic by turning 00790052007Athe
COMAND controller and press 0098to con-
firm.
X Select Read out all messages on
Read out all messages on
route
route and press 0098to confirm.
COMAND reads out the reports in
sequence.
i If there are no reports for the route, the
Read
Read out
outall
allmessages
messages on
onroute
route menu
item is shown in gray and cannot be selec- ted.
X To switch off the read-aloud function:
select Cancel Cancel Read-Aloud
Read-Aloud Function
Functionand
press 0098to confirm or press the 0063but-
ton.
COMAND reads out the current report and then exits the read-aloud function.
Automatic read-aloud function X
To switch to navigation mode: press the
00BE button.
X To show the menu: press0098the COMAND
controller.
X Select Traffic
Traffic by sliding 00970052and turning
00790052007Athe COMAND controller and press 0098
to confirm.
X Select Read Traffic Messages Auto‐
Read Traffic Messages Auto‐
matically matically and press0098to confirm.
Depending on the previous state, switch
the option on 0073or off 0053. 102
Traffic reportsNavigation
Page 106 of 270

The
My Address
My Address entry is listed as the first
entry in the destination memory.
X Select My Address
My Address by turning00790052007Athe
COMAND controller and press 0098to con-
firm.
i If you have not yet entered any charac-
ters, My
My Address Address is automatically highligh-
ted in the selection list.
If no home address has been stored yet, you
can now assign an address book entry. If a
home address already exists, it is displayed
and you can alter it.
i If you select
New Entry
New Entry, you are also
offered the option of entering the home
address for the first time. You can then
save the home address without having to
start route guidance.
X To enter the home address for the first
time: select Assign to Address Book
Assign to Address Book
Entry Entry and press 0098to confirm.
X Select Home
Home,Work
WorkorNot
Not Classified
Classified and
press 0098to confirm.
X To change the home address: select
Change
Change and press 0098to confirm.
X Select Assign to Address Book Entry
Assign to Address Book Entry
and press 0098to confirm.
i If you select
New Entry
New Entry, you are also
offered the option of changing the home
address by entering an address. You can then save the home address without having
to start route guidance.
X Select Home Home,Work
WorkorNot
Not Classified
Classified and
press 0098to confirm.
In both cases, you will see the address book either with the character bar or as a selec-
tion list.
X Select an address book entry
(Y page 148).
X To confirm the selection: press0098the
COMAND controller.
If there is no existing home address,
COMAND saves the entry. You will see a
message and then the address menu with
the selected address. Start Startis highlighted
automatically.
If a home address has already been stored, you will see a prompt asking you whether
the My Address My Address entry should be overwrit-
ten.
X Select Yes
Yes orNo
No and press 0098to confirm.
If you select Yes
Yes, COMAND overwrites the
destination. You will see a message and
then the address menu with the selected
address. Start Startis highlighted automati-
cally.
If you select No No, the list will appear again.
Selecting the home address for route
guidance X
Proceed as described under "Selecting a
destination from the destination memory"
(Y page 70). Saving a destination
General notes This function also stores the destination in
the address book.
When the address book is full, no destinations can be saved in the destination memory. You
must first delete address book entries
(Y page 148). 104
Destination memoryNavigation
Page 110 of 270
X
Select Delete
Delete and press 0098to confirm.
A prompt appears asking whether the entry
should be deleted.
X Select Yes
Yes orNo
No and press 0098to confirm.
If you select Yes
Yes, the entry is deleted.
If you select No
No, the process will be can-
celed. Map operation and map settings
General notes
Company logos displayed on the map are
trademarks of the respective companies and
used solely for the purpose of indicating the
locations of these companies. The use of such
logos on the map does not indicate approval
of, support of or advertising by these compa-
nies for the navigation system itself. Setting the map scale
0043
Set map scale as a number with unit
0044 Currently set map scale as indicated by
the needle on the scale bar
0087 New map scale
0085 Scale bar
Unit of measurement 0043in the COMAND dis-
play depends on the selection made in the
instrument cluster; see the separate vehicle
Operator's Manual.
X To hide the menu: slide00970052the COMAND
controller and, when the Full Screen
Full Screen
menu item is shown, press 0098.
X To call up the scale bar: as soon as you
turn 00790052007A the COMAND controller, scale
bar 0087appears.
X Turn 00790052007A until the desired scale is set. Moving the map
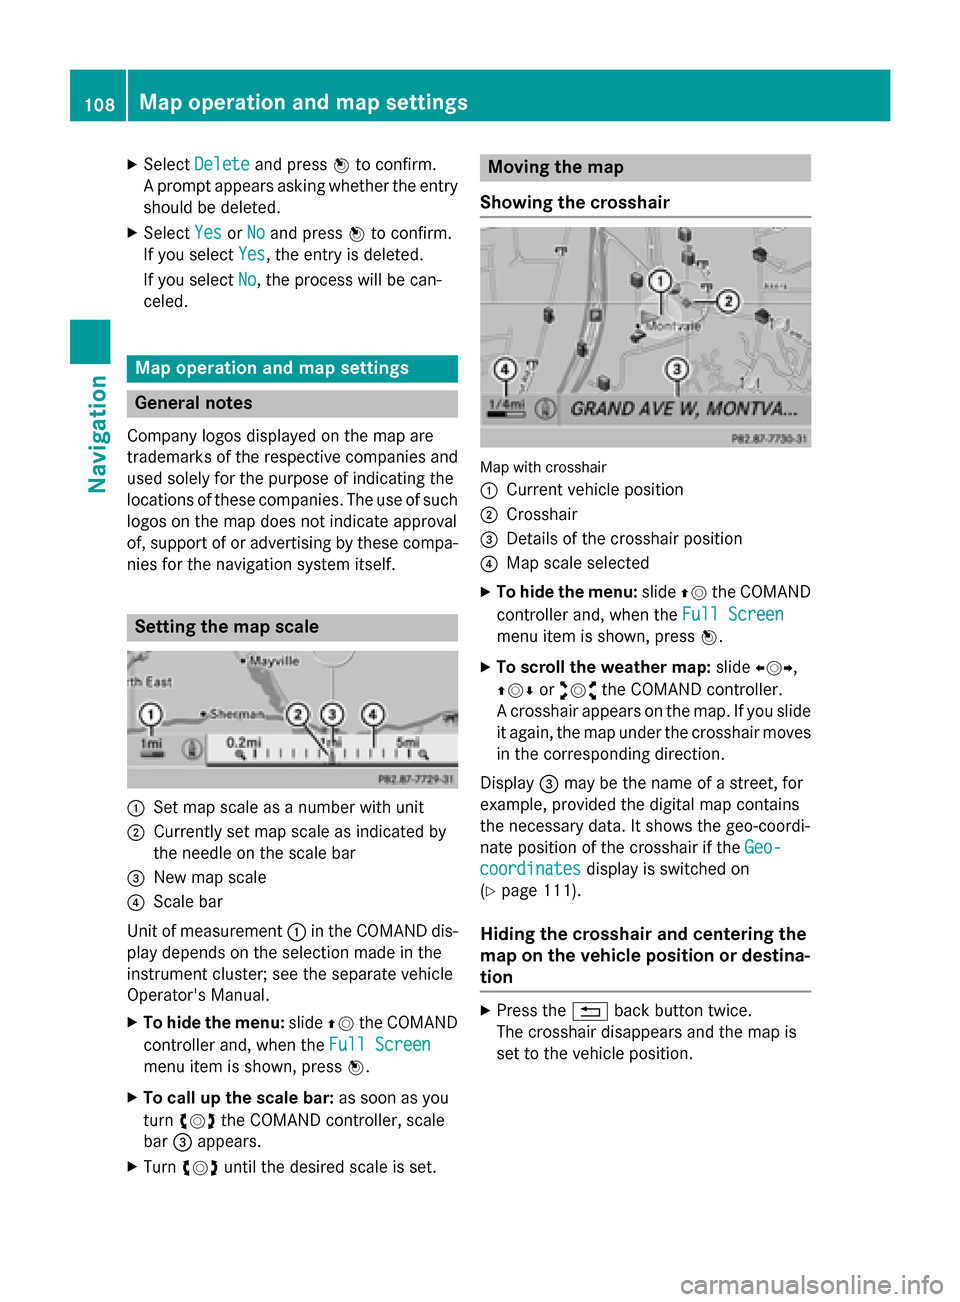
Showing the crosshair Map with crosshair
0043
Current vehicle position
0044 Crosshair
0087 Details of the crosshair position
0085 Map scale selected
X To hide the menu: slide00970052the COMAND
controller and, when the Full Screen Full Screen
menu item is shown, press 0098.
X To scroll the weather map: slide009500520096,
009700520064 or009100520078 the COMAND controller.
A crosshair appears on the map. If you slide it again, the map under the crosshair movesin the corresponding direction.
Display 0087may be the name of a street, for
example, provided the digital map contains
the necessary data. It shows the geo-coordi-
nate position of the crosshair if the Geo-
Geo-
coordinates coordinates display is switched on
(Y page 111).
Hiding the crosshair and centering the
map on the vehicle position or destina-
tion X
Press the 0038back button twice.
The crosshair disappears and the map is
set to the vehicle position. 108
Map operation and map settingsNavigation
Page 111 of 270

Centering the map on the vehicle's posi-
tion X
To show the menu: press0098the COMAND
controller.
X Select Position
Position in the navigation system
menu bar by sliding 00520064and turning 00790052007A
the COMAND controller and press 0098to
confirm.
X Select Vehicle Position Map
Vehicle Position Map and press
0098 to confirm or, if the crosshair is shown,
press the 0038back button.
This hides the crosshair.
Centering the map on the destination
position This function requires a calculated route to a
destination. If the route includes way points
and an intermediate stop, the map can also be set to these positions.
X To show the menu: press0098the COMAND
controller.
X Select Position Position in the navigation system
menu bar by sliding 00520064and turning 00790052007A
the COMAND controller and press 0098to
confirm.
X Select Destination Position Map
Destination Position Map and
press 0098to confirm.
The crosshair position is set to the relevant
destination. Map settings
Calling up the map settings menu X
To show the menu: press0098the COMAND
controller.
X Select Navi
Naviin the main function bar by
sliding 00970052and turning 00790052007Athe COMAND
controller and press 0098to confirm.
X Select Map
Map Settings
Settings and press0098to con-
firm.
The map settings menu appears. Map orientation
Example: map orientation
0043
Current map orientation (005B or¤)
Possible map orientations:
R 005B North orientation (The map view is dis-
played so that north is always up)
R ¤ Heading orientation (the map view is
aligned to the direction of travel. The direc-
tion of travel is always at the top, the
orange-color tip of the symbol points
north.)
R ¤ Bird's-eye view (the map view is aligned
to the direction of travel. The map projec-
tion reproduces the curvature of the earth's surface, the orange-color tip of the symbol
points north.)
R ¤ 3D map (the map view is aligned to the
direction of travel. At a scale of 1 km the
map displays elevation, the orange-color
tip of the symbol points north.) Map orientation menu
Setting the map orientation
X To show the menu: press0098the COMAND
controller. Map operation and map settings
109Navigation Z