heating MERCEDES-BENZ CLA-Class 2014 C117 Owner's Manual
[x] Cancel search | Manufacturer: MERCEDES-BENZ, Model Year: 2014, Model line: CLA-Class, Model: MERCEDES-BENZ CLA-Class 2014 C117Pages: 358, PDF Size: 6.6 MB
Page 13 of 358
Gear or selector lever (cleaning
guidelines)
........................................ .293
Genuine parts ...................................... 21
Glove box .......................................... .257 H
Handbrake see Parking brake
Hazard warning lamps ......................111
Display message ............................ 242
Headlamps
Fogging up ..................................... 113
see Automatic headlamp mode
Head restraints
Adjusting ......................................... 99
Adjusting (electrically) ................... 100
Adjusting (manually) ........................ 99
Adjusting (rear) .............................. 100
Heating
see Climate control
High-beam headlamps
Changing bulbs .............................. 116
Display message ............................ 227
Switching on/off ........................... 110
Hill start assist .................................. 142
HOLD function Activating ....................................... 176
Deactivating ................................... 177
Display message ............................ 233
Function/notes ............................ .176
Hood
Closing .......................................... .283
Display message ............................ 241
Important safety notes .................. 282
Opening ......................................... 282
Hydroplaning ..................................... 165 I
Ignition lock see Key positions
Immobilizer .......................................... 72
Indicator lamps see Warning and indicator lamps
Indicators
see Turn signals Inspection
see ASSYST PLUS
Instrument cluster
Overview .......................................... 31
Settings ......................................... 207
Warning and indicator lamps ........... 32
Instrument cluster lighting .............. 196
Interior lighting ................................. 113
Automatic control .......................... 114
Delayed switch-off (on-board
computer) ...................................... 209
Emergency lighting ........................ 114
Manual control ............................... 114
Overview ........................................ 113
Reading lamp ................................. 113
Setting the brightness of the
ambient lighting (on-board com-
puter) ............................................. 208 J
Jack Storage location ............................ 296
Using ............................................. 337
Jump starting (engine) ......................305 K
Kickdown Driving tips ................................... .150
Manual drive program .................... 154
Knee bag .............................................. 45 L
Lamps see Warning and indicator lamps
Lane Keeping Assist
Activating/deactivating ................. 206
Display message ............................ 233
Function/informatio n.................... 193
Lane Tracking package ..................... 191
Lap time (RACETIMER) ...................... 211
LATCH-type (ISOFIX) child seat
anchors ................................................ 60
License plate lamp (display mes-
sage) ................................................... 227 Index
11
Page 17 of 358
Rear view camera
Cleaning instructions ..................... 291
Function/notes ............................ .186
Switching on/off ........................... 186
Rear-view mirror
Anti-glare (manual) ........................ 103
Dipping (automatic) ....................... 104
Rear window defroster
Problem (malfunction) ................... 135
Switching on/off ........................... 134
Refrigerant (air-conditioning sys-
tem)
Important safety notes .................. 352
Refueling
Fuel gauge ....................................... 31
Important safety notes .................. 155
Refueling process .......................... 156
see Fuel
Remote control
Garage door opene r....................... 274
Programming (garage door
opener) .......................................... 275
Replacing bulbs
Important safety notes .................. 114
Overview of bulb types .................. 115
Removing/replacing the cover
(front wheel arch) .......................... 116
Reporting safety defects .................... 26
Reserve (fuel tank) see Fuel
Reserve fuel
Display message ............................ 231
Warning lamp ................................. 251
see Fuel
Residual heat (climate control) ........ 135
Restraint system see SRS (Supplemental Restraint
System)
Reverse gear (selector lever) ........... 148
Reversing feature Panorama sliding sunroof ................ 91
Roller sunblind s............................... 92
Side windows ................................... 87
Roadside Assistance (breakdown) .... 23Roller sunblind
Opening/closing .............................. 93
Panorama roof with power tilt/
sliding panel ..................................... 92
Roof carrier ........................................ 261
Roof lining and carpets (cleaning
guidelines) ......................................... 294
Roof load (maximum) ........................ 353
Route (navigation) see Route guidance (navigation)
Route guidance (navigation) ............ 201 S
Safety Children in the vehicle ..................... 56
Child restraint systems .................... 56
Occupant Classification System
(OCS) ............................................... 47
Safety system
see Driving safety systems
Seat
Adjusting (Performance Seat) ........ 100
Seat belts
Adjusting the height ......................... 54
Belt force limiters ............................ 55
Cleaning ......................................... 294
Correct usage .................................. 52
Emergency Tensioning Devices ........ 55
Fastening ......................................... 53
Important safety guidelines ............. 52
Releasing ......................................... 54
Safety guidelines ............................. 42
Warning lamp ................................. 243
Warning lamp (function) ................... 55
Seats
Adjusting (electrically) ..................... 99
Adjusting (manually) ........................ 98
Adjusting the 4-way lumbar sup-
port ................................................ 100
Adjusting the head restraint ............ 99
Cleaning the cover ......................... 293
Correct driver's seat position ........... 96
Folding the backrest (rear com-
partment) forwards/back .............. 260
Important safety notes .................... 97
Seat heating problem .................... 102 Index
15
Page 18 of 358
Storing settings (memory func-
tion) ............................................... 105
Switching seat heating on/of f....... 101
Sensors (cleaning instructions) ....... 291
Service menu (on-board com-
puter) .................................................. 207
Service products Brake fluid ..................................... 350
Coolant (engine) ............................ 351
Engine oil ....................................... 349
Fuel ................................................ 348
Important safety notes .................. 347
Refrigerant (air-conditioning sys-
tem) ............................................... 352
Washer fluid ................................... 352
Settings
Factory (on-board computer) ......... 210
On-board computer ....................... 207
Setting the air distribution ............... 132
Setting the airflow ............................ 132
SETUP (on-board computer) ............. 211
Side impact air bag ............................. 46
Side marker lamp (display mes-
sage) ................................................... 228
Side windows Cleaning ......................................... 290
Convenience closing feature ............ 88
Convenience opening feature .......... 88
Important safety information ........... 86
Opening/closing .............................. 87
Problem (malfunction) ..................... 90
Resetting ......................................... 88
Sliding sunroof
see Panorama roof with power
tilt/sliding panel
SmartKey
Changing the battery ....................... 78
Changing the programming ............. 77
Checking the battery ....................... 78
Convenience closing feature ............ 88
Convenience opening feature .......... 88
Display message ............................ 243
Door central locking/unlocking ....... 76
Important safety notes .................... 76
Loss ................................................. 80
Mechanical key ................................ 77
Positions (ignition lock) ................. 141 Problem (malfunction) ..................... 80
Starting the engine ........................ 142
SmartKey positions (ignition lock) .. 141
Snow chains ...................................... 317
Sockets Center console .............................. 265
Points to observe before use ......... 265
Rear compartment ......................... 266
Trunk ............................................. 266
Specialist workshop ............................ 26
Special seat belt retractor .................. 59
Speed, controlling see Cruise control
Speed Limit Assist
Activating/deactivating the warn-ing function .................................... 205
Display message ............................ 232
Display message in the multifunc-
tion display .................................... 191
Function/note s............................. 190
Important safety notes .................. 190
Speedometer
Activating/deactivating the addi-
tional speedometer ........................ 207
Digital ............................................ 200
In the Instrument cluster ................. 31
Segments ...................................... 197
Selecting the unit of measure-
ment .............................................. 207
see Instrument cluster
SPORT handling mode
Activating/deactivating (AMG
vehicles) .......................................... 69
Warning lamp ................................. 248
SRS (Supplemental Restraint Sys-
tem) Display message ............................ 222
Introduction ..................................... 40
Warning lamp ................................. 250
Warning lamp (function) ................... 41
Standing lamps
Display message ............................ 228
Switching on/of f........................... 110
Start/stop function
see ECO start/stop function
Starting (engine) ................................ 141
STEER CONTROL .................................. 7116
Index
Page 36 of 358
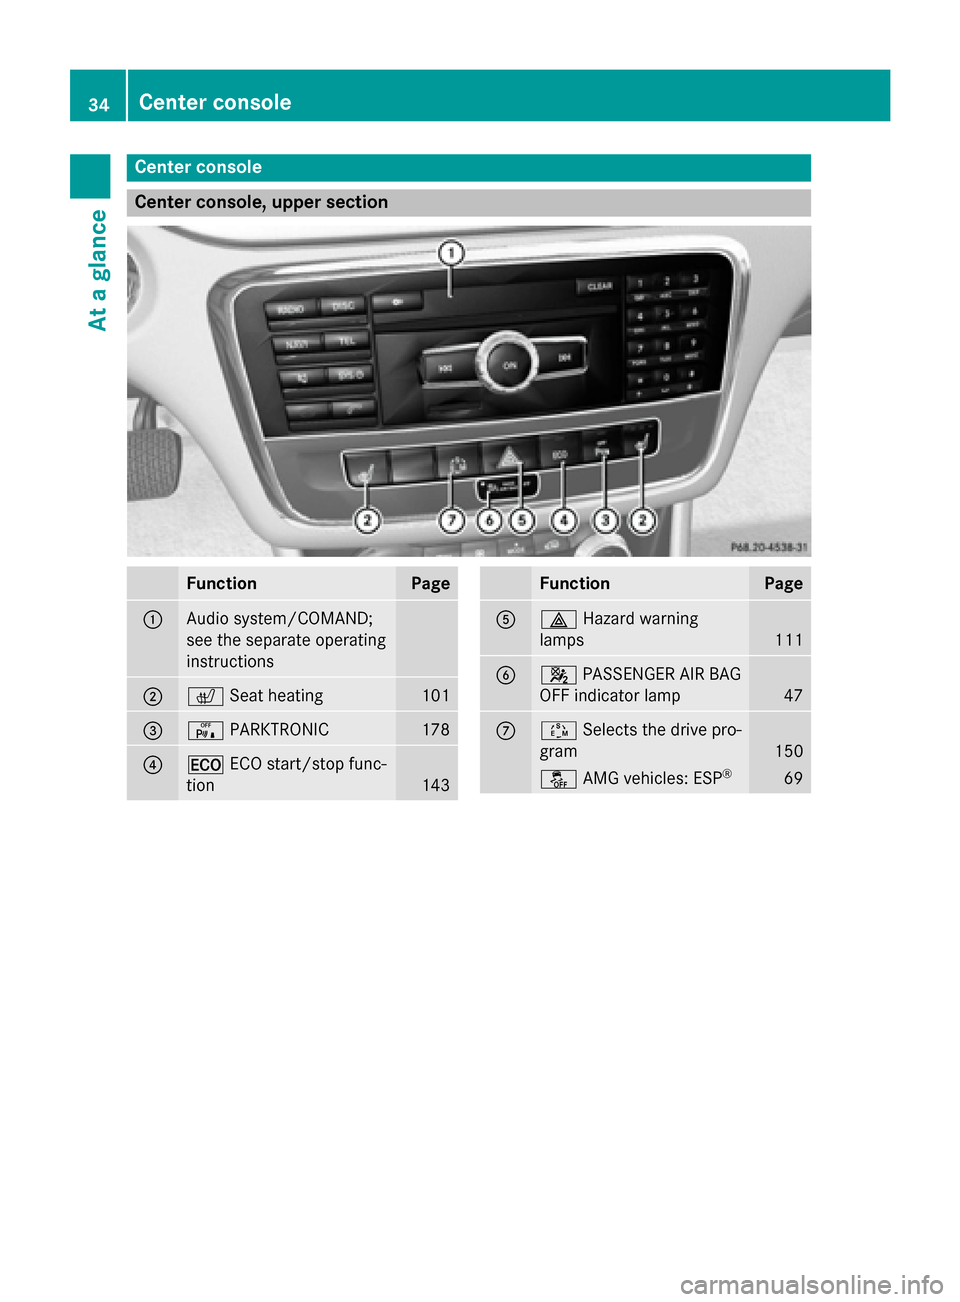
Center console
Center console, upper section
Function Page
0043
Audio system/COMAND;
see the separate operating
instructions
0044
0072
Seat heating 101
0087
008F
PARKTRONIC 178
0085
00A7
ECO start/stop func-
tion 143 Function Page
0083
002F
Hazard warning
lamps 111
0084
0073
PASSENGER AIR BAG
OFF indicator lamp 47
006B
00C8
Selects the drive pro-
gram 150
00BB
AMG vehicles: ESP ® 6934
Center consoleAt a glance
Page 83 of 358
Problem
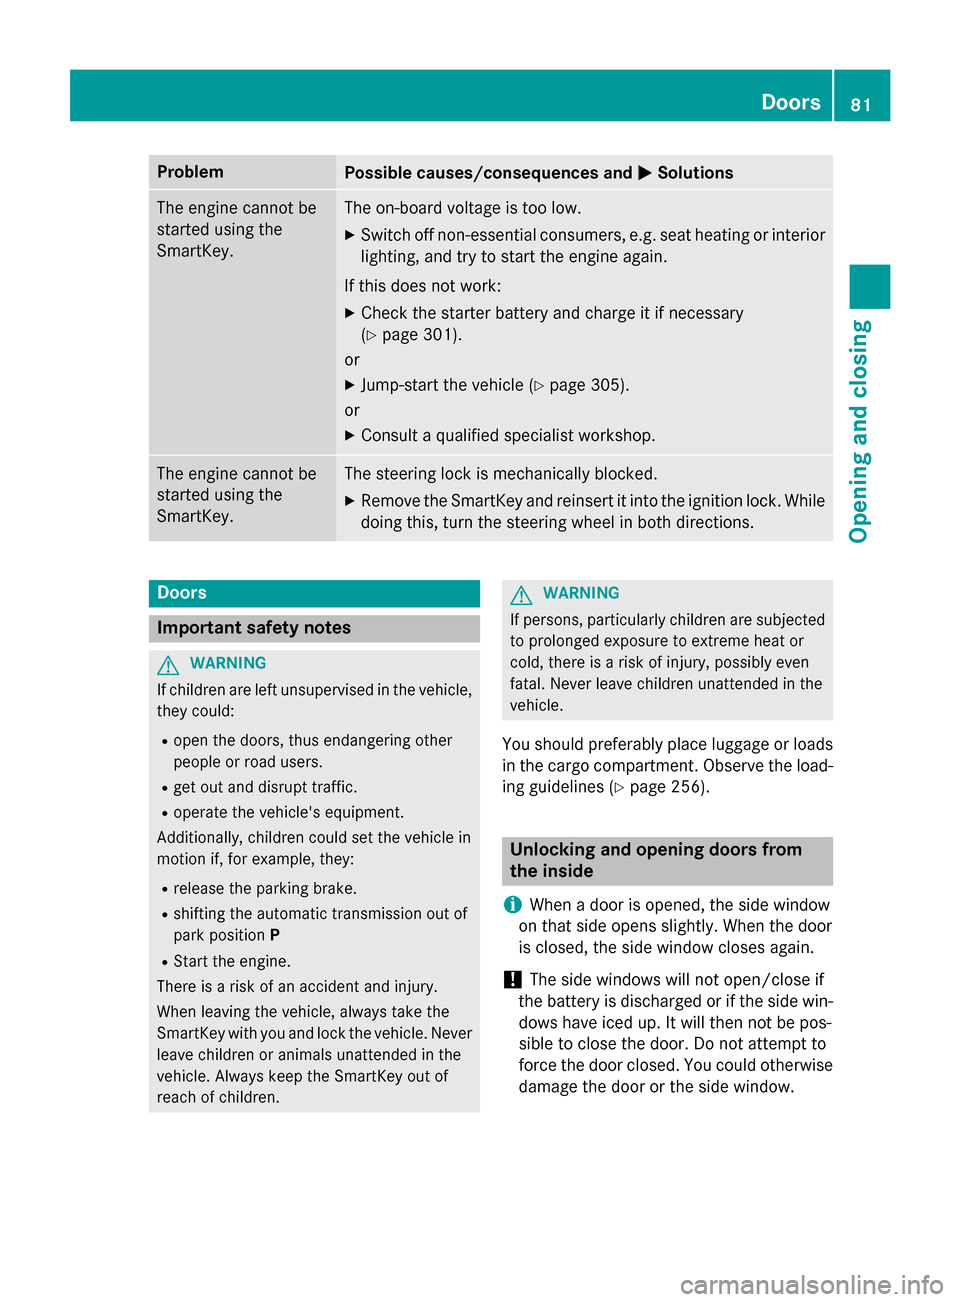
Possible causes/consequences and
0050
0050Solutions The engine cannot be
started using the
SmartKey. The on-board voltage is too low.
X Switch off non-essential consumers, e.g. seat heating or interior
lighting, and try to start the engine again.
If this does not work:
X Check the starter battery and charge it if necessary
(Y page 301).
or
X Jump-start the vehicle (Y page 305).
or
X Consult a qualified specialist workshop. The engine cannot be
started using the
SmartKey. The steering lock is mechanically blocked.
X Remove the SmartKey and reinsert it into the ignition lock. While
doing this, turn the steering wheel in both directions. Doors
Important safety notes
G
WARNING
If children are left unsupervised in the vehicle, they could:
R open the doors, thus endangering other
people or road users.
R get out and disrupt traffic.
R operate the vehicle's equipment.
Additionally, children could set the vehicle in
motion if, for example, they:
R release the parking brake.
R shifting the automatic transmission out of
park position P
R Start the engine.
There is a risk of an accident and injury.
When leaving the vehicle, always take the
SmartKey with you and lock the vehicle. Never
leave children or animals unattended in the
vehicle. Always keep the SmartKey out of
reach of children. G
WARNING
If persons, particularly children are subjected to prolonged exposure to extreme heat or
cold, there is a risk of injury, possibly even
fatal. Never leave children unattended in the
vehicle.
You should preferably place luggage or loads
in the cargo compartment. Observe the load- ing guidelines (Y page 256). Unlocking and opening doors from
the inside
i When a door is opened, the side window
on that side opens slightly. When the door
is closed, the side window closes again.
! The side windows will not open/close if
the battery is discharged or if the side win- dows have iced up. It will then not be pos-
sible to close the door. Do not attempt to
force the door closed. You could otherwise
damage the door or the side window. Doors
81Opening and closing Z
Page 100 of 358
years old and under must be seated and prop-
erly secured in an appropriately sized child
restraint system or booster seat recommen-
ded for the size and weight of the child. For
additional information, see the "Children in
the vehicle" section.
A child's risk of serious or fatal injuries is sig- nificantly increased if the child restraints are
not properly secured in the vehicle and/or the child is not properly secured in the child
restraint.
! To avoid damage to the seats and the seat
heating, observe the following information:
R keep liquids from spilling on the seats. If
liquid is spilled on the seats, dry them as soon as possible.
R if the seat covers are damp or wet, do not
switch on the seat heating. The seat
heating should also not be used to dry
the seats.
R clean the seat covers as recommended;
see the "Interior care" section.
R do not transport heavy loads on the
seats. Do not place sharp objects on the
seat cushions, e.g. knives, nails or tools.
The seats should only be occupied by
passengers, if possible.
R when the seat heating is in operation, do
not cover the seats with insulating mate- rials, e.g. blankets, coats, bags, seat cov-
ers, child seats or booster seats.
! Make sure that there are no objects in the
footwell under or behind the seats when
moving the seats back. There is a risk that
the seats and/or the objects could be dam-
aged.
i Further related subjects:
R cargo compartment enlargement (fold-
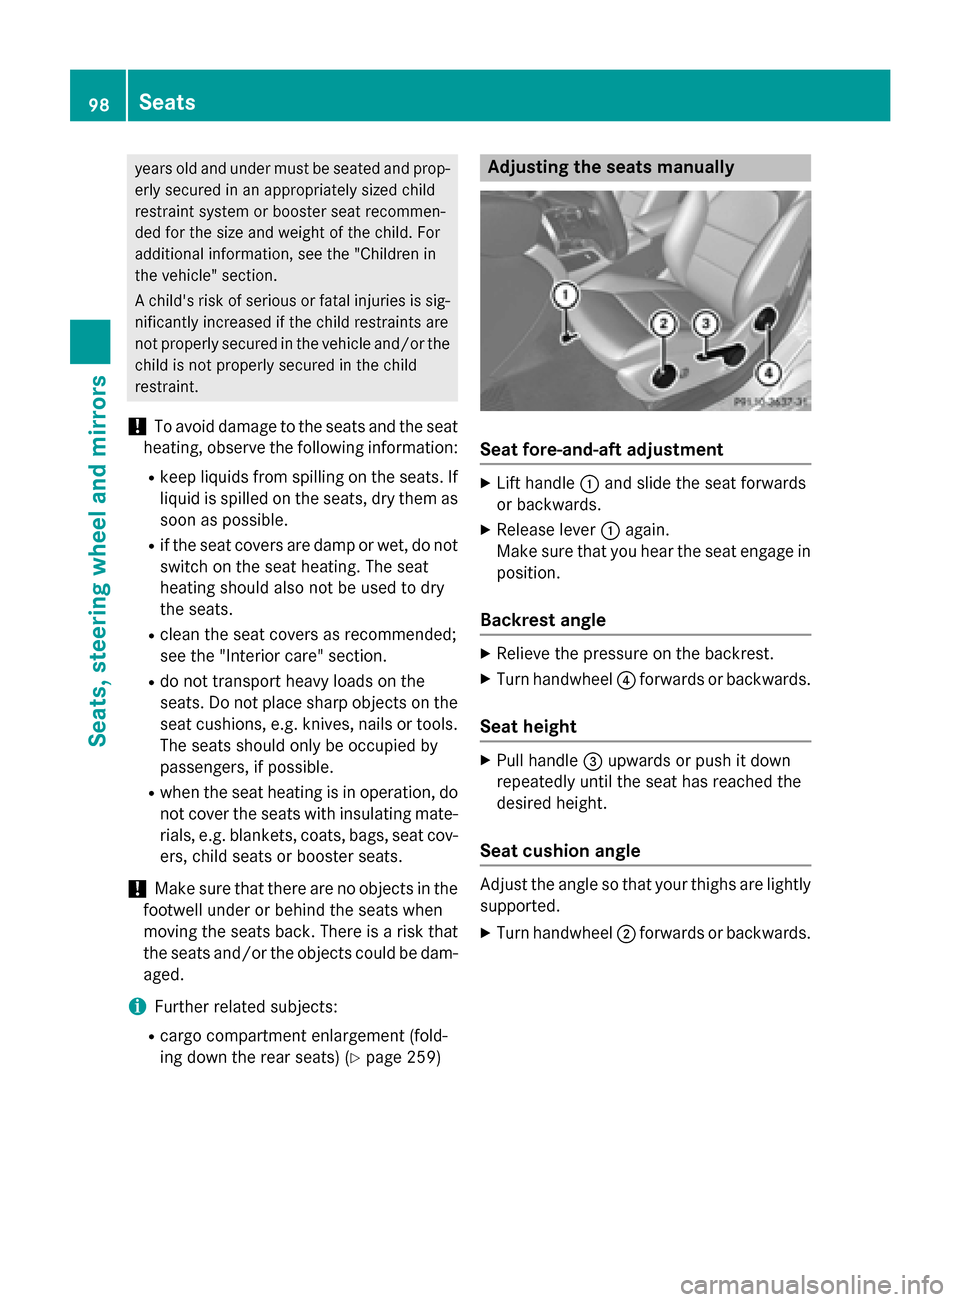
ing down the rear seats) (Y page 259) Adjusting the seats manually
Seat fore-and-aft adjustment
X
Lift handle 0043and slide the seat forwards
or backwards.
X Release lever 0043again.
Make sure that you hear the seat engage in
position.
Backrest angle X
Relieve the pressure on the backrest.
X Turn handwheel 0085forwards or backwards.
Seat height X
Pull handle 0087upwards or push it down
repeatedly until the seat has reached the
desired height.
Seat cushion angle Adjust the angle so that your thighs are lightly
supported.
X Turn handwheel 0044forwards or backwards. 98
SeatsSeats
, steering wheel and mirrors
Page 103 of 358
Adjusting the seat backrest side bol-
sters
X
To set the side bolsters of the seat
backrest narrower: press button0087.
X To set the side bolsters of the seat
backrest wider: press button0085. Switching the seat heating on/off
Activating/deactivating G
WARNING
Repeatedly switching on the seat heating can
cause the seat cushion and backrest pads to
become very hot. The health of persons with
limited temperature sensitivity or a limited
ability to react to excessively high tempera-
tures may be affected or they may even suffer burn-like injuries. There is a risk of injury.
Therefore, do not switch the seat heating on
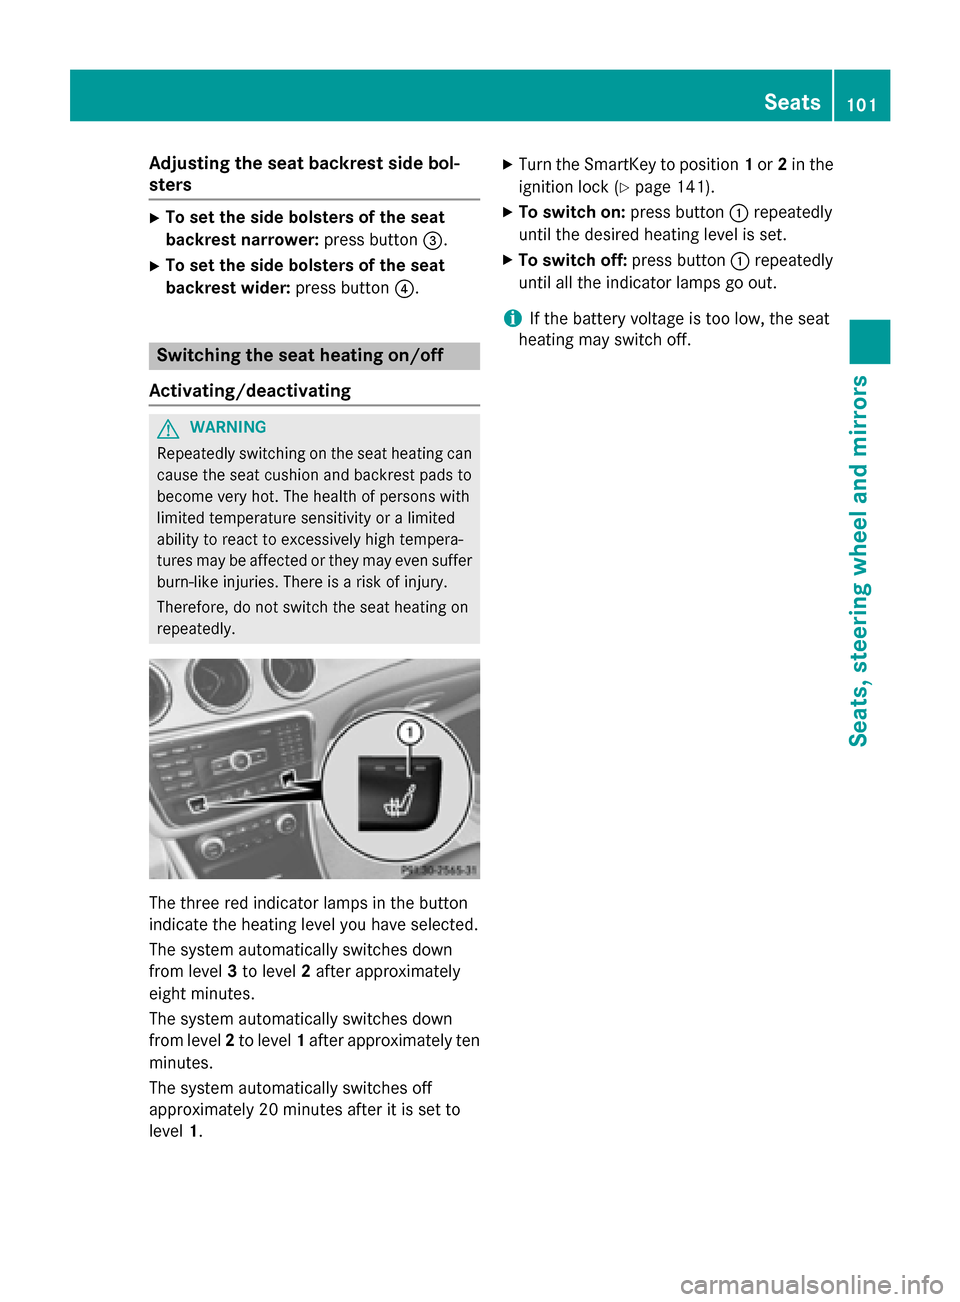
repeatedly. The three red indicator lamps in the button
indicate the heating level you have selected.
The system automatically switches down
from level 3to level 2after approximately
eight minutes.
The system automatically switches down
from level 2to level 1after approximately ten
minutes.
The system automatically switches off
approximately 20 minutes after it is set to
level 1. X
Turn the SmartKey to position 1or 2in the
ignition lock (Y page 141).
X To switch on: press button0043repeatedly
until the desired heating level is set.
X To switch off: press button0043repeatedly
until all the indicator lamps go out.
i If the battery voltage is too low, the seat
heating may switch off. Seats
101Seats, steering wheel and mirrors Z
Page 104 of 358
Problems with the seat heating
Problem
Possible causes/consequences and
0050
0050Solutions The seat heating has
switched off prema-
turely or cannot be
switched on. The on-board voltage is too low because too many electrical con-
sumers are switched on.
X Switch off electrical consumers that you do not need, such as
the rear window defroster or interior lighting.
Once the battery is sufficiently charged, the seat heating will
switch back on automatically. Steering wheel
Important safety notes
G
WARNING
You could lose control of your vehicle if you do the following while driving:
R adjust the driver's seat, head restraint,
steering wheel or mirrors
R fasten the seat belt
There is a risk of an accident.
Adjust the driver's seat, head restraint, steer-
ing wheel and mirror and fasten your seat belt before starting the engine. G
WARNING
Children could injure themselves if they
adjust the steering wheel. There is a risk of
injury.
When leaving the vehicle, always take the
SmartKey with you and lock the vehicle. Never leave children unsupervised in the vehicle. Adjusting the steering wheel
G
WARNING
If the steering wheel is unlocked while the
vehicle is in motion, it could change position
unexpectedly. This could cause you to lose
control of the vehicle. There is a risk of an
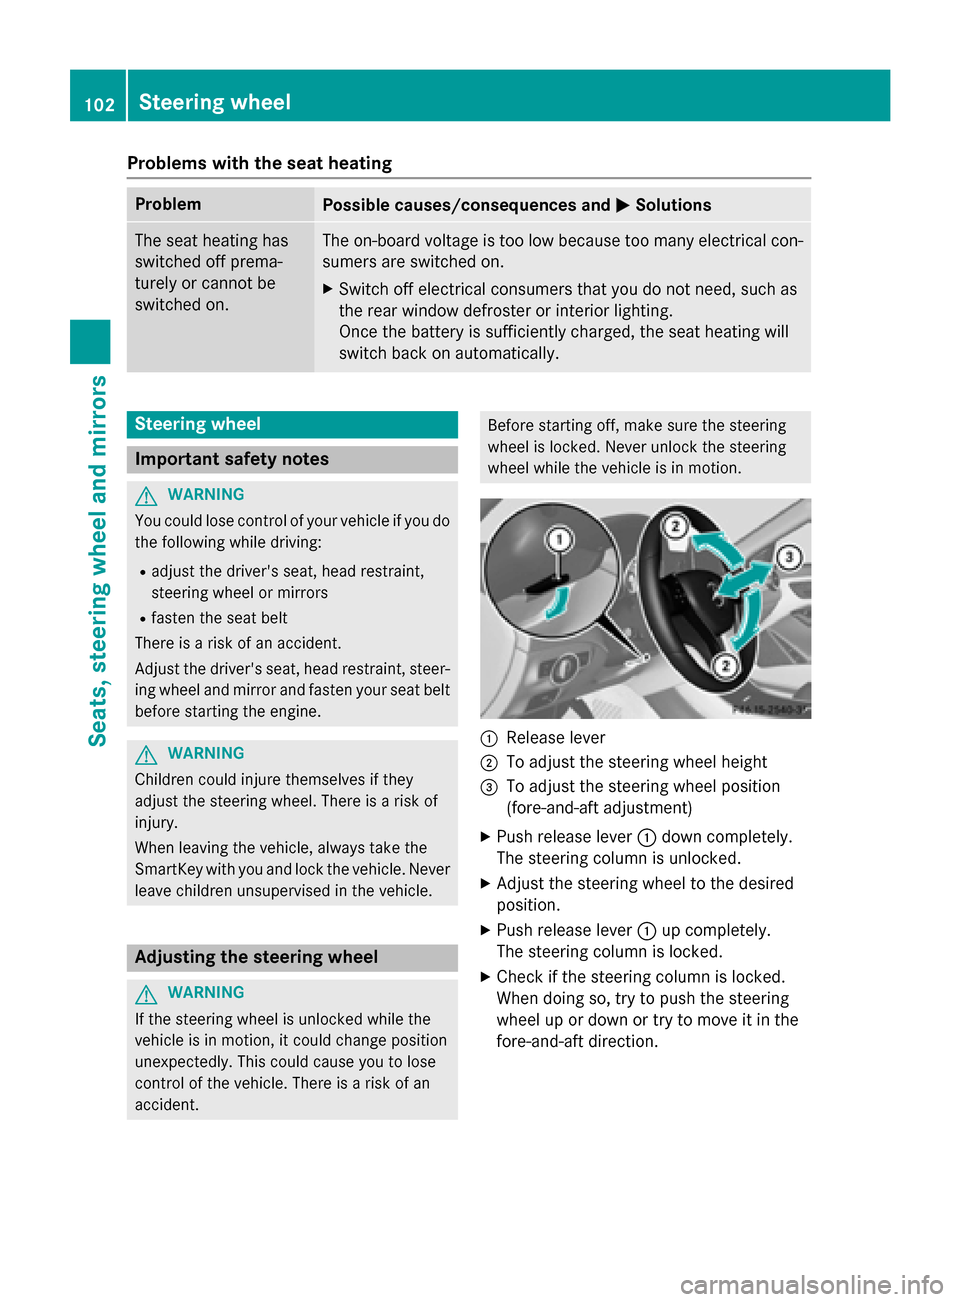
accident. Before starting off, make sure the steering
wheel is locked. Never unlock the steering
wheel while the vehicle is in motion. 0043
Release lever
0044 To adjust the steering wheel height
0087 To adjust the steering wheel position
(fore-and-aft adjustment)
X Push release lever 0043down completely.
The steering column is unlocked.
X Adjust the steering wheel to the desired
position.
X Push release lever 0043up completely.
The steering column is locked.
X Check if the steering column is locked.
When doing so, try to push the steering
wheel up or down or try to move it in the
fore-and-aft direction. 102
Steering wheelSeats, steering wheel and mirrors
Page 105 of 358
Mirrors
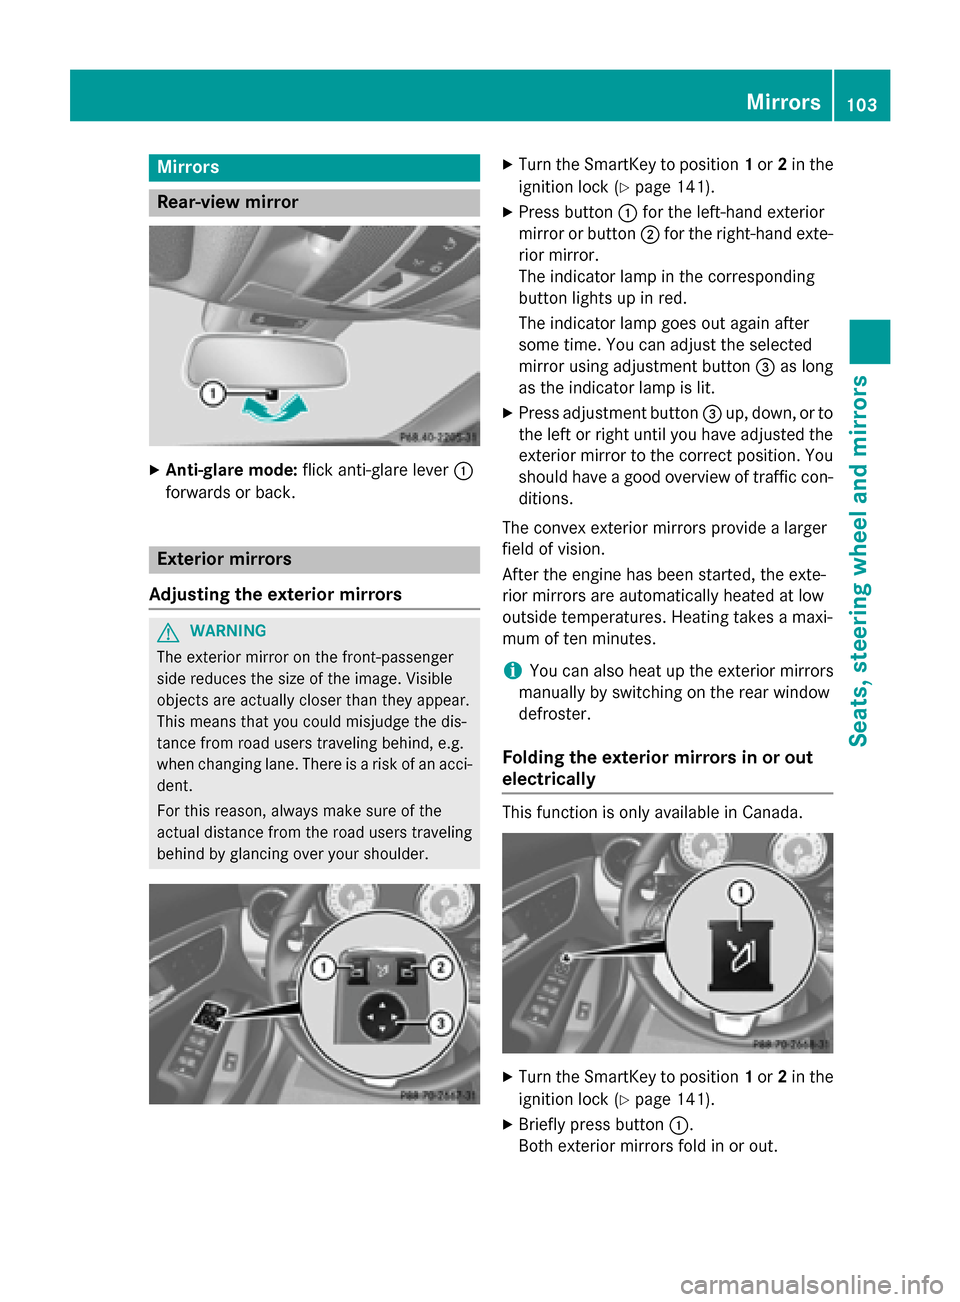
Rear-view mirror
X
Anti-glare mode: flick anti-glare lever 0043
forwards or back. Exterior mirrors
Adjusting the exterior mirrors G
WARNING
The exterior mirror on the front-passenger
side reduces the size of the image. Visible
objects are actually closer than they appear.
This means that you could misjudge the dis-
tance from road users traveling behind, e.g.
when changing lane. There is a risk of an acci-
dent.
For this reason, always make sure of the
actual distance from the road users traveling
behind by glancing over your shoulder. X
Turn the SmartKey to position 1or 2in the
ignition lock (Y page 141).
X Press button 0043for the left-hand exterior
mirror or button 0044for the right-hand exte-
rior mirror.
The indicator lamp in the corresponding
button lights up in red.
The indicator lamp goes out again after
some time. You can adjust the selected
mirror using adjustment button 0087as long
as the indicator lamp is lit.
X Press adjustment button 0087up, down, or to
the left or right until you have adjusted the
exterior mirror to the correct position. You
should have a good overview of traffic con- ditions.
The convex exterior mirrors provide a larger
field of vision.
After the engine has been started, the exte-
rior mirrors are automatically heated at low
outside temperatures. Heating takes a maxi-
mum of ten minutes.
i You can also heat up the exterior mirrors
manually by switching on the rear window
defroster.
Folding the exterior mirrors in or out
electrically This function is only available in Canada.
X
Turn the SmartKey to position 1or 2in the
ignition lock (Y page 141).
X Briefly press button 0043.
Both exterior mirrors fold in or out. Mirrors
103Seats, steering wheel and mirrors Z
Page 128 of 358
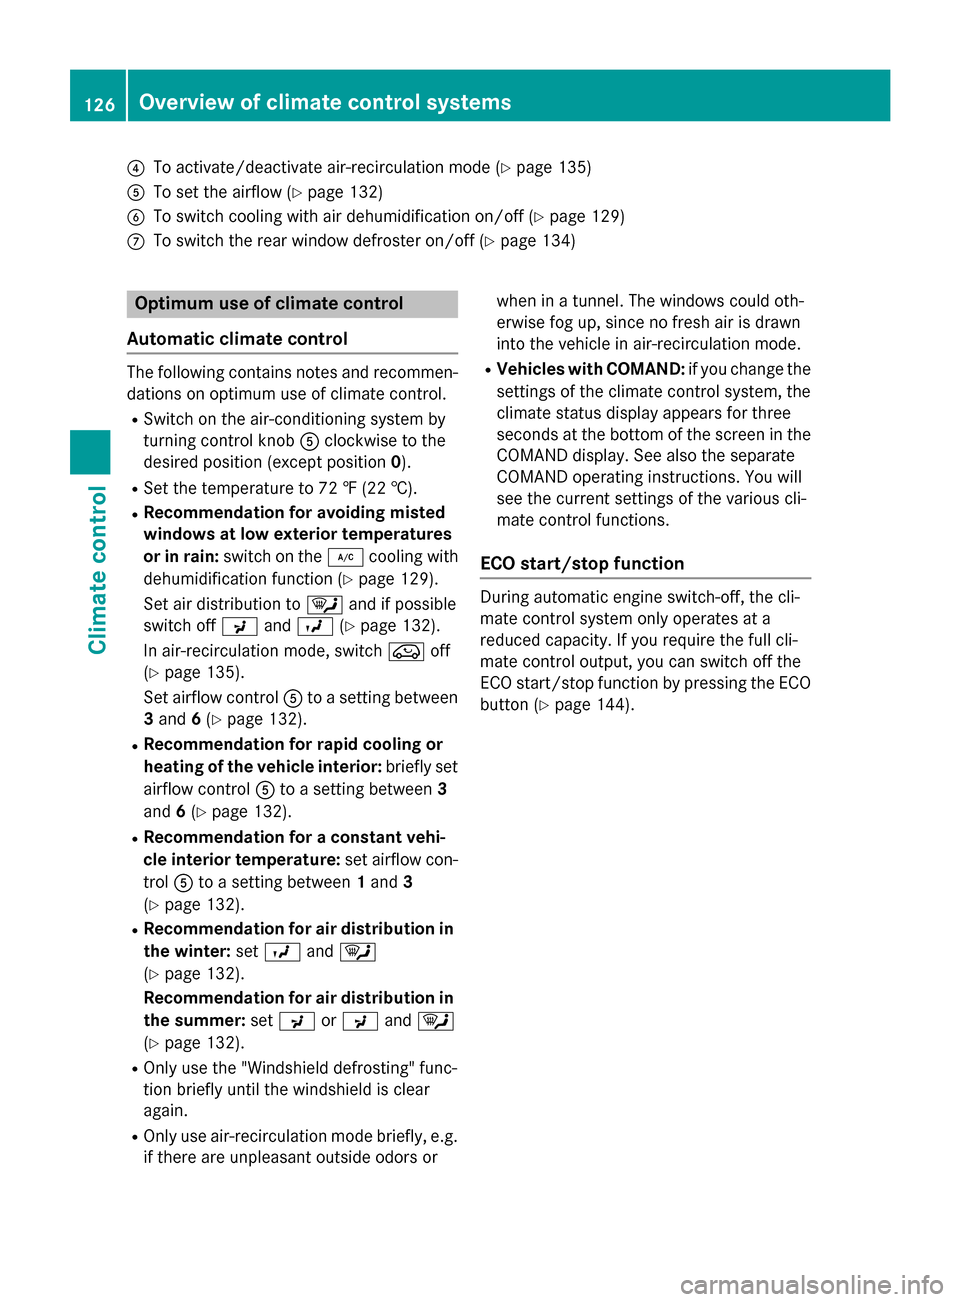
0085
To activate/deactivate air-recirculation mode (Y page 135)
0083 To set the airflow (Y page 132)
0084 To switch cooling with air dehumidification on/off (Y page 129)
006B To switch the rear window defroster on/off (Y page 134)Optimum use of climate control
Automatic climate control The following contains notes and recommen-
dations on optimum use of climate control.
R Switch on the air-conditioning system by
turning control knob 0083clockwise to the
desired position (except position 0).
R Set the temperature to 72 ‡ (22 †).
R Recommendation for avoiding misted
windows at low exterior temperatures
or in rain: switch on the 005Acooling with
dehumidification function (Y page 129).
Set air distribution to 0061and if possible
switch off 009Cand009B (Ypage 132).
In air-recirculation mode, switch 008Aoff
(Y page 135).
Set airflow control 0083to a setting between
3 and 6(Y page 132).
R Recommendation for rapid cooling or
heating of the vehicle interior: briefly set
airflow control 0083to a setting between 3
and 6(Y page 132).
R Recommendation for a constant vehi-
cle interior temperature: set airflow con-
trol 0083to a setting between 1and 3
(Y page 132).
R Recommendation for air distribution in
the winter: set009B and0061
(Y page 132).
Recommendation for air distribution in
the summer: set009C or009C and0061
(Y page 132).
R Only use the "Windshield defrosting" func-
tion briefly until the windshield is clear
again.
R Only use air-recirculation mode briefly, e.g.
if there are unpleasant outside odors or when in a tunnel. The windows could oth-
erwise fog up, since no fresh air is drawn
into the vehicle in air-recirculation mode.
R Vehicles with COMAND: if you change the
settings of the climate control system, the
climate status display appears for three
seconds at the bottom of the screen in the
COMAND display. See also the separate
COMAND operating instructions. You will
see the current settings of the various cli-
mate control functions.
ECO start/stop function During automatic engine switch-off, the cli-
mate control system only operates at a
reduced capacity. If you require the full cli-
mate control output, you can switch off the
ECO start/stop function by pressing the ECO
button (Y page 144). 126
Overview of climate control systemsClimate control