engine MERCEDES-BENZ CLA-Class 2014 C117 Owners Manual
[x] Cancel search | Manufacturer: MERCEDES-BENZ, Model Year: 2014, Model line: CLA-Class, Model: MERCEDES-BENZ CLA-Class 2014 C117Pages: 358, PDF Size: 6.6 MB
Page 210 of 358
![MERCEDES-BENZ CLA-Class 2014 C117 Owners Manual X
Press the 0064or0063 button to select the
Speedometer [km/h]
Speedometer [km/h] orSpeedometer
Speedometer
[mph]
[mph] function.
You will see the selected setting: on
onoroff
off.
X Press the 0076but MERCEDES-BENZ CLA-Class 2014 C117 Owners Manual X
Press the 0064or0063 button to select the
Speedometer [km/h]
Speedometer [km/h] orSpeedometer
Speedometer
[mph]
[mph] function.
You will see the selected setting: on
onoroff
off.
X Press the 0076but](/img/4/3597/w960_3597-209.png)
X
Press the 0064or0063 button to select the
Speedometer [km/h]
Speedometer [km/h] orSpeedometer
Speedometer
[mph]
[mph] function.
You will see the selected setting: on
onoroff
off.
X Press the 0076button to save the setting.
Selecting the permanent display function
You can determine whether the multifunction display permanently shows your speed or the
outside temperature.
X Press the 0059or0065 button on the steer-
ing wheel to select the Sett
Sett menu.
X Press the 0064or0063 button to select the
Instrument Cluster
Instrument Cluster submenu.
X Press 0076to confirm.
X Press the 0064or0063 button to select the
Permanent Display
Permanent Display function.
You will see the selected setting Outside
Outside
Temperature
Temperature orSpeedometer [km/h]
Speedometer [km/h]/
Speedometer [mph]
Speedometer [mph].
X Press the 0076button to save the setting.
Lights Switching the daytime running lamps on/
off
Canada only: daytime running lamps are
required by law. You cannot set the Daytime
Daytime
Running Lights
Running Lights function via the on-board
computer.
X Press the 0059or0065 button on the steer-
ing wheel to select the Sett
Sett menu.
X Press the 0064or0063 button to select the
Light Light submenu.
X Press 0076to confirm.
X Press the 0064or0063 button to select the
Daytime Running Lights
Daytime Running Lights function.
If the Daytime Running Lights
Daytime Running Lights function
has been switched on, the cone of light and the 0086 symbol in the multifunction dis-
play are shown in orange.
X Press the 0076button to save the setting.
Further information on daytime running
lamps (Y page 109). Setting the brightness of the ambient
lighting
X Press the 0059or0065 button on the steer-
ing wheel to select the Sett
Sett menu.
X Press the 0064or0063 button to select the
Light
Light submenu.
X Press 0076to confirm.
X Press the 0064or0063 button to select the
Amb. Light +/- Amb. Light +/- function.
You will see the selected setting.
X Change the setting with 0076.
X Press the 0064or0063 button to adjust the
brightness to a level from Off
OfftoLevel 5
Level 5
(bright).
X Press the 0076or0038 button to save the
setting.
Activating/deactivating surround light-
ing and exterior lighting delayed switch-
off
If you have activated the Surround Light‐
Surround Light‐
ing ing function and the light switch is set to
0058, the following functions are activated
when it is dark:
R surround lighting: the exterior lighting
remains lit for 40 seconds after unlocking
with the key. If you start the engine, the
surround lighting is switched off and auto-
matic headlamp mode is activated
(Y page 109).
R exterior lighting delayed switch-off: the
exterior lighting remains lit for 60 seconds
after the engine is switched off. If you close all the doors and the trunk lid, the exterior
lighting goes off after 15 seconds.
X Press the 0059or0065 button on the steer-
ing wheel to select the Sett Settmenu.
X Press the 0064or0063 button to select the
Light
Light submenu.
X Press 0076to confirm.
X Press the 0064or0063 button to select the
Surround Lighting
Surround Lighting function.
When the Surround Lighting
Surround Lighting function is
activated, the light cone and the area 208
Menus and submenusOn-board computer and displays
Page 211 of 358
around the vehicle are displayed in orange
in the multifunction display.
X Press the 0076button to save the setting.
Deactivating delayed switch-off of the exte-
rior lighting temporarily:
X Before leaving the vehicle, turn the Smart-
Key to position 0in the ignition lock.
X Turn the SmartKey to position 2in the igni-
tion lock.
The exterior lighting delayed switch-off is
deactivated.
Delayed switch-off of the exterior lighting is
reactivated the next time you start the
engine.
i Depending on your vehicle's equipment,
when the surround lighting and delayed
switch-off exterior lighting are on, the fol-
lowing light up:
R Parking lamps
R Front fog lamps
R Low-beam headlamps
R Daytime running lamps
R Side marker lamps
R Surround lighting in the exterior mirrors
Activating/deactivating the interior light-
ing delayed switch-off
If you activate the Interior Lighting
Interior Lighting
Delay
Delay function, the interior lighting remains
on for 20 seconds after you remove the key
from the ignition lock.
X Press the 0059or0065 button on the steer-
ing wheel to select the Sett Settmenu.
X Press the 0064or0063 button to select the
Light
Light submenu.
X Press 0076to confirm.
X Press the 0064or0063 button to select the
Interior Lighting Delay
Interior Lighting Delay function.
If the Interior
Interior Lighting
LightingDelay
Delayfunction
has been switched on, the vehicle interior is
displayed in orange in the multifunction
display.
X Press the 0076button to save the setting. Vehicle Activating/deactivating the automatic
door locking mechanism
X Press the 0059or0065 button on the steer-
ing wheel to select the Sett Settmenu.
X Press the 0064or0063 button to select the
Vehicle
Vehicle submenu.
X Press 0076to confirm.
X Press the 0064or0063 button to select the
Automatic Door Lock
Automatic Door Lock function.
When the Automatic
Automatic Door
DoorLock
Lockfunction
is activated, the vehicle doors are displayed in orange in the multifunction display.
X Press the 0076button to save the setting.
If you activate the Automatic Door Lock
Automatic Door Lock
function, the vehicle is centrally locked above
a speed of approximately 9 mph (15 km/h).
For further information on the automatic lock- ing feature, see (Y page 83).
Activating/deactivating the acoustic
locking verification signal
If you switch on the Acoustic AcousticLock
Lockfunction,
an acoustic signal sounds when you lock the
vehicle.
X Press the 0059or0065 button on the steer-
ing wheel to select the Sett
Sett menu.
X Press the 0064or0063 button to select the
Vehicle Vehicle submenu.
X Press 0076to confirm.
X Press the 0064or0063 button to select the
Acoustic Lock
Acoustic Lock function.
If the Acoustic
Acoustic Lock
Lockfunction is activated,
the 0037 symbol in the multifunction dis-
play lights up orange.
X Press the 0076button to save the setting.
Activating/deactivating the radar sensor
system X Press the 0059or0065 button on the steer-
ing wheel to select the Sett Settmenu.
X Press the 0064or0063 button to select the
Vehicle
Vehicle submenu.
X Press 0076to confirm. Menus and submenus
209On-board computer and displays Z
Page 212 of 358
X
Press the 0063or0064 button to select
Radar Sensor (See Oper. Manual):
Radar Sensor (See Oper. Manual):.
You will see the selected setting: Enabled
Enabled
or Disabled
Disabled.
X Press the 0076button to save the setting.
If the radar sensor system is switched off,
Blind Spot Assist is deactivated (Y page 191).
Convenience Switching the fold-in mirrors when lock-
ing feature on/off
This function is only available on vehicles with
the memory function (Y page 105).
When you activate the Auto. Auto.Mirror
Mirror Fold‐
Fold‐
ing ing function, the exterior mirrors are folded
in when the vehicle is locked.
If you unlock the vehicle and then open a
door, the exterior mirrors fold out again.
If you have switched on the Auto. Mirror Auto. Mirror
Folding
Folding function and you fold in the exterior
mirrors using the button on the door
(Y page 103), they will not fold out automat-
ically. The exterior mirrors can then only be
folded out using the button on the door.
X Press the 0059or0065 button on the steer-
ing wheel to select the Sett
Sett menu.
X Press the 0064or0063 button to select the
Convenience Convenience submenu.
X Press 0076to confirm.
X Press the 0064or0063 button to select the
Auto. Mirror Folding
Auto. Mirror Folding function.
If the Auto. Mirror Folding
Auto. Mirror Folding function is
activated, the vehicle's exterior mirror is
displayed in orange in the multifunction
display.
X Press the 0076button to save the setting.
Restoring the factory settings X
Press the 0059or0065 button on the steer-
ing wheel to select the Sett Settmenu.
X Press the 0064or0063 button to select the
Factory Setting
Factory Setting submenu. X
Press 0076to confirm.
The Reset All Settings? Reset All Settings? message
appears.
X Press the 0064or0063 button to select No No
or Yes
Yes.
X Press 0076to confirm the selection.
If you have selected Yes
Yes, the multifunction
display shows a confirmation message.
For safety reasons, the Daytime Running
Daytime Running
Lamps
Lamps function in the Light
Lightsubmenu is only
reset if the vehicle is stationary. AMG menu in AMG vehicles
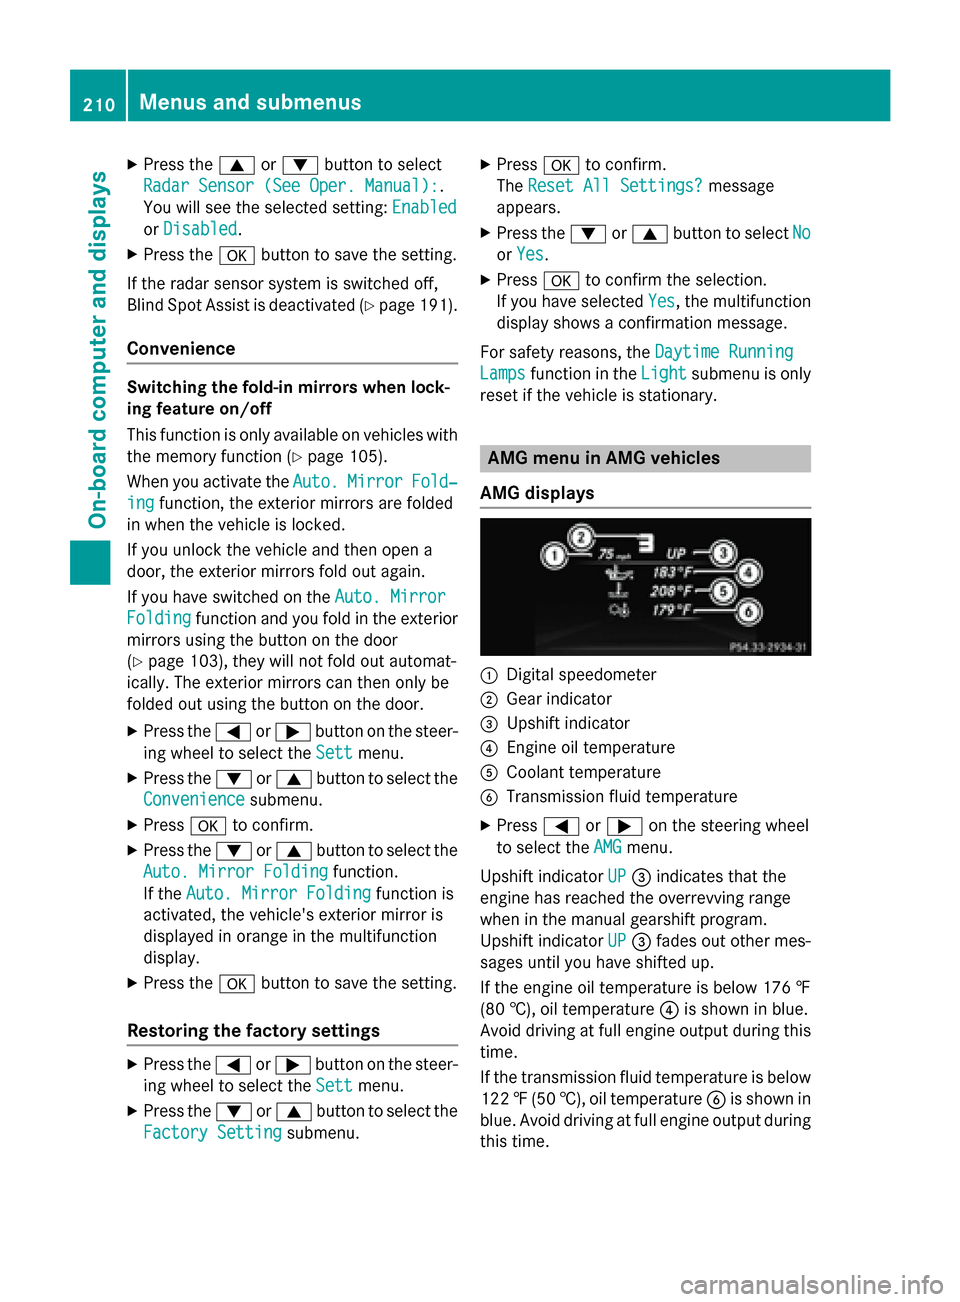
AMG displays 0043
Digital speedometer
0044 Gear indicator
0087 Upshift indicator
0085 Engine oil temperature
0083 Coolant temperature
0084 Transmission fluid temperature
X Press 0059or0065 on the steering wheel
to select the AMG
AMG menu.
Upshift indicator UP
UP0087 indicates that the
engine has reached the overrevving range
when in the manual gearshift program.
Upshift indicator UP UP0087 fades out other mes-
sages until you have shifted up.
If the engine oil temperature is below 176 ‡
(80 †), oil temperature 0085is shown in blue.
Avoid driving at full engine output during this time.
If the transmission fluid temperature is below
122 ‡(50 †), oil temperature 0084is shown in
blue. Avoid driving at full engine output during
this time. 210
Menus and submenusOn-board computer and displays
Page 213 of 358
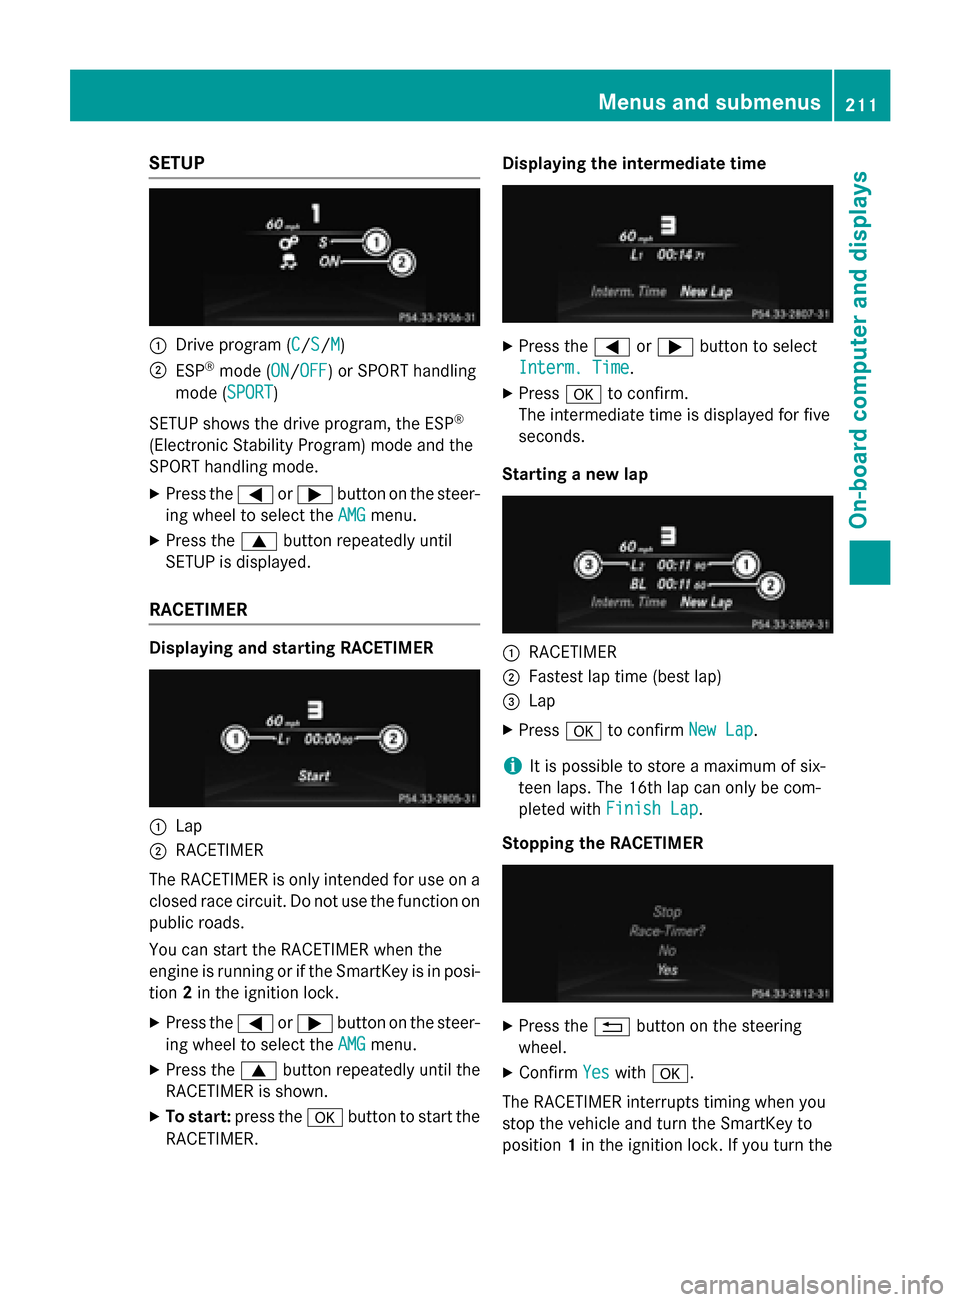
SETUP
0043
Drive program (C C/SS/MM)
0044 ESP ®
mode (ON ON/OFFOFF) or SPORT handling
mode (SPORT SPORT)
SETUP shows the drive program, the ESP ®
(Electronic Stability Program) mode and the
SPORT handling mode. X Press the 0059or0065 button on the steer-
ing wheel to select the AMG
AMG menu.
X Press the 0063button repeatedly until
SETUP is displayed.
RACETIMER Displaying and starting RACETIMER
0043
Lap
0044 RACETIMER
The RACETIMER is only intended for use on a closed race circuit. Do not use the function on
public roads.
You can start the RACETIMER when the
engine is running or if the SmartKey is in posi-
tion 2in the ignition lock.
X Press the 0059or0065 button on the steer-
ing wheel to select the AMG AMGmenu.
X Press the 0063button repeatedly until the
RACETIMER is shown.
X To start: press the 0076button to start the
RACETIMER. Displaying the intermediate time
X
Press the 0059or0065 button to select
Interm. Time
Interm. Time.
X Press 0076to confirm.
The intermediate time is displayed for five
seconds.
Starting a new lap 0043
RACETIMER
0044 Fastest lap time (best lap)
0087 Lap
X Press 0076to confirm New Lap New Lap.
i It is possible to store a maximum of six-
teen laps. The 16th lap can only be com-
pleted with Finish Lap Finish Lap.
Stopping the RACETIMER X
Press the 0038button on the steering
wheel.
X Confirm Yes
Yeswith 0076.
The RACETIMER interrupts timing when you
stop the vehicle and turn the SmartKey to
position 1in the ignition lock. If you turn the Menus and submenus
211On-board computer and displays Z
Page 214 of 358
key to position
2or 3and then press 0076to
confirm Start
Start, timing is continued.
Resetting the current lap X Stop the RACETIMER.
X Press the 0059or0065 button to select
Reset Lap
Reset Lap .
X Press 0076to reset the lap time to "0".
Deleting all laps If you switch off the engine, the RACETIMER is
reset to "0" after 30 seconds. All laps are
deleted.
You cannot delete individual stored laps. If
you have stopped 16 laps, the current lap
does not have to be reset.
X Reset the current lap.
X Press 0076to confirm Reset Reset.
Reset Race Timer?
Reset Race Timer? appears in the multi-
function display.
X Press the 0064button to select Yes
Yes and
press the 0076button to confirm.
All laps are deleted.
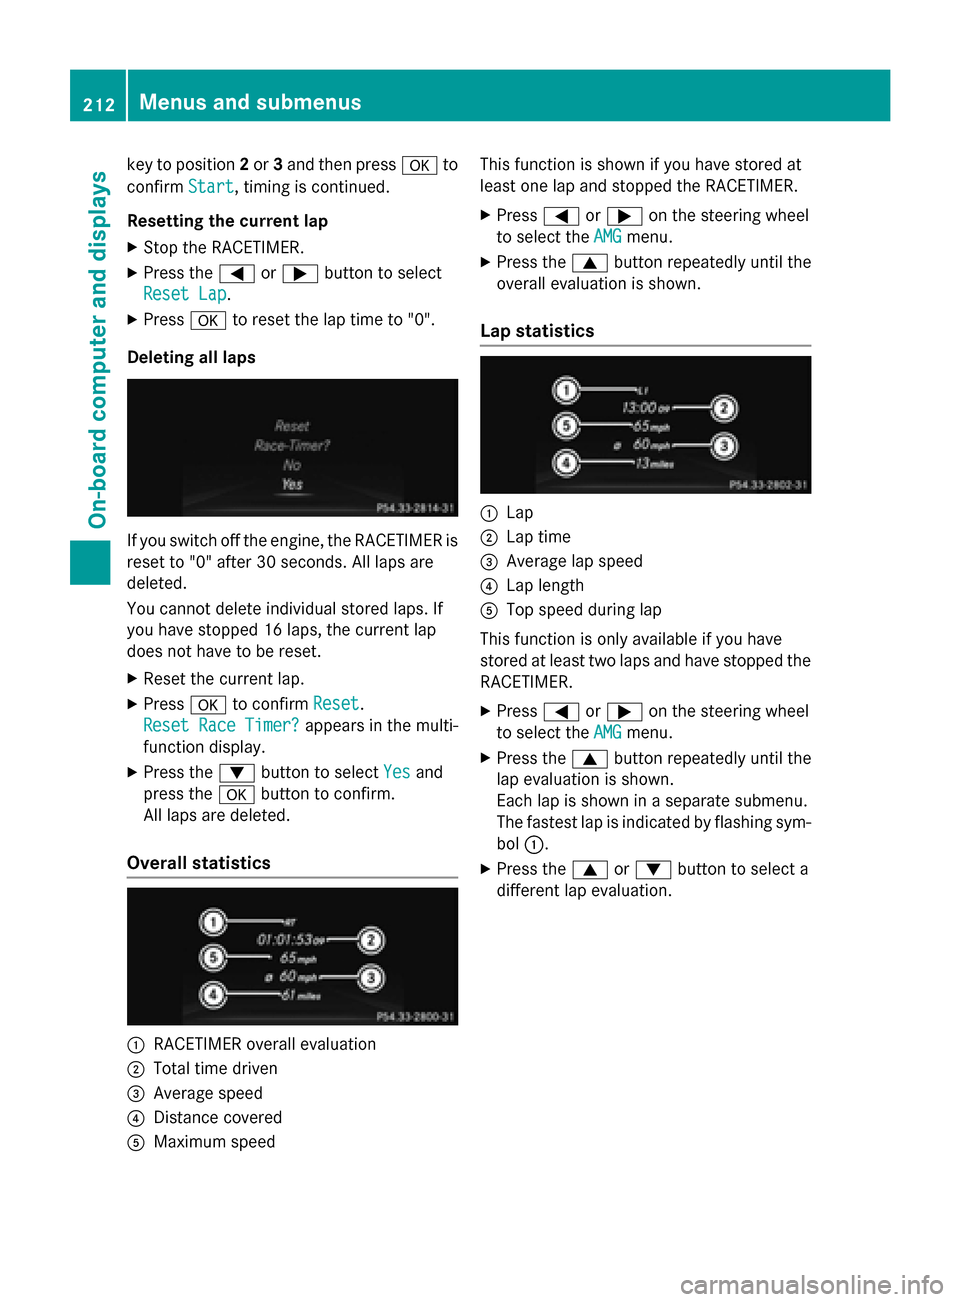
Overall statistics 0043
RACETIMER overall evaluation
0044 Total time driven
0087 Average speed
0085 Distance covered
0083 Maximum speed This function is shown if you have stored at
least one lap and stopped the RACETIMER.
X Press 0059or0065 on the steering wheel
to select the AMG AMGmenu.
X Press the 0063button repeatedly until the
overall evaluation is shown.
Lap statistics 0043
Lap
0044 Lap time
0087 Average lap speed
0085 Lap length
0083 Top speed during lap
This function is only available if you have
stored at least two laps and have stopped the
RACETIMER.
X Press 0059or0065 on the steering wheel
to select the AMG AMGmenu.
X Press the 0063button repeatedly until the
lap evaluation is shown.
Each lap is shown in a separate submenu.
The fastest lap is indicated by flashing sym-
bol 0043.
X Press the 0063or0064 button to select a
different lap evaluation. 212
Menus and submenusOn-board computer and displays
Page 221 of 358
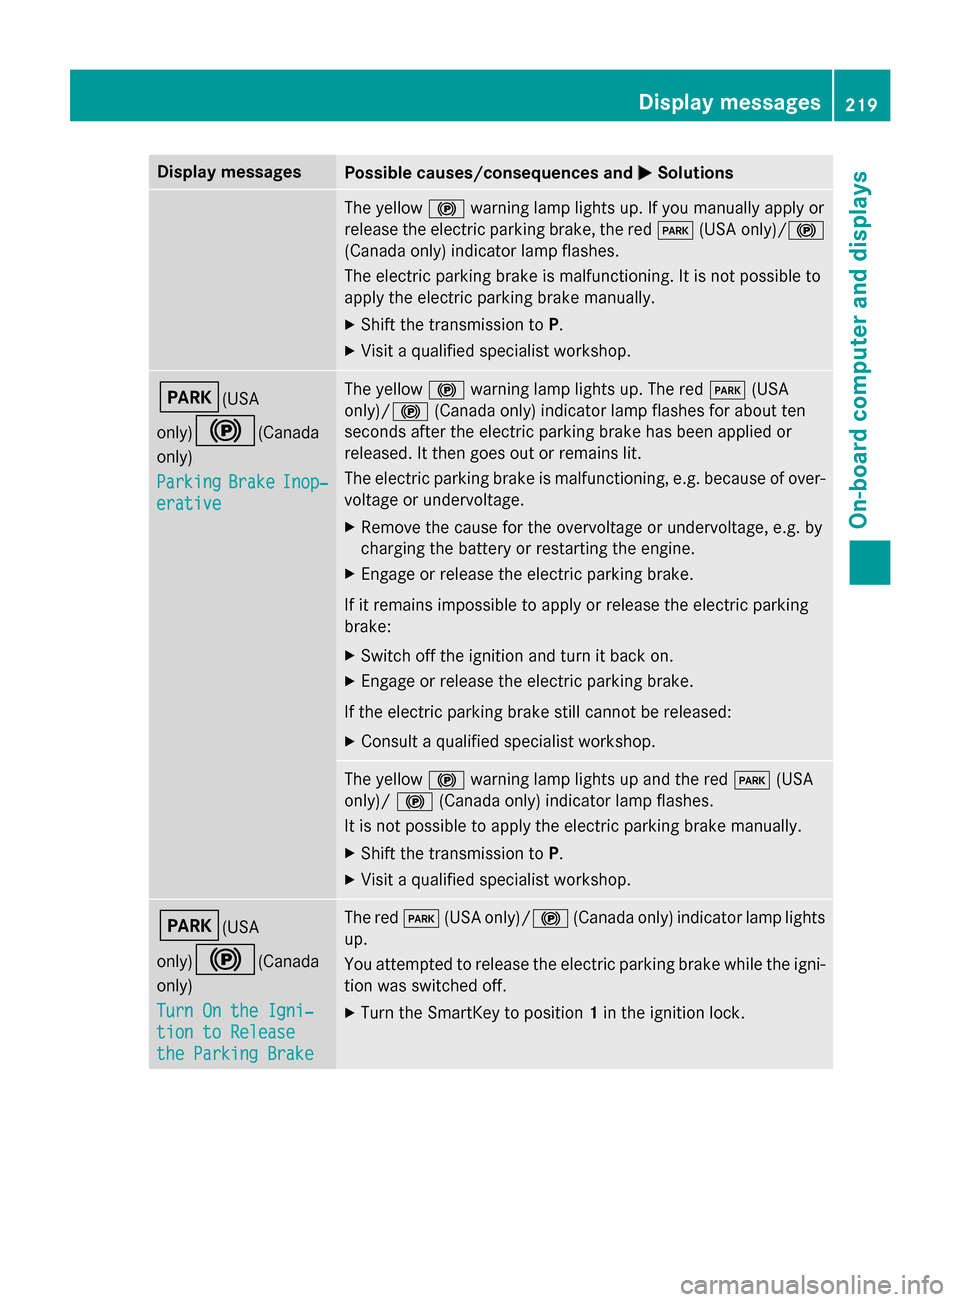
Display messages
Possible causes/consequences and
0050
0050Solutions The yellow
0024warning lamp lights up. If you manually apply or
release the electric parking brake, the red 0049(USA only)/ 0024
(Canada only) indicator lamp flashes.
The electric parking brake is malfunctioning. It is not possible to
apply the electric parking brake manually.
X Shift the transmission to P.
X Visit a qualified specialist workshop. 0049(USA
only)0024
(Canada
only)
Parking Parking Brake
BrakeInop‐
Inop‐
erative
erative The yellow
0024warning lamp lights up. The red 0049(USA
only)/ 0024(Canada only) indicator lamp flashes for about ten
seconds after the electric parking brake has been applied or
released. It then goes out or remains lit.
The electric parking brake is malfunctioning, e.g. because of over-
voltage or undervoltage.
X Remove the cause for the overvoltage or undervoltage, e.g. by
charging the battery or restarting the engine.
X Engage or release the electric parking brake.
If it remains impossible to apply or release the electric parking
brake:
X Switch off the ignition and turn it back on.
X Engage or release the electric parking brake.
If the electric parking brake still cannot be released: X Consult a qualified specialist workshop. The yellow
0024warning lamp lights up and the red 0049(USA
only)/ 0024(Canada only) indicator lamp flashes.
It is not possible to apply the electric parking brake manually.
X Shift the transmission to P.
X Visit a qualified specialist workshop. 0049(USA
only)0024
(Canada
only)
Turn On the Igni‐ Turn On the Igni‐
tion to Release tion to Release
the Parking Brake the Parking Brake The red
0049(USA only)/0024 (Canada only) indicator lamp lights
up.
You attempted to release the electric parking brake while the igni-
tion was switched off.
X Turn the SmartKey to position 1in the ignition lock. Display
messages
219On-board computer and displays Z
Page 223 of 358
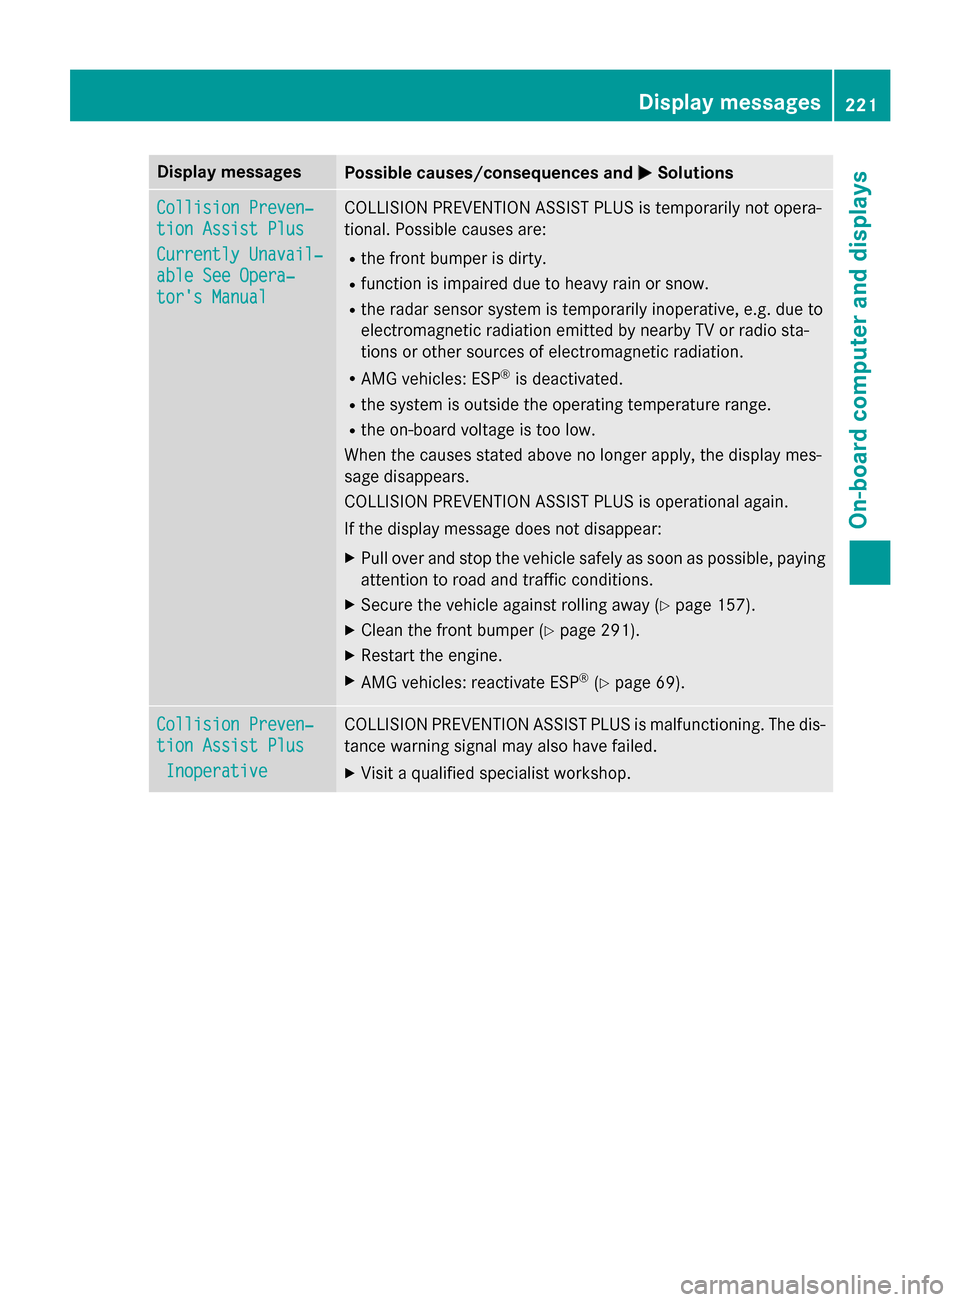
Display messages
Possible causes/consequences and
0050
0050Solutions Collision Preven‐
Collision Preven‐
tion Assist Plus tion Assist Plus
Currently Unavail‐ Currently Unavail‐
able See Opera‐ able See Opera‐
tor's Manual tor's Manual COLLISION PREVENTION ASSIST PLUS is temporarily not opera-
tional. Possible causes are:
R the front bumper is dirty.
R function is impaired due to heavy rain or snow.
R the radar sensor system is temporarily inoperative, e.g. due to
electromagnetic radiation emitted by nearby TV or radio sta-
tions or other sources of electromagnetic radiation.
R AMG vehicles: ESP ®
is deactivated.
R the system is outside the operating temperature range.
R the on-board voltage is too low.
When the causes stated above no longer apply, the display mes-
sage disappears.
COLLISION PREVENTION ASSIST PLUS is operational again.
If the display message does not disappear:
X Pull over and stop the vehicle safely as soon as possible, paying
attention to road and traffic conditions.
X Secure the vehicle against rolling away (Y page 157).
X Clean the front bumper (Y page 291).
X Restart the engine.
X AMG vehicles: reactivate ESP ®
(Y page 69). Collision Preven‐ Collision Preven‐
tion Assist Plus tion Assist Plus
Inoperative
Inoperative COLLISION PREVENTION ASSIST PLUS is malfunctioning. The dis-
tance warning signal may also have failed.
X Visit a qualified specialist workshop. Display
messages
221On-board computer and displays Z
Page 224 of 358
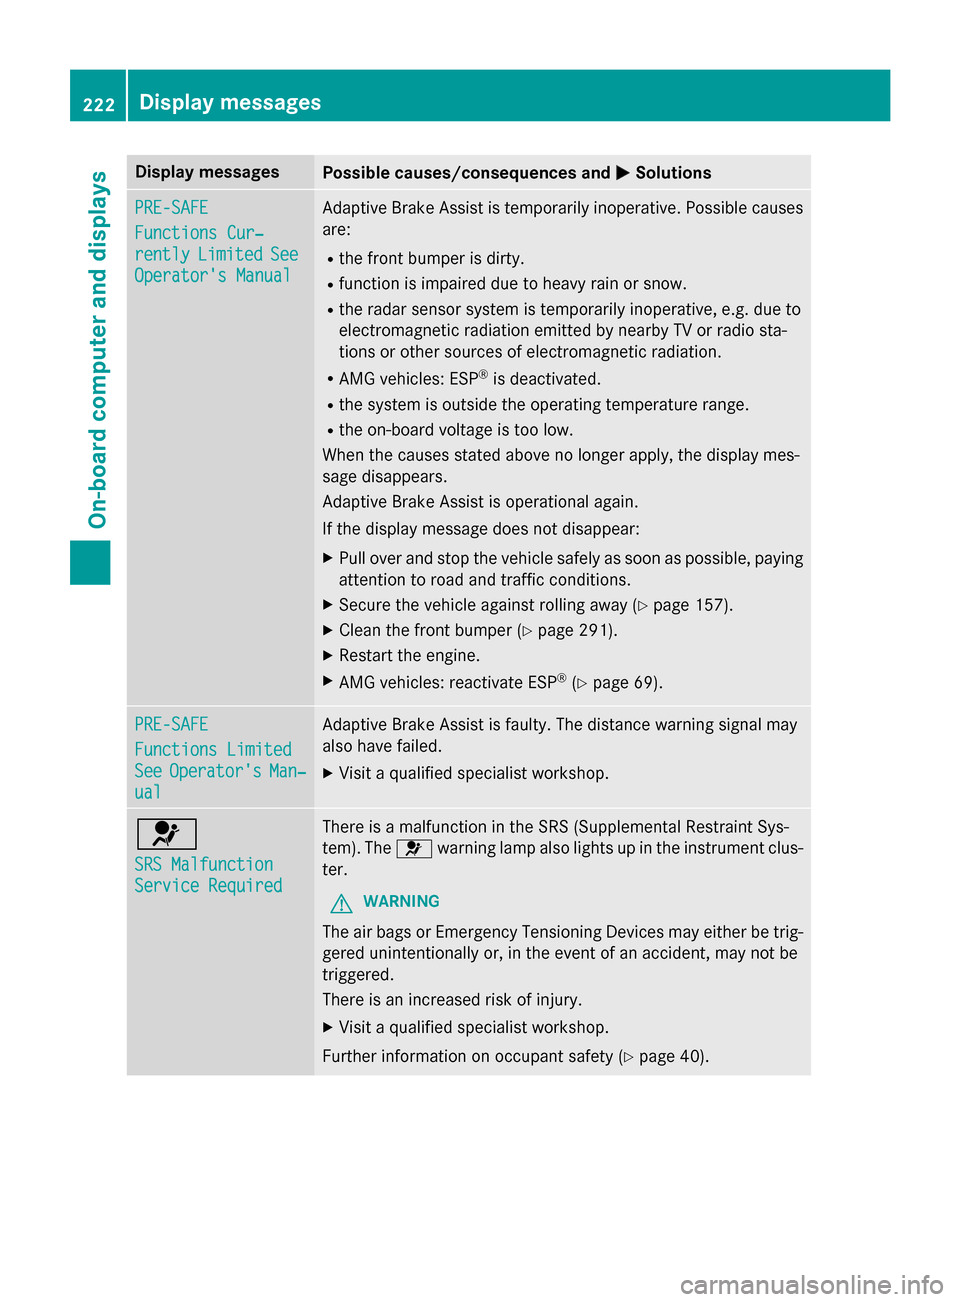
Display messages
Possible causes/consequences and
0050
0050Solutions PRE-SAFE
PRE-SAFE
Functions Cur‐ Functions Cur‐
rently rently
Limited
Limited See
See
Operator's Manual
Operator's Manual Adaptive Brake Assist is temporarily inoperative. Possible causes
are:
R the front bumper is dirty.
R function is impaired due to heavy rain or snow.
R the radar sensor system is temporarily inoperative, e.g. due to
electromagnetic radiation emitted by nearby TV or radio sta-
tions or other sources of electromagnetic radiation.
R AMG vehicles: ESP ®
is deactivated.
R the system is outside the operating temperature range.
R the on-board voltage is too low.
When the causes stated above no longer apply, the display mes-
sage disappears.
Adaptive Brake Assist is operational again.
If the display message does not disappear:
X Pull over and stop the vehicle safely as soon as possible, paying
attention to road and traffic conditions.
X Secure the vehicle against rolling away (Y page 157).
X Clean the front bumper (Y page 291).
X Restart the engine.
X AMG vehicles: reactivate ESP ®
(Y page 69). PRE-SAFE PRE-SAFE
Functions Limited Functions Limited
See See
Operator's
Operator's Man‐
Man‐
ual
ual Adaptive Brake Assist is faulty. The distance warning signal may
also have failed.
X Visit a qualified specialist workshop. 0075
SRS Malfunction SRS Malfunction
Service Required Service Required There is a malfunction in the SRS (Supplemental Restraint Sys-
tem). The
0075warning lamp also lights up in the instrument clus-
ter.
G WARNING
The air bags or Emergency Tensioning Devices may either be trig- gered unintentionally or, in the event of an accident, may not be
triggered.
There is an increased risk of injury.
X Visit a qualified specialist workshop.
Further information on occupant safety (Y page 40).222
Display
messagesOn-board computer and displays
Page 232 of 358
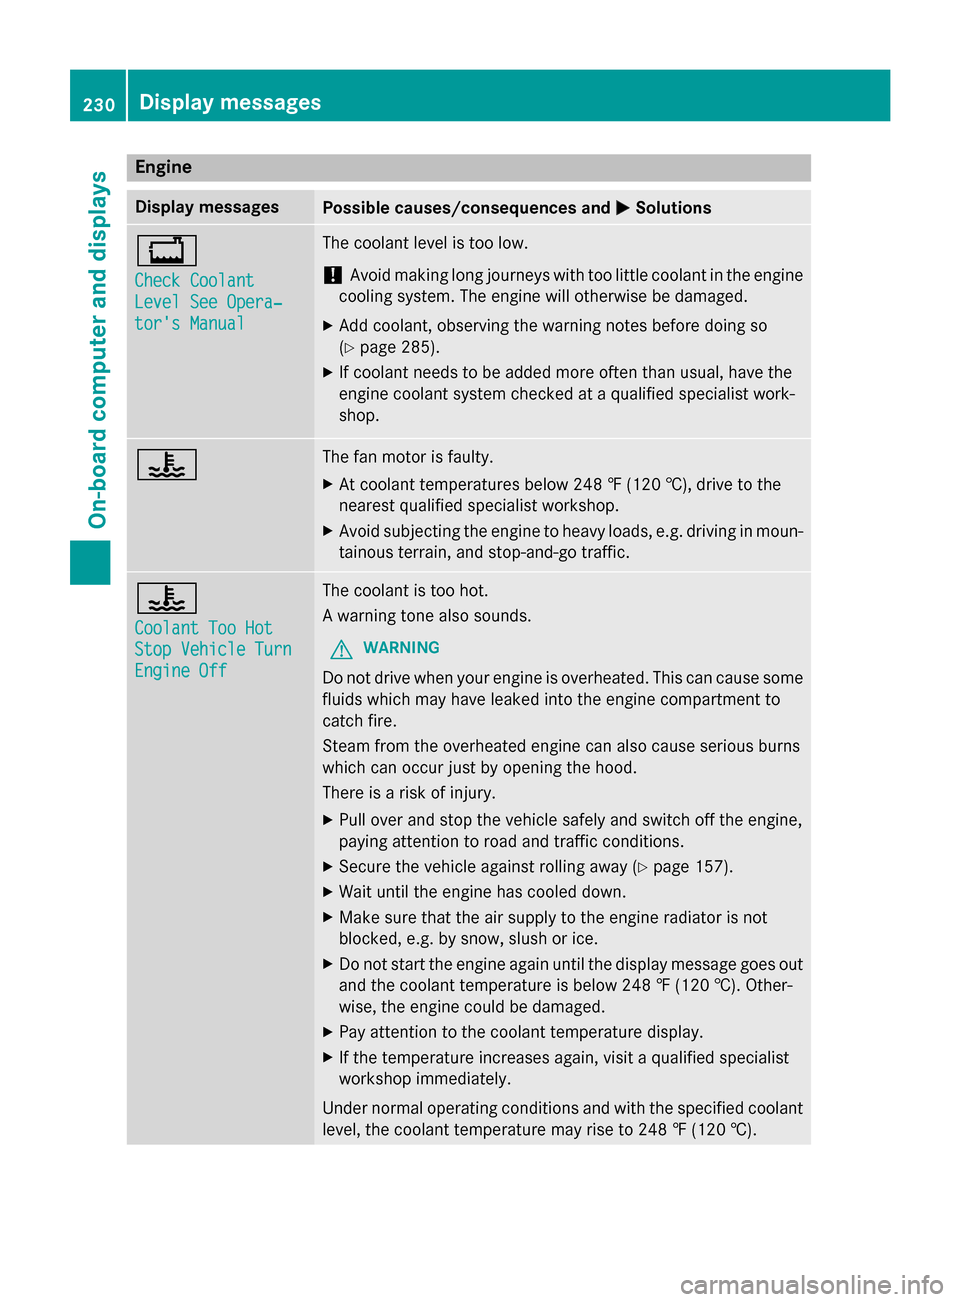
Engine
Display messages
Possible causes/consequences and
0050
0050Solutions 00BD
Check Coolant Check Coolant
Level See Opera‐ Level See Opera‐
tor's Manual tor's Manual The coolant level is too low.
! Avoid making long journeys with too little coolant in the engine
cooling system. The engine will otherwise be damaged.
X Add coolant, observing the warning notes before doing so
(Y page 285).
X If coolant needs to be added more often than usual, have the
engine coolant system checked at a qualified specialist work-
shop. 00AC The fan motor is faulty.
X At coolant temperatures below 248 ‡ (120 †), drive to the
nearest qualified specialist workshop.
X Avoid subjecting the engine to heavy loads, e.g. driving in moun-
tainous terrain, and stop-and-go traffic. 00AC
Coolant Too Hot Coolant Too Hot
Stop Vehicle Turn Stop Vehicle Turn
Engine Off Engine Off The coolant is too hot.
A warning tone also sounds.
G WARNING
Do not drive when your engine is overheated. This can cause some
fluids which may have leaked into the engine compartment to
catch fire.
Steam from the overheated engine can also cause serious burns
which can occur just by opening the hood.
There is a risk of injury.
X Pull over and stop the vehicle safely and switch off the engine,
paying attention to road and traffic conditions.
X Secure the vehicle against rolling away (Y page 157).
X Wait until the engine has cooled down.
X Make sure that the air supply to the engine radiator is not
blocked, e.g. by snow, slush or ice.
X Do not start the engine again until the display message goes out
and the coolant temperature is below 248 ‡ (120 †). Other-
wise, the engine could be damaged.
X Pay attention to the coolant temperature display.
X If the temperature increases again, visit a qualified specialist
workshop immediately.
Under normal operating conditions and with the specified coolant
level, the coolant temperature may rise to 248 ‡ (120 †). 230
Display messagesOn-board computer and displays
Page 233 of 358
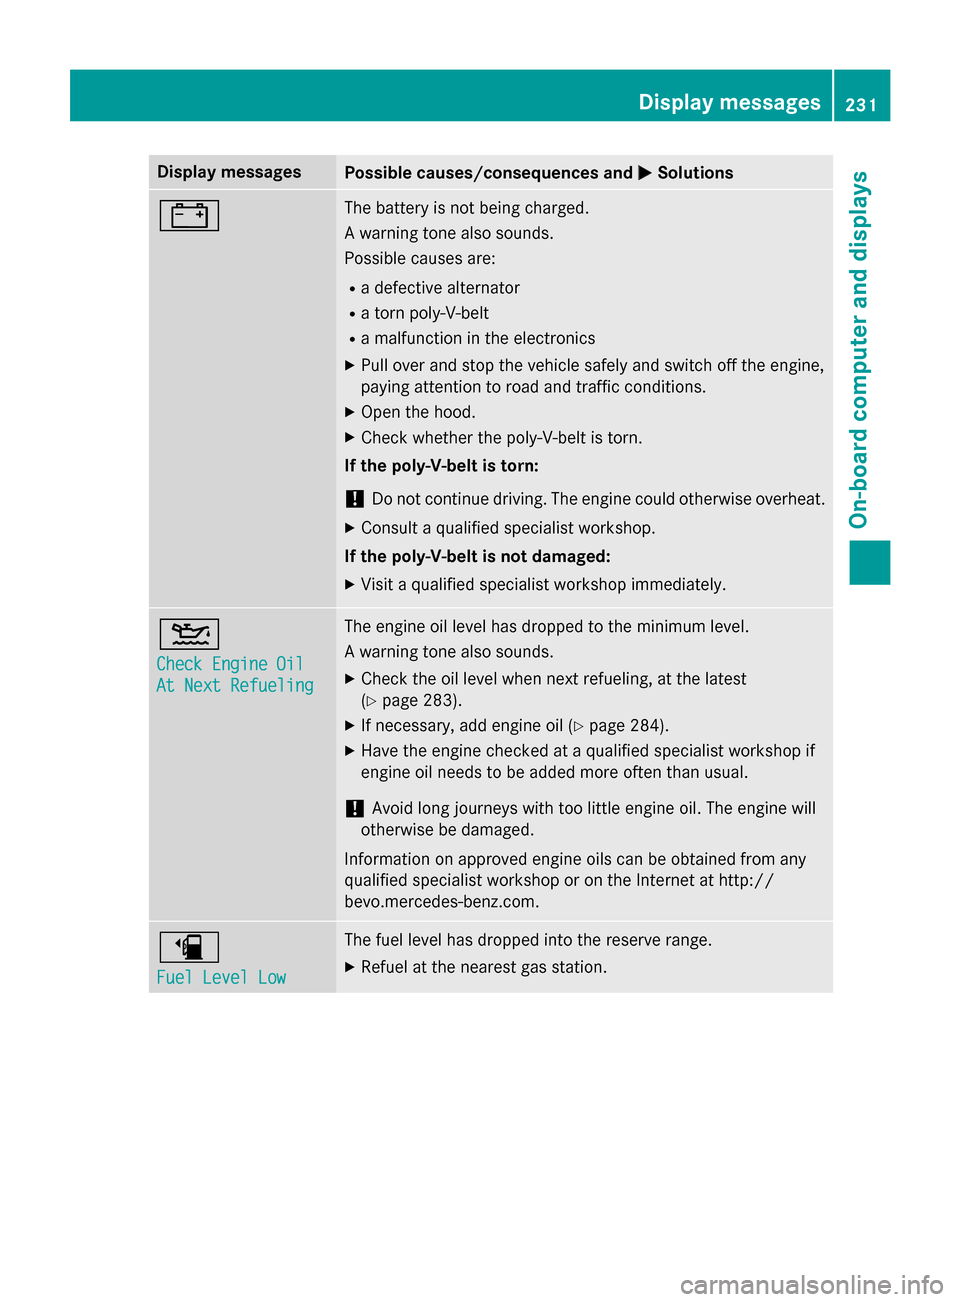
Display messages
Possible causes/consequences and
0050
0050Solutions 003D The battery is not being charged.
A warning tone also sounds.
Possible causes are:
R a defective alternator
R a torn poly-V-belt
R a malfunction in the electronics
X Pull over and stop the vehicle safely and switch off the engine,
paying attention to road and traffic conditions.
X Open the hood.
X Check whether the poly-V-belt is torn.
If the poly-V-belt is torn:
! Do not continue driving. The engine could otherwise overheat.
X Consult a qualified specialist workshop.
If the poly-V-belt is not damaged:
X Visit a qualified specialist workshop immediately. 00B2
Check Engine Oil Check Engine Oil
At Next Refueling At Next Refueling The engine oil level has dropped to the minimum level.
A warning tone also sounds.
X Check the oil level when next refueling, at the latest
(Y page 283).
X If necessary, add engine oil (Y page 284).
X Have the engine checked at a qualified specialist workshop if
engine oil needs to be added more often than usual.
! Avoid long journeys with too little engine oil. The engine will
otherwise be damaged.
Information on approved engine oils can be obtained from any
qualified specialist workshop or on the Internet at http://
bevo.mercedes-benz.co m.00D4
Fuel Level Low Fuel Level Low The fuel level has dropped into the reserve range.
X Refuel at the nearest gas station. Display messages
231On-board computer and displays Z