Side lights MERCEDES-BENZ CLA-Class 2014 C117 User Guide
[x] Cancel search | Manufacturer: MERCEDES-BENZ, Model Year: 2014, Model line: CLA-Class, Model: MERCEDES-BENZ CLA-Class 2014 C117Pages: 358, PDF Size: 6.6 MB
Page 112 of 358
specific regulations for the use of rear fog
lamps.
X To switch on the rear fog lamps: turn the
SmartKey in the ignition lock to position 2
or start the engine.
X Turn the light switch to 0058or0058.
X Press the 005Ebutton.
The yellow 005Eindicator lamp in the
instrument cluster lights up.
X To switch off the rear fog lamp: press the
005E button.
The yellow 005Eindicator lamp in the
instrument cluster goes out.
i When the rear fog lamp is switched on,
the center brake lamp in the tail lamp
switches off due to a legal requirement.
Parking lamps ! If the battery has been excessively dis-
charged, the parking lamps or standing
lamps are automatically switched off to
enable the next engine start. Always park
your vehicle safely and sufficiently lit
according to legal standards. Avoid the
continuous use of the 0060parking lamps
for several hours. If possible, switch on the
0064 right or the 0063left standing lamp.
X To switch on: turn the light switch to 0060.
The green 0060indicator lamp in the instru-
ment cluster lights up.
Standing lamps
Switching on the standing lamps ensures the
corresponding side of the vehicle is illumina-
ted.
X To switch on the standing lamps: the
SmartKey is not in the ignition lock or it is in position 0.
X Turn the light switch to 0063(left-hand side
of the vehicle) or 0064(right-hand side of
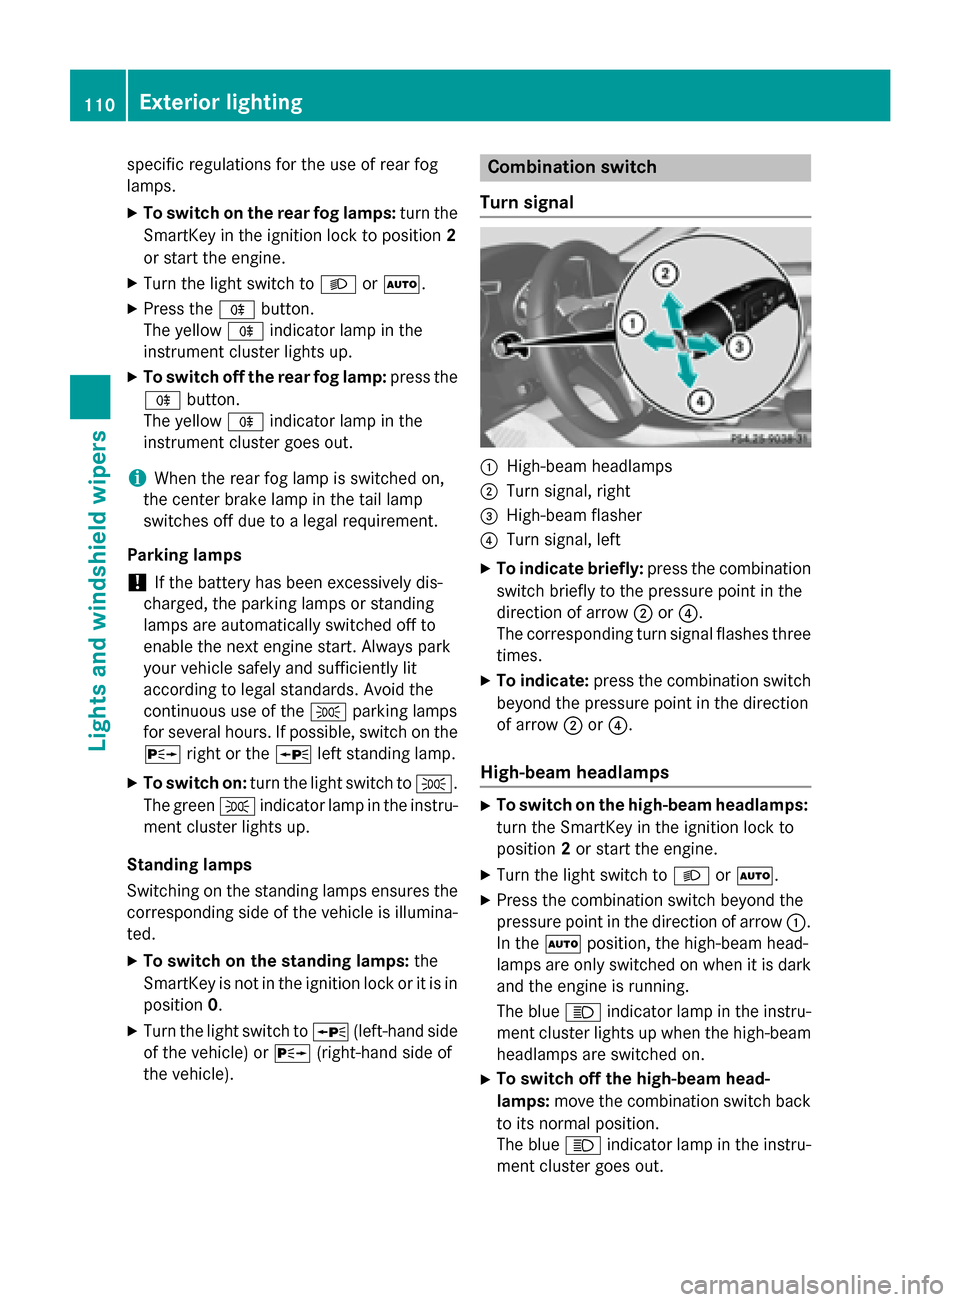
the vehicle). Combination switch
Turn signal 0043
High-beam headlamps
0044 Turn signal, right
0087 High-beam flasher
0085 Turn signal, left
X To indicate briefly: press the combination
switch briefly to the pressure point in the
direction of arrow 0044or0085.
The corresponding turn signal flashes three
times.
X To indicate: press the combination switch
beyond the pressure point in the direction
of arrow 0044or0085.
High-beam headlamps X
To switch on the high-beam headlamps:
turn the SmartKey in the ignition lock to
position 2or start the engine.
X Turn the light switch to 0058or0058.
X Press the combination switch beyond the
pressure point in the direction of arrow 0043.
In the 0058position, the high-beam head-
lamps are only switched on when it is dark
and the engine is running.
The blue 0057indicator lamp in the instru-
ment cluster lights up when the high-beam headlamps are switched on.
X To switch off the high-beam head-
lamps: move the combination switch back
to its normal position.
The blue 0057indicator lamp in the instru-
ment cluster goes out. 110
Exterior lightingLights and windshield wipers
Page 113 of 358
i
Vehicles with Adaptive Highbeam Assist:
when Adaptive Highbeam Assist is active, it controls activation of the high-beam head-
lamps (Y page 112).
High-beam flasher X
To switch on: turn the SmartKey in the
ignition lock to position 1or 2or start the
engine.
X Pull the combination switch in the direction
of arrow 0087. Hazard warning lamps
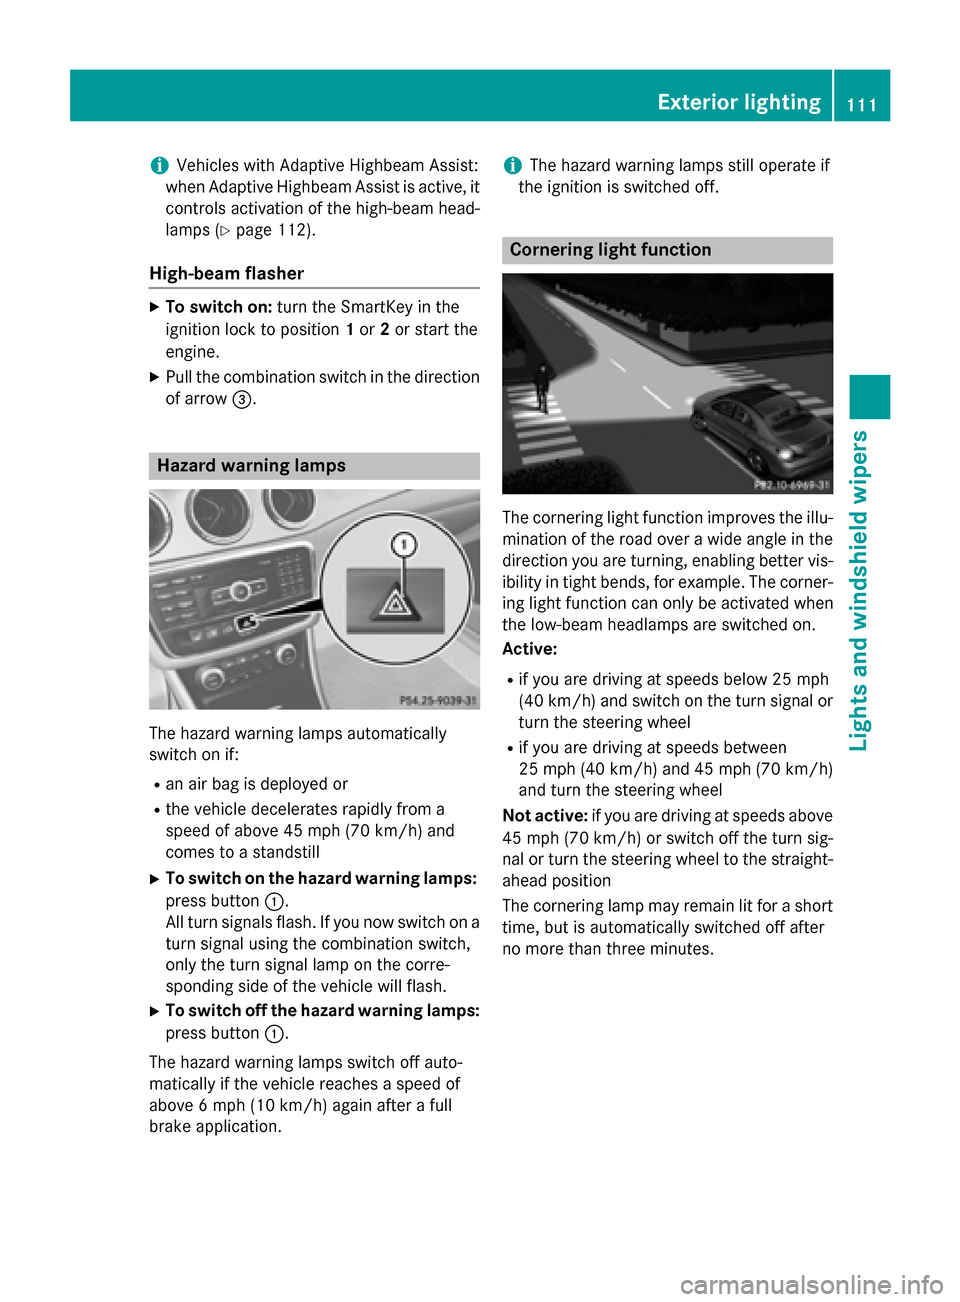
The hazard warning lamps automatically
switch on if:
R an air bag is deployed or
R the vehicle decelerates rapidly from a
speed of above 45 mph (70 km/h) and
comes to a standstill
X To switch on the hazard warning lamps:
press button 0043.
All turn signals flash. If you now switch on a turn signal using the combination switch,
only the turn signal lamp on the corre-
sponding side of the vehicle will flash.
X To switch off the hazard warning lamps:
press button 0043.
The hazard warning lamps switch off auto-
matically if the vehicle reaches a speed of
above 6 mph (10 km/h) again after a full
brake application. i
The hazard warning lamps still operate if
the ignition is switched off. Cornering light function
The cornering light function improves the illu-
mination of the road over a wide angle in the direction you are turning, enabling better vis-
ibility in tight bends, for example. The corner- ing light function can only be activated when
the low-beam headlamps are switched on.
Active:
R if you are driving at speeds below 25 mph
(40 km/h) and switch on the turn signal or
turn the steering wheel
R if you are driving at speeds between
25 mph (40 km/h) and 45 mph (70 km/h)
and turn the steering wheel
Not active: if you are driving at speeds above
45 mph (70 km/h) or switch off the turn sig-
nal or turn the steering wheel to the straight-
ahead position
The cornering lamp may remain lit for a short
time, but is automatically switched off after
no more than three minutes. Exterior lighting
111Lights and windshield wipers Z
Page 115 of 358
In particular, the detection of obstacles can
be restricted if there is:
R poor visibility, e.g. due to fog, heavy rain or
snow
R dirt on the sensors or the sensors are
obscured
Switching Adaptive Highbeam Assist
on/off X
To switch on: turn the light switch to 0058.
X Press the combination switch beyond the
pressure point in the direction of arrow 0043.
The 00CE indicator lamp in the multifunc-
tion display lights up when it is dark and the
light sensor activates the low-beam head-
lamps.
If you are driving at speeds above approx-
imately 16 mph (25 km/h):
The headlamp range is set automatically
depending on the distance between the
vehicle and other road users.
If you are driving at speeds above approx-
imately 19 mph (30 km/h) and no other
road users have been detected:
The high-beam headlamps are switched on automatically. The 0057indicator lamp in
the instrument cluster also lights up.
If you are driving at speeds below approx-
imately 16 mph (25 km/h) or other road
users have been detected or the roads are
adequately lit:
The high-beam headlamps are switched off
automatically. The 0057indicator lamp in
the instrument cluster goes out. The 00CE
indicator lamp in the multifunction display
remains lit.
X To switch off: move the combination
switch back to its normal position or move
the light switch to another position.
The 00CE indicator lamp in the instrument
cluster goes out. Headlamps fogged up on the inside
Certain climatic and physical conditions may
cause moisture to form in the headlamp. This moisture does not affect the functionality of
the headlamp. Interior lighting
Overview of interior lighting
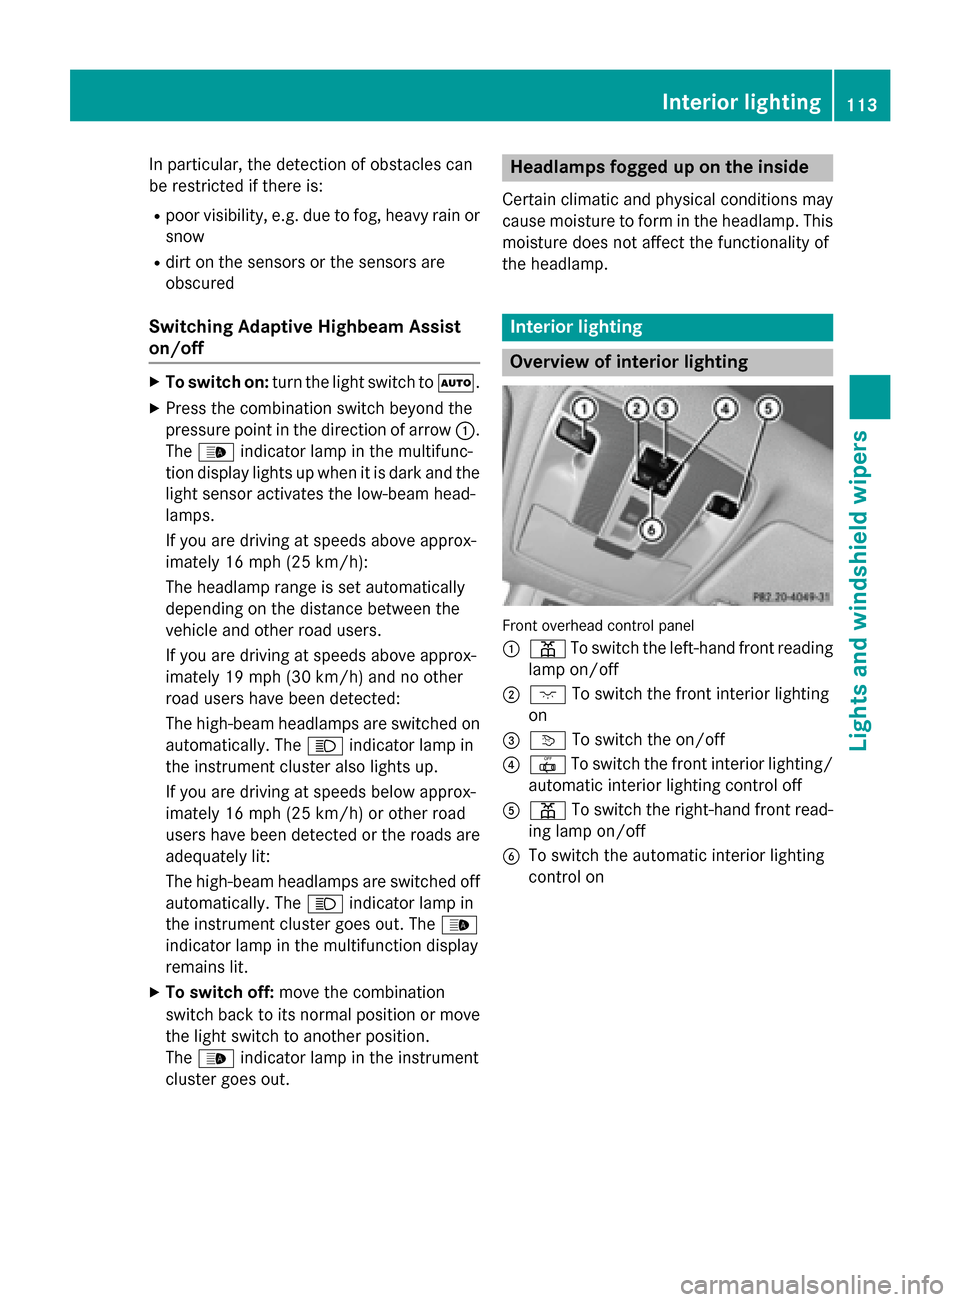
Front overhead control panel
0043
003D To switch the left-hand front reading
lamp on/off
0044 004A To switch the front interior lighting
on
0087 0043 To switch the on/off
0085 0033 To switch the front interior lighting/
automatic interior lighting control off
0083 003D To switch the right-hand front read-
ing lamp on/off
0084 To switch the automatic interior lighting
control on Interior lighting
113Lights and windshield wipers Z
Page 119 of 358
X
Turn housing cover 0043counter-clockwise
and pull it out.
X Turn bulb 0044counter-clockwise and pull it
out.
X Insert the new bulb and engage it to the
stop.
X Align housing cover 0043and turn it clock-
wise until it engages.
Turn signals (halogen headlamps) X
Switch off the lights.
X Open the hood.
X Turn bulb holder 0043counter-clockwise and
pull it out.
X Take the bulb out of bulb holder 0043.
X Insert the new bulb into bulb holder 0043.
X Insert bulb holder 0043and turn it clockwise
until it engages.
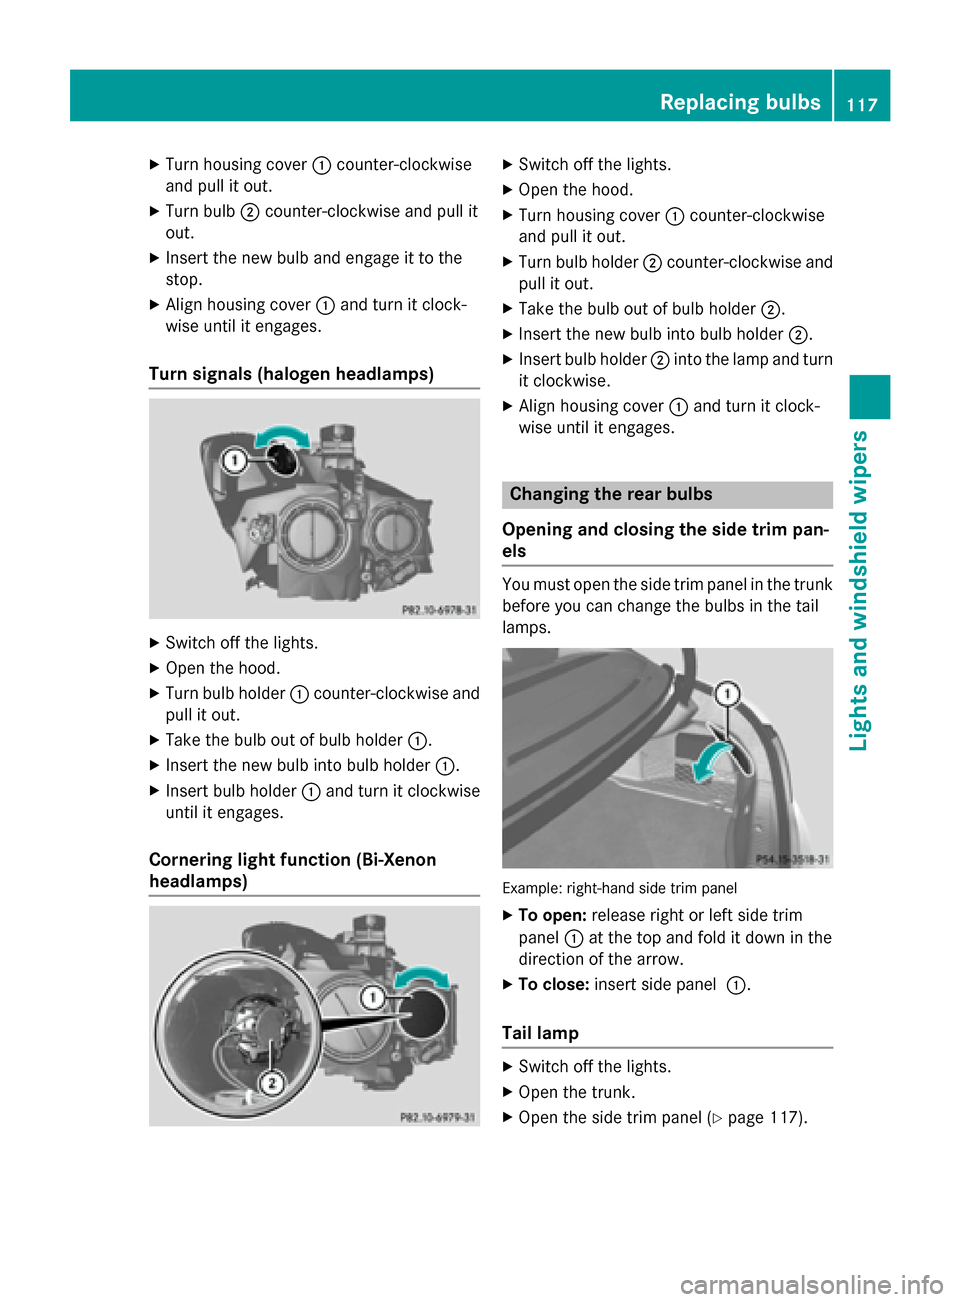
Cornering light function (Bi-Xenon
headlamps) X
Switch off the lights.
X Open the hood.
X Turn housing cover 0043counter-clockwise
and pull it out.
X Turn bulb holder 0044counter-clockwise and
pull it out.
X Take the bulb out of bulb holder 0044.
X Insert the new bulb into bulb holder 0044.
X Insert bulb holder 0044into the lamp and turn
it clockwise.
X Align housing cover 0043and turn it clock-
wise until it engages. Changing the rear bulbs
Opening and closing the side trim pan-
els You must open the side trim panel in the trunk
before you can change the bulbs in the tail
lamps. Example: right-hand side trim panel
X To open: release right or left side trim
panel 0043at the top and fold it down in the
direction of the arrow.
X To close: insert side panel 0043.
Tail lamp X
Switch off the lights.
X Open the trunk.
X Open the side trim panel (Y page 117). Replacing bulbs
117Lights and windshield wipers Z
Page 120 of 358
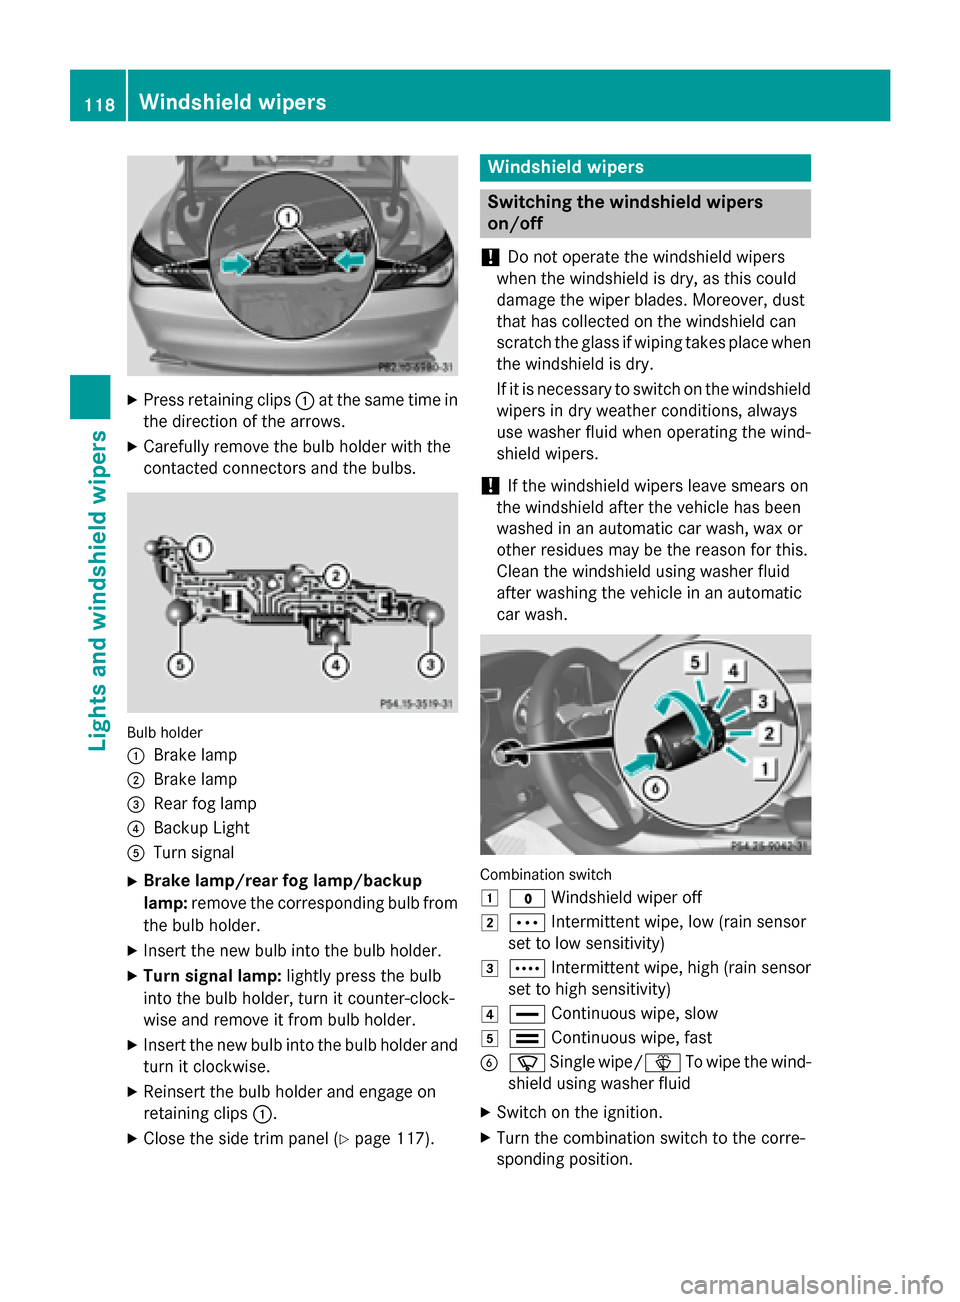
X
Press retaining clips 0043at the same time in
the direction of the arrows.
X Carefully remove the bulb holder with the
contacted connectors and the bulbs. Bulb holder
0043
Brake lamp
0044 Brake lamp
0087 Rear fog lamp
0085 Backup Light
0083 Turn signal
X Brake lamp/rear fog lamp/backup
lamp: remove the corresponding bulb from
the bulb holder.
X Insert the new bulb into the bulb holder.
X Turn signal lamp: lightly press the bulb
into the bulb holder, turn it counter-clock-
wise and remove it from bulb holder.
X Insert the new bulb into the bulb holder and
turn it clockwise.
X Reinsert the bulb holder and engage on
retaining clips 0043.
X Close the side trim panel (Y page 117). Windshield wipers
Switching the windshield wipers
on/off
! Do not operate the windshield wipers
when the windshield is dry, as this could
damage the wiper blades. Moreover, dust
that has collected on the windshield can
scratch the glass if wiping takes place when the windshield is dry.
If it is necessary to switch on the windshield wipers in dry weather conditions, always
use washer fluid when operating the wind-
shield wipers.
! If the windshield wipers leave smears on
the windshield after the vehicle has been
washed in an automatic car wash, wax or
other residues may be the reason for this.
Clean the windshield using washer fluid
after washing the vehicle in an automatic
car wash. Combination switch
0047
003F Windshield wiper off
0048 0062 Intermittent wipe, low (rain sensor
set to low sensitivity)
0049 0063 Intermittent wipe, high (rain sensor
set to high sensitivity)
004A 00AA Continuous wipe, slow
004B 00A9 Continuous wipe, fast
0084 00D3 Single wipe/00D4 To wipe the wind-
shield using washer fluid
X Switch on the ignition.
X Turn the combination switch to the corre-
sponding position. 118
Windshield wipersLights and windshield wipers
Page 131 of 358
R
Only available on vehicles for Canada:
use the residual heat function if you want to
heat or ventilate the vehicle interior when
the ignition is switched off. The residual
heat function can only be activated or deac-
tivated with the ignition switched off.
R Vehicles with COMAND: if you change the
settings of the climate control system, the
climate status display appears for three
seconds at the bottom of the screen in the COMAND display. See also the separate
COMAND operating instructions. You will
see the current settings of the various cli-
mate control functions.
ECO start/stop function During automatic engine switch-off, the cli-
mate control system only operates at a
reduced capacity. If you require the full cli-
mate control output, you can switch off the
ECO start/stop function by pressing the ECO
button (Y page 144). Operating the climate control sys-
tems Switching climate control on/off
General notes When the climate control is switched off, the
air supply and air circulation are also
switched off. The windows could fog up.
Therefore, switch off climate control only
briefly
Climate control X
Turn the SmartKey to position 2in the igni-
tion lock (Y page 141).
X To switch on: turn control0083clockwise to
the desired position (except position 0)
(Y page 125).
X To switch off: turn control0083counter-
clockwise to position 0(Y page 125). Dual-zone automatic climate control X
Turn the SmartKey to position 2in the igni-
tion lock (Y page 141).
X To activate: press the0058button.
The indicator lamp in the 0058button lights
up. Airflow and air distribution are set to
automatic mode.
or
X Press the 0078button.
The indicator lamp in the 0078button goes
out. The previously selected settings are
restored.
X To deactivate: press the0078button.
The indicator lamp in the 0078button lights
up.
i Dual-zone automatic climate control:
switch on climate control primarily using
the 0058 button. Activating/deactivating cooling with
air dehumidification
General notes If you deactivate the "Cooling with air-dehu-
midification" function, the air inside the vehi-
cle will not be cooled. The air inside the vehi-cle will also not be dehumidified. The win-
dows can fog up more quickly. Therefore, only
deactivate the "Cooling with air-dehumidifi-
cation" function briefly.
The "Cooling with air dehumidification" func-
tion is only available when the engine is run-
ning. The air inside the vehicle is cooled and
dehumidified according to the temperature
selected.
Condensation may drip from the underside of the vehicle when it is in cooling mode. This is
normal and not a sign that there is a malfunc- tion. Operating the climate control systems
129Climate control
Page 133 of 358
Problems with the "Cooling with air dehumidification" function
Problem
Possible causes/consequences and
0050
0050Solutions The indicator lamp in
the
005A button
flashes three times or
remains off. The "Cool-
ing with air dehumidifi-
cation" function cannot
be switched on. Cooling with air dehumidification has been deactivated due to a
malfunction.
X Visit a qualified specialist workshop. Setting climate control to automatic
General notes The automatic function is only available in
conjunction with dual-zone automatic climate
control.
In automatic mode, the set temperature is
maintained automatically at a constant level. The system automatically regulates the tem-
perature of the dispensed air, the airflow and
the air distribution.
The automatic mode functions optimally
when the "Cooling with air dehumidification"
function is activated. If necessary, cooling
with air dehumidification can be deactivated.
If you deactivate the "Cooling with air-dehu-
midification" function, the air inside the vehi-
cle will not be cooled. The air inside the vehi- cle will also not be dehumidified. The win-
dows can fog up more quickly. Therefore, only deactivate the "Cooling with air-dehumidifi-
cation" function briefly.
Setting climate control to automatic X
Turn the SmartKey to position 2in the igni-
tion lock (Y page 141).
X Set the desired temperature.
X To activate: press the0058button.
The indicator lamp in the 0058button lights
up. Automatic air distribution and airflow
are activated. X
To switch to manual mode: press the
004F or004A button.
or X Press the 0097or0095 button.
The indicator lamp in the 0058button goes
out. Automatic air distribution and airflow
are deactivated. Setting the temperature
Climate control You can set the temperature for the entire
vehicle.
X Turn the SmartKey to position 2in the igni-
tion lock (Y page 141).
X To increase/reduce: turn control0043
clockwise or counter-clockwise
(Y page 125). Only change the temperature
setting in small increments. Start at 72 ‡
(22 †).
Dual-zone automatic climate control Different temperatures can be set for the
driver's and front-passenger sides.
X Turn the SmartKey to position 2in the igni-
tion lock (Y page 141).
X To increase/reduce: turn control0043or006D
clockwise or counter-clockwise
(Y page 127). Only change the temperature
setting in small increments. Start at 72 ‡
(22 †). Operating the climate control systems
131Climate control
Page 134 of 358
Setting the air distribution
Climate control Air distribution settings
0061
Directs air through the defroster vents
009C Directs air through the center and side
air vents
009B Directs air through the footwell air
vents
i You can also activate several air distribu-
tion settings simultaneously. To do this,
press multiple air distribution buttons. The air is then directed through various vents.
Setting the air distribution X Turn the SmartKey to position 2in the igni-
tion lock (Y page 141).
X Press one or more of the 009C,009B, 0061
buttons.
The corresponding indicator lamp lights up briefly.
Dual-zone automatic climate control Air distribution settings
0061
Directs air through the defroster vents
009C Directs air through the center and side
air vents
009B Directs air through the footwell air
vents
0087 Directs air through the defroster, cen-
ter and side air vents
0086 Directs air through the defroster and
footwell vents
i Regardless of the air distribution setting,
airflow is always directed through the side
air vents. The side air vents can only be
closed if the adjusters are turned clockwise until they engage. Setting the air distribution
X Turn the SmartKey to position 2in the igni-
tion lock (Y page 141).
X Press the 004For004A button repeatedly
until the desired symbol appears in the dis- play. Setting the airflow
Climate control X
Turn the SmartKey to position 2in the igni-
tion lock (Y page 141).
X To increase/reduce: turn control0083
clockwise or counter-clockwise
(Y page 125).
Dual-zone automatic climate control X
Turn the SmartKey to position 2in the igni-
tion lock (Y page 141).
X To increase/reduce: press the0097or
0095 button. Switching the ZONE function on/off
This function is only available with dual-zone
automatic climate control.
X To activate: press the00D6button.
The indicator lamp in the 00D6button lights
up.
The temperature setting for the driver's
side is not adopted for the front-passenger
side.
X To deactivate: press the00D6button.
The indicator lamp in the 00D6button goes
out.
The temperature setting for the driver's
side is adopted for the front-passenger
side. 132
Operating the climate control systemsClimate control
Page 135 of 358
Defrosting the windshield
You can use this function to defrost the wind-
shield or to defrost the inside of the wind-
shield and the side windows.
i You should only select the "Windshield
defrosting" function until the windshield is
clear again.
X Turn the SmartKey to position 2in the igni-
tion lock (Y page 141).
X To activate: press the0064button.
The indicator lamp in the 0064button lights
up.
The climate control system switches to the
following functions:
R high airflow
R high temperature
R air distribution to the windshield and
front side windows
R air-recirculation mode off
i The "Windshield defrosting" function
automatically sets the blower output to the optimum defrosting effect. As a result, the
airflow may increase or decrease automat-
ically after the button is pressed.
i You can adjust the blower output man-
ually while the "Windshield defrosting"
function is in operation:
R Climate control: turn airflow control 0083
clockwise or counter-clockwise
(Y page 125).
R Dual-zone automatic climate control:
press the 00F2or00F3 button.
X To deactivate: press the0064button.
The indicator lamp in the 0064button goes
out. The previously selected settings are
restored. Air-recirculation mode remains
deactivated.
or
X Dual-zone automatic climate control: press
the 0058 button.
The indicator lamp in the 0064button goes
out. Airflow and air distribution are set to
automatic mode. or
X Climate control: turn temperature con-
trol 0043clockwise or counter-clockwise
(Y page 125).
Dual-zone automatic climate control: turn
temperature control 0043or006D clockwise or
counter-clockwise (Y page 127). MAX COOL maximum cooling
The MAX COOL function is only available in
vehicles for the USA.
MAX COOL is only operational when the
engine is running. X To activate: press the00C9button.
The indicator lamp in the button lights up.
X To deactivate: press the00C9button
again.
The indicator lamp goes out. The previously selected settings are restored.
When you activate MAX COOL, climate con-
trol switches to the following functions:
R maximum cooling
R maximum airflow
R air-recirculation mode on Defrosting the windows
Windows fogged up on the inside Climate control
X Activate the 005A"Cooling with air dehu-
midification" function.
X If the windows continue to fog up, activate
the 0064 "Windshield defrosting" function.
i You should only select this setting until
the windshield is clear again. Operating the climate cont
rol systems
133Climate control
Page 136 of 358
Dual-zone automatic climate control
X Activate the 005A"Cooling with air dehu-
midification" function.
X Activate automatic mode 0058.
X If the windows continue to fog up, activate
the 0064 "Windshield defrosting" function.
i You should only select this setting until
the windshield is clear again.
Windows fogged up on the outside X
Activate the windshield wipers.
X Set the air distribution to 009Cor009B.
i You should only select this setting until
the windshield is clear again. Rear window defroster
General notes The rear window defroster has a high current
draw. You should therefore switch it off as
soon as the rear window is clear. Otherwise,
the rear window defroster switches off auto-
matically after several minutes.
If the battery voltage is too low, the rear win-
dow defroster may switch off.
Activating/deactivating X
Turn the SmartKey to position 2in the igni-
tion lock (Y page 141).
X Press the 006Cbutton.
The indicator lamp in the 006Cbutton lights
up or goes out. 134
Operating the climate cont
rol systemsClimate control