wipers MERCEDES-BENZ CLA-Class 2014 C117 User Guide
[x] Cancel search | Manufacturer: MERCEDES-BENZ, Model Year: 2014, Model line: CLA-Class, Model: MERCEDES-BENZ CLA-Class 2014 C117Pages: 358, PDF Size: 6.6 MB
Page 117 of 358
Bulbs and lamps are an important aspect of
vehicle safety. You must therefore make sure that these function correctly at all times.
Have the headlamp setting checked regularly.
Other bulbs G
WARNING
Bulbs, lamps and connectors can get very hot when operating. If you change a bulb, you
could burn yourself on these components.
There is a risk of injury.
Allow these components to cool down before changing a bulb.
Do not use a bulb that has been dropped or if
its glass tube has been scratched.
The bulb may explode if:
R you touch it
R it is hot
R you drop it
R you scratch it
Only operate bulbs in enclosed lamps
designed for that purpose. Only install spare
bulbs of the same type and the specified volt- age.
Marks on the glass tube reduce the service
life of the bulbs. Do not touch the glass tube
with your bare hands. If necessary, clean the
glass tube when cold with alcohol or spirit and
rub it off with a lint-free cloth.
Protect bulbs from moisture during opera-
tion. Do not allow bulbs to come into contact
with liquids.
There are bulbs other than the Xenon bulbs
that you cannot replace. Replace only the
bulbs listed (Y page 115). Have the bulbs that
you cannot replace yourself changed at a
qualified specialist workshop.
If you require assistance changing bulbs, con- sult a qualified specialist workshop.
If the new bulb still does not light up, consult
a qualified specialist workshop.
Bulbs and lamps are an important aspect of
vehicle safety. You must therefore make sure that these function correctly at all times.
Have the headlamp setting checked regularly. Overview: changing bulbs/bulb types
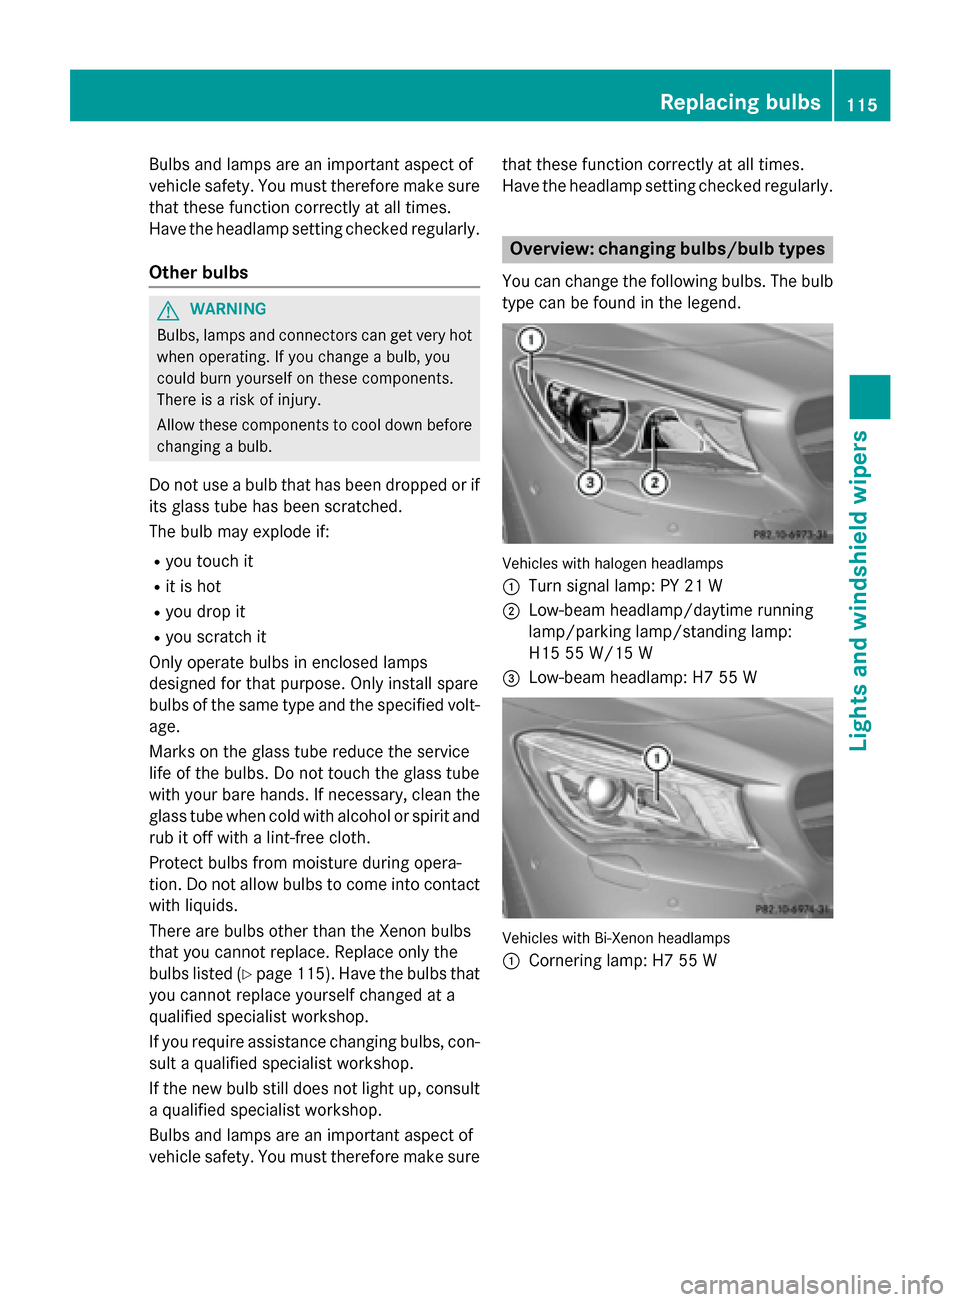
You can change the following bulbs. The bulb type can be found in the legend. Vehicles with halogen headlamps
0043
Turn signal lamp: PY 21 W
0044 Low-beam headlamp/daytime running
lamp/parking lamp/standing lamp:
H15 55 W/15 W
0087 Low-beam headlamp: H7 55 W Vehicles with Bi-Xenon headlamps
0043
Cornering lamp: H7 55 W Replacing bulbs
115Lights and windshield wipers Z
Page 118 of 358
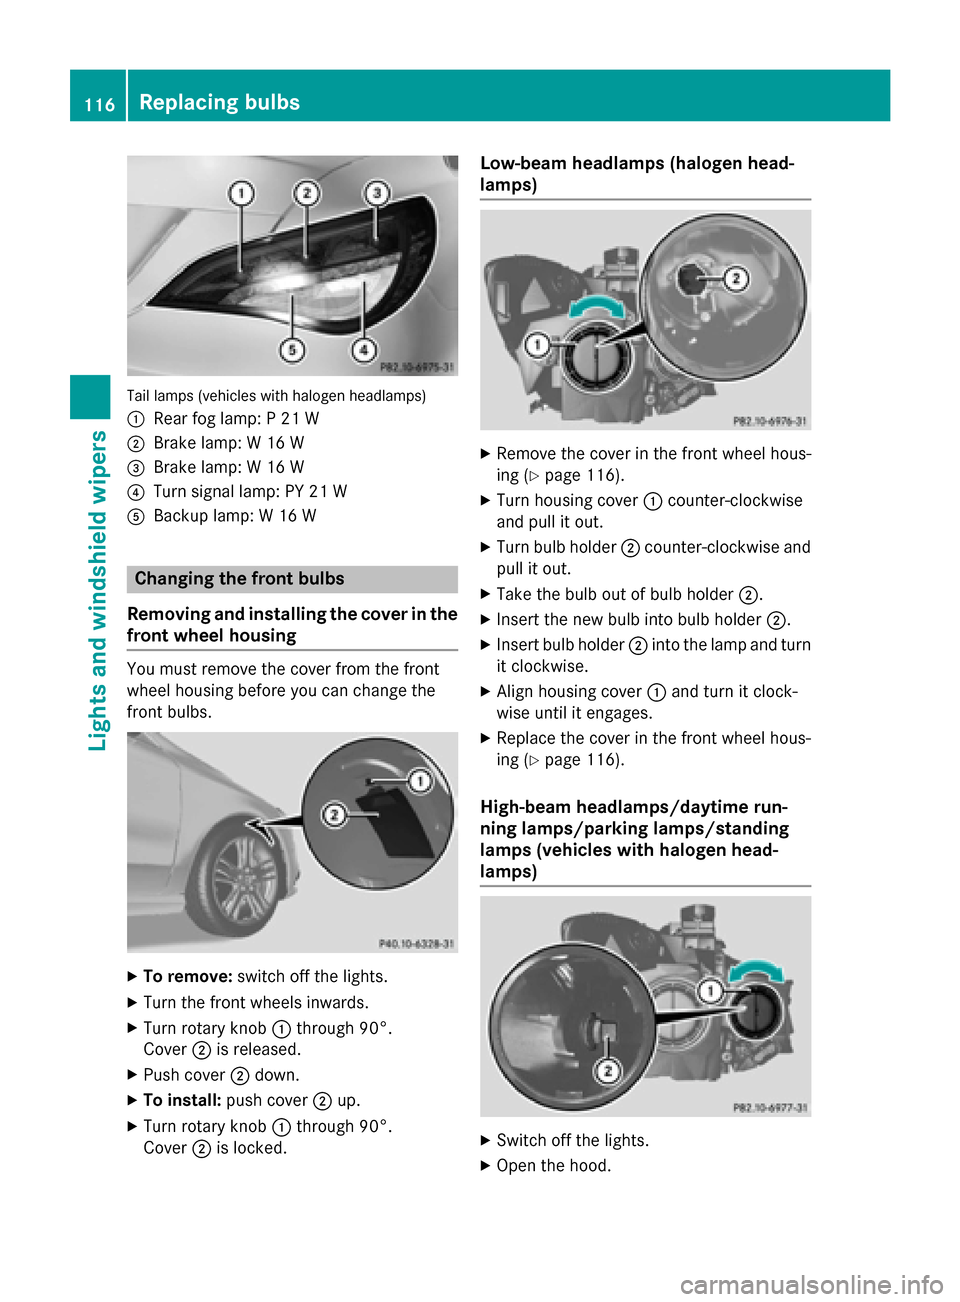
Tail lamps (vehicles with halogen headlamps)
0043 Rear fog lamp: P 21 W
0044 Brake lamp: W 16 W
0087 Brake lamp: W 16 W
0085 Turn signal lamp: PY 21 W
0083 Backup lamp: W 16 W Changing the front bulbs
Removing and installing the cover in the
front wheel housing You must remove the cover from the front
wheel housing before you can change the
front bulbs. X
To remove: switch off the lights.
X Turn the front wheels inwards.
X Turn rotary knob 0043through 90°.
Cover 0044is released.
X Push cover 0044down.
X To install: push cover 0044up.
X Turn rotary knob 0043through 90°.
Cover 0044is locked. Low-beam headlamps (halogen head-
lamps)
X
Remove the cover in the front wheel hous-
ing (Y page 116).
X Turn housing cover 0043counter-clockwise
and pull it out.
X Turn bulb holder 0044counter-clockwise and
pull it out.
X Take the bulb out of bulb holder 0044.
X Insert the new bulb into bulb holder 0044.
X Insert bulb holder 0044into the lamp and turn
it clockwise.
X Align housing cover 0043and turn it clock-
wise until it engages.
X Replace the cover in the front wheel hous-
ing (Y page 116).
High-beam headlamps/daytime run-
ning lamps/parking lamps/standing
lamps (vehicles with halogen head-
lamps) X
Switch off the lights.
X Open the hood. 116
Replacing bulbsLights and windshield wipers
Page 119 of 358
X
Turn housing cover 0043counter-clockwise
and pull it out.
X Turn bulb 0044counter-clockwise and pull it
out.
X Insert the new bulb and engage it to the
stop.
X Align housing cover 0043and turn it clock-
wise until it engages.
Turn signals (halogen headlamps) X
Switch off the lights.
X Open the hood.
X Turn bulb holder 0043counter-clockwise and
pull it out.
X Take the bulb out of bulb holder 0043.
X Insert the new bulb into bulb holder 0043.
X Insert bulb holder 0043and turn it clockwise
until it engages.
Cornering light function (Bi-Xenon
headlamps) X
Switch off the lights.
X Open the hood.
X Turn housing cover 0043counter-clockwise
and pull it out.
X Turn bulb holder 0044counter-clockwise and
pull it out.
X Take the bulb out of bulb holder 0044.
X Insert the new bulb into bulb holder 0044.
X Insert bulb holder 0044into the lamp and turn
it clockwise.
X Align housing cover 0043and turn it clock-
wise until it engages. Changing the rear bulbs
Opening and closing the side trim pan-
els You must open the side trim panel in the trunk
before you can change the bulbs in the tail
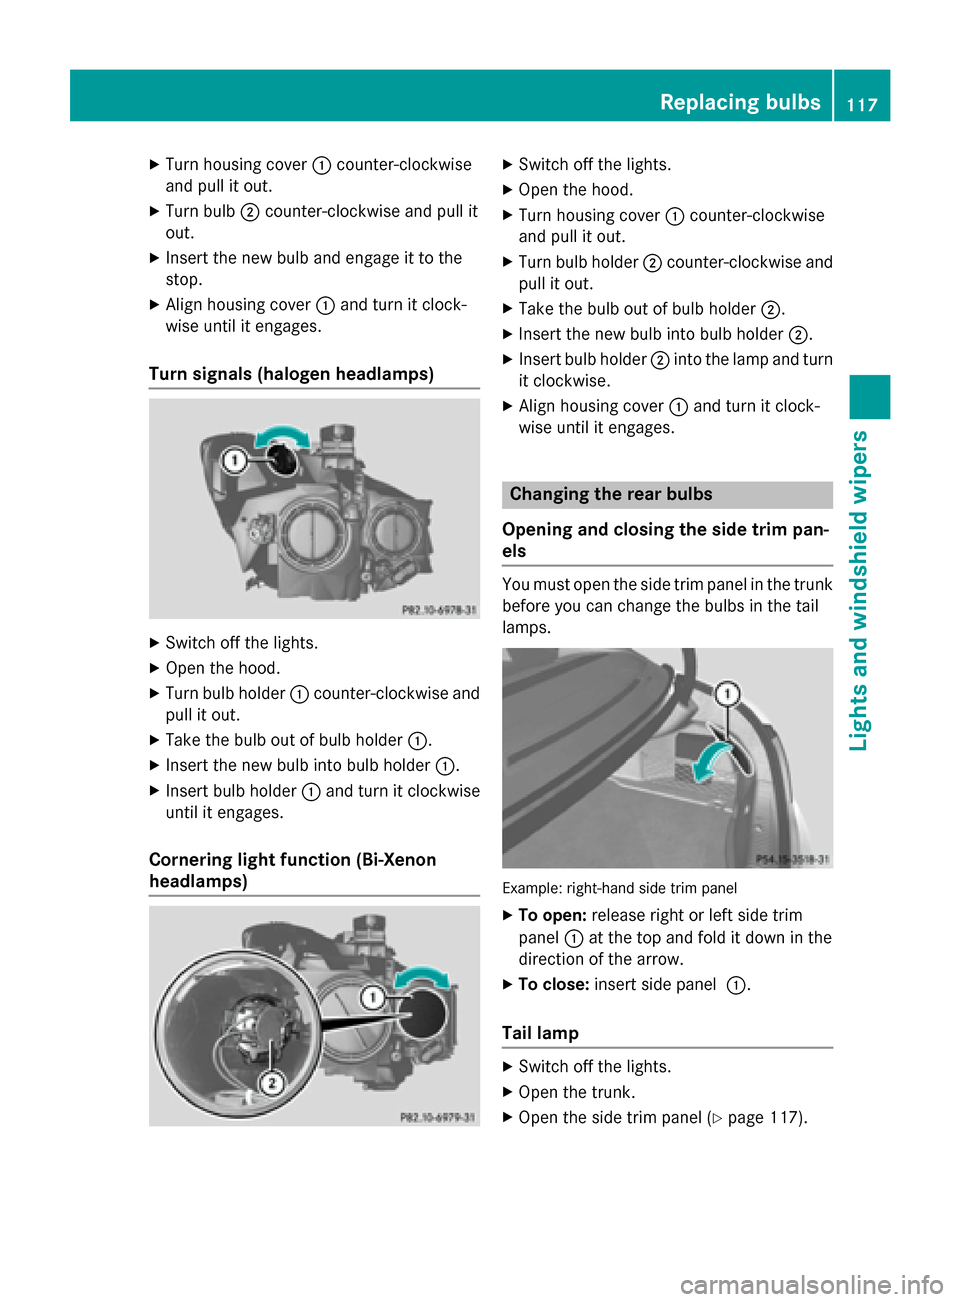
lamps. Example: right-hand side trim panel
X To open: release right or left side trim
panel 0043at the top and fold it down in the
direction of the arrow.
X To close: insert side panel 0043.
Tail lamp X
Switch off the lights.
X Open the trunk.
X Open the side trim panel (Y page 117). Replacing bulbs
117Lights and windshield wipers Z
Page 120 of 358
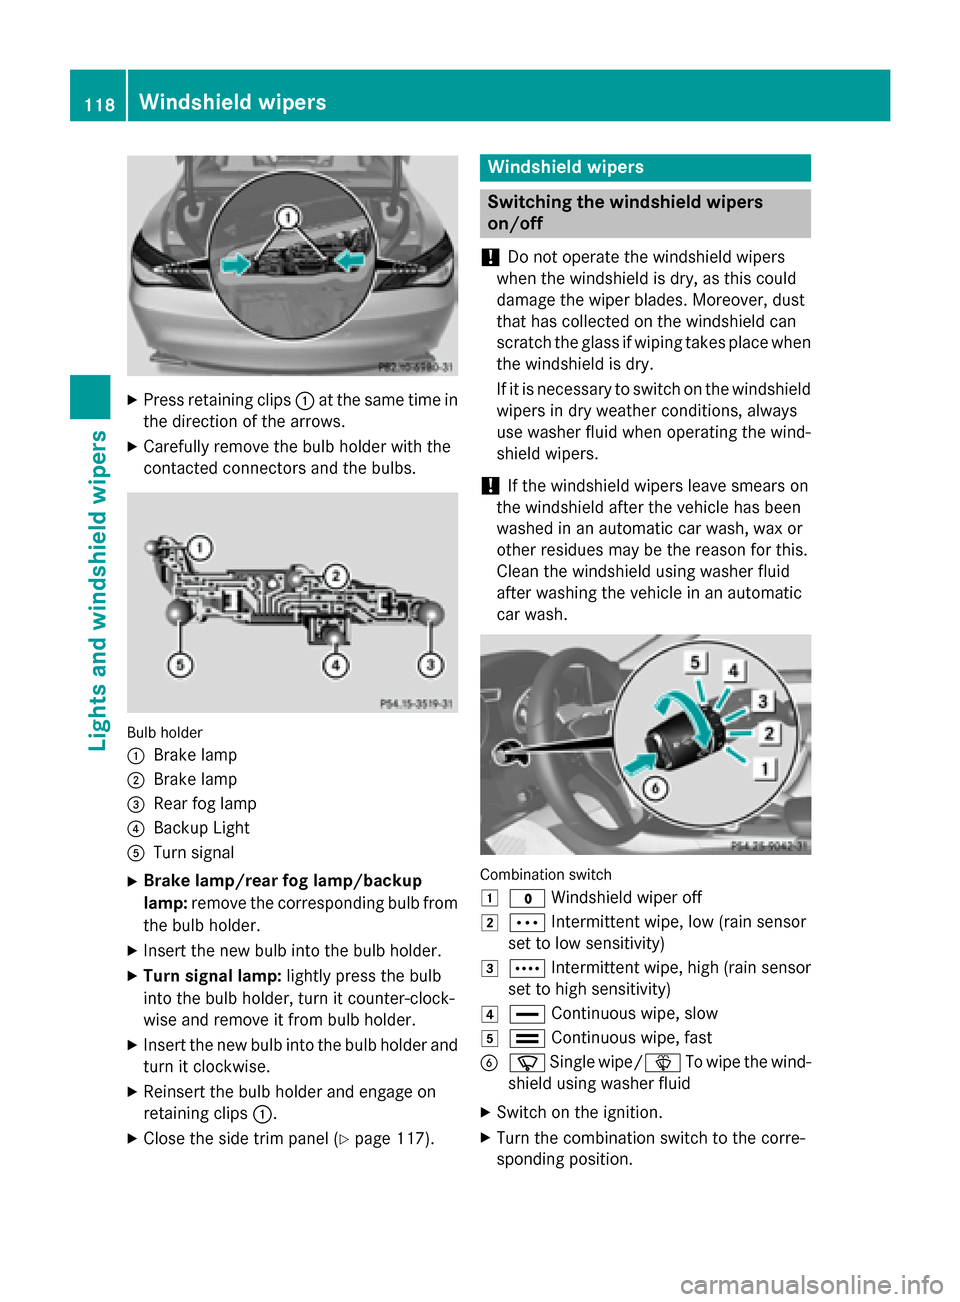
X
Press retaining clips 0043at the same time in
the direction of the arrows.
X Carefully remove the bulb holder with the
contacted connectors and the bulbs. Bulb holder
0043
Brake lamp
0044 Brake lamp
0087 Rear fog lamp
0085 Backup Light
0083 Turn signal
X Brake lamp/rear fog lamp/backup
lamp: remove the corresponding bulb from
the bulb holder.
X Insert the new bulb into the bulb holder.
X Turn signal lamp: lightly press the bulb
into the bulb holder, turn it counter-clock-
wise and remove it from bulb holder.
X Insert the new bulb into the bulb holder and
turn it clockwise.
X Reinsert the bulb holder and engage on
retaining clips 0043.
X Close the side trim panel (Y page 117). Windshield wipers
Switching the windshield wipers
on/off
! Do not operate the windshield wipers
when the windshield is dry, as this could
damage the wiper blades. Moreover, dust
that has collected on the windshield can
scratch the glass if wiping takes place when the windshield is dry.
If it is necessary to switch on the windshield wipers in dry weather conditions, always
use washer fluid when operating the wind-
shield wipers.
! If the windshield wipers leave smears on
the windshield after the vehicle has been
washed in an automatic car wash, wax or
other residues may be the reason for this.
Clean the windshield using washer fluid
after washing the vehicle in an automatic
car wash. Combination switch
0047
003F Windshield wiper off
0048 0062 Intermittent wipe, low (rain sensor
set to low sensitivity)
0049 0063 Intermittent wipe, high (rain sensor
set to high sensitivity)
004A 00AA Continuous wipe, slow
004B 00A9 Continuous wipe, fast
0084 00D3 Single wipe/00D4 To wipe the wind-
shield using washer fluid
X Switch on the ignition.
X Turn the combination switch to the corre-
sponding position. 118
Windshield wipersLights and windshield wipers
Page 121 of 358

!
Vehicles with a rain sensor: if the wind-
shield becomes dirty in dry weather condi-
tions, the windshield wipers may be activa- ted inadvertently. This could then damage
the windshield wiper blades or scratch the
windshield.
For this reason, you should always switch
off the windshield wipers in dry weather.
Vehicles with a rain sensor: in the0062or
0063 position, the appropriate wiping fre-
quency is automatically set according to the
intensity of the rain. In the 0063position, the
rain sensor is more sensitive than in the 0062
position, causing the windshield wipers to
wipe more frequently.
If the wiper blades are worn, the windshield
will no longer be wiped properly. This could
prevent you from observing the traffic condi-
tions. Replacing the wiper blades
Important safety notes G
WARNING
If the windshield wipers begin to move while
you are changing the wiper blades, you could be trapped by the wiper arm. There is a risk of
injury.
Always switch off the windshield wipers and
ignition before changing the wiper blades.
! To avoid damaging the wiper blades,
make sure that you touch only the wiper
arm of the wiper.
! Never open the hood if a windshield wiper
arm has been folded away from the wind-
shield.
Never fold a windshield wiper arm without a
wiper blade back onto the windshield.
Hold the windshield wiper arm firmly when you change the wiper blade. If you release
the windshield wiper arm without a wiper
blade and it falls onto the windshield, the windshield may be damaged by the force of
the impact.
Mercedes-Benz recommends that you have the wiper blades changed at a qualified
specialist workshop.
Changing the windshield wiper blades Removing the wiper blades
X Remove the SmartKey from the ignition
lock.
X Fold the wiper arm away from the wind-
shield. X
Press both release clips 0044.
X Fold wiper blade 0043in the direction of
arrow 0087away from wiper arm 0085.
X Remove wiper blade 0043in the direction of
arrow 0083.
Installing the wiper blades Windshield wipers
119Lights and windshield wipers Z
Page 122 of 358
X
Position new wiper blade 0043with recess 0084
on lug 0083.
X Fold wiper blade 0043in the direction of
arrow 0087onto the wiper arm, until retaining
clips 0044engage in bracket 0085.
X Make sure that wiper blade 0043is seated
correctly.
X Fold the wiper arm back onto the wind-
shield. 120
Windshield wipersLights and windshield wipers
Page 123 of 358
Problems with the windshield wipers
Problem
Possible causes/consequences and
0050
0050Solutions The windshield wipers
are jammed. Leaves or snow, for example, may be obstructing the windshield
wiper movement. The wiper motor has been deactivated.
X For safety reasons, you should remove the SmartKey from the
ignition lock.
X Remove the cause of the obstruction.
X Switch the windshield wipers back on. The windshield wipers
fail completely. The windshield wiper drive is malfunctioning.
X Select another wiper speed on the combination switch.
X Have the windshield wipers checked at a qualified specialist
workshop. The windshield washer
fluid from the spray
nozzles no longer hits
the center of the wind-
shield. The spray nozzles are misaligned.
X Have the spray nozzles adjusted at a qualified specialist work-
shop. Windshield wipers
121Lights and windshield wipers Z
Page 136 of 358
Dual-zone automatic climate control
X Activate the 005A"Cooling with air dehu-
midification" function.
X Activate automatic mode 0058.
X If the windows continue to fog up, activate
the 0064 "Windshield defrosting" function.
i You should only select this setting until
the windshield is clear again.
Windows fogged up on the outside X
Activate the windshield wipers.
X Set the air distribution to 009Cor009B.
i You should only select this setting until
the windshield is clear again. Rear window defroster
General notes The rear window defroster has a high current
draw. You should therefore switch it off as
soon as the rear window is clear. Otherwise,
the rear window defroster switches off auto-
matically after several minutes.
If the battery voltage is too low, the rear win-
dow defroster may switch off.
Activating/deactivating X
Turn the SmartKey to position 2in the igni-
tion lock (Y page 141).
X Press the 006Cbutton.
The indicator lamp in the 006Cbutton lights
up or goes out. 134
Operating the climate cont
rol systemsClimate control
Page 143 of 358
G
WARNING
Unsuitable footwear can hinder correct usage of the pedals, e.g.:
R shoes with thick soles
R shoes with high heels
R slippers
There is a risk of an accident.
Wear suitable footwear to ensure correct
usage of the pedals. G
WARNING
If you switch off the ignition while driving,
safety-relevant functions are only available
with limitations, or not at all. This could affect, for example, the power steering and the brake
boosting effect. You will require considerably
more effort to steer and brake. There is a risk of an accident.
Do not switch off the ignition while driving. G
WARNING
If the parking brake has not been fully
released when driving, the parking brake can:
R overheat and cause a fire
R lose its hold function.
There is a risk of fire and an accident. Release
the parking brake fully before driving off.
! Warm up the engine quickly. Do not use
the engine's full performance until it has
reached operating temperature.
Only shift the automatic transmission to
the desired drive position when the vehicle
is stationary.
Where possible, avoid spinning the drive
wheels when pulling away on slippery
roads. You could otherwise damage the
drive train.
! AMG vehicles:
avoid full-load operation
and engine speeds greater than 5000 rpm
when the engine is cold. This helps to pro-
tect the engine and avoids uncomfortable
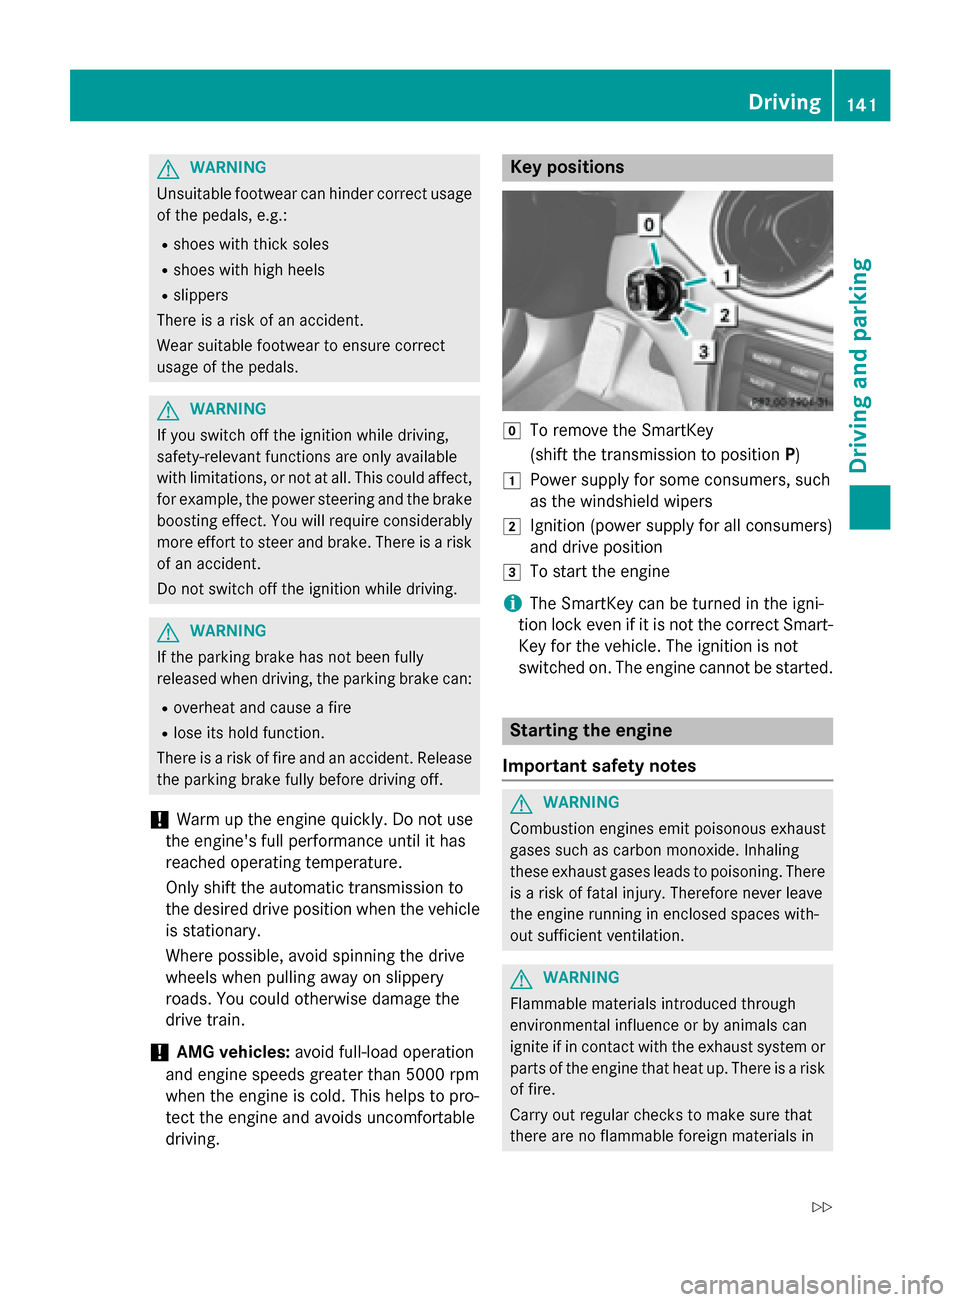
driving. Key positions
005A
To remove the SmartKey
(shift the transmission to position P)
0047 Power supply for some consumers, such
as the windshield wipers
0048 Ignition (power supply for all consumers)
and drive position
0049 To start the engine
i The SmartKey can be turned in the igni-
tion lock even if it is not the correct Smart- Key for the vehicle. The ignition is not
switched on. The engine cannot be started. Starting the engine
Important safety notes G
WARNING
Combustion engines emit poisonous exhaust
gases such as carbon monoxide. Inhaling
these exhaust gases leads to poisoning. There is a risk of fatal injury. Therefore never leave
the engine running in enclosed spaces with-
out sufficient ventilation. G
WARNING
Flammable materials introduced through
environmental influence or by animals can
ignite if in contact with the exhaust system or parts of the engine that heat up. There is a risk
of fire.
Carry out regular checks to make sure that
there are no flammable foreign materials in Driving
141Driving and parking
Z
Page 244 of 358
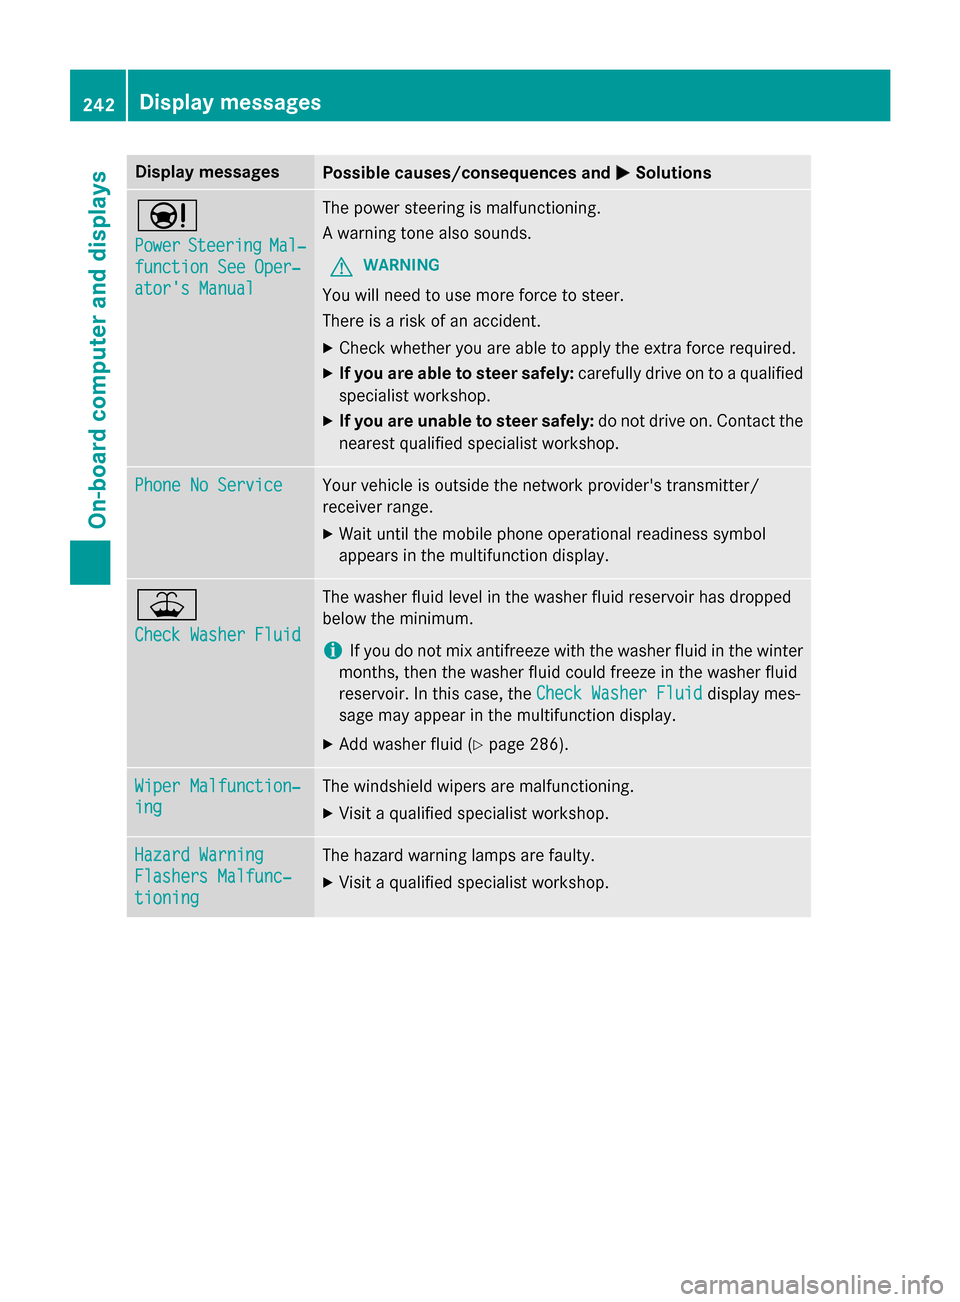
Display messages
Possible causes/consequences and
0050
0050Solutions 00CC
Power Power
Steering
Steering Mal‐
Mal‐
function See Oper‐
function See Oper‐
ator's Manual ator's Manual The power steering is malfunctioning.
A warning tone also sounds.
G WARNING
You will need to use more force to steer.
There is a risk of an accident. X Check whether you are able to apply the extra force required.
X If you are able to steer safely: carefully drive on to a qualified
specialist workshop.
X If you are unable to steer safely: do not drive on. Contact the
nearest qualified specialist workshop. Phone No Service Phone No Service Your vehicle is outside the network provider's transmitter/
receiver range.
X Wait until the mobile phone operational readiness symbol
appears in the multifunction display. 00B2
Check Washer Fluid Check Washer Fluid The washer fluid level in the washer fluid reservoir has dropped
below the minimum.
i If you do not mix antifreeze with the washer fluid in the winter
months, then the washer fluid could freeze in the washer fluid
reservoir. In this case, the Check Washer Fluid
Check Washer Fluid display mes-
sage may appear in the multifunction display.
X Add washer fluid (Y page 286).Wiper Malfunction‐ Wiper Malfunction‐
ing ing The windshield wipers are malfunctioning.
X Visit a qualified specialist workshop. Hazard Warning
Hazard Warning
Flashers Malfunc‐ Flashers Malfunc‐
tioning tioning The hazard warning lamps are faulty.
X Visit a qualified specialist workshop. 242
Display
messagesOn-board computer and displays