engine MERCEDES-BENZ CLA-Class 2014 C117 Service Manual
[x] Cancel search | Manufacturer: MERCEDES-BENZ, Model Year: 2014, Model line: CLA-Class, Model: MERCEDES-BENZ CLA-Class 2014 C117Pages: 358, PDF Size: 6.6 MB
Page 111 of 358
Automatic headlamp mode
G
WARNING
When the light switch is set to 0058, the low-
beam headlamps may not be switched on
automatically if there is fog, snow or other
causes of poor visibility due to the weather
conditions such as spray. There is a risk of an
accident.
In such situations, turn the light switch to
0058.
The automatic headlamp feature is only an
aid. The driver is responsible for the vehicle's lighting at all times.
0058 is the favored light switch setting. The
light setting is automatically selected accord- ing to the brightness of the ambient light
(exception: poor visibility due to weather con-
ditions such as fog, snow or spray):
R SmartKey in position 1in the ignition lock:
the parking lamps are switched on or off
automatically depending on the brightness of the ambient light.
R With the engine running: if you have acti-
vated the daytime running lamps function
via the on-board computer, the daytime
running lamps or the low-beam headlamps
and parking lamps are switched on or off
automatically depending on the brightnessof the ambient light.
X To switch on automatic headlamp
mode: turn the light switch to 0058.
The daytime running lamps improve the visi-
bility of your vehicle during the day. The day-
time running lamps function is required by law in Canada.
When the engine is running and the vehicle is
stationary: if you move the selector lever from a drive position to P, the daytime running
lamps/low-beam headlamps go out after
three minutes.
When the engine is running, the vehicle is
stationary and in bright ambient light: if you
turn the light switch to 0060, the daytime
running lamps and parking lamps switch on. If the engine is running and you turn the light
switch to 0058, the manual settings take
precedence over the daytime running lamps.
Low-beam headlamps
Even if the light sensor does not detect that it is dark, the parking lamps and low-beam
headlamps switch on when the ignition is
switched on and the light switch is set to the
0058 position. This is a particularly useful
function in the event of rain and fog.
X To switch on the low-beam headlamps:
turn the SmartKey in the ignition lock to
position 2or start the engine.
X Turn the light switch to 0058.
The green 0058indicator lamp in the instru-
ment cluster lights up.
Front fog lamps
In conditions where visibility is poor due to
fog, snow or rain, the fog lamps improve vis-
ibility as well as making it easier for other road
users to see you. They can be operated
together with the parking lamps or together
with the parking lamps and low-beam head-
lamps.
X To switch on the front fog lamps: turn
the SmartKey in the ignition lock to position 2 or start the engine.
X Turn the light switch to 0058or0058.
X Press the 005Abutton.
The green 005Aindicator lamp in the instru-
ment cluster lights up.
X To switch off the front fog lamps: press
the 005A button.
The green 005Aindicator lamp in the instru-
ment cluster goes out.
Only vehicles with front fog lamps are equip-
ped with the "fog lamp" function; information
on the fog lamp function for vehicles with
Intelligent Light System (Y page 112).
Rear fog lamp
The rear fog lamp improves visibility of your
vehicle for the traffic behind in the event of
thick fog. Please take note of the country- Exterior lighting
109Lights and windshield wipers Z
Page 112 of 358
specific regulations for the use of rear fog
lamps.
X To switch on the rear fog lamps: turn the
SmartKey in the ignition lock to position 2
or start the engine.
X Turn the light switch to 0058or0058.
X Press the 005Ebutton.
The yellow 005Eindicator lamp in the
instrument cluster lights up.
X To switch off the rear fog lamp: press the
005E button.
The yellow 005Eindicator lamp in the
instrument cluster goes out.
i When the rear fog lamp is switched on,
the center brake lamp in the tail lamp
switches off due to a legal requirement.
Parking lamps ! If the battery has been excessively dis-
charged, the parking lamps or standing
lamps are automatically switched off to
enable the next engine start. Always park
your vehicle safely and sufficiently lit
according to legal standards. Avoid the
continuous use of the 0060parking lamps
for several hours. If possible, switch on the
0064 right or the 0063left standing lamp.
X To switch on: turn the light switch to 0060.
The green 0060indicator lamp in the instru-
ment cluster lights up.
Standing lamps
Switching on the standing lamps ensures the
corresponding side of the vehicle is illumina-
ted.
X To switch on the standing lamps: the
SmartKey is not in the ignition lock or it is in position 0.
X Turn the light switch to 0063(left-hand side
of the vehicle) or 0064(right-hand side of
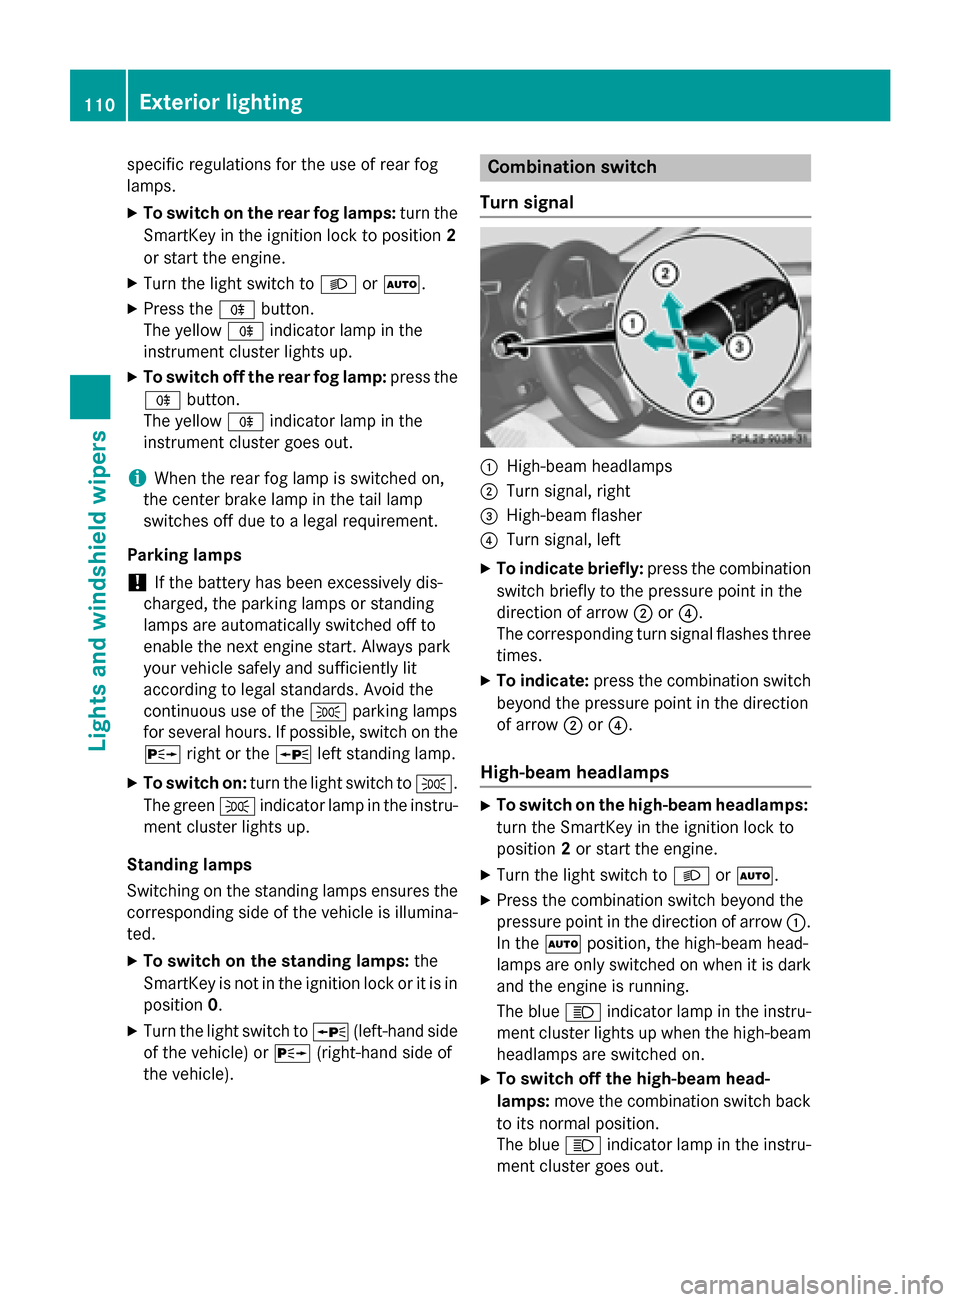
the vehicle). Combination switch
Turn signal 0043
High-beam headlamps
0044 Turn signal, right
0087 High-beam flasher
0085 Turn signal, left
X To indicate briefly: press the combination
switch briefly to the pressure point in the
direction of arrow 0044or0085.
The corresponding turn signal flashes three
times.
X To indicate: press the combination switch
beyond the pressure point in the direction
of arrow 0044or0085.
High-beam headlamps X
To switch on the high-beam headlamps:
turn the SmartKey in the ignition lock to
position 2or start the engine.
X Turn the light switch to 0058or0058.
X Press the combination switch beyond the
pressure point in the direction of arrow 0043.
In the 0058position, the high-beam head-
lamps are only switched on when it is dark
and the engine is running.
The blue 0057indicator lamp in the instru-
ment cluster lights up when the high-beam headlamps are switched on.
X To switch off the high-beam head-
lamps: move the combination switch back
to its normal position.
The blue 0057indicator lamp in the instru-
ment cluster goes out. 110
Exterior lightingLights and windshield wipers
Page 113 of 358
i
Vehicles with Adaptive Highbeam Assist:
when Adaptive Highbeam Assist is active, it controls activation of the high-beam head-
lamps (Y page 112).
High-beam flasher X
To switch on: turn the SmartKey in the
ignition lock to position 1or 2or start the
engine.
X Pull the combination switch in the direction
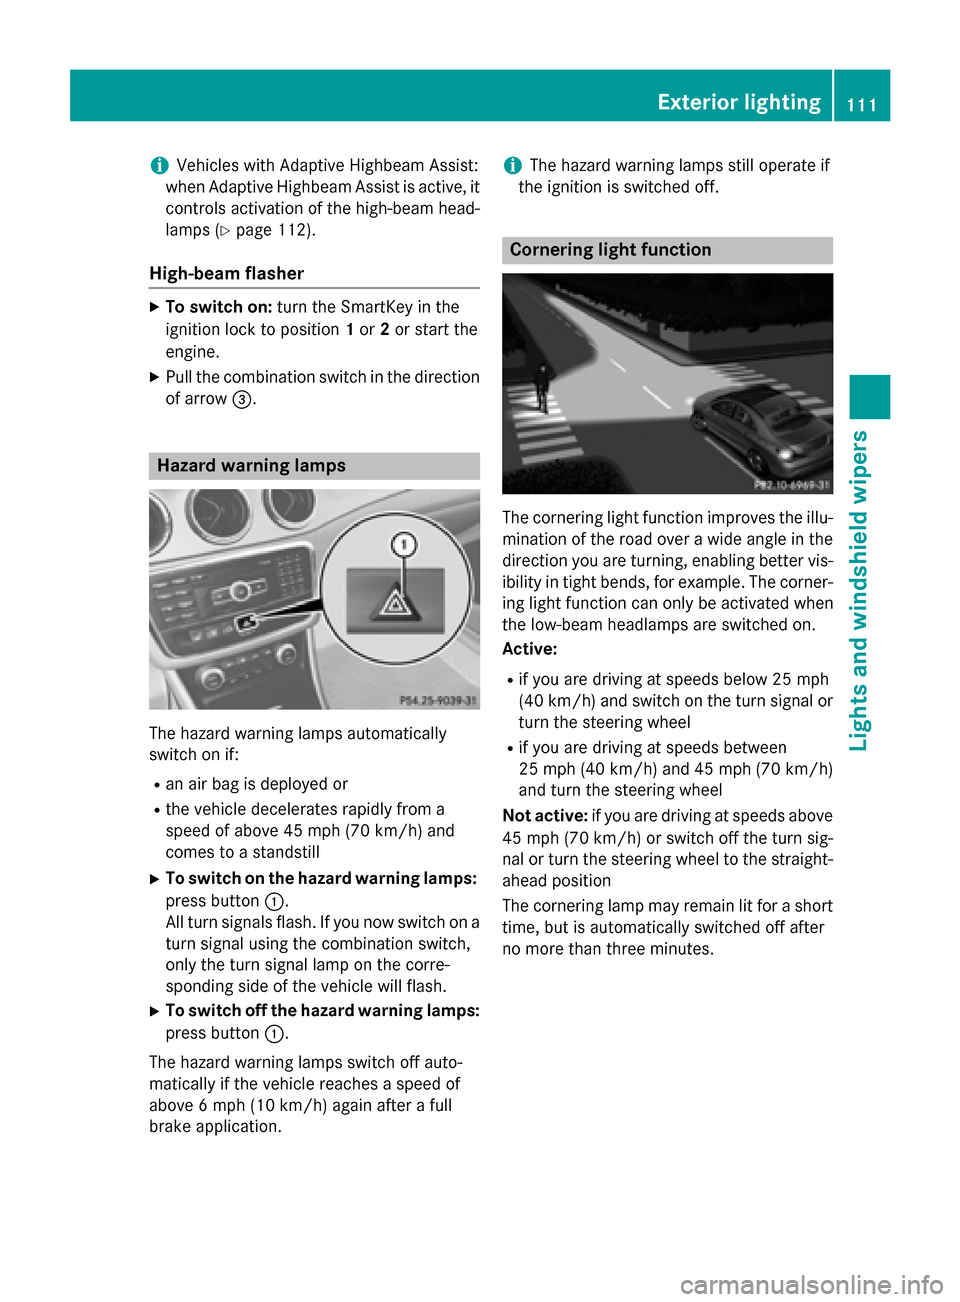
of arrow 0087. Hazard warning lamps
The hazard warning lamps automatically
switch on if:
R an air bag is deployed or
R the vehicle decelerates rapidly from a
speed of above 45 mph (70 km/h) and
comes to a standstill
X To switch on the hazard warning lamps:
press button 0043.
All turn signals flash. If you now switch on a turn signal using the combination switch,
only the turn signal lamp on the corre-
sponding side of the vehicle will flash.
X To switch off the hazard warning lamps:
press button 0043.
The hazard warning lamps switch off auto-
matically if the vehicle reaches a speed of
above 6 mph (10 km/h) again after a full
brake application. i
The hazard warning lamps still operate if
the ignition is switched off. Cornering light function
The cornering light function improves the illu-
mination of the road over a wide angle in the direction you are turning, enabling better vis-
ibility in tight bends, for example. The corner- ing light function can only be activated when
the low-beam headlamps are switched on.
Active:
R if you are driving at speeds below 25 mph
(40 km/h) and switch on the turn signal or
turn the steering wheel
R if you are driving at speeds between
25 mph (40 km/h) and 45 mph (70 km/h)
and turn the steering wheel
Not active: if you are driving at speeds above
45 mph (70 km/h) or switch off the turn sig-
nal or turn the steering wheel to the straight-
ahead position
The cornering lamp may remain lit for a short
time, but is automatically switched off after
no more than three minutes. Exterior lighting
111Lights and windshield wipers Z
Page 116 of 358
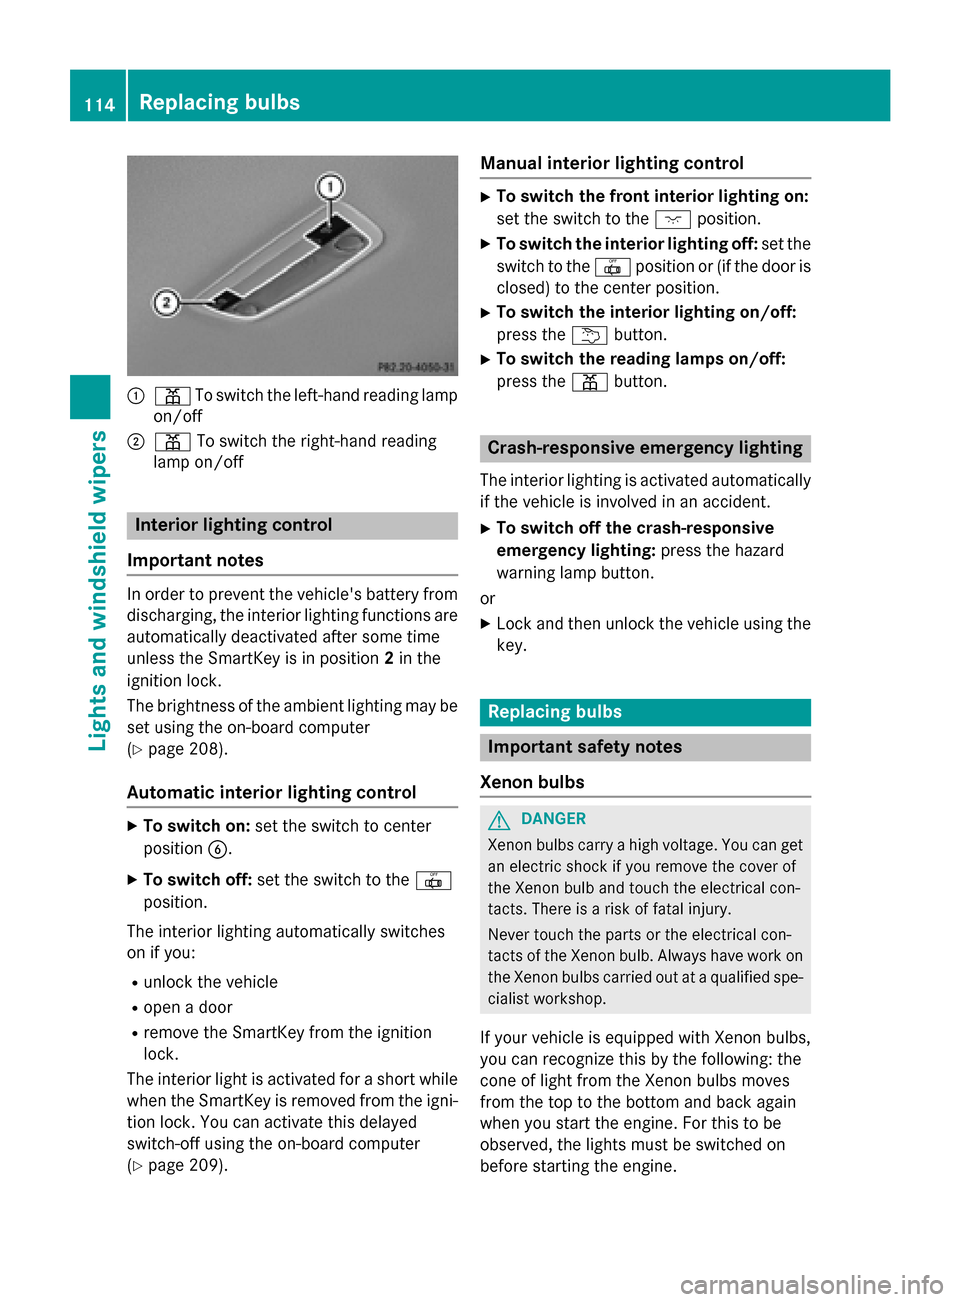
0043
003D To switch the left-hand reading lamp
on/off
0044 003D To switch the right-hand reading
lamp on/off Interior lighting control
Important notes In order to prevent the vehicle's battery from
discharging, the interior lighting functions are automatically deactivated after some time
unless the SmartKey is in position 2in the
ignition lock.
The brightness of the ambient lighting may be
set using the on-board computer
(Y page 208).
Automatic interior lighting control X
To switch on: set the switch to center
position 0084.
X To switch off: set the switch to the 0033
position.
The interior lighting automatically switches
on if you:
R unlock the vehicle
R open a door
R remove the SmartKey from the ignition
lock.
The interior light is activated for a short while when the SmartKey is removed from the igni-
tion lock. You can activate this delayed
switch-off using the on-board computer
(Y page 209). Manual interior lighting control X
To switch the front interior lighting on:
set the switch to the 004Aposition.
X To switch the interior lighting off: set the
switch to the 0033position or (if the door is
closed) to the center position.
X To switch the interior lighting on/off:
press the 0042button.
X To switch the reading lamps on/off:
press the 003Dbutton. Crash-responsive emergency lighting
The interior lighting is activated automatically
if the vehicle is involved in an accident.
X To switch off the crash-responsive
emergency lighting: press the hazard
warning lamp button.
or X Lock and then unlock the vehicle using the
key. Replacing bulbs
Important safety notes
Xenon bulbs G
DANGER
Xenon bulbs carry a high voltage. You can get an electric shock if you remove the cover of
the Xenon bulb and touch the electrical con-
tacts. There is a risk of fatal injury.
Never touch the parts or the electrical con-
tacts of the Xenon bulb. Always have work on
the Xenon bulbs carried out at a qualified spe-
cialist workshop.
If your vehicle is equipped with Xenon bulbs,
you can recognize this by the following: the
cone of light from the Xenon bulbs moves
from the top to the bottom and back again
when you start the engine. For this to be
observed, the lights must be switched on
before starting the engine. 114
Replacing bulbsLights and windshield wipers
Page 126 of 358
Useful information
i This Operator's manual describes all
models and all standard and optional equip- ment of your vehicle available at the time of
publication of the Operator's manual.
Country-specific differences are possible.
Please note that your vehicle may not be
equipped with all features described. This
also applies to safety-related systems and
functions.
i Read the information on qualified special-
ist workshops (Y page 26). Overview of climate control systems
Important safety notes
Observe the settings recommended on the
following pages. The windows could other-
wise fog up.
To prevent the windows from fogging up:
R switch off climate control only briefly
R switch on air-recirculation mode only
briefly
R switch on the cooling with air dehumidifi-
cation function
R switch on the defrost windshield function
briefly, if required
The climate control/dual-zone automatic
control regulates the temperature and the
humidity of the vehicle interior and filters out undesirable substances from the air.
Climate control/dual-zone automatic climate control is only operational when the engine is
running. Optimum operation is only achieved
with the side windows and panorama roof
with power tilt/sliding panel closed.
The residual heat function can only be acti-
vated or deactivated with the ignition
switched off (Y page 135).
Always keep the ventilation flaps behind the
side trim panel in the cargo compartment
clear (Y page 117). Otherwise the vehicle will
not be ventilated correctly. i
Ventilate the vehicle for a brief period
during warm weather, e.g. using the con-
venience opening feature (Y page 88). This
will speed up the cooling process and the
desired interior temperature will be
reached more quickly.
i The integrated filter filters out most par-
ticles of dust and soot and completely fil-
ters out pollen. With dual-zone automatic
climate control, gaseous pollutants and
odors will also be reduced. A clogged filter
reduces the amount of air supplied to the
vehicle interior. For this reason, you should always observe the interval for replacing
the filter, which is specified in the Mainte-
nance Booklet. As it depends on environ-
mental conditions, e.g. heavy air pollution,
the interval may be shorter than stated in
the Maintenance Booklet.
i It is possible that the residual heat func-
tion may be activated automatically an hour
after the SmartKey has been removed in
order to dry the air-conditioning system.
The vehicle is then ventilated for
30 minutes. 124
Overview of climate control systemsClimate control
Page 128 of 358
0085
To activate/deactivate air-recirculation mode (Y page 135)
0083 To set the airflow (Y page 132)
0084 To switch cooling with air dehumidification on/off (Y page 129)
006B To switch the rear window defroster on/off (Y page 134)Optimum use of climate control
Automatic climate control The following contains notes and recommen-
dations on optimum use of climate control.
R Switch on the air-conditioning system by
turning control knob 0083clockwise to the
desired position (except position 0).
R Set the temperature to 72 ‡ (22 †).
R Recommendation for avoiding misted
windows at low exterior temperatures
or in rain: switch on the 005Acooling with
dehumidification function (Y page 129).
Set air distribution to 0061and if possible
switch off 009Cand009B (Ypage 132).
In air-recirculation mode, switch 008Aoff
(Y page 135).
Set airflow control 0083to a setting between
3 and 6(Y page 132).
R Recommendation for rapid cooling or
heating of the vehicle interior: briefly set
airflow control 0083to a setting between 3
and 6(Y page 132).
R Recommendation for a constant vehi-
cle interior temperature: set airflow con-
trol 0083to a setting between 1and 3
(Y page 132).
R Recommendation for air distribution in
the winter: set009B and0061
(Y page 132).
Recommendation for air distribution in
the summer: set009C or009C and0061
(Y page 132).
R Only use the "Windshield defrosting" func-
tion briefly until the windshield is clear
again.
R Only use air-recirculation mode briefly, e.g.
if there are unpleasant outside odors or when in a tunnel. The windows could oth-
erwise fog up, since no fresh air is drawn
into the vehicle in air-recirculation mode.
R Vehicles with COMAND: if you change the
settings of the climate control system, the
climate status display appears for three
seconds at the bottom of the screen in the
COMAND display. See also the separate
COMAND operating instructions. You will
see the current settings of the various cli-
mate control functions.
ECO start/stop function During automatic engine switch-off, the cli-
mate control system only operates at a
reduced capacity. If you require the full cli-
mate control output, you can switch off the
ECO start/stop function by pressing the ECO
button (Y page 144). 126
Overview of climate control systemsClimate control
Page 131 of 358
R
Only available on vehicles for Canada:
use the residual heat function if you want to
heat or ventilate the vehicle interior when
the ignition is switched off. The residual
heat function can only be activated or deac-
tivated with the ignition switched off.
R Vehicles with COMAND: if you change the
settings of the climate control system, the
climate status display appears for three
seconds at the bottom of the screen in the COMAND display. See also the separate
COMAND operating instructions. You will
see the current settings of the various cli-
mate control functions.
ECO start/stop function During automatic engine switch-off, the cli-
mate control system only operates at a
reduced capacity. If you require the full cli-
mate control output, you can switch off the
ECO start/stop function by pressing the ECO
button (Y page 144). Operating the climate control sys-
tems Switching climate control on/off
General notes When the climate control is switched off, the
air supply and air circulation are also
switched off. The windows could fog up.
Therefore, switch off climate control only
briefly
Climate control X
Turn the SmartKey to position 2in the igni-
tion lock (Y page 141).
X To switch on: turn control0083clockwise to
the desired position (except position 0)
(Y page 125).
X To switch off: turn control0083counter-
clockwise to position 0(Y page 125). Dual-zone automatic climate control X
Turn the SmartKey to position 2in the igni-
tion lock (Y page 141).
X To activate: press the0058button.
The indicator lamp in the 0058button lights
up. Airflow and air distribution are set to
automatic mode.
or
X Press the 0078button.
The indicator lamp in the 0078button goes
out. The previously selected settings are
restored.
X To deactivate: press the0078button.
The indicator lamp in the 0078button lights
up.
i Dual-zone automatic climate control:
switch on climate control primarily using
the 0058 button. Activating/deactivating cooling with
air dehumidification
General notes If you deactivate the "Cooling with air-dehu-
midification" function, the air inside the vehi-
cle will not be cooled. The air inside the vehi-cle will also not be dehumidified. The win-
dows can fog up more quickly. Therefore, only
deactivate the "Cooling with air-dehumidifi-
cation" function briefly.
The "Cooling with air dehumidification" func-
tion is only available when the engine is run-
ning. The air inside the vehicle is cooled and
dehumidified according to the temperature
selected.
Condensation may drip from the underside of the vehicle when it is in cooling mode. This is
normal and not a sign that there is a malfunc- tion. Operating the climate control systems
129Climate control
Page 135 of 358
Defrosting the windshield
You can use this function to defrost the wind-
shield or to defrost the inside of the wind-
shield and the side windows.
i You should only select the "Windshield
defrosting" function until the windshield is
clear again.
X Turn the SmartKey to position 2in the igni-
tion lock (Y page 141).
X To activate: press the0064button.
The indicator lamp in the 0064button lights
up.
The climate control system switches to the
following functions:
R high airflow
R high temperature
R air distribution to the windshield and
front side windows
R air-recirculation mode off
i The "Windshield defrosting" function
automatically sets the blower output to the optimum defrosting effect. As a result, the
airflow may increase or decrease automat-
ically after the button is pressed.
i You can adjust the blower output man-
ually while the "Windshield defrosting"
function is in operation:
R Climate control: turn airflow control 0083
clockwise or counter-clockwise
(Y page 125).
R Dual-zone automatic climate control:
press the 00F2or00F3 button.
X To deactivate: press the0064button.
The indicator lamp in the 0064button goes
out. The previously selected settings are
restored. Air-recirculation mode remains
deactivated.
or
X Dual-zone automatic climate control: press
the 0058 button.
The indicator lamp in the 0064button goes
out. Airflow and air distribution are set to
automatic mode. or
X Climate control: turn temperature con-
trol 0043clockwise or counter-clockwise
(Y page 125).
Dual-zone automatic climate control: turn
temperature control 0043or006D clockwise or
counter-clockwise (Y page 127). MAX COOL maximum cooling
The MAX COOL function is only available in
vehicles for the USA.
MAX COOL is only operational when the
engine is running. X To activate: press the00C9button.
The indicator lamp in the button lights up.
X To deactivate: press the00C9button
again.
The indicator lamp goes out. The previously selected settings are restored.
When you activate MAX COOL, climate con-
trol switches to the following functions:
R maximum cooling
R maximum airflow
R air-recirculation mode on Defrosting the windows
Windows fogged up on the inside Climate control
X Activate the 005A"Cooling with air dehu-
midification" function.
X If the windows continue to fog up, activate
the 0064 "Windshield defrosting" function.
i You should only select this setting until
the windshield is clear again. Operating the climate cont
rol systems
133Climate control
Page 137 of 358
Problems with the rear window defroster
Problem
Possible causes/consequences and
0050
0050Solutions The rear window
defroster has deactiva-
ted prematurely or can-
not be activated. The battery has not been sufficiently charged.
X Switch off any consumers that are not required, e.g. reading
lamps, interior lighting or the seat heating.
When the battery is sufficiently charged, the rear window
defroster can be activated again. Activating/deactivating air-recircula-
tion mode
General notes You can deactivate the flow of fresh air if
unpleasant odors are entering the vehicle
from outside. The air already inside the vehi-
cle will then be recirculated.
If you switch on air-recirculation mode, the
windows can fog up more quickly, in particu-
lar at low temperatures. Only use air-recircu-
lation mode briefly to prevent the windows
from fogging up.
The operation of air-recirculation mode is the same for all control panels.
Activating/deactivating X
Turn the SmartKey to position 2in the igni-
tion lock (Y page 141).
X To activate: press the008Abutton.
The indicator lamp in the 008Abutton lights
up.
i Air-recirculation mode is activated auto-
matically at high outside temperatures.
When air-recirculation mode is activated
automatically, the indicator lamp in the
008A button is not lit. Outside air is added
after about 30 minutes.
X To deactivate: press the008Abutton.
The indicator lamp in the 008Abutton goes
out. i
Air-recirculation mode deactivates auto-
matically:
R after approximately five minutes at out-
side temperatures below approximately
41 ‡ (5 †)
R after approximately five minutes if the
"Cooling with air dehumidification" func-
tion is deactivated
R after approximately 30 minutes at out-
side temperatures above approximately
41 ‡ (5 †) if the "Cooling with air dehu-
midification" function is activated Activating/deactivating the residual
heat function
General notes The residual heat function is only available in
vehicles for Canada with dual-zone automatic
climate control.
It is possible to make use of the residual heat
of the engine to continue heating the vehicle
for approximately 30 minutes after the engine
has been switched off. The heating time
depends on the set interior temperature.
i The blower will run at a low speed regard-
less of the airflow setting.
i If you activate the residual heat function
at high temperatures, only the ventilation
will be activated. The blower runs at
medium speed. Operating the climate control systems
135Climate control
Page 142 of 358
Useful information
i This Operator's manual describes all
models and all standard and optional equip- ment of your vehicle available at the time of
publication of the Operator's manual.
Country-specific differences are possible.
Please note that your vehicle may not be
equipped with all features described. This
also applies to safety-related systems and
functions.
i Read the information on qualified special-
ist workshops (Y page 26). Notes on breaking-in a new vehicle
Important safety notes
The sensor system of some driving and driv-
ing safety systems adjusts automatically
while a certain distance is being driven after
the vehicle has been delivered or after
repairs. Full system effectiveness is not
reached until the end of this teach-in proce-
dure.
New and replaced brake pads and discs only
reach their optimum braking effect after sev-
eral hundred kilometers of driving. Compen-
sate for this by applying greater force to the
brake pedal. The first 1000 miles (1500 km)
The more you look after the engine when it is
new, the more satisfied you will be with its
performance in the future.
R You should therefore drive at varying vehi-
cle and engine speeds for the first
1000 miles (1500 km).
R Avoid heavy loads, e.g. driving at full throt-
tle, during this period.
R Change gear in good time, before the tach-
ometer needle is 00C3of the way to the red
area of the tachometer. R
Do not manually shift to a lower gear to
brake the vehicle.
R Try to avoid depressing the accelerator
pedal beyond the point of resistance (kick-
down).
R Ideally, for the first 1000 miles (1500 km),
drive in program E.
After 1,000 miles (1,500 km), you can
increase the engine speed gradually and bring the vehicle to full speed.
Additional breaking-in notes for AMG vehi-
cles:
R Do not drive faster than 85 mph
(140 km/h) for the first 1,000 miles
(1,500 km).
R Only allow the engine to reach a maximum
engine speed of 4,500 rpm briefly.
R Change gear in good time.
i You should also observe these notes on
breaking-in if the engine or parts of the
drive train on your vehicle have been
replaced.
i Always observe the respective speed lim-
its. Driving
Important safety notes
G
WARNING
Objects in the driver's footwell can restrict the pedal travel or obstruct a depressed pedal.
The operating and road safety of the vehicle is
jeopardized. There is a risk of an accident.
Make sure that all objects in the vehicle are
stowed correctly, and that they cannot enter
the driver's footwell. Install the floormats
securely and as specified in order to ensure
sufficient clearance for the pedals. Do not use loose floormats and do not place floormats on
top of one another. 140
DrivingDriving and parking