ECU MERCEDES-BENZ CLA-Class 2014 C117 Owner's Manual
[x] Cancel search | Manufacturer: MERCEDES-BENZ, Model Year: 2014, Model line: CLA-Class, Model: MERCEDES-BENZ CLA-Class 2014 C117Pages: 358, PDF Size: 6.6 MB
Page 15 of 358
Memory function
...............................105
Mercedes-Benz CONNECT Recovering a stolen vehicle ........... 272
Search & Send ............................... 271
Message memory (on-board com-
puter) ................................................. .213
Messages see Display messages
Mirrors
see Exterior mirrors
see Rear-view mirror
see Vanity mirror (in the sun visor)
Mobile phone
Menu (on-board computer) ............ 203
Modifying the programming
(SmartKey) .......................................... .77
MOExtended tires .............................. 297
Mounting wheels Lowering the vehicle ...................... 340
Mounting a new wheel ................... 339
Preparing the vehicle .................... .336
Raising the vehicle ......................... 337
Removing a wheel .......................... 339
Securing the vehicle against roll-
ing away ........................................ 337
MP3
Operation ....................................... 202
see separate operating instructions
Multifunction display
Function/notes ............................ .198
Permanent display ......................... 208
Multifunction steering wheel
Operating the on-board computer .. 197
Overview .......................................... 33 N
Navigation Menu (on-board computer) ............ 201
see separate operating instructions
Notes on breaking-in a new vehi-
cle ....................................................... 140 O
Occupant Classification System
(OCS) Faults ............................................... 51
Operation ......................................... 47
System self-test ............................... 50
Occupant safety
Children in the vehicle ..................... 56
Important safety notes .................... 40
OCS
Faults ............................................... 51
Operation ......................................... 47
System self-test ............................... 50
Oil
see Engine oil
On-board computer
AMG menu ..................................... 210
Assistance menu ........................... 204
Audio menu ................................... 202
Convenience submenu .................. 210
Displaying a service message ....... .287
Display messages .......................... 213
DISTRONIC PLUS ........................... 174
Factory settings submenu ............. 210
Important safety notes .................. 196
Instrument cluster submenu .......... 207
Lighting submenu .......................... 208
Menu overview .............................. 199
Message memory .......................... 213
Navigation menu ............................ 201
Operation ....................................... 197
RACETIMER ................................... 211
Service menu ................................. 207
Settings menu ............................... 207
Standard display ............................ 199
Telephone menu ............................ 203
Trip menu ...................................... 199
Vehicle submenu ........................... 209
Video DVD operation ..................... 203
Opening and closing the side trim
panels ................................................. 117
Operating safety Declaration of conformity ................ 25
Important safety notes .................... 24
Operating system
see On-board computer Index
13
Page 21 of 358
Top Tether
............................................ 61
Towing Important safety guidelines ........... 307
Installing the towing eye ................ 308
Removing the towing eye ............... 309
Towing a trailer
ESP ®
(Electronic Stability Pro-
gram) .............................................. .71
Towing away
With both axles on the ground ....... 309
With front axle raised ..................... 309
Tow-starting
Emergency engine starting ............ 310
Important safety notes .................. 307
Installing the towing eye ................ 308
Removing the towing eye ............... 309
Transmission
see Automatic transmission
Transmission position display ......... 147
Transporting the vehicle .................. 309
Trim pieces (cleaning instruc-
tions) .................................................. 293
Trip computer (on-board com-
puter) .................................................. 199
Trip meter see Trip odometer
Trip odometer
Calling up ....................................... 199
Resetting (on-board computer) ...... 200
Trunk
Emergency release .......................... 86
Emergency release button ............... 86
Important safety notes .................... 84
Opening/closing (manually from
outside) ............................................ 84
Opening (automatically from out-
side) ................................................. 85
Opening automatically from
inside .............................................. .85
Trunk emergency release button ....... 86
Trunk lid Display message ............................ 241
Opening dimensions ...................... 353
Trunk load (maximum) ...................... 353
Turn signals Changing bulbs (front) ................... 117
Changing bulbs (rear ).................... 117 Display message ............................ 226
Switching on/of f........................... 110
Type identification plate
see Vehicle identification plate U
Unlocking Emergency unlocking ....................... 83
From inside the vehicle (central
unlocking button) ............................. 82 V
Vanity mirror (in the sun visor) ........ 264
Vehicle Correct use ...................................... 26
Equipment ....................................... 22
Individual settings .......................... 207
Limited Warranty ............................. 27
Loading .......................................... 324
Locking (in an emergency) ............... 83
Locking (SmartKey ).......................... 76
Lowering ........................................ 340
Maintenance .................................... 23
Parking for a long period ................ 160
Pulling away ................................... 142
Raising ........................................... 337
Reporting problems ......................... 26
Securing from rolling away ............ 337
Towing away .................................. 307
Tow-starting ................................... 307
Transporting .................................. 309
Unlocking (in an emergency) ........... 83
Unlocking (SmartKey )...................... 76
Vehicle data ................................... 353
Vehicle data ....................................... 353
Vehicle dimensions ........................... 353
Vehicle emergency locking ................ 83
Vehicle identification number see VIN
Vehicle identification plate .............. 346
Vehicle maintenance see ASSYST PLUS
Vehicle tool kit .................................. 296
Video (DVD) ........................................ 203
VIN ...................................................... 346 Index
19
Page 27 of 358
If you make any changes to the vehicle elec-
tronics, the general operating permit is ren-
dered invalid.
! There is a risk of damage to the vehicle if:
R the vehicle becomes stuck, e.g. on a high
curb or an unpaved road
R you drive too fast over an obstacle, e.g. a
curb or a hole in the road
R a heavy object strikes the undercarriage
or parts of the chassis
In situations like this, the body, the under-
carriage, chassis parts, wheels or tires
could be damaged without the damage
being visible. Components damaged in this way can unexpectedly fail or, in the case of
an accident, no longer withstand the strain
they are designed to.
If the underbody paneling is damaged,
combustible materials such as leaves,
grass or twigs can gather between the
underbody and the underbody paneling. If
these materials come in contact with hot
parts of the exhaust system, they can catch fire.
In such situations, have the vehicle
checked and repaired immediately at a
qualified specialist workshop. If on con-
tinuing your journey you notice that driving
safety is impaired, pull over and stop the
vehicle immediately, paying attention to
road and traffic conditions. In such cases,
visit a qualified specialist workshop. Declarations of conformity
Vehicle components which receive
and/or transmit radio waves USA:
"The wireless devices of this vehicle
comply with Part 15 of the FCC Rules. Oper-
ation is subject to the following two condi-
tions: 1) These devices may not cause harm-
ful interference, and 2) These devices must
accept any interference received, including
interference that may cause undesired oper-
ation. Changes or modifications not expressly approved by the party responsible for com-
pliance could void the user’s authority to
operate the equipment."
Canada:
"The wireless devices of this vehicle
comply with Industry Canada license-exempt
RSS standard(s). Operation is subject to the
following two conditions: (1) These devices
may not cause interference, and (2) These
devices must accept any interference, includ- ing interference that may cause undesired
operation of the device." Diagnostics connection
The diagnostics connection is only intended
for the connection of diagnostic equipment at a qualified specialist workshop. G
WARNING
If you connect equipment to the diagnostics
connection in the vehicle, it may affect the
operation of the vehicle systems. As a result, the operating safety of the vehicle could be
affected. There is a risk of an accident.
Do not connect any equipment to a diagnos-
tics connection in the vehicle. G
WARNING
Objects in the driver's footwell can restrict the pedal travel or obstruct a depressed pedal.
The operating and road safety of the vehicle is
jeopardized. There is a risk of an accident.
Make sure that all objects in the vehicle are
stowed correctly, and that they cannot enter
the driver's footwell. Install the floormats
securely and as specified in order to ensure
sufficient clearance for the pedals. Do not use loose floormats and do not place floormats on
top of one another.
! If the engine is switched off and equip-
ment on the diagnostics connection is
used, the starter battery may discharge.
Connecting equipment to the diagnostics
connection can lead to emissions monitoring information being reset, for example. This
may lead to the vehicle failing to meet the Introduction
25 Z
Page 42 of 358
Useful information
i This Operator's manual describes all
models and all standard and optional equip- ment of your vehicle available at the time of
publication of the Operator's manual.
Country-specific differences are possible.
Please note that your vehicle may not be
equipped with all features described. This
also applies to safety-related systems and
functions.
i Read the information on qualified special-
ist workshops (Y page 26). Panic alarm
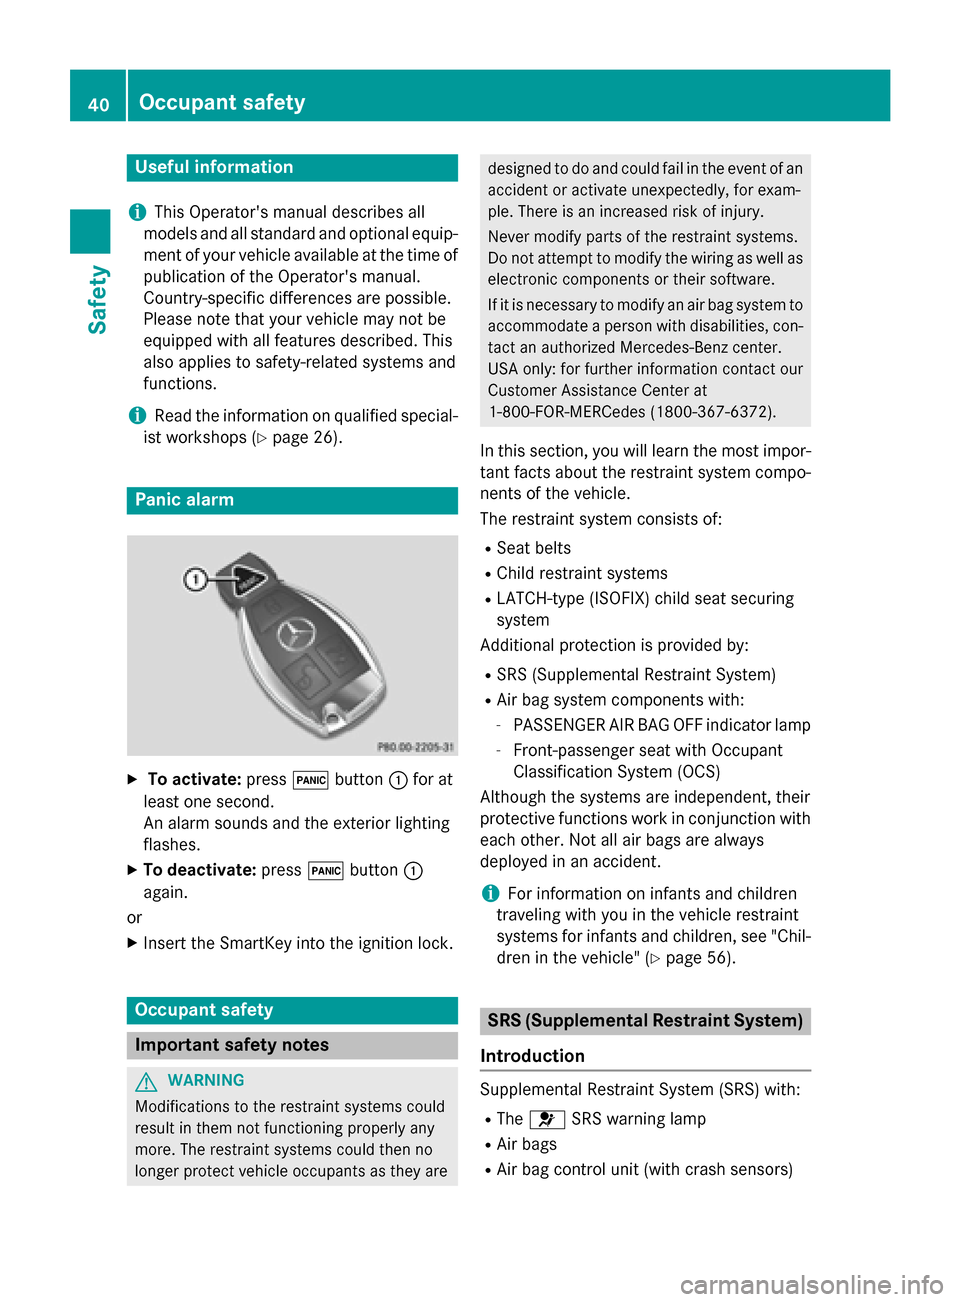
X
To activate: press0033button 0043for at
least one second.
An alarm sounds and the exterior lighting
flashes.
X To deactivate: press0033button 0043
again.
or
X Insert the SmartKey into the ignition lock. Occupant safety
Important safety notes
G
WARNING
Modifications to the restraint systems could
result in them not functioning properly any
more. The restraint systems could then no
longer protect vehicle occupants as they are designed to do and could fail in the event of an
accident or activate unexpectedly, for exam-
ple. There is an increased risk of injury.
Never modify parts of the restraint systems.
Do not attempt to modify the wiring as well as
electronic components or their software.
If it is necessary to modify an air bag system to accommodate a person with disabilities, con-tact an authorized Mercedes-Benz center.
USA only: for further information contact our
Customer Assistance Center at
1-800-FOR-MERCedes (1800-367-6372).
In this section, you will learn the most impor- tant facts about the restraint system compo-
nents of the vehicle.
The restraint system consists of:
R Seat belts
R Child restraint systems
R LATCH-type (ISOFIX) child seat securing
system
Additional protection is provided by:
R SRS (Supplemental Restraint System)
R Air bag system components with:
- PASSENGER AIR BAG OFF indicator lamp
- Front-passenger seat with Occupant
Classification System (OCS)
Although the systems are independent, their
protective functions work in conjunction with each other. Not all air bags are always
deployed in an accident.
i For information on infants and children
traveling with you in the vehicle restraint
systems for infants and children, see "Chil-
dren in the vehicle" (Y page 56). SRS (Supplemental Restraint System)
Introduction Supplemental Restraint System (SRS) with:
R The 0075 SRS warning lamp
R Air bags
R Air bag control unit (with crash sensors) 40
Occupant safetySafety
Page 50 of 358
being heavier than the weight of a typical 12-
month-old child seated in a standard child
restraint or as being a small individual (such
as a young teenager or a small adult), the
00730074 indicator lamp will illuminate for
approximately 6 seconds when the engine is
started and then, depending on occupant
weight sensor readings from the front-
passenger seat, remain illuminated or go out. With the 00730074 indicator lamp illumina-
ted, the front-passenger front air bag is deac-
tivated. With the 00730074indicator lamp
out, the front-passenger front air bag is acti-
vated.
When the OCS senses that the front-
passenger seat occupant is classified as an
adult or someone larger than a small individ-
ual, the 00730074 indicator lamp will illumi-
nate for approximately 6 seconds when the
engine is started and then go out, indicating
that the front-passenger front air bag is acti-
vated.
If the 00730074 indicator lamp is illuminated,
the front-passenger front air bag is deactiva-
ted and will not be deployed.
If the 00730074 indicator lamp is not illumi-
nated, the front-passenger front air bag is
activated and will be deployed:
R in the event of certain frontal impacts
R if impact exceeds a preset deployment
threshold
R independently of the side impact air bags
If the front-passenger front air bag is
deployed, the rate of inflation will be influ-
enced by:
R the rate of relevant vehicle deceleration as
assessed by the air bag control unit
R the front passenger's weight category as
identified by OCS G
WARNING
According to accident statistics, children are
safer when properly restrained on the rear
seats than on the front-passenger seat. Thus, we strongly recommend that children be placed in the rear seats whenever possible.
Regardless of seating position, children 12
years old and under must be seated and prop- erly secured in an appropriate infant restraint,
toddler restraint, or booster seat recommen-
ded for the size and weight of the child.
The infant or child restraint must be properly
secured with the vehicle's seat belt, the seat
belt and Top Tether strap, or lower anchors
and Top Tether strap, fully in accordance with the child seat manufacturer's instructions.
Occupants, especially children, should always
sit as upright as possible, wear the seat belt
properly and use an appropriately sized infant
restraint, toddler restraint, or booster seat
recommended for the size and weight of the
child.
Children can be killed or seriously injured by
an inflating air bag. Note the following impor-
tant information when circumstances require you to place a child in the front-passenger
seat:
R Your vehicle is equipped with air bag tech-
nology designed to deactivate the front-
passenger front air bag in your vehicle
when the system senses the weight of a
typical 12-month-old child or less along
with the weight of a standard appropriate
child restraint on the front-passenger seat.
R A child in a rear-facing child restraint on the
front-passenger seat will be seriously
injured or even killed if the front-passenger
front air bag inflates in a collision which
could occur under some circumstances,
even with the air bag technology installed in your vehicle. The only means to eliminate
this risk completely is never to place a child
in a rear-facing child restraint in the front-
passenger seat. We therefore strongly rec- ommend that you always place a child in a
rear-facing child restraint on the rear seat.
R If you install a rear-facing child restraint on
the front-passenger seat, make sure the
00730074 indicator lamp is illuminated,
indicating that the front-passenger front air bag is deactivated. Should the 0073007448
Occupant safetySafety
Page 51 of 358
indicator lamp not illuminate or go out while
the restraint is installed, please check
installation. Periodically check the
00730074 indicator lamp while driving to
make sure that the 00730074indicator
lamp is illuminated. If the 00730074indi-
cator lamp goes out or remains out, do not transport a child on the front-passenger
seat until the system has been repaired.
A child in a rear-facing child restraint on the
front-passenger seat will be seriously
injured or even killed if the front-passenger front air bag inflates.
R If you place a child in a forward-facing child
restraint on the front-passenger seat:
- move the seat as far back as possible
- use the proper child restraint recommen-
ded for the age, size and weight of the
child
- secure child restraint with the vehicle's
seat belt according to the child seat man-
ufacturer's instructions
R For children larger than the typical 12-
month-old child, the front-passenger front
air bag may or may not be activated. G
WARNING
If the red 0075SRS warning lamp in the
instrument cluster and the 00730074indica-
tor lamp light up simultaneously, the OCS is
malfunctioning. The front passenger front air
bag will be deactivated in this case. Have the system checked by qualified technicians as
soon as possible. Contact an authorized
Mercedes-Benz Center.
Only have the seat repaired or replaced at an
authorized Mercedes-Benz Center.
In order to ensure proper operation of the air
bag system and OCS:
R Sit with the seat belt properly fastened in a
position that is as upright as possible with
your back against the seat backrest.
R When seated, a passenger should not posi-
tion him/herself in such a way as to cause the passenger's weight to be lifted from the seat cushion as this may result in the OCS
being unable to correctly approximate the
passenger's weight category.
R Read and observe all warnings in this chap-
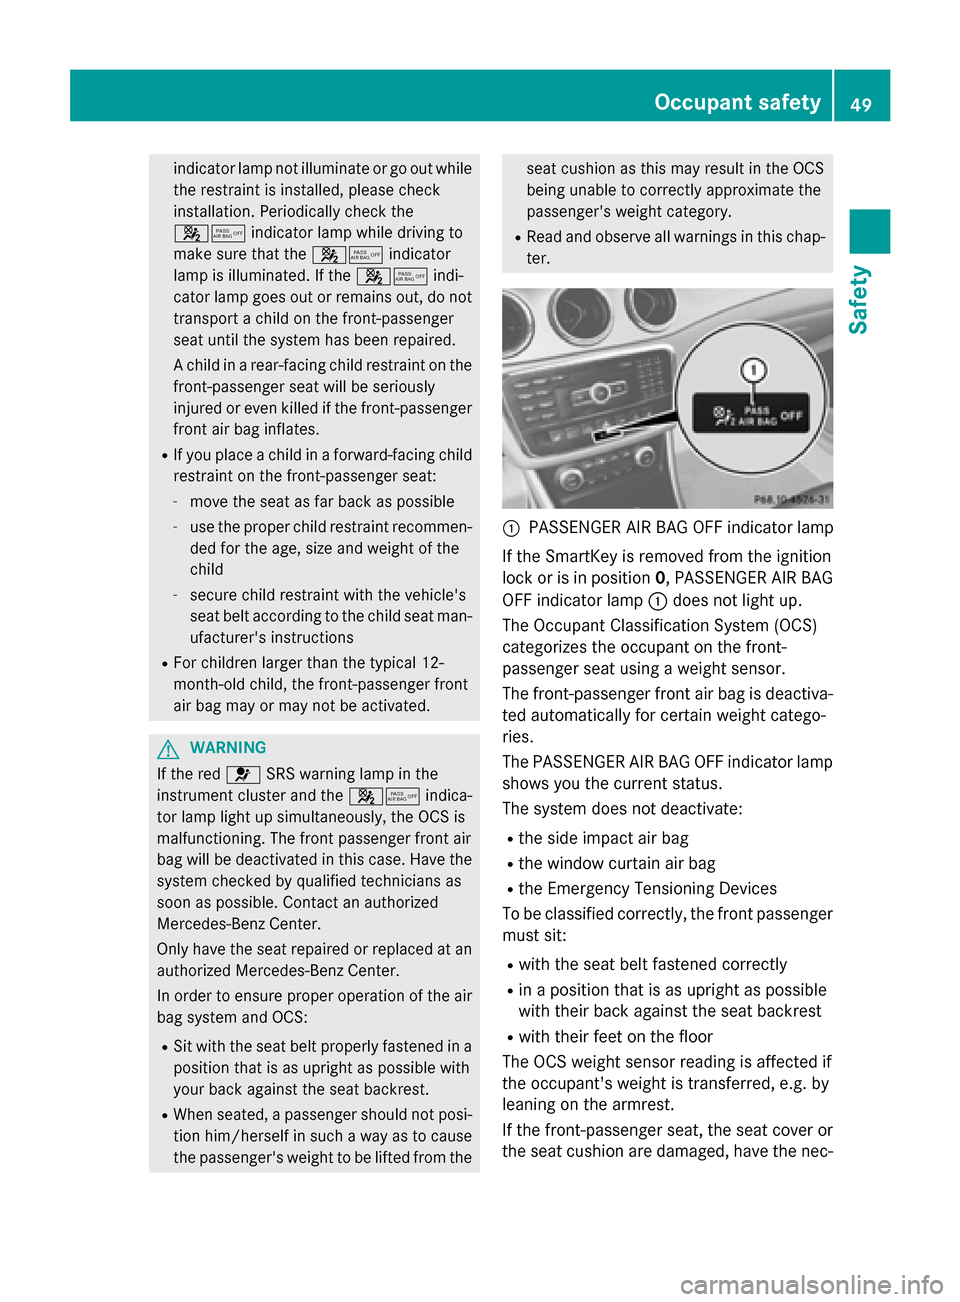
ter. 0043
PASSENGER AIR BAG OFF indicator lamp
If the SmartKey is removed from the ignition
lock or is in position 0, PASSENGER AIR BAG
OFF indicator lamp 0043does not light up.
The Occupant Classification System (OCS)
categorizes the occupant on the front-
passenger seat using a weight sensor.
The front-passenger front air bag is deactiva-
ted automatically for certain weight catego-
ries.
The PASSENGER AIR BAG OFF indicator lamp
shows you the current status.
The system does not deactivate:
R the side impact air bag
R the window curtain air bag
R the Emergency Tensioning Devices
To be classified correctly, the front passenger
must sit:
R with the seat belt fastened correctly
R in a position that is as upright as possible
with their back against the seat backrest
R with their feet on the floor
The OCS weight sensor reading is affected if
the occupant's weight is transferred, e.g. by
leaning on the armrest.
If the front-passenger seat, the seat cover or the seat cushion are damaged, have the nec- Occupant safety
49Safety Z
Page 53 of 358
Problems with the occupant classification system
Problem
Possible causes/consequences and
0050
0050Solutions The PASSENGER AIR
BAG OFF indicator
lights up and remains
on.
The person on the
front-passenger seat:
R
has the weight of a
typical adult
R has been determined
by the system not to
be a child The OCS is malfunctioning.
X Make sure that the front passenger is sitting in a correct, upright
position.
X Have the OCS checked as soon as possible at a qualified spe-
cialist workshop.
X Observe the additional display messages in the multifunction
display (Y page 225). G
WARNING
If the 00730074 indicator lamp illuminates and remains illuminated when the weight of a typical
adult or someone larger than a small individual has been detected on the passenger seat, do not allow any occupant to use the passenger seat until the system has been repaired. Problem
Possible causes/consequences and
0050 0050Solutions The PASSENGER AIR
BAG OFF indicator
lamp does not light up
and/or stays on.
The front-passenger
seat is:
R unoccupied
R occupied with the
weight of a child up
to twelve months old
in a child restraint
system The OCS is malfunctioning.
X Make sure there is nothing between the seat cushion and the
child seat.
X Make sure that the backrest and base of the child restraint sys-
tem are resting securely on the front-passenger seat. If neces-
sary, adjust the position of the front-passenger seat.
X When installing the child restraint system, make sure that the
seat belt is tight. Do not pull the seat belt tight with the front-
passenger seat adjustment. This could result in the seat belt
being pulled too tightly.
X Check the installation of the child restraint system.
X Make sure that no objects are applying additional weight onto
the seat.
X If the PASSENGER AIR BAG OFF indicator lamp remains off, have
the OCS checked immediately at a qualified specialist work-
shop. Do not transport a child on the front-passenger seat until the OCS has been repaired.
X Observe the additional display messages in the multifunction
display (Y page 225). Occupant safety
51Safety Z
Page 55 of 358
and ETDs) impacts which exceed preset
deployment thresholds and in certain roll-
overs (window curtain air bags and ETDs).
R Never wear the shoulder belt under your
arm, across your neck or off your shoulder.
In a frontal crash, your body would move
too far forward. That would increase the
chance of head and neck injuries. The seat belt would also apply too much force to the
ribs or abdomen, which could severely
injure internal organs such as your liver or
spleen.
Adjust the seat belt so that the shoulder
section is located as close as possible to
the middle of the shoulder. It should not
touch the neck. Never pass the shoulder
portion of the seat belt under your arm. For
this purpose, you can adjust the height of
the seat belt outlet.
R Position the lap belt as low as possible on
your hips and not across the abdomen. If
the lap belt is positioned across your abdo-
men, it could cause serious injuries in a
crash.
R Never wear seat belts over rigid or breaka-
ble objects in or on your clothing, such as
eyeglasses, pens, keys etc., as these might
cause injuries.
R Make sure the seat belt is always fitted
snugly. Take special care of this when wear-
ing loose clothing.
R Never use a seat belt for more than one
person at a time. Do not fasten a seat belt
around a person and another person or
other objects at the same time.
R Seat belts should not be worn twisted. In a
crash, you would not have the full width of
the seat belt to distribute impact forces.
The twisted seat belt against your body
could cause injuries.
R Pregnant women should also always use a
lap-shoulder belt. The lap belt portion
should be positioned as low as possible on the hips to avoid any possible pressure on
the abdomen. R
Place the seat backrest in a position that is
as upright as possible.
R Check your seat belt during travel to make
sure it is properly positioned.
R Never place your feet on the instrument
panel, dashboard, or on the seat. Always
keep both feet on the floor in front of the
seat.
R When using a seat belt to secure infant
restraints, toddler restraints, or children in
booster seats, always follow the child seat
manufacturer's instructions. G
WARNING
Do not pass seat belts over sharp edges. They
could tear.
Do not allow the seat belt to get caught in the door or in the seat adjustment mechanism.
This could damage the seat belt.
Never attempt to make modifications to seat
belts. This could impair the effectiveness of
the seat belts.
Fastening seat belts G
WARNING
According to accident statistics, children are
safer when properly restrained on the rear
seats than on the front-passenger seat. Thus, we strongly recommend that children be
placed in the rear seat whenever possible.
Regardless of seating position, children 12
years old and under must be seated and prop- erly secured in an appropriately sized child
restraint system or booster seat recommen-
ded for the size and weight of the child. For
additional information, see the "Children in
the vehicle" section.
A child's risk of serious or fatal injuries is sig-
nificantly increased if the child restraints are
not properly secured in the vehicle and/or the child is not properly secured in the child
restraint. Occupant safety
53Safety Z
Page 56 of 358
X
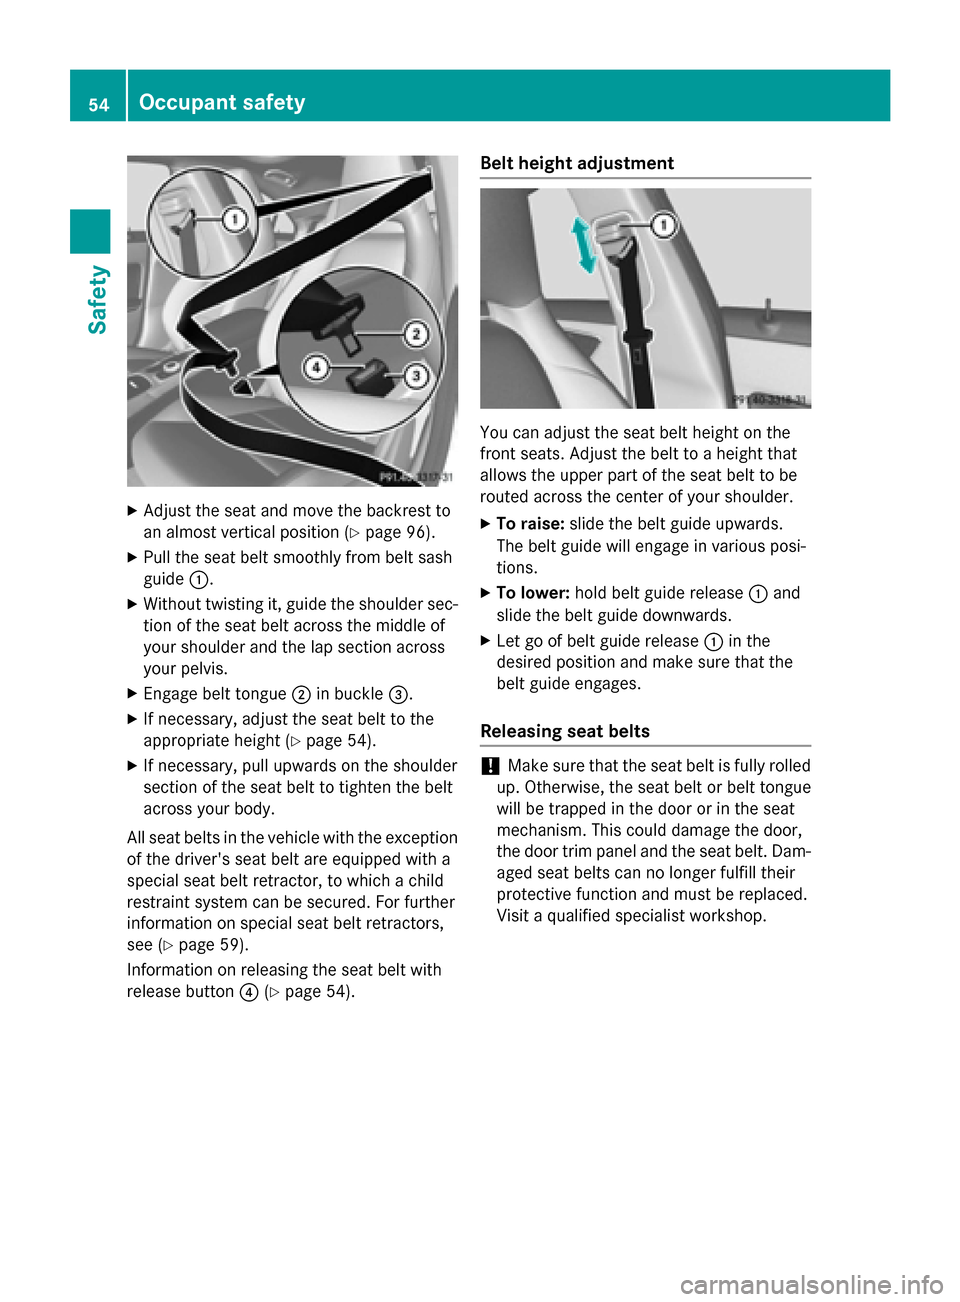
Adjust the seat and move the backrest to
an almost vertical position (Y page 96).
X Pull the seat belt smoothly from belt sash
guide 0043.
X Without twisting it, guide the shoulder sec-
tion of the seat belt across the middle of
your shoulder and the lap section across
your pelvis.
X Engage belt tongue 0044in buckle 0087.
X If necessary, adjust the seat belt to the
appropriate height (Y page 54).
X If necessary, pull upwards on the shoulder
section of the seat belt to tighten the belt
across your body.
All seat belts in the vehicle with the exception of the driver's seat belt are equipped with a
special seat belt retractor, to which a child
restraint system can be secured. For further
information on special seat belt retractors,
see (Y page 59).
Information on releasing the seat belt with
release button 0085(Ypage 54). Belt height adjustment You can adjust the seat belt height on the
front seats. Adjust the belt to a height that
allows the upper part of the seat belt to be
routed across the center of your shoulder.
X To raise: slide the belt guide upwards.
The belt guide will engage in various posi-
tions.
X To lower: hold belt guide release 0043and
slide the belt guide downwards.
X Let go of belt guide release 0043in the
desired position and make sure that the
belt guide engages.
Releasing seat belts !
Make sure that the seat belt is fully rolled
up. Otherwise, the seat belt or belt tongue
will be trapped in the door or in the seat
mechanism. This could damage the door,
the door trim panel and the seat belt. Dam- aged seat belts can no longer fulfill their
protective function and must be replaced.
Visit a qualified specialist workshop. 54
Occupant safetySafety
Page 58 of 358
The front seat belts and the outer seat belts in
the rear are equipped with Emergency Ten-
sioning Devices and seat belt force limiters.
The ETDs tighten the seat belts in an accident, pulling them close against the body.
The ETDs do not correct incorrect seat posi-
tions or incorrectly fastened seat belts.
The ETDs do not pull vehicle occupants back
towards the backrest.
The ETDs can only be activated when:
R the ignition is switched on
R the restraint systems are operational; see
"0075 SRS warning lamp" (Y page 41)
R the belt tongue has engaged in the belt
buckle of the respective front seat
The ETDs on the outside seats in the rear
compartment are triggered independently of
the lock status of the seat belts.
The ETDs are triggered depending on the type
and severity of an accident:
R in the event of a head-on or rear-end colli-
sion if the vehicle decelerates or acceler-
ates rapidly in a longitudinal direction dur-
ing the initial stages of the impact.
R in the event of a side impact if the vehicle
decelerates or accelerates rapidly in a lat-
eral direction on the side opposite to the
impact.
R in certain situations where the vehicle rolls
over if the system determines that it can
provide additional protection.
If the ETDs are deployed, you will hear a bang,
and a small amount of powder may also be
released. Only in rare cases will the bang
affect your hearing. The powder that is
released generally does not constitute a
health hazard and does not indicate that there is a fire in the vehicle. The dust might cause
some temporary breathing difficulty for peo-
ple with asthma or other breathing trouble. To avoid this, you may wish to get out of the
vehicle as soon as it is safe to do so. You can
also open the window to allow fresh air to
enter the vehicle interior. The 0075SRS warn-
ing lamp lights up. If the seat belt is also equipped with a seat
belt force limiter and this is triggered, the
force exerted by the seat belt on the vehicle
occupant is reduced.
The seat belt force limiters for the front seats
are synchronized with the front air bags,
which absorb part of the deceleration force.
This results in the force exerted on the occu- pant being distributed over a greater area. Children in the vehicle
Child restraint systems
Important safety notes G
WARNING
According to accident statistics, children are
safer when properly restrained in the rear
seating positions than in the front seating
position. Thus, we strongly recommend that
children be placed in the rear seats whenever possible. Regardless of seating position, chil- dren 12 years old and under must be seated
and properly secured in an appropriate infant
restraint, toddler restraint, or booster seat
recommended for the size and weight of the
child.
The infant or child restraint must be properly
secured with the vehicle's seat belt, the seat
belt and top tether strap, or lower anchors and
top tether strap, fully in accordance with the
child seat manufacturer's instructions.
Occupants, especially children, should always
sit as upright as possible, wear the seat belt
properly and use an appropriately sized infant
restraint, toddler restraint, or booster seat
recommended for the size and weight of the
child.
Children can be killed or seriously injured by
an inflating air bag. Note the following impor-
tant information when circumstances require you to place a child in the front passenger
seat:
R Your vehicle is equipped with air bag tech-
nology designed to deactivate the front 56
Children in the vehicleSafety