fuel type MERCEDES-BENZ CLA-Class 2014 C117 Owner's Manual
[x] Cancel search | Manufacturer: MERCEDES-BENZ, Model Year: 2014, Model line: CLA-Class, Model: MERCEDES-BENZ CLA-Class 2014 C117Pages: 358, PDF Size: 6.6 MB
Page 17 of 358

Rear view camera
Cleaning instructions ..................... 291
Function/notes ............................ .186
Switching on/off ........................... 186
Rear-view mirror
Anti-glare (manual) ........................ 103
Dipping (automatic) ....................... 104
Rear window defroster
Problem (malfunction) ................... 135
Switching on/off ........................... 134
Refrigerant (air-conditioning sys-
tem)
Important safety notes .................. 352
Refueling
Fuel gauge ....................................... 31
Important safety notes .................. 155
Refueling process .......................... 156
see Fuel
Remote control
Garage door opene r....................... 274
Programming (garage door
opener) .......................................... 275
Replacing bulbs
Important safety notes .................. 114
Overview of bulb types .................. 115
Removing/replacing the cover
(front wheel arch) .......................... 116
Reporting safety defects .................... 26
Reserve (fuel tank) see Fuel
Reserve fuel
Display message ............................ 231
Warning lamp ................................. 251
see Fuel
Residual heat (climate control) ........ 135
Restraint system see SRS (Supplemental Restraint
System)
Reverse gear (selector lever) ........... 148
Reversing feature Panorama sliding sunroof ................ 91
Roller sunblind s............................... 92
Side windows ................................... 87
Roadside Assistance (breakdown) .... 23Roller sunblind
Opening/closing .............................. 93
Panorama roof with power tilt/
sliding panel ..................................... 92
Roof carrier ........................................ 261
Roof lining and carpets (cleaning
guidelines) ......................................... 294
Roof load (maximum) ........................ 353
Route (navigation) see Route guidance (navigation)
Route guidance (navigation) ............ 201 S
Safety Children in the vehicle ..................... 56
Child restraint systems .................... 56
Occupant Classification System
(OCS) ............................................... 47
Safety system
see Driving safety systems
Seat
Adjusting (Performance Seat) ........ 100
Seat belts
Adjusting the height ......................... 54
Belt force limiters ............................ 55
Cleaning ......................................... 294
Correct usage .................................. 52
Emergency Tensioning Devices ........ 55
Fastening ......................................... 53
Important safety guidelines ............. 52
Releasing ......................................... 54
Safety guidelines ............................. 42
Warning lamp ................................. 243
Warning lamp (function) ................... 55
Seats
Adjusting (electrically) ..................... 99
Adjusting (manually) ........................ 98
Adjusting the 4-way lumbar sup-
port ................................................ 100
Adjusting the head restraint ............ 99
Cleaning the cover ......................... 293
Correct driver's seat position ........... 96
Folding the backrest (rear com-
partment) forwards/back .............. 260
Important safety notes .................... 97
Seat heating problem .................... 102 Index
15
Page 158 of 358

!
Overfilling the fuel tank could damage the
fuel system.
! Take care not to spill any fuel on painted
surfaces. You could otherwise damage the
paintwork.
! Use a filter when refueling from a fuel can.
Otherwise, the fuel lines and/or injection
system could be blocked by particles from
the fuel can.
Do not get into the vehicle again during the
refueling process. Otherwise, electrostatic
charge could build up again.
If you overfill the fuel tank, fuel could spray
out when the fuel pump nozzle is removed.
For further information on fuel and fuel quality (Y page 348). Refueling
General information The fuel filler flap is unlocked or locked auto-
matically when you open or close the vehicle
with the SmartKey.
The position of the fuel filler cap is displayed
00D4 in the instrument cluster. The arrow on
the filling pump indicates the side of the vehi-
cle.
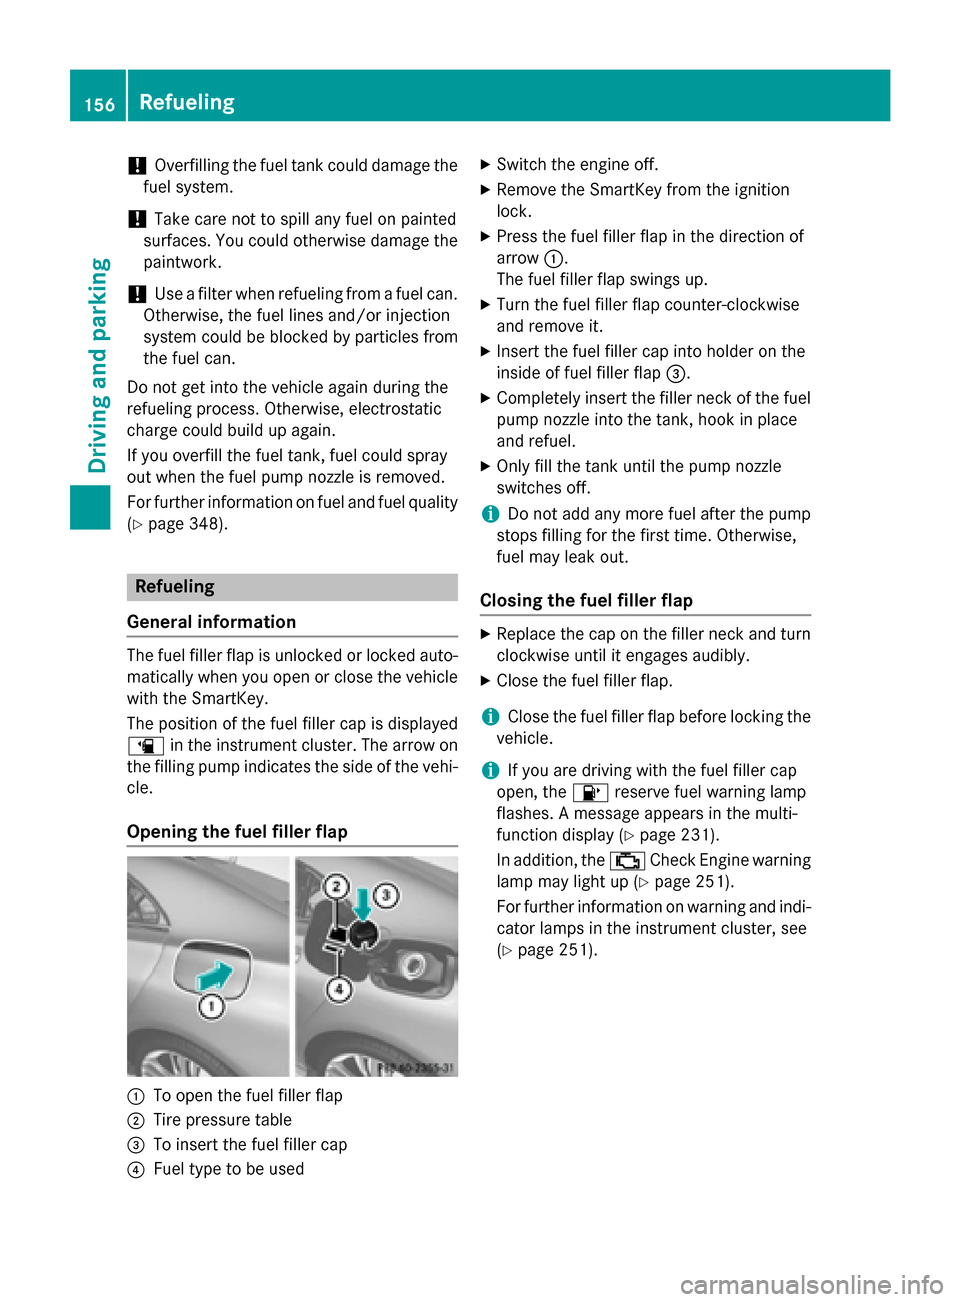
Opening the fuel filler flap 0043
To open the fuel filler flap
0044 Tire pressure table
0087 To insert the fuel filler cap
0085 Fuel type to be used X
Switch the engine off.
X Remove the SmartKey from the ignition
lock.
X Press the fuel filler flap in the direction of
arrow 0043.
The fuel filler flap swings up.
X Turn the fuel filler flap counter-clockwise
and remove it.
X Insert the fuel filler cap into holder on the
inside of fuel filler flap 0087.
X Completely insert the filler neck of the fuel
pump nozzle into the tank, hook in place
and refuel.
X Only fill the tank until the pump nozzle
switches off.
i Do not add any more fuel after the pump
stops filling for the first time. Otherwise,
fuel may leak out.
Closing the fuel filler flap X
Replace the cap on the filler neck and turn
clockwise until it engages audibly.
X Close the fuel filler flap.
i Close the fuel filler flap before locking the
vehicle.
i If you are driving with the fuel filler cap
open, the 00B6reserve fuel warning lamp
flashes. A message appears in the multi-
function display (Y page 231).
In addition, the 00B9Check Engine warning
lamp may light up (Y page 251).
For further information on warning and indi- cator lamps in the instrument cluster, see
(Y page 251). 156
RefuelingDriving and parking
Page 316 of 358

Useful information
i This Operator's manual describes all
models and all standard and optional equip- ment of your vehicle available at the time of
publication of the Operator's manual.
Country-specific differences are possible.
Please note that your vehicle may not be
equipped with all features described. This
also applies to safety-related systems and
functions.
i Read the information on qualified special-
ist workshops (Y page 26). Important safety notes
G
WARNING
If wheels and tires of the wrong size are used, the wheel brakes or suspension components
may be damaged. There is a risk of an acci-
dent.
Always replace wheels and tires with those
that fulfill the specifications of the original
part.
When replacing wheels, make sure to use the
correct:
R designation
R model
When replacing tires, make sure to use the
correct:
R designation
R manufacturer
R model G
WARNING
A flat tire severely impairs the driving, steer-
ing and braking characteristics of the vehicle.
There is a risk of accident.
Tires without run-flat characteristics:
R do not drive with a flat tire.
R immediately replace the flat tire with your
emergency spare wheel or spare wheel, or
consult a qualified specialist workshop. Tires with run-flat characteristics:
R pay attention to the information and warn-
ing notices on MOExtended tires (tires with
run-flat characteristics).
Accessories that are not approved for your
vehicle by Mercedes-Benz or that are not
being used correctly can impair operating
safety.
Before purchasing and using non-approved
accessories, visit a qualified specialist work-
shop and inquire about:
R suitability
R legal stipulations
R factory recommendations
Information on dimensions and types of
wheels and tires for your vehicle can be found (Y page 340).
Information on air pressure for the tires on
your vehicle can be found:
R on the vehicle's Tire and Loading Informa-
tion placard on the B-pillar
R on the tire pressure label on the fuel filler
flap (Y page 156)
R under "Tire pressure" (Y page 317)
i Further information on wheels and tires
can be obtained at any qualified specialist
workshop. Operation
Information on driving
R If the vehicle is heavily loaded, check the
tire pressures and correct them if neces-
sary.
R While driving, pay attention to vibrations,
noises and unusual handling characteris-
tics, e.g. pulling to one side. This may indi- cate that the wheels or tires are damaged.If you suspect that a tire is defective,
reduce your speed immediately. Stop the
vehicle as soon as possible to check the
wheels and tires for damage. Hidden tire
damage could also be causing the unusual 314
OperationWheels and tires
Page 343 of 358

come into contact with the bodywork and
axle components. This could result in dam- age to the tires or the vehicle.
Mercedes-Benz accepts no liability for
damage resulting from the use of tires,
wheels or accessories other than those tes-
ted and approved.
Information on tires, wheels and approved
combinations can be obtained from any
qualified specialist workshop.
! Retreaded tires are neither tested nor rec-
ommended by Mercedes-Benz, since pre-
vious damage cannot always be detected
on retreaded tires. As a result, Mercedes-
Benz cannot guarantee vehicle safety if
retreaded tires are mounted. Do not mount used tires if you have no information about
their previous usage.
Overview of abbreviations used in the follow-
ing tire tables:
R BA: both axles
R FA: front axle
R RA: rear axle
The recommended pressures for various
operating conditions can be found:
R on the Tire and Loading Information placard
with the recommended tire pressures on
the B-pillar on the driver's side
R in the tire pressure table on the inside of the
fuel filler flap
Observe the notes on recommended tire
pressures under various operating conditions (Y page 317).
Check tire pressures regularly, and only when the tires are cold. Comply with the mainte-
nance recommendations of the tire manufac-
turer in the vehicle document wallet.
Notes on the vehicle equipment – always
equip the vehicle with:
R tires of the same size on a given axle (left/
right)
R the same type of tires at a given time (sum-
mer tires, winter tires, MOExtended tires) Exception: it is permissible to install a dif-
ferent type or make in the event of a flat
tire. Observe the "MOExtended tires (tires
with run-flat characteristics" section
(Y
page 297).
i Vehicles equipped with MOExtended tires
are not equipped with a TIREFIT kit at the
factory. It is therefore recommended that
you additionally equip your vehicle with a
TIREFIT kit if you mount tires that do not
feature run-flat properties, e.g. winter tires. A TIREFIT kit can be obtained from a quali- fied specialist workshop.
i The following pages contain information
on approved wheel rim and tire sizes for
equipping your vehicle with winter tires.
Winter tires are not available at the factory as standard equipment or optional extras.
If you want to equip your vehicle with
approved winter tires, it may be necessary
to obtain wheel rims in the corresponding
size. The size of the approved winter tires
may differ from the standard tires. This is
dependent on the model and the equip-
ment installed at the factory.
The tires and wheel rims, as well as further
information, can be obtained at a qualified
specialist workshop.
i Not all wheel and tire combinations are
available at the factory for all countries. Wheel and tire combinations
341Wheels and tires Z