load capacity MERCEDES-BENZ CLA-Class 2014 C117 Owner's Manual
[x] Cancel search | Manufacturer: MERCEDES-BENZ, Model Year: 2014, Model line: CLA-Class, Model: MERCEDES-BENZ CLA-Class 2014 C117Pages: 358, PDF Size: 6.6 MB
Page 20 of 358
Tire pressure
Calling up (on-board computer) ..... 321
Checking manuall y........................ 320
Display message ............................ 237
Important safety notes .................. 321
Maximum ....................................... 320
Notes ............................................. 319
Not reached (TIREFIT) .................... 300
Reached (TIREFIT) .......................... 300
Recommended ............................... 317
Tire pressure monitoring system
Checking the tire pressure elec-
tronically ........................................ 322
Function/note s............................. 321
General notes ................................ 321
Important safety notes .................. 321
Restarting ...................................... 323
Warning lamp ................................. 254
Warning message .......................... 323
Tires
Aspect ratio (definition) ................. 334
Average weight of the vehicle
occupants (definition) .................... 333
Bar (definition) ............................... 333
Changing a whee l.......................... 335
Characteristics .............................. 333
Checking ........................................ 315
Curb weight (definition) ................. 334
Definition of terms ......................... 333
Direction of rotation ...................... 336
Display message ............................ 237
Distribution of the vehicle occu-
pants (definition) ............................ 335
DOT, Tire Identification Number
(TIN) ............................................... 332
DOT (Department of Transporta-
tion) (definition) ............................. 333
GAWR (Gross Axle Weight Rating)
(definition) ..................................... 333
GVW (Gross Vehicle Weight) (def-
inition) ........................................... 334
GVWR (Gross Vehicle Weight Rat-
ing) (definition) .............................. 334
Important safety notes .................. 314
Increased vehicle weight due to
optional equipment (definition) ...... 333
Kilopascal (kPa) (definition) ........... 334
Labeling (overview) ........................ 329 Load bearing index (definition) ...... 335
Load index ..................................... 332
Load index (definition) ................... 334
M+S tire
s....................................... 316
Maximum loaded vehicle weight
(definition) ..................................... 334
Maximum load on a tire (defini-
tion) ............................................... 334
Maximum permissible tire pres-
sure (definition) ............................. 334
Maximum tire load ......................... 327
Maximum tire load (definition) ....... 334
MOExtended tire s.......................... 316
Optional equipment weight (defi-
nition) ............................................ 335
PSI (pounds per square inch) (def-
inition) ........................................... 334
Replacing ....................................... 336
Service life ..................................... 316
Sidewall (definition) ....................... 335
Speed rating (definition) ................ 334
Storing ........................................... 336
Structure and characteristics
(definition) ..................................... 333
Summer tire s......................... 165, 316
Temperature .................................. 329
TIN (Tire Identification Number)
(definition) ..................................... 335
Tire bead (definition) ...................... 335
Tire pressure (definition) ................ 335
Tire pressures (recommended) ...... 333
Tire size (data) ............................... 340
Tire size designation, load-bearing capacity, speed rating .................... 330
Tire tread ....................................... 315
Tire tread (definition) ..................... 335
Total load limit (definition) ............. 335
Traction ......................................... 328
Traction (definition) ....................... 335
Tread wear ..................................... 328
Uniform Tire Quality Grading
Standards ...................................... 328
Uniform Tire Quality Grading
Standards (definition) .................... 333
Wear indicator (definition) ............. 335
Wheel and tire combination ........... 342
Wheel rim (definition) .................... 333
see Flat tire 18
Index
Page 262 of 358
R
The vehicle occupant would thereby be
pushed into the seat belt by the rear bench
seat/rear seat or by the seat backrest. The
seat belt can no longer offer the intended
level of protection and could even cause
injuries.
R Objects or loads in the trunk cannot be
restrained by the seat backrest.
There is an increased risk of injury.
Before every trip, make sure that the seat
backrests and the rear bench seat/rear seat
are engaged.
! Before folding the backrest in the rear
compartment forwards, make sure that the rear compartment armrest and the
cupholder are folded in. They may other-
wise be damaged.
Observe the loading guidelines (Y page 256).
Folding the rear seat backrest forwards and back Folding the rear seat backrest forward
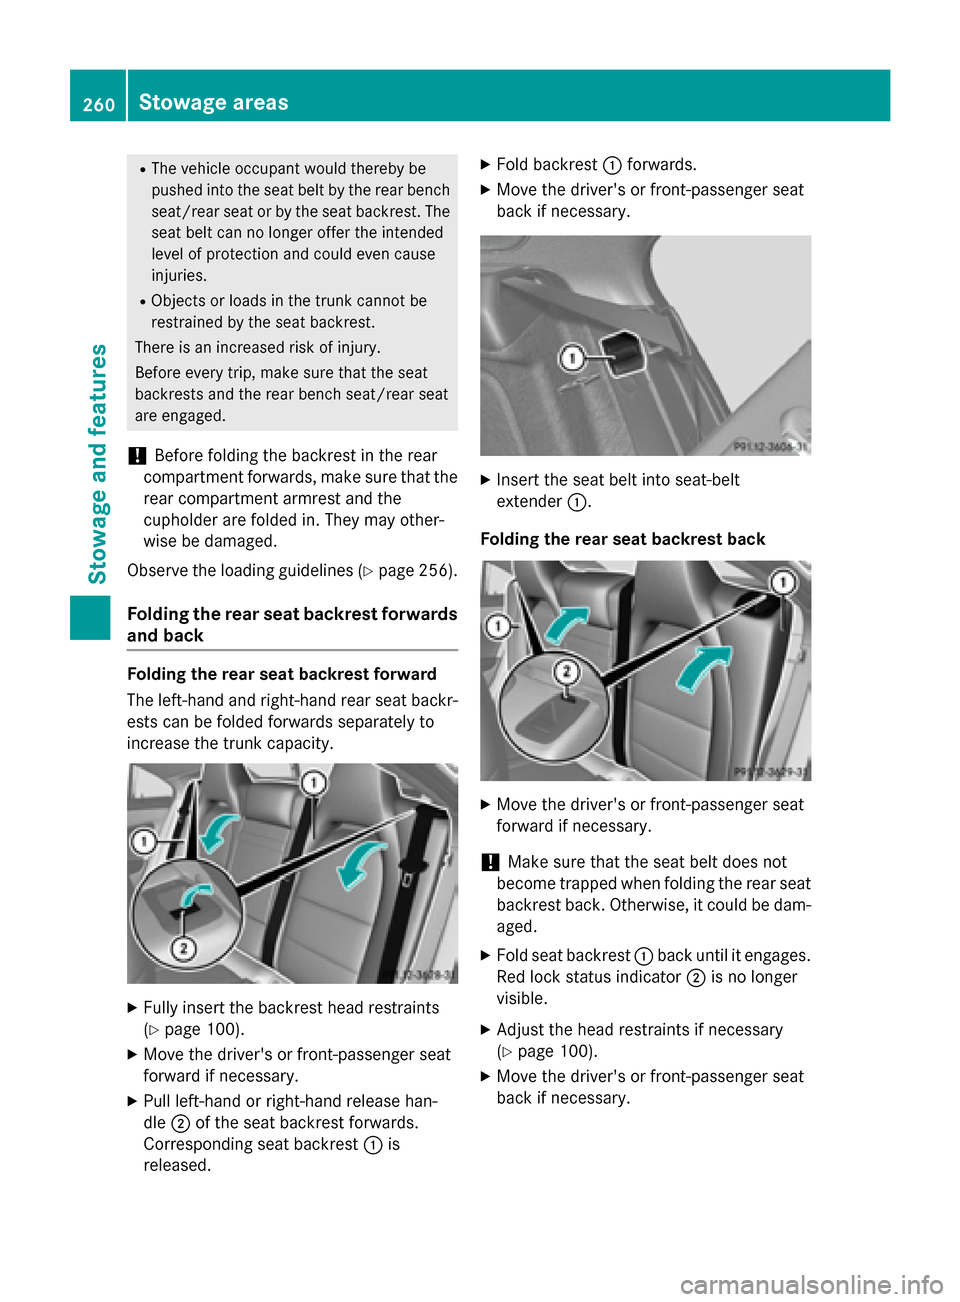
The left-hand and right-hand rear seat backr-
ests can be folded forwards separately to
increase the trunk capacity. X
Fully insert the backrest head restraints
(Y page 100).
X Move the driver's or front-passenger seat
forward if necessary.
X Pull left-hand or right-hand release han-
dle 0044of the seat backrest forwards.
Corresponding seat backrest 0043is
released. X
Fold backrest 0043forwards.
X Move the driver's or front-passenger seat
back if necessary. X
Insert the seat belt into seat-belt
extender 0043.
Folding the rear seat backrest back X
Move the driver's or front-passenger seat
forward if necessary.
! Make sure that the seat belt does not
become trapped when folding the rear seat backrest back. Otherwise, it could be dam-
aged.
X Fold seat backrest 0043back until it engages.
Red lock status indicator 0044is no longer
visible.
X Adjust the head restraints if necessary
(Y page 100).
X Move the driver's or front-passenger seat
back if necessary. 260
Stowage areasStowage and features
Page 299 of 358
Information on changing/mounting a wheel
(Y page 336).
X Stop the vehicle on solid, non-slippery and
level ground, as far away as possible from
traffic.
X Switch on the hazard warning lamps.
X Secure the vehicle against rolling away
(Y page 157).
X If possible, bring the front wheels into the
straight-ahead position.
X Switch off the engine.
X Remove the SmartKey from the ignition
lock.
X All occupants must get out of the vehicle.
Make sure that they are not endangered as
they do so.
X Make sure that no one is near the danger
area while a wheel is being changed. Any-
one who is not directly assisting in the
wheel change should, for example, stand
behind the barrier.
X Get out of the vehicle. Pay attention to traf-
fic conditions when doing so.
X Close the driver's door.
i Vehicles equipped with MOExtended tires
are not equipped with a TIREFIT kit at the
factory. It is therefore recommended that
you additionally equip your vehicle with a
TIREFIT kit if you mount tires that do not
feature run-flat properties, e.g. winter tires. A TIREFIT kit can be obtained from a quali-
fied specialist workshop. MOExtended tires (tires with run-flat
properties)
General notes With MOExtended tires (tires with run flat
characteristics), you can continue to drive
your vehicle even if there is a total loss of
pressure in one or more tires. The affected
tire must not show any clearly visible damage.
You can recognize MOExtended tires by the
MOExtended marking which appears on the sidewall of the tire. You will find this marking
next to the tire size designation, the load-
bearing capacity and the speed index
(Y page 330).
MOExtended tires may only be used in con-
junction with an active tire pressure monitor. If the pressure loss warning message
appears in the multifunction display:
R Observe the instructions in the display
messages (Y page 237).
R Check the tire for damage.
R If driving on, observe the following notes.
The maximum driving distance is approx-
imately 50 miles (80 km) when the vehicle is
partially laden and approximately 18 miles
(30 km) when the vehicle is fully laden.
In addition to the vehicle load, the driving dis- tance possible depends upon:
R Speed
R Road condition
R Outside temperature
The driving distance possible in run-flat mode may be reduced by extreme driving condi-
tions/maneuvers, or it can be increased
through a moderate style of driving.
The maximum permissible distance which
can be driven in run-flat mode is counted from
the moment the tire pressure loss warning
appears in the multifunction display.
You must not exceed a maximum speed of
50 mph (80 km/h).
i When replacing one or all tires, make sure
that you use only tires:
R of the size specified for the vehicle and
R marked "MOExtended"
If a tire has gone flat and cannot be
replaced with a MOExtended tire, a stand-
ard tire may be used as a temporary meas-
ure. Make sure that you use the proper size and type (summer or winter tire).
i Vehicles equipped with MOExtended tires
are not equipped with a TIREFIT kit at the
factory. It is therefore recommended that Flat tire
297Breakdown assistance
Page 327 of 358
Number of seats
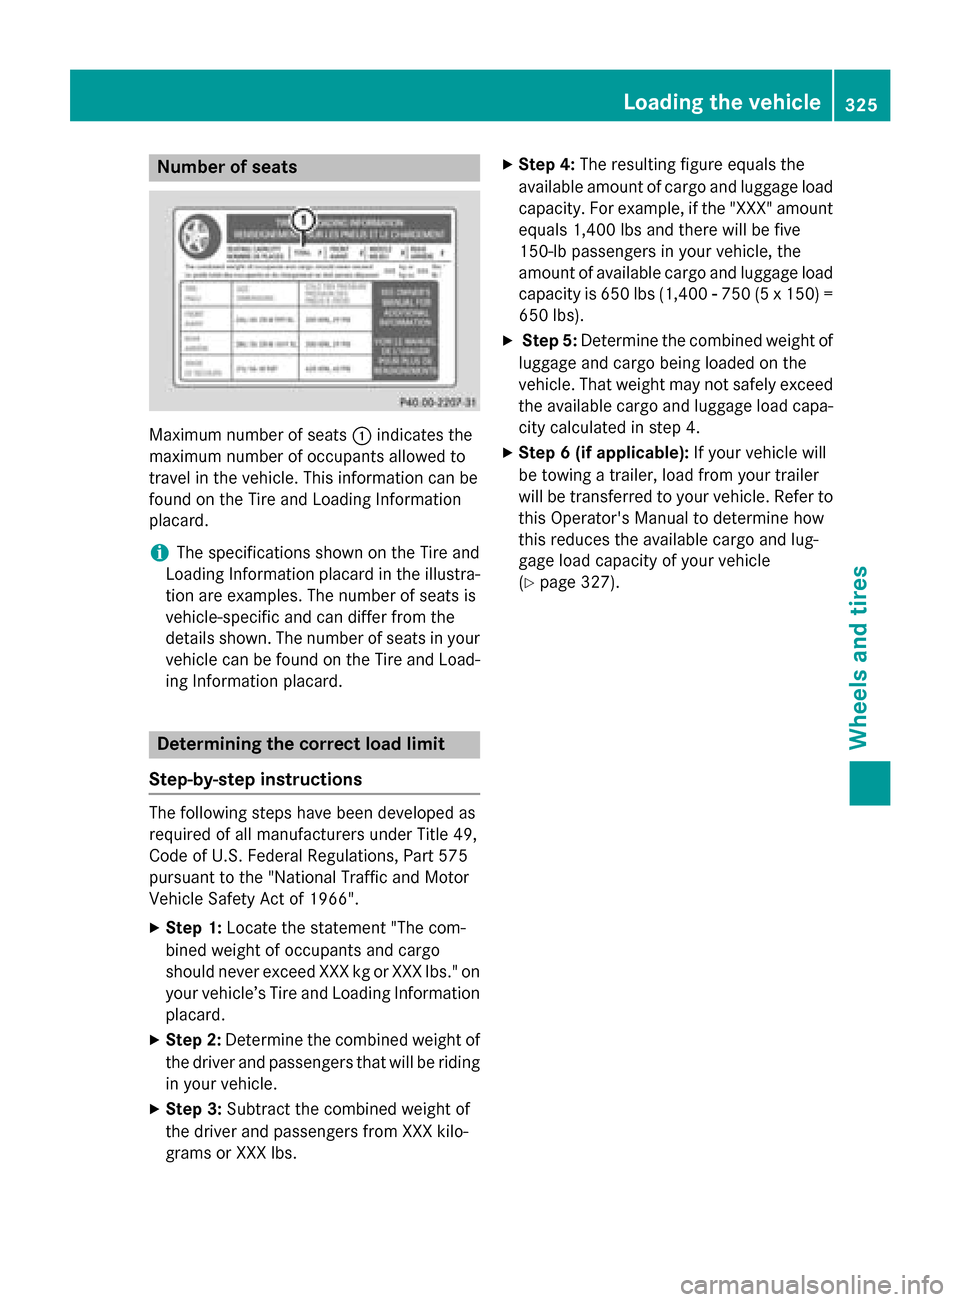
Maximum number of seats
0043indicates the
maximum number of occupants allowed to
travel in the vehicle. This information can be
found on the Tire and Loading Information
placard.
i The specifications shown on the Tire and
Loading Information placard in the illustra-
tion are examples. The number of seats is
vehicle-specific and can differ from the
details shown. The number of seats in your vehicle can be found on the Tire and Load-
ing Information placard. Determining the correct load limit
Step-by-step instructions The following steps have been developed as
required of all manufacturers under Title 49,
Code of U.S. Federal Regulations, Part 575
pursuant to the "National Traffic and Motor
Vehicle Safety Act of 1966".
X Step 1: Locate the statement "The com-
bined weight of occupants and cargo
should never exceed XXX kg or XXX lbs." on your vehicle’s Tire and Loading Information
placard.
X Step 2: Determine the combined weight of
the driver and passengers that will be riding
in your vehicle.
X Step 3: Subtract the combined weight of
the driver and passengers from XXX kilo-
grams or XXX lbs. X
Step 4: The resulting figure equals the
available amount of cargo and luggage load capacity. For example, if the "XXX" amount
equals 1,400 lbs and there will be five
150-l b passengers in your vehicle, the
amount of available cargo and luggage load
capacity is 650 lbs (1,400 00F8750 (5 x 150) =
650 lbs).
X Step 5: Determine the combined weight of
luggage and cargo being loaded on the
vehicle. That weight may not safely exceed
the available cargo and luggage load capa- city calculated in step 4.
X Step 6 (if applicable): If your vehicle will
be towing a trailer, load from your trailer
will be transferred to your vehicle. Refer to this Operator's Manual to determine how
this reduces the available cargo and lug-
gage load capacity of your vehicle
(Y page 327). Loading the vehicle
325Wheels and tires Z
Page 332 of 358
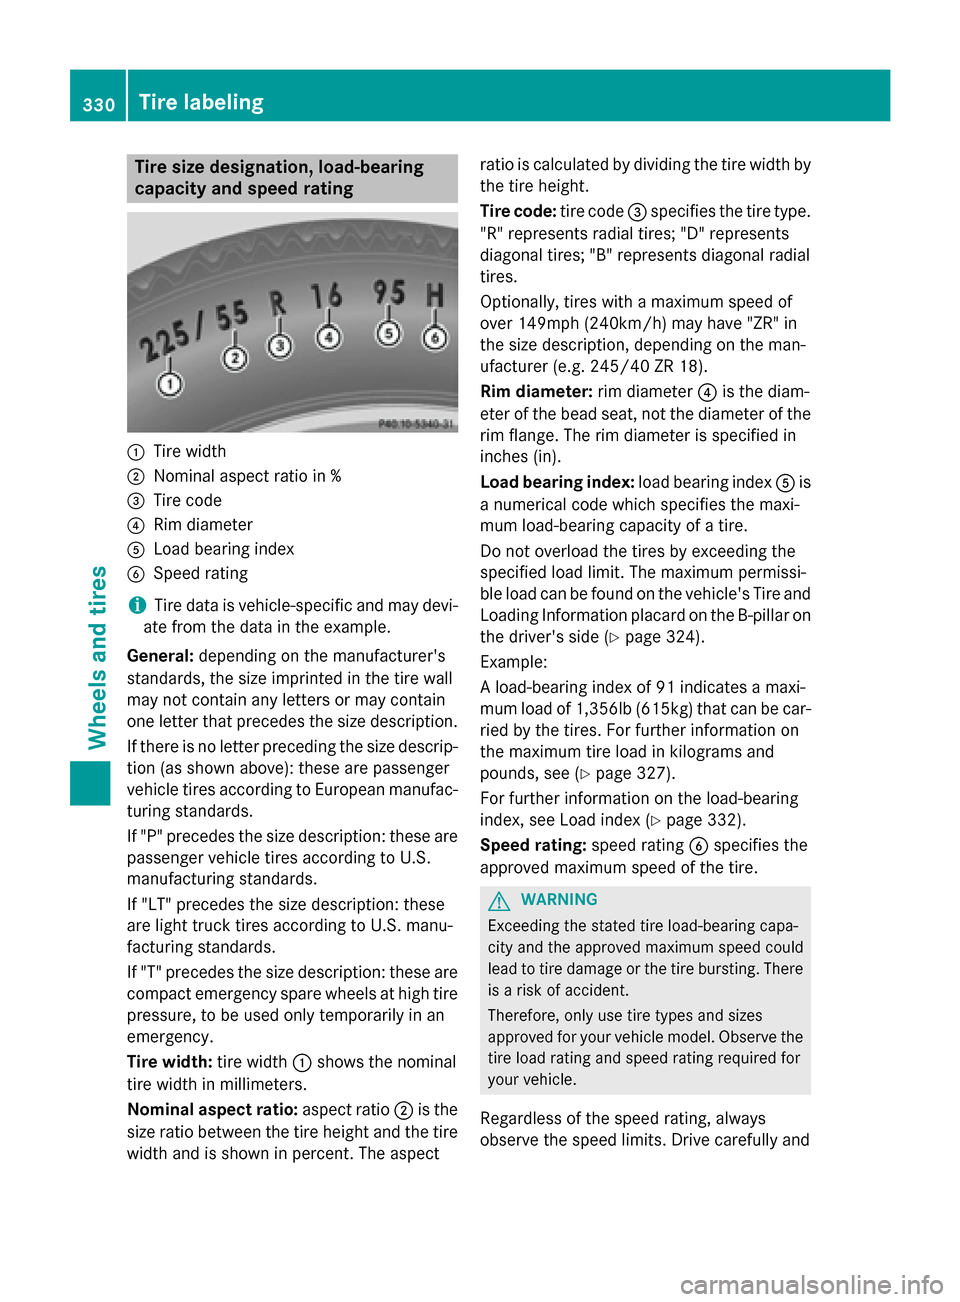
Tire size designation, load-bearing
capacity and speed rating 0043
Tire width
0044 Nominal aspect ratio in %
0087 Tire code
0085 Rim diameter
0083 Load bearing index
0084 Speed rating
i Tire data is vehicle-specific and may devi-
ate from the data in the example.
General: depending on the manufacturer's
standards, the size imprinted in the tire wall
may not contain any letters or may contain
one letter that precedes the size description.
If there is no letter preceding the size descrip-
tion (as shown above): these are passenger
vehicle tires according to European manufac-
turing standards.
If "P" precedes the size description: these are passenger vehicle tires according to U.S.
manufacturing standards.
If "LT" precedes the size description: these
are light truck tires according to U.S. manu-
facturing standards.
If "T" precedes the size description: these are
compact emergency spare wheels at high tire pressure, to be used only temporarily in an
emergency.
Tire width: tire width0043shows the nominal
tire width in millimeters.
Nominal aspect ratio: aspect ratio0044is the
size ratio between the tire height and the tire width and is shown in percent. The aspect ratio is calculated by dividing the tire width by
the tire height.
Tire code: tire code0087specifies the tire type.
"R" represents radial tires; "D" represents
diagonal tires; "B" represents diagonal radial
tires.
Optionally, tires with a maximum speed of
over 149mph (24 0km/h) may have "ZR" in
the size description, depending on the man-
ufacturer (e.g. 245/40 ZR 18).
Rim diameter: rim diameter0085is the diam-
eter of the bead seat, not the diameter of the
rim flange. The rim diameter is specified in
inches (in).
Load bearing index: load bearing index0083is
a numerical code which specifies the maxi-
mum load-bearing capacity of a tire.
Do not overload the tires by exceeding the
specified load limit. The maximum permissi-
ble load can be found on the vehicle's Tire and
Loading Information placard on the B-pillar on the driver's side (Y page 324).
Example:
A load-bearing index of 91 indicates a maxi-
mum load of 1,356lb (615kg) that can be car-
ried by the tires. For further information on
the maximum tire load in kilograms and
pounds, see (Y page 327).
For further information on the load-bearing
index, see Load index (Y page 332).
Speed rating: speed rating0084specifies the
approved maximum speed of the tire. G
WARNING
Exceeding the stated tire load-bearing capa-
city and the approved maximum speed could
lead to tire damage or the tire bursting. There is a risk of accident.
Therefore, only use tire types and sizes
approved for your vehicle model. Observe the
tire load rating and speed rating required for
your vehicle.
Regardless of the speed rating, always
observe the speed limits. Drive carefully and 330
Tire labelingWheels and tires
Page 336 of 358
Speed rating
The speed rating is part of the tire identifica-
tion. It specifies the speed range for which the tire is approved. GVW (Gross Vehicle Weight)
The gross vehicle weight includes the weight
of the vehicle including fuel, tools, the spare
wheel, accessories installed, occupants, lug-
gage and the drawbar noseweight, if applica- ble. The gross vehicle weight must not exceed
the gross vehicle weight rating GVWR as
specified on the vehicle identification plate on the B-pillar on the driver's side. GVWR (Gross Vehicle Weight Rating)
The GVWR is the maximum permissible gross weight of a fully loaded vehicle (the weight of the vehicle including all accessories, occu-
pants, fuel, luggage and the drawbar nose-
weight, if applicable). The gross vehicle
weight rating is specified on the vehicle iden-
tification plate on the B-pillar on the driver's
side. Maximum loaded vehicle weight
The maximum weight is the sum of:
R the curb weight of the vehicle
R the weight of the accessories
R the load limit
R the weight of the factory installed optional
equipment Kilopascal (kPa)
Metric unit for tire pressure. 6.9 kPa corre-
sponds to 1 psi. Another unit for tire pressure
is bar. 100 kilopascal (kPa) is the equivalent
of 1 bar. Load index
In addition to the load-bearing index, the load
index may also be imprinted on the sidewall of the tire. This specifies the load-bearing capa- city more precisely. Curb weight
The weight of a vehicle with standard equip-
ment including the maximum capacity of fuel, oil and coolant. It also includes the air-condi- tioning system and optional equipment if
these are installed in the vehicle, but does not
include passengers or luggage. Maximum load rating
The maximum load rating in kilograms or
pounds is the maximum weight for which a
tire is approved. Maximum permissible tire pressure
Maximum permissible tire pressure for one
tire. Maximum load on one tire
Maximum load on one tire. This is calculated
by dividing the maximum axle load of one axle by two. PSI (pounds per square inch)
A standard unit of measure for tire pressure. Aspect ratio
Relationship between tire height and tire
width in percent. 334
Definition of terms for tires and loadingWheels and tires
Page 337 of 358
Tire pressure
This is pressure inside the tire applying an
outward force to each square inch of the tire's
surface. The tire pressure is specified in
pounds per square inch (psi), in kilopascal
(kPa) or in bar. The tire pressure should only
be corrected when the tires are cold. Tire pressure of cold tires
The tires are cold:
R if the vehicle has been parked without
direct sunlight on the tires for at least three
hours and
R if the vehicle has not been driven further
than 1 mile (1.6 km) Tread
The part of the tire that comes into contact
with the road. Bead
The tire bead ensures that the tire sits
securely on the wheel. There are several steel
wires in the bead to prevent the tire from
coming loose from the wheel rim. Sidewall
The part of the tire between the tread and the
bead. Weight of optional extras
The combined weight of those optional extras
that weigh more than the replaced standard
part and more than 2.3 kg (5 lbs). These
optional extras, such as high-performance
brakes, level control, a roof rack or a high-
performance battery, are not included in the
curb weight and the weight of the accesso-
ries. TIN (Tire Identification Number)
This is a unique identifier which can be used
by a tire manufacturer to identify tires, for
example for a product recall, and thus identify the purchasers. The TIN is made up of the
manufacturer's identity code, tire size, tire
type code and the manufacturing date. Load bearing index
The load bearing index (also load index) is a
code that contains the maximum load bearing
capacity of a tire. Traction
Traction is the result of friction between the
tires and the road surface. Treadwear indicators
Narrow bars (tread wear bars) that are dis-
tributed over the tire tread. If the tire tread is level with the bars, the wear limit of 00CDin
(1.6 mm) has been reached. Occupant distribution
The distribution of occupants in a vehicle at
their designated seating positions. Total load limit
Nominal load and luggage load plus
68 kilograms (150 lb) multiplied by the num-
ber of seats in the vehicle. Changing a wheel
Flat tire
You can find information on what to do in the
event of a flat tire in the "Flat tire" section
(Y page 296). Information on driving with
MOExtended tires in the event of a flat tire can Changing a
wheel
335Wheels an d tires Z
Page 340 of 358
R
before raising the vehicle, secure it from
rolling away by applying the parking brake
and inserting wheel chocks. Never disen-
gage the parking brake while the vehicle is raised.
R the jack must be placed on a firm, flat and
non-slip surface. On a loose surface, a
large, flat, load-bearing underlay must be
used. On a slippery surface, a non-slip
underlay must be used, e.g. rubber mats.
R do not use wooden blocks or similar
objects as a jack underlay. Otherwise, the
jack will not be able to achieve its load-
bearing capacity due to the restricted
height.
R make sure that the distance between the
underside of the tires and the ground does
not exceed 1.2 in (3 cm).
R never place your hands and feet under the
raised vehicle.
R do not lie under the vehicle.
R do not start the engine when the vehicle is
raised.
R never open or close a door or the boot when
the vehicle is raised.
R make sure that no persons are present in
the vehicle when the vehicle is raised.
! The jack is designed exclusively for jack-
ing up the vehicle at the jacking points.
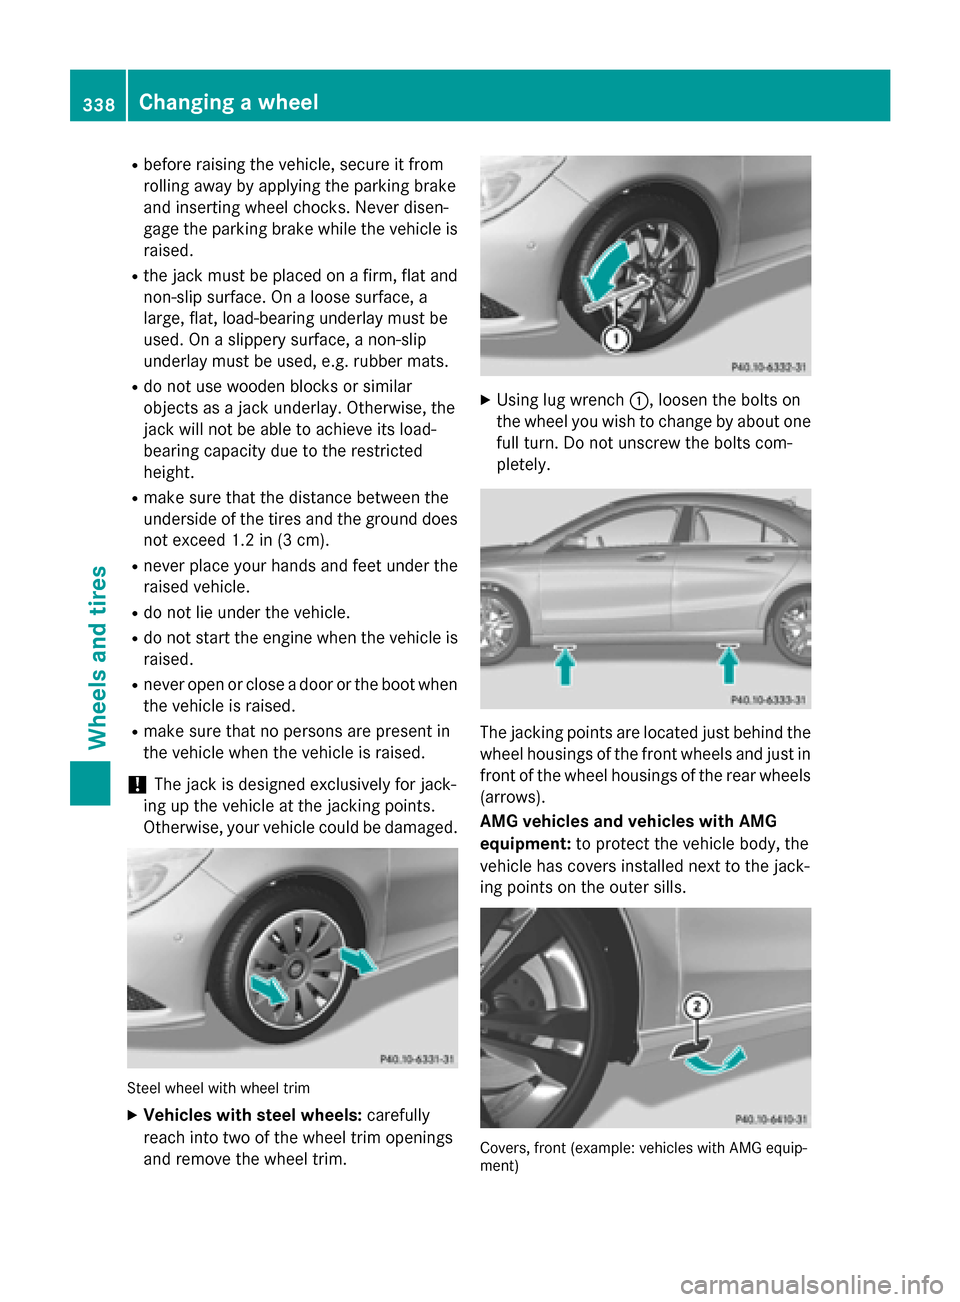
Otherwise, your vehicle could be damaged. Steel wheel with wheel trim
X
Vehicles with steel wheels: carefully
reach into two of the wheel trim openings
and remove the wheel trim. X
Using lug wrench 0043, loosen the bolts on
the wheel you wish to change by about one full turn. Do not unscrew the bolts com-
pletely. The jacking points are located just behind the
wheel housings of the front wheels and just in front of the wheel housings of the rear wheels(arrows).
AMG vehicles and vehicles with AMG
equipment: to protect the vehicle body, the
vehicle has covers installed next to the jack-
ing points on the outer sills. Covers, front (example: vehicles with AMG equip-
ment) 338
Changing a wheelWheels and tires