battery MERCEDES-BENZ CLA-Class 2016 C117 Owner's Manual
[x] Cancel search | Manufacturer: MERCEDES-BENZ, Model Year: 2016, Model line: CLA-Class, Model: MERCEDES-BENZ CLA-Class 2016 C117Pages: 374, PDF Size: 8.19 MB
Page 7 of 374
ATA (Anti-Theft Alarm system)Activating/deactivating .................. .73
Function ........................................... 73
Switching off the alarm .................... 73
ATTENTION ASSIST
Activating/deactivating .................2 20
Display message ............................ 246
Function/notes .............................2 03
Audio menu (on-board computer) .... 217
Audio system
see separate operating instructions
Authorized Mercedes-Benz Center
see Qualified specialist workshop
Authorized workshop
see Qualified specialist workshop
AUTO lights
Display message ............................ 242
see Lights
Automatic car wash (care) ...............302
Automatic engine start (ECO start/
stop function) ....................................1 52
Automatic engine switch-off (ECO
start/stop function) .......................... 152
Automatic headlamp mode .............. 114
Automatic transmission
Accelerator pedal position ............. 161
Changing gear ............................... 161
DIRECT SELECT lever ..................... 157
Drive program ................................ 162
Drive program display .................... 157
Driving tips .................................... 161
DYNAMIC SELECT button (all vehi-
cles except Mercedes-AMG vehi-
cles) ............................................... 155
DYNAMIC SELECT controller
(Mercedes-AMG vehicles) .............. 156
Emergency running mode .............. 167
Engaging drive position .................. 159
Engaging neutral ............................ 158
Engaging park position
(Mercedes-AMG vehicles) .............. 160
Engaging park position automati-
cally ............................................... 158
Engaging reverse gear ................... 158
Engaging the park position ............ 157
Holding the vehicle stationary on
uphill gradients .............................. 161 Kickdown ....................................... 161
Manual shifting .............................. 164
Oil temperature (on-board com-
puter, Mercedes-AMG vehicl
es) ..... 223
Overvi
ew ........................................ 157
Problem (malfunction) ................... 167
Pulling away ................................... 150
Selector lever ................................ 159
Starting the engine ........................ 149
Steering wheel paddle shifters ...... 164
Transmission position display ........ 159
Transmission position display
(DIRECT SELECT lever) ................... 157
Transmission positions .................. 160
Automatic transmission emer-
gency mode ....................................... 167
B
Backup lamp
Display message ............................ 241
BAS (Brake Assist System) ................. 66
Battery (SmartKey)
Checking .......................................... 79
Important safety notes .................... 79
Replacing ......................................... 80
Battery (vehicle)
Charging ........................................ 317
Display message ............................ 244
Important safety notes .................. 315
Jump starting ................................. 319
Belt
see Seat belts
Blind Spot Assist
Activating/deactivating (on-
board computer) ............................ 220
Display message ............................ 247
Notes/function .............................. 205
Brake Assist
see BAS (Brake Assist System)
Brake fluid
Display message ............................ 234
Notes ............................................. 369
Brake force distribution
see EBD (electronic brake force
distribution)
Brake lamps
Changing bulbs .............................. 123
Index5
Page 18 of 374
Seat heating problem .................... 106
Storing settings (memory func-
tion) ............................................... 110
Switching seat heating on/off ....... 105
Securing cargo .................................. 276
Selector lever
Cleaning ......................................... 307
Sensors (cleaning instructions) ....... 305
Service menu (on-board com-
puter) .................................................. 221
Service message
see ASSYST PLUS
Service products
Brake fluid ..................................... 369
Coolant (engine) ............................ 369
Engine oil ....................................... 368
Fuel ................................................ 365
Important safety notes .................. 365
Refrigerant (air-conditioning sys-
tem) ............................................... 371
Washer fluid ................................... 370
Setting the air distribution ............... 138
Setting the airflow ............................ 138
Settings
Factory (on-board computer) ......... 223
On-board computer ....................... 221
SETUP (on-board computer) ............. 224
Side impact air bag ............................. 50
Side marker lamp (display mes-
sage) ................................................... 242
Side windows
Cleaning ......................................... 304
Convenience closing feature ............ 90
Convenience opening feature .......... 89
Important safety information ........... 88
Opening/closing .............................. 89
Problem (malfunction) ..................... 92
Resetting ......................................... 91
Reversing feature ............................. 88
Sliding sunroof
see Panorama roof with power
tilt/sliding panel
SmartKey
Changing the battery ....................... 80
Changing the programming ............. 78
Checking the battery ....................... 79
Convenience closing feature ............ 90 Convenience opening feature .......... 89
Display message ............................ 257
Door central locking/unlocking ....... 76
Important safety notes .................... 76
KEYLESS-GO start function .............. 78
Loss ................................................. 81
Mechanical key ................................ 78
Positions (ignition lock) ................. 147
Problem (malfunction)
..................... 81
Sta
rting the engine ........................ 149
SmartKey positions (ignition lock) .. 147
Snow chains ...................................... 331
Sockets
Center console .............................. 281
General notes ................................ 281
Rear compartment ......................... 281
Trunk ............................................. 281
Special seat belt retractor .................. 59
Specialist workshop ............................ 25
Speed, controlling
see Cruise control
Speedometer
Activating/deactivating the addi-
tional speedometer ........................ 221
Digital ............................................ 215
In the Instrument cluster ................. 31
Segments ...................................... 210
Selecting the display unit ............... 221
SPORT handling mode
Deactivating/activating
(Mercedes-AMG vehicles) ................ 70
Warning lamp ................................. 264
Standing lamps
Display message ............................ 241
Switching on/off ........................... 116
Start-off assist
Activating ....................................... 189
Important safety notes .................. 189
Start/Stop button
Removing ....................................... 148
Starting the engine ........................ 150
Start/stop function
see ECO start/stop function
Starting (engine) ................................ 149
STEER CONTROL .................................. 72
Steering
Display message ............................ 256
16Index
Page 27 of 374
an accident, no longer withstand the strain
they are designed to.
If the underbody paneling is damaged,
combustible materials such as leaves,
grass or twigs can gather between the
underbody and the underbody paneling. If
these materials come in contact with hot
parts of the exhaust system, they can catch
fire.
In such situations, have the vehicle
checked and repaired immediately at a
qualified specialist workshop. If on con-
tinuing your journey you notice that driving
safety is impaired, pull over and stop the
vehicle immediately, paying attention to
road and traffic conditions. In such cases,
consult a qualified specialist workshop.
Declarations of conformity
Vehicle components which receive
and/or transmit radio waves
USA: "The wireless devices of this vehicle
comply with Part 15 of the FCC Rules. Oper-
ation is subject to the following two condi-
tions: 1) These devices may not cause harm-
ful interference, and 2) These devices must
accept any interference received, including
interference that may cause undesired oper-
ation. Changes or modifications not expressly
approved by the party responsible for com-
pliance could void the user’s authority to
operate the equipment."
Canada: "The wireless devices of this vehicle
comply with Industry Canada license-exempt
RSS standard(s). Operation is subject to the
following two conditions: (1) These devices
may not cause interference, and (2) These
devices must accept any interference, includ-
ing interference that may cause undesired
operation of the device."
Diagnostics connection
The diagnostics connection is only intended
for the connection of diagnostic equipment at
a qualified specialist workshop.
GWARNING
If you connect equipment to the diagnostics
connection in the vehicle, itmay affect the
operation of the vehicle systems. As a result,
the operating safety of the vehicle could be
affected. There isa risk of an accident.
Do not connect any equipment to a diagnos-
tics connection inthe vehicle.
GWARNING
Objects in the driver's footwell can restrict the pedal travel or obstruct a depressed pedal.
The operating and road safety of the vehicle is
je opardized. There is a risk of an accident.
Make sure that all objects in the vehicle are
stowed correctly, and that they cannot enter
the driver's footwell. Install the floormats
securely and as specified in order to ensure
sufficient clearance for the pedals. Do not use
loose floormats and do not place floormats on
top of one another.
!If the engine is switched off and equip-
ment on the diagnostics connection is
used, the starter battery may discharge.
Connecting equipment to the diagnostics
connection can lead to emissions monitoring
information being reset, for example. This
may lead to the vehicle failing to meet the
requirements of the next emissions test dur-
ing the main inspection.
Qualified specialist workshop
An authorized Mercedes-Benz Center is a
qualified specialist workshop. It has the nec-
essary specialist knowledge, tools and quali-
fications to correctly carry out the work
required on your vehicle. This is especially the
case for work relevant to safety.
Introduction25
Z
Page 75 of 374
No steering assistance is provided from
STEER CONTROL, if:
RESP®is malfunctioning.
Rthe lighting is faulty.
If ESP
®is malfunctioning, you will be assisted
further by the electrical power steering.
Protection against theft
Immobilizer
The immobilizer prevents your vehicle from
being started without the correct SmartKey.
XTo activate with the SmartKey: remove
the SmartKey from the ignition lock.
XTo activate with KEYLESS-GO start-
function or KEYLESS-GO: switch the igni-
tion off and open the driver's door.
XTo deactivate: switch on the ignition.
When leaving the vehicle, always take the
SmartKey with you and lock the vehicle. Any-
one can start the engine if a valid SmartKey
has been left inside the vehicle.
iThe immobilizer is always deactivated
when you start the engine.
In the event that the engine cannot be star-
ted (yet the vehicle's battery is charged),
the system is not operational. Contact an
authorized Mercedes-Benz Center or call
1-800-FOR-MERCedes (in the USA) or
1-800-387-0100 (in Canada).
ATA (anti-theft alarm system)
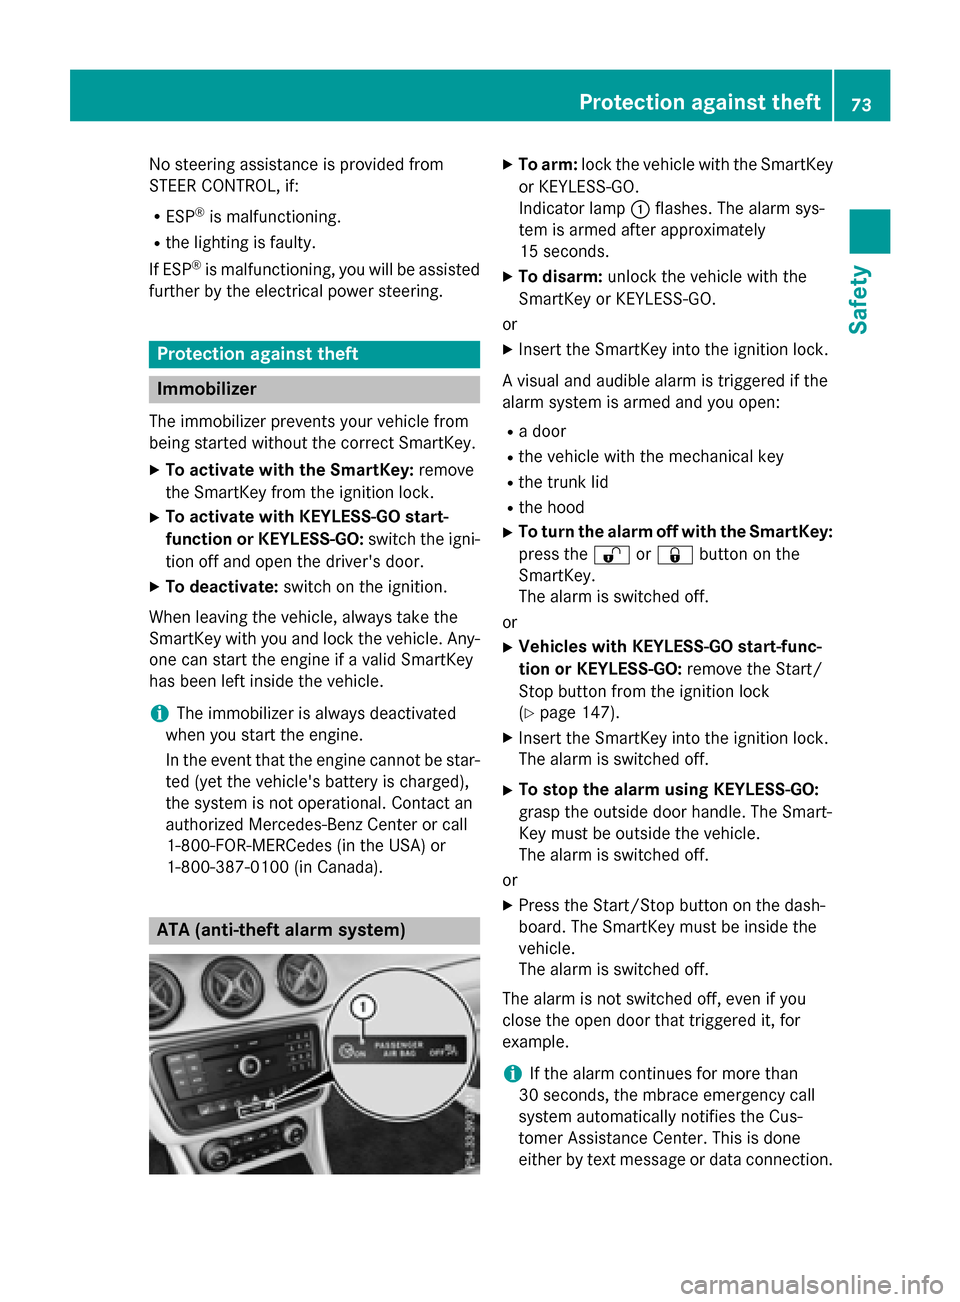
XTo arm: lock the vehicle with the SmartKey
or KEYLESS-GO.
Indicator lamp :flashes. The alarm sys-
tem is armed after approximately
15 seconds.
XTo disarm: unlock the vehicle with the
SmartKey or KEYLESS-GO.
or
XInsert the SmartKey into the ignition lock.
A visual and audible alarm is triggered if the
alarm system is armed and you open:
Ra door
Rthe vehicle with the mechanical key
Rthe trunk lid
Rthe hood
XTo turn the alarm off with the SmartKey:
press the %or& button on the
SmartKey.
The alarm is switched off.
or
XVehicles with KEYLESS-GO start-func-
tion or KEYLESS-GO: remove the Start/
Stop button from the ignition lock
(
Ypage 147).
XInsert the SmartKey into the ignition lock.
The alarm is switched off.
XTo stop the alarm using KEYLESS-GO:
grasp the outside door handle. The Smart-
Key must be outside the vehicle.
The alarm is switched off.
or
XPress the Start/Stop button on the dash-
board. The SmartKey must be inside the
vehicle.
The alarm is switched off.
The alarm is not switched off, even if you
close the open door that triggered it, for
example.
iIf the alarm continues for more than
30 seconds, the mbrace emergency call
system automatically notifies the Cus-
tomer Assistance Center. This is done
either by text message or data connection.
Protection against theft73
Safety
Z
Page 80 of 374
Deactivating andactivating
If you do no tintend to use th evehicle fo r a
longer period of time, you can deactivat eKEY-
LESS-GO .The SmartKey will then use ver ylit -
tl e power, thereby conservin gbattery power.
Fo rth epurposes of activation/deactivation ,
th evehicle mus tno tbe nearby.
XTo deactivate :press th e& buttonon
th eSmartKey twic ein rapid succession .
The battery chec klamp of th eSmartKey
flashes twic ebriefly and lights up once ,
then KEYLESS-GO is deactivated
(
Ypage 79) .
XTo activate :press any butto non th e
SmartKey.
or
XInser tth eSmartKey into th eignition lock.
KEYLESS-GO and all of it sassociated fea-
tures are available again .
KEYLESS-GOstar tfunction
General notes
Bear in min dthat th eengin ecan be started by
any of th evehicle occupant sif there is a
SmartKey in th evehicle.
Changin gth esettings of th elocking
syste m
You can chang eth esetting sof th elocking
system. Thi smeans that only th edriver's doo r
and th efue lfiller flap are unlocke dwhen th e
vehicle is unlocked. Thi sis useful if you fre-
quentl ytrave lon your own .
XTo change th esetting: press and hol dth e
% and& buttons simultaneousl yfo r approximately six seconds until th
ebattery
indicator lamp flashes twic e (
Ypage 79).
If th esetting of th elocking system is changed
within th esignal range of th evehicle, press-
in g th e& or% button:
Rlocks or
Runlocks th evehicle
The SmartKey no wfunction sas follows :
XTo unlock :press th e% buttononce .
XTo unlock centrally :press th e% but-
to ntwice.
XTo lock centrally :press th e& button.
The KEYLESS-GO function is changed as fol-
lows :
XTo unlock th edriver's door: touch the
inne rsurfac eof th edoo rhandle on th e
driver's door.
XTo unlock centrally :touch th einne rsur -
fac eof th edoo rhandle on th efront-
passenger doo ror th erea rdoor.
XTo lock centrally :touch th eouter sensor
surfac eon on eof th edoo rhandles .
XTo restor eth efactory settings: press
and hol dth e% and& buttons simul-
taneousl yfo rapproximately six seconds
until th ebattery chec klamp flashes twic e
(
Ypage 79).
Mechanica lkey
General notes
If th evehicle can no longer be locke dor
unlocke dwit hth eSmartKey or KEYLESS-GO ,
use th emechanical key.
If you use th emechanical ke yto unloc kand
ope nth edriver's doo ror th etrunk lid, th e
anti-thef talar msystem will be triggere d
(
Ypage 73).
There are severa lways to turn of fth ealarm:
XTo deactivate th ealarm wit hth ekey :
press th e% or& buttonon th ekey.
or
78SmartKey
Opening and closing
Page 81 of 374
XInsert the SmartKey into the ignition lock.
or
XTo deactivate the alarm with KEYLESS-
GO: press the Start/Stop button in the igni-
tion lock. The SmartKey must be in the
vehicle.
or
XLock or unlock the vehicle using KEYLESS-
GO. The SmartKey must be outside the
vehicle.
If you unlock the vehicle using the mechanical
key, the fuel filler flap will not be unlocked
automatically.
XTo unlock the fuel filler flap: insert the
SmartKey into the ignition lock.
Removing the mechanical key
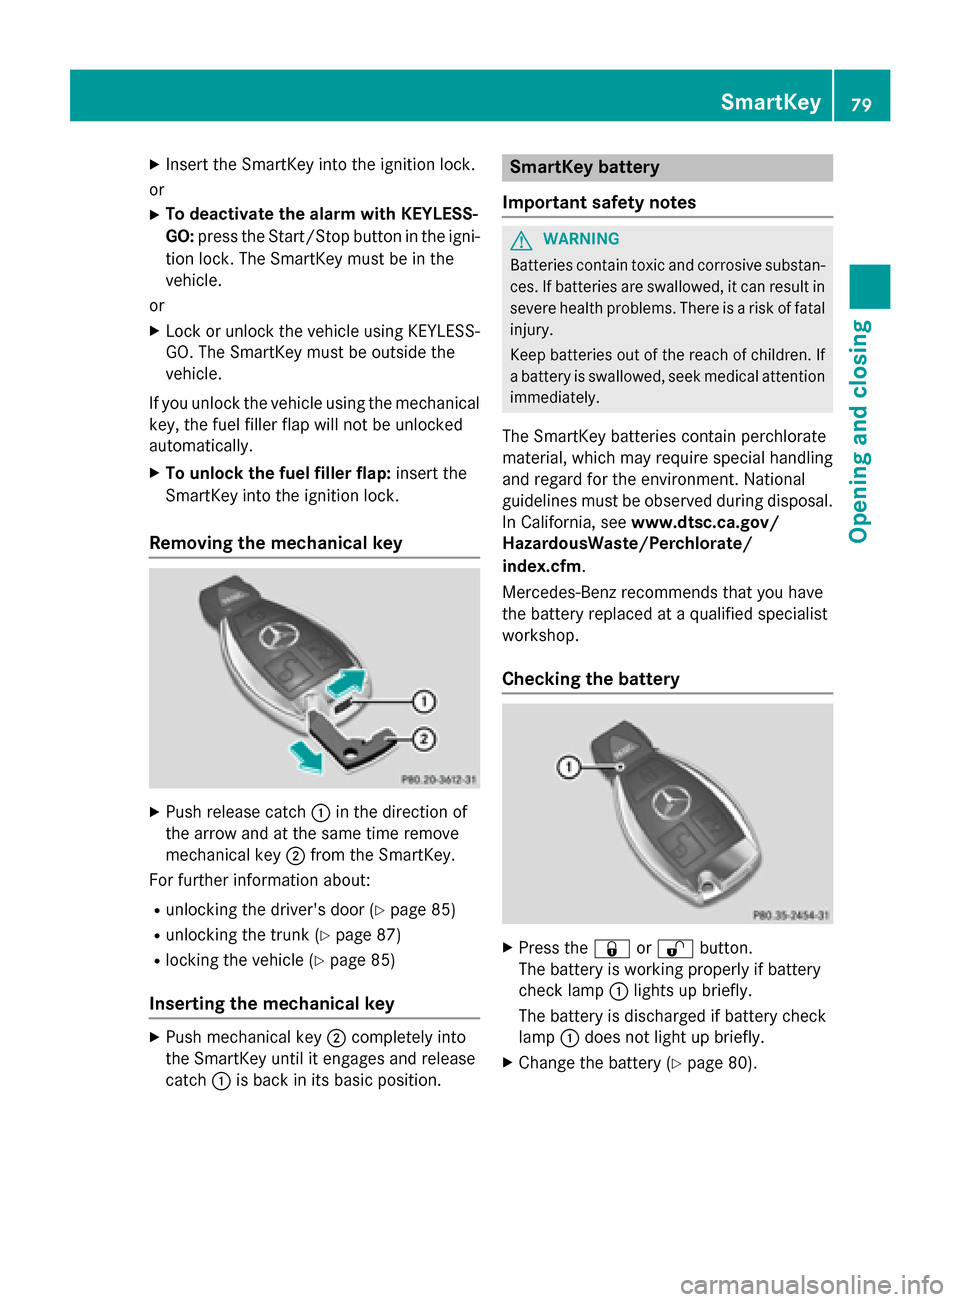
XPush release catch :in the direction of
the arrow and at the same time remove
mechanical key ;from the SmartKey.
For further information about:
Runlocking the driver's door (Ypage 85)
Runlocking the trunk (Ypage 87)
Rlocking the vehicle (Ypage 85)
Inserting the mechanical key
XPush mechanical key ;completely into
the SmartKey until it engages and release
catch :is back in its basic position.
SmartKey battery
Important safety notes
GWARNING
Batteries contain toxic and corrosive substan- ces. If batteries are swallowed, it can result in
severe health problems. There is a risk of fatalinjury.
Keep batteries out of the reach of children. If
a battery is swallowed, seek medical attention immediately.
The SmartKey batteries contain perchlorate
material, which may require special handling
and regard for the environment. National
guidelines must be observed during disposal.
In California, see www.dtsc.ca.gov/
HazardousWaste/Perchlorate/
index.cfm.
Mercedes-Benz recommends that you have
the battery replaced at a qualified specialist
workshop.
Checking the battery
XPress the &or% button.
The battery is working properly if battery
check lamp :lights up briefly.
The battery is discharged if battery check
lamp :does not light up briefly.
XChange the battery (Ypage 80).
SmartKey79
Opening and closing
Z
Page 82 of 374
iIf the SmartKey battery is checked within
the signal reception range of the vehicle,
pressing the &or% button:
Rlocks or
Runlocks the vehicle
iYou can get a battery at any qualified spe-
cialist workshop.
Replacing the battery
You require a CR 2025 3 V cell battery.
XTake the mechanical key out of the Smart-
Key (
Ypage 78).
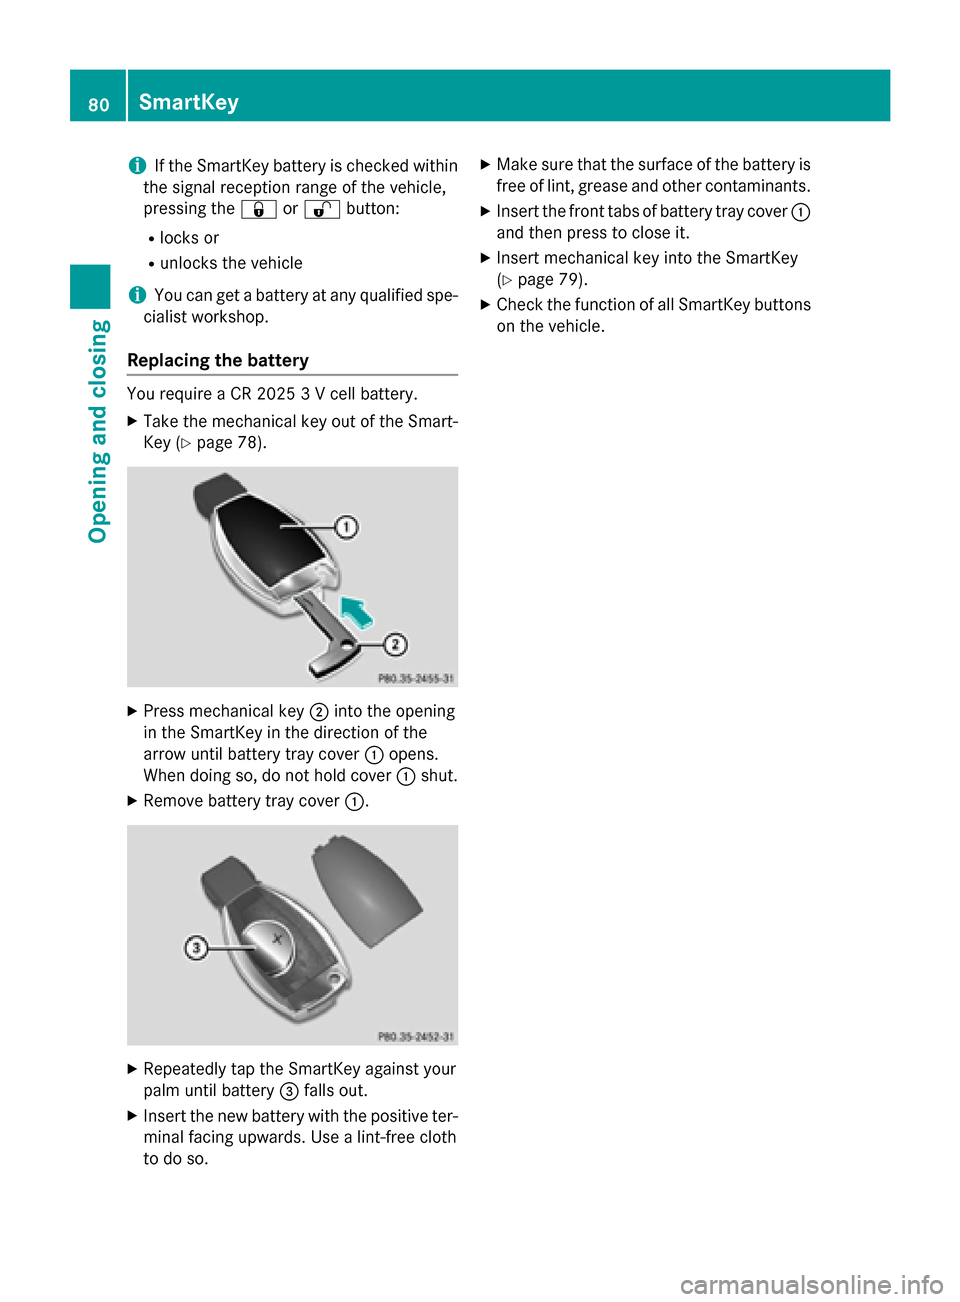
XPress mechanical key ;into the opening
in the SmartKey in the direction of the
arrow until battery tray cover :opens.
When doing so, do not hold cover :shut.
XRemove battery tray cover :.
XRepeatedly tap the SmartKey against your
palm until battery=falls out.
XInsert the new battery with the positive ter-
minal facing upwards. Use a lint-free cloth
to do so.
XMake sure that the surface of the battery is
free of lint, grease and other contaminants.
XInsert the front tabs of battery tray cover :
and then press to close it.
XInsert mechanical key into the SmartKey
(
Ypage 79).
XCheck the function of all SmartKey buttons on the vehicle.
80SmartKey
Opening and closing
Page 83 of 374
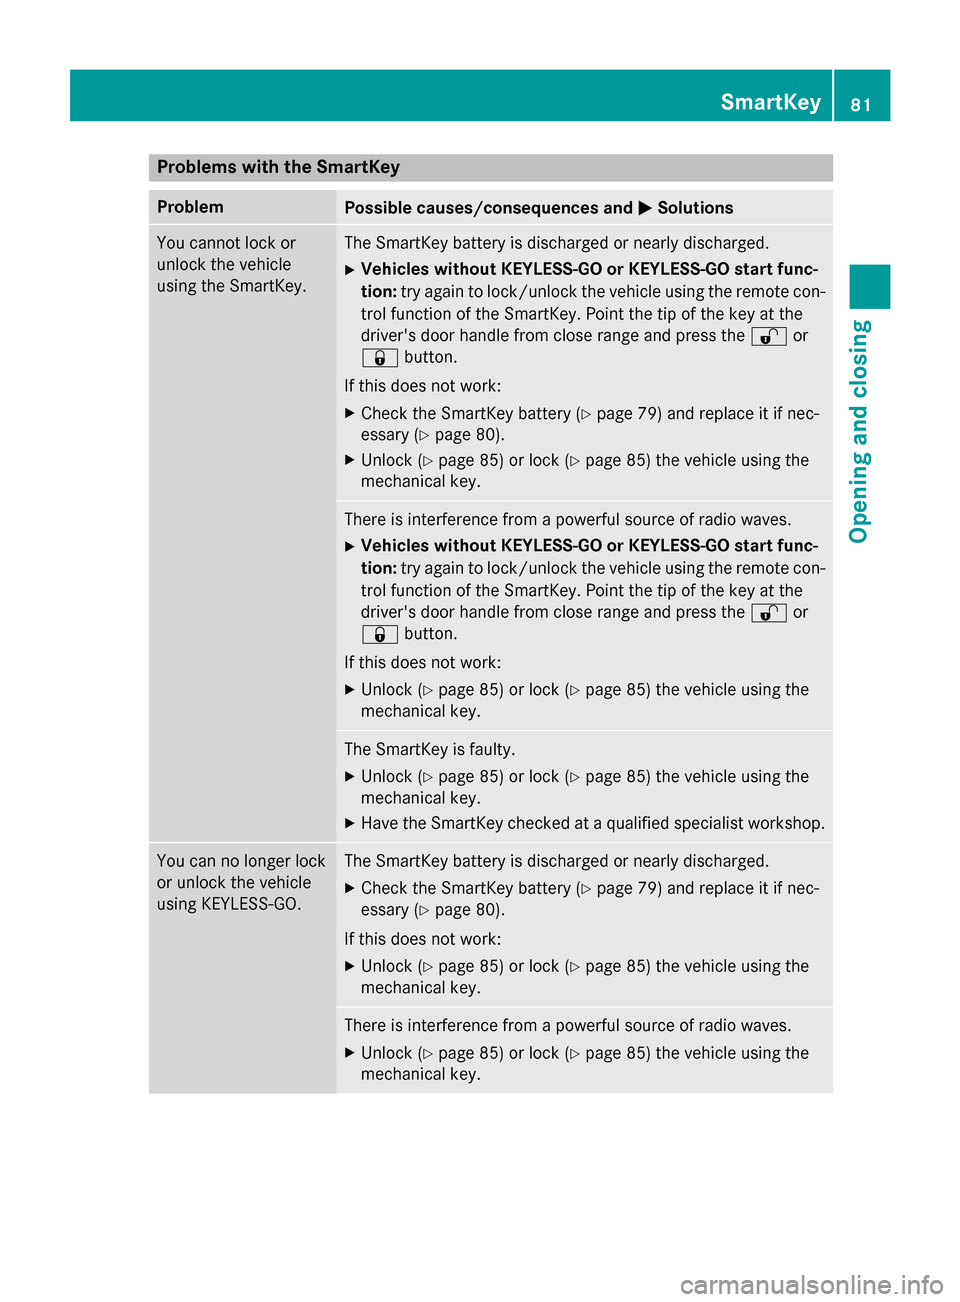
Problems with the SmartKey
ProblemPossible causes/consequences andMSolutions
You cannot lock or
unlock the vehicle
using the SmartKey.The SmartKey battery is discharged or nearly discharged.
XVehicles without KEYLESS-GO or KEYLESS-GO start func-
tion:try again to lock/unlock the vehicle using the remote con-
trol function of the SmartKey. Point the tip of the key at the
driver's door handle from close range and press the %or
& button.
If this does not work:
XCheck the SmartKey battery (Ypage 79) and replace it if nec-
essary (
Ypage 80).
XUnlock (Ypage 85) or lock (Ypage 85) the vehicle using the
mechanical key.
There is interference from a powerful source of radio waves.
XVehicles without KEYLESS-GO or KEYLESS-GO start func-
tion: try again to lock/unlock the vehicle using the remote con-
trol function of the SmartKey. Point the tip of the key at the
driver's door handle from close range and press the %or
& button.
If this does not work:
XUnlock (Ypage 85) or lock (Ypage 85) the vehicle using the
mechanical key.
The SmartKey is faulty.
XUnlock (Ypage 85) or lock (Ypage 85) the vehicle using the
mechanical key.
XHave the SmartKey checked at a qualified specialist workshop.
You can no longer lock
or unlock the vehicle
using KEYLESS-GO.The SmartKey battery is discharged or nearly discharged.
XCheck the SmartKey battery (Ypage 79) and replace it if nec-
essary (
Ypage 80).
If this does not work:
XUnlock (Ypage 85) or lock (Ypage 85) the vehicle using the
mechanical key.
There is interference from a powerful source of radio waves.
XUnlock (Ypage 85) or lock (Ypage 85) the vehicle using the
mechanical key.
SmartKey81
Opening and closing
Z
Page 84 of 374
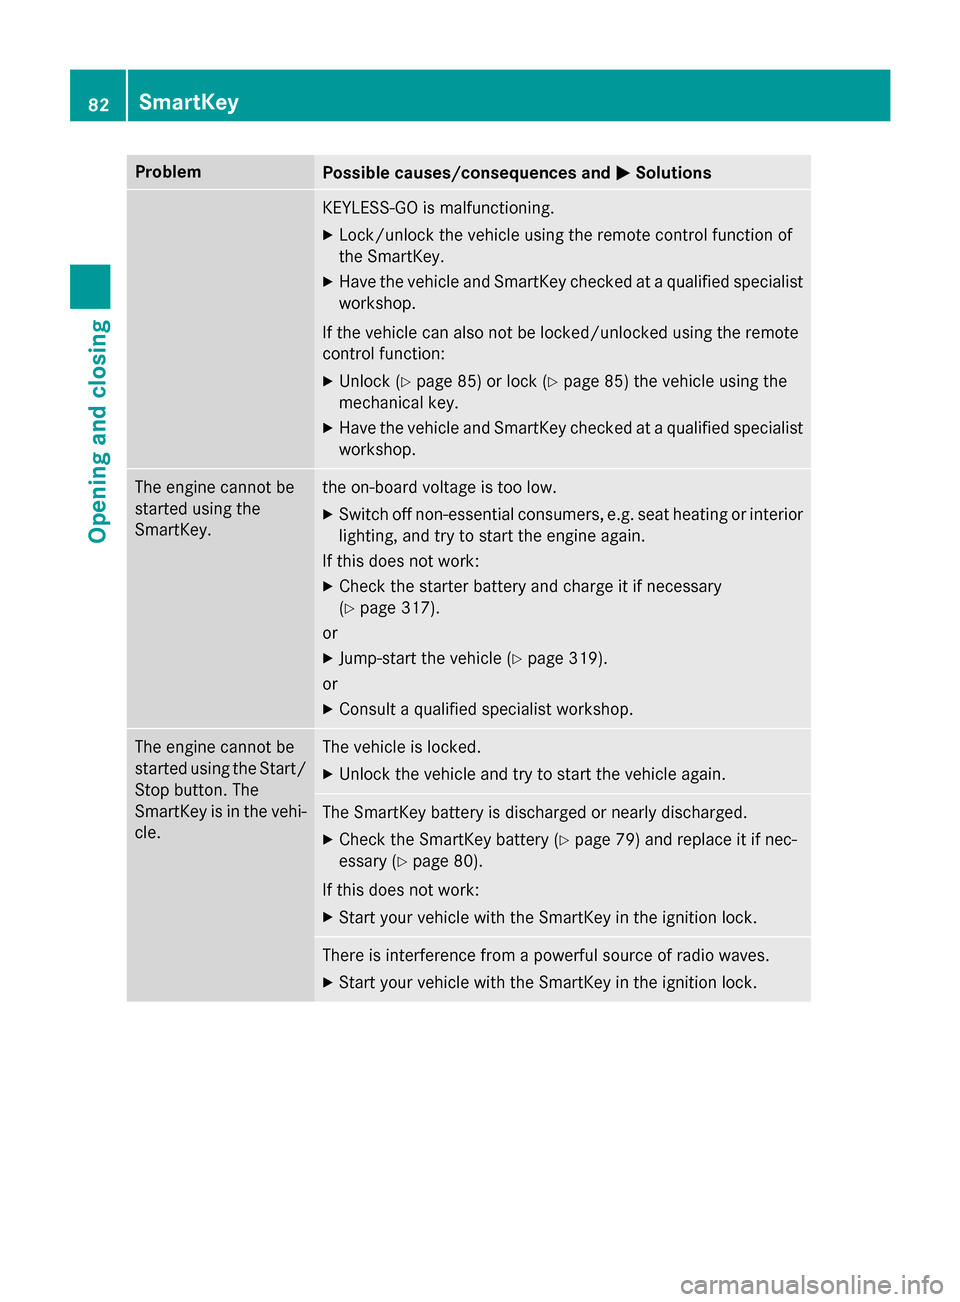
ProblemPossible causes/consequences andMSolutions
KEYLESS-GO is malfunctioning.
XLock/unlock the vehicle using the remote control function of
the SmartKey.
XHave the vehicle and SmartKey checked at a qualified specialist
workshop.
If the vehicle can also not be locked/unlocked using the remote
control function:
XUnlock (Ypage 85) or lock (Ypage 85) the vehicle using the
mechanical key.
XHave the vehicle and SmartKey checked at a qualified specialist
workshop.
The engine cannot be
started using the
SmartKey.the on-board voltage is too low.
XSwitch off non-essential consumers, e.g. seat heating or interior
lighting, and try to start the engine again.
If this does not work:
XCheck the starter battery and charge it if necessary
(
Ypage 317).
or
XJump-start the vehicle (Ypage 319).
or
XConsult a qualified specialist workshop.
The engine cannot be
started using the Start/
Stop button. The
SmartKey is in the vehi-
cle.The vehicle is locked.
XUnlock the vehicle and try to start the vehicle again.
The SmartKey battery is discharged or nearly discharged.
XCheck the SmartKey battery (Ypage 79) and replace it if nec-
essary (
Ypage 80).
If this does not work:
XStart your vehicle with the SmartKey in the ignition lock.
There is interference from a powerful source of radio waves.
XStart your vehicle with the SmartKey in the ignition lock.
82SmartKey
Opening and closing
Page 85 of 374
ProblemPossible causes/consequences andMSolutions
You have lost a Smart-
Key.XHave the SmartKey deactivated at a qualified specialist work-
shop.
XReport the loss immediately to the vehicle insurers.
XIf necessary, have the locks changed as well.
You have lost the
mechanical key.XReport the loss immediately to the vehicle insurers.
XIf necessary, have the locks changed as well.
Doors
Important safety notes
GWARNING
If children are left unsupervised in the vehicle,
they could:
Ropen the doors, thus endangering other
people or road users.
Rget out and disrupt traffic.
Roperate the vehicle's equipment.
Additionally, children could set the vehicle in
motion if, for example, they:
Rrelease the parking brake.
Rshifting the automatic transmission out of
park position P
RStart the engine.
There is a risk of an accident and injury.
When leaving the vehicle, always take the
SmartKey with you and lock the vehicle. Never
leave children or animals unattended in the
vehicle. Always keep the SmartKey out of
reach of children.
You should preferably place luggage or loads in the cargo compartment. Observe the load-
ing guidelines (
Ypage 272).
Unlocking and opening doors from
the inside
!
The side windows will not open/close if
the battery is discharged or if the side win-
dows have iced up. It will then not be pos- sible to close the door. Do not attempt to
force the door closed. You could otherwise
damage the door or the side window.
When a door is opened, the side window on
that side opens slightly. When the door is
closed, the side window closes again.
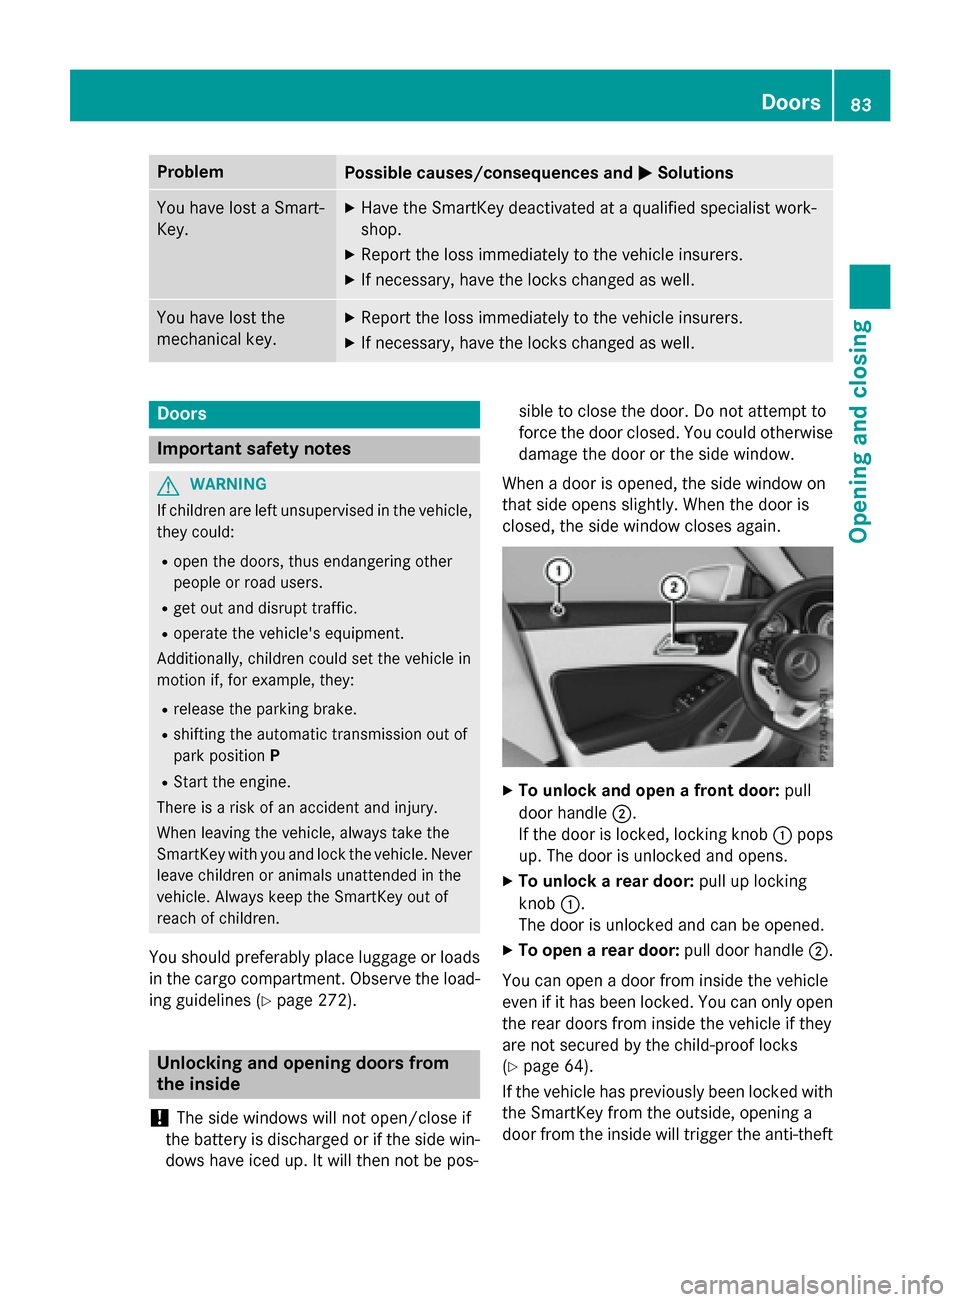
XTo unlock and open a front door: pull
door handle ;.
If the door is locked, locking knob :pops
up. The door is unlocked and opens.
XTo unlock a rear door: pull up locking
knob :.
The door is unlocked and can be opened.
XTo open a rear door: pull door handle;.
You can open a door from inside the vehicle
even if it has been locked. You can only open the rear doors from inside the vehicle if they
are not secured by the child-proof locks
(
Ypage 64).
If the vehicle has previously been locked with
the SmartKey from the outside, opening a
door from the inside will trigger the anti-theft
Doors83
Opening and closing
Z