ad blue MERCEDES-BENZ CLA-Class 2017 C117 Comand Manual
[x] Cancel search | Manufacturer: MERCEDES-BENZ, Model Year: 2017, Model line: CLA-Class, Model: MERCEDES-BENZ CLA-Class 2017 C117Pages: 202, PDF Size: 6.35 MB
Page 128 of 202
Conditions for a Bluetooth®connection:
RThe mobile phone supports at least one of the
Bluetooth®profiles DUN ( Dial-UpNetwork-
ing) or PAN (Personal AreaNetwork).
The Bluetooth
®profiles DUN and PAN enable
the Internet connection of the mobile phone
to be made available to the system.
The terms of use are shown when the system is used for the first time and then once a year
thereafter. Only read and accept the terms of
use when the vehicle is stationary.
The driver is not permitted to call up websites
while driving and use of the Mercedes-Benz
Apps is restricted.
iThe availability of individual Mercedes-Benz
Apps may vary depending on the country.
Setting up an Internet connection
(Canada)
Procedure and general information
USA: to use Mercedes-Benz Apps and Internet
access, mbrace must be activated and opera-
tional. Furthermore, mbrace must be activated
for Mercedes-Benz Apps and Internet access.
No further settings are required.
Canada: in order to set up a mobile phone for
Internet access, your mobile phone must be
connected via Bluetooth
®(Ypage 93) to the
multimedia system. If you are using Internet
access for the first time, you must enable the
connected mobile phone for Internet access
(
Ypage 126). If the connected mobile phone
supports the Bluetooth®PAN profile, you do not
need to make additional settings. The Internet
connection is established. If the connected
mobile phone does not support the named Blue-
tooth
®profile, predefined (Ypage 127) or man-
ual access data (Ypage 127) must be set.
Enabling the mobile phone for Inter-
net access
XTo call up the telephone menu: press the
% button.
XTo switch to the main function bar: slide 5
the controller.
XTo select Tel/®: press the controller.
XTo selectInternet: turn and press the con-
troller.
The menu with the Internet functions is dis-
played.
XTo switch to the menu bar: slide 6the con-
troller.
XTo select Settings: turn and press the con-
troller.
XTo select Configure Internet Settings:
turn and press the controller.
The device list is displayed.
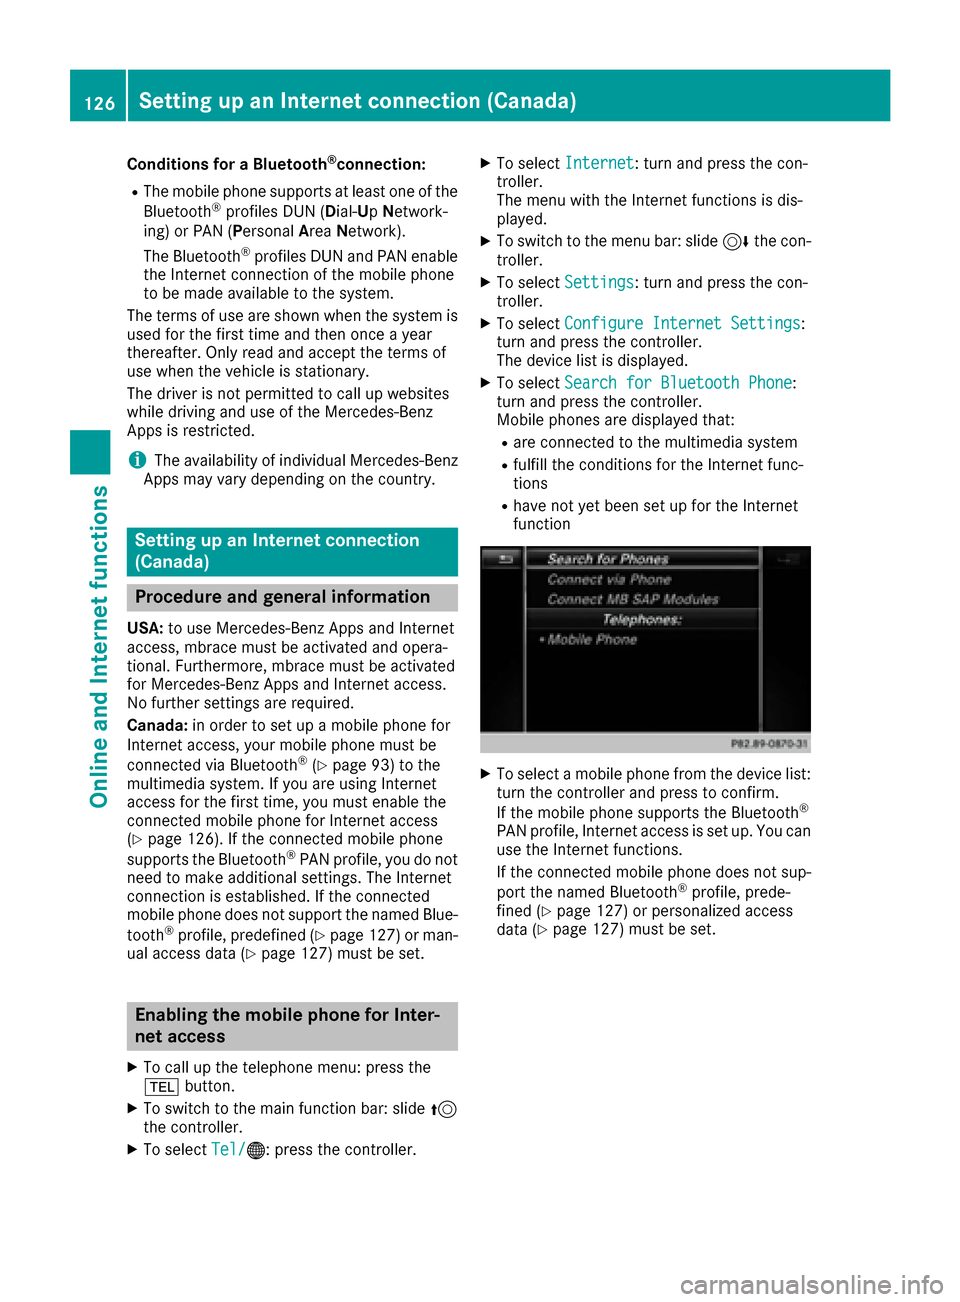
XTo select Search for Bluetooth Phone:
turn and press the controller.
Mobile phones are displayed that:
Rare connected to the multimedia system
Rfulfill the conditions for the Internet func-
tions
Rhave not yet been set up for the Internet
function
XTo select a mobile phone from the device list: turn the controller and press to confirm.
If the mobile phone supports the Bluetooth
®
PAN profile, Internet access is set up. You can
use the Internet functions.
If the connected mobile phone does not sup-
port the named Bluetooth
®profile, prede-
fined (Ypage 127) or personalized access
data (Ypage 127) must be set.
126Setting up an Internet connection (Canada)
Online and Internet functions
Page 146 of 202
Your multimediasyste mequipment
These operatin ginstruction sdescribe all th e
standar dan doptional equipment of your multi-
media system, as available at th etime of going
to press. Country-specifi cdifference sare pos -
sible. Bear in min dthat your vehicle may no t
feature all function sdescribed here. Thi salso
applies to safety-relevan tsystems an dfunc-
tions.
Read th einformation on qualifie dspecialis t
workshop sin th evehicle Operator's Manual.
Activating medi amode
General notes
There are severa lways to activat emedia sour-
ce susin gth emultimedia system.
The relevant section sof th eOperator's Manual
describe th esimples tway to activat e amedia
source.
Thi ssection describes all option sfo ractivatin g
media sources.
Connections for externa lmedi asour-
ces
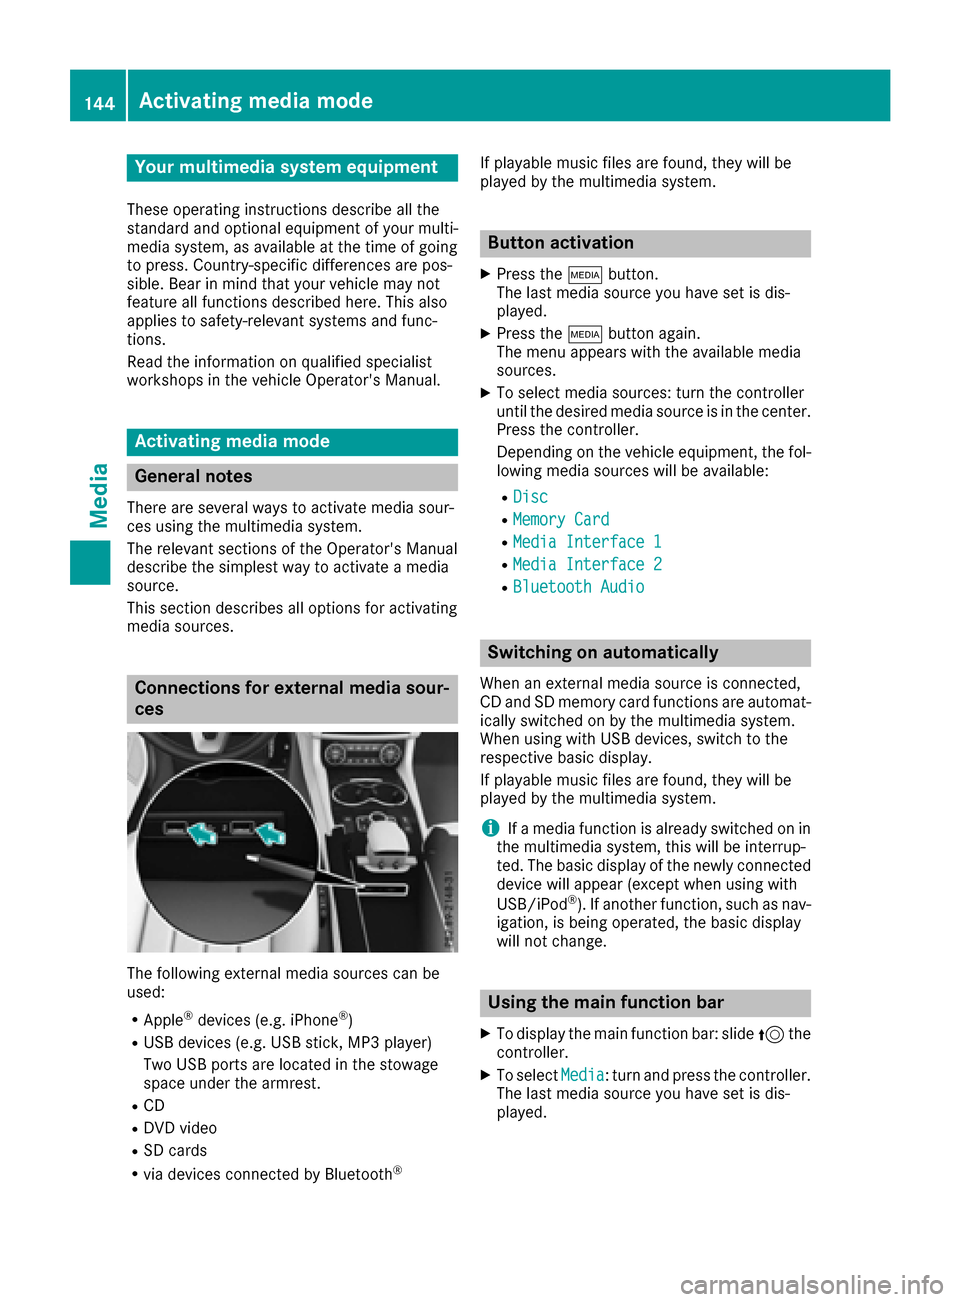
The followin gexternal media sources can be
used :
RApple®devices (e.g. iPhon e®)
RUSBdevices (e.g. US Bstick, MP3 player)
Two US Bports are located in th estowag e
spac eunder th earmrest.
RCD
RDV Dvideo
RSD cards
Rvia devices connecte dby Bluetoot h®
If playable music files are found ,they will be
playe dby th emultimedia system.
Button activation
XPress th eÕ button.
The last media sourc eyou hav eset is dis -
played.
XPress th eÕ buttonagain .
The men uappears wit hth eavailable media
sources.
XTo selec tmedia sources: turn th econtroller
until th edesire dmedia sourc eis in th ecenter.
Press th econtroller .
Dependin gon th evehicle equipment ,th efol-
lowing media sources will be available :
RDisc
RMemory Card
RMediaInterfac e 1
RMediaInterfac e 2
RBluetoothAudi o
Switching on automatically
Whenan external media sourc eis connected,
CD an dSD memor ycar dfunction sare automat -
ically switched on by th emultimedia system.
Whe nusin gwit hUS Bdevices, switch to th e
respective basi cdisplay.
If playable music files are found ,they will be
playe dby th emultimedia system.
iIf amedia function is already switched on in
th emultimedia system, this will be interrup-
ted. The basi cdisplay of th enewly connecte d
devic ewill appear (except when usin gwit h
USB/iPo d
®). If another function ,suc has nav-
igation ,is bein goperated, th ebasi cdisplay
will no tchange.
Usin gth emain function ba r
XTo display themain function bar :slid e5 the
controller .
XTo selectMedi a:turn an dpress th econtroller .
The last media sourc eyou hav eset is dis -
played.
144Activating media mode
Media
Page 156 of 202
iThere is a database for iPod®and for each of
the other media sources (CD, USB, SD card).
During the search the relevant database is
accessed depending on the active media
source.
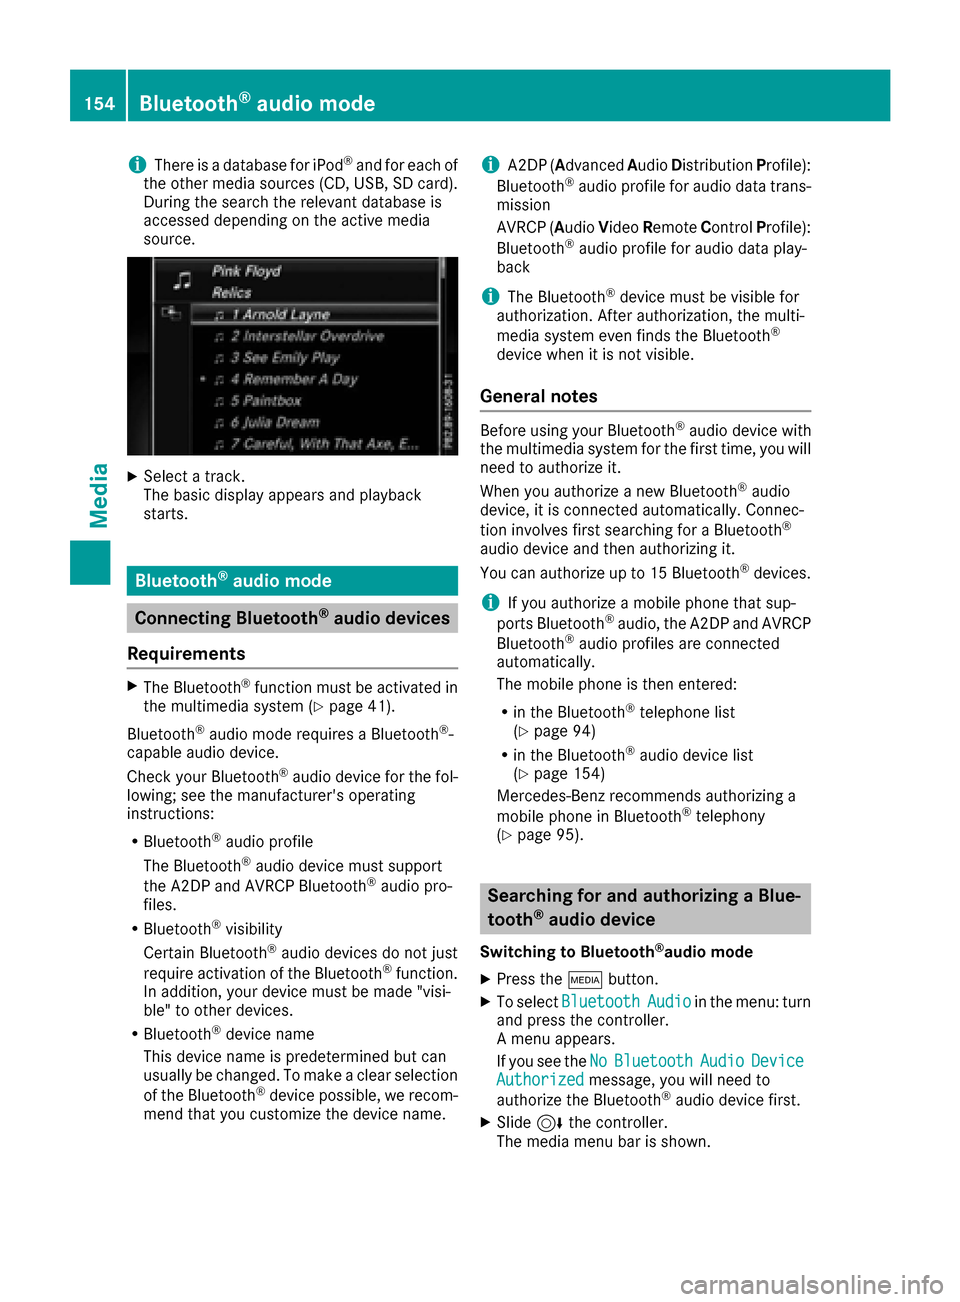
XSelect a track.
The basic display appears and playback
starts.
Bluetooth®audio mode
Connecting Bluetooth®audio devices
Requirements
XThe Bluetooth®function must be activated in
the multimedia system (Ypage 41).
Bluetooth
®audio mode requires a Bluetooth®-
capable audio device.
Check your Bluetooth
®audio device for the fol-
lowing; see the manufacturer's operating
instructions:
RBluetooth®audio profile
The Bluetooth®audio device must support
the A2DP and AVRCP Bluetooth®audio pro-
files.
RBluetooth®visibility
Certain Bluetooth®audio devices do not just
require activation of the Bluetooth®function.
In addition, your device must be made "visi-
ble" to other devices.
RBluetooth®device name
This device name is predetermined but can
usually be changed. To make a clear selection
of the Bluetooth
®device possible, we recom-
mend that you customize the device name.
iA2DP (Advanced AudioDistribution Profile):
Bluetooth®audio profile for audio data trans-
mission
AVRCP (Audio VideoRemote ControlProfile):
Bluetooth
®audio profile for audio data play-
back
iThe Bluetooth®device must be visible for
authorization. After authorization, the multi-
media system even finds the Bluetooth
®
device when it is not visible.
General notes
Before using your Bluetooth®audio device with
the multimedia system for the first time, you will
need to authorize it.
When you authorize a new Bluetooth
®audio
device, it is connected automatically. Connec-
tion involves first searching for a Bluetooth
®
audio device and then authorizing it.
You can authorize up to 15 Bluetooth®devices.
iIf you authorize a mobile phone that sup-
ports Bluetooth®audio, the A2DP and AVRCP
Bluetooth®audio profiles are connected
automatically.
The mobile phone is then entered:
Rin the Bluetooth®telephone list
(Ypage 94)
Rin the Bluetooth®audio device list
(Ypage 154)
Mercedes-Benz recommends authorizing a
mobile phone in Bluetooth
®telephony
(Ypage 95).
Searching for and authorizing a Blue-
tooth®audio device
Switching to Bluetooth®audio mode
XPress the Õbutton.
XTo select BluetoothAudioin the menu: turn
and press the controller.
A menu appears.
If you see the No
BluetoothAudioDeviceAuthorizedmessage, you will need to
authorize the Bluetooth®audio device first.
XSlide 6the controller.
The media menu bar is shown.
154Bluetooth®audio mode
Media
Page 157 of 202
XTo selectOptions: turn and press the con-
troller.
XTo select BluetoothAudioDevices: press
the controller.
A new menu appears.
Searching for Bluetooth
®audio
XTo select Search for Audio Devices:
press the controller.
A message appears.
XSelect Start Search.
The multimedia system searches for Blue-
tooth
®audio devices within range and adds
them to the Bluetooth®device list.
The duration of the search depends on the
number of Bluetooth
®audio devices within
range and their characteristics.
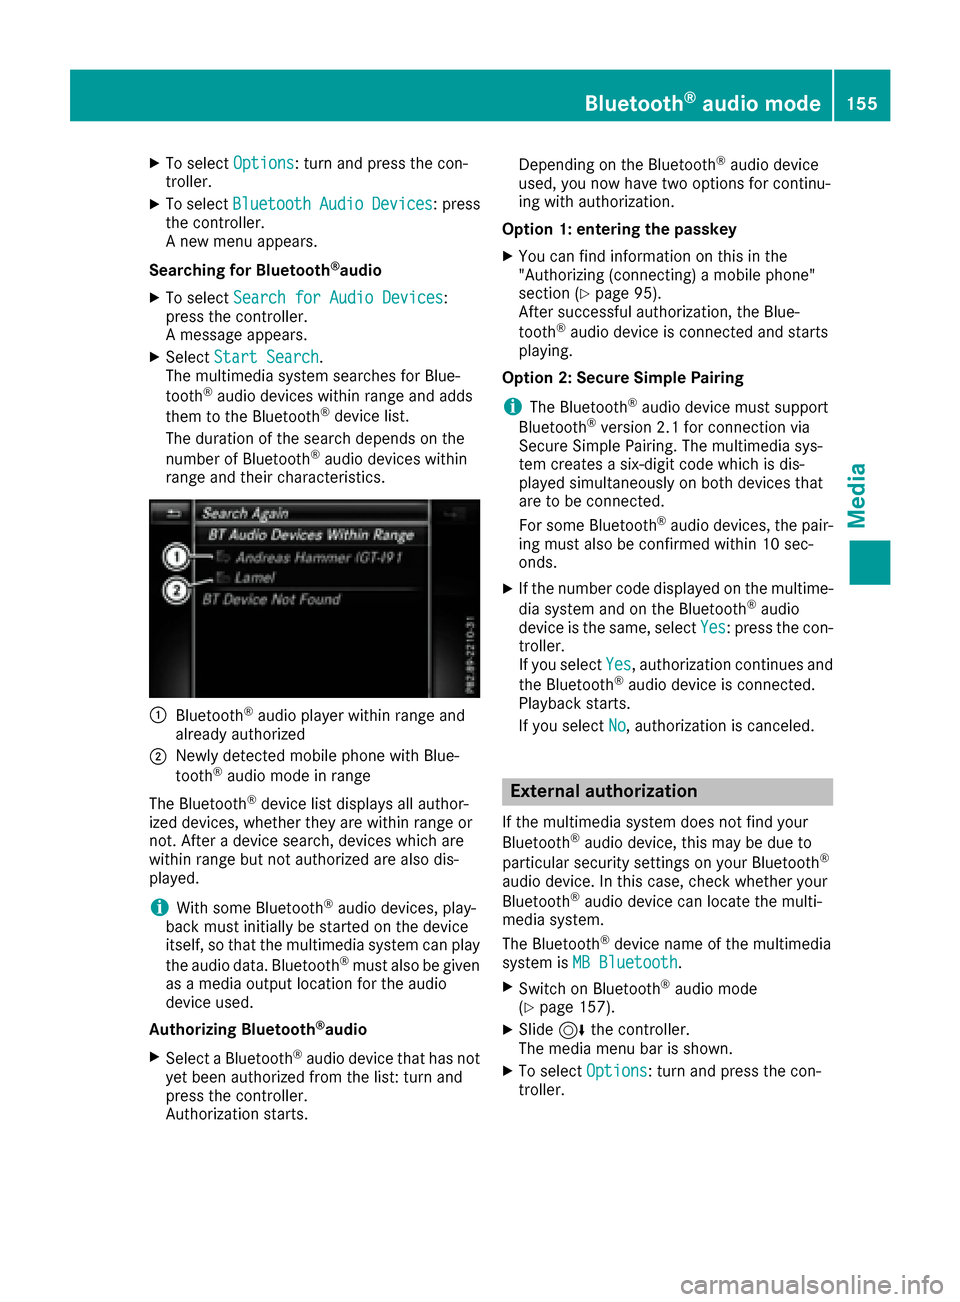
:Bluetooth®audio player within range and
already authorized
;Newly detected mobile phone with Blue-
tooth®audio mode in range
The Bluetooth
®device list displays all author-
ized devices, whether they are within range or
not. After a device search, devices which are
within range but not authorized are also dis-
played.
iWith some Bluetooth®audio devices, play-
back must initially be started on the device
itself, so that the multimedia system can play
the audio data. Bluetooth
®must also be given
as a media output location for the audio
device used.
Authorizing Bluetooth
®audio
XSelect a Bluetooth®audio device that has not
yet been authorized from the list: turn and
press the controller.
Authorization starts. Depending on the Bluetooth
®audio device
used, you now have two options for continu-
ing with authorization.
Option 1: entering the passkey
XYou can find information on this in the
"Authorizing (connecting) a mobile phone"
section (
Ypage 95).
After successful authorization, the Blue-
tooth
®audio device is connected and starts
playing.
Option 2: Secure Simple Pairing
iThe Bluetooth®audio device must support
Bluetooth®version 2.1 for connection via
Secure Simple Pairing. The multimedia sys-
tem creates a six-digit code which is dis-
played simultaneously on both devices that
are to be connected.
For some Bluetooth
®audio devices, the pair-
ing must also be confirmed within 10 sec-
onds.
XIf the number code displayed on the multime-
dia system and on the Bluetooth®audio
device is the same, select Yes: press the con-
troller.
If you select Yes
, authorization continues and
the Bluetooth®audio device is connected.
Playback starts.
If you select No
, authorization is canceled.
External authorization
If the multimedia system does not find your
Bluetooth®audio device, this may be due to
particular security settings on your Bluetooth®
audio device. In this case, check whether your
Bluetooth®audio device can locate the multi-
media system.
The Bluetooth
®device name of the multimedia
system is MB Bluetooth.
XSwitch on Bluetooth®audio mode
(Ypage 157).
XSlide 6the controller.
The media menu bar is shown.
XTo select Options: turn and press the con-
troller.
Bluetooth®audio mode155
Media
Z
Page 158 of 202
XTo selectBluetoothAudioDevices: press
the controller.
XTo select ConnectviaAudioDevice: turn
and press the controller.
A message appears.
Authorizing
XStart the authorization on your Bluetooth®
audio device; see the manufacturer's operat-
ing instructions.
After successful authorization, the Blue-
tooth
®audio device is connected and starts
playing.
With some Bluetooth
®audio devices, playback
must initially be started on the device itself, so
that the multimedia system can play the audio
data.
Reconnecting a Bluetooth®audio
device
The Bluetooth®audio profiles are connected
automatically under the following circumstan-
ces:
Rone of the last two mobile phones to have
been connected has also been used as a Blue-
tooth
®audio player (if this function is sup-
ported by the mobile phone).
Rthe mobile phone is automatically connected.
The Bluetooth®audio player is then connec-
ted.
iFor an automatic connection with the mul-
timedia system, the telephone must be within
range.
For most Bluetooth
®audio devices, the "auto-
matic connection" must be activated by tick-
ing a box. Depending on the device used, this
prompt often takes place when authorizing;
see the manufacturer's operating instruc-
tions.
If the No Bluetooth Audio Device Connec‐
tedmessage appears, you have two options to
reconnect the Bluetooth®audio device.
Option 1:
XTo confirm the ConnectLastUsedPlayermessage in the basic display: press the con-
troller.
If the multimedia system can locate the Blue-
tooth
®audio device, it will be connected and
start playing. Option 2:
XSlide
6the controller.
The media menu bar is shown.
XTo select Options: turn and press the con-
troller.
XTo select BluetoothAudioDevices: press
the controller.
XTo select a Bluetooth®audio device: turn and
press the controller.
If the Bluetooth
®audio device has been
authorized, playback starts.
Bluetooth®audio device and simulta-
neous search for mobile phones
i
When searching for a mobile phone or a new
Bluetooth®audio device, the connection to an
already activated Bluetooth®audio device is
separated (Ypage 94).
In the Bluetooth
®audio basic display, you will
see the No Bluetooth Audio Device Con‐
nectedmessage, and the displayed ConnectLast Used Playermessage cannot be selec-
ted.
Displaying details
XSlide 6the controller.
The media menu bar is shown.
XTo select Options: turn and press the con-
troller.
XTo select BluetoothAudioDevices: press
the controller.
XTo select a Bluetooth®audio device from the
Bluetooth®device list: turn the controller.
XTo select G: slide 9the controller.
XTo select Details: turn and press the con-
troller.
The following information concerning the
selected mobile phone is shown:
RBluetooth®name
RBluetooth®address
RAvailability status (shown after an update)
RAuthorization status
XTo close the detailed display: press the
% button.
156Bluetooth®audio mode
Media
Page 159 of 202
De-authorizing (deregistering)aBlue-
toot h®audi odevice
XSlide 6thecontroller .
The media men ubar is shown .
XTo selectOption s:turn and press th econ-
troller.
XTo selec tBluetoothAudioDevice s:press
th econtroller .
XTo select aBluetoot h®audio devic efrom th e
Bluetoot h®devicelist :turn th econtroller .
XTo selectG: slide9 and press th econ-
troller.
XTo selec tDeauthorize:press th econtroller .
A prompt appears askin gwhether you really
wish to de-authoriz ethis device.
XTo selec tYesor No:turn and press th econ-
troller.
If you selec tYes
,th edevic ewill be delete d
from th eBluetoot h®devicelist .
If you selec tNo
th eprocess is canceled.
iBefore re-authorizin gth eBluetoot h®audio
device, you should also delete th edevic e
nam eMB Bluetooth
from your Bluetoot h®
audio device's Bluetoot h®list (seeth eBlue-
toot h®audio device's operatin ginstructions).
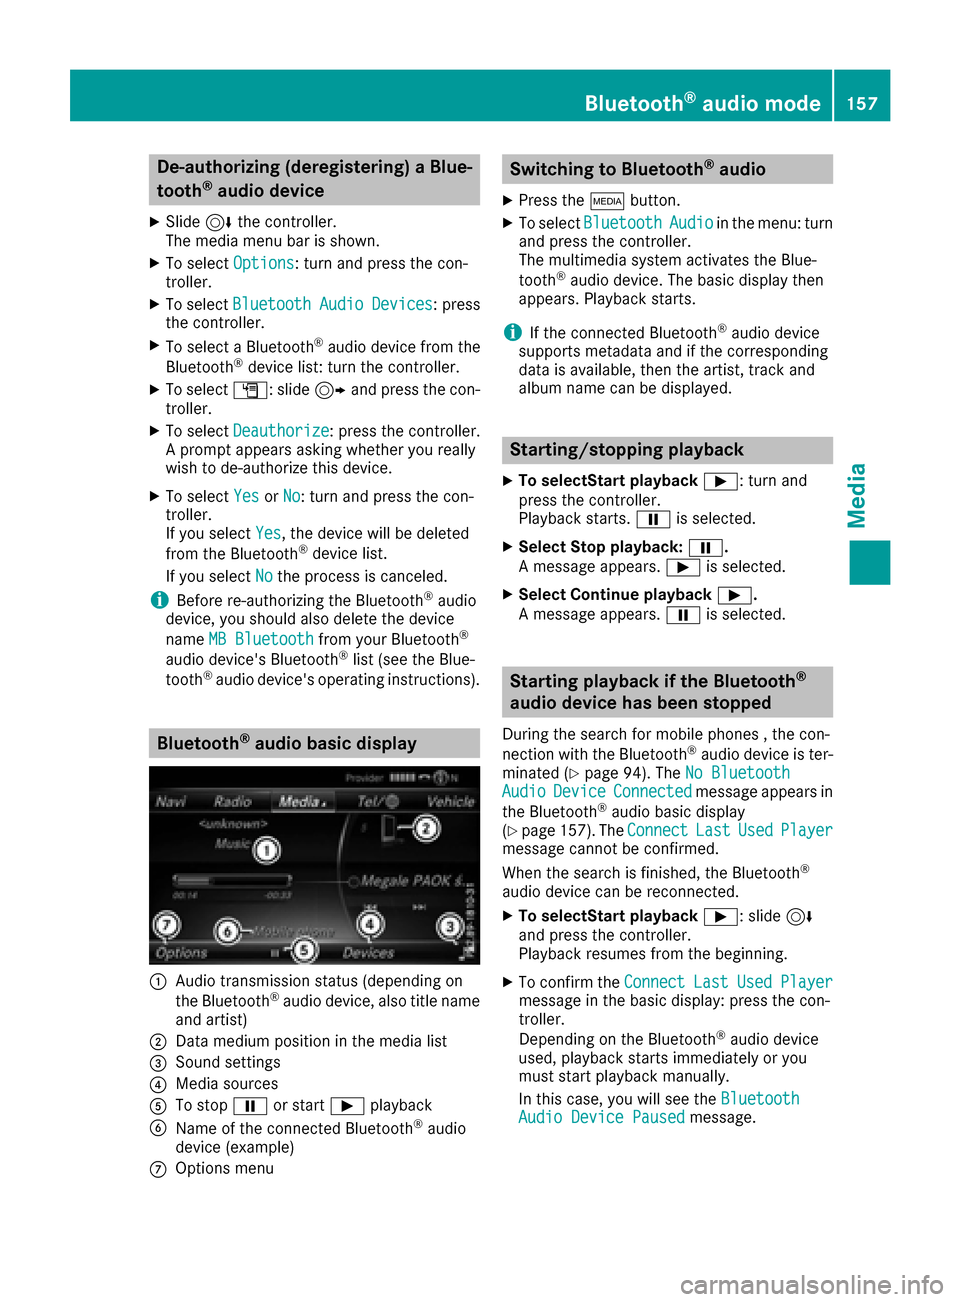
Bluetoot h®audiobasic display
:Audio transmissio nstatus (dependin gon
th eBluetoot h®audio device, also titl enam e
and artist )
;Data medium position in th emedia list
=Sound setting s
?Media sources
ATo stopËor start Ìplayback
BNameof th econnecte dBluetoot h®audio
devic e(example)
COption smen u
Switchin gto Bluetoot h®audio
XPress th eÕ button.
XTo selec tBluetoothAudioin th emenu: turn
and press th econtroller .
The multimedia system activates th eBlue-
toot h
®audio device. The basi cdisplay then
appears .Playback starts.
iIf th econnecte dBluetoot h®audio devic e
supports metadat aand if th ecorrespondin g
dat ais available ,then th eartist ,track and
album nam ecan be displayed.
Starting/stopping playback
XTo selec tStart pl aybackÌ: turn and
press the controller.
Playback starts. Ëis selected.
XSelec tStop playback: Ë.
A message appears. Ìis selected.
XSelect Continue playback Ì.
A message appears. Ëis selected.
Starting playback if the Bluetooth®
audio device has been stopped
During the search for mobile phones , the con-
nection with the Bluetooth®audio device is ter-
minated (Ypage 94). The No BluetoothAudioDeviceConnectedmessage appears in
the Bluetooth®audio basic display
(Ypage 157). The ConnectLastUsedPlayermessage cannot be confirmed.
When the search is finished, the Bluetooth®
audio device can be reconnected.
XTo selectStart playback Ì: slide6
and press the controller.
Playback resumes from the beginning.
XTo confirm the ConnectLastUsedPlayermessage in the basic display: press the con-
troller.
Depending on the Bluetooth
®audio device
used, playback starts immediately or you
must start playback manually.
In this case, you will see the Bluetooth
Audio Device Pausedmessage.
Bluetooth®audio mode157
Media
Z
Page 160 of 202
Selecting a track
The function is not supported by all Bluetooth®
audio devices.
Some mobile phones impair function with
regard to the following criteria:
Rthe number of tracks that can be selected.
Rthe time period until the next or previous trackis played.
XUse the multifunction steering wheel to
switch to the media menu in the on-board
computer; see the vehicle Operator's Manual.
XTo skip forwards or backwards to a track:
press the 9or: button on the multi-
function steering wheel.
XRapid scroll: press and hold the 9
or : button on the multifunction steering
wheel until the desired track is reached.
If you press and hold the 9or: but-
tons, the rapid scrolling speed increases after
a short time.
Further ways to select tracks (
Ypage 150).
iIn rapid scroll, track names are not shown,
but instead only Track 1, Track 2 etc. The
playback times for the tracks played are not
displayed. This is available as an optional
function starting with AVRCP Version 1.3.
There is also no music search option available
with Bluetooth
®Audio.
Selecting playback options
If the Bluetooth®audio device supports the cor-
responding function, the following options are
available:
RNormal Track Sequence: the tracks are
played in the normal order (e.g. track 1, 2, 3
etc.).
Audio data playback is determined by the
order in which the tracks are written to the
data medium. Alphabetical order is the most
common. Once all the tracks in a folder have
been played, the tracks in the next folder are
played.
RRandomTrackList: the current track list is
played in random order (e.g. 3, 8, 5 etc.).
RRandom Medium: all tracks on the data
medium are played in random order (e.g.
track 3, 8, 5 etc.). Playback options are optional functions and
are not, or only partially, supported by Blue-
tooth
®audio devices.
Selecting playback options
XSlide 6the controller.
XTo select Options: turn and press the con-
troller.
XSelect Playback Mode.
A # dot indicates the current setting.
XSelect the desired option.
If you select Random Track List, you will
see a corresponding message in the display or
selection window.
Increasing the volume in the multime-
dia system
XSlide 6the controller.
XTo select Options: turn and press the con-
troller.
XTo select Volume: turn and press the control-
ler.
A menu appears. The #dot indicates the cur-
rent setting.
XSelect StandardorBoost.
iIf play back on the Bluetooth®audio player
is too quiet, the Boostfunction may be used.
It is recommended however, that you
increase the volume on the Bluetooth
®audio
player directly.
Operation with the Media Interface
General notes
Media Interface is a universal interface for the
connection of mobile audio and video devices.
Media Interface in the multimedia system has
two USB connections.
The USB connection sockets are located in the
stowage compartment under the armrest
(
Ypage 144).
158Operation with the Media Interface
Media
Page 170 of 202
XTo adjust the balance: slide8or9 the
controller.
XTo adjust the fader: slide 6or5 the con-
troller.
XTo return to the basic menu: press the %
button briefly.
Harman/kardon®Logic 7®surround
sound system
General notes
The harman/kardon®Logic7®surround sound
system is available for all functions in the radio
and media modes.
The harman/kardon
®Logic7®surround sound
system is available for the following operating
modes:
RRadio (FM only)
RSatellite radio
RAudio CD
RMP3 (including SD card and USB storage
device)
RMedia Interface
RBluetooth®audio mode
RVideo DVD (PCM, DTS®and Dolby®Digital
audio formats)
iFor the best sound, CD or WAV CD format is
recommended. For data-reduced media, AAC
with a data rate of 320 kbit/s is recommen-
ded.
Discs which support the audio formats men-
tioned have the following logos:
iManufactured under license from Dolby
Laboratories. Dolby and the double-D symbol
are trademarks of Dolby Laboratories.
iFor DTS patents see
http://patents.dts.com. Manufactured
under license from DTS Licensing Limited.
DTS, the Symbol & DTS and the Symbol
together are registered trademarks, and DTS
Digital Surround is a trademark of DTS, Inc.
©
DTS, Inc. All rights reserved.
Calling up the sound menu
You can make various sound settings for the
different audio and video sources. It is possible
to set more bass for radio mode than for CD
audio mode, for example. The respective sound
menu is called up from the menu of the desired
mode.
XSwitch to radio mode (Ypage 135).
or
XSwitch to media mode (Ypage 144).
XTo switch to the menu bar: slide 6the con-
troller.
XTo select à: turn and press the controller.
The menu appears with the last setting
accessed, e.g. Equalizer
.
Overview of harman/kardon
®Logic7®surround
sound system
FunctionOptions
EqualizerSets treble, mid-
range and bass
Balance/faderAdjusts the volume:
right/left and
front/rear
Logic 7Optimizes the sound
playback
168Harman/kardon®Logic 7®surround sound system
Sound
Page 172 of 202

Bang & Olufsen BeoSound
General notes
The Bang & Olufsen BeoSound AMG sound sys-
tem is available for all functions in the radio and
media modes.
The following modes are available for the Bang &
Olufsen BeoSound AMG sound system:
RRadio (FM only)
RSatellite radio
RAudio CD
RMP3/AAC
RMedia Interface
RBluetooth®audio mode
RVideo DVD (PCM, DTS®and Dolby®Digital
audio formats)
iFor the best sound, CD or WAV CD format is
recommended. For data-reduced media, AAC
with a data rate of 320 kbit/s is recommen-
ded.
iManufactured under license from Dolby
Laboratories. Dolby and the double-D symbol
are trademarks of Dolby Laboratories.
iFor DTS patents see
http://patents.dts.com. Manufactured
under license from DTS Licensing Limited.
DTS, the Symbol & DTS and the Symbol
together are registered trademarks, and DTS
Digital Surround is a trademark of DTS, Inc.
©
DTS, Inc. All rights reserved.
Calling up the sound menu
You can make various sound settings for the
different audio and video sources. It is possible
to set more bass for radio mode than for audio
CD mode, for example. The respective sound
menu is called up from the menu of the desired
mode.
XSwitch to radio mode (Ypage 135).
or
XSwitch to media mode (Ypage 144).
XTo switch to the menu bar: slide 6the con-
troller.
XTo select à: turn and press the controller.
The menu appears with the last setting
accessed, e.g. Equalizer
.
Bang & Olufsen BeoSound AMG sound system
FunctionOptions
EqualizerSets treble, mid-
range and bass
Balance/faderAdjusts the volume:
right/left and
front/rear
True Image™Sets a sound profile
in the vehicle
Sound mode ( VIP &BAL Selection)Optimizes the sound
playback
Setting treble, mid-range and bass
XCall up the sound menu (Ypage 170).
XTurn the controller until Equalizeris in the
center.
XSlide 6the controller.
Rotary menus for treble, mid-range and bass
are activated.
170Bang & Olufsen BeoSound
Sound
Page 180 of 202

You can call up the legend for storms
(Ypage 179).
The following information on a storm cell is
displayed (if available):
Rcharacteristics of the storm cell
Rdate and time of observation (time stamp)
Rdirectional movement speed and path
Propagation speed: the speed at which the
storm cell is advancing.
XTo display the weather fronts: activate the
Atmospheric Pressure
display level
(Ypage 177).
If weather data is available, the weather map
will then display the weather fronts.
The example shows the position of high and
low-pressure areas (H, L), weather fronts and
isobars. Isobars are lines that show where the
air pressure is the same.
Legend: weather fronts
Weather
frontExplanation
Cold front
(blue line with
blue triangles)If a cold front moves in, the
weather remains changeable
and there are often rain
showers and thunderstorms. The air temperature decrea-
ses.
Warm front
(red line with
red semi-cir-
cles)A warm front may cause
more prolonged steady rain,
more cloud cover and a slow
rise in temperature.
Weather
frontExplanation
Stationary
front
(red and blue
line with red
semi-circles
and blue trian-
gles)The weather front moves
minimally. The weather
remains changeable in this
area.
Occlusion
(purple line
with purple
semi-circles
and triangles)When the faster cold front
catches up and joins the
warm front ahead of it, an
occluded front is formed. The
weather remains changeable
and rainy within an occlu-
sion.
XTo display the track of a storm: activate the
Tropical Storm Tracking
display level
(Ypage 177).
If weather data is available, the weather map
will then display storm tracking information.
Example: in the middle of the map you can see
the current position of the tropical low-pres-
sure area (cyclone). To the right of this a solid
line shows the previous path with positions
and times. The forecast for the direction of
propagation is shown by a dotted line with
positions and times.
178Weather forecasts
SIRIUS Weather