stop start MERCEDES-BENZ CLA-Class 2017 C117 User Guide
[x] Cancel search | Manufacturer: MERCEDES-BENZ, Model Year: 2017, Model line: CLA-Class, Model: MERCEDES-BENZ CLA-Class 2017 C117Pages: 318, PDF Size: 8.02 MB
Page 64 of 318
Thus, the distance warning function cannot
provide a warning in all critical situations.
There is a risk of an accident.
Always pay careful attention to the traffic sit-uation and be ready to brake.
GWARNING
The distance warning function cannot always
clearly identify objects and complex traffic
situations.
In such cases, the distance warning function
may:
Rgive an unnecessary warning
Rnot give a warning
There is a risk of an accident.
Always pay careful attention to the traffic sit-
uation and do not rely solely on the distance
warning function.
Function
Starting at a speed of approximately 4 mph
(7 km/h), the distance warning function warns
you if you rapidly approach a vehicle in front. An
intermittent warning tone will then sound, and
the · distance warning lamp will light up in
the instrument cluster.
XBrake immediately in order to increase the
distance from the vehicle in front.
or
XTake evasive action, provided it is safe to do
so.
Due to the nature of the system, particularly
complicated but non-critical driving conditions
may also cause the system to display a warning.
With the help of the radar sensor system, the
distance warning function can detect obstacles
that are in the path of your vehicle for an exten-
ded period of time.
Up to a speed of approximately 44 mph
(70 km/h), the distance warning function can
also react to stationary obstacles, such as stop-
ped or parked vehicles.
Autonomous braking function
If the driver does not react to the distance warn-
ing signal in a critical situation, Active Brake
Assist can assist the driver with the autonomous
braking function. The autonomous braking function:
Rgives the driver more time to react to critical
driving situations
Rcan help the driver to avoid an accident or
Rreduces the effects of an accident
Vehicles without Distance Pilot DISTRONIC:
the autonomous braking function is available in
the following speed ranges:
R4 - 65 mph (7 - 105 km/h) for moving objects
R4 - 31 mph (7 - 50 km/h) for stationary
objects
Vehicles with Distance Pilot DISTRONIC: the
autonomous braking function is available in the
following speed ranges:
R4 - 124 mph (7 - 200 km/h) for moving
objects
R4 - 31 mph (7 - 50 km/h) for stationary
objects
Due to the nature of the system, particularly
complicated but non-critical driving conditions
may also cause the Autonomous Braking Func-
tion to intervene.
Braking assistance appropriate to the
situation
General information
iObserve the "Important safety notes" sec-
tion (Ypage 60).
With the help of the radar sensor system, Adap-
tive Brake Assist can detect obstacles that are in
the path of your vehicle for an extended period
of time.
If Adaptive Brake Assist detects a risk of colli-
sion with the vehicle in front, it calculates the
brake pressure necessary to avoid a collision. If
you apply the brakes forcefully, the braking
assistance adapts to the situation and automat-
ically increases the brake pressure to a degree
appropriate to the traffic situation.
Braking assistance appropriate to the situation
provides braking assistance in hazardous situa- tions at speeds above 4 mph (7 km/h). It uses
radar sensor technology to assess the traffic
situation.
Situation-dependent braking assistance is capa-
ble of reacting to moving objects that have
already been recognized as such at least once
over the period of observation, up to vehicle
speeds of around 155 mph (250 km/h).
62Driving safety systems
Safety
Page 66 of 318
Vehicles without 4MATIC:when towing your
vehicle with the front axle raised, it is important
that you observe the notes on ESP
®
(Ypage 277).
If the å ESP®OFF warning lamp lights up
continuously, ESP®is deactivated.
If the ÷ ESP®warning lamp and the å
warning lamp are lit continuously, ESP®is not
available due to a malfunction.
Observe the information on warning lamps
(
Ypage 219) and display messages which may
be shown in the instrument cluster
(
Ypage 189).
Only use wheels with the recommended tire
sizes. Only then will ESP
®function properly.
Characteristics of ESP®
General information
If the ÷ ESP®warning lamp goes out before
beginning the journey, ESP®is automatically
active.
If ESP
®intervenes, the ÷ESP®warning lamp
flashes in the instrument cluster.
If ESP
®intervenes:
XDo not deactivate ESP®under any circum-
stances.
XOnly depress the accelerator pedal as far as
necessary when pulling away.
XAdapt your driving style to suit the prevailing
road and weather conditions.
ECO start/stop function
The ECO start/stop function switches the
engine off automatically when the vehicle stops
moving. The engine starts automatically when
the driver wants to pull away again. ESP
®
remains in its previously selected status. Exam-
ple: if ESP®was deactivated before the engine
was switched off, ESP®remains deactivated
when the engine is switched on again.
Deactivating/activating ESP®(except
Mercedes‑AMG vehicles)
Important safety notes
iObserve the "Important safety notes" sec-
tion (Ypage 60). You can select between the following states of
ESP
®:
RESP®is activated.
RESP®is deactivated.
GWARNING
If you deactivate ESP
®, ESP®no longer sta-
bilizes the vehicle. There is an increased risk
of skidding and an accident.
Only deactivate ESP
®in the situations descri-
bed in the following.
The spinning of the wheels results in a cutting
action for better traction on loose surfaces.
It may be best to deactivate ESP
®in the follow-
ing situations:
Rwhen using snow chains
Rin deep snow
Ron sand or gravel
iActivate ESP®as soon as the situations
described above no longer apply. ESP®will
otherwise not be able to stabilize the vehicle if
the vehicle starts to skid or a wheel starts to
spin.
!Avoid spinning the driven wheels for an
extended period with ESP®deactivated. You
could otherwise damage the drivetrain.
Deactivating/activating ESP®
You can deactivate or activate ESP®via the on-
board computer (Ypage 182).
ESP®deactivated:
The å ESP®OFF warning lamp in the instru-
ment cluster lights up.
ESP
®activated:
The å ESP®OFF warning lamp in the instru-
ment cluster goes out.
Characteristics when ESP®is deactivated
If ESP®is deactivated and one or more wheels
start to spin, the ÷ESP®warning lamp in the
instrument cluster flashes. In such situations,
ESP
®will not stabilize the vehicle.
If you deactivate ESP®:
RESP®no longer improves driving stability.
REngine torque is no longer limited and the
drive wheels are able to spin.
64Driving safety systems
Safety
Page 69 of 318
This steering assistance is provided in particular
if:
Rboth right wheels or both left wheels are on awet or slippery road surface when you brake
Rthe vehicle begins to skid
Important safety notes
iObserve the "Important safety notes" sec-
tion (Ypage 60).
No steering assistance is provided from STEER
CONTROL, if:
RESP®is malfunctioning
Rthe steering is malfunctioning
If ESP®is malfunctioning, you will be assisted
further by the electrical power steering.
Protection against theft
Immobilizer
The immobilizer prevents your vehicle from
being started without the correct SmartKey.
XTo activate with the SmartKey: remove the
SmartKey from the ignition lock.
XTo activate with KEYLESS-GO start-func-
tion or KEYLESS-GO: switch the ignition off
and open the driver's door.
XTo deactivate: switch on the ignition.
When leaving the vehicle, always take the
SmartKey with you and lock the vehicle. Anyone
can start the engine if a valid SmartKey has been
left inside the vehicle.
iThe immobilizer is always deactivated when
you start the engine.
In the event that the engine cannot be started
(yet the vehicle's battery is charged), the sys-
tem is not operational. Contact an authorized
Mercedes-Benz Center or call
1-800-FOR-MERCedes (in the USA) or
1-800-387-0100 (in Canada).
ATA (anti-theft alarm system)
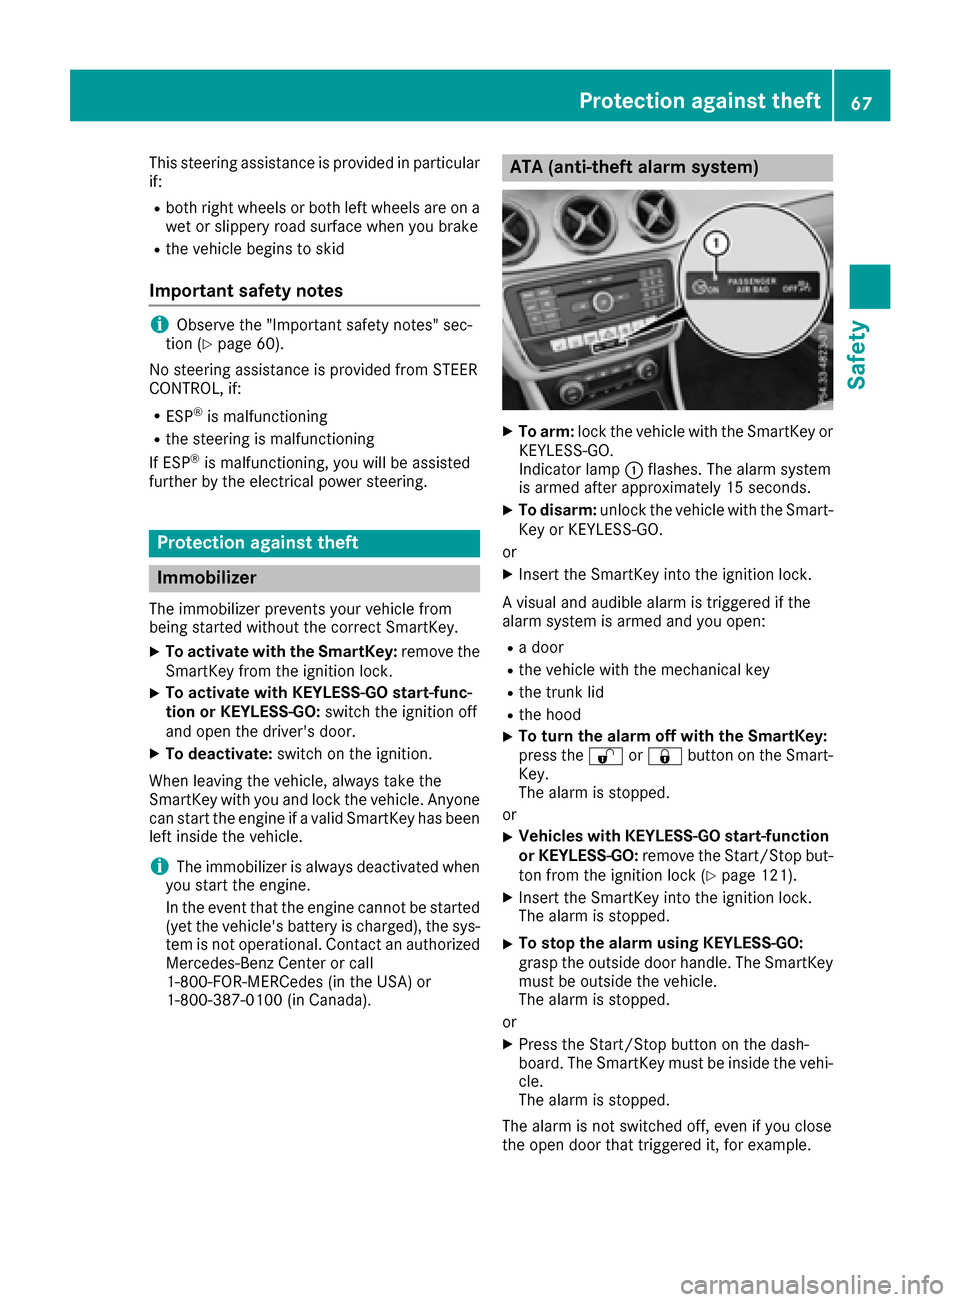
XTo arm: lock the vehicle with the SmartKey or
KEYLESS-GO.
Indicator lamp :flashes. The alarm system
is armed after approximately 15 seconds.
XTo disarm: unlock the vehicle with the Smart-
Key or KEYLESS-GO.
or
XInsert the SmartKey into the ignition lock.
A visual and audible alarm is triggered if the
alarm system is armed and you open:
Ra door
Rthe vehicle with the mechanical key
Rthe trunk lid
Rthe hood
XTo turn the alarm off with the SmartKey:
press the %or& button on the Smart-
Key.
The alarm is stopped.
or
XVehicles with KEYLESS-GO start-function
or KEYLESS-GO: remove the Start/Stop but-
ton from the ignition lock (
Ypage 121).
XInsert the SmartKey into the ignition lock.
The alarm is stopped.
XTo stop the alarm using KEYLESS-GO:
grasp the outside door handle. The SmartKey
must be outside the vehicle.
The alarm is stopped.
or
XPress the Start/Stop button on the dash-
board. The SmartKey must be inside the vehi-
cle.
The alarm is stopped.
The alarm is not switched off, even if you close
the open door that triggered it, for example.
Protection against theft67
Safety
Z
Page 71 of 318
SmartKey
Important safety notes
GWARNING
If children are left unsupervised in the vehicle,
they could:
Ropen the doors, thus endangering other
people or road users.
Rget out and disrupt traffic.
Roperate the vehicle's equipment.
Additionally, children could set the vehicle in
motion if, for example, they:
Rrelease the parking brake.
Rshifting the automatic transmission out of
park position P
RStart the engine.
There is a risk of an accident and injury.
When leaving the vehicle, always take the
SmartKey with you and lock the vehicle. Never
leave children or animals unattended in the
vehicle. Always keep the SmartKey out of
reach of children.
GWARNING
If you attach heavy or large objects to the
SmartKey, the SmartKey could be uninten-
tionally turned in the ignition lock. This could
cause the engine to be switched off. There is a risk of an accident.
Do not attach any heavy or large objects to the
SmartKey. Remove any bulky key rings before
inserting the SmartKey into the ignition lock.
!Keep the SmartKey away from strong mag-
netic fields. Otherwise, the remote control
function could be affected.
Strong magnetic fields can occur in the vicin-
ity of powerful electrical installations.
Do not keep the SmartKey:
Rwith electronic devices, e.g. a mobile phone
or another SmartKey.
Rwith metallic objects, e.g. coins or metal foil.
Rinside metallic objects, e.g. a metal case
Vehicles with KEYLESS-GO start function: do
not keep the SmartKey in the trunk. Otherwise, the SmartKey may not be detected, e.g. when
starting the engine using the Start/Stop button.
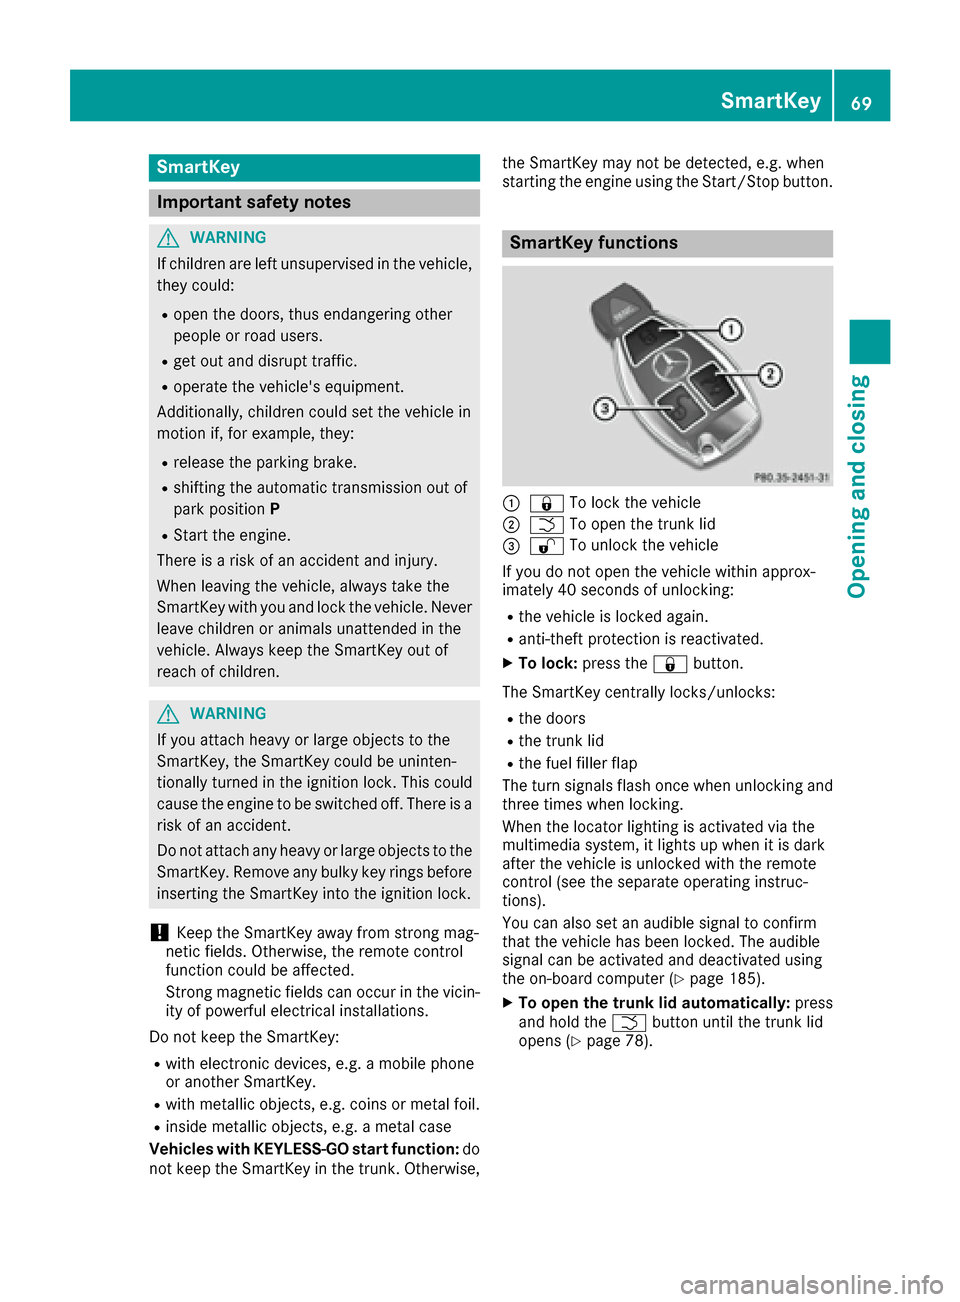
SmartKey functions
:&
To lock the vehicle
;FTo open the trunk lid
=%To unlock the vehicle
If you do not open the vehicle within approx-
imately 40 seconds of unlocking:
Rthe vehicle is locked again.
Ranti-theft protection is reactivated.
XTo lock: press the &button.
The SmartKey centrally locks/unlocks:
Rthe doors
Rthe trunk lid
Rthe fuel filler flap
The turn signals flash once when unlocking and
three times when locking.
When the locator lighting is activated via the
multimedia system, it lights up when it is dark
after the vehicle is unlocked with the remote
control (see the separate operating instruc-
tions).
You can also set an audible signal to confirm
that the vehicle has been locked. The audible
signal can be activated and deactivated using
the on-board computer (
Ypage 185).
XTo open the trunk lid automatically: press
and hold the Fbutton until the trunk lid
opens (
Ypage 78).
SmartKey69
Opening and closing
Z
Page 73 of 318
Changing the settings of the locking
system
You can change the settings of the locking sys-
tem. This means that only the driver's door and
the fuel filler flap are unlocked when the vehicle
is unlocked. This is useful if you frequently travel
on your own.
XTo change the setting:press and hold the
% and& buttons simultaneously for
approximately six seconds until the battery
indicator lamp flashes twice (
Ypage 72).
If the setting of the locking system is changed
within the signal range of the vehicle, pressing
the & or% button:
Rlocks or
Runlocks the vehicle
The SmartKey now functions as follows:
XTo unlock: press the%button once.
XTo unlock centrally: press the%button
twice.
XTo lock centrally: press the&button.
The KEYLESS-GO function is changed as fol-
lows:
XTo unlock the driver's door: touch the inner
surface of the door handle on the driver's
door.
XTo unlock centrally: touch the inner surface
of the door handle on the front-passenger
door or the rear door.
XTo lock centrally: touch the outer sensor
surface on one of the door handles.
XTo restore the factory settings: press and
hold the %and& buttons simultane-
ously for approximately six seconds until the
batter
y check lamp flashes twice
(Ypage 72).
Mechanical key
General notes
If the vehicle can no longer be locked or
unlocked with the SmartKey or KEYLESS-GO,
use the mechanical key.
If you use the mechanical key to unlock and
open the driver's door or the trunk lid, the anti-
theft alarm system will be triggered (
Ypage 67). There are several ways to turn off the alarm:
XTo deactivate the alarm with the key:
press
the % or& button on the key.
or
XInsert the SmartKey into the ignition lock.
or
XTo deactivate the alarm with KEYLESS-GO: press the Start/Stop button in the ignition
lock. The SmartKey must be in the vehicle.
or
XLock or unlock the vehicle using KEYLESS-
GO. The SmartKey must be outside the vehi-
cle.
If you unlock the vehicle using the mechanical
key, the fuel filler flap will not be unlocked auto- matically.
XTo unlock the fuel filler flap: insert the
SmartKey into the ignition lock.
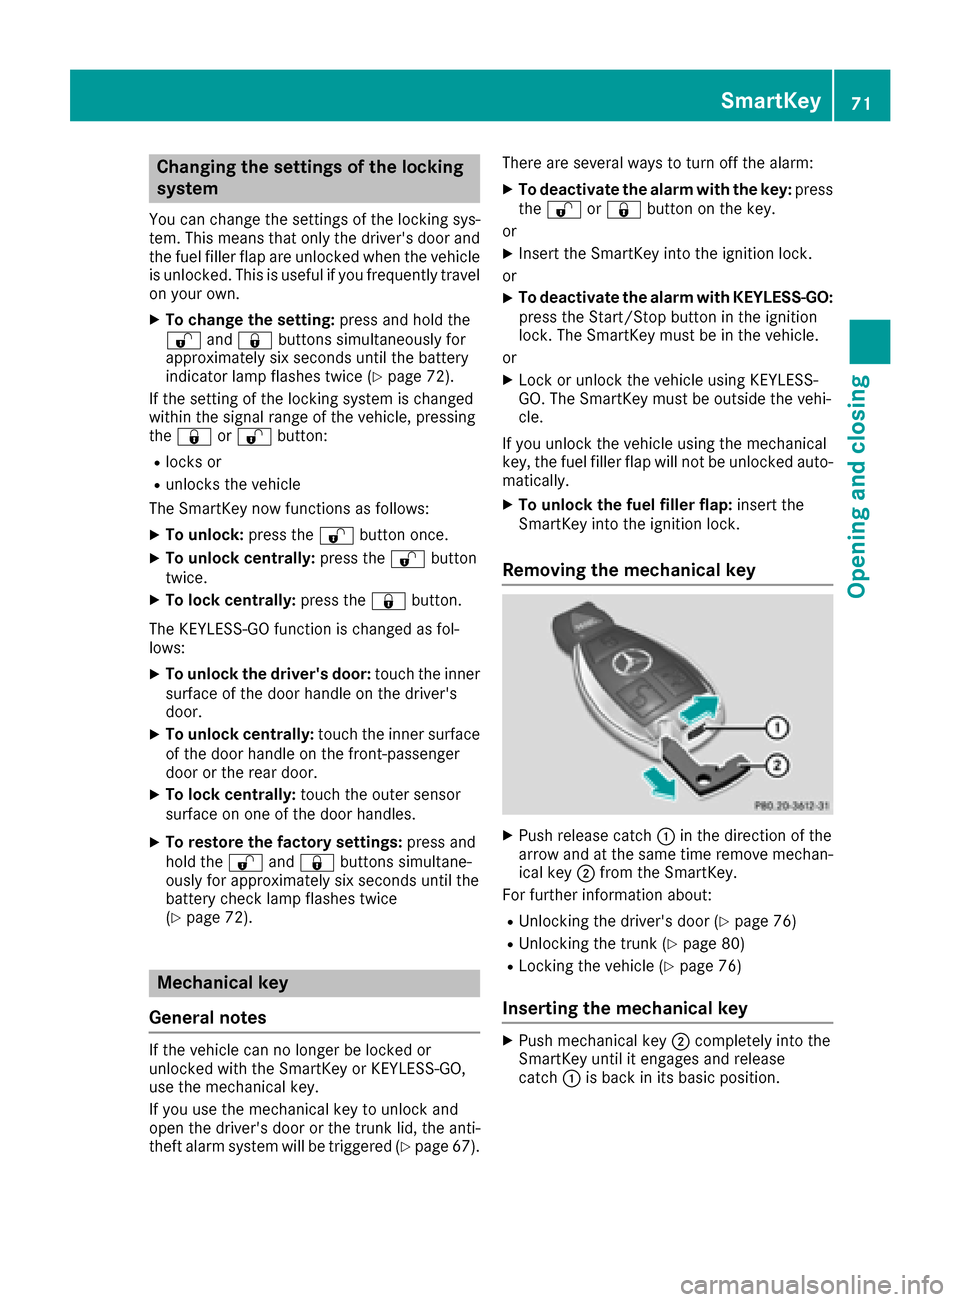
Removing the mechanical key
XPush release catch :in the direction of the
arrow and at the same time remove mechan- ical key ;from the SmartKey.
For further information about:
RUnlocking the driver's door (Ypage 76)
RUnlocking the trunk (Ypage 80)
RLocking the vehicle (Ypage 76)
Inserting the mechanical key
XPush mechanical key ;completely into the
SmartKey until it engages and release
catch :is back in its basic position.
SmartKey71
Opening and closing
Z
Page 76 of 318
ProblemPossible causes/consequences andMSolutions
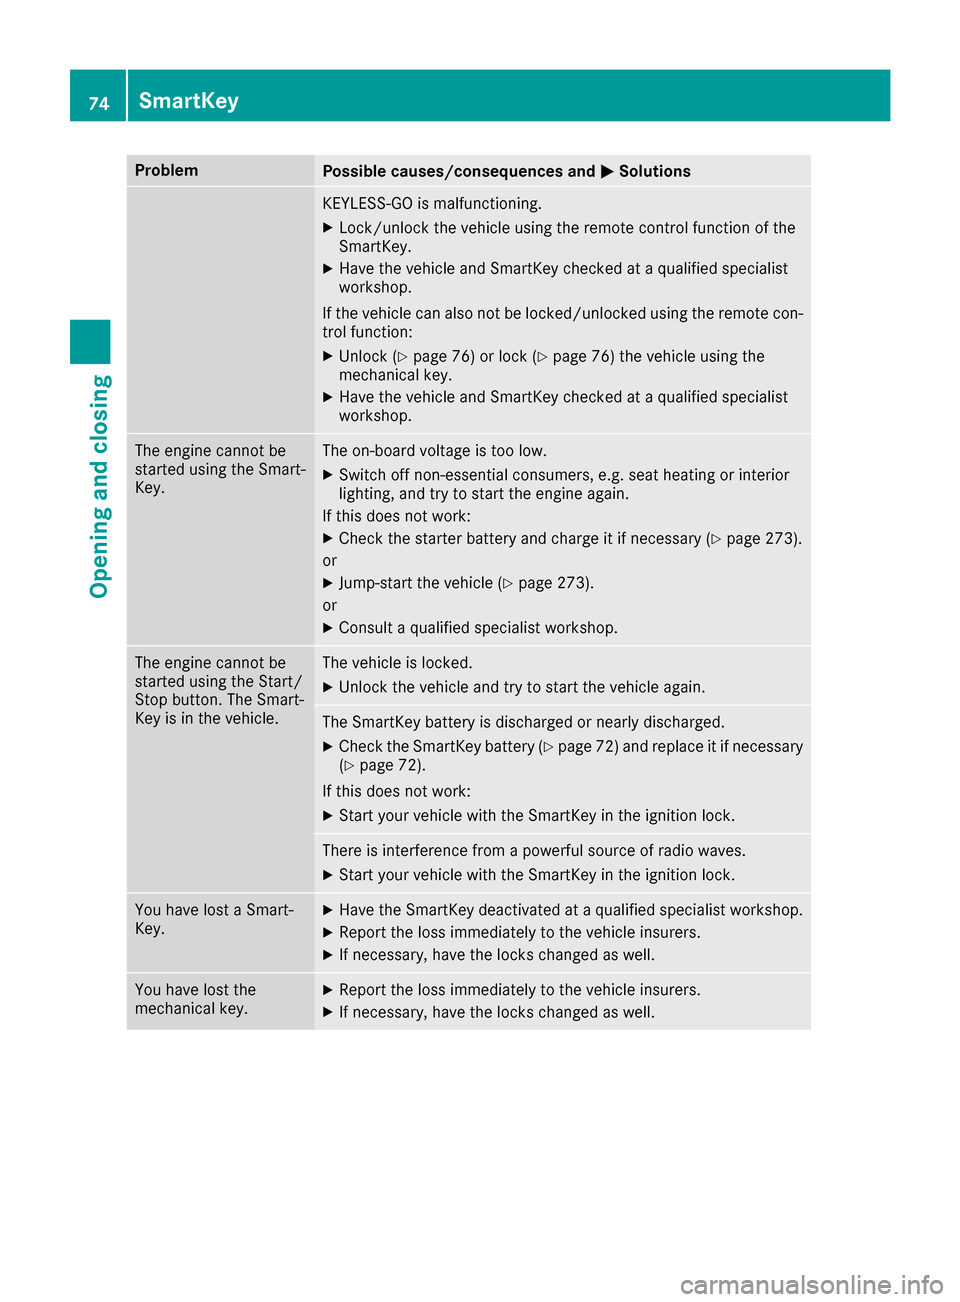
KEYLESS-GO is malfunctioning.
XLock/unlock the vehicle using the remote control function of the
SmartKey.
XHave the vehicle and SmartKey checked at a qualified specialist
workshop.
If the vehicle can also not be locked/unlocked using the remote con-
trol function:
XUnlock (Ypage 76) or lock (Ypage 76) the vehicle using the
mechanical key.
XHave the vehicle and SmartKey checked at a qualified specialist
workshop.
The engine cannot be
started using the Smart-
Key.The on-board voltage is too low.
XSwitch off non-essential consumers, e.g. seat heating or interior
lighting, and try to start the engine again.
If this does not work:
XCheck the starter battery and charge it if necessary (Ypage 273).
or
XJump-start the vehicle (Ypage 273).
or
XConsult a qualified specialist workshop.
The engine cannot be
started using the Start/
Stop button. The Smart-
Key is in the vehicle.The vehicle is locked.
XUnlock the vehicle and try to start the vehicle again.
The SmartKey battery is discharged or nearly discharged.
XCheck the SmartKey battery (Ypage 72) and replace it if necessary
(Ypage 72).
If this does not work:
XStart your vehicle with the SmartKey in the ignition lock.
There is interference from a powerful source of radio waves.
XStart your vehicle with the SmartKey in the ignition lock.
You have lost a Smart-
Key.XHave the SmartKey deactivated at a qualified specialist workshop.
XReport the loss immediately to the vehicle insurers.
XIf necessary, have the locks changed as well.
You have lost the
mechanical key.XReport the loss immediately to the vehicle insurers.
XIf necessary, have the locks changed as well.
74SmartKey
Opening and closing
Page 83 of 318
body becomes trapped, release the switch or
pull the switch to close the side window again.
GWARNING
While closing the side windows, body parts in
the closing area could become trapped. There is a risk of injury.
When closing make sure that no parts of the
body are in the closing area. If somebody
becomes trapped, release the switch or press
the switch to open the side window again.
GWARNING
If children operate the side windows they
could become trapped, particularly if they are left unsupervised. There is a risk of injury.
Activate the override feature for the rear side
windows. When leaving the vehicle, always
take the SmartKey with you and lock the vehi-
cle. Never leave children unsupervised in the
vehicle.
Side window reversing feature
The side windows are equipped with an auto-
matic reversing feature. If a solid object blocks
or restricts a side window from traveling
upwards during the automatic closing process,
the side window opens again automatically. Dur-
ing the manual closing process, the side windowonly opens again automatically after the corre-
sponding switch is released. The automatic
reversing feature is only an aid and is no substi-
tute for your attention when closing a side win-
dow.
GWARNING
The reversing feature does not react:
Rto soft, light and thin objects, e.g. small fin-
gers
Rwhile resetting
This means that the reversing feature cannot
prevent someone being trapped in these sit-
uations. There is a risk of injury.
Make sure that no body parts are in close
proximity during the closing procedure. If
someone becomes trapped, press the switch
to open the side window again.
Opening and closing the side win-
dows
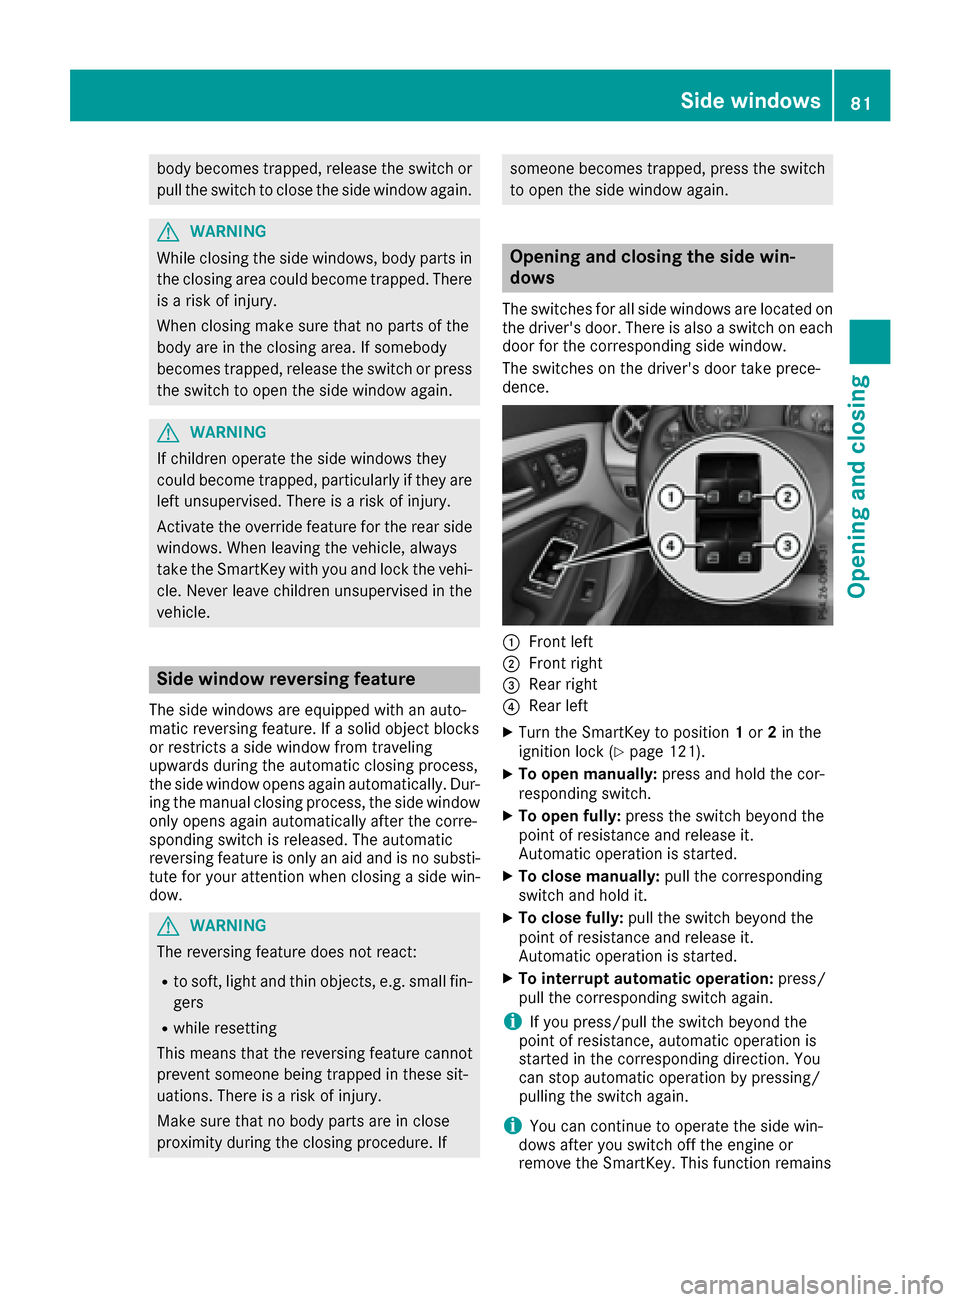
The switches for all side windows are located on the driver's door. There is also a switch on each
door for the corresponding side window.
The switches on the driver's door take prece-
dence.
:Front left
;Front right
=Rear right
?Rear left
XTurn the SmartKey to position 1or 2in the
ignition lock (Ypage 121).
XTo open manually: press and hold the cor-
responding switch.
XTo open fully: press the switch beyond the
point of resistance and release it.
Automatic operation is started.
XTo close manually: pull the corresponding
switch and hold it.
XTo close fully: pull the switch beyond the
point of resistance and release it.
Automatic operation is started.
XTo interrupt automatic operation: press/
pull the corresponding switch again.
iIf you press/pull the switch beyond the
point of resistance, automatic operation is
started in the corresponding direction. You
can stop automatic operation by pressing/
pulling the switch again.
iYou can continue to operate the side win-
dows after you switch off the engine or
remove the SmartKey. This function remains
Side windows81
Opening and closing
Z
Page 86 of 318
ProblemPossible causes/consequences andMSolutions
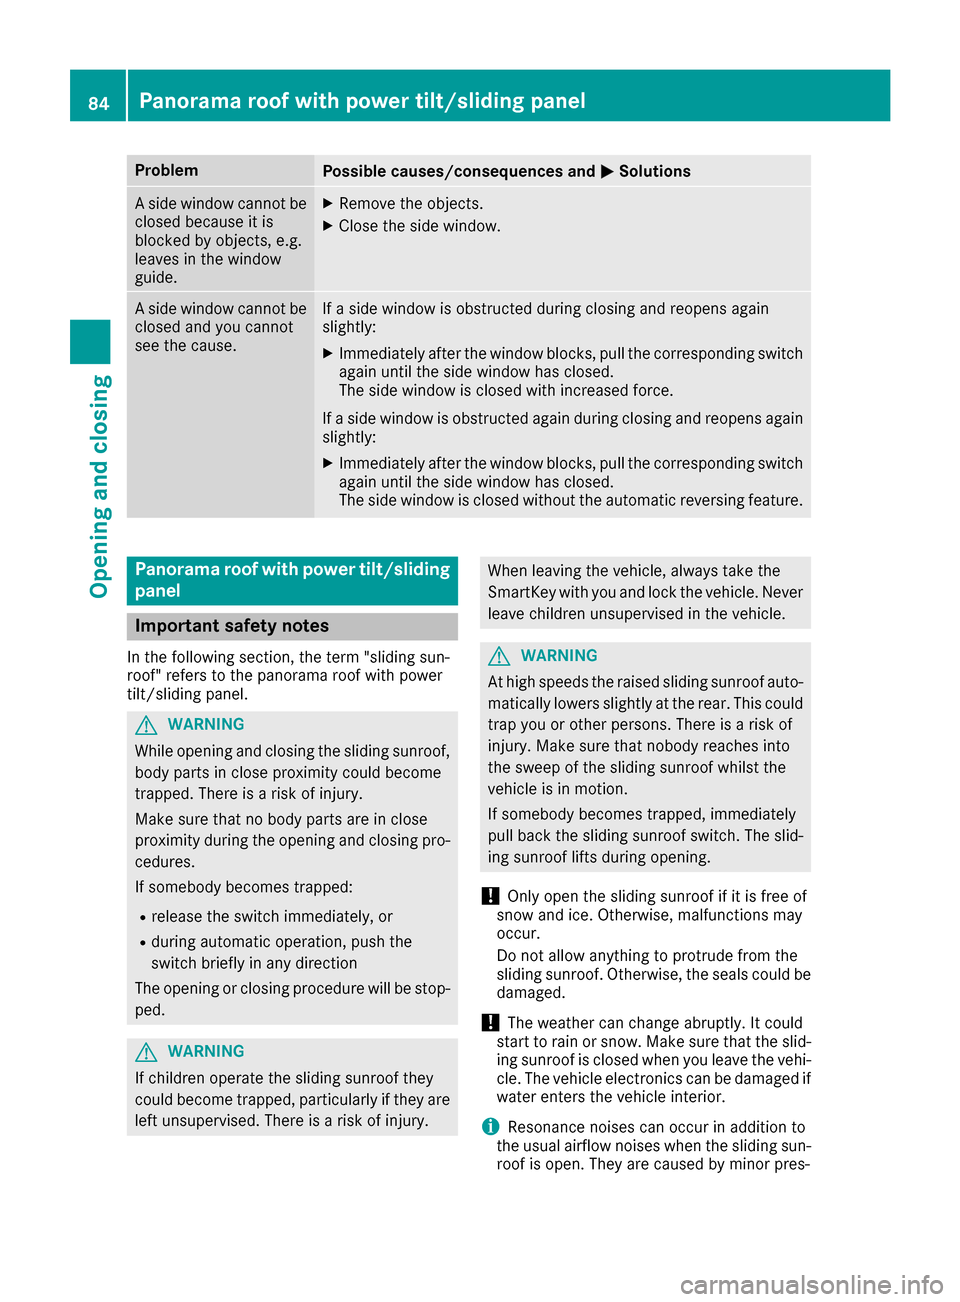
A side window cannot be
closed because it is
blocked by objects, e.g.
leaves in the window
guide.XRemove the objects.
XClose the side window.
A side window cannot be
closed and you cannot
see the cause.If a side window is obstructed during closing and reopens again
slightly:
XImmediately after the window blocks, pull the corresponding switch
again until the side window has closed.
The side window is closed with increased force.
If a side window is obstructed again during closing and reopens again slightly:
XImmediately after the window blocks, pull the corresponding switchagain until the side window has closed.
The side window is closed without the automatic reversing feature.
Panorama roof with power tilt/sliding
panel
Important safety notes
In the following section, the term "sliding sun-
roof" refers to the panorama roof with power
tilt/sliding panel.
GWARNING
While opening and closing the sliding sunroof, body parts in close proximity could become
trapped. There is a risk of injury.
Make sure that no body parts are in close
proximity during the opening and closing pro-
cedures.
If somebody becomes trapped:
Rrelease the switch immediately, or
Rduring automatic operation, push the
switch briefly in any direction
The opening or closing procedure will be stop- ped.
GWARNING
If children operate the sliding sunroof they
could become trapped, particularly if they are left unsupervised. There is a risk of injury.
When leaving the vehicle, always take the
SmartKey with you and lock the vehicle. Never
leave children unsupervised in the vehicle.
GWARNING
At high speeds the raised sliding sunroof auto-
matically lowers slightly at the rear. This could
trap you or other persons. There is a risk of
injury. Make sure that nobody reaches into
the sweep of the sliding sunroof whilst the
vehicle is in motion.
If somebody becomes trapped, immediately
pull back the sliding sunroof switch. The slid-
ing sunroof lifts during opening.
!Only open the sliding sunroof if it is free of
snow and ice. Otherwise, malfunctions may
occur.
Do not allow anything to protrude from the
sliding sunroof. Otherwise, the seals could be
damaged.
!The weather can change abruptly. It could
start to rain or snow. Make sure that the slid- ing sunroof is closed when you leave the vehi-
cle. The vehicle electronics can be damaged if
water enters the vehicle interior.
iResonance noises can occur in addition to
the usual airflow noises when the sliding sun- roof is open. They are caused by minor pres-
84Panorama roof with power tilt/sliding panel
Opening and closing
Page 88 of 318
If contact is made with a roof carrier approved
by Mercedes-Benz, the sliding sunroof lowers
slightly but remains raised at the rear.
Rain-closing feature
The rain-closing feature is only available for vehi-cles with a rain sensor.
When the SmartKey is in position 0in the igni-
tion lock or is removed, the sliding sunroof
closes automatically:
Rif it starts to rain.
Rat extreme outside temperatures.
Rafter six hours.
Rif there is a malfunction in the power supply.
The panorama roof with power tilt/sliding panel
remains raised at the rear in order to allow ven-
tilation of the vehicle interior.
If the panorama roof with power tilt/sliding
panel is obstructed while being closed by the
rain-closing feature, it opens again slightly. The
rain-closing feature is then deactivated.
The panorama roof with power tilt/sliding panel
does not close if:
Rit is raised at the rear.
Rit is blocked.
Rno rain is falling on the area of the windshield
being monitored by the rain sensor. If the
vehicle is under a bridge or in a carport, for
example, the field of the sensor may be cov-
ered.
Operating the roller sunblind for the
panorama roof with power tilt/sliding
panel
Important safety notes
GWARNING
Parts of the body could become trapped
between the roller sunblind and frame or slid-
ing sunroof during automatic opening or clos-
ing. There is a risk of injury.
When opening or closing, make sure that no
body parts are in the sweep of the roller sun-
blind.
If somebody becomes trapped:
Rrelease the switch immediately, or
Rduring automatic operation, push the
switch briefly in any direction
The opening or closing procedure will be stop-
ped.
The roller sunblind shields the vehicle interior
from sunlight. The roller sunblind can only be
opened and closed when the panorama roof
with power tilt/sliding panel is closed.
Roller sunblind reversing feature
The roller sunblind is equipped with an auto-
matic reversing feature. If a solid object blocks
or restricts the roller sunblind during the closing process, the roller sunblind opens again auto-
matically. However, the automatic reversing
feature is only an aid and does not relieve you of
the responsibility of paying attention when clos-
ing the roller sunblind.
GWARNING
The reversing feature does not react:
Rto soft, light and thin objects, e.g. small fin-
gers
Rwhen closing the roller sunblind again man-
ually immediately after automatic reversal
This means that the reversing feature cannot
prevent someone being trapped in these sit-
uations. There is a risk of injury.
When closing the roller sunblind, make sure
that no body parts are in the sweep area.
If somebody becomes trapped:
Rrelease the switch immediately, or
Rpress the switch in any direction during the
automatic closing process
The closing process is stopped.
86Panorama roof with power tilt/sliding panel
Opening and closing
Page 113 of 318
BSwitches cooling with air dehumidification on/off (Ypage 114)
CSwitches the rear window defroster on/off (Ypage 117)
Notes on using the air-conditioning
system
Air-conditioning system
Below, you can find a number of notes and rec-
ommendations to help you use the air-condi-
tioning system optimally.
RSwitch on the air-conditioning system by turn- ing control knob Aclockwise to the desired
position (except position 0).
RSet the temperature to 72 ‡ (22 †).
RRecommendation for avoiding misted
windows at low exterior temperatures or
in rain: switch on the ¿cooling with dehu-
midification function (
Ypage 114).
Set air distribution to ¯and if possible
switch off PandO (
Ypage 115).
Deactivate air-recirculation mode e
(
Ypage 118).
Set airflow control Ato a setting between 3
and 6(
Ypage 116).
RRecommendation for rapid cooling or
heating of the vehicle interior: briefly set
airflow control Ato a setting between 3and
6 (
Ypage 116).
RRecommendation for a constant vehicle
interior temperature: set airflow controlA
to a setting between 1and 3(
Ypage 116).
RRecommendation for air distribution in
winter: select the Oand¯ settings
(
Ypage 115).
Recommendation for air distribution in
summer: select the PorP and¯
settings (
Ypage 115).
ROnly use the "Windshield defrosting" function
briefly until the windshield is clear again.
ROnly use air-recirculation mode briefly, e.g. if
there are unpleasant outside odors or when in
a tu
nnel. The windows could otherwise fog up,
since no fresh air is drawn into the vehicle in
air-recirculation mode.
RIf you change the settings of the climate con-
trol system, the climate status display
appears for approximately three seconds at
the bottom of the screen in the multimedia
system display; see separate operating
instructions. You will see the current settings
of the various climate control functions.
DYNAMIC SELECT button (except
Mercedes-AMG vehicles)
You can choose between various drive programs
with the DYNAMIC SELECT button
(
Ypage 127).
If you have selected drive program E:
Rwhen heating, the electrical heater booster is
deactivated and in the warming-up phase
heat output is reduced
Rthe rear window defroster running time is
reduced
Depending on the configuration, climate set-
tings may also be influenced in the drive pro-
gram I.
If you have selected drive program Cor S, cli-
mate settings are not influenced.
ECO start/stop function
During automatic engine switch-off, the climate
control system only operates at a reduced capa-
city. If you require the full climate control output,
you can switch off the ECO start/stop function
by pressing the ECO button (
Ypage 126).
Overview of climate control systems111
Climate control