Position key MERCEDES-BENZ CLA-Class 2017 C117 Owner's Guide
[x] Cancel search | Manufacturer: MERCEDES-BENZ, Model Year: 2017, Model line: CLA-Class, Model: MERCEDES-BENZ CLA-Class 2017 C117Pages: 318, PDF Size: 8.02 MB
Page 88 of 318
If contact is made with a roof carrier approved
by Mercedes-Benz, the sliding sunroof lowers
slightly but remains raised at the rear.
Rain-closing feature
The rain-closing feature is only available for vehi-cles with a rain sensor.
When the SmartKey is in position 0in the igni-
tion lock or is removed, the sliding sunroof
closes automatically:
Rif it starts to rain.
Rat extreme outside temperatures.
Rafter six hours.
Rif there is a malfunction in the power supply.
The panorama roof with power tilt/sliding panel
remains raised at the rear in order to allow ven-
tilation of the vehicle interior.
If the panorama roof with power tilt/sliding
panel is obstructed while being closed by the
rain-closing feature, it opens again slightly. The
rain-closing feature is then deactivated.
The panorama roof with power tilt/sliding panel
does not close if:
Rit is raised at the rear.
Rit is blocked.
Rno rain is falling on the area of the windshield
being monitored by the rain sensor. If the
vehicle is under a bridge or in a carport, for
example, the field of the sensor may be cov-
ered.
Operating the roller sunblind for the
panorama roof with power tilt/sliding
panel
Important safety notes
GWARNING
Parts of the body could become trapped
between the roller sunblind and frame or slid-
ing sunroof during automatic opening or clos-
ing. There is a risk of injury.
When opening or closing, make sure that no
body parts are in the sweep of the roller sun-
blind.
If somebody becomes trapped:
Rrelease the switch immediately, or
Rduring automatic operation, push the
switch briefly in any direction
The opening or closing procedure will be stop-
ped.
The roller sunblind shields the vehicle interior
from sunlight. The roller sunblind can only be
opened and closed when the panorama roof
with power tilt/sliding panel is closed.
Roller sunblind reversing feature
The roller sunblind is equipped with an auto-
matic reversing feature. If a solid object blocks
or restricts the roller sunblind during the closing process, the roller sunblind opens again auto-
matically. However, the automatic reversing
feature is only an aid and does not relieve you of
the responsibility of paying attention when clos-
ing the roller sunblind.
GWARNING
The reversing feature does not react:
Rto soft, light and thin objects, e.g. small fin-
gers
Rwhen closing the roller sunblind again man-
ually immediately after automatic reversal
This means that the reversing feature cannot
prevent someone being trapped in these sit-
uations. There is a risk of injury.
When closing the roller sunblind, make sure
that no body parts are in the sweep area.
If somebody becomes trapped:
Rrelease the switch immediately, or
Rpress the switch in any direction during the
automatic closing process
The closing process is stopped.
86Panorama roof with power tilt/sliding panel
Opening and closing
Page 89 of 318
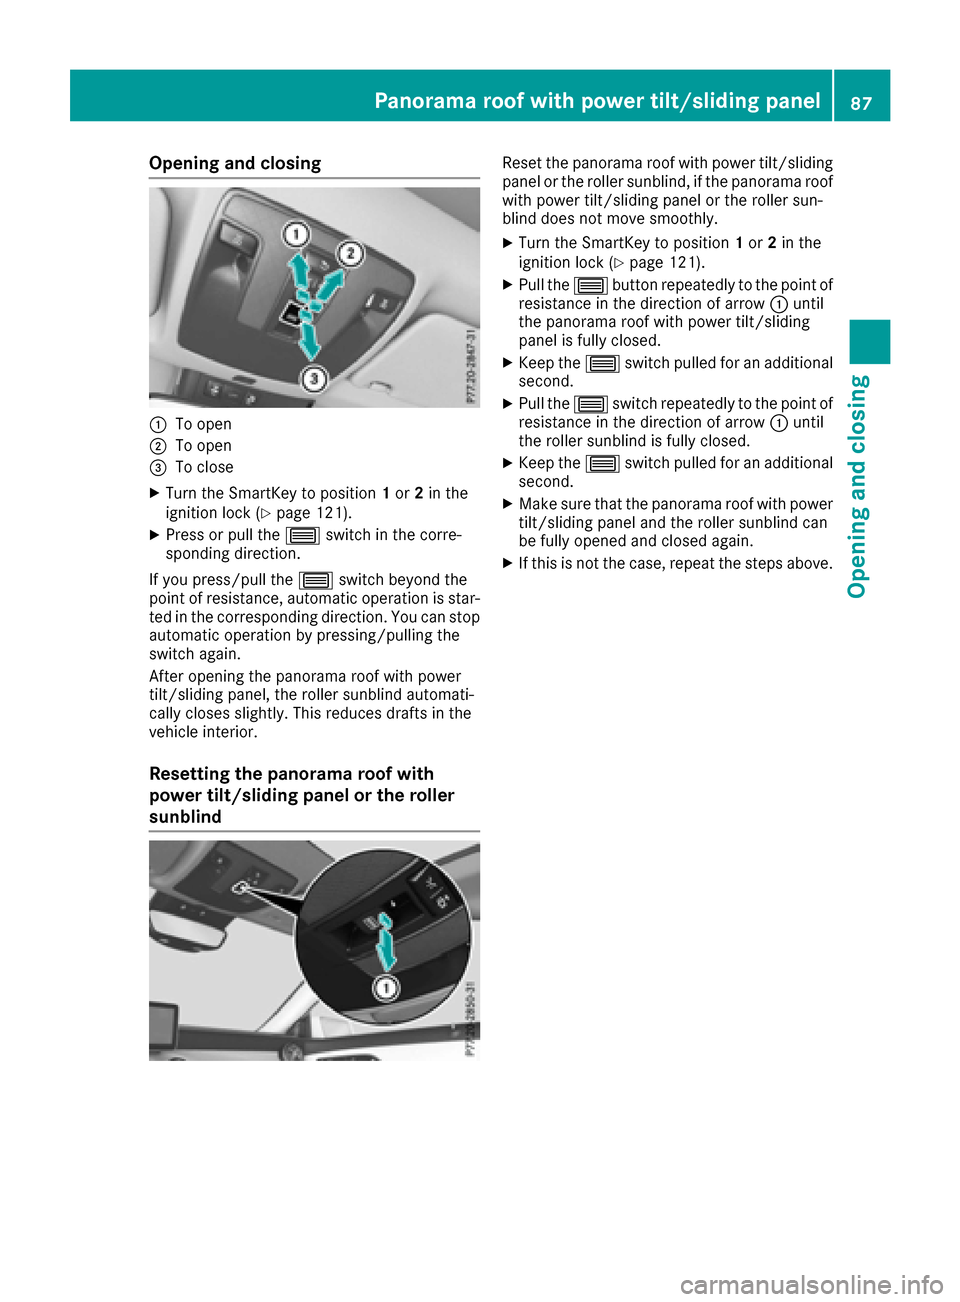
Opening and closing
:To open
;To open
=To close
XTurn the SmartKey to position1or 2in the
ignition lock (Ypage 121).
XPress or pull the 3switch in the corre-
sponding direction.
If you press/pull the 3switch beyond the
point of resistance, automatic operation is star-
ted in the corresponding direction. You can stop
automatic operation by pressing/pulling the
switch again.
After opening the panorama roof with power
tilt/sliding panel, the roller sunblind automati-
cally closes slightly. This reduces drafts in the
vehicle interior.
Resetting the panorama roof with
power tilt/sliding panel or the roller
sunblind
Reset the panorama roof with power tilt/sliding
panel or the roller sunblind, if the panorama roof
with power tilt/sliding panel or the roller sun-
blind does not move smoothly.
XTurn the SmartKey to position 1or 2in the
ignition lock (Ypage 121).
XPull the 3button repeatedly to the point of
resistance in the direction of arrow :until
the panorama roof with power tilt/sliding
panel is fully closed.
XKeep the 3switch pulled for an additional
second.
XPull the 3switch repeatedly to the point of
resistance in the direction of arrow :until
the roller sunblind is fully closed.
XKeep the 3switch pulled for an additional
second.
XMake sure that the panorama roof with power
tilt/sliding panel and the roller sunblind can
be fully opened and closed again.
XIf this is not the case, repeat the steps above.
Panorama roof with power tilt/sliding panel87
Opening and closing
Z
Page 91 of 318

Correct driver's seat position
GWARNING
You could lose control of your vehicle if you do the following while driving:
Radjust the driver's seat, head restraint,
steering wheel or mirrors
Rfasten the seat belt
There is a risk of an accident.
Adjust the driver's seat, head restraint, steer-
ing wheel and mirror and fasten your seat belt before starting the engine.
Observe the following when adjusting steering
wheel :, seat belt ;and driver's seat =:
Ryou are as far away from the driver's air bag as
possible
Ryou are sitting in a normal upright position
Ryour thighs are slightly supported by the seat
cushion
Ryour legs are not entirely stretched and you
can depress the pedals properly
Rthe back of your head is supported at eye level
by the center of the head restraint
Ryou can hold the steering wheel with your
arms slightly bent
Ryou can move your legs freely
Ryou can see all the displays in the instrument
cluster clearly
Ryou should have a good overview of traffic
conditions
Rthe seat belt is pulled snugly against the body and is routed across the center of your shoul-
der and across your hips in the pelvic area
Further related subjects:
RAdjusting the seats manually (Ypage 90)
RAdjusting the seats electrically
(Ypage 91)
RAdjusting the steering wheel manually
(Ypage 94)
RFastening the seat belt correctly
(Ypage 43)
RAdjusting the rear-view mirror and exterior
mirrors (Ypage 95)
RVehicles with a memory function: saving
the seat, steering wheel and exterior mirror
settings using the memory function
(
Ypage 97)
Seats
Important safety notes
GWARNING
Children could become trapped if they adjust
the seats, particularly when unattended.
There is a risk of injury.
When leaving the vehicle, always take the
SmartKey with you and lock the vehicle. Never
leave children unsupervised in the vehicle.
The seats can still be adjusted when there is no
SmartKey in the ignition lock.
GWARNING
When you adjust a seat, you or other vehicle
occupants could become trapped, e.g. on the seat guide rail. There is a risk of injury.
Make sure when adjusting a seat that no one
has any body parts in the sweep of the seat.
Observe the safety notes on "Air bags"
(
Ypage 44) and "Children in the vehicle"
(Ypage 53).
GWARNING
If the driver's seat is not engaged, it could
move unexpectedly while the vehicle is in
Seats89
Seats, steering wheel and mirrors
Z
Page 95 of 318

:Raises thebackrest contour
;Soften sth ebackrest contour
=Lowers th ebackrest contour
?Harden sth ebackrest contour
AMG Performance Seat
Vehicles wit helectrically adjustable seats: to
adjust th econtour of th eseat and for improve d
lateral support ,you can individually adjust th e
fron tseats.
Adjusting th esid ebolsters of th esea tcush -
ion
XTo set th esid ebolsters of th esea tcush -
ion narrower: press button:.
XTo set th esid ebolsters of th esea tcush -
ion wider: press butto n;.
Adjusting th esid ebolsters of th esea tback -
res t
XTo set th esid ebolsters of th esea tback -
res tnarrower: press butto n=.
XTo set th esid ebolsters of th esea tback -
res twider: press butto n?.
Switching the seat heating on/off
Switching on/off
GWARNIN G
Repeatedly switching on th eseat heating can
caus eth eseat cushion and backrest pads to
become ver yhot .The healt hof person swit h
limite dtemperature sensitivit yor alimite d
abilit yto reac tto excessively high tempera-
tures may be affecte dor they may eve nsuffer
burn-like injuries. There is aris kof injury.
Therefore ,do no tswitch th eseat heating on
repeatedly.
The three red indicator lamp sin th ebutto nindi-
cat eth eheating level you hav eselected.
The system automatically switches down from
level 3to level 2after approximately eigh t
minutes.
The system automatically switches down from
level 2to level 1after approximately te n
minutes.
The system automatically switches off approx -
imately 20 minute safter it is set to level 1.
XTurn theSmartKey to position 1or 2in th e
ignition loc k (Ypage 121).
XTo switch on: press button: repeatedly
until th edesired heating level is set .
XTo switch off:press butto n: repeatedly
until all th eindicator lamp sgo out .
iIf thebattery voltag eis to olow, th eseat
heating may switch off .
Seats93
Seats, steering wheel and mirrors
Z
Page 96 of 318
Problems with the seat heating
ProblemPossible causes/consequences andMSolutions
The seat heating has
switched off prematurely
or cannot be switched
on.The on-board voltage is too low because too many electrical consum-
ers are switched on.
XSwitch off electrical consumers that you do not need, such as the
rear window defroster or interior lighting.
Once the battery is sufficiently charged, the seat heating will switch
back on automatically.
Steering wheel
Important safety notes
GWARNING
You could lose control of your vehicle if you do the following while driving:
Radjust the driver's seat, head restraint,
steering wheel or mirrors
Rfasten the seat belt
There is a risk of an accident.
Adjust the driver's seat, head restraint, steer-
ing wheel and mirror and fasten your seat belt before starting the engine.
GWARNING
Children could injure themselves if they
adjust the steering wheel. There is a risk of
injury.
When leaving the vehicle, always take the
SmartKey with you and lock the vehicle. Never
leave children unsupervised in the vehicle.
Adjusting the steering wheel
GWARNING
If the steering wheel is unlocked while the
vehicle is in motion, it could change position
unexpectedly. This could cause you to lose
control of the vehicle. There is a risk of an
accident.
Before starting off, make sure the steering
wheel is locked. Never unlock the steering
wheel while the vehicle is in motion.
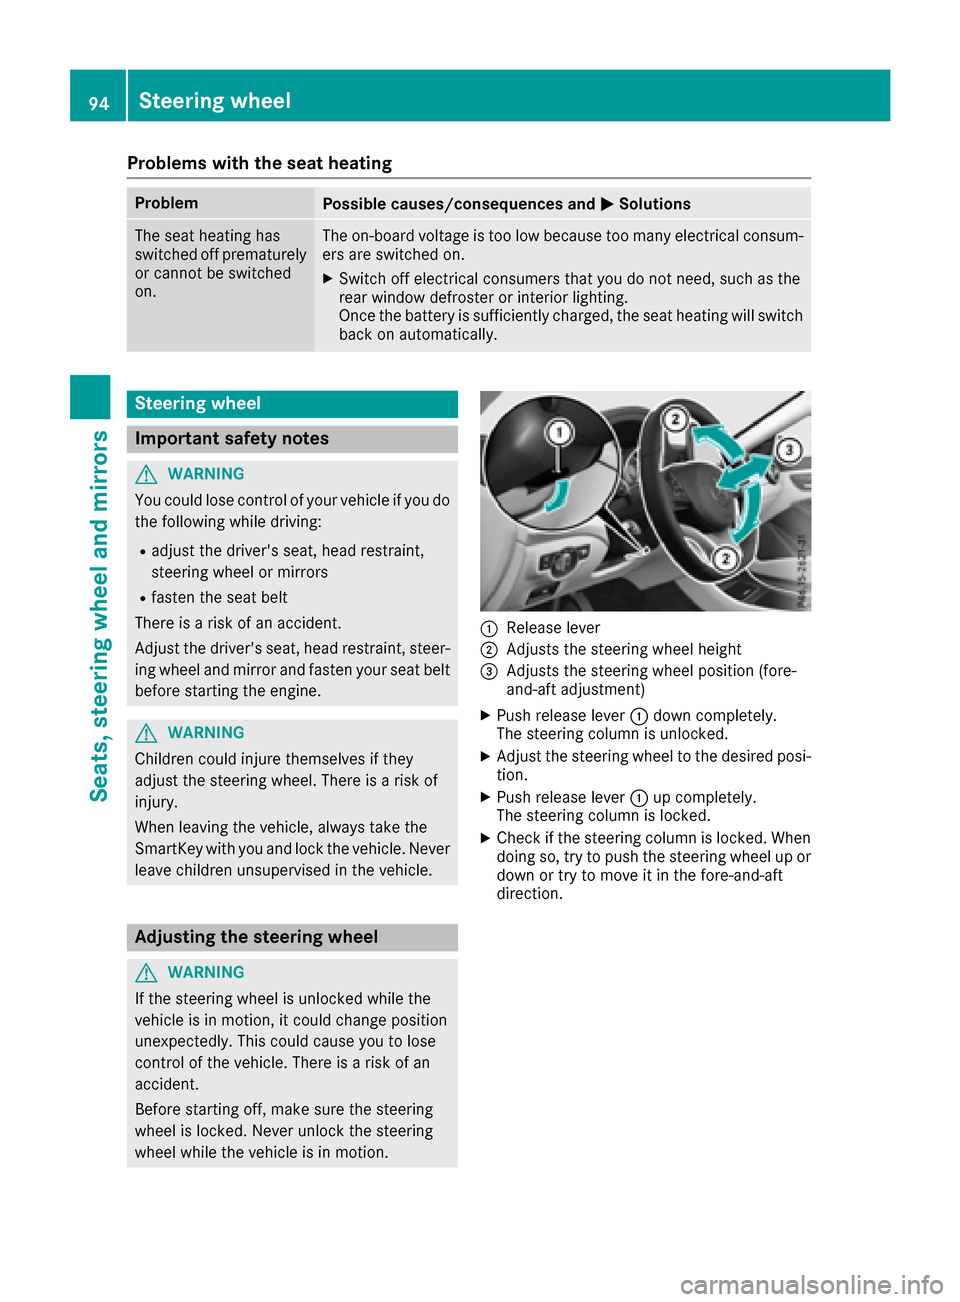
:Release lever
;Adjusts the steering wheel height
=Adjusts the steering wheel position (fore-
and-aft adjustment)
XPush release lever :down completely.
The steering column is unlocked.
XAdjust the steering wheel to the desired posi-
tion.
XPush release lever :up completely.
The steering column is locked.
XCheck if the steering column is locked. When
doing so, try to push the steering wheel up or down or try to move it in the fore-and-aft
direction.
94Steering wheel
Seats, steering wheel and mirrors
Page 97 of 318
Mirrors
Rear-view mirror
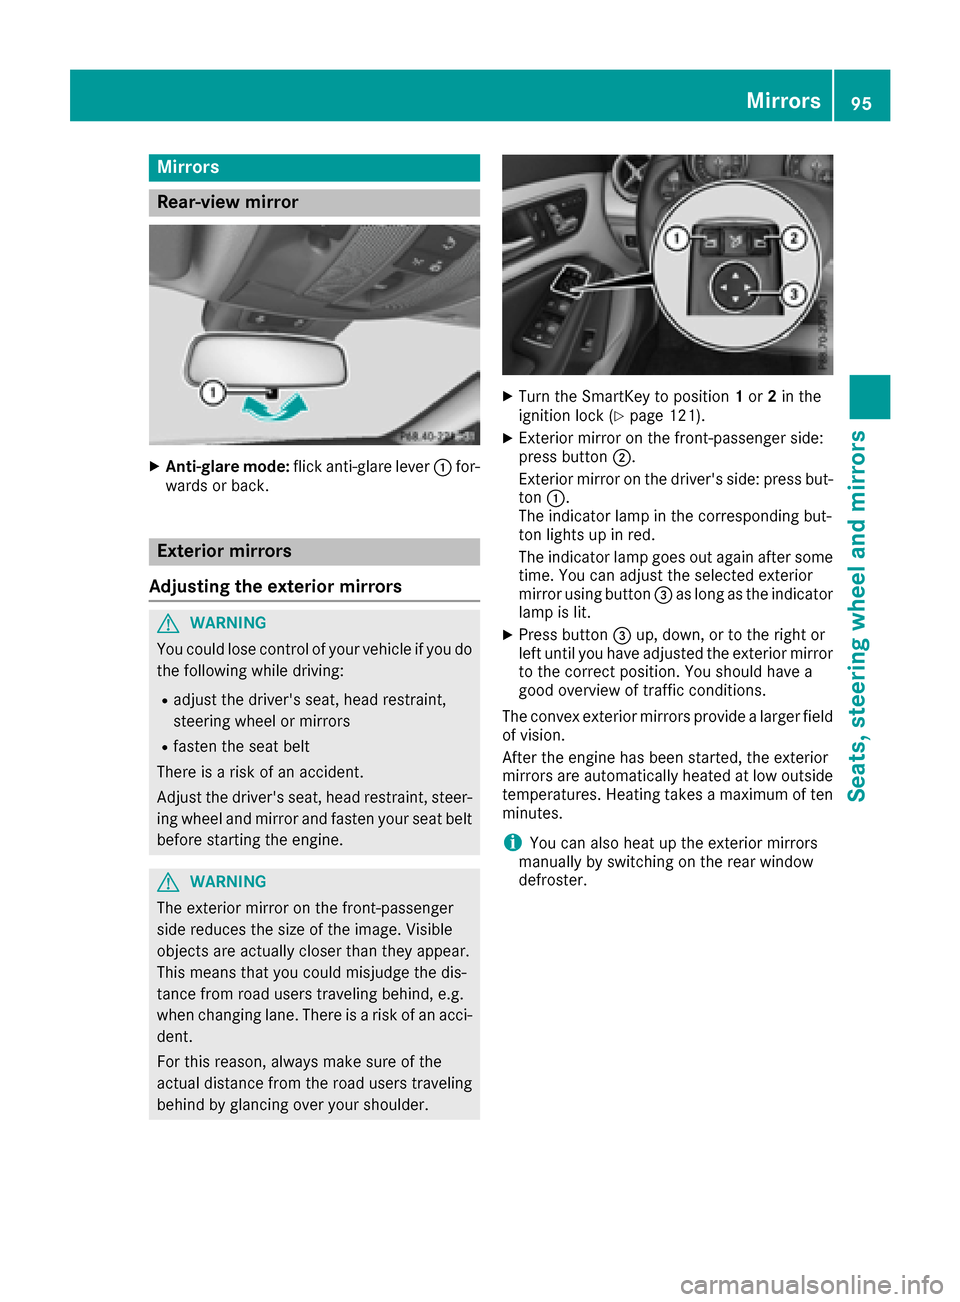
XAnti-glare mode:flick anti-glare lever :for-
wards or back.
Exterior mirrors
Adjusting the exterior mirrors
GWARNING
You could lose control of your vehicle if you do the following while driving:
Radjust the driver's seat, head restraint,
steering wheel or mirrors
Rfasten the seat belt
There is a risk of an accident.
Adjust the driver's seat, head restraint, steer-
ing wheel and mirror and fasten your seat belt before starting the engine.
GWARNING
The exterior mirror on the front-passenger
side reduces the size of the image. Visible
objects are actually closer than they appear.
This means that you could misjudge the dis-
tance from road users traveling behind, e.g.
when changing lane. There is a risk of an acci-
dent.
For this reason, always make sure of the
actual distance from the road users traveling
behind by glancing over your shoulder.
XTurn the SmartKey to position 1or 2in the
ignition lock (Ypage 121).
XExterior mirror on the front-passenger side:
press button ;.
Exterior mirror on the driver's side: press but-
ton :.
The indicator lamp in the corresponding but-
ton lights up in red.
The indicator lamp goes out again after some
time. You can adjust the selected exterior
mirror using button =as long as the indicator
lamp is lit.
XPress button =up, down, or to the right or
left until you have adjusted the exterior mirror
to the correct position. You should have a
good overview of traffic conditions.
The convex exterior mirrors provide a larger field
of vision.
After the engine has been started, the exterior
mirrors are automatically heated at low outside temperatures. Heating takes a maximum of ten
minutes.
iYou can also heat up the exterior mirrors
manually by switching on the rear window
defroster.
Mirrors95
Seats, steering wheel and mirrors
Z
Page 98 of 318

Folding the exterior mirrors in or out
electrically
XTurn theSmartKey to position 1or 2in th e
ignition loc k (Ypage 121).
XBriefly press :.
Both exterio rmirror sfol din or out .
iMakesure that th eexterio rmirror sare
always folded out fully while driving .They
could otherwise vibrate .
iIf you are driving fasterthan 30 mph
(47 km/h), you can no longer fol din th eexte -
rio rmirrors.
Resetting the exterior mirrors
If th ebattery has been disconnected or com-
pletely discharged, th eexterio rmirror smust be
reset .The exterio rmirror swill otherwise no t
fol din when you select th e"Fold in mirror swhen
locking" function in th eon-board computer
(
Ypage 185).
XTurn th eSmartKey to position 1in th eignition
loc k (Ypage 121).
XBriefly press :.
Folding the exterior mirrors in or out
automatically
If the"Fold in mirror swhen locking" function is
activated in th eon-board computer
(
Ypage 185):
Rth eexterio rmirror sfol din automatically as
soo nas you loc kth evehicl efrom th eoutside .
Rtheexterio rmirror sfol dout again automati-
call yas soo nas you unlock th evehicl eand
then open th edriver' sor front-passenger
door .
iIf theexterio rmirror shave been folded in
manually, they do no tfol dout .
Exterior mirror pushed out of position
If an exterio rmirror has been pushed out of
position ,procee das follows :
XVehicles without electricall yfolding exte-
rior mirrors :mov eth eexterio rmirror int o
th ecorrect position manually.
XVehicles with electricall yfolding exterior
mirrors :press and hold mirror-foldin gbutto n
(
Ypage 96 )until you hear the mirror click into
place.
The mirror housing is engaged again and you
can adjust the exterior mirrors as usual
(
Ypage 95).
Automatic anti-glare mirrors
GWARNING
Electrolyte may escape if the glass in an auto-
matic anti-glare mirror breaks. The electrolyte
is harmful and causes irritation. It must not
come into contact with your skin, eyes, res-
piratory organs or clothing or be swallowed.
There is a risk of injury.
If you come into contact with the electrolyte,
observe the following:
RRinse off the electrolyte from your skin
immediately with water.
RImmediately rinse the electrolyte out of
your eyes thoroughly with clean water.
RIf the electrolyte is swallowed, immediately
rinse your mouth out thoroughly. Do not
induce vomiting.
RIf electrolyte comes into contact with your
skin or hair or is swallowed, seek medical
attention immediately.
RImmediately change out of clothing which
has come into contact with electrolyte.
RIf an allergic reaction occurs, seek medical
attention immediately.
The "Automatic anti-glare mirrors" function is
only available if the vehicle is equipped with the
"Mirrors package".
96Mirrors
Seats, steering wheel and mirrors
Page 99 of 318
The rear-view mirror and the exterior mirror on
the driver's side automatically go into anti-glare
mode if:
Rthe ignition is switched on and
Rincident light from headlamps strikes the sen-
sor in the rear-view mirror
The mirrors do not go into anti-glare mode if
reverse gear is engaged or if the interior lighting
is switched on.
Parking position for the exterior mir-
ror on the front-passenger side
Setting and storing the parking position
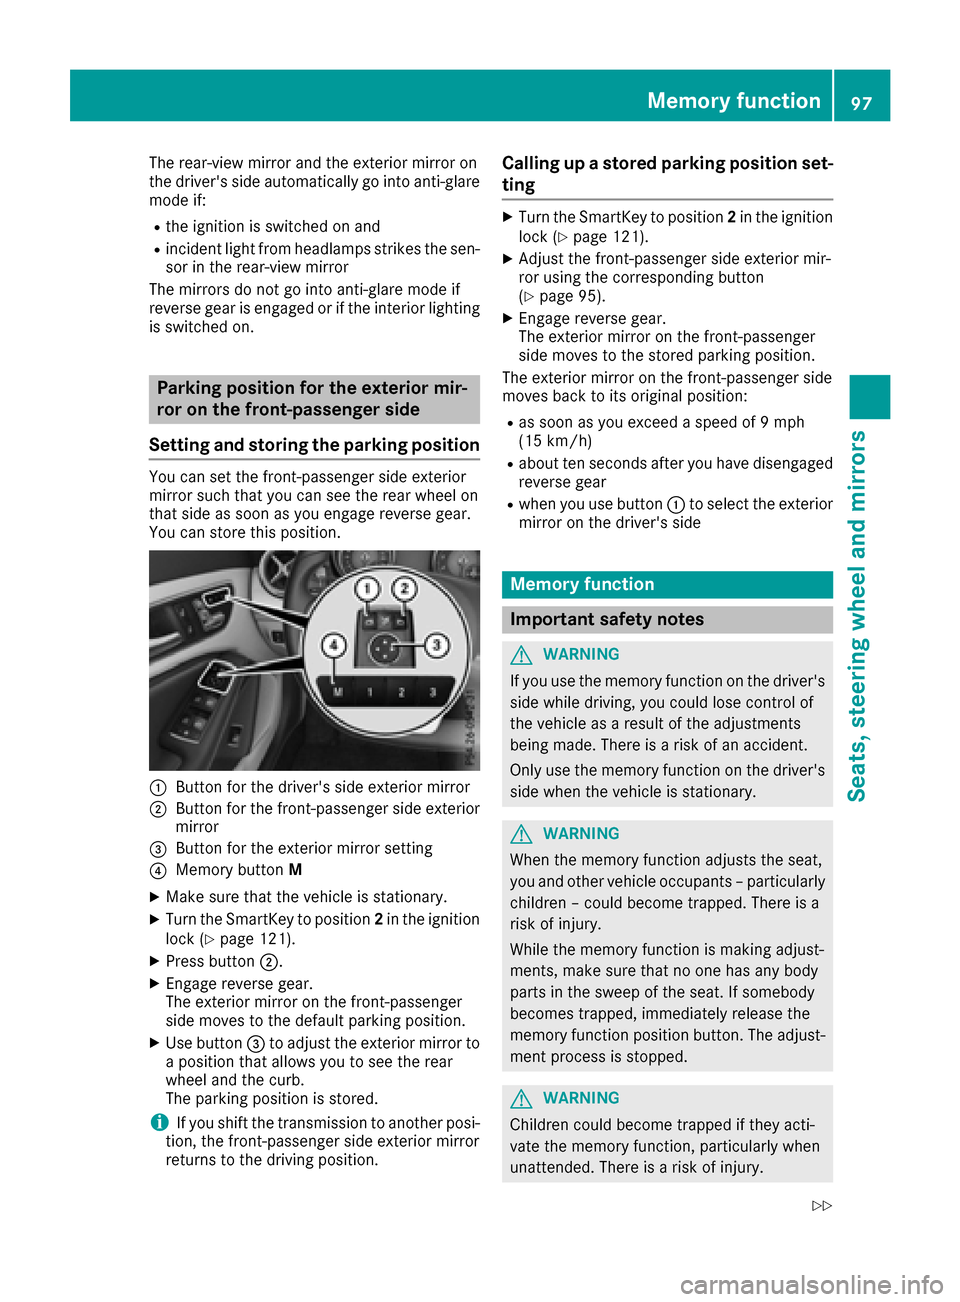
You can set the front-passenger side exterior
mirror such that you can see the rear wheel on
that side as soon as you engage reverse gear.
You can store this position.
:Button for the driver's side exterior mirror
;Button for the front-passenger side exterior
mirror
=Button for the exterior mirror setting
?Memory button M
XMake sure that the vehicle is stationary.
XTurn the SmartKey to position 2in the ignition
lock (Ypage 121).
XPress button ;.
XEngage reverse gear.
The exterior mirror on the front-passenger
side moves to the default parking position.
XUse button=to adjust the exterior mirror to
a position that allows you to see the rear
wheel and the curb.
The parking position is stored.
iIf you shift the transmission to another posi-
tion, the front-passenger side exterior mirror
returns to the driving position.
Calling up a stored parking position set-
ting
XTurn the SmartKey to position 2in the ignition
lock (Ypage 121).
XAdjust the front-passenger side exterior mir-
ror using the corresponding button
(
Ypage 95).
XEngage reverse gear.
The exterior mirror on the front-passenger
side moves to the stored parking position.
The exterior mirror on the front-passenger side
moves back to its original position:
Ras soon as you exceed a speed of 9 mph
(15 km/h)
Rabout ten seconds after you have disengaged
reverse gear
Rwhen you use button :to select the exterior
mirror on the driver's side
Memory function
Important safety notes
GWARNING
If you use the memory function on the driver's side while driving, you could lose control of
the vehicle as a result of the adjustments
being made. There is a risk of an accident.
Only use the memory function on the driver's
side when the vehicle is stationary.
GWARNING
When the memory function adjusts the seat,
you and other vehicle occupants – particularly
children – could become trapped. There is a
risk of injury.
While the memory function is making adjust-
ments, make sure that no one has any body
parts in the sweep of the seat. If somebody
becomes trapped, immediately release the
memory function position button. The adjust-
ment process is stopped.
GWARNING
Children could become trapped if they acti-
vate the memory function, particularly when
unattended. There is a risk of injury.
Memory function97
Seats, steering wheel and mirrors
Z
Page 100 of 318

When leaving the vehicle, always take the
SmartKey with you and lock the vehicle. Never
leave children unsupervised in the vehicle.
The memory function can be used at any time,
e.g. even when the SmartKey is not in the igni-
tion lock.
Storing settings
With the memory function, you can store up to
three different settings, e.g. for three different
people.
The following settings are stored as a single
memory preset:
Rseat and backrest position
Rdriver's side: position of the exterior mirrors
on the driver's and front-passenger sides
XAdjust the seat (Ypage 91).
XAdjust the exterior mirror on the driver's side
(Ypage 95).
XBriefly press the Mmemory button and then
press preset position button 1,2or 3within
three seconds.
The settings are stored in the selected preset
position. A tone sounds when the settings
have been completed.
Calling up a stored setting
XPress and hold the relevant preset position
button 1,2or 3until the seat and exterior
mirrors are in the stored position.
iThe setting procedure is interrupted as soon
as you release the storage position button.
98Memory function
Seats, steering wheel and mirrors
Page 101 of 318
Exterior lighting
General notes
For reasons of safety, Mercedes-Benz recom-
mends that you drive with the lights switched on
even during the daytime. In some countries,
operation of the headlamps varies due to legal
requirements and self-imposed obligations.
Setting the exterior lighting
Setting options
Exterior lighting can be set using the:
Rlight switch
Rcombination switch (Ypage 100)
Ron-board computer (Ypage 184)
Light switch
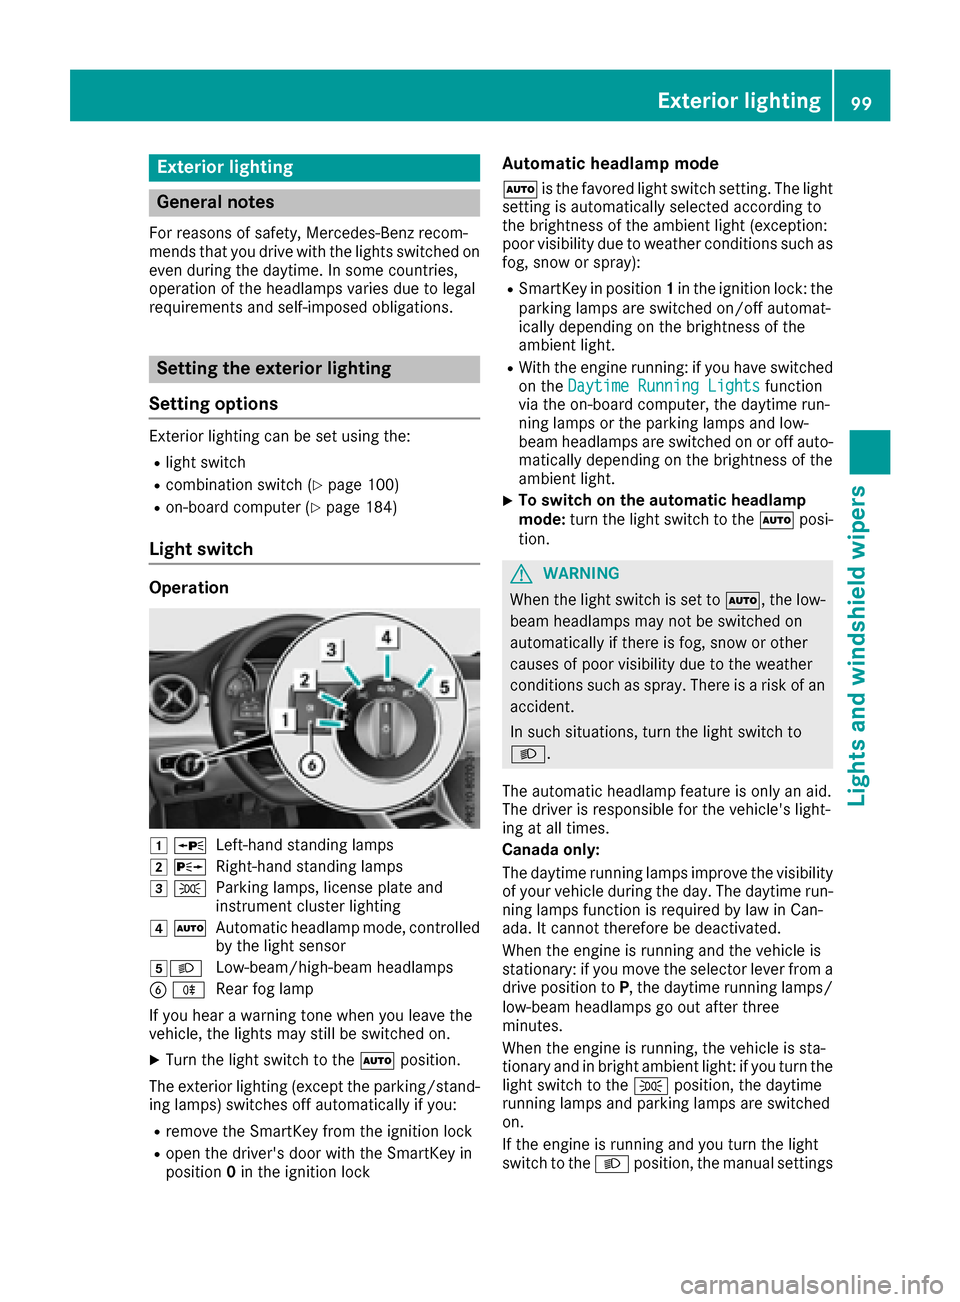
Operation
1 WLeft-hand standing lamps
2XRight-hand standing lamps
3TParking lamps, license plate and
instrument cluster lighting
4ÃAutomatic headlamp mode, controlled
by the light sensor
5LLow-beam/high-beam headlamps
B RRear fog lamp
If you hear a warning tone when you leave the
vehicle, the lights may still be switched on.
XTurn the light switch to the Ãposition.
The exterior lighting (except the parking/stand- ing lamps) switches off automatically if you:
Rremove the SmartKey from the ignition lock
Ropen the driver's door with the SmartKey in
position 0in the ignition lock
Automatic headlamp mode
à is the favored light switch setting. The light
setting is automatically selected according to
the brightness of the ambient light (exception:
poor visibility due to weather conditions such as
fog, snow or spray):
RSmartKey in position 1in the ignition lock: the
parking lamps are switched on/off automat-
ically depending on the brightness of the
ambient light.
RWith the engine running: if you have switched
on the Daytime Running Lightsfunction
via the on-board computer, the daytime run-
ning lamps or the parking lamps and low-
beam headlamps are switched on or off auto-
matically depending on the brightness of the
ambient light.
XTo switch on the automatic headlamp
mode: turn the light switch to the Ãposi-
tion.
GWARNING
When the light switch is set to Ã, the low-
beam headlamps may not be switched on
automatically if there is fog, snow or other
causes of poor visibility due to the weather
conditions such as spray. There is a risk of an
accident.
In such situations, turn the light switch to
L.
The automatic headlamp feature is only an aid.
The driver is responsible for the vehicle's light-
ing at all times.
Canada only:
The daytime running lamps improve the visibility
of your vehicle during the day. The daytime run-
ning lamps function is required by law in Can-
ada. It cannot therefore be deactivated.
When the engine is running and the vehicle is
stationary: if you move the selector lever from a
drive position to P, the daytime running lamps/
low-beam headlamps go out after three
minutes.
When the engine is running, the vehicle is sta-
tionary and in bright ambient light: if you turn the
light switch to the Tposition, the daytime
running lamps and parking lamps are switched
on.
If the engine is running and you turn the light
switch to the Lposition, the manual settings
Exterior lighting99
Lights and windshield wipers
Z