brake fluid MERCEDES-BENZ CLA-Class 2017 C117 Owner's Manual
[x] Cancel search | Manufacturer: MERCEDES-BENZ, Model Year: 2017, Model line: CLA-Class, Model: MERCEDES-BENZ CLA-Class 2017 C117Pages: 318, PDF Size: 8.02 MB
Page 8 of 318
Blootooth®
Connecting a different mobile
phone ............................................ 232
Bluetooth
®
Searching for a mobile phone ........ 231
see also Digital Operator's Man-
ual .................................................. 227
Telephony ...................................... 230
Brake Assist
see BAS (Brake Assist System)
Brake fluid
Display message ............................ 194
Notes ............................................. 312
Brake force distribution
see EBD (electronic brake force
distribution)
Brake lamp
Replacing bulbs ............................. 105
Brake lamps
Display message ............................ 199
Brakes
ABS .................................................. 60
BAS .................................................. 60
Brake fluid (notes) ......................... 312
Braking assistance appropriate to
the situation ..................................... 62
Display message ............................ 189
EBD .................................................. 66
Hill start assist ............................... 124
HOLD function ............................... 156
Important safety notes .................. 145
Maintenance .................................. 146
Parking brake ................................ 141
Riding tips ...................................... 145
Warning lamp ................................. 217
Braking assistance appropriate to
the situation
Function/notes ................................ 62
Breakdown
Where will I find...? ........................ 266
see Flat tire
see Tow-starting
see Towing away
Buttons on the steering wheel ......... 175
C
California
Important notice for retail cus-
tomers and lessees .......................... 24
Calling up a malfunction
see Display messages
Car
see Vehicle
Care
Car wash ........................................ 259
Carpets .......................................... 265
Display ........................................... 263
Exhaust pipe .................................. 263
Exterior lights ................................ 262
Gear or selector lever .................... 264
Interior ........................................... 263
Matte finish ................................... 261
Notes ............................................. 259
Paint .............................................. 260
Plastic trim .................................... 263
Power washer ................................ 260
Rear view camera .......................... 262
Roof lining ...................................... 265
Seat belt ........................................ 264
Seat cover ..................................... 264
Sensors ......................................... 262
Steering wheel ............................... 264
Trim pieces .................................... 264
Washing by hand ........................... 260
Wheels ........................................... 261
Windows ........................................ 261
Wiper blades .................................. 262
Wooden trim .................................. 264
Cargo compartment enlargement ... 236
Cargo tie down rings ......................... 237
CD
see also Digital Operator's Man-
ual .................................................. 227
CD player (on-board computer) ........ 180
Center console
Lower section .................................. 35
Upper section .................................. 34
Central locking
Automatic locking (on-board com-puter) ............................................. 184
Locking/unlocking (SmartKey) ........ 69
Change of address .............................. 25
6Index
Page 18 of 318
Turn signals (front) .........................105
Turn signals (rear) .......................... 105
Reporting safety defects .................... 27
Rescue card ......................................... 28
Reserve (fuel tank)
see Fuel
Reserve fuel
Display message ............................ 204
Warning lamp ................................. 222
see Fuel
Residual heat (climate control) ........118
Restraint system
Display message ............................ 195
Introduction ..................................... 39
Warning lamp ................................. 222
Warning lamp (function) ................... 40
Reverse gear (selector lever) ........... 131
Reversing feature
Panorama sliding sunroof ................ 85
Roller sunblind ................................. 86
Side windows ................................... 81
Roadside Assistance (breakdown) .... 25
Roller sunblind
Panorama roof with power tilt/
sliding panel ..................................... 86
Roof carrier ........................................ 238
Roof lining and carpets (cleaning
guidelines) ......................................... 265
Roof load (maximum) ........................ 314
Route guidance
see also Digital Operator's Man-
ual ..................................................2 27
S
Safety
Children in the vehicle ..................... 53
see Occupant safety
Safety system
see Driving safety systems
SD card
Inserting ........................................ 232
Inserting/removing ........................ 232
Removing ....................................... 232
SD memory card
see also Digital Operator's Man-
ual ..................................................2 27Search & Send
see also Digital Operator's Man-
ual ..................................................2 27
Seat belts
Adjusting the height ......................... 43
Cleaning ......................................... 264
Correct usage .................................. 42
Fastening ......................................... 43
Important safety guidelines ............. 41
Introduction ..................................... 40
Releasing ......................................... 43
Warning lamp ................................. 216
Warning lamp (function) ................... 43
Seats
Adjusting (electrically) ..................... 91
Adjusting (manually) ........................ 90
Adjusting (Performance Seat) .......... 93
Adjusting the 4-way lumbar sup-
port ..................................................9 2
Adjusting the head restraint ............ 91
Cleaning the cover ......................... 264
Correct driver's seat position ........... 89
Folding the backrest (rear com-
partment) forwards/back .............. 236
Important safety notes .................... 89
Seat heating problem ...................... 94
Storing settings (memory func-
tion) ................................................. 98
Switching seat heating on/off ......... 93
Securing cargo .................................. 237
Selector lever
Cleaning ......................................... 264
Sensors (cleaning instructions) ....... 262
Service menu (on-board com-
puter) .................................................. 183
Service message
see ASSYST PLUS
Service products
Brake fluid ..................................... 312
Coolant (engine) ............................ 312
Eng
ine oil ....................................... 311
Fuel ................................................ 309
Important safety notes .................. 309
Refrigerant (air-conditioning sys-
tem) ............................................... 313
Washer fluid ................................... 313
Setting the air distribution ............... 115
16Index
Page 23 of 318
Vehicle dimensions........................... 314
Vehicle emergency locking ................ 76
Vehicle identification number
see VIN
Vehicle identification plate .............. 308
Vehicle tool kit .................................. 266
Ventilation
Setting the vents ........................... 119
Video
Operating the DVD ......................... 180
see also Digital Operator's Man-
ual .................................................. 227
VIN
Seat ............................................... 309
Type plate ...................................... 308
W
Warning and indicator lampsABS ................................................ 218
Active Brake Assist ........................ 225
Brakes ........................................... 217
Check Engine ................................. 222
Coolant .......................................... 223
Distance warning ........................... 225
ESP
®.............................................. 219
ESP®OFF ....................................... 220
Fuel tank ........................................ 222
Overview .......................................... 32
PASSENGER AIR BAG ...................... 40
Reserve fuel ................................... 222
Restraint system ............................ 222
Seat belt ........................................ 216
SPORT handling mode ................... 220
Tire pressure monitor .................... 226
Warranty .............................................. 24
Washer fluid
Display message ............................ 214
Weather display (COMAND)
see also Digital Operator's Man-
ual .................................................. 227
Wheel and tire combinations
Tires ............................................... 306
Wheel bolt tightening torque ........... 305
Wheel chock ...................................... 302
Wheels
Changing a wheel .......................... 301
Checking ........................................ 282 Cleaning ......................................... 261
Important safety notes .................. 282
Information on driving .................... 282
Interchanging/changing ................ 301
Mounting a new wheel ................... 304
Removing a wheel .......................... 304
Storing ........................................... 302
Tightening torque ........................... 305
Wheel size/tire size ....................... 306
Window curtain air bag
Display message ............................ 196
Operation ......................................... 46
Windows
see Side windows
Windshield
Defrosting ...................................... 116
Windshield washer system
Adding washer fluid ....................... 257
Important safety notes .................. 313
Windshield wipers
Display message ............................ 214
Problem (malfunction) ................... 108
Replacing the wiper blades ............ 107
Switching on/off ........................... 106
Winter driving
Slippery road surfaces ................... 147
Snow chains .................................. 285
Winter operation
General notes ................................ 284
Winter tires
M+S tires ....................................... 284
Wiper blades
Cleaning ......................................... 262
Imp
ortant safety notes .................. 107
Wooden trim (cleaning instruc-
tions) .................................................. 264
Workshop
see Qualified specialist workshop
Z
ZONE functionSwitching on/off ........................... 116
Index21
Page 30 of 318
The following text is reproduced as required of
all manufacturers under Title 49, Code of U.S.
Federal Regulations, Part 575 pursuant to the
National Traffic and Motor Vehicle Safety Act of
1966.
If you believe that your vehicle has a defect
which could cause a crash or could cause injury
or death, you should immediately inform the
National Highway Traffic Safety Administration
(NHTSA) in addition to notifying Mercedes-Benz USA, LLC.
If NHTSA receives similar complaints, it may
open an investigation, and if it finds that a safety
defect exists in a group of vehicles, it may order
a recall and remedy campaign. However, NHTSA
cannot become involved in individual problems
between you, your dealer, or Mercedes-Benz
USA, LLC.
To contact NHTSA, you may call the Vehicle
Safety Hotline toll-free at 1-888-327-4236
(TTY: 1-800-424-9153); go tohttp://
www.safercar.gov; or write to: Administrator,
NHTSA, 400 Seventh Street, SW., Washington,
DC 20590.
You can also obtain other information about
motor vehicle safety from
http://www.safercar.gov
Limited Warranty
!
Follow the instructions in this manual about
the proper operation of your vehicle as well as
about possible vehicle damage. Damage to
your vehicle that arises from culpable contra-
ventions against these instructions is not cov-
ered either by the Mercedes-Benz Limited
Warranty or by the New or Used-Vehicle War-
ranty.
QR codes for the rescue card
The QR codes are secured in the fuel filler flap
and on the opposite side on the B-pillar. In the
event of an accident, rescue services can use
the QR code to quickly find the appropriate res-
cue card for your vehicle. The current rescue
card contains the most important information
about your vehicle in a compact form, e.g. the
routing of the electric cables.
You can find more information under
www.mercedes-benz.de/qr-code.
Data stored in the vehicle
Data storage
A wide range of electronic components in your
vehicle contain data memories.
These data memories temporarily or perma-
nently store technical information about:
Rthe vehicle's operating state
Rincidents
Rmalfunctions
In general, this technical information docu-
ments the state of a component, a module, a
system or the surroundings.
These include, for example:
Roperating conditions of system components,
e.g. fluid levels
Rthe vehicle's status messages and those of its
individual components, e.g. number of wheel
revolutions/speed, deceleration in move-
ment, lateral acceleration, accelerator pedal
position
Rmalfunctions and defects in important system
components, e.g. lights, brakes
Rvehicle reactions and operating conditions in
special driving situations, e.g. air bag deploy-
ment, intervention of stability control sys-
tems
Rambient conditions, e.g. outside temperature
This data is of an exclusively technical nature
and can be used to:
Rassist in recognizing and rectifying malfunc-
tions and defects
Ranalyze vehicle functions, e.g. after an acci-
dent
Roptimize vehicle functions
The data cannot be used to trace the vehicle's
movements.
When your vehicle is serviced, technical infor-
mation can be read from the event data memory
and malfunction data memory.
Services include, for example:
Rrepair services
Rservice processes
Rwarranties
Rquality assurance
The vehicle is read out by employees of the ser-
vice network (including the manufacturer) using special diagnostic testers. More detailed infor-
mation is obtained from it, if required.
28Data stored in the vehicle
Introduction
Page 108 of 318
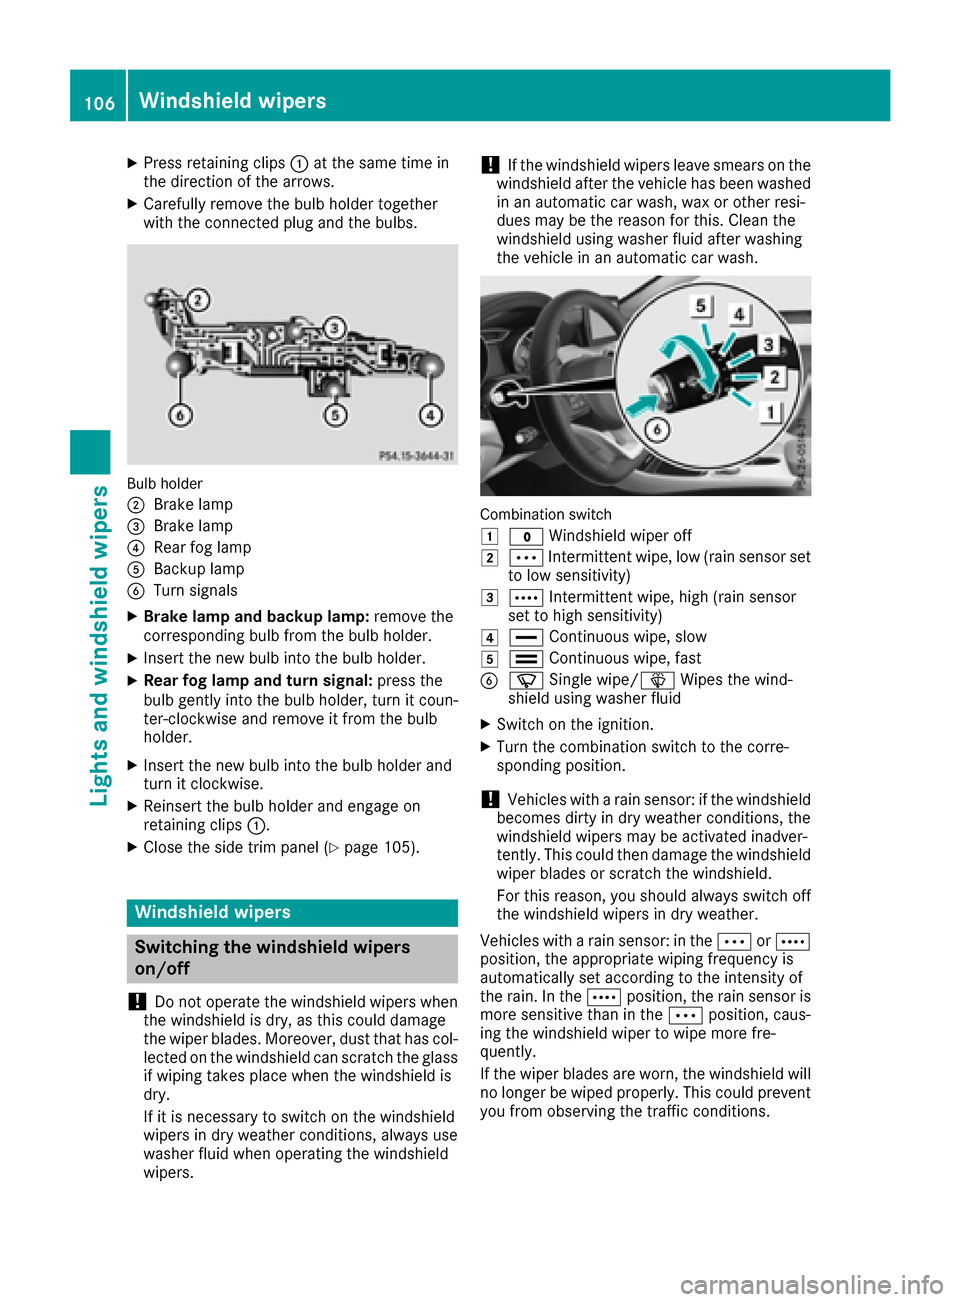
XPress retaining clips:at the same time in
the direction of the arrows.
XCarefully remove the bulb holder together
with the connected plug and the bulbs.
Bulb holder
;
Brake lamp
=Brake lamp
?Rear fog lamp
ABackup lamp
BTurn signals
XBrake lamp and backup lamp: remove the
corresponding bulb from the bulb holder.
XInsert the new bulb into the bulb holder.
XRear fog lamp and turn signal: press the
bulb gently into the bulb holder, turn it coun-
ter-clockwise and remove it from the bulb
holder.
XInsert the new bulb into the bulb holder and
turn it clockwise.
XReinsert the bulb holder and engage on
retaining clips :.
XClose the side trim panel (Ypage 105).
Windshield wipers
Switching the windshield wipers
on/off
!
Do not operate the windshield wipers when
the windshield is dry, as this could damage
the wiper blades. Moreover, dust that has col-
lected on the windshield can scratch the glass
if wiping takes place when the windshield is
dry.
If it is necessary to switch on the windshield
wipers in dry weather conditions, always use
washer fluid when operating the windshield
wipers.
!If the windshield wipers leave smears on the
windshield after the vehicle has been washed
in an automatic car wash, wax or other resi-
dues may be the reason for this. Clean the
windshield using washer fluid after washing
the vehicle in an automatic car wash.
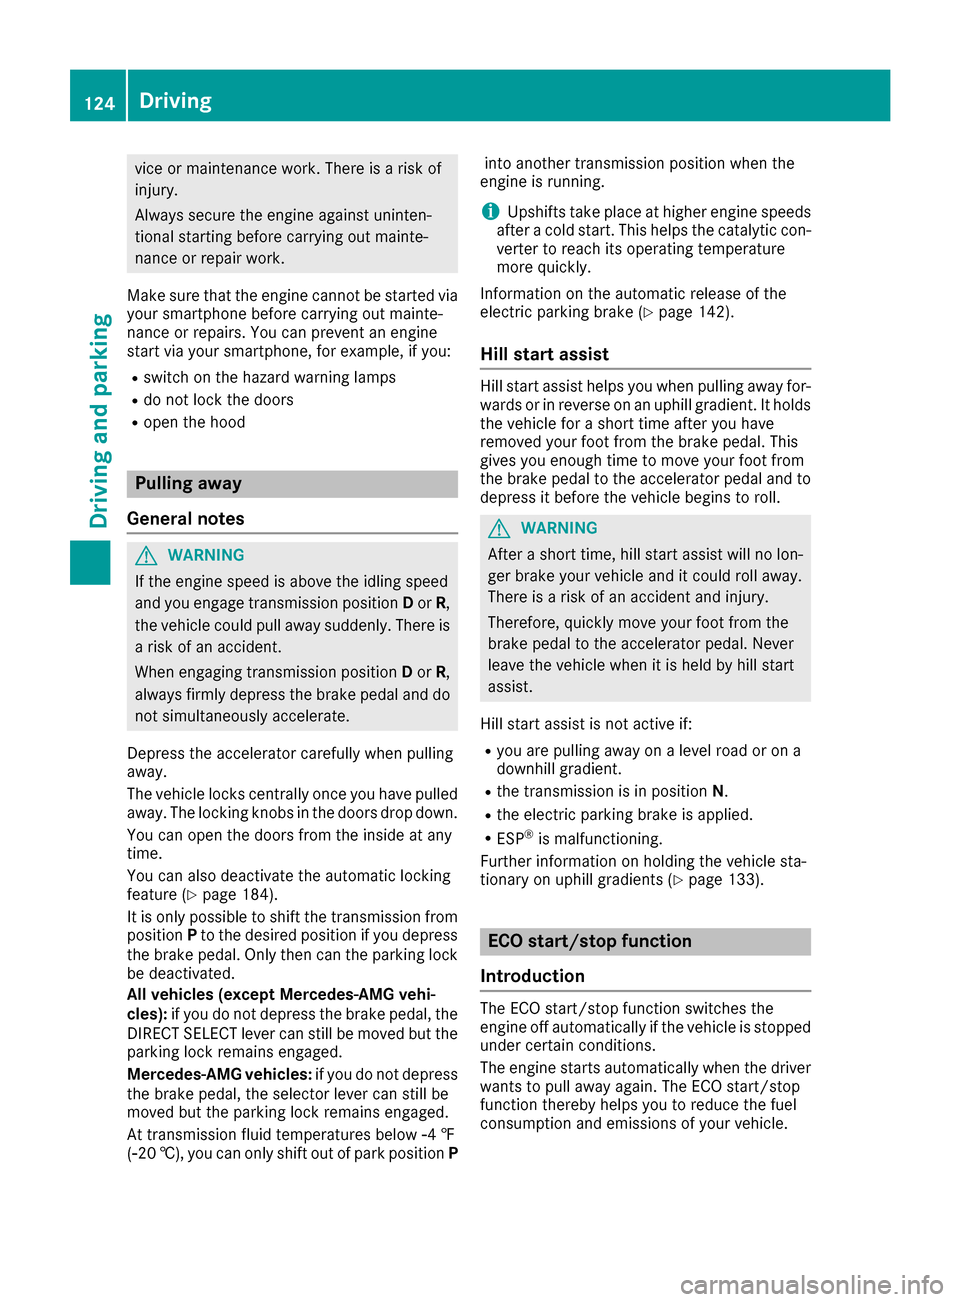
Combination switch
1
$ Windshield wiper off
2ÄIntermittent wipe, low (rain sensor set
to low sensitivity)
3Å Intermittent wipe, high (rain sensor
set to high sensitivity)
4° Continuous wipe, slow
5¯Continuous wipe, fast
BíSingle wipe/î Wipes the wind-
shield using washer fluid
XSwitch on the ignition.
XTurn the combination switch to the corre-
sponding position.
!Vehicles with a rain sensor: if the windshield
becomes dirty in dry weather conditions, the
windshield wipers may be activated inadver-
tently. This could then damage the windshield
wiper blades or scratch the windshield.
For this reason, you should always switch off
the windshield wipers in dry weather.
Vehicles with a rain sensor: in the ÄorÅ
position, the appropriate wiping frequency is
automatically set according to the intensity of
the rain. In the Åposition, the rain sensor is
more sensitive than in the Äposition, caus-
ing the windshield wiper to wipe more fre-
quently.
If the wiper blades are worn, the windshield will
no longer be wiped properly. This could prevent
you from observing the traffic conditions.
106Windshield wipers
Lights and windshield wipers
Page 126 of 318
vice or maintenance work. There is a risk of
injury.
Always secure the engine against uninten-
tional starting before carrying out mainte-
nance or repair work.
Make sure that the engine cannot be started via
your smartphone before carrying out mainte-
nance or repairs. You can prevent an engine
start via your smartphone, for example, if you:
Rswitch on the hazard warning lamps
Rdo not lock the doors
Ropen the hood
Pulling away
General notes
GWARNING
If the engine speed is above the idling speed
and you engage transmission position Dor R,
the vehicle could pull away suddenly. There is
a risk of an accident.
When engaging transmission position Dor R,
always firmly depress the brake pedal and do not simultaneously accelerate.
Depress the accelerator carefully when pulling
away.
The vehicle locks centrally once you have pulled
away. The locking knobs in the doors drop down.
You can open the doors from the inside at any
time.
You can also deactivate the automatic locking
feature (
Ypage 184).
It is only possible to shift the transmission from
position Pto the desired position if you depress
the brake pedal. Only then can the parking lock
be deactivated.
All vehicles (except Mercedes-AMG vehi-
cles): if you do not depress the brake pedal, the
DIRECT SELECT lever can still be moved but the
parking lock remains engaged.
Mercedes-AMG vehicles: if you do not depress
the brake pedal, the selector lever can still be
moved but the parking lock remains engaged.
At transmission fluid temperatures below Ò4 ‡
(Ò20 †), you can only shift out of park position Pinto another transmission position when the
engine is running.
iUpshifts take place at higher engine speeds
after a cold start. This helps the catalytic con-
verter to reach its operating temperature
more quickly.
Information on the automatic release of the
electric parking brake (
Ypage 142).
Hill start assist
Hill start assist helps you when pulling away for-
wards or in reverse on an uphill gradient. It holds
the vehicle for a short time after you have
removed your foot from the brake pedal. This
gives you enough time to move your foot from
the brake pedal to the accelerator pedal and to
depress it before the vehicle begins to roll.
GWARNING
After a short time, hill start assist will no lon-
ger brake your vehicle and it could roll away.
There is a risk of an accident and injury.
Therefore, quickly move your foot from the
brake pedal to the accelerator pedal. Never
leave the vehicle when it is held by hill start
assist.
Hill start assist is not active if:
Ryou are pulling away on a level road or on a
downhill gradient.
Rthe transmission is in position N.
Rthe electric parking brake is applied.
RESP®is malfunctioning.
Further information on holding the vehicle sta-
tionary on uphill gradients (
Ypage 133).
ECO start/stop function
Introduction
The ECO start/stop function switches the
engine off automatically if the vehicle is stopped
under certain conditions.
The engine starts automatically when the driver
wants to pull away again. The ECO start/stop
function thereby helps you to reduce the fuel
consumption and emissions of your vehicle.
124Driving
Driving and parking
Page 132 of 318
At transmission fluid temperatures belowÒ4 ‡
( Ò20†), you can only shift out of park position P
into another transmission position when the
engine is running.
In order to shift from park position Pdirectly into
R or D:
Rdepress the brake pedal and
Rpush the DIRECT SELECT lever up or down
past the first point of resistance
Engaging park position P automatically
Park position Pis automatically engaged if:
Ryou switch off the engine using the SmartKey
and remove the SmartKey
Ryou switch off the engine using the SmartKey
or using the Start/Stop button and open the
driver's door or front-passenger door
Ryou open the driver's door when the vehicle is
stationary or when driving at a very low speed
and the transmission is in position Dor R
Under certain conditions, the automatic trans-
mission shifts automatically to transmission
position Pif the HOLD function or Distance Pilot
DISTRONIC is activated. Observe the informa-
tion on the HOLD function (
Ypage 156) and on
Distance Pilot DISTRONIC (Ypage 153).
Engaging reverse gear R
!Only shift the automatic transmission to R
when the vehicle is stationary.
XDepress the brake and keep it pressed.
XPush the DIRECT SELECT lever up past the
first point of resistance.
The ECO start/stop function is not available
when reverse gear is engaged. Further informa-
tion on the ECO start/stop function
(
Ypage 125).
Shifting to neutral N
GWARNING
If children are left unsupervised in the vehicle,
they could:
Ropen the doors, thus endangering other
people or road users.
Rget out and disrupt traffic.
Roperate the vehicle's equipment.
Additionally, children could set the vehicle in
motion if, for example, they:
Rrelease the parking brake.
Rshifting the automatic transmission out of
park position P
RStart the engine.
There is a risk of an accident and injury.
When leaving the vehicle, always take the
SmartKey with you and lock the vehicle. Never
leave children or animals unattended in the
vehicle. Always keep the SmartKey out of
reach of children.
XIf the transmission is in position Dor R: push
the DIRECT SELECT lever up or down to the
first point of resistance.
XIf the transmission is in position P: depress
the brake pedal and push the DIRECT SELECT lever up or down to the first point of resist-
ance.
If you switch the engine off with the transmis-
sion in position Ror D, the automatic transmis-
sion shifts to Nautomatically.
With the SmartKey: if you then open the driv-
er's door or the front-passenger door or remove the SmartKey from the ignition, the automatic
transmission shifts to Pautomatically.
With the Start/Stop button: if you then open
the driver's door or the front-passenger door,
the automatic transmission shifts to Pautomat-
ically.
If you want the automatic transmission to
remain in neutral N,e.g. w
hen having the vehicle
cleaned in an automatic car wash with a towing system:
XVehicles with the Start-Stop button:
remove the Start-Stop button from the igni-
tion lock.
XInsert the SmartKey into the ignition lock.
XAll vehicles: switch the ignition on.
XDepress the brake pedal and keep it
depressed.
XShift to neutral N.
XRelease the brake pedal.
XRelease the electric parking brake.
XSwitch off the ignition and leave the SmartKey
in the ignition lock.
130Automatic transmission
Driving and parking
Page 148 of 318

Limited braking performance on salt-
treated roads
If you drive on salted roads, a layer of salt resi-
due may form on the brake discs and brake
pads. This can result in a significantly longer
braking distance.
RIn order to prevent any salt build-up, apply the
brakes occasionally while paying attention to the traffic conditions.
RCarefully depress the brake pedal and the
beginning and end of a journey.
RMaintain a greater distance to the vehicle
ahead.
Servicing the brakes
!The brake fluid level may be too low, if:
Rif the red brake warning lamp lights up in
the instrument cluster and
Ryou hear a warning tone while the engine is
running
Observe additional warning messages in the
multifunction display.
The brake fluid level may be too low due to
brake pad wear or leaking brake lines.
Have the brake system checked immediately.
Consult a qualified specialist workshop to
arrange this.
!A function or performance test should only
be carried out on a 2-axle dynamometer. If
you wish to operate the vehicle on such a
dynamometer, please consult a qualified spe- cialist workshop in advance. You could oth-
erwise damage the drive train or the brake
system.
!As the ESP®system operates automatically,
the engine and the ignition must be switched
off (the SmartKey must be in position 0or 1in
the ignition lock) if:
Rthe electric parking brake is tested on a
brake dynamometer (for a maximum of
ten seconds)
Rthe vehicle is towed with the front axle
raised.
Braking triggered automatically by ESP
®may
seriously damage the brake system.
All checks and maintenance work on the brake
system must be carried out at a qualified spe-
cialist workshop. Have brake pads installed and brake fluid
replaced at a qualified specialist workshop.
If the brake system has only been subject to
moderate loads, you should test the functional-
ity
of your brakes at regular in
tervals.
You can find a description of Brake Assist (BAS)
on (
Ypage 60).
Mercedes-Benz recommends that you only have
brake pads/linings installed on your vehicle
which have been approved for Mercedes-Benz
vehicles or which correspond to an equivalent
quality standard. Brake pads/linings which have
not been approved for Mercedes-Benz vehicles
or which are not of an equivalent quality could
affect your vehicle's operating safety.
Mercedes-Benz recommends that you only use
brake fluid that has been specially approved for
your vehicle by Mercedes-Benz, or which corre-
sponds to an equivalent quality standard. Brake
fluid which has not been approved for
Mercedes-Benz vehicles or which is not of an
equivalent quality could affect your vehicle's
operating safety.
Checking brake lining thickness
You can measure the break pad/lining thick-
ness using a test gage. Color-coding (green or
red) on the test gage allows you to determine
whether the brake pad/lining thickness is still
sufficient. The test gage is in the vehicle docu-
ment wallet in the glove box.
Front wheel
146Driving tips
Driving and parking
Page 196 of 318
Display messagesPossible causes/consequences andMSolutions
The yellow!warning lamp lights up and th ered F (USAonly)
or ! (Canada only) indicator lamp flashes .
It is no tpossibl eto apply th eelectric parking brak emanually.
XShift th etransmission to position P.
XVisitaqualified specialist workshop .
$(USA
only)
J( Canada
only)
Check Brake Fluid
Level
There is no tenough brak efluid in th ebrak efluid reservoir .
A warning tone sounds. The $(USAonly) or J(Canada only)
warning lamp sin th einstrumen tcluste rmay also ligh tup.
GWARNIN G
The braking effec tmay be impaired.
There is aris kof an accident.
XPull ove rand stop th evehicl esafely as soo nas possible, payin g
attention to roa dand traffic conditions. Do no tcontinu edrivin g
under any circumstances.
XSecur eth evehicl eagainst rollin gaway (Ypage 140).
XConsult aqualified specialist workshop .
XDo notadd brak efluid .This does no tcorrec tth emalfunction .
#
CheckBrakePadWear
The brak epads/linings hav ereached their wear limit.
XVisit aqualified specialist workshop .
G
Inoperative
Oneor mor emain features of th embrace system are malfunctioning .
XVisitaqualified specialist workshop .
ActiveBrakeAssistFunctionsCurrentlyLimitedSee Opera‐tor's Manual
Active Brake Assis tis temporarily inoperative.
Possibl ecauses are:
Rth eradar sensor system is temporarily inoperative, e.g. due to elec -
tromagneti cradiation emitted by nearby TV or radi ostation sor
other source sof electromagneti cradiation
Rth esystem is outside th eoperating temperature range
Rth eon-boar dvoltag eis to olow
Whe nth ecauses state dabov eno longer apply, th edisplay message
disappears.
Active Brake Assis tis operational again .
If th edisplay message does no tdisappear :
XPull overand stop th evehicl esafely as soo nas possible, payin g
attention to roa dand traffic conditions.
XSecur eth evehicl eagainst rollin gaway (Ypage 140).
XRestart th eengine.
Active BrakeAssist :SystemInop‐erative
Active Brake Assis tis unavailable due to amalfunction .Situation -
dependen tparking assistanc emay also hav efailed.
XVisit aqualified specialist workshop immediately.
194Display messages
On-board computer and displays
Page 213 of 318

Display messagesPossible causes/consequences andMSolutions
TirePress.Sen ‐sor(s) Missin gUSAonly:
There is no signal from th etire pressur esensor of on eor several
wheels. The pressur eof th eaffecte dtire does no tappear in th emul-
tifunction display.
XHav eth efault ytire pressur esensor replace dat aqualified special -
ist workshop .
TirePressure Moni‐tor Inoperative NoWheel Sensor s
USAonly:
The wheels mounte ddo no thav e a suitable tire pressur esensor .The
tire pressur emonitor is deactivated.
XMoun twheels wit hsuitable tire pressur esensors.
The tire pressur emonitor is activated automatically after drivin gfor
a few minutes.
Tir ePress.Monito rInoperativeUSAonly:
The tire pressur emonitor is faulty.
XVisit aqualified specialist workshop .
Vehicle
Display messagesPossible causes/consequences and MSolutions
DepressBrake toStart EngineYou hav eattempte dto start th eengin ewit hth etransmission in posi-
tion Nwithout depressing th ebrak epedal .
XDepress th ebrak epedal .
ToDeselectPorN,Depres sBrake andStart Engine
You hav eattempte dto shift th etransmission to position Ror Dwith-
out starting th eengine.
XStart th eengine.
XDepress th ebrak epedal .
iIt is only possibl eto shift th etransmission from position Pto th e
desire dposition if you depress th ebrak epedal .Only then can th e
parking loc kbe deactivated. If you do no tdepress th ebrak epedal ,
th eDIRECT SELECT lever can still be moved but th eparking loc k
remain sengaged.
iAt transmission fluid temperatures belo wÒ4 ‡ ( Ò20†) you can
only shift out of position Pint oanother transmission position when
th eengin eis running.
Apply Brake toShift fro m'P'You hav eattempte dto shift th etransmission to position R,N or D
without depressing th ebrak epedal .
XDepress th ebrak epedal .
Display messages211
On-board computer and displays
Z