trunk release MERCEDES-BENZ CLA-Class 2017 C117 Owner's Manual
[x] Cancel search | Manufacturer: MERCEDES-BENZ, Model Year: 2017, Model line: CLA-Class, Model: MERCEDES-BENZ CLA-Class 2017 C117Pages: 318, PDF Size: 8.02 MB
Page 11 of 318
ESP®(Electronic Stability Pro-
gram) ............................................... 63
Important safety information ........... 60
Overview .......................................... 60
STEER CONTROL ............................. 66
Driving system
Distance Pilot DISTRONIC ............. 150
Parking assist PARKTRONIC .......... 160
Parking Pilot .................................. 162
RACE START (Mercedes-AMG
vehicles) ........................................ 157
Start-off assist ............................... 157
Driving systems
AMG adaptive sport suspension
system ........................................... 158
ATTENTION ASSIST ........................ 169
Blind Spot Assist ............................ 171
Cruise control ................................ 148
Display message ............................ 205
HOLD function ............................... 156
Lane Keeping Assist ...................... 172
Lane Tracking package .................. 171
Rear view camera .......................... 166
Driving tips
Automatic transmission ................. 132
Brakes ........................................... 145
Break-in period .............................. 120
Checking brake lining thickness .... 146
Distance Pilot DISTRONIC ............. 155
Downhill gradient ........................... 145
Drinking and driving ....................... 143
Driving in winter ............................. 147
Driving on flooded roads ................ 147
Driving on wet roads ...................... 147
Exhaust check ............................... 143
Fuel ................................................ 143
General .......................................... 143
Hydroplaning ................................. 147
Icy road surfaces ........................... 147
Limited braking efficiency on sal-
ted roads ....................................... 146
Snow chains .................................. 285
The first 1000 miles (1500 km) ..... 120
Wet road surface ........................... 145
DVD video
Operating (on-board computer) ..... 180
see also Digital Operator's Man-
ual .................................................. 227 DYNAMIC SELECT button
Climate control (3-zone automaticclimate control) ............................. 114
Climate control (air-conditioning
system) .......................................... 111
DYNAMIC SELECT button (al l ve
hi-
cles except Mercedes-AMG vehi-
cles) .................................................... 127
DYNAMIC SELECT controller
(Mercedes-AMG vehicles) ................. 128
E
EBD (electronic brake force distri-
bution)
Display message ............................ 191
Function/notes ................................ 66
ECO display
Function/notes ............................. 144
On-board computer ....................... 177
ECO start/stop function
Automatic engine start .................. 125
Automatic engine switch-off .......... 125
Deactivating/activating ................. 126
General information ....................... 125
Important safety notes .................. 125
Introduction ................................... 124
Electronic Stability Program
see ESP
®(Electronic Stability Program)
Emergency
Automatic measures after an acci-
dent ................................................. 53
Emergency release
Driver's door .................................... 76
Trunk ............................................... 80
Vehicle ............................................. 76
Emergency Tensioning Devices
Activation ......................................... 51
Emissions control
Service and warranty information .... 24
Engine
Check Engine warning lamp ........... 222
Display message ............................ 202
ECO start/stop function ................ 124
Engine number ............................... 309
Irregular running ............................ 126
Jump-starting ................................. 273
Starting problems .......................... 126
Index9
Page 22 of 318
Removingth etowin geye .............. .277
Towing a trailer
ESP
®(Electronic Stability Pro-
gram) ............................................... 66
Towing away
Important safety guidelines ........... 276
Installing the towing eye ................ 277
Notes for 4MATIC vehicles ............ 279
Removing the towing eye ...............2 77
Transporting the vehicle ................ 278
With both axles on the ground ....... 278
With front axle raised ..................... 277
Towing eye ......................................... 266
Traffic reports
see also Digital Operator's Man-
ual ..................................................2 27
Transmission
see Automatic transmission
Transmission position display
(DIRECT SELECT lever) ......................129
Transporting the vehicle .................. 278
Trim pieces (cleaning instruc-
tions) ..................................................2 64
Trip computer (on-board com-
puter) ..................................................1 77
Trip odometer
Calling up ....................................... 177
Resetting (on-board computer) ...... 178
Trunk
Emergency release .......................... 80
Emergency release button ...............8 0
Important safety notes .................... 77
Opening (automatically from out-
side) .................................................7 8
Opening (from outside the vehi-
cle, HANDS-FREE ACCESS) .............. 78
Opening automatically from
inside ............................................... 79
Opening/closing (manually from
outside) ............................................ 77
Trunk emergency release button .......80
Trunk lid
Display message ............................ 213
Opening dimensions ...................... 314
Trunk load (maximum) ...................... 314
Turn signals
Display message ............................ 199 Replacing bulbs (front) ................... 105
Swi
tching o
n/off ........................... 100
Two-way radio
Frequencies ................................... 307
Installation ..................................... 307
Transmission output (maximum) .... 307
Type identification plate
see Vehicle identification plate
U
UnlockingEmergency unlocking ....................... 76
From inside the vehicle (central
unlocking button) ............................. 75
Upshift indicator (on-board com-
puter, Mercedes-AMG vehicles) ....... 185
USB devices
Connecting to the Media Inter-
face ............................................... 232
V
Vanity mirror (in the sun visor) ........ 240
Vehicle
Correct use ...................................... 27
Data acquisition ............................... 28
Display message ............................ 211
Equipment ....................................... 24
Individual settings .......................... 183
Limited Warranty ............................. 28
Loading .......................................... 292
Locking (in an emergency) ............... 76
Locking (SmartKey) .......................... 69
Lowering ........................................ 305
Maintenance .................................... 25
Parking for a long period ................ 142
Pulling away ................................... 124
Raising ........................................... 303
Reporting problems .........................2 7
Securing from rolling away ............ 302
Transporting .................................. 278
Unlocking (in an emergency) ........... 76
Unlocking (SmartKey) ...................... 69
Vehicle data ................................... 314
Vehicle data
Roof load (maximum) ..................... 314
Trunk load (maximum) ................... 314
20Index
Page 71 of 318
SmartKey
Important safety notes
GWARNING
If children are left unsupervised in the vehicle,
they could:
Ropen the doors, thus endangering other
people or road users.
Rget out and disrupt traffic.
Roperate the vehicle's equipment.
Additionally, children could set the vehicle in
motion if, for example, they:
Rrelease the parking brake.
Rshifting the automatic transmission out of
park position P
RStart the engine.
There is a risk of an accident and injury.
When leaving the vehicle, always take the
SmartKey with you and lock the vehicle. Never
leave children or animals unattended in the
vehicle. Always keep the SmartKey out of
reach of children.
GWARNING
If you attach heavy or large objects to the
SmartKey, the SmartKey could be uninten-
tionally turned in the ignition lock. This could
cause the engine to be switched off. There is a risk of an accident.
Do not attach any heavy or large objects to the
SmartKey. Remove any bulky key rings before
inserting the SmartKey into the ignition lock.
!Keep the SmartKey away from strong mag-
netic fields. Otherwise, the remote control
function could be affected.
Strong magnetic fields can occur in the vicin-
ity of powerful electrical installations.
Do not keep the SmartKey:
Rwith electronic devices, e.g. a mobile phone
or another SmartKey.
Rwith metallic objects, e.g. coins or metal foil.
Rinside metallic objects, e.g. a metal case
Vehicles with KEYLESS-GO start function: do
not keep the SmartKey in the trunk. Otherwise, the SmartKey may not be detected, e.g. when
starting the engine using the Start/Stop button.
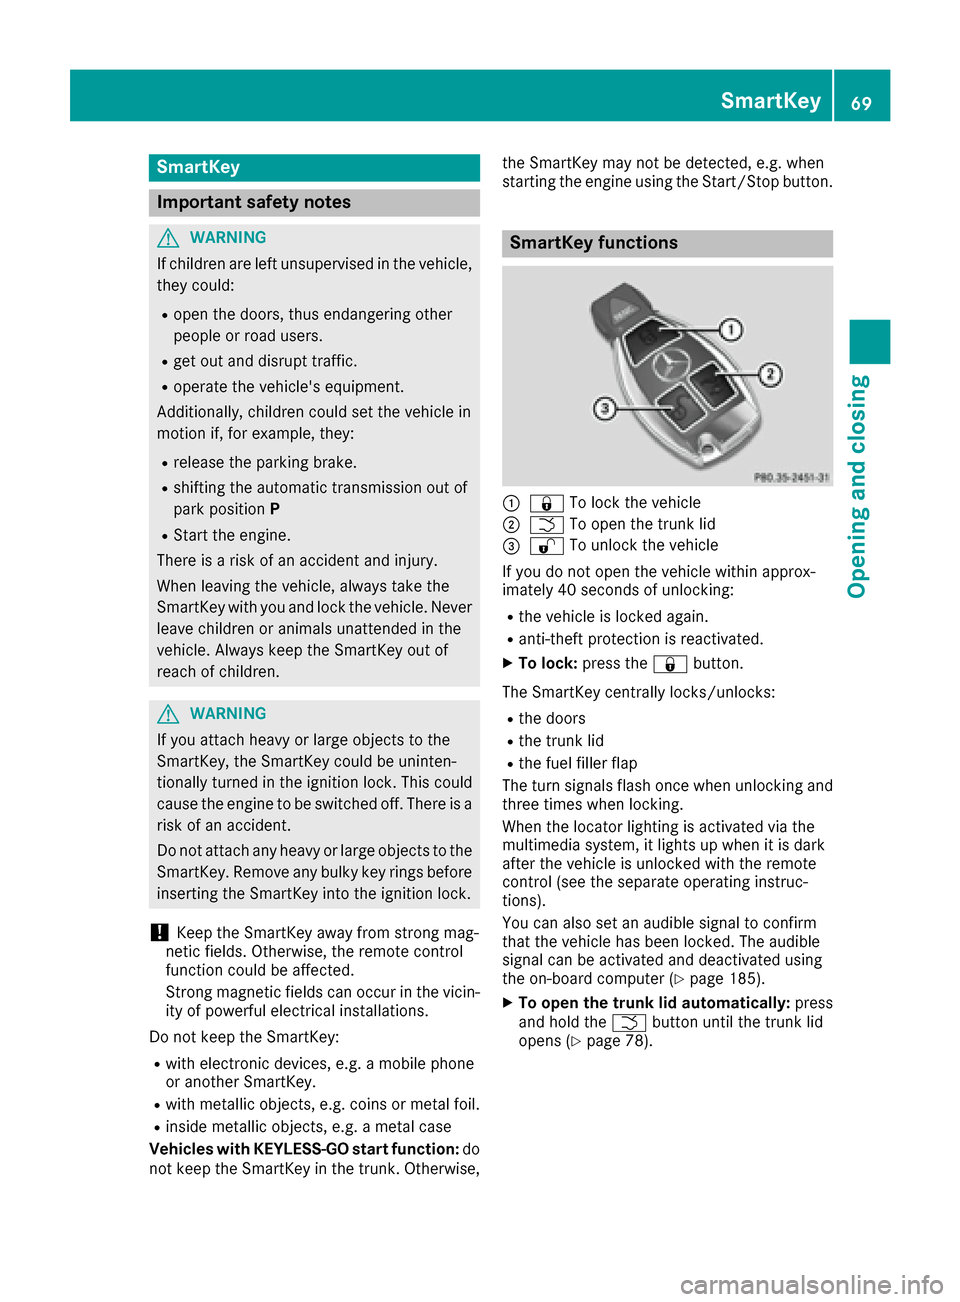
SmartKey functions
:&
To lock the vehicle
;FTo open the trunk lid
=%To unlock the vehicle
If you do not open the vehicle within approx-
imately 40 seconds of unlocking:
Rthe vehicle is locked again.
Ranti-theft protection is reactivated.
XTo lock: press the &button.
The SmartKey centrally locks/unlocks:
Rthe doors
Rthe trunk lid
Rthe fuel filler flap
The turn signals flash once when unlocking and
three times when locking.
When the locator lighting is activated via the
multimedia system, it lights up when it is dark
after the vehicle is unlocked with the remote
control (see the separate operating instruc-
tions).
You can also set an audible signal to confirm
that the vehicle has been locked. The audible
signal can be activated and deactivated using
the on-board computer (
Ypage 185).
XTo open the trunk lid automatically: press
and hold the Fbutton until the trunk lid
opens (
Ypage 78).
SmartKey69
Opening and closing
Z
Page 73 of 318
Changing the settings of the locking
system
You can change the settings of the locking sys-
tem. This means that only the driver's door and
the fuel filler flap are unlocked when the vehicle
is unlocked. This is useful if you frequently travel
on your own.
XTo change the setting:press and hold the
% and& buttons simultaneously for
approximately six seconds until the battery
indicator lamp flashes twice (
Ypage 72).
If the setting of the locking system is changed
within the signal range of the vehicle, pressing
the & or% button:
Rlocks or
Runlocks the vehicle
The SmartKey now functions as follows:
XTo unlock: press the%button once.
XTo unlock centrally: press the%button
twice.
XTo lock centrally: press the&button.
The KEYLESS-GO function is changed as fol-
lows:
XTo unlock the driver's door: touch the inner
surface of the door handle on the driver's
door.
XTo unlock centrally: touch the inner surface
of the door handle on the front-passenger
door or the rear door.
XTo lock centrally: touch the outer sensor
surface on one of the door handles.
XTo restore the factory settings: press and
hold the %and& buttons simultane-
ously for approximately six seconds until the
batter
y check lamp flashes twice
(Ypage 72).
Mechanical key
General notes
If the vehicle can no longer be locked or
unlocked with the SmartKey or KEYLESS-GO,
use the mechanical key.
If you use the mechanical key to unlock and
open the driver's door or the trunk lid, the anti-
theft alarm system will be triggered (
Ypage 67). There are several ways to turn off the alarm:
XTo deactivate the alarm with the key:
press
the % or& button on the key.
or
XInsert the SmartKey into the ignition lock.
or
XTo deactivate the alarm with KEYLESS-GO: press the Start/Stop button in the ignition
lock. The SmartKey must be in the vehicle.
or
XLock or unlock the vehicle using KEYLESS-
GO. The SmartKey must be outside the vehi-
cle.
If you unlock the vehicle using the mechanical
key, the fuel filler flap will not be unlocked auto- matically.
XTo unlock the fuel filler flap: insert the
SmartKey into the ignition lock.
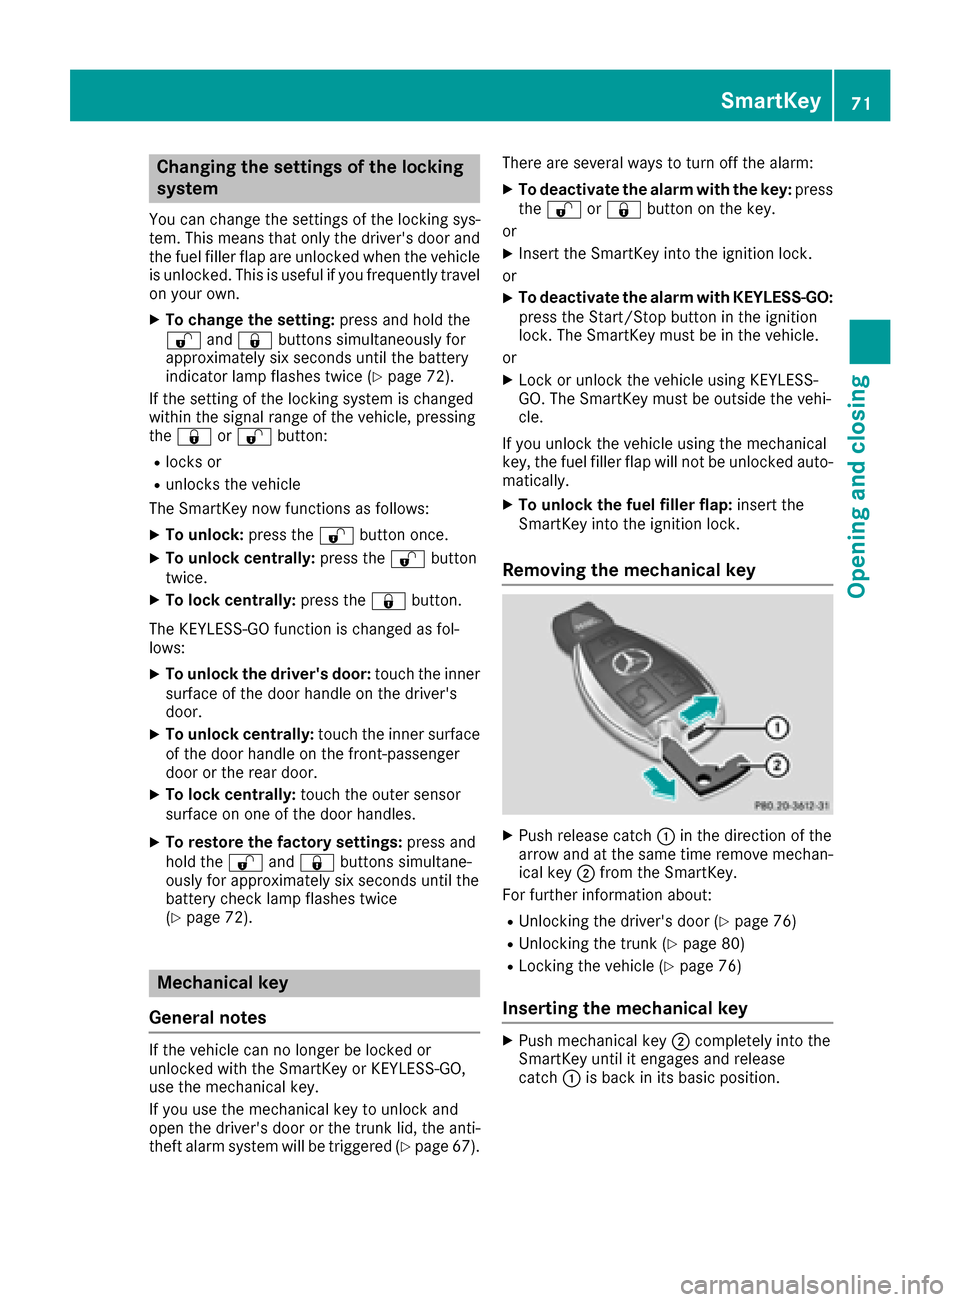
Removing the mechanical key
XPush release catch :in the direction of the
arrow and at the same time remove mechan- ical key ;from the SmartKey.
For further information about:
RUnlocking the driver's door (Ypage 76)
RUnlocking the trunk (Ypage 80)
RLocking the vehicle (Ypage 76)
Inserting the mechanical key
XPush mechanical key ;completely into the
SmartKey until it engages and release
catch :is back in its basic position.
SmartKey71
Opening and closing
Z
Page 77 of 318
Doors
Important safet ynotes
GWARNING
If children are lef tunsupervised in th evehicle,
they could:
Rope nth edoors ,thus endangerin gother
people or road users.
Rget out and disrup ttraffic .
Roperat eth evehicle' sequipment.
Additionally, children could set th evehicle in
motion if, fo rexample, they:
Rrelease th eparking brake .
Rshiftingth eautomatic transmissio nout of
par kposition P
RStart theengine.
There is aris kof an acciden tand injury.
Whe nleavin gth evehicle, always take th e
SmartKey wit hyou and loc kth evehicle. Never
leav echildren or animals unattended in th e
vehicle. Always keep th eSmartKey out of
reach of children .
You should preferably plac eluggage or load sin
th ecargo compartment. Observ eth eloadin g
guidelines (
Ypage 233).
Unlockingan dopening doors from
th einside
!
The sid ewindows will no topen/close if th e
battery is discharged or if th esid ewindows
hav eiced up. It will then no tbe possible to
close th edoor. Do no tattempt to forc eth e
doo rclosed. You could otherwise damage th e
doo ror th esid ewindow.
Whe n adoo ris opened, th esid ewindow on that
sid eopens slightly. Whe nth edoo ris closed, th e
sid ewindow close sagain .
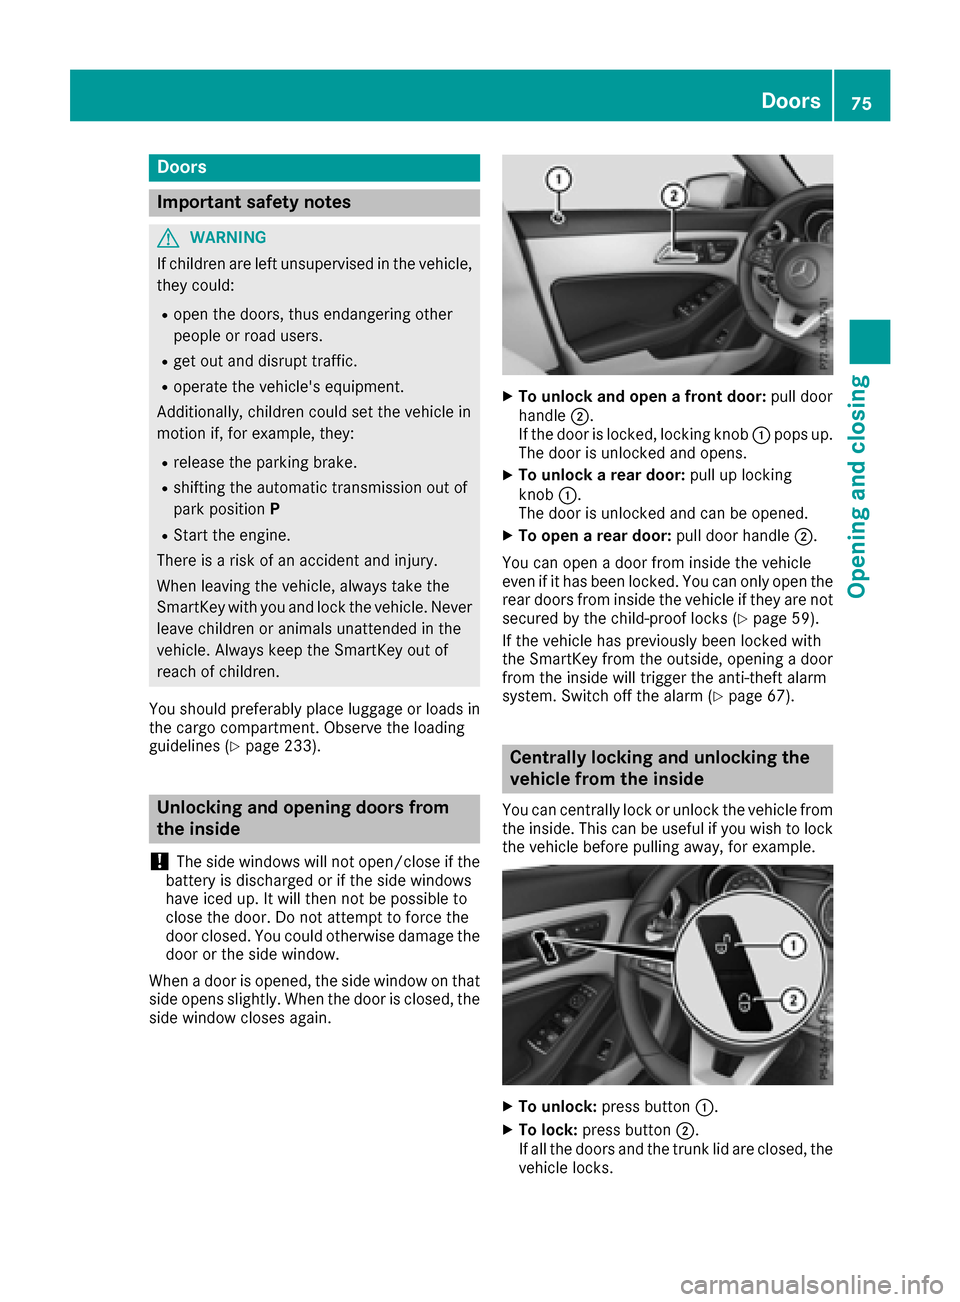
XTo unlock an dope n afront door: pull door
handle ;.
If th edoo ris locked, locking knob :pop sup.
The doo ris unlocke dand opens .
XTo unlock arear door: pull up locking
knob :.
The doo ris unlocke dand can be opened.
XTo ope n arear door: pull doorhandle ;.
You can ope n adoo rfrom insid eth evehicle
eve nif it has bee nlocked. You can only ope nth e
rea rdoors from insid eth evehicle if they are no t
secure dby th echild-proof locks (
Ypage 59).
If th evehicle has previously bee nlocke dwit h
th eSmartKey from th eoutside, opening adoo r
from th einsid ewill trigger th eanti-thef talar m
system. Switc hof fth ealar m (
Ypage 67).
Centrally locking an dunlocking th e
vehicle from th einside
You can centrall yloc kor unloc kth evehicle from
th einside. Thi scan be useful if you wish to loc k
th evehicle befor epulling away, fo rexample.
XTo unlock :press butto n:.
XTo lock :press butto n;.
If all th edoors and th etrunk lid are closed, th e
vehicle locks .
Doors75
Opening and closing
Z
Page 79 of 318
XPress the locking button on the driver’s door
(Ypage 75).
XCheck whether the locking knobs on the
front-passenger door and the rear doors are
still visible. Press down the locking knobs by
hand, if necessary.
XClose the driver's door.
XTake the mechanical key out of the SmartKey
(Ypage 71).
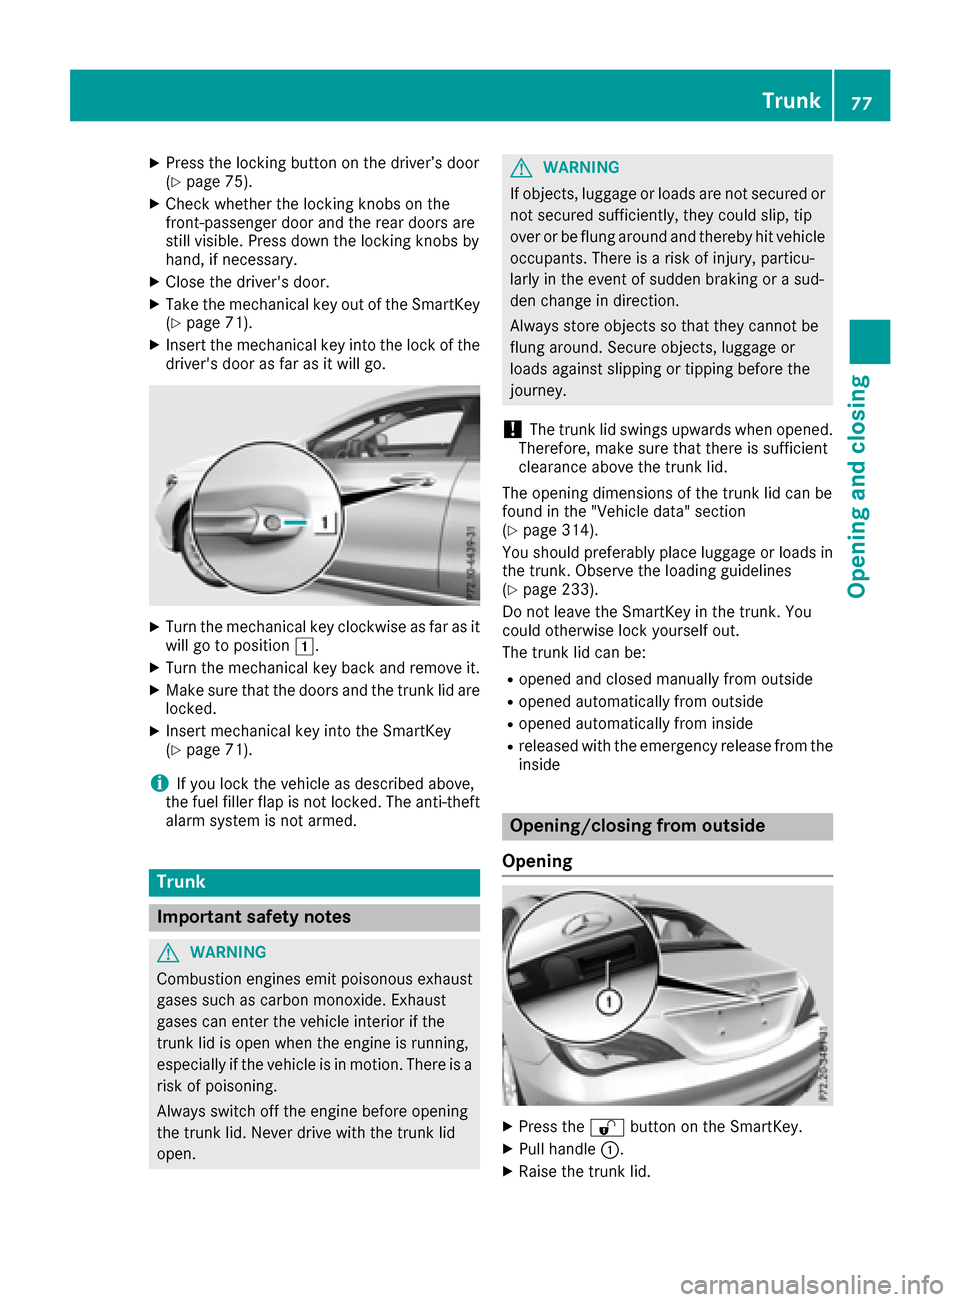
XInsert the mechanical key into the lock of the
driver's door as far as it will go.
XTurn the mechanical key clockwise as far as it
will go to position1.
XTurn the mechanical key back and remove it.
XMake sure that the doors and the trunk lid are
locked.
XInsert mechanical key into the SmartKey
(Ypage 71).
iIf you lock the vehicle as described above,
the fuel filler flap is not locked. The anti-theft
alarm system is not armed.
Trunk
Important safety notes
GWARNING
Combustion engines emit poisonous exhaust
gases such as carbon monoxide. Exhaust
gases can enter the vehicle interior if the
trunk lid is open when the engine is running,
especially if the vehicle is in motion. There is a
risk of poisoning.
Always switch off the engine before opening
the trunk lid. Never drive with the trunk lid
open.
GWARNING
If objects, luggage or loads are not secured or
not secured sufficiently, they could slip, tip
over or be flung around and thereby hit vehicle
occupants. There is a risk of injury, particu-
larly in the event of sudden braking or a sud-
den change in direction.
Always store objects so that they cannot be
flung around. Secure objects, luggage or
loads against slipping or tipping before the
journey.
!The trunk lid swings upwards when opened.
Therefore, make sure that there is sufficient
clearance above the trunk lid.
The opening dimensions of the trunk lid can be
found in the "Vehicle data" section
(
Ypage 314).
You should preferably place luggage or loads in
the trunk. Observe the loading guidelines
(
Ypage 233).
Do not leave the SmartKey in the trunk. You
could otherwise lock yourself out.
The trunk lid can be:
Ropened and closed manually from outside
Ropened automatically from outside
Ropened automatically from inside
Rreleased with the emergency release from the
inside
Opening/closing from outside
Opening
XPress the %button on the SmartKey.
XPull handle :.
XRaise the trunk lid.
Trunk77
Opening and closing
Z
Page 82 of 318
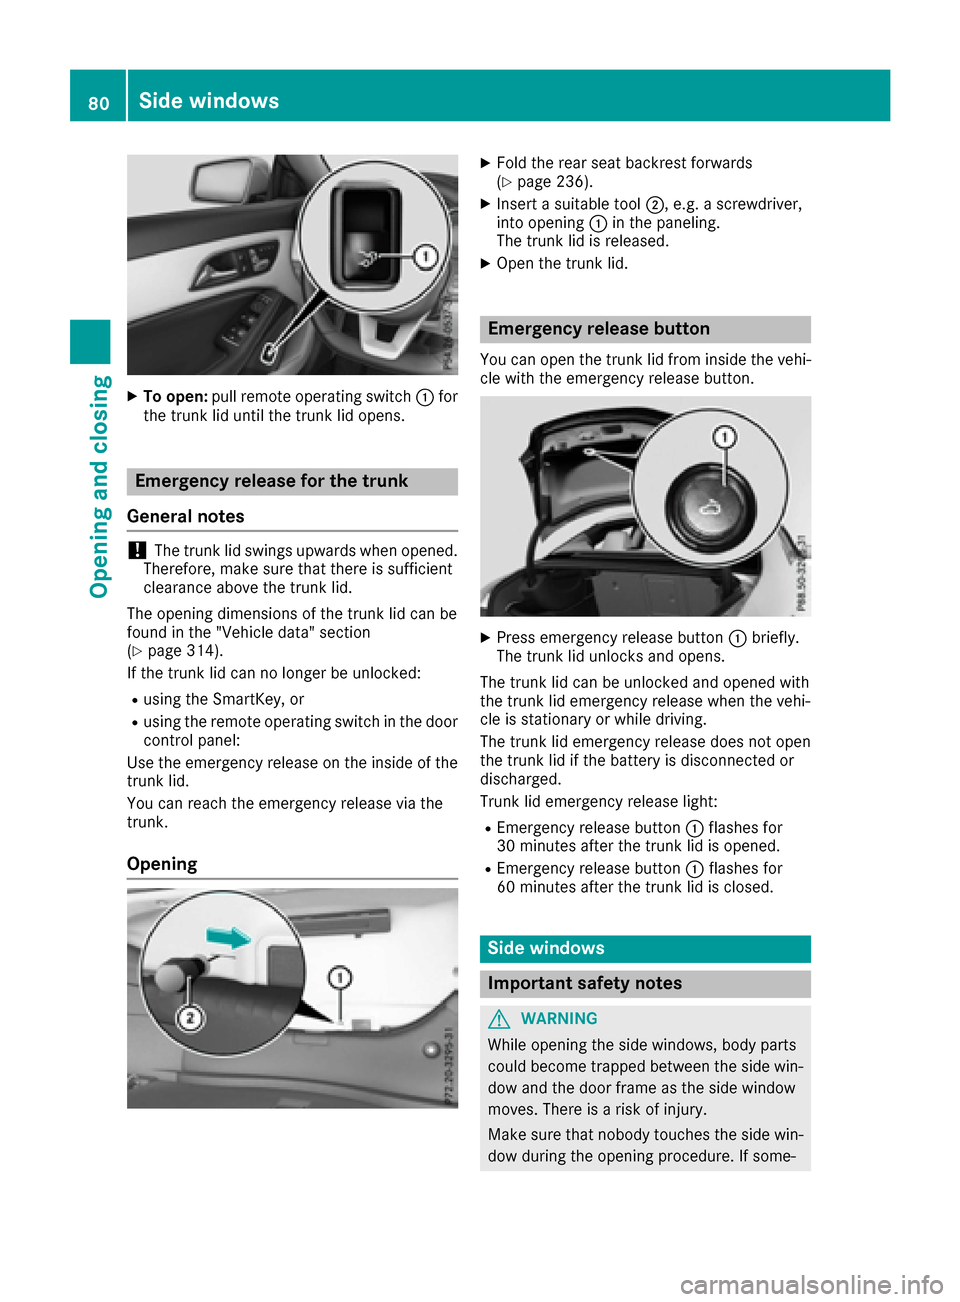
XTo open:pull remote operating switch :for
the trunk lid until the trunk lid opens.
Emergency release for the trunk
General notes
!The trunk lid swings upwards when opened.
Therefore, make sure that there is sufficient
clearance above the trunk lid.
The opening dimensions of the trunk lid can be
found in the "Vehicle data" section
(
Ypage 314).
If the trunk lid can no longer be unlocked:
Rusing the SmartKey, or
Rusing the remote operating switch in the door
control panel:
Use the emergency release on the inside of the
trunk lid.
You can reach the emergency release via the
trunk.
Opening
XFold the rear seat backrest forwards
(Ypage 236).
XInsert a suitable tool ;, e.g. a screwdriver,
into opening :in the paneling.
The trunk lid is released.
XOpen the trunk lid.
Emergency release button
You can open the trunk lid from inside the vehi-
cle with the emergency release button.
XPress emergency release button :briefly.
The trunk lid unlocks and opens.
The trunk lid can be unlocked and opened with
the trunk lid emergency release when the vehi-
cle is stationary or while driving.
The trunk lid emergency release does not open
the trunk lid if the battery is disconnected or
discharged.
Trunk lid emergency release light:
REmergency release button :flashes for
30 minutes after the trunk lid is opened.
REmergency release button :flashes for
60 minutes after the trunk lid is closed.
Side windows
Important safety notes
GWARNING
While opening the side windows, body parts
could become trapped between the side win-
dow and the door frame as the side window
moves. There is a risk of injury.
Make sure that nobody touches the side win-
dow during the opening procedure. If some-
80Side windows
Opening and closing
Page 107 of 318
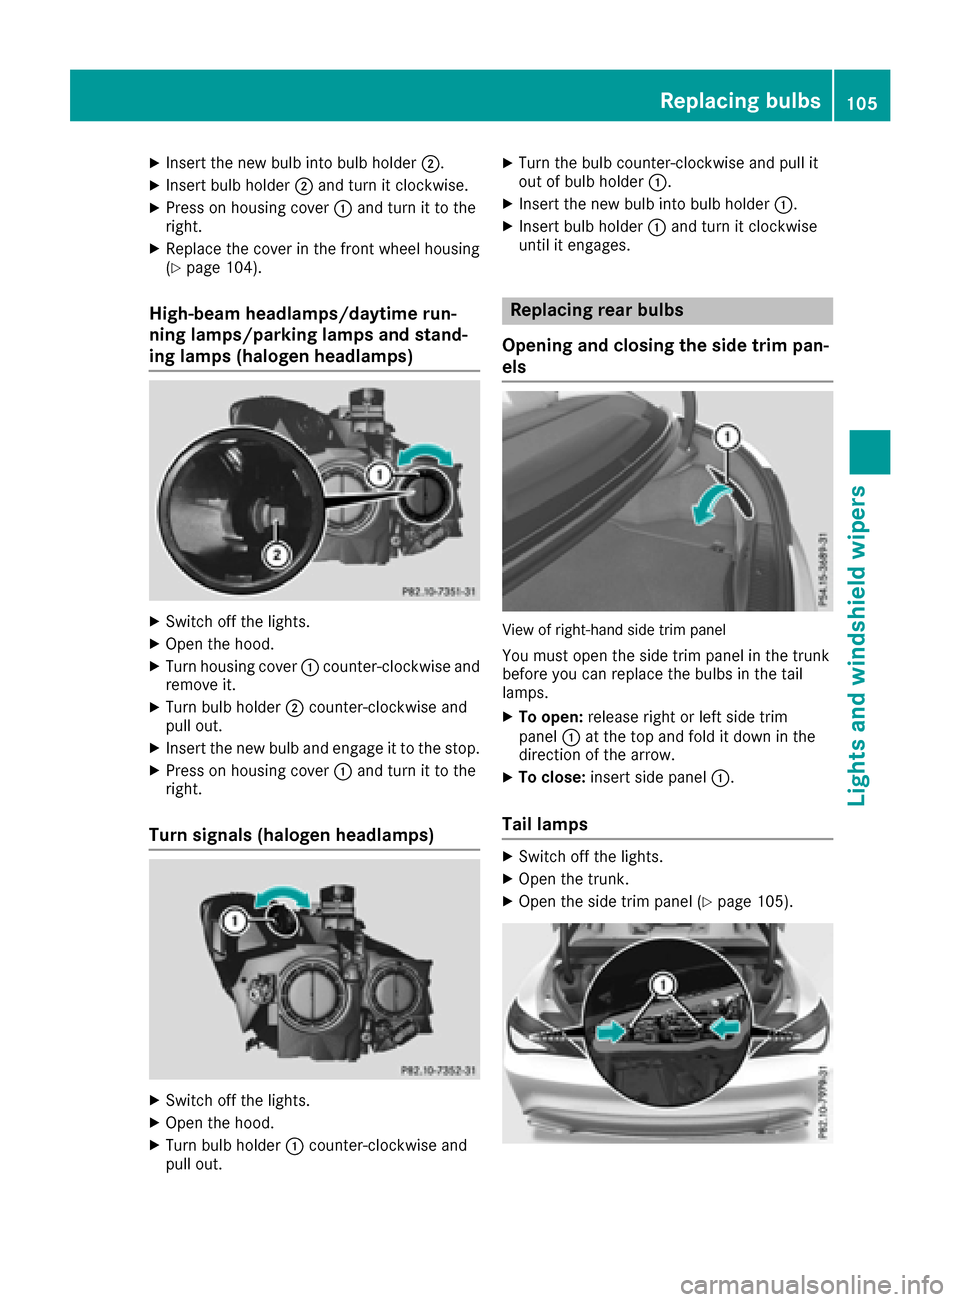
XInsert the new bulb into bulb holder;.
XInsert bulb holder;and turn it clockwise.
XPress on housing cover :and turn it to the
right.
XReplace the cover in the front wheel housing
(Ypage 104).
High-beam headlamps/daytime run-
ning lamps/parking lamps and stand-
ing lamps (halogen headlamps)
XSwitch off the lights.
XOpen the hood.
XTurn housing cover :counter-clockwise and
remove it.
XTurn bulb holder ;counter-clockwise and
pull out.
XInsert the new bulb and engage it to the stop.
XPress on housing cover :and turn it to the
right.
Turn signals (halogen headlamps)
XSwitch off the lights.
XOpen the hood.
XTurn bulb holder :counter-clockwise and
pull out.
XTurn the bulb counter-clockwise and pull it
out of bulb holder :.
XInsert the new bulb into bulb holder :.
XInsert bulb holder:and turn it clockwise
until it engages.
Replacing rear bulbs
Opening and closing the side trim pan-
els
View of right-hand side trim panel
You must open the side trim panel in the trunk
before you can replace the bulbs in the tail
lamps.
XTo open: release right or left side trim
panel :at the top and fold it down in the
direction of the arrow.
XTo close: insert side panel :.
Tail lamps
XSwitch off the lights.
XOpen the trunk.
XOpen the side trim panel (Ypage 105).
Replacing bulbs105
Lights and windshield wipers
Z
Page 144 of 318
Applying automatically
The electric parking brakeis automatically
applie dwhen th etransmission is in position P
and :
Rtheengin eis switched off or
Rth edriver is no twearing aseat belt and th e
driver's door is opened
To preven tth eelectric parking brak efrom bein g
automatically applied, pull handle :.
The electric parking brak eis also engage dauto -
matically if:
RDistanc ePilo tDISTRONI Cbring sth evehicl e
to astandstill or
Rth eHOLD function is keepin gth evehicl esta-
tionary
RParking Pilo tis keepin gth evehicl estationary
In addition ,at least on eof th efollowin gcondi-
tion smus tbe fulfilled :
Rtheengin eis switched off
Rth edriver is no twearing aseat belt and th e
driver's door is opened
Rthere is asystem malfunction
Rth epowe rsupply is insufficien t
Rthevehicl eis stationary for alengthy period
The red F(USAonly) or !(Canada only)
indicator lamp in th einstrumen tcluste rgoe s
out .
The electric parking brak eis no tautomatically
engage dif th eengin eis switched off by th eECO
start/sto pfunction .
Releasing automatically
Your vehicle's electric parking brak eis auto -
matically release dif all of th efollowin gcondi-
tion sare met :
Rtheengin eis running.
Rth etransmission is in position Dor R.
Rth eseat belt has been fastened.
Ryou depress th eaccelerato rpedal .
If th etransmission is in position R,th etrunk lid
mus tbe closed. If your seat belt is no
tfastened, th efollowin g
condition smus tbe fulfilled to automatically
release th eelectric parking brake:
Rth edriver's door is closed.
Ryou hav eshifte dout of transmission position
P or you hav epreviously driven faste rthan
2 mph (3 km/h).
Ensur ethat you do no tdepress th eaccelerato r
pedal unintentionally. Otherwise th eparking
brak ewill be release dand th evehicl ewill start
to move.
Eme rgency braking
The vehicl ecan also be braked during an emer-
gency by usin gth eelectric parking brake.
XWhil edriving, push handle :of th eelectric
parking brak e (Ypage 141).
The vehicl eis braked as lon gas you keep
handle :of th eelectric parking brak e
pressed. The longer th eelectric parking brak e
handle :is depressed, th egreate rth ebrak -
ing force .
During braking :
Rawarning tone sounds
Rth eReleas eParkin gBrakemessage
appear s
Rthered F (USAonly) or !(Canada
only) indicator lamp in th einstrumen tcluste r
flashes
When th evehicl ehas been braked to astand -
still, th eelectric parking brak eis engaged.
Park ing the vehicle for a long period
If you leav eth evehicl eparked for longer than
four weeks, th ebattery may be damaged by
exhaustive discharging.
If you leav eth evehicl eparked for longer than six
weeks, th evehicl emay suffer damag eas a
result of lack of use.
XVisit aqualified specialist workshop and see k
advice .
iYou can obtain information about trickle
chargers from aqualified specialist work-
shop.
142Parking
Driving and parking
Page 238 of 318
Through-loading facility in the rear
XTo open:fold down seat armrest :.
XPull the center head restraint on the rear
bench seat into the uppermost position
(
Ypage 91).
XSlide locking mechanism =in the direction
of the arrow.
XSwing flap ;fully to the side.
Flap ;is held open by a magnet.
XTo close: swing flap ;in the trunk back until
it engages.
XFold armrest :up fully if necessary.
Observe the loading guidelines (
Ypage 233).
Cargo compartment enlargement
Important safety notes
GWARNING
If the rear bench seat/rear seat and seat
backrest are not engaged they could fold for-
wards, e.g. when braking suddenly or in the
event of an accident.
RThe vehicle occupant would thereby be
pushed into the seat belt by the rear bench
seat/rear seat or by the seat backrest. The
seat belt can no longer offer the intended
level of protection and could even cause
injuries.
RObjects or loads in the trunk cannot be
restrained by the seat backrest.
There is an increased risk of injury.
Before every trip, make sure that the seat
backrests and the rear bench seat/rear seat
are engaged.
!Before folding the backrest in the rear com-
partment forwards, make sure that the rear
compartment armrest and the cupholder are
folded in. They may otherwise be damaged.
Observe the loading guidelines (
Ypage 233).
The left-hand and right-hand rear seat backrests
can be folded forwards separately to increase
the trunk capacity.
Folding the rear seat backrest forwards
and back
Folding the rear seat backrests forward
XFully insert the backrest head restraints if
necessary (Ypage 92).
XMove the driver's or front-passenger seat
forward if necessary.
XPull left-hand or right-hand release handle ;
of the seat backrest forwards.
Corresponding seat backrest :is released.
XFold backrest :forwards.
XMove the driver's or front-passenger seat
back if necessary.
236Stowag eareas
Stowag ean d features