child lock MERCEDES-BENZ CLA COUPE 2013 User Guide
[x] Cancel search | Manufacturer: MERCEDES-BENZ, Model Year: 2013, Model line: CLA COUPE, Model: MERCEDES-BENZ CLA COUPE 2013Pages: 373, PDF Size: 11.47 MB
Page 88 of 373
You can open a door from inside the vehicle
even if it has been locked.
If the vehicle has previously been locked with the key, opening a door from the inside will
trigger the anti-theft alarm system. Switch off
the alarm (Y page 73).
You can open the rear doors from inside the
vehicle if they are not secured by the child-
proof locks (Y page 63).
When a locked door is opened from inside the vehicle, the previous unlocking process will
be observed if the vehicle has been:
R locked with the locking button for the cen-
tral locking or
R locked automatically
Tthe vehicle will be fully unlocked if it had
previously been fully unlocked. Only the door which has been opened form the inside is
unlocked if only the driver's door had been
previously unlocked.
Only for the United Kingdom: if the vehicle
has been locked with the key, the double lock
function is activated as standard. It is then not possible to open the doors from inside the
vehicle. You can deactivate the double lock
function by deactivating the interior motion
sensor (Y page 74). The doors can then be
opened from the inside after the vehicle has
been locked from the outside. You can open
the rear doors from inside the vehicle if they
are not secured by the child-proof locks
(Y page 63). The anti-theft alarm system is
triggered if the door is opened from the
inside. Switch off the alarm (Y page 73).
When a locked door is opened from inside the vehicle, the previous unlocking process will
be observed if the vehicle has been:
R locked with the locking button for the cen-
tral locking or
R locked automatically
Tthe vehicle will be fully unlocked if it had
previously been fully unlocked. Only the door which has been opened form the inside is
unlocked if only the driver's door had been
previously unlocked. Automatic locking feature
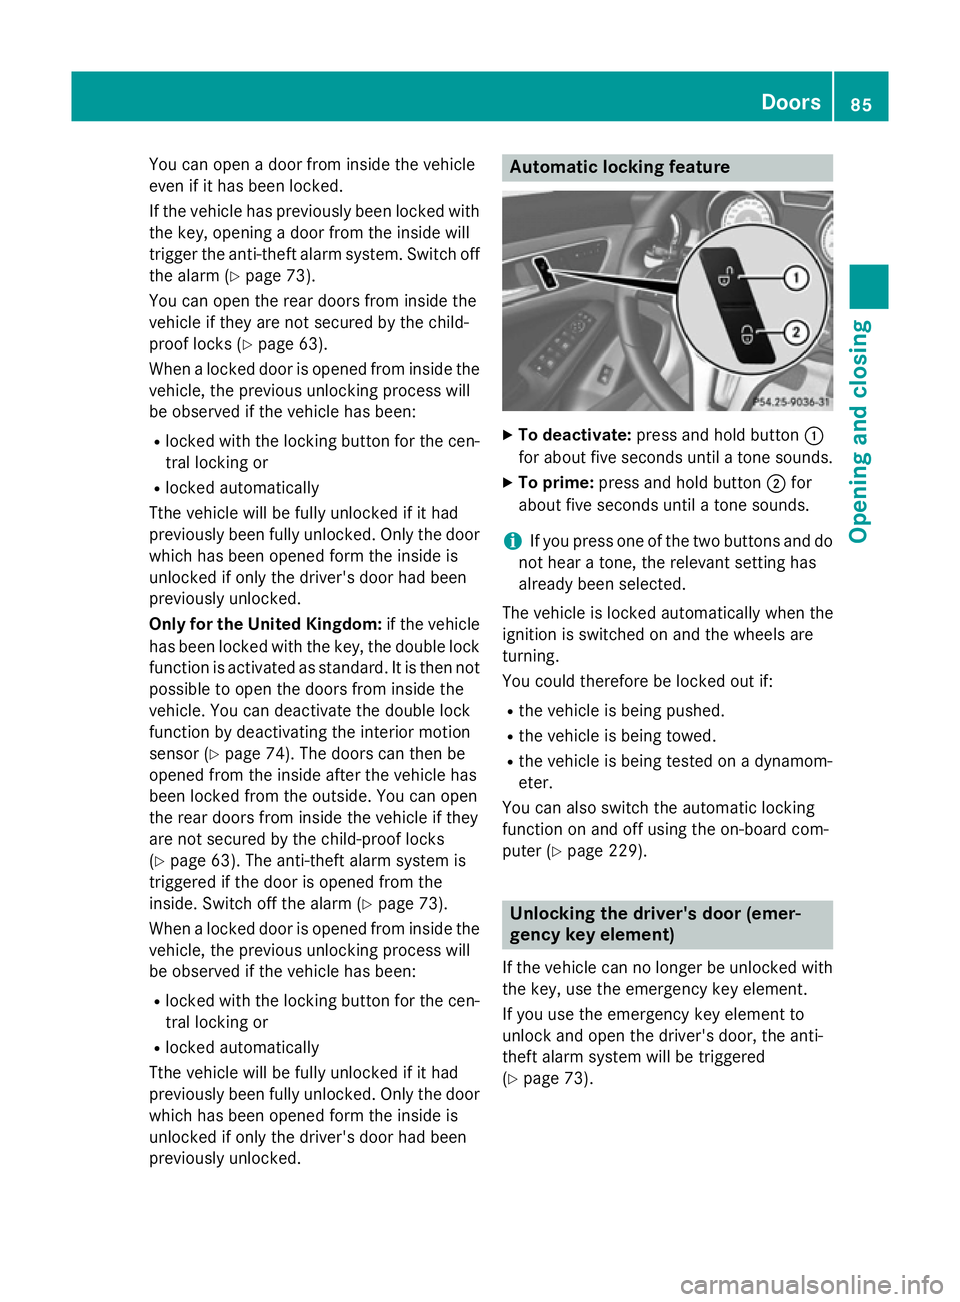
X
To deactivate: press and hold button :
for about five seconds until a tone sounds.
X To prime: press and hold button ;for
about five seconds until a tone sounds.
i If you press one of the two buttons and do
not hear a tone, the relevant setting has
already been selected.
The vehicle is locked automatically when the
ignition is switched on and the wheels are
turning.
You could therefore be locked out if:
R the vehicle is being pushed.
R the vehicle is being towed.
R the vehicle is being tested on a dynamom-
eter.
You can also switch the automatic locking
function on and off using the on-board com-
puter (Y page 229). Unlocking the driver's door (emer-
gency key element)
If the vehicle can no longer be unlocked with
the key, use the emergency key element.
If you use the emergency key element to
unlock and open the driver's door, the anti-
theft alarm system will be triggered
(Y page 73). Doors
85Opening and closing Z
Page 89 of 373
X
Take the emergency key element out of the
key (Y page 79).
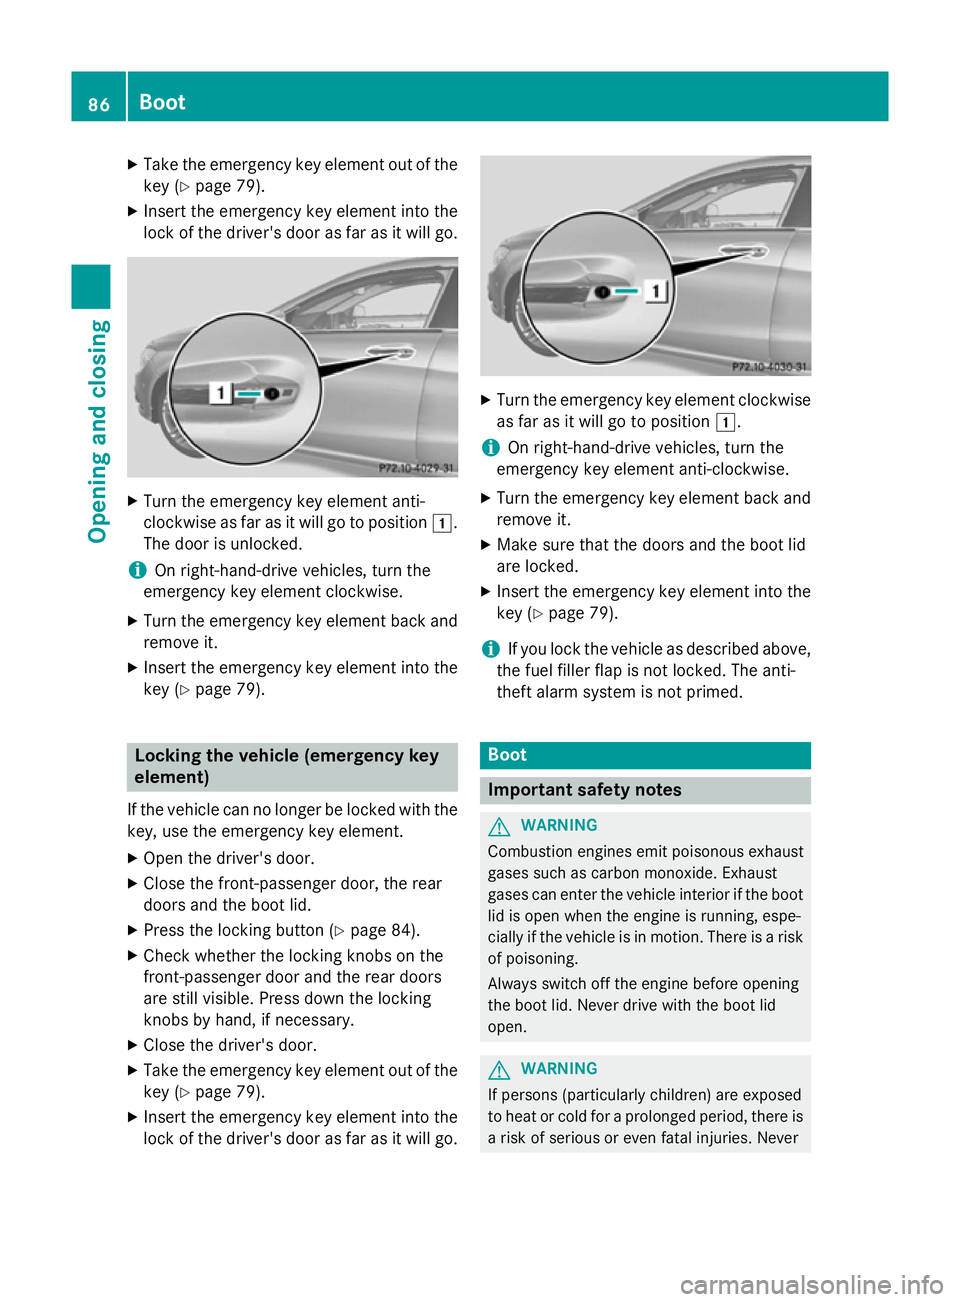
X Insert the emergency key element into the
lock of the driver's door as far as it will go. X
Turn the emergency key element anti-
clockwise as far as it will go to position 1.
The door is unlocked.
i On right-hand-drive vehicles, turn the
emergency key element clockwise.
X Turn the emergency key element back and
remove it.
X Insert the emergency key element into the
key (Y page 79). Locking the vehicle (emergency key
element)
If the vehicle can no longer be locked with the key, use the emergency key element.
X Open the driver's door.
X Close the front-passenger door, the rear
doors and the boot lid.
X Press the locking button (Y page 84).
X Check whether the locking knobs on the
front-passenger door and the rear doors
are still visible. Press down the locking
knobs by hand, if necessary.
X Close the driver's door.
X Take the emergency key element out of the
key (Y page 79).
X Insert the emergency key element into the
lock of the driver's door as far as it will go. X
Turn the emergency key element clockwise
as far as it will go to position 1.
i On right-hand-drive vehicles, turn the
emergency key element anti-clockwise.
X Turn the emergency key element back and
remove it.
X Make sure that the doors and the boot lid
are locked.
X Insert the emergency key element into the
key (Y page 79).
i If you lock the vehicle as described above,
the fuel filler flap is not locked. The anti-
theft alarm system is not primed. Boot
Important safety notes
G
WARNING
Combustion engines emit poisonous exhaust
gases such as carbon monoxide. Exhaust
gases can enter the vehicle interior if the boot
lid is open when the engine is running, espe-
cially if the vehicle is in motion. There is a risk of poisoning.
Always switch off the engine before opening
the boot lid. Never drive with the boot lid
open. G
WARNING
If persons (particularly children) are exposed
to heat or cold for a prolonged period, there is a risk of serious or even fatal injuries. Never 86
BootOpening and closing
Page 90 of 373
leave persons (particularly children) unatten-
ded in the vehicle.
! The boot lid swings upwards when
opened. Therefore, make sure that there is sufficient clearance above the boot lid.
i The opening dimensions of the boot lid
can be found in the "Vehicle data" section
(Y page 362).
Stow luggage or loads preferably in the boot.
Observe the loading guidelines (Y page 276).
Do not leave the key in the boot. You could
otherwise lock yourself out.
The boot lid can be:
R opened and closed manually from outside
R opened automatically from outside
R opened automatically from inside
R unlocked from the inside with the emer-
gency key element Opening and closing manually from
outside
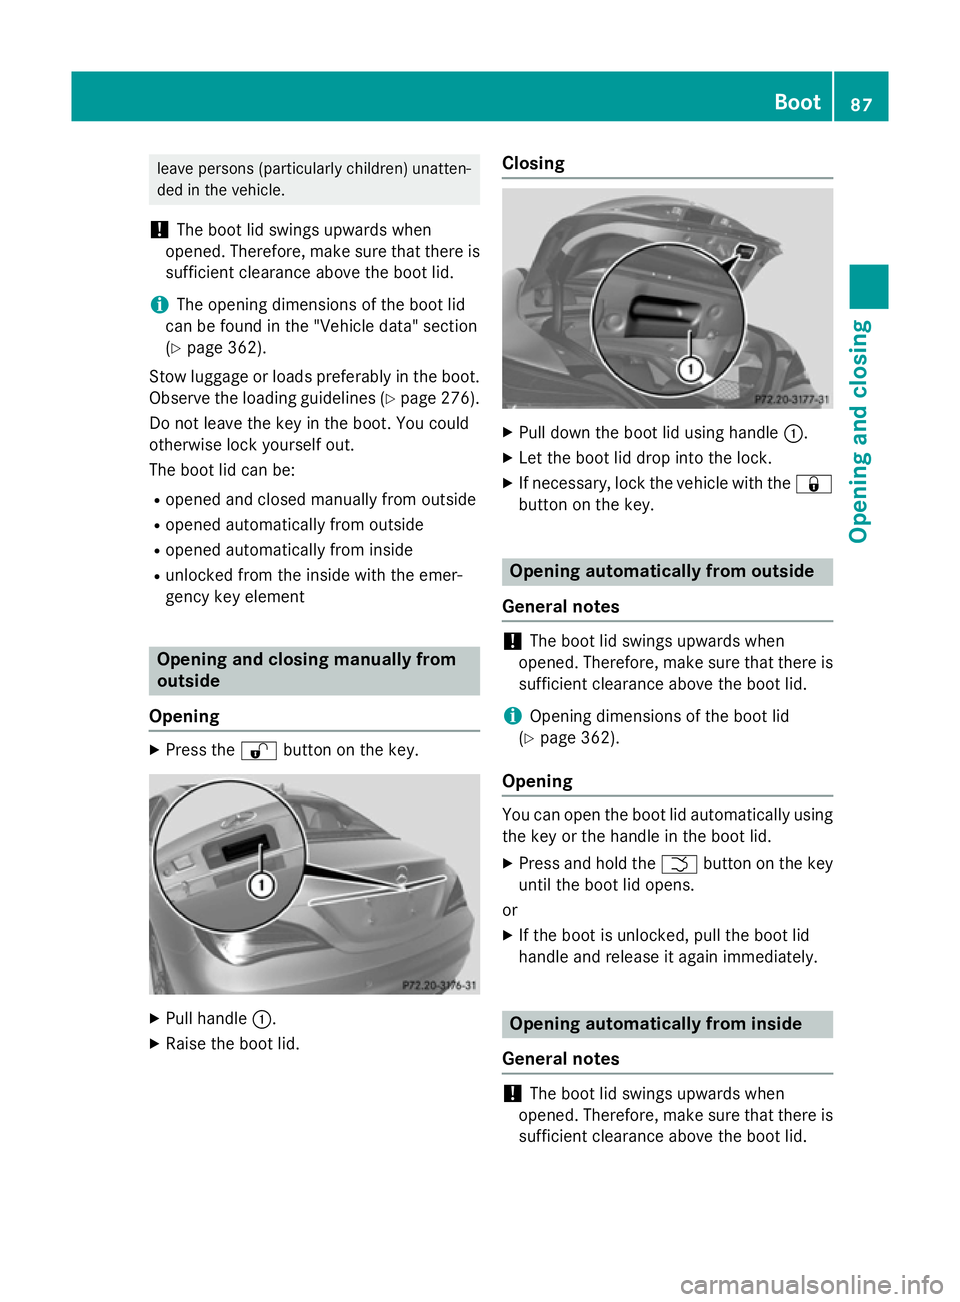
Opening X
Press the %button on the key. X
Pull handle :.
X Raise the boot lid. Closing
X
Pull down the boot lid using handle :.
X Let the boot lid drop into the lock.
X If necessary, lock the vehicle with the &
button on the key. Opening automatically from outside
General notes !
The boot lid swings upwards when
opened. Therefore, make sure that there is sufficient clearance above the boot lid.
i Opening dimensions of the boot lid
(Y page 362).
Opening You can open the boot lid automatically using
the key or the handle in the boot lid.
X Press and hold the Fbutton on the key
until the boot lid opens.
or
X If the boot is unlocked, pull the boot lid
handle and release it again immediately. Opening automatically from inside
General notes !
The boot lid swings upwards when
opened. Therefore, make sure that there is sufficient clearance above the boot lid. Boot
87Opening and closing Z
Page 91 of 373
i
The opening dimensions of the boot lid
can be found in the "Vehicle data" section
(Y page 362).
Opening You can open the boot lid from the driver's
seat when the vehicle is stationary and
unlocked.
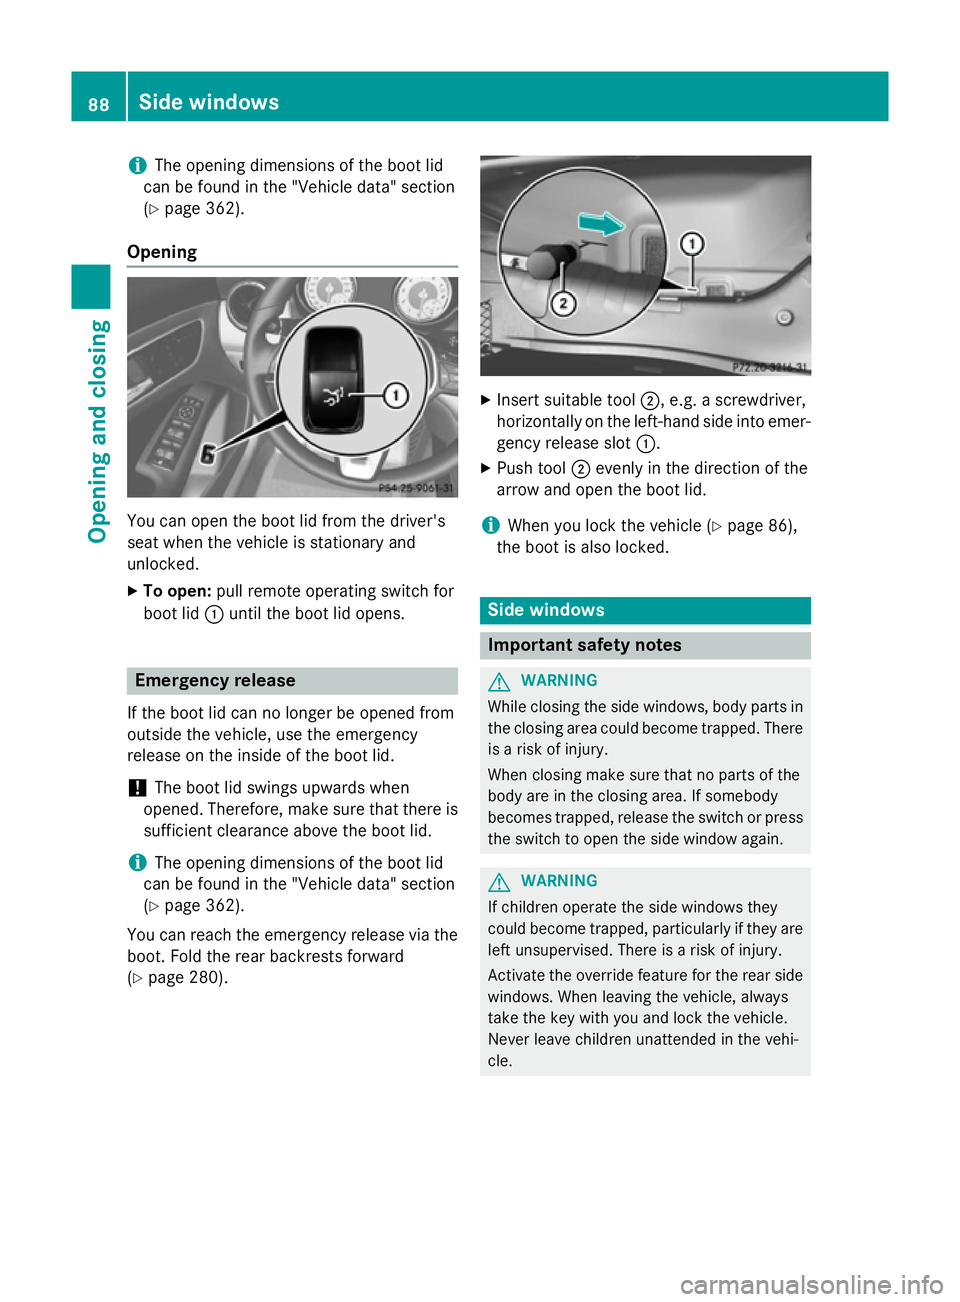
X To open: pull remote operating switch for
boot lid :until the boot lid opens. Emergency release
If the boot lid can no longer be opened from
outside the vehicle, use the emergency
release on the inside of the boot lid.
! The boot lid swings upwards when
opened. Therefore, make sure that there is sufficient clearance above the boot lid.
i The opening dimensions of the boot lid
can be found in the "Vehicle data" section
(Y page 362).
You can reach the emergency release via the boot. Fold the rear backrests forward
(Y page 280). X
Insert suitable tool ;, e.g. a screwdriver,
horizontally on the left-hand side into emer- gency release slot :.
X Push tool ;evenly in the direction of the
arrow and open the boot lid.
i When you lock the vehicle (Y
page 86),
the boot is also locked. Side windows
Important safety notes
G
WARNING
While closing the side windows, body parts in the closing area could become trapped. There is a risk of injury.
When closing make sure that no parts of the
body are in the closing area. If somebody
becomes trapped, release the switch or press
the switch to open the side window again. G
WARNING
If children operate the side windows they
could become trapped, particularly if they are left unsupervised. There is a risk of injury.
Activate the override feature for the rear side
windows. When leaving the vehicle, always
take the key with you and lock the vehicle.
Never leave children unattended in the vehi-
cle. 88
Side windowsOpening and closing
Page 94 of 373
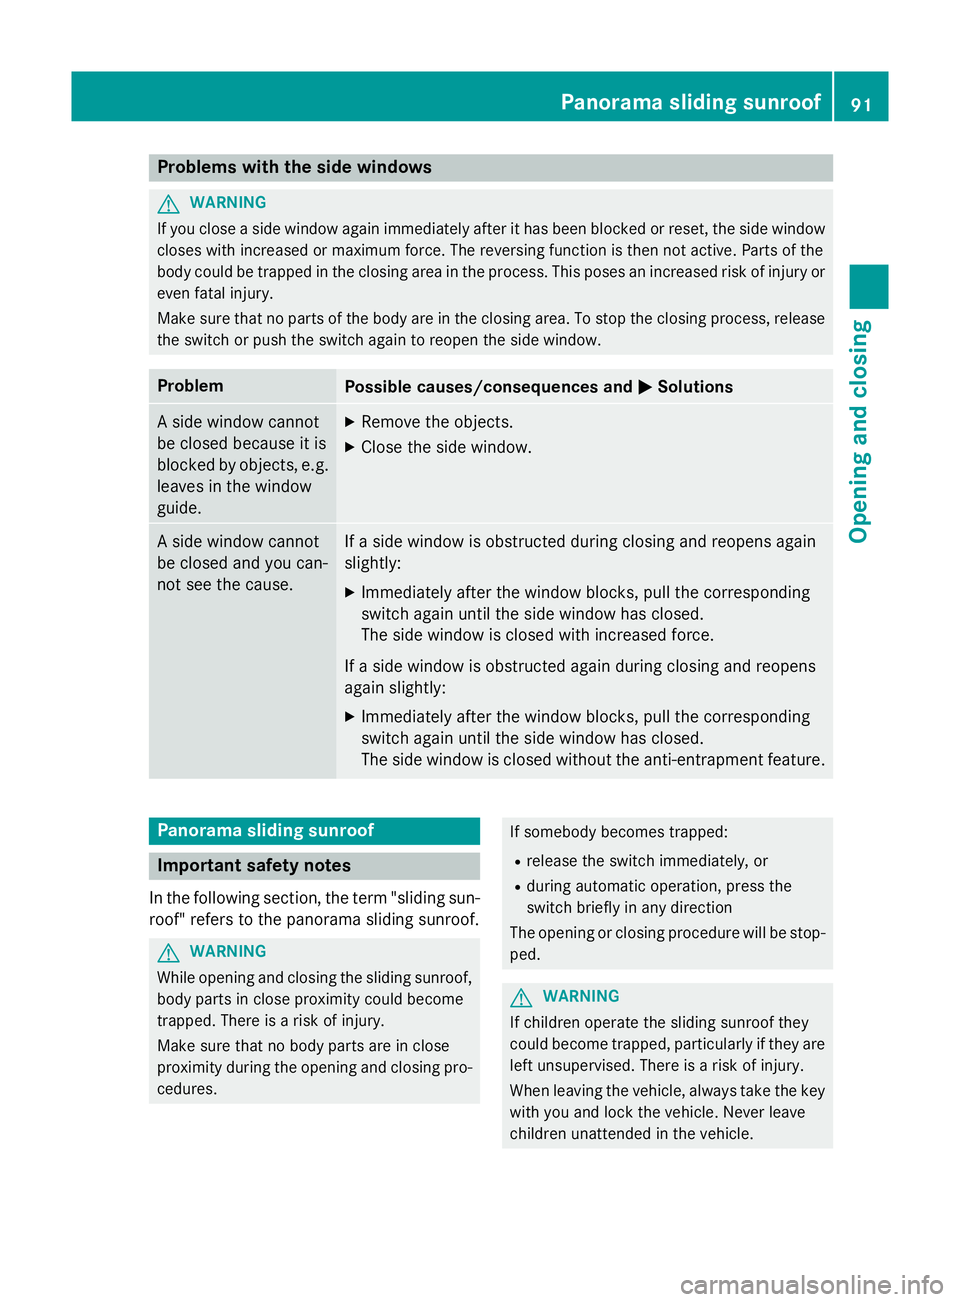
Problems with the side windows
G
WARNING
If you close a side window again immediately after it has been blocked or reset, the side window
closes with increased or maximum force. The reversing function is then not active. Parts of the
body could be trapped in the closing area in the process. This poses an increased risk of injury or even fatal injury.
Make sure that no parts of the body are in the closing area. To stop the closing process, releasethe switch or push the switch again to reopen the side window. Problem
Possible causes/consequences and
M MSolutions A side window cannot
be closed because it is
blocked by objects, e.g.
leaves in the window
guide. X
Remove the objects.
X Close the side window. A side window cannot
be closed and you can-
not see the cause. If a side window is obstructed during closing and reopens again
slightly:
X Immediately after the window blocks, pull the corresponding
switch again until the side window has closed.
The side window is closed with increased force.
If a side window is obstructed again during closing and reopens
again slightly: X Immediately after the window blocks, pull the corresponding
switch again until the side window has closed.
The side window is closed without the anti-entrapment feature. Panorama sliding sunroof
Important safety notes
In the following section, the term "sliding sun-
roof" refers to the panorama sliding sunroof. G
WARNING
While opening and closing the sliding sunroof, body parts in close proximity could become
trapped. There is a risk of injury.
Make sure that no body parts are in close
proximity during the opening and closing pro- cedures. If somebody becomes trapped:
R release the switch immediately, or
R during automatic operation, press the
switch briefly in any direction
The opening or closing procedure will be stop-
ped. G
WARNING
If children operate the sliding sunroof they
could become trapped, particularly if they are left unsupervised. There is a risk of injury.
When leaving the vehicle, always take the key
with you and lock the vehicle. Never leave
children unattended in the vehicle. Panorama sliding sunroof
91Opening and closing Z
Page 102 of 373
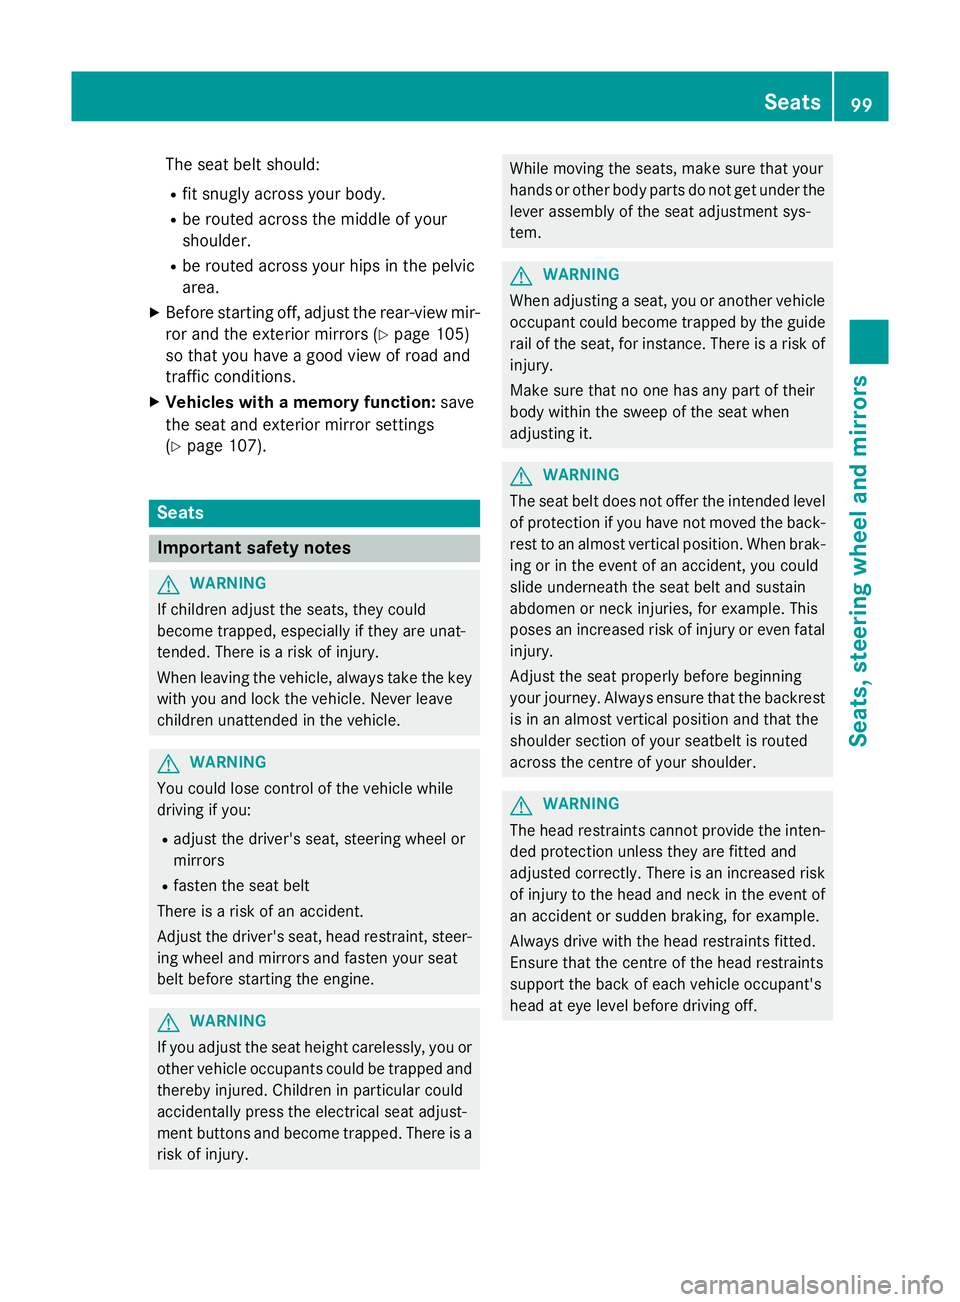
The seat belt should:
R fit snugly across your body.
R be routed across the middle of your
shoulder.
R be routed across your hips in the pelvic
area.
X Before starting off, adjust the rear-view mir-
ror and the exterior mirrors (Y page 105)
so that you have a good view of road and
traffic conditions.
X Vehicles with a memory function: save
the seat and exterior mirror settings
(Y page 107). Seats
Important safety notes
G
WARNING
If children adjust the seats, they could
become trapped, especially if they are unat-
tended. There is a risk of injury.
When leaving the vehicle, always take the key with you and lock the vehicle. Never leave
children unattended in the vehicle. G
WARNING
You could lose control of the vehicle while
driving if you:
R adjust the driver's seat, steering wheel or
mirrors
R fasten the seat belt
There is a risk of an accident.
Adjust the driver's seat, head restraint, steer-
ing wheel and mirrors and fasten your seat
belt before starting the engine. G
WARNING
If you adjust the seat height carelessly, you or other vehicle occupants could be trapped andthereby injured. Children in particular could
accidentally press the electrical seat adjust-
ment buttons and become trapped. There is a
risk of injury. While moving the seats, make sure that your
hands or other body parts do not get under the
lever assembly of the seat adjustment sys-
tem. G
WARNING
When adjusting a seat, you or another vehicle occupant could become trapped by the guiderail of the seat, for instance. There is a risk of
injury.
Make sure that no one has any part of their
body within the sweep of the seat when
adjusting it. G
WARNING
The seat belt does not offer the intended level of protection if you have not moved the back-
rest to an almost vertical position. When brak-
ing or in the event of an accident, you could
slide underneath the seat belt and sustain
abdomen or neck injuries, for example. This
poses an increased risk of injury or even fatal injury.
Adjust the seat properly before beginning
your journey. Always ensure that the backrest
is in an almost vertical position and that the
shoulder section of your seatbelt is routed
across the centre of your shoulder. G
WARNING
The head restraints cannot provide the inten-
ded protection unless they are fitted and
adjusted correctly. There is an increased risk of injury to the head and neck in the event of
an accident or sudden braking, for example.
Always drive with the head restraints fitted.
Ensure that the centre of the head restraints
support the back of each vehicle occupant's
head at eye level before driving off. Seats
99Seats, steering wheel and mirrors Z
Page 107 of 373
Problems with the seat heating
Problem
Possible causes/consequences and
M
MSolutions The seat heating has
switched off prema-
turely or cannot be
switched on. The on-board voltage is too low because too many electrical con-
sumers are switched on.
X Switch off electrical consumers that you do not need, such as
the rear window heating or interior lighting.
Once the battery is sufficiently charged, the seat heating will
switch back on automatically. Steering wheel
Important safety notes
G
WARNING
You could lose control of the vehicle while
driving if you:
R adjust the driver's seat, steering wheel or
mirrors
R fasten the seat belt
There is a risk of an accident.
Adjust the driver's seat, head restraint, steer-
ing wheel and mirrors and fasten your seat
belt before starting the engine. G
WARNING
Children could become trapped by the steer-
ing wheel if they adjust it. There is a risk of
injury.
When leaving the vehicle, always take the key with you and lock the vehicle. Never leave
children unattended in the vehicle. Adjusting the steering wheel
G
WARNING
The steering wheel may move unexpectedly if you adjust it while driving. This could cause
you to lose control of the vehicle. There is a
risk of an accident.
Make sure that the steering wheel is locked
before driving off. Never unlock the steering
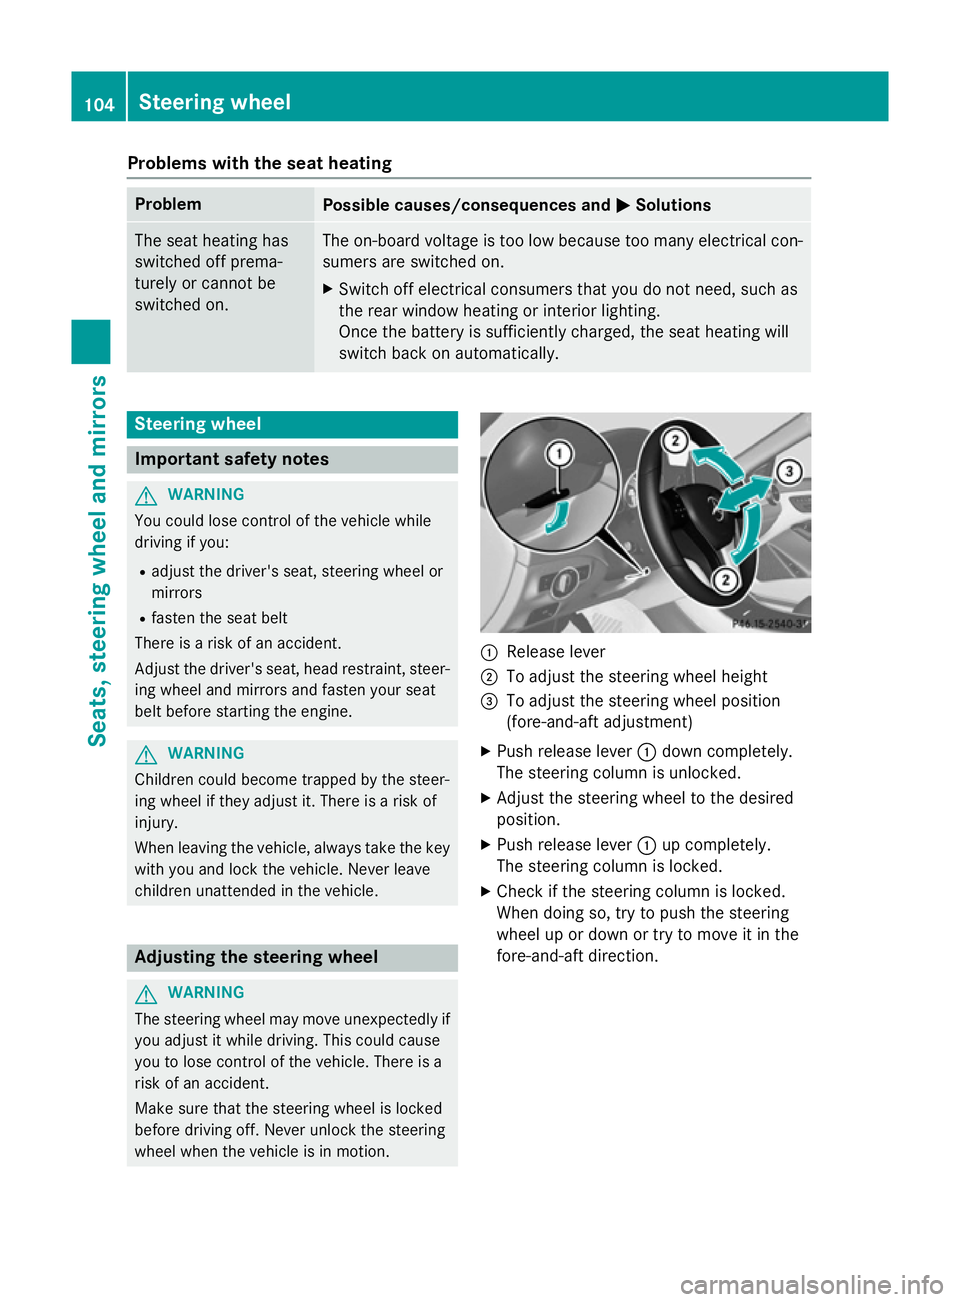
wheel when the vehicle is in motion. :
Release lever
; To adjust the steering wheel height
= To adjust the steering wheel position
(fore-and-aft adjustment)
X Push release lever :down completely.
The steering column is unlocked.
X Adjust the steering wheel to the desired
position.
X Push release lever :up completely.
The steering column is locked.
X Check if the steering column is locked.
When doing so, try to push the steering
wheel up or down or try to move it in the
fore-and-aft direction. 104
Steering wheelSeats, steering wheel and mirrors
Page 110 of 373
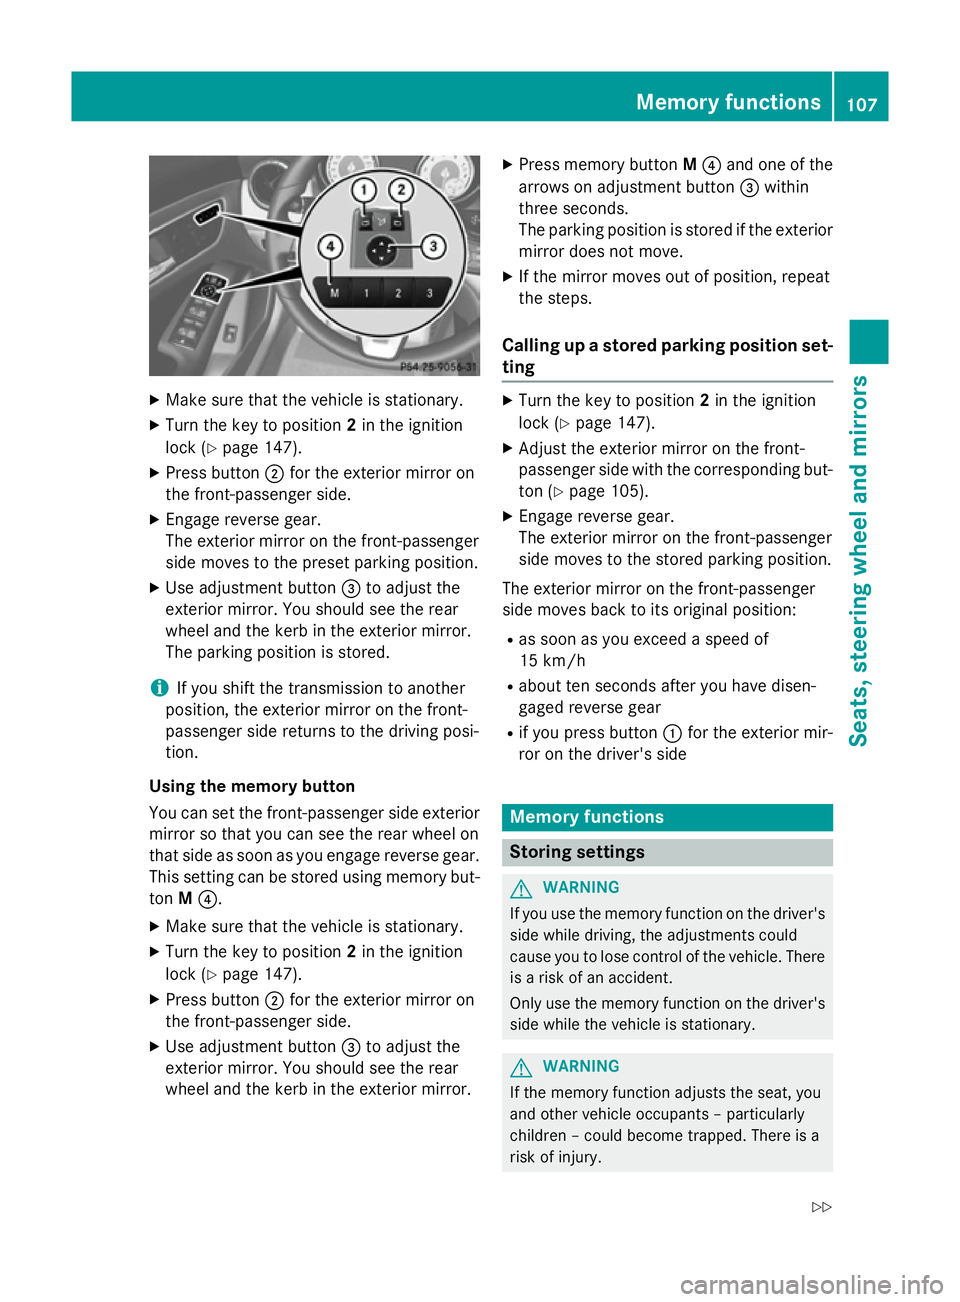
X
Make sure that the vehicle is stationary.
X Turn the key to position 2in the ignition
lock (Y page 147).
X Press button ;for the exterior mirror on
the front-passenger side.
X Engage reverse gear.
The exterior mirror on the front-passenger
side moves to the preset parking position.
X Use adjustment button =to adjust the
exterior mirror. You should see the rear
wheel and the kerb in the exterior mirror.
The parking position is stored.
i If you shift the transmission to another
position, the exterior mirror on the front-
passenger side returns to the driving posi-
tion.
Using the memory button
You can set the front-passenger side exterior
mirror so that you can see the rear wheel on
that side as soon as you engage reverse gear. This setting can be stored using memory but-
ton M?.
X Make sure that the vehicle is stationary.
X Turn the key to position 2in the ignition
lock (Y page 147).
X Press button ;for the exterior mirror on
the front-passenger side.
X Use adjustment button =to adjust the
exterior mirror. You should see the rear
wheel and the kerb in the exterior mirror. X
Press memory button M? and one of the
arrows on adjustment button =within
three seconds.
The parking position is stored if the exterior
mirror does not move.
X If the mirror moves out of position, repeat
the steps.
Calling up a stored parking position set- ting X
Turn the key to position 2in the ignition
lock (Y page 147).
X Adjust the exterior mirror on the front-
passenger side with the corresponding but-
ton (Y page 105).
X Engage reverse gear.
The exterior mirror on the front-passenger
side moves to the stored parking position.
The exterior mirror on the front-passenger
side moves back to its original position:
R as soon as you exceed a speed of
15 km/h
R about ten seconds after you have disen-
gaged reverse gear
R if you press button :for the exterior mir-
ror on the driver's side Memory functions
Storing settings
G
WARNING
If you use the memory function on the driver's side while driving, the adjustments could
cause you to lose control of the vehicle. There
is a risk of an accident.
Only use the memory function on the driver's
side while the vehicle is stationary. G
WARNING
If the memory function adjusts the seat, you
and other vehicle occupants – particularly
children – could become trapped. There is a
risk of injury. Memory functions
107Seats, steering wheel and mirrors
Z
Page 111 of 373
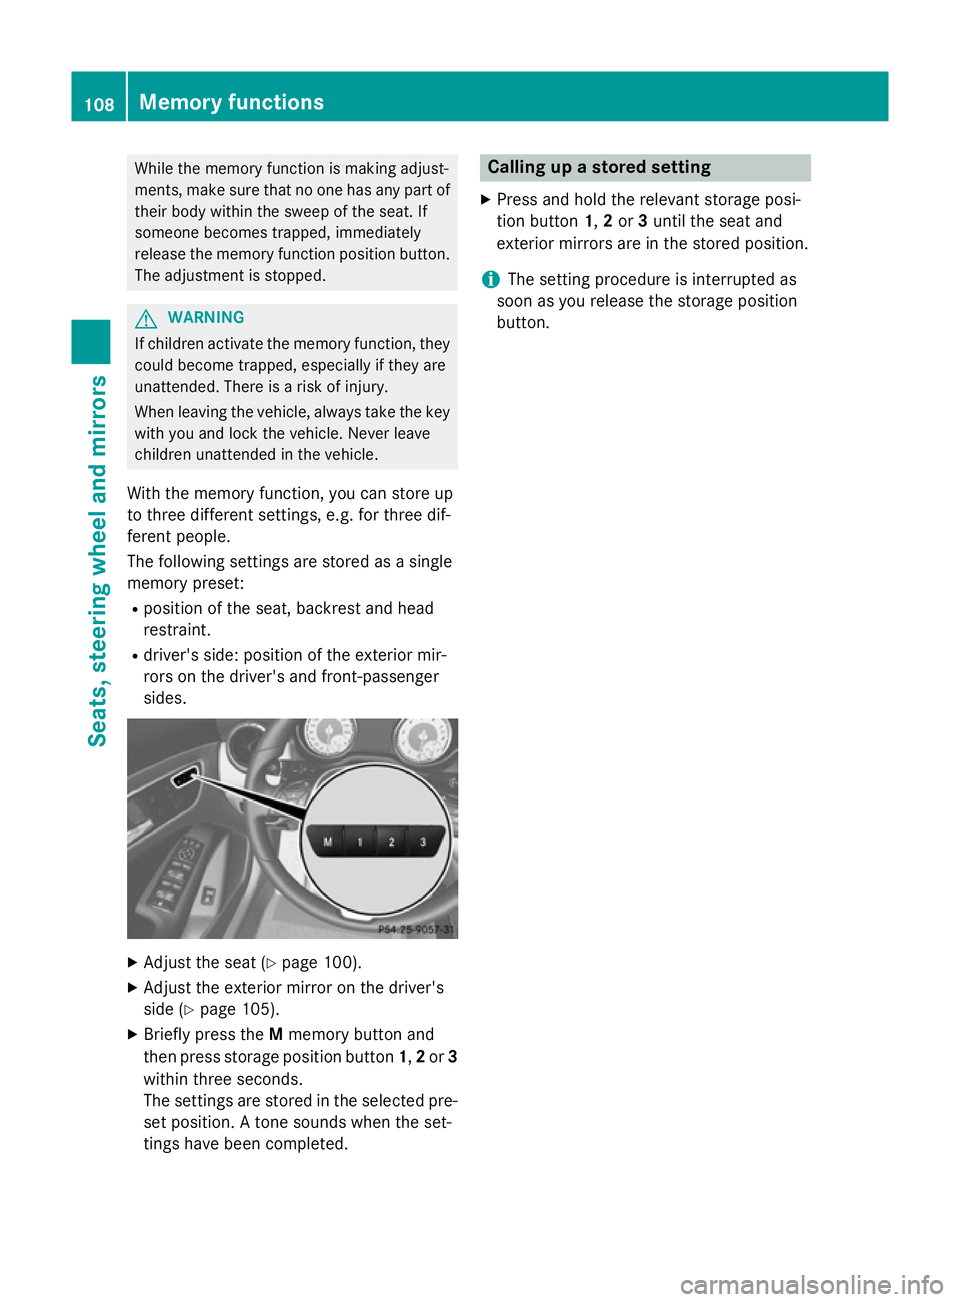
While the memory function is making adjust-
ments, make sure that no one has any part of their body within the sweep of the seat. If
someone becomes trapped, immediately
release the memory function position button.
The adjustment is stopped. G
WARNING
If children activate the memory function, they
could become trapped, especially if they are
unattended. There is a risk of injury.
When leaving the vehicle, always take the key with you and lock the vehicle. Never leave
children unattended in the vehicle.
With the memory function, you can store up
to three different settings, e.g. for three dif-
ferent people.
The following settings are stored as a single
memory preset:
R position of the seat, backrest and head
restraint.
R driver's side: position of the exterior mir-
rors on the driver's and front-passenger
sides. X
Adjust the seat (Y page 100).
X Adjust the exterior mirror on the driver's
side (Y page 105).
X Briefly press the Mmemory button and
then press storage position button 1,2or 3
within three seconds.
The settings are stored in the selected pre- set position. A tone sounds when the set-
tings have been completed. Calling up a stored setting
X Press and hold the relevant storage posi-
tion button 1,2or 3until the seat and
exterior mirrors are in the stored position.
i The setting procedure is interrupted as
soon as you release the storage position
button. 108
Memory functionsSeats, steering wheel and mirrors
Page 170 of 373
Parking
Important safety notes
G
WARNING
Flammable material such as leaves, grass or
twigs may ignite if they come into contact with hot parts of the exhaust system or exhaust
gas flow. There is a risk of fire.
Park the vehicle so that no flammable mate-
rial can come into contact with hot vehicle
components. In particular, do not park on dry grassland or harvested grain fields. G
WARNING
If you leave children unattended in the vehi-
cle, they may be able to set the vehicle in
motion if, for example, they:
R release the parking brake
R shift the automatic transmission out of park
position Por shift manual transmission into
neutral
R start the engine
In addition, they may operate vehicle equip-
ment and become trapped. There is a risk of
an accident and injury.
When leaving the vehicle, always take the key with you and lock the vehicle. Never leave
children unattended in the vehicle.
! Always secure the vehicle correctly
against rolling away. Otherwise, the vehicle
or its drivetrain could be damaged.
To ensure that the vehicle is secured against
rolling away unintentionally:
R the electric parking brake must be applied.
R on vehicles with manual transmission,
engage first gear or reverse gear.
R on vehicles with automatic transmission,
the transmission must be in position Pand
the transmission position display must
show Pin the multifunction display. R
the key must be removed from the ignition
lock.
R on uphill or downhill gradients, the front
wheels must be turned towards the kerb. Switching off the engine
Important safety notes G
WARNING
The automatic transmission switches to neu-
tral position Nwhen you switch off the engine.
The vehicle may roll away. There is a risk of an
accident.
After switching off the engine, always switch
to parking position P. Prevent the parked vehi-
cle from rolling away by applying the parking
brake.
Vehicles with manual transmission X
Shift to either first gear or reverse gear R.
X Turn the key to position 0in the ignition
lock and remove it.
The immobiliser is activated.
X Apply the electric parking brake.
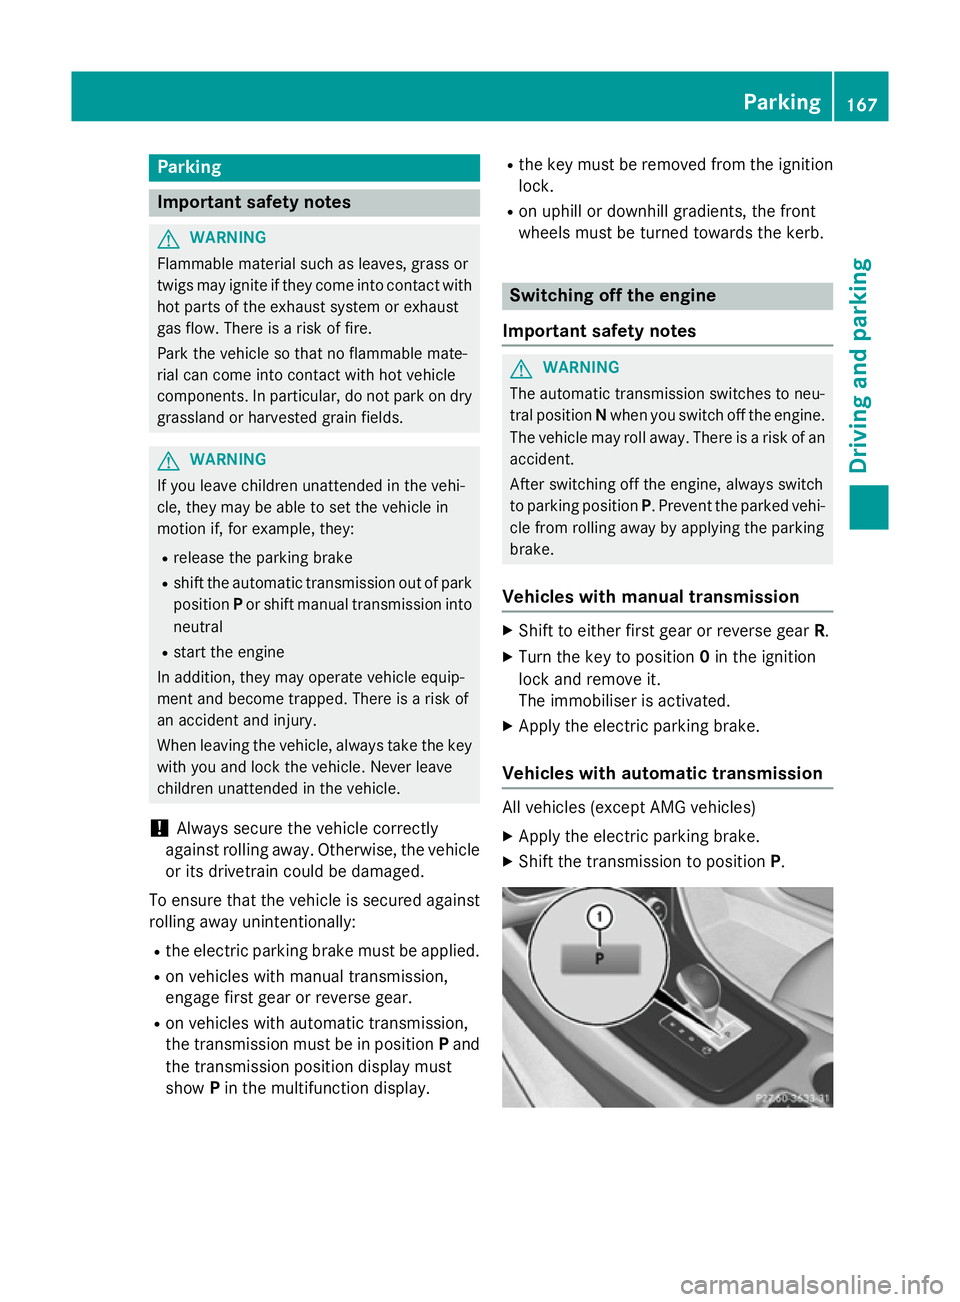
Vehicles with automatic transmission All vehicles (except AMG vehicles)
X Apply the electric parking brake.
X Shift the transmission to position P. Parking
167Driving and parking Z