automatic transmission MERCEDES-BENZ CLA COUPE 2013 Workshop Manual
[x] Cancel search | Manufacturer: MERCEDES-BENZ, Model Year: 2013, Model line: CLA COUPE, Model: MERCEDES-BENZ CLA COUPE 2013Pages: 373, PDF Size: 11.47 MB
Page 243 of 373
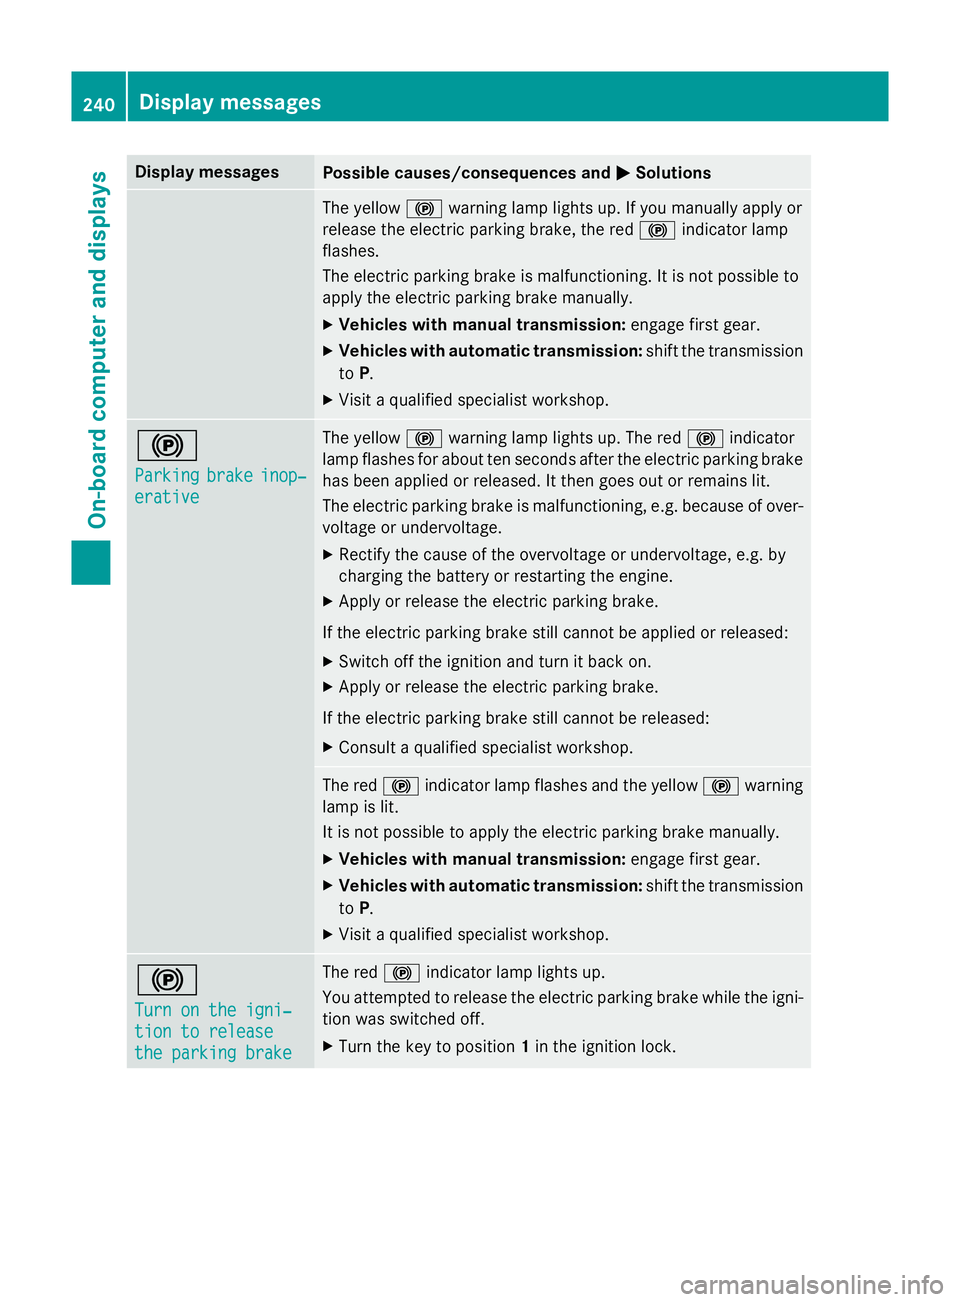
Display messages
Possible causes/consequences and
M
MSolutions The yellow
!warning lamp lights up. If you manually apply or
release the electric parking brake, the red !indicator lamp
flashes.
The electric parking brake is malfunctioning. It is not possible to
apply the electric parking brake manually.
X Vehicles with manual transmission: engage first gear.
X Vehicles with automatic transmission: shift the transmission
to P.
X Visit a qualified specialist workshop. !
Parking Parking
brake
brakeinop‐
inop‐
erative
erative The yellow
!warning lamp lights up. The red !indicator
lamp flashes for about ten seconds after the electric parking brake
has been applied or released. It then goes out or remains lit.
The electric parking brake is malfunctioning, e.g. because of over- voltage or undervoltage.
X Rectify the cause of the overvoltage or undervoltage, e.g. by
charging the battery or restarting the engine.
X Apply or release the electric parking brake.
If the electric parking brake still cannot be applied or released: X Switch off the ignition and turn it back on.
X Apply or release the electric parking brake.
If the electric parking brake still cannot be released: X Consult a qualified specialist workshop. The red
!indicator lamp flashes and the yellow !warning
lamp is lit.
It is not possible to apply the electric parking brake manually.
X Vehicles with manual transmission: engage first gear.
X Vehicles with automatic transmission: shift the transmission
to P.
X Visit a qualified specialist workshop. !
Turn on the igni‐ Turn on the igni‐
tion to release tion to release
the parking brake the parking brake The red
!indicator lamp lights up.
You attempted to release the electric parking brake while the igni-
tion was switched off.
X Turn the key to position 1in the ignition lock. 240
Display
messagesOn-board computer and displays
Page 261 of 373
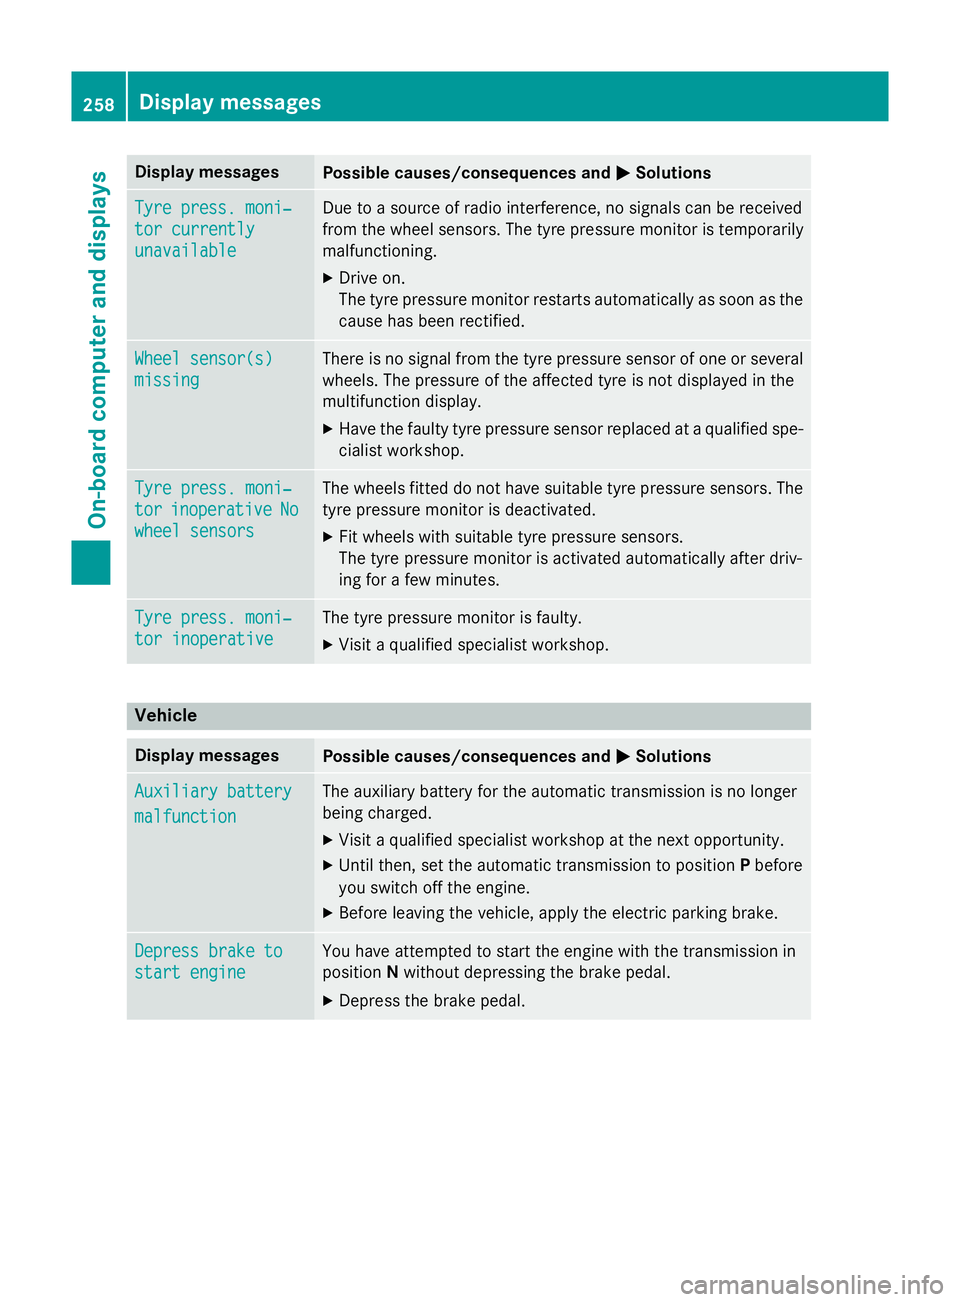
Display messages
Possible causes/consequences and
M
MSolutions Tyre press. moni‐
Tyre press. moni‐
tor currently tor currently
unavailable unavailable Due to a source of radio interference, no signals can be received
from the wheel sensors. The tyre pressure monitor is temporarily
malfunctioning.
X Drive on.
The tyre pressure monitor restarts automatically as soon as the
cause has been rectified. Wheel sensor(s) Wheel sensor(s)
missing missing There is no signal from the tyre pressure sensor of one or several
wheels. The pressure of the affected tyre is not displayed in the
multifunction display.
X Have the faulty tyre pressure sensor replaced at a qualified spe-
cialist workshop. Tyre press. moni‐ Tyre press. moni‐
tor tor
inoperative
inoperative No
No
wheel sensors
wheel sensors The wheels fitted do not have suitable tyre pressure sensors. The
tyre pressure monitor is deactivated.
X Fit wheels with suitable tyre pressure sensors.
The tyre pressure monitor is activated automatically after driv-
ing for a few minutes. Tyre press. moni‐ Tyre press. moni‐
tor inoperative tor inoperative The tyre pressure monitor is faulty.
X Visit a qualified specialist workshop. Vehicle
Display messages
Possible causes/consequences and
M
MSolutions Auxiliary battery
Auxiliary battery
malfunction malfunction The auxiliary battery for the automatic transmission is no longer
being charged.
X Visit a qualified specialist workshop at the next opportunity.
X Until then, set the automatic transmission to position Pbefore
you switch off the engine.
X Before leaving the vehicle, apply the electric parking brake. Depress brake to
Depress brake to
start engine start engine You have attempted to start the engine with the transmission in
position
Nwithout depressing the brake pedal.
X Depress the brake pedal. 258
Display
messagesOn-board computer and displays
Page 262 of 373
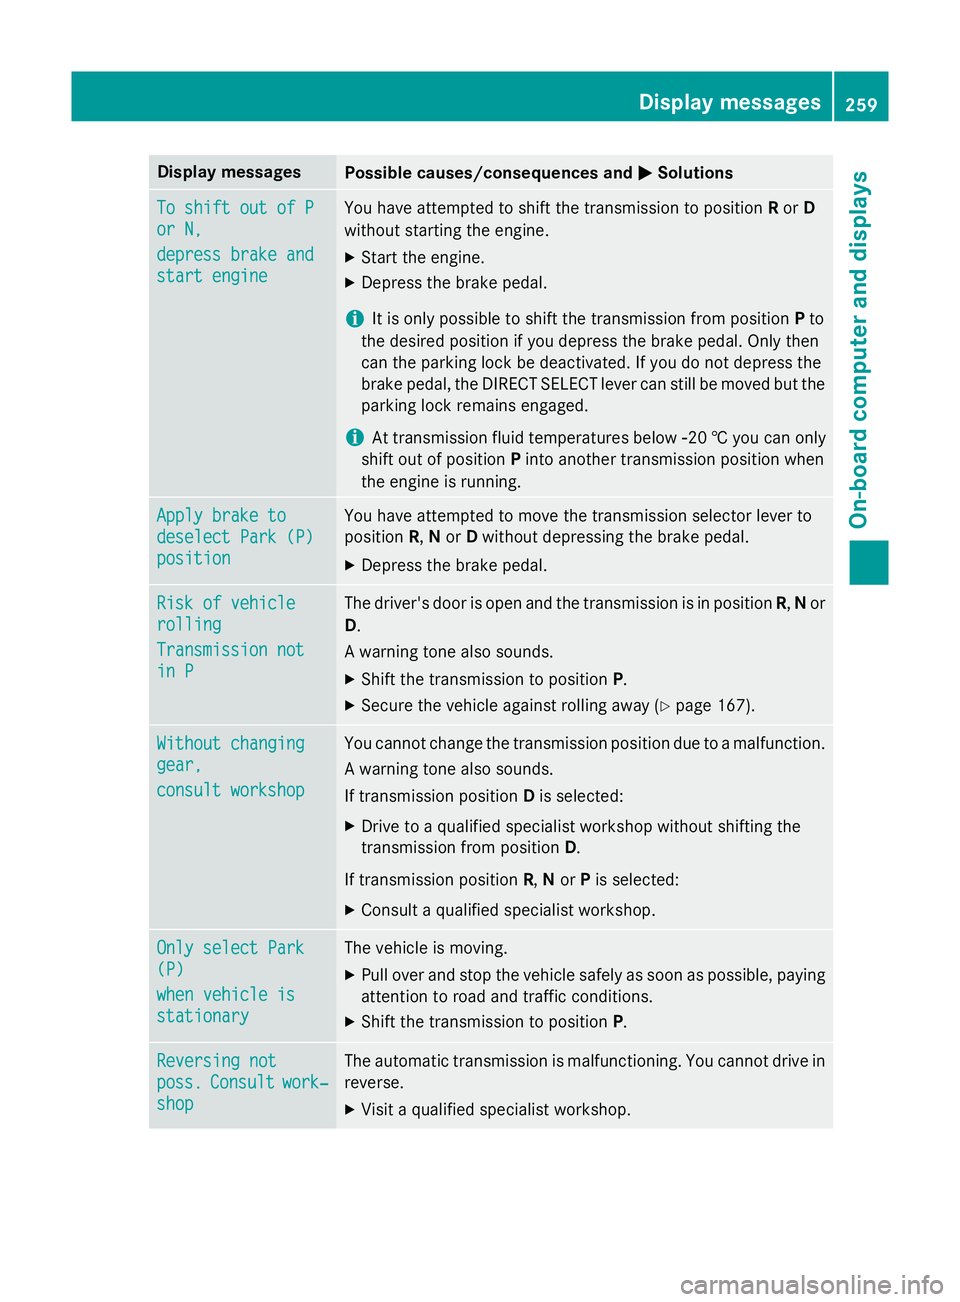
Display messages
Possible causes/consequences and
M
MSolutions To shift out of P
To shift out of P
or N, or N,
depress brake and depress brake and
start engine start engine You have attempted to shift the transmission to position
Ror D
without starting the engine.
X Start the engine.
X Depress the brake pedal.
i It is only possible to shift the transmission from position
Pto
the desired position if you depress the brake pedal. Only then
can the parking lock be deactivated. If you do not depress the
brake pedal, the DIRECT SELECT lever can still be moved but the parking lock remains engaged.
i At transmission fluid temperatures below
Ò20 † you can only
shift out of position Pinto another transmission position when
the engine is running. Apply brake to Apply brake to
deselect Park (P) deselect Park (P)
position position You have attempted to move the transmission selector lever to
position
R,Nor Dwithout depressing the brake pedal.
X Depress the brake pedal. Risk of vehicle Risk of vehicle
rolling rolling
Transmission not Transmission not
in P in P The driver's door is open and the transmission is in position
R,Nor
D.
A warning tone also sounds. X Shift the transmission to position P.
X Secure the vehicle against rolling away (Y page 167).Without changing
Without changing
gear, gear,
consult workshop consult workshop You cannot change the transmission position due to a malfunction.
A warning tone also sounds.
If transmission position Dis selected:
X Drive to a qualified specialist workshop without shifting the
transmission from position D.
If transmission position R,Nor Pis selected:
X Consult a qualified specialist workshop. Only select Park Only select Park
(P) (P)
when vehicle is when vehicle is
stationary stationary The vehicle is moving.
X
Pull over and stop the vehicle safely as soon as possible, paying
attention to road and traffic conditions.
X Shift the transmission to position P.Reversing not Reversing not
poss. poss.
Consult
Consult work‐
work‐
shop
shop The automatic transmission is malfunctioning. You cannot drive in
reverse.
X Visit a qualified specialist workshop. Display
messages
259On-board computer and displays Z
Page 263 of 373
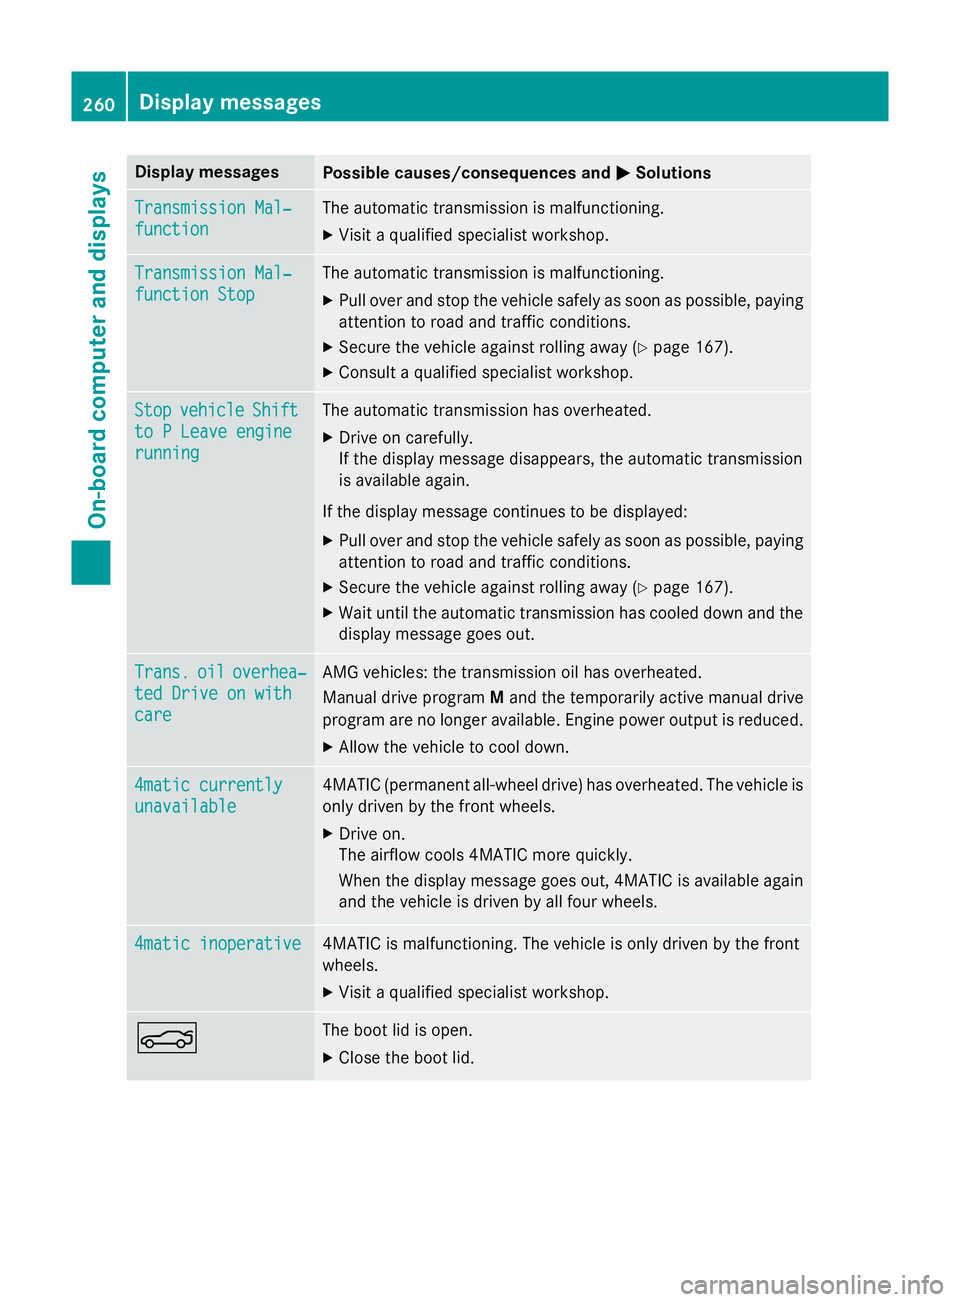
Display messages
Possible causes/consequences and
M
MSolutions Transmission Mal‐
Transmission Mal‐
function function The automatic transmission is malfunctioning.
X Visit a qualified specialist workshop. Transmission Mal‐
Transmission Mal‐
function Stop function Stop The automatic transmission is malfunctioning.
X Pull over and stop the vehicle safely as soon as possible, paying
attention to road and traffic conditions.
X Secure the vehicle against rolling away (Y page 167).
X Consult a qualified specialist workshop. Stop
Stop
vehicle
vehicle Shift
Shift
to P Leave engine
to P Leave engine
running running The automatic transmission has overheated.
X Drive on carefully.
If the display message disappears, the automatic transmission
is available again.
If the display message continues to be displayed:
X Pull over and stop the vehicle safely as soon as possible, paying
attention to road and traffic conditions.
X Secure the vehicle against rolling away (Y page 167).
X Wait until the automatic transmission has cooled down and the
display message goes out. Trans. Trans.
oil
oiloverhea‐
overhea‐
ted Drive on with
ted Drive on with
care care AMG vehicles: the transmission oil has overheated.
Manual drive program
Mand the temporarily active manual drive
program are no longer available. Engine power output is reduced.
X Allow the vehicle to cool down. 4matic currently 4matic currently
unavailable unavailable 4MATIC (permanent all-wheel drive) has overheated. The vehicle is
only driven by the front wheels.
X Drive on.
The airflow cools 4MATIC more quickly.
When the display message goes out, 4MATIC is available again and the vehicle is driven by all four wheels. 4matic inoperative
4matic inoperative 4MATIC is malfunctioning. The vehicle is only driven by the front
wheels.
X Visit a qualified specialist workshop. N The boot lid is open.
X Close the boot lid. 260
Display
messagesOn-board computer and displays
Page 300 of 373
ple, changed more frequently. The tyres must
be checked more frequently if the vehicle is
operated under increased loads. Further
information can be obtained at a qualified
specialist workshop, e.g. a Mercedes-Benz
Service Centre.
Driving abroad
An extensive Mercedes-Benz Service network is also available in other countries. You can
obtain further information from any
Mercedes-Benz Service Centre. Care
General notes
H
Environmental note
Dispose of empty packaging and cleaning
cloths in an environmentally responsible man- ner.
! For cleaning your vehicle, do not use any
of the following:
R dry, rough or hard cloths
R abrasive cleaning agents
R solvents
R cleaning agents containing solvents
Do not scrub.
Do not touch the surfaces or protective
films with hard objects, e.g. a ring or ice
scraper. You could otherwise scratch or
damage the surfaces and protective film.
! Do not park up the vehicle for an extended
period straight after cleaning it, particularly after having cleaned the wheels with wheel
cleaner. Wheel cleaners could cause
increased corrosion of the brake discs and
brake pads/linings. For this reason, you
should drive for a few minutes after clean-
ing. Braking heats the brake discs and the
brake pads/linings, thus drying them. The
vehicle can then be parked up.
Regular care of your vehicle is a condition for
retaining the quality in the long term. Use care products and cleaning agents rec-
ommended and approved by Mercedes-Benz. Care of the exterior
Automatic car wash G
WARNING
Braking efficiency is reduced after the vehicle has been washed. There is a risk of an acci-
dent.
After washing the vehicle, brake carefully
while paying attention to the traffic conditions in order to restore full braking efficiency.
! If DISTRONIC PLUS or the HOLD function
is activated, the vehicle brakes automati-
cally in certain situations. To prevent dam-
age to the vehicle, deactivate DISTRONIC
PLUS and the HOLD function in the follow-
ing or other similar situations:
R when towing the vehicle
R in the car wash
! Make sure that the automatic transmis-
sion is in position Nwhen washing your
vehicle in a tow-through car wash. The vehi-
cle could be damaged if the transmission is
in another position.
! Make sure that:
R the side windows and sliding sunroof are
closed completely.
R the blower for the ventilation/heating is
switched off (OFF button is depressed/
airflow control is turned to position 0).
R the windscreen wiper switch is at posi-
tion 0.
The vehicle could otherwise be damaged.
You can wash the vehicle in an automatic car
wash from the very start.
Wash off excess dirt before cleaning the vehi-
cle in an automatic car wash.
After using an automatic car wash, wipe off
wax from the windscreen and the wiper
blades. This will prevent smears and reduce Care
297Maintenance and care Z
Page 317 of 373
The vehicle electronics may otherwise be
damaged.
R on vehicles with automatic transmission,
the transmission is locked in position P
after disconnecting the battery. The vehi-
cle is secured against rolling away. You
can then no longer move the vehicle.
The battery and the cover of the positive
terminal clamp must be fitted securely dur- ing operation.
Comply with safety precautions and take pro-
tective measures when handling batteries. WARNING
Fire, naked flames and smoking
are prohibited when handling the
battery. Avoid creating sparks. Battery acid is caustic. Avoid con-
tact with the skin, eyes or clothing.
Wear suitable protective clothing,
in particular gloves, an apron and a
face mask.
Immediately rinse acid splashes
off with clean water. Consult a doc-
tor if necessary. Wear eye protection.
Keep children away.
Observe this Owner's Manual.
For safety reasons, Mercedes–Benz recom-
mends that you only use batteries that have
been tested and approved for your vehicle by
Mercedes-Benz. These batteries have greater impact resistance and as a result there is no
risk of acid burns to occupants when a batteryis damaged in an accident. In order for the battery to achieve the maxi-
mum possible service life, it must always be
sufficiently charged.
Like other batteries, the vehicle battery may
discharge over time if you do not use the
vehicle. In such cases, have the battery dis-
connected at a qualified specialist workshop.
You can also charge the battery with a
charger recommended by Mercedes-Benz.
For more information, please contact a quali-
fied specialist workshop.
Have the battery charge checked more fre-
quently if you use the vehicle mainly for short
trips or if you leave it standing idle for a
lengthy period. Consult a qualified specialist
workshop if you wish to leave your vehicle
parked up for a long period of time.
i When you park the vehicle, remove the
key if you do not require any electrical con-
sumers. The vehicle will then use very little energy, thus conserving battery power.
i If the power supply has been interrupted,
e.g. if the battery was discharged, you will
have to:
R set the clock (audio system/COMAND
Online, see the separate operating
instructions).
R reset the function for folding the exterior
mirrors in/out automatically, by folding
the mirrors out once (Y page 106). Charging the battery
G
WARNING
During charging and jump-starting, explosive
gases can escape from the battery. There is a risk of an explosion.
Particularly avoid fire, naked flames, creating
sparks and smoking. Ensure there is sufficient
ventilation while charging and jump-starting.
Do not lean over a battery. G
WARNING
Battery acid is caustic. There is a risk of injury. 314
Battery (vehicle)Breakdown assistance
Page 320 of 373
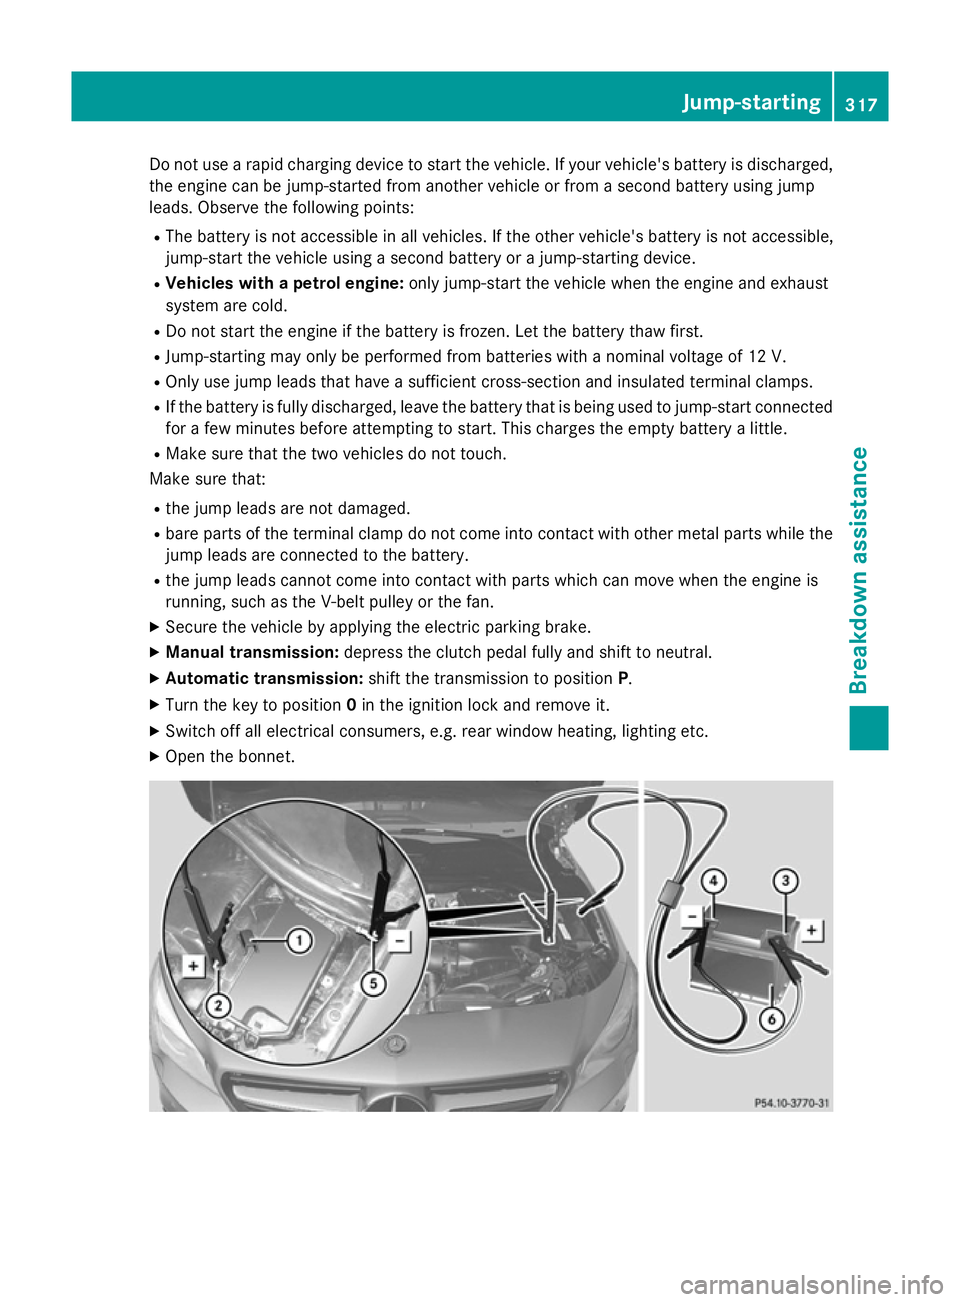
Do not use a rapid charging device to start the vehicle. If your vehicle's battery is discharged,
the engine can be jump-started from another vehicle or from a second battery using jump
leads. Observe the following points:
R The battery is not accessible in all vehicles. If the other vehicle's battery is not accessible,
jump-start the vehicle using a second battery or a jump-starting device.
R Vehicles with a petrol engine: only jump-start the vehicle when the engine and exhaust
system are cold.
R Do not start the engine if the battery is frozen. Let the battery thaw first.
R Jump-starting may only be performed from batteries with a nominal voltage of 12 V.
R Only use jump leads that have a sufficient cross-section and insulated terminal clamps.
R If the battery is fully discharged, leave the battery that is being used to jump-start connected
for a few minutes before attempting to start. This charges the empty battery a little.
R Make sure that the two vehicles do not touch.
Make sure that:
R the jump leads are not damaged.
R bare parts of the terminal clamp do not come into contact with other metal parts while the
jump leads are connected to the battery.
R the jump leads cannot come into contact with parts which can move when the engine is
running, such as the V-belt pulley or the fan.
X Secure the vehicle by applying the electric parking brake.
X Manual transmission: depress the clutch pedal fully and shift to neutral.
X Automatic transmission: shift the transmission to position P.
X Turn the key to position 0in the ignition lock and remove it.
X Switch off all electrical consumers, e.g. rear window heating, lighting etc.
X Open the bonnet. Jump-starting
317Breakdown assistance Z
Page 322 of 373
!
When COLLISION PREVENTION ASSIST
PLUS, DISTRONIC PLUS or the HOLD func- tion is activated, the vehicle brakes auto-
matically in certain situations. To avoid
damage to the vehicle, deactivate these
systems in the following or similar situa-
tions:
R when towing away
R in a car wash
! Only secure the tow cable or tow bar to
the towing eyes or, if available, to the trailer
tow hitch. You could otherwise damage the
vehicle.
! Observe the following points when towing
with a tow rope:
R Secure the tow rope on the same side on
both vehicles.
R Make sure that the tow rope is not longer
than legally permitted. Mark the tow rope
in the middle, e.g. with a white cloth
(30 x 30 cm). This will make other road
users aware that a vehicle is being
towed.
R Only secure the tow cable to the towing
eyes or, if available, to the trailer tow
hitch.
R Observe the brake lamps of the towing
vehicle while driving. Always maintain a
distance a distance so that the tow rope
does not sag.
R Do not use steel cables or chains to tow
your vehicle. You could otherwise dam-
age the vehicle.
! Do not use the towing eyes for recovery
purposes as this could damage the vehicle.
If in doubt, recover the vehicle with a crane.
! Pull away smoothly when towing away or
tow-starting a vehicle. If the tractive power
is too high, the vehicles could be damaged.
! You may tow the vehicle for a maximum of
50km. A towing speed of 50 km/h must not be exceeded. For towing distances over 50 km, the front
axle or the entire vehicle must be raised
and transported.
! If you tow or tow-start another vehicle, its
weight must not exceed the maximum per- missible gross vehicle weight of your vehi-
cle.
! Vehicles with automatic transmission
must not be tow-started. The transmission
may otherwise be damaged.
Observe the legal requirements for the rele-
vant countries when towing and tow-starting.
It is better to have the vehicle transported
than to have it towed.
Vehicles with automatic transmission:
when towing a vehicle, the transmission must be in position N.
The battery must be connected and charged.
Otherwise, you:
R cannot turn the key in the ignition lock to
position 2
R cannot shift the transmission to position N
on vehicles with automatic transmis-
sion
i Deactivate the automatic locking feature
before the vehicle is towed (Y page 229).
You could otherwise be locked out when
pushing or towing the vehicle.
Deactivate tow-away protection
(Y page 73) before the vehicle is towed. Towing and tow-starting
319Breakdown assistance Z
Page 323 of 373
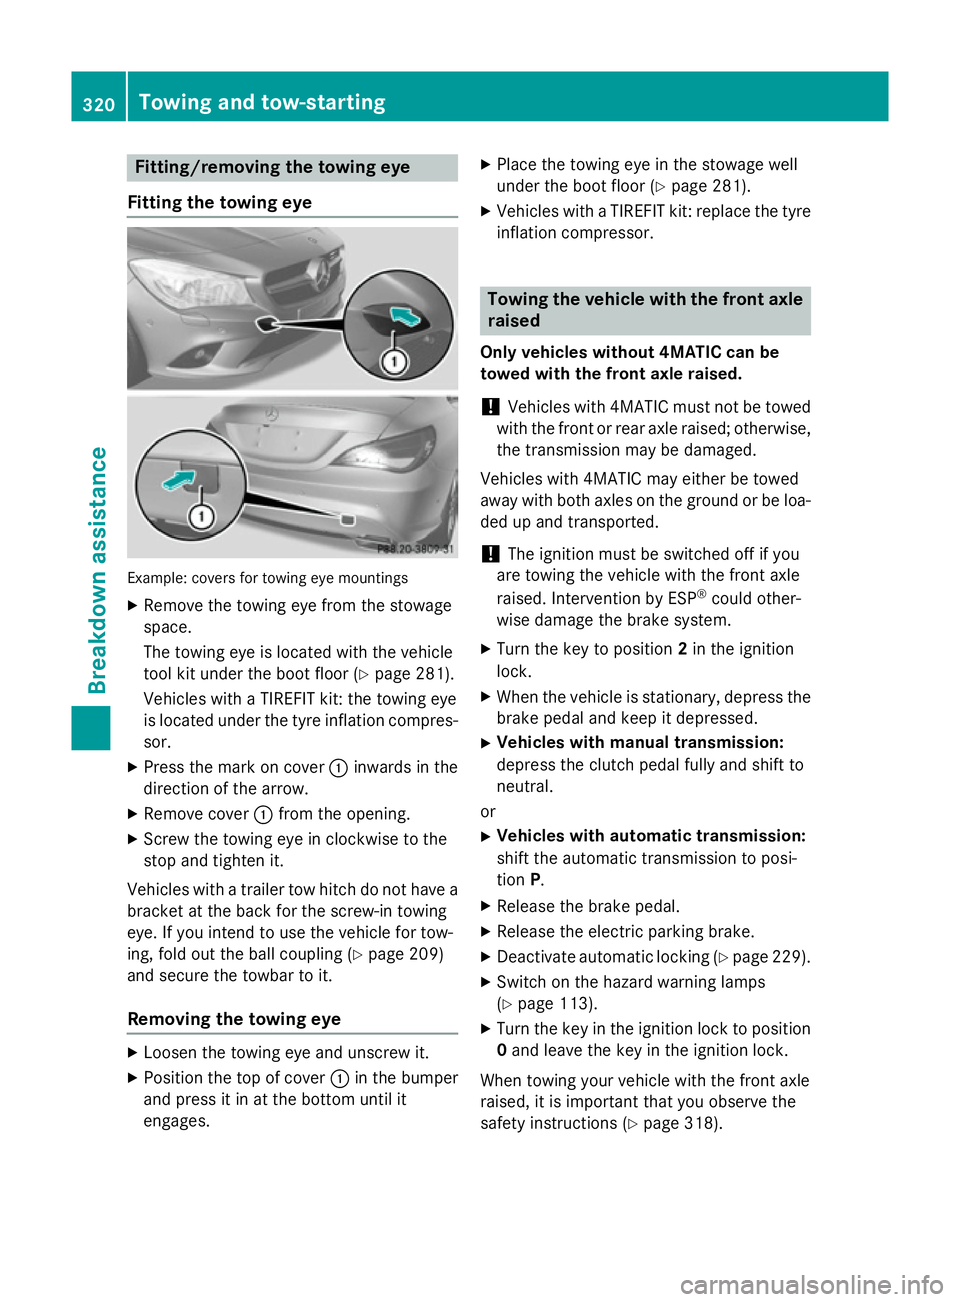
Fitting/removing the towing eye
Fitting the towing eye Example: covers for towing eye mountings
X Remove the towing eye from the stowage
space.
The towing eye is located with the vehicle
tool kit under the boot floor (Y page 281).
Vehicles with a TIREFIT kit: the towing eye
is located under the tyre inflation compres-
sor.
X Press the mark on cover :inwards in the
direction of the arrow.
X Remove cover :from the opening.
X Screw the towing eye in clockwise to the
stop and tighten it.
Vehicles with a trailer tow hitch do not have a bracket at the back for the screw-in towing
eye. If you intend to use the vehicle for tow-
ing, fold out the ball coupling (Y page 209)
and secure the towbar to it.
Removing the towing eye X
Loosen the towing eye and unscrew it.
X Position the top of cover :in the bumper
and press it in at the bottom until it
engages. X
Place the towing eye in the stowage well
under the boot floor (Y page 281).
X Vehicles with a TIREFIT kit: replace the tyre
inflation compressor. Towing the vehicle with the front axle
raised
Only vehicles without 4MATIC can be
towed with the front axle raised.
! Vehicles with 4MATIC must not be towed
with the front or rear axle raised; otherwise, the transmission may be damaged.
Vehicles with 4MATIC may either be towed
away with both axles on the ground or be loa-
ded up and transported.
! The ignition must be switched off if you
are towing the vehicle with the front axle
raised. Intervention by ESP ®
could other-
wise damage the brake system.
X Turn the key to position 2in the ignition
lock.
X When the vehicle is stationary, depress the
brake pedal and keep it depressed.
X Vehicles with manual transmission:
depress the clutch pedal fully and shift to
neutral.
or
X Vehicles with automatic transmission:
shift the automatic transmission to posi-
tion P.
X Release the brake pedal.
X Release the electric parking brake.
X Deactivate automatic locking (Y page 229).
X Switch on the hazard warning lamps
(Y page 113).
X Turn the key in the ignition lock to position
0 and leave the key in the ignition lock.
When towing your vehicle with the front axle
raised, it is important that you observe the
safety instructions (Y page 318).320
Towing and tow-startingBreakdown assistance
Page 324 of 373
Towing the vehicle with both axles on
the ground
i In order to signal a change of direction
when towing with the hazard warning lamps switched on, use the combination switch as
usual. In this case, only the turn signals for
the desired direction flash. When you reset
the combination switch, the hazard warn-
ing lamps start flashing again.
Vehicles with automatic transmission: the
automatic transmission automatically shifts
to position Pwhen you open the driver's or
front-passenger door or when you remove the
key from the ignition lock. In order to ensure that the automatic transmission stays in posi- tion Nwhen towing the vehicle, you must
observe the following points:
X Make sure that the vehicle is stationary.
X Turn the key to position 2in the ignition
lock.
X Depress and hold the brake pedal.
X Shift the automatic transmission to posi-
tion N.
Vehicles with manual transmission: X Turn the key to position 2in the ignition
lock.
X Depress and hold the brake pedal.
X Depress the clutch pedal fully and shift to
neutral.
Vehicles with manual or automatic trans- mission:
X Leave the key in position 2in the ignition
lock.
X Release the brake pedal.
X Release the electric parking brake.
X Switch on the hazard warning lamps
(Y page 113).
It is important that you observe the safety
instructions when towing away your vehicle
(Y page 318). Transporting the vehicle
! You may only secure the vehicle by the
wheels, not by parts of the vehicle such as
axle or steering components. Otherwise,
the vehicle could be damaged.
X Vehicles with manual transmission:
depress the clutch pedal fully and shift to
neutral.
X Vehicles with automatic transmission:
turn the key to position 2in the ignition
lock.
X Move the transmission to position N.
As soon as the vehicle is loaded: X Prevent the vehicle from rolling away by
applying the electric parking brake.
X Vehicles with manual transmission:
depress the clutch pedal fully and engage
first or reverse gear.
X Vehicles with automatic transmission:
shift the transmission to position P.
X Turn the key to position 0in the ignition
lock and remove it.
X Secure the vehicle.
The towing eyes or trailer tow hitch can be
used to pull the vehicle onto a trailer or trans-
porter if you wish to transport it. Notes for 4MATIC vehicles
! Vehicles with 4MATIC must not be towed
with the front or rear axle raised; otherwise, the transmission may be damaged.
Vehicles with 4MATIC may only be either
towed away with both axles on the ground or be loaded up and transported.
If the vehicle has transmission damage or
damage to the front or rear axle, have it trans-
ported on a transporter or trailer.
In the event of damage to the electrical
system
If the battery is defective, the automatic
transmission will be locked in position P. To
shift the automatic transmission to position Towing and tow-starting
321Breakdown assistance Z